
Don't wanna be here? Send us removal request.
Statistics
We looked inside some of the posts by nsfmpyear2 and here's what we found interesting.
Average Info
Notes Per Post
0
Likes Per Post
0
Reblog Per Post
0
Reply Per Post
0
Time Between Posts
1 day
Number of Posts By Type
Text
17
Last Seen Tumblr Blogs


Fun Fact
In 2020, 27% of US Tumblr users had an annual household income of over $100,000.

Text
How my project has changed throughout development
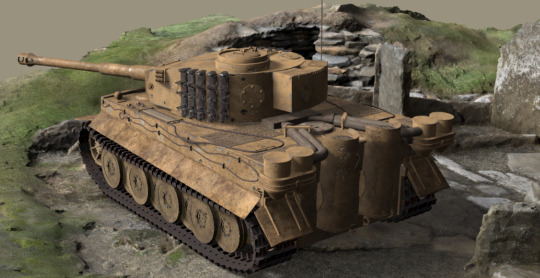
I initially planned to create a scene consisting of two tanks, however, due to UV issues, and amount of details each tank has, i saw i was a bit too ambitious so i had to drop the panzer tank, and purely focus on making the model of the Tiger tank to the best of my ability, to ensure that the quality of what i make is as realistic and represents the real life version as close as possible.
Overall i am happy with how my project came out, its a shame i wasn't able to make 2 tanks however but throughout this project i have learnt to adapt and work against small amounts of time to still develop something i believe has exceeded my expectations and definitely helped me develop as a 3D modeller
0 notes
Text
Ideas on presentation - references from art station.
i wanted to get a more direct reference of scenes for my tank, which is why i had a look at others peoples work, and looking at how they present their models of tanks, to see if i can get any inspiration.
I came across a scene of a tiger tank, in combat in a desert attacking the other side.
A lot of thing stick out, such as the environment, the dust coming off the floor from where the tracks drove over hide the tank more, which could explain why the tank is so in the open, relying on the weather and dust to conceal itself.
Another thing i pointed out was that it destroyed one of the vehicles in front of it, which i think adds realism to people who know more around the tank, and the damage it did on vehicles.
ArtStation - Tiger tank, Eugene Volyntsevich
Something more interesting i found was a tiger tank being constructed, somethin i could gather from this if planning on implementing the same thing, would be to try add my model in some sort of warehouse / factory, and maybe moving some parts of my tank around the make it look like they aren't fully attached yet and awaiting repair, or to be built.
ArtStation - WWII factory (Tiger 1 Tank), Hyun Seung Kim (Shaun)
0 notes
Text
More ideas for presentation - Hot Toys / Side show collectables
Upon further research on presentation, i came across a video of a company that creates models of different things, and turns them into real life collectibles, in this video, side show is working on a prototype of a Luke Skywalker figuring planning to limb into an X - wing fighter, which is a jet styled fighting plane in star wars.
Something i got from this is the context behind it, In star wars, Luke Skywalker can be seen flying an X wing, so having these small details can really increase the quality and realism that side show is trying to present through the model, this would stand out particularly to people who are fans of star wars and Luke as a character, and id want to do the same thing with the tiger tank, placing it in a realistic scene, or capturing small details, so audience who are also interested in the topic of tanks and other large vehicles could capture these small details and appreciate it more.
Luke can be seen getting ready to climb while holding his helmet, however, the way Luke is positioned other people can see it as him climbing down the ladder. I think this is important as when people view it, they can all have different interpretations of what's actually going on in the scene, and its something i would also try to capture when presenting my tank model, allowing the audience think and come up with they're own stories for what the tank is doing, kind of increasing a sense of immersion.
Adam Savage Inspects Sideshow's Prototype Star Wars Statue!
0 notes
Text
Other ideas for presentation - Warhammer white dwarf
I began looking into other ways i would be able to present my tank in a scene, and had a look at Warhammer, and how they model the characters, while it doesn't display vehicles, a lot of the models, there is a model statue of a small warrior posed in a way that suits his character style, being a warrior, he can be seen pointed with an axe in his hand, looking like its leading an army to battle, small details like these give the character depth,

having the statue in a little scene environment that suits the character, it exaggerates the depth even more, and can completely alter how the character can be portrayed, for instance, here is a colored version of the character statue, just with a different base and environment
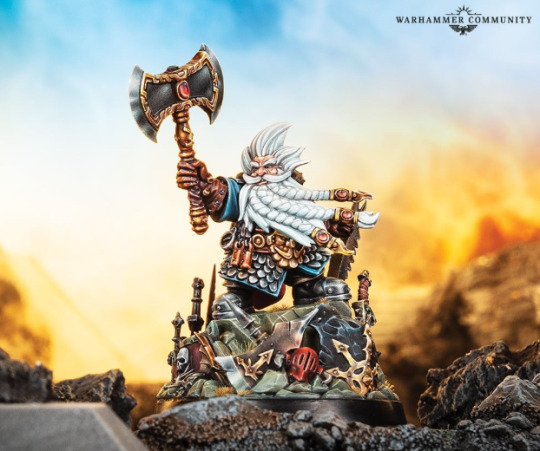
what i wanted to take from this is seeing how much an environment can alter the appearance of a model, so when posing my tank, having the right environment for it is crucial to emphasize realism and show a story of the tank purely just by the way it is positioned and looks
0 notes
Text
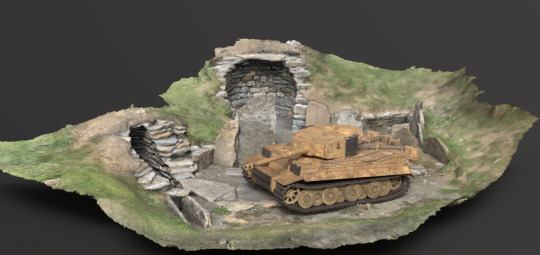
What are Diorama models
i aim to look into different techniques to present my work, as i plan to place my tank in some sort of land to make it appear as if its stationary aiming at something.
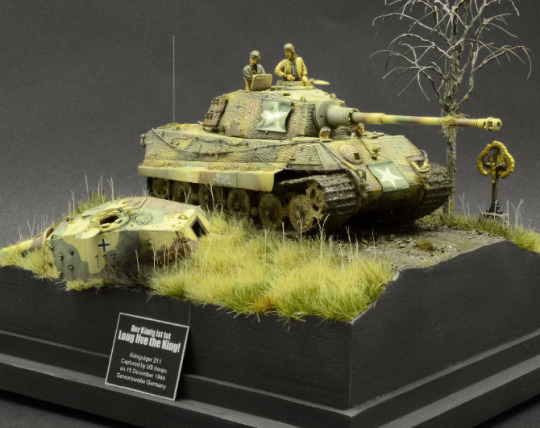
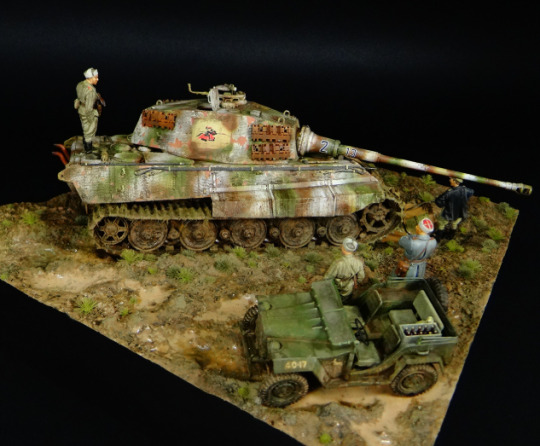
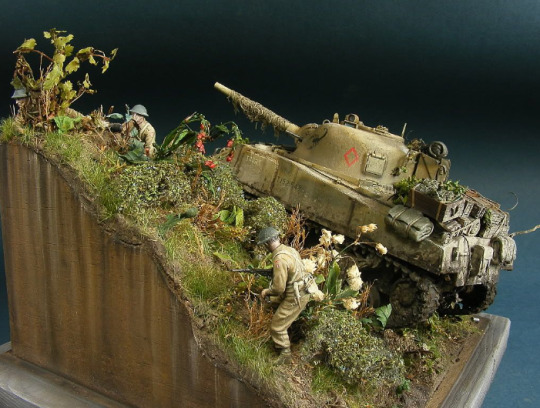
Trying to find examples, i came across diorama models, which are 3D scenes that are usually displayed on small scales, and almost always consist of detailed representations of humans, figures, vehicles, and or animals in a specific area, trying to realistically imitate a real life scenario, i managed to find multiple examples of these diorama models that also present scenes of tanks, the best ones i managed to find were actual model kits for sale, however they still present something id like to recreate for my tiger model.
0 notes
Text
finishing touches - scrapes around edge of the tank body
along with all the bullet holes and bullet scratched, i wanted to add the same thing on the body of the tank, primarily around the edges, i think this will give it some more shape and make the edges less boring, in the way my tank is positioned, i will focus the detail on the side of the tank that is facing the enemies, to look like that's where it got hit the hardest

these small scratches are a minor detal but i think they still all add up to make a realistic looking tank, i will repeat this process on the sides and the hull
0 notes
Text
scrapes on armor
even with the stitching, i don't feel like it was enough so i decided to do the same technique with the bullet holes, except using some steel and brush it along some of the edges of the armor to look like they repelled bullets

i also repeated this on the front
i felt like these small details are realistic as the tiger tank crew would do their best to keep the front of the tank at the enemies as the front had the most armor and was nearly impenetrable at the time, so i think a lot of the focused fire would go on points on the front of the tank

0 notes
Text
Bullet hole details
To make the tank look like it was being attacked, i wanted to add bullet holes from opposing fire, i do this by adding the bullet hole texture and adding a black mask so i can add my own bullet holes using a paint brush where i want, and being able to make the bullet holes look more random and scattered
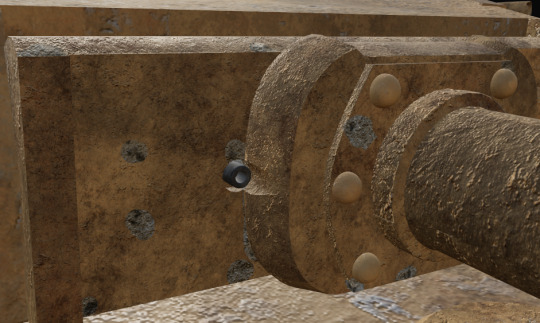
while it is a small detail i still wanted to add it to really show that this tank is being attacked and holding off a hill
and only added them on a few selected sides to show where the tank was getting shot from, i also wanted to do his with how the tank is positioned, as the tank is facing a certain direction, i wanted to add bullet holes on the side its facing, as if the tank is getting ready to fire back, this would add a bit more story to the tank as well as making it more realistic
0 notes
Text
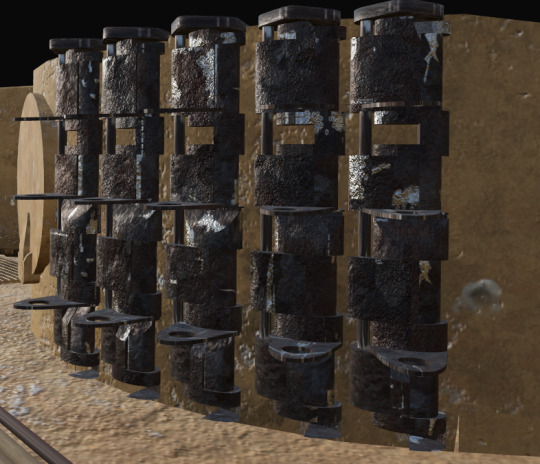
Tank tracks
for the tank i layered multiple materials, as the tank track links had a very strange UV, so the textures would slightly warp, so to prevent this from being seen, i decided to texture the color as normal using concrete, rubber, and a metal rust to make it look dirty, but to push the detail further, i re added the same concrete i used to create bumps, and changed the color so it would imitate clumps of dirt stuck in-between the links and all over the tank itself, overall i am super pleased with the result of this as the tracks were the only worry i had when texturing, but turns out it worked extremely well
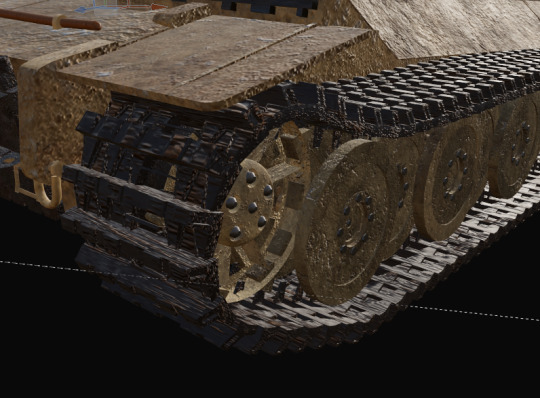
since the tiger tanks would have to travel on dirt paths or off-road, it was common for these tanks to have really dirty tracks, so being able to recreate it further adds onto the realism of the tank
0 notes
Text
Wheel result

i think they came out decent, i definitely would prefer to have them with a black outer rim but in he time i ave left this is the best i can do, either way i think it looks good, and when i add more dirt around the tank it should blend in fairly well, i plan to do the same idea for the front and rear wheels so they all connect
0 notes
Text
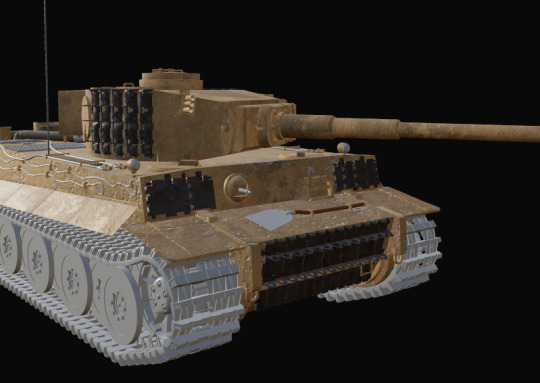
issues with the wheels
On the yellow tank the wheels are not a solid color, the outer rim is black and the center is the beige as everything else, however, i made the week all one section, i could paint each inner rim but that would take way too long and wouldn't be worth it when i could focus on the rest of the tank, as i still need to texture the tracks and back of the tank, instead, i will try make it all he beige but make it look as dirty as possible to hopefully blend it together but still make it look good.
I came up with this decision from the Tiger II, the rims on the tiger are a full color

0 notes
Text
armor progress
using some metal textures and layering them onto of each other, i was able to make a rusty/ dirty looking armor

i then wanted to add even more detail, so i added another generator and added an auto sticker, this created a stitch pattern around the top of the plate, but using a jitter modifier i was able to make it look more uneven and less full, trying to imitate bullet scrapes

over all i am quite happy with this as i didn't expect it to work as well as i thought, and looks really well when put together on the other parts of the armor, i also placed this texture on the front plates and the front ram, and i am really happy with the current look of the tank.
once i finish the rest of the textures, i plan to also add bullet holes and decals on the tank to exaggerate the fact it has been damaged
0 notes
Text
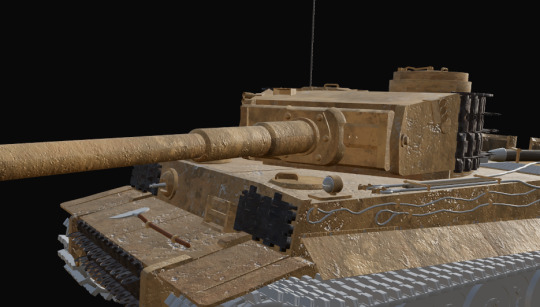
Texturing the armor
looking at some reference photos, the armor on this variant of tank is mainly a grey or black


therefore i will try to do something similar myself, with that, will try make it follow the theme of my tank standing it ground, so blemishes and dirt would make the side armor more realistic and blend in with the rest of the tank as the armor was in key points of the tank so a lot of opposing fire would be concentrated on these areas, so ill need to make it look as rough and beat up as i can.
0 notes
Text
Progress on texturing
as i aim planning to make the yellow variant of the tank, i searched up a color code to hopefully find the right shade for the tiger tank, and fortunately i did actually manage to find something
RAL 090 90 50 / Tiger Yellow / #ffde7e Hex Color Code, RGB and Paints
while this was a start, it was a bit too bright for me, so when writing the color code, i slowly moved the color wheel towards, orange, until i got something that resembled the photos more. Using a concrete texture, i increased the grain and intensity to make it more blemished, as well as increasing the color variation to make it look dirty and smudged, i added this texture on all the parts that are meant to have this yellow color, and so far, even without having the whole model textured, i can already see the tank standing out so much more rather than when it was still grey, im glad i switched out the color choice last second as now with the color variation, its much easier to make the tank appear more dirty


0 notes
Text
Todays goals
Fully focus all my attention on texturing my tank and making sure it is of the best quality i can make in the time i have, along with this try some new techniques such as generators to add on scratches, dirt and other blemishes to the tank, i plan by doing this using a few YouTube tutorials and self experimentation to make sure i myself can get my way around the program
0 notes
Text
end of day evaluation
Minus the fact i wasn't able to properly start texturing, i am glad i was able to find the root cause of why my textures kept bugging and getting warped, due to this i can now purely focus on texturing the tank to the best of my ability and try add as much detail as possible
0 notes