
Just documenting my journey through Blender and Unreal. I'm starting from basically no knowledge, so be prepared for mistakes. Hopefully this will be handy for anyone else who wants to get started in game devMain blog: https://www.tumblr.com/blog/bizarremachinist
Last active 60 minutes ago
Don't wanna be here? Send us removal request.
Statistics
We looked inside some of the posts by obgd and here's what we found interesting.
Average Info
Notes Per Post
104
Likes Per Post
72
Reblog Per Post
26
Reply Per Post
6
Time Between Posts
12 days
Number of Posts By Type
Note
1
Text
16
Last Seen Tumblr Blogs


Fun Fact
130K people were victims of a chain letter scam that affected Tumblr in May 2011.
Note
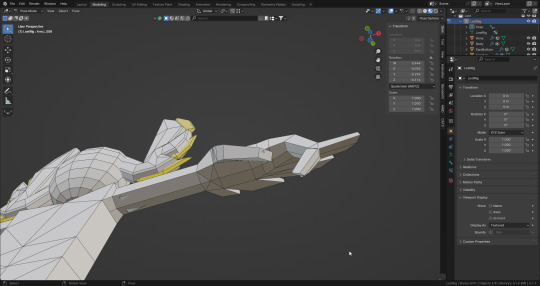
rate my topology
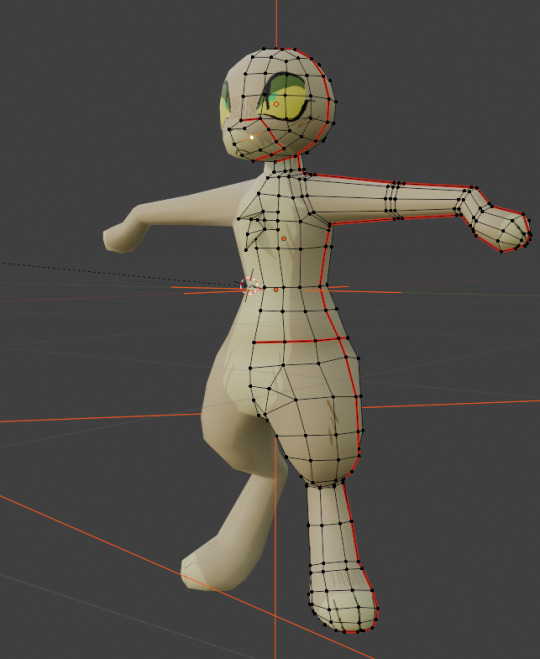
it looks pretty alright
it is rather low poly compared to what i am used to seeing, would add more edge loops around the snout usually in case that was moving around but i am guessing yours doesn't so it's all good. though i would recommend another loop around the wrist
I usually also avoid triangles at all costs, just a thing i was taught, but i don't see it being an issue, and usually it is fine on lower poly models
your elbows might have a bit of a hard time deforming
you kinda want to give it this kinda shape if you want it to bend a lot

(I love stealing gifs from random websites) you can ignore the text, third one is the one i am pointing out
knees work the same way too
(sorry if you have all this and i just can't see)
but overall stuff is looking good, it is pretty solid
here is random stuff about topology with examples if you want more
54 notes
·
View notes
Text
FOUND #4: The Complete FOUND
<-<- FIRST || <- PREV
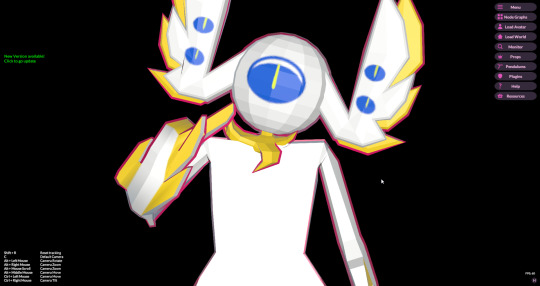
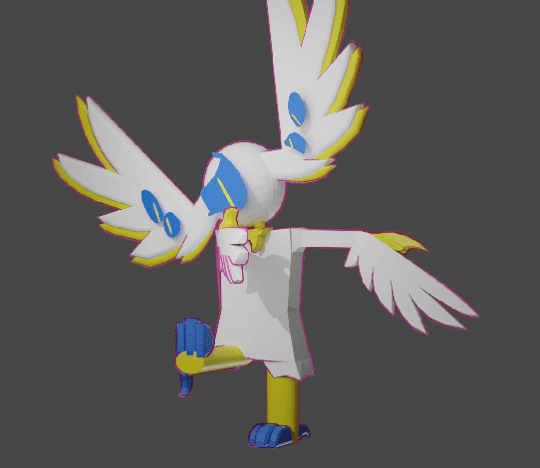
And here we are, my first completed VRChat avatar and Vtuber model, and we're out here having a party! The dance world was Madame's idea, but honestly it turned out to be a great way to test the bones. Happy late birthday gift @madameclaws <3
[ As per the norm FOUND belongs to @madameclaws. The first song is Monster, the second is BAAM. The vrchat world is MMD Dance World ]
I completely reworked the arm bones. I realized the eyes and pupils were slightly misaligned, so I spruced that up. I got the springy bones working for the ears, neck floof, and butt tail. I fixed up the weights on the outline. Sadly I didn't set up the expressions for the VRChat avatar, but they do work on the Vtuber and that's a whole other adventure. There they are, in all their glory. (They are quite short)
Oh yea, for the leg stripes all I did was cut ribbons into the outline mesh, then reversed the normals so they're facing outwards, instead of inwards like the rest of the outline.


2 notes
·
View notes
Text
FOUND #3: First Test of FOUND in VRChat
<-<- FIRST || <- PREV || NEXT ->


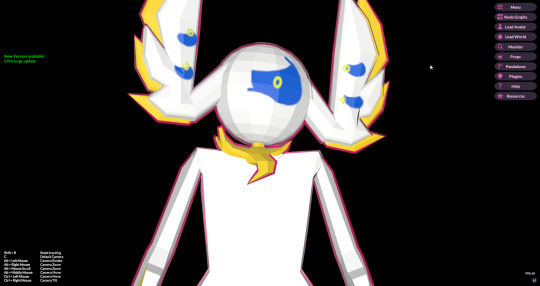
I FINALLY GOT THEM UPLOADED TO VRCHAT, but what are the issues I need to solve now? Let's look at some problems for future me under the cut
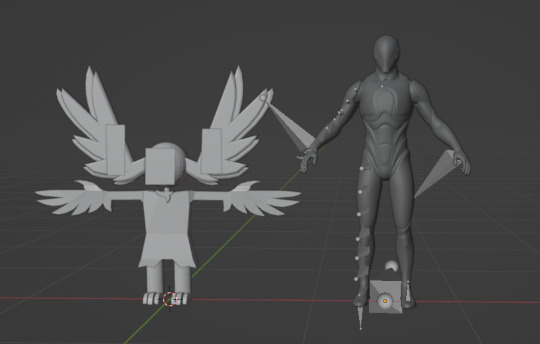
For reference, I used the 2022 avatar creator in the VRChat Creator Companion. Unfortunately, I couldn't use the same blend file that I used to create the Vtuber model, but whatever. I wasn't that hard to start from scratch in Unity.
So first and foremost, the obvious thing is the arms. The first pic is literally me standing still, and the arms are different. I'm 99% sure this is due to my pose mode in blender not being reset before exporting.
Pic 2 you can see the transparent material for the eyes and pupil are not exactly transparent. I think that's a Unity thing? Like I need to adjust the shader or something?
Next next, it looks like the weight paint on the model is not the exact same as the outline?
It's back to the drawing board and I think I have a better setup for the bones. VRChat was really bitching about FOUND having shoulders, so I have to fit those in. FOUND's new X6 model will have shoulders, and a bicep where you'd expect, but the forearm will be a small-er bone in the elbow, then the hand bone will be the forearm looking part. So the next model will have an arm bone overhaul
[As per the norm, FOUND belongs to @madameclaws. And if you want a wonderful VRChat world to test your avatar, I highly suggest this "Avatar Testing Chamber", by Ziggor]
3 notes
·
View notes
Text
FOUND #2: Getting Blendshape Expressions Working
<- FIRST || NEXT ->
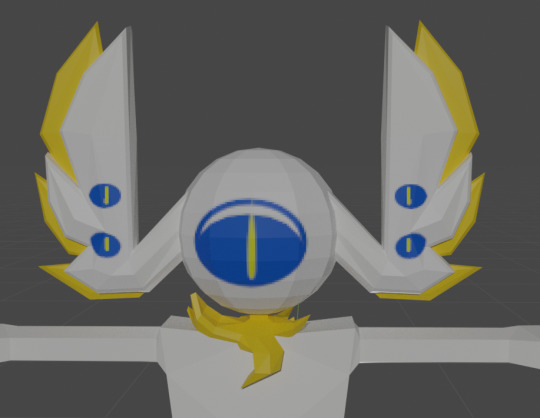
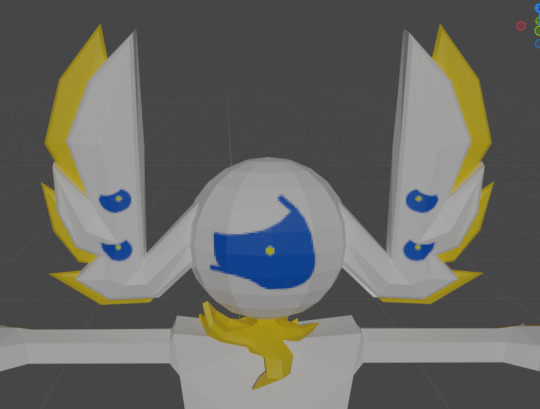
Here I am, back again. Not dead yet. Let's get back to it. I got the expressions to swap UV coordinates on the eye map. So that's pretty bangers, except, there's a little * at the end there that might make me change up how I'm doing this a tad. Let's look at it anyways. (As per the last post, this character (FOUND) belongs to @madameclaws ♥)
Getting this to work this way was quick once you've figured out creating a VRM. Basically just have an image of all the expressions I want mapped to the mesh. In Blender I defined a 2nd material for the face area and applied the new map like you would any other material.

When importing your FBX into Unity, change the materials location to external, and fix the materials "Albedo" so it actually displays right. Once you export and re-import your VRM to continue working on it, head over to your Blendshapes, select the emotion you want, (here's the secret) head to "Material List" and pick which material and its new offset values. Mine has 4 rows total, so each expression is an offset of -0.25 down from the top. Use "_MainTex_ST" and it'll work. Not sure what that means yet, but it works. Side note: I tried to swap to URP for my rendering pipeline, but then this step doesn't seem to work with Vnyan. Probably something I'm missing to get it to work, but as far as I know rn, it's best to stick to the default Unity rendering pipeline and only if you know what you're doing should you switch pipelines.


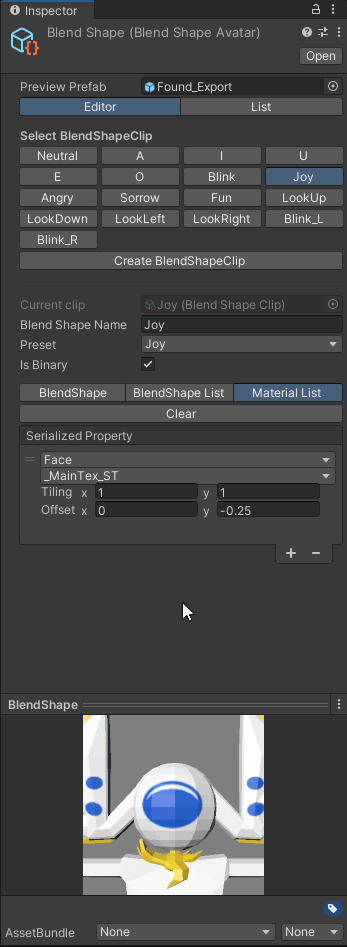
The problem I'm having now is getting the pupil on the model and tracking the eyes in the way I'd like it. I suspect I'll need to do some alpha channel something something, which means I need to put the eye on a separate mesh that's hovering ever so slightly off the face, but I'll figure that out and make another post...
#3d model#dev journal#devlog#unity#vtube model#wip#ÆTHERVALE#never forget how much Activision used to care about their games#FOUND#FOUND but not LOST#vnyan
2 notes
·
View notes
Text
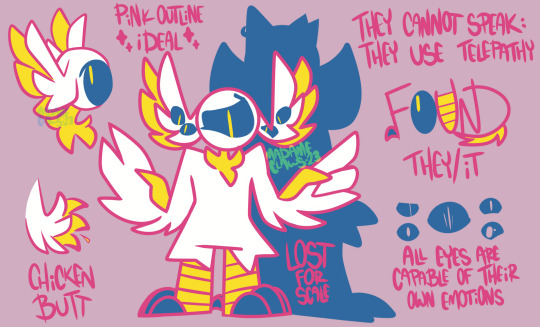
FOUND #1: A "Simple" Gift
NEXT -> || LAST ->->
I've been up to some sneaky things. I spent a week doing nothing, then the next 15 days doing nothing but something. I put myself through an intensive crash course on making a Vtuber model as a birthday gift for the lovely @madameclaws ♥. Don't get over excited, I'm still working on getting the model 100%. There's a lot of things I had to learn.
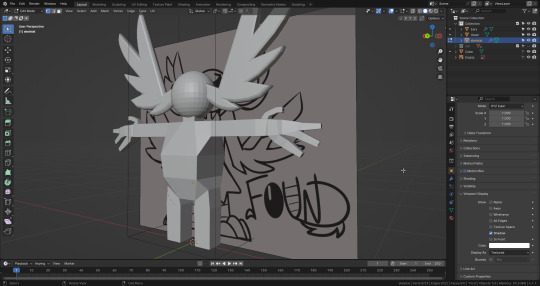
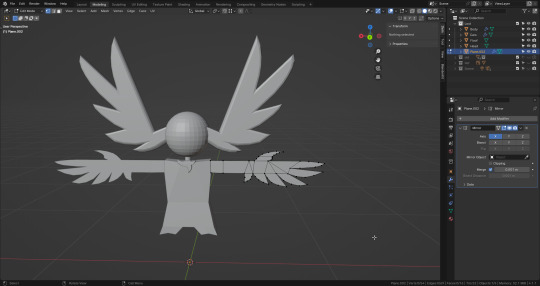
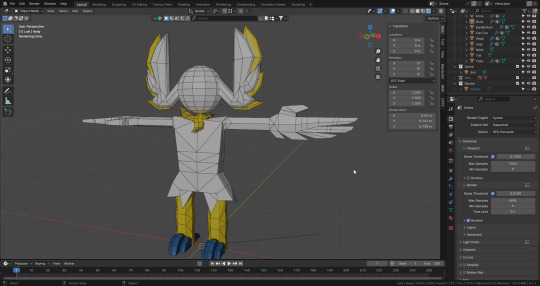
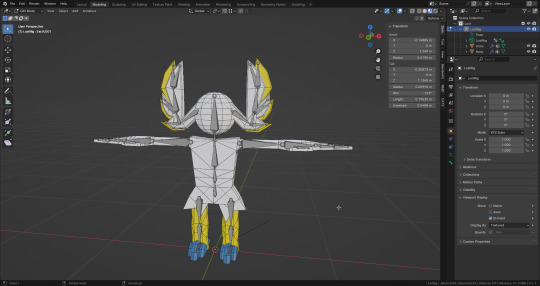
The model I'm making is a MadameClaws OC named Found (Both images drawn by MadameClaws). An expression filled, chicken butt angel from ÆTHERVALE. I want all the feathers to be flow-y and spring-y, the model to be low poly, and the eyes to be low res and flat.
(An actual detailed explanation of some of these features I tried will be posted later. There was a lot that happened and I gotta just start with this overview)
Let's get to work under that cut
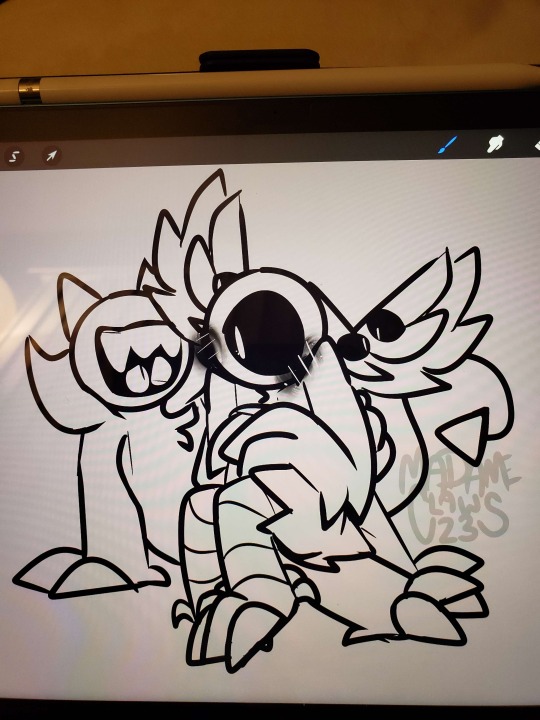
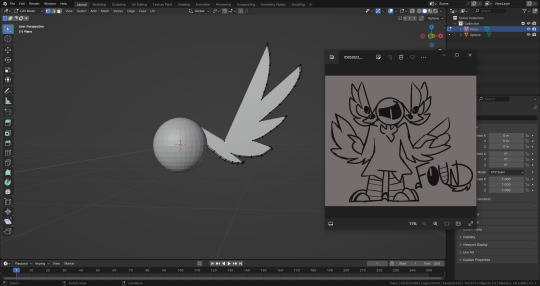
It took a long fucking time to get a version of the model I was happy with. I restarted from scratch like 5 separate times. I started with sub-dividing the planes by hand, then I discovered I can create curves and skin them. I immediately hated doing that, went back to sub-dividing and moving the vertices by hand.
By the time I had Found V3, the ears were much bigger, and the leg were cylinders. But there was an unforgivably major issue... The geometry on this model was a bigger nightmare than anything Alien Colonial Marines ever had, and that's not the standard I want to live up too.
(Side note: Ignore that fact that all the files are called "Lost" instead of "Found". I miss-named the first file, then by the time I realized, I already had 20 different files and objects with the wrong name)
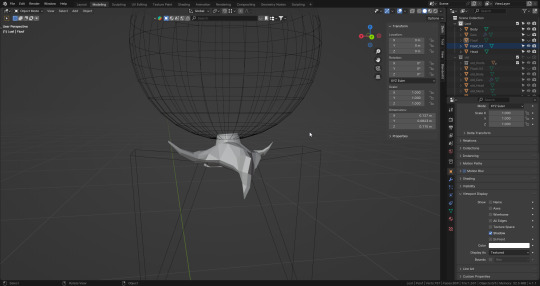
Probably the biggest shot to the head was making the neck floof. There was moments where I'd rather be pulling teeth. This is the part that went through the most renditions and even led me to restart completely because I though the problem wasn't just the floof shape, but also neck and body shape. In the end, changing the neck shape helped a shit ton.

At some point I started playing with an outline. I started with playing with the shader and used the geometry nodes to made the sharp bits pink. Then I moved on to using a copy of the whole mesh that's slightly bigger and reversing the normals, so the mesh is facing inwards, then I enabled backface culling. The massive downside to this is that it doubles the polygon count, but looks lovely.

To finish off this post, here's what I got so far. The design was redone to have smaller ears, less polygons and more volume to all portions. The entire mesh was redone to be more flexible. The yellow feathers on the ears can move with their own bones connected to the main feathers. All floofy spots can wiggle and bob. They have only 3 fingers, a thumb, an index, and a middle finger. I added a little chicken butt. The arm bones are a little devious, because you're supposed to have a bicep, forearm, and hand bone.... Found only has a bicep and hand bone.... So I added a very tiny bicep inside the chest that has no weight, and made Found's bicep their "forearm"
I'm still working on the face with expressions. I'm currently having a time trying to get Vnyan to swap expressions, and once it can do that, I'll get the pupil to look around with the eye tracking. But everything else works and bends in a way I'm happy with.

2 notes
·
View notes
Text
Armature animation in Blender ATTEMPT 3!!!!
I've fucked up exporting animations time and time again for UE5, and I've made 2 other posts about exporting animations, but this time I think I've 90% nailed it. So lets try and make a "master" guide to exporting, complete with some mistakes I made.


This is assuming that your Blender file has many unrelated meshes that have their own armatures with multiple animations on each armature.
My first mistake, ALWAYS have a different name for all your bones across all your meshes. I've adopted using <ObjectName>Root for the root, and <ObjectName>Bone.001...<ObjectName>Bone.999 for all other bones.
Next up, make a bone group for each independent armature. I use <ObjectName>Bones for the primary collection.
All this hubbub was to make sure there's no bone conflicts when bringing it into UE5.


Now lets make more than a single animation. I found you can make your dope sheet like normal, and when you're done, head on over to the action editor, and "stash" your animation. Then you can start a new animation for the same armature by duplicating the current one (click the 2 papers icon), or click "new" (I guess, I never tried "new"). This should make a new NLA track.


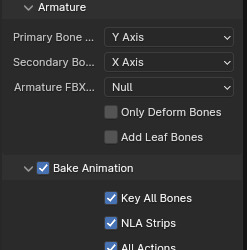
Now we've got the bones organized, the animations are organized, lets export.
My export settings for skeletal meshes is above. The main changes here are the "Apply transform". This doesn't seem to do anything if you don't need it, but it does if you do. So there's no harm in having it turned on. Without it, you'll get an error that UE5 can't create the physics asset.
"NLA strips" and "All actions" are important tho. If you don't organize your bones and animations like this, these options might fuck you over, BUT, as far as I know, if you do it this way, this is how we can export our multiple animations. When brought into UE5, you'll have a skeletal mesh, skeleton, physics asset, and as many animation assets that you saved as NLA strips
1 note
·
View note
Text
Great News! I've discovered material instances
If you've got plenty of materials that are all basically the same thing under the hood with minor variations to their parameters, do I have a feature for you! Material instances!

Supposedly making material instances doesn't just make your life easier, it's also much easier on the game. Probably because under the hood, all these materials now share code or something.
Making one is easy, just make a master material like any other material, and any nodes that you want to vary, right click and select "Convert to parameter". Master material done, now lets make an instance. In the content drawer, right click on the master material, and select "Create material instance", done done.

1 note
·
View note
Text
Great news, I've progressed to the point where I can shitpost
I think the entirety of Starfox's Sector X was just that they forgot to set their coordinates to absolute

0 notes
Text
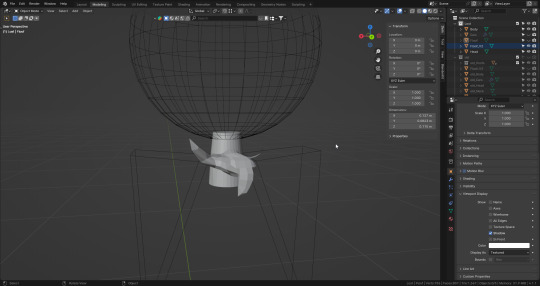
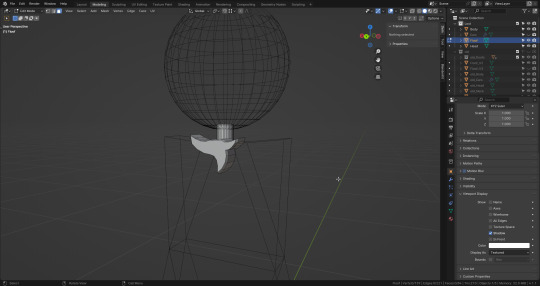
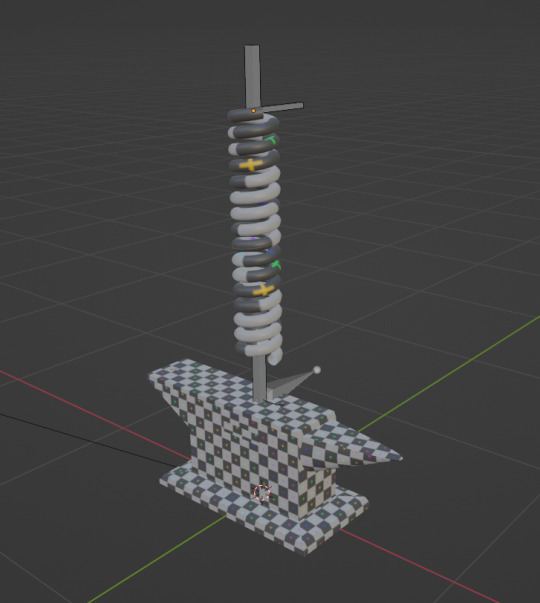
Modular Wiggly Things! (BETTER)
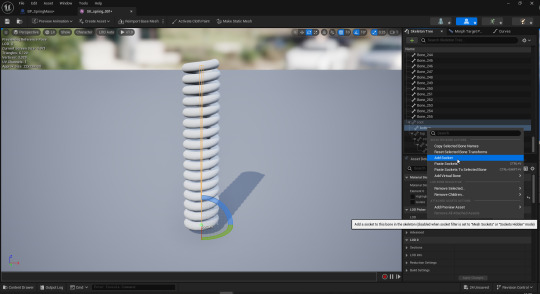
So I've remade the spring mass, except now it's a hell of a lot better. Instead of the anvil being permanently fixed to the spring and exported as 1 animation. The spring is now its own thing, with the animation, then the anvil is socketed in, same with VFD's claw

Started opening the spring skeletal mesh and adding a socket to the bone I wanted things to attach to
Then I start a new actor blueprint and dropped in the spring skeletal mesh, anvil, and claw. I set the animation of the spring to the spring animation just like in the regular editor. I then parented the anvil and claw both to the spring, and set both their "Parent socket"s to the newly created socket. An important thing to do here is now to fix your location, rotation, and scale. If they're set to relative, they follow the socket, if they're absolute, then they don't. I.E. It's probably a good idea to set at the very least your scale to absolute so it doesn't become ridiculously big or small.

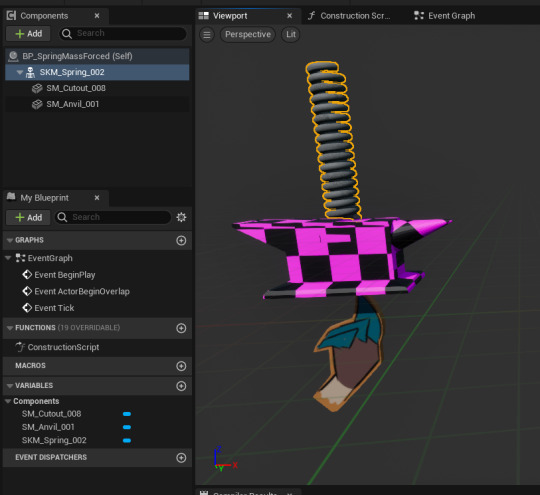
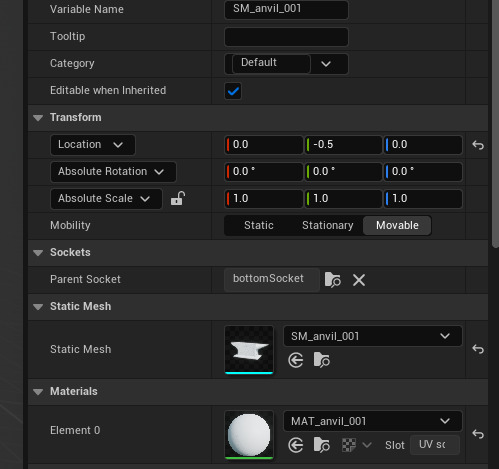
Now you just drop in the blueprint into your world and you're done! That was shockingly easy.
1 note
·
View note
Text
Problem solved
So the main change I made was removing the "NLA strips" and "All actions". I also removed "Add leaf bones", but I'm awfully certain that has nothing to do with it. That's just for my own convenience. I still get a warning about something something bind pose, but it doesn't seem to change anything, and for the life of me I can't get that to go away.


My animation is scared...
So I'm having an issue that I'm smashing my face over that when I pop my mesh into UE5, it all looks good, but when I put my animation on it, it vanishes.... TURNS OUT when I stick the animation on it, it zips far into the distance. That distant rectangle is the wall of the template world. The animation doesn't even completely work. It jitters around instead of turning in a circle.
Gonna keep trying shit until this works. What's worse is this feels like a bare bones basic animation. There's only 2 bones for Arceus sake. How bad it be? I kinda really want to start my Udemy class on rigging because of this....
2 notes
·
View notes
Text
Making a cardboard cutout
To avoid needing to make some 3D models as a drop in for VFD, because I'm not that smart yet, I decided I'm going to craft up some 2D static models like cardboard cutouts


Started by importing my reference image into Blender and moving it forwards a tad so it's not inside of the mesh I was about to make. Add a square, sub-divide the edges and start placing the vertices.
To make it accurate, click the gizmo to always be looking straight on, and click 'G' then 'shift+Y' to constrain motion to the XZ plane as you move the vertices.
To unwrap the mesh, you need seams. To make this easy I figured out you could press '3' and select a face, then press '2' which selects all the edges. To put the art on it I exported the UV map by selecting all faces, then hit "UV" -> "Export UV layout". Import that into Krita, move the stuff around to fit, and BANG

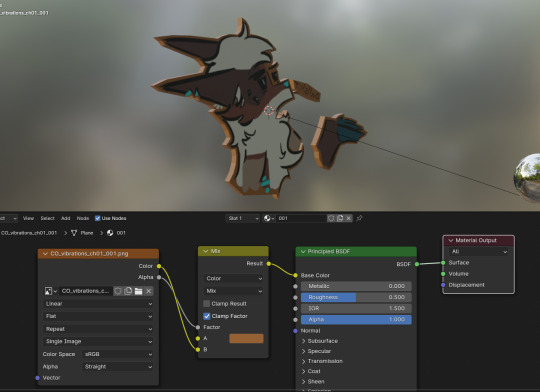
To get this onto the mesh, I created a new material, added an image as texture, pipped that into a mix colors node, used the colors as one of the colors and used the alpha as the factor. If it gives you guff, swap the A and the B inputs. (Ignore the fact it's mirrored for now)
Lets get it into Unreal now. I don't fully understand what is and isn't allowed in Unreal as far as textures go. The only thing I know how to do is bake the shit out of it. Under the bake settings switch the bake type to "Diffuse", and only check the "Color" box so we only get the color being diffused off the mesh and no reflections or shadows or anything. Export that baked UV to its own image, and I'm done in Blender.
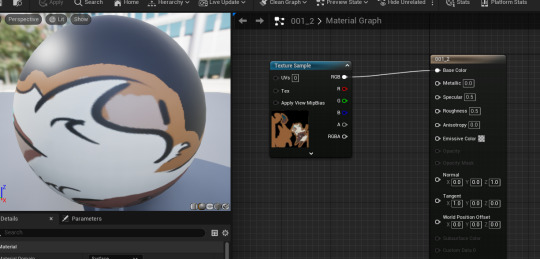
To attach this png to the material in Unreal, double click the material to open the material editor, drag the image into it to create a node, attach the new node. The end result is a VFD ball! DONE DONE

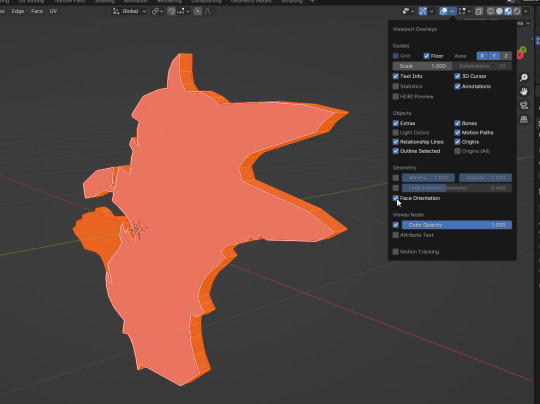
BUT WHAT THE FUCK WAS WITH THAT MIRRORED IMAGE???
I found out that's because the normals were the wrong way around. The front of each face was pointing inwards. To fix that was easy. To view your normals, check the "Face orientation" in this menu. Red I guess means you're looking at the back, blue means it's the front. In the mesh options, head to "Normals" -> "Flip". You'll probably need to re-unwrap your mesh after, buuuut DONE

10 notes
·
View notes
Text
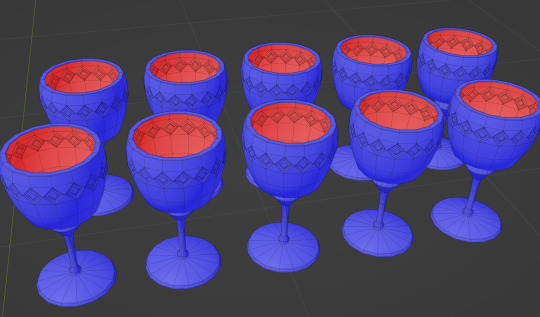
Glass Rendering Issue
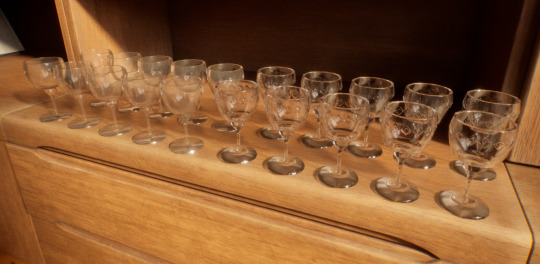
The biggest struggle I faced after moving onto using path tracing was how the glass was rendering. As shown below, glass placed behind glass would render as black which isn’t realistic, especially when compared to the reference image to the side:


After adjusting shader nodes and settings didn’t help, and after I couldn’t find relevant solutions on UE forums, I thought the issue could be caused by the mesh so I revisited my model and deleted all interior faces. As shown below, this helped to minimise the problem but did not solve the root of it. Although the glass is clearer, you can still see the stems of the glass behind rendering as black:

I then revisited the UE documentation and found a very thorough explanatory video about path tracing by William Faucher. In this video he went over glass in detail and helped me realise that my issue stemmed from my post process volume settings. In order to get rid of the blackness, I simply needed to increase the max bounces under path tracer rendering. An increase in bounces allows for light rays to penetrate further before being eliminated.
Results after increased bounces:
The left half of the glasses have my old glass shader applied vs the right having a newer simpler shader. In this example you can see the blackness is gone and the glass renders much more realistically. I also reimported my older model with interior faces included.
6 notes
·
View notes
Text
One Wiggly Thing
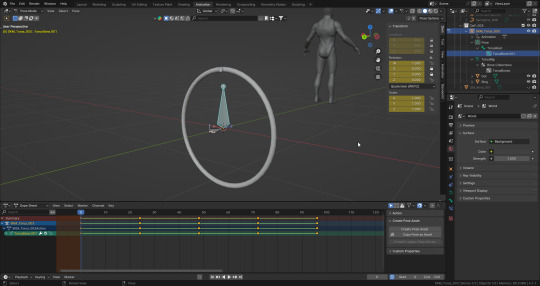
After much bullshit fighting and Googling I have achieved... 1 (one) wiggly thing in Unreal. It's a simple keyframed animation of a mass on a spring that I whipped up in Blender and exported to Unreal. But what have I done to achieve such a masterful piece of art?

First thing first, I used the dope sheet to set a small handful of keyframes at the extremes (Tap 'i' to create keyframes). I set the handle type to give it sinusoidal motion.
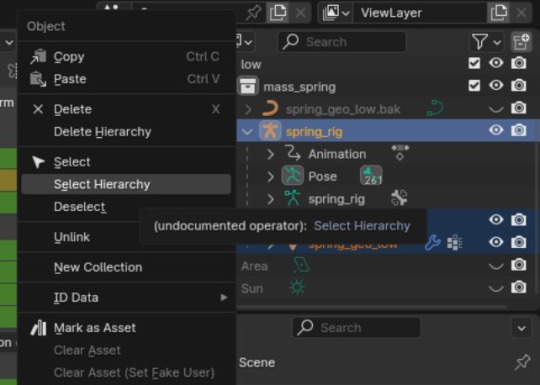
The bigger issue was exporting it to UE5. Turns out, you need to select the whole hierarchy before exporting, then select "selected objects" when exporting. My issue is that I was selecting the top most "spring_rig" and expecting that to be fine
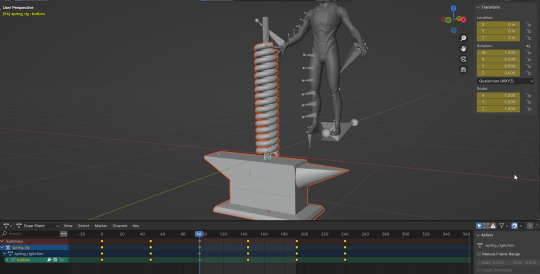
Once they're in Unreal, there is a "Skeletal Mesh", "Animation Sequence", and a "Physics Asset". Pop down the Skeletal Mesh, select the object, head on over to the "Animation" tab, set "Animation Mode" to "Use Animation Asset", and select your animation sequence. DONE
Not a clue what the physics asset is for and you might also have a "Skeleton", but I haven't a clue what those are for yet
(Yes that was the actual frame rate while trying to screen capture while running UE5 (I pinky promise tho it run smooth while not trying to screen capture))
8 notes
·
View notes
Text
Saying fuck it
One of the first things I'm trying to model is a mass bouncing on a spring for the main blog covering mechanical vibrations, but I don't think things work like I think they work. The world of games operate on their own ✨ plane of reasoning ✨

I thought "HEY, lets make a mass (an anvil), and a spring (the spring), then use Unreal as a physics engine to apply a mass to the anvil and some kind of a deformation resistance to the spring." And no matter how many things I try to search, it's feeling like adding physics to a spring is impossible. I just don't have the slightest clue as to what I'm supposed to do with basically anything, nor do I have an idea of where to even start or search most of the time.
CG Cookie had some nice videos on making a spring using curves HERE, but OOPSY, I don't understand how Unreal interprets curves if at all. It wants a mesh?? Np, CG Cookie has me covered with a BETTER SPRING VIDEO, but now OOPSY, I haven't a clue on how to apply physics to this, and Unreal keeps complaining something something about bones.
And so, I've finally said fuck it. Instead of applying physics to things, at least until I find out what "applying physics to things" even means, I'm going to use keyframes and set animations. I've also picked up a Udemy course on Blender/Unreal from Creativity Unleashed. It was on super sale for basically nothing (I've really got nothing to lose) and it may not be THE MOST advanced course, but it seems like a good one just to get my foot in the door and point me in A direction, instead of flailing around like I am rn
0 notes
Text
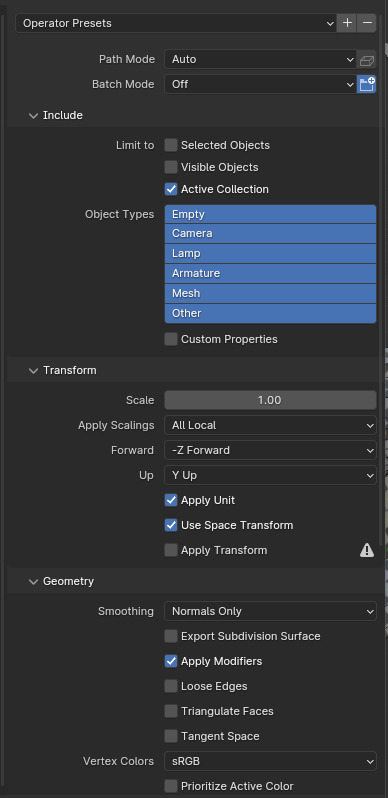
Blender -> UE5 import errors
The first time I tried to import my model into UE5 after doing nothing but meshing, I got this set of warnings. I THINK you can survive with these for testing. They are just warnings after all. But lets see how I went about fixing it...

To start I'll show off my standard Blender export settings. I may need to change these depending on the job, but for the most part this was them

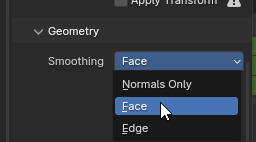
Smoothing none sense
To get rid of the blabbering about smoothing shit, I just flip-flopped this "smoothing" option during exporting from "normals only" to "face". EASY
Next up, the other 2 errors I fixed at the same time by creating a UV map. As far as I can tell, the job of the UV map is to unwrap this 3D object into a 2D sheet. Then you can start drawing all over that 2D sheet and it will be displayed on the 3D object correctly. Because I never made one, it's being left up to Unreal to generate whatever it thinks is the best unwrapping. But to have more control, lets make a UV map ourselves!
UV mapping
HERE is a very helpful video on how to do this step
To start I opened the "UV editing" windows, selected all surfaces in "edit mode" and clicked "unwrap". And what you get out doesn't make much sense.... yet. There's was a sneaky way to view your UV grid by switching to your "shading" windows, create a new "image texture" node, and add the "UV grid" image. The end result waaaaaasssss.... this shit....


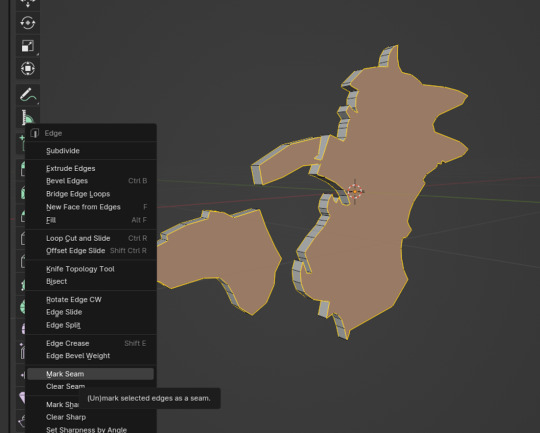
Let's fix that by defining the seams. This is happening because the program is just guessing where (if at all) to cut the texture while unwrapping it, so by using the raw horse power of our human brains, we can define where the smartest places to cut it are. The way I see it, it's probably best to cut it between segments. Like, the horn will be it's own thing, then the top surfaces, then the sides. Makes sense to me, because if I were to color it I'd probably color all of the one side, then all of another side, then the horn and so on.

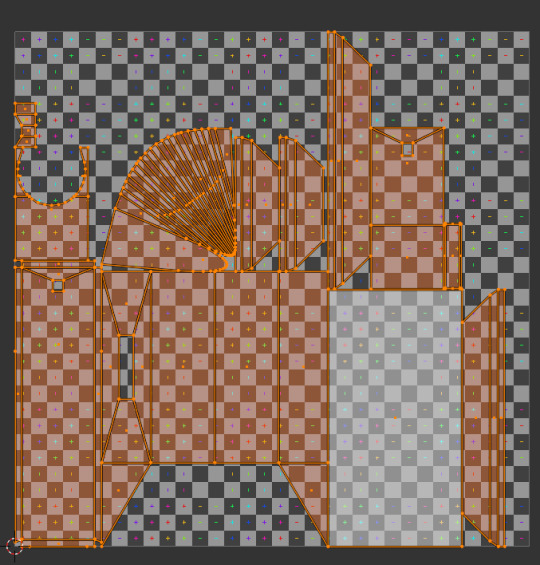
LOOK AT HOW PRETTY THAT IS!
Now I was able to import the anvil with 0 complaints from our friend UE5
7 notes
·
View notes
Text
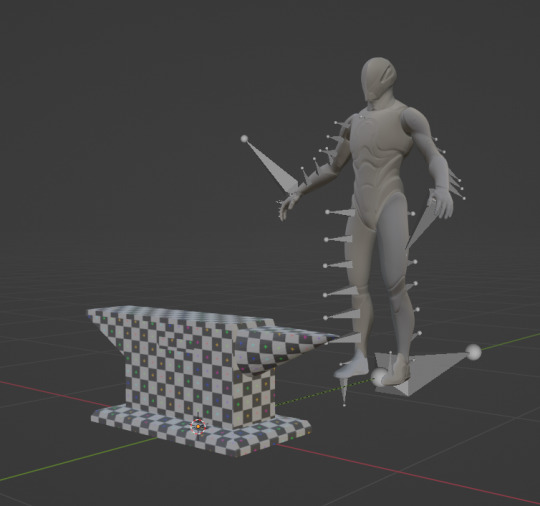
Getting a reference scale
when making stuff in Blender, I found it confusing as to how big to make things for importing into UE5. This one was pretty simple. I found that you can start up a new 3rd person project in UE5, and be a loot goblin to scrape the mannequin model out of the files

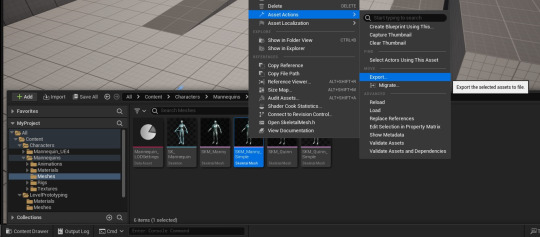
The you just slip it into Blender and now you've got a sense of scale without needing to worry about scaling your piece after the fact! (p.s. I don't know what the difference is between the "simple" version and the regular, but then again, I don't even know what the difference between the "skeleton" and the "skeletal mesh" is)
3 notes
·
View notes