
How to install your microsoft office 365, How to download Office 365 Account, Office.com/setup.
Don't wanna be here? Send us removal request.
Statistics
We looked inside some of the posts by officegetsetup and here's what we found interesting.
Average Info
Notes Per Post
14
Likes Per Post
14
Reblog Per Post
0
Reply Per Post
0
Time Between Posts
22 days
Number of Posts By Type
Text
17
Last Seen Tumblr Blogs


Fun Fact
Tumblr.com is the 103rd most visited website in the world.
Text
How to Fix MS Outlook Not Receiving Emails on Window 10/11?
Here are some common solutions to fix the issue of Outlook not receiving emails on Windows 10/11: Office.com/myaccount
1. Check Internet Connection: Make sure your internet connection is working and stable. Check if you are able to access websites or other online services.
2. Check email account settings: Verify that your email account settings are correct in Outlook. You can access the settings by clicking on File -> Account Settings -> Account Settings. Check if your email address, username, and password are correct.
3. Disable Firewall and Antivirus temporarily: Firewall and antivirus software can block incoming emails in Outlook. Temporarily disable them and check if you start receiving emails.
4. Update Windows and Office: Make sure your Windows and Office software are up to date. This can help fix any bugs or compatibility issues that may be causing the problem.
5. Repair Outlook: You can try repairing your Outlook installation to fix the issue. You can do this by going to Control Panel -> Programs and Features -> Right-click on Microsoft Office -> Click on Change -> Select Repair.
6. Disable add-ins: If you have any add-ins installed in Outlook, they may be causing the problem. Disable them and check if you start receiving emails.
7. Delete and recreate email account: If the above steps do not work, you can try deleting your email account and then recreating it in Outlook.
8. Contact your email provider: If you continue to face issues, you can contact your email provider for assistance. They may have information about any ongoing issues or maintenance work that may be affecting email delivery.
By following these steps, you should be able to resolve the issue of Outlook not receiving emails on Windows 10/11. If you continue to face issues, it may be helpful to seek assistance from a professional. Www.office.com/myaccount
1 note
·
View note
Text
How To Fix If Outlook Search Not Working?
Outlook is one of the best email service providers. Its number of users is increasing day by day due to its amazing features. One such feature is the Outlook email client search tool. It allows users to search for a particular detail in an email such as date, folder, the sender, and more. But due to several reasons, your Outlook search tool may not work. If you are going through the same Outlook issue and looking for solutions to fix Outlook search not working on Mac then, this is the best guide to go through. The detailed guide takes you through the reasons and most effective solutions to the issue.
However, before jumping into the solutions, let’s check out the reasons for the Outlook Search function not working issue. Office.com/myaccount
Why Outlook Search is Not Working?
If you are searching for specific information in an email and Outlook is not showing emails or results based on your search then, there must be a problem with the Outlook search engine. There could be several reasons for such an issue in the Outlook account, some of the most possible are listed below:
Windows search feature is turned ‘Off’.
Issues in Windows Indexing Service.
Outlook ost file is corrupt or damaged.
An outdated Microsoft Office.
There can be many other unknown reasons for this issue. However, irrespective of these, you can fix this Outlook search not working issue in no time by following the below-mentioned solutions.
What to do if the Outlook Search is Not Working on Mac?
There are various effective ways to deal with the Outlook search not working on Mac issue. This section contains all of them. Read and implement one by one. The methods are for Outlook 2016, 365, 2010 and 2013 versions. Www.office.com/myaccount
Solutions 1
Fix Windows Indexing Service
If the reason behind the why Outlook search not working problem is a particular system error in Windows indexing service, then you need to rebuild the service by implementing the enlisted steps:
Open your system and go to the ‘Control Panel’.
Double-click the option of ‘Programs and Features’.
Click on the ‘Windows Features’ tab and select the option of ‘On’.
Hit the button of ‘OK’ and restart your system.
Now, open MS Outlook and leave it while the application is reconfiguring the search engine.
Go back to ‘Control Panel’ and then open ‘Programs and Features’.
Check the box of ‘Windows Search Features’ and let it update the changes.
Once, the process is completed, go back to the ‘Control Panel’.
Click on ‘Windows Indexing Service’ and choose the ‘Advanced Option’.
Select the option of ‘Rebuild and click on ‘OK’.
Let the process complete and then, verify the indexing process.
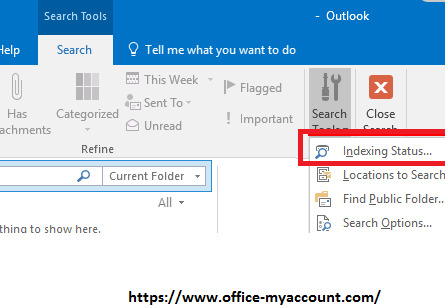
Press ‘Control’ and ‘F’ keys together and open ‘Indexing Status’.
If the message, ‘Outlook has finished indexing all the items’ pops up on your screen, this means the process is completed.
Now, restart your system for one last time to start afresh.
Once you have implemented all the steps, open your Outlook account and search anything to check if the search engine is working and if Outlook 2016 search is still not working, try the next method.
Solutions 2
Update Microsoft Office and Fix Outlook Search Not Working Issue
Outdated versions of MS Office often become the reason for technical glitches in an account. Outlook updating can solve the unresponsive search function issue.
1. Check updates in your version of Outlook.
For Outlook versions 2016 and 2013
Open Outlook and go to the ‘File’.
Click on ‘Office Account’.
Drop down the tab of ‘Product Information’.
Select ‘Update Options’.
Click on ‘Enable Updates’.
Select ‘Update Now’ and hit the option of any of the recent updates.
For Outlook versions 2010
Open Outlook and select ‘File’.
Navigate yourself towards ‘Help’.
Open ‘Check for Updates’.
Select the option of ‘Install Updates’.
Select any of the available updates.
Click on ‘Download’.
For Outlook versions MacBook
Start Outlook and find the option of ‘Help’.
Click on ‘Check for Updates’.
Dropdown the option of ‘How would you like to install the updates?’.
Select the option of ‘Automatically Download and Install’.
Open the list of ‘Check for Updates’ and choose any recent update.
2. Once the update has downloaded, click on the button of ‘Install’.
3. Run’ the new version
4. Restart your system
After applying the steps, open your Outlook account and search for a particular detail to get the results.
Solutions 3:
Repair Outlook
By repairing Outlook you can fix many common Outlook issues including Outlook search not working on Mac. Read the basic steps to repair Outlook with the help of built-in repair services.
Repair Outlook and fix your Outlook 2016 search not working issue
Open ‘Outlook Search Repair Service’.
(If the option is not available in your system, download it)
If any notification of duplicate Outlook installation pops on your screen, remove it.
Restart your system.
Open the option of ‘Reindex’.
Let the service completely and when you receive a ‘Reindexing has completed’ message, close it.
Repair Outlook and fix your Outlook 2010/ 2013 search not working issue
Press on ‘Start’ and open the ‘Control Panel’.
Scroll down the list of ‘View By’ and select the ‘Category’.
Scroll down the tab of ‘Programs’ and click on ‘Uninstall the Program’.
Click on ‘Microsoft Office’ and hit the button of ‘Change’.
Choose ‘Repair’ or ‘Online Repair’.
When ‘Control Window’ pops up click on ‘Yes’.
Once the process is completed, restart the system and you will see that Outlook 2013 search not working issue has been fixed.
1 note
·
View note
Text
How to Recover Deleted Emails in Outlook?
The crummiest thing that can happen to you is if you delete an important email message in Outlook by mistake? Whether you just delete the email or permanently purge it, it doesn’t disappear. We often delete unwanted emails to clear the junk without knowing that we might want it later. But there is nothing to worry about because the technological advancements enable you to recover deleted email messages. If you want to restore the deleted emails and look for some most effective ways that teach you how to recover deleted emails in Outlook, then stop looking more. Here is a much detailed guide that comes in handy, go through the guide, and recover the deleted emails. office.com/myaccount

How to Recover Deleted Emails In Outlook From An Exchange Account?
If you have deleted an important email by a fault that is no longer in your Outlook exchange account’s ‘Deleted Items’ folder, use the web interface to the Outlook account and recover your deleted emails. Read and follow the below-mentioned steps one by one to learn how to recover deleted emails in Outlook.
Note: Users must take note that Outlook on Macbook does not provide an interface to retrieve deleted email from an Exchange account.
If you are looking for the method of how to recover deleted emails in Outlook Mac, this method will go.
Start the operating system and open Outlook Web App to log in to your Exchange account in an internet browser
Once you are signed in, navigate yourself towards the ‘Deleted Items’ folder
Drop down the list in the folder and click on the ‘Recover items deleted from this folder’
Emails will be sorted by the date they were deleted on. Hover over the emails you would like to recover and select all of them by ‘Checking’ the box
Navigate yourself towards the middle of the window. There will be three options. Click on the ‘Restore’
Once you follow all the aforementioned steps one by one you will know how to recover deleted emails in Outlook. The recovered emails will automatically move to its original folder from where you deleted the email.
How to Recover Permanently Deleted Emails In Outlook 2013 On Windows? office.com/myaccount
When we delete emails from the Outlook account, we think the emails get deleted permanently but the emails move to the ‘Deleted Items’ folder. When you delete the email from the ‘Deleted Items’ folder as well, the emails get permanently deleted. Such emails can be recovered after a period of time, that span of time depends on the settings of ‘Exchange Administrator’. To know how to recover deleted emails in Outlook 2013 on Windows, follow the below-mentioned steps.
Open your Windows operating system and connect to the Outlook 2013 Exchange account
Provide your valid Outlook login credentials and log in to your Exchange account.
Move your cursor towards the ‘Home’ tab and navigate towards the ‘Deleted Items’ folder
Choose the option of ‘Action’ and drop down the list to further select the ‘Recover Deleted Items From Server’
There will be all the permanently deleted emails presented in the list with the headers like ‘From’ and ‘Deleted On’, check the email you would want to recover under the ‘Recover Deleted Items’
In case you want to recover all the permanently deleted emails, navigate towards the bottom-left corner and click on ‘Selected All’
Now, navigate towards the bottom-left corner and click on ‘Restore Selected Items’ and click on ‘Ok’
Once you follow the aforementioned steps, your permanently deleted emails will be recovered and stored in the ‘Deleted Items’. Now that you know how to recover permanently deleted emails in Outlook, learn how you can shift the recovered emails to any folder as per your wish.
Now, go back to the ‘Deleted Items’ folder and mark the ‘Recovered emails’ and right-click on it
Select the option of ‘Move’ and hit the button of ‘Other Folder’ and drop down the list to choose the name of the folder
Select any one option from the ‘Inbox’, ‘Drafts’, ‘Sent Items’ etc. and hit the button of ‘Ok’
After just a quick follow up on the aforementioned method of how to recover permanently deleted emails in Outlook 2013.
How to Recover Deleted Emails In Outlook From .PST Files?
A .pst file (Personal Storage Folder) by Outlook is given to every user with 2GB, the users can store the copies of Calendar, Contacts, Emails, Notes, etc. If the .pst file gets corrupted, you lose many imperative items and also the chance to recover your deleted emails. Now, learn how to recover deleted emails in Outlook by following the below-mentioned steps and from your pst file.
Launch an Outlook pst file repairer and select the pst file to recover it
You can search for the ‘pst file’ in the search box of your Windows operating system if you are not aware of the location of the pst file.
Once the ‘PST file (Outlook)’ is opened, click on the button of ‘Next’
Under the ‘Item Type’ all the types of the items stored in the pst file will be presented such as Email, Calendar, Task, Journal, Notes, Contacts, Distribution List
Select the button of ‘Email’ and click on ‘Next’
Here will be all the email messages stored that you have deleted, the emails might be sorted by date. Select the emails you would want to recover
Right-click on the highlighted emails and select the option of ‘Save’ to recover
Provide the ‘Destination Path’ in the dialogue box and hit the button of ‘Ok’
Your destination path has to be the folder you would want to store the recover messages
The emails you have deleted will once have now been recovered in the desired folder you mentioned as the destination path.
Once the emails have been recovered, you will be notified as ‘File saved at: E:\Steve Mike\Documents\PST\PST Repaired3.pst’ along with the size of the file.
After following the above-mentioned steps, all the highlighted emails will be stored in your desired folder.
Why Choose us for Recover Deleted Emails in Outlook?
We hope all the aforementioned methods helped you in recovering deleted emails or permanently purged emails in the Outlook email account. The steps mentioned in the methods were easy to execute and do not require an expert to perform. Still, if you are facing difficulty in implementing any of them, start a conversation with our experts over a chat. And let him teach you how to recover deleted emails in Outlook.
Visit Microsoft Office via www.office.com/myaccount
1 note
·
View note
Text
Www.office.com/myaccount - Office.com/myaccount

If you are a new user of Microsoft 365 Office, you need to add your account to Www.office.com/myaccount. You can have a number advantage as a consumer of Microsoft Products. The following advantages for Microsoft Product consumer are: Renew your subscriptions
1. Access to your Cloud data
2. Make Payments
3. Update the application of MS Office
4. Manage/ Reset security settings
5. Buy new Office products
What is Office.Com/MyAccount?
Microsoft account offers get right of entry to to all Microsoft applications, programs, and services. If you choose to use MS Office then, you will have to create an MS Office account and log in to it by way of the use of your credentials.
Your Microsoft Office account stores the information about what product you have subscribed to along with the product key so that you can retrieve your subscription whenever you want to.
Why Need an MS Office Account?
An MS Office account can provide you get right of entry to to its software and services. You can at once signal in to Outlook mail, Windows, Xbox, Gmail, and greater if you have a Microsoft Office account. With the assist of your MS Office account, you can purchase new or renew ancient subscriptions and operate many different tasks.
Check out the aspects of the ‘Office.com/myaccount’.
How Do I Create My Office Account?
· Open the net browser and type: www.office.com/myaccount
· Click on ‘Create’ beneath the ‘Sign-in’ alternative
· Enter your electronic mail address of any e-mail customer and click on on ‘Next’
· Now, grant a password
· You will get hold of a ‘Code’ on your supplied electronic mail ID, enter the identical code right here
· Click on ‘Next’
· Enter the ‘Characters’ you see in the ‘captcha box’ and click on on ‘Next’
· Now, you will be robotically redirected to the ‘Sign-in’ page.
Here you go! Your Microsoft Account is good to go. To access, enter your MS Office Login credentials.
How Can I Login Office.Com/MyAccount?
You can log in your MS 365 Office account and manage/change account settings performing by way of the following steps:
Open the browser and visit www.office.com/myaccount page
Enter your MS Office electronic mail tackle and click on on ‘Next’
Enter your password for the identical ID and click on on ‘Next’
Now, get right of entry to the emails, notifications or manipulate your MS Office account.
How to Manage www.Office.Com/MyAccount?
In order to control your Microsoft Office account, you should go to the internet site of MS Office that is office.com/my account. Enter your login credentials and sign-in to your Microsoft account. Go to the ‘View Account’ and the complete listing of the account settings will dropdown. Now, manipulate your Services, Payments, Subscriptions, Status, and all the extra settings.
How to Check MS Office Subscriptions?
Visit the MS Office Login website
Sign in to your account with the login Password.
Navigate your self closer to the upper-right nook and click on on ‘My Account’
Scroll down and click on ‘Subscriptions’
Under the same tab, read the details of your subscriptions.
How to Change Office.Com/MyAccount Password?
Open the browser and visit account.microsoft.com/security/
Type your e-mail tackle and click on on the ‘Next’ choice
Enter your password and click on ‘Next’
Press on the option of ‘Change my password’
Press on the ‘I don’t have any of these’ tab and ‘Next’ respectively
You’ll be redirected to the verification page.
Enter your phone number and click on ‘Next’
Provide the ‘Code’ you acquired on your given telephone number
Enter your ‘New Password’ and re-enter the password to confirm it.
Finish the system of altering the Microsoft workplace password with the aid of clicking on ‘Save’.
How Do I Recover My Microsoft Office Account?
Have you forgotten the password for your MS Office e mail tackle and can't get admission to your account? No worries! Follow the below-mentioned steps and get better your Microsoft Office account immediately.
Open www.office.com/myaccount
Type your Microsoft e-mail tackle and click on on ‘Next’
Select the alternative of ‘Forgot my password’
Perform the verification process
Provide a ‘New Password’ and re-enter again
Press on ‘Save’ and your account will be recovered.
0 notes
Text
How To Match Up Your Email With MS Office?
MS office is a goliath in the PC business and all the little and huge organizations will undoubtedly utilize this product here and there. Actually, the individuals that have a PC in their home can’t consider utilizing their gadgets except if they have the MS office introduced in it. There are various adaptations of MS office.com/myaccount that were propelled at various stages.

Each time the MS office thought of some cool and remarkable highlights. What’s more, that is the fundamental motivation behind why it has become a significant need for each PC client. There are numerous individuals that don’t that you would now be able to utilize this fantastic programming on your cell phone also. As indicated by my computation, this product will continue commanding the tech and business industry for an exceptionally significant time-frame.
Those clients that utilization the PC for their own utilization don’t as a rule utilize the MS yet the workplace laborers and business people need to invest a ton of energy chipping away at this product. Thus, these experts need to match up to their email with the MS office so they can utilize their documents anyplace they need. There is no uncertainty that you would now be able to utilize the MS office on any gadget that you have yet you won’t have the option to get to your own documents from various gadgets except if you match up your email with the MS office.
There are numerous advantages of synchronizing your email with MS office yet as of now, we are simply going to discuss the manner in which that you can use to match up your email with MS office. You can look at Google in the event that you need to see a few advantages of synchronizing your email with MS office. Be that as it may, on the off chance that you need to match up your email with MS office, you have to buy the exceptional adaptation of MS office 365.
1 note
·
View note
Text
How You can Set Automatically Reply In MS Outlook App?
We all know Office applications to sort your work-related tasks with timely accomplishments for the same. It enables the users to work effortlessly and even allows you to set automatic replies on your Outlook application.

You can without difficulty use the automatic replies in the Outlook Web app on every occasion you want that human beings who are sending you a mail be aware of that you will no longer be capable to reply to their message shortly as you are away.
Here, in this article, you will get to examine the steps to set Automatically reply in Outlook application. Remember, as soon as the computerized replies are on they will be despatched to every of the senders. So let’s start to learn how to set up the automatic replies on Outlook application.
What are the steps to follow for setting up automatic replies in Outlook?
Before discussing the steps the most important thing to remember is that you can turn on, turn off or modify the automatic replies in the Outlook applications. To set the automatic replies to follow the steps on-screen:
Go to your web browser and visit office.com/setup.
You can now signal in to the “Outlook Web app”.
Now enter the credentials associated with the account and then tap on the “Sign In” button.
After this, you have to select the “Settings” option and then choose the “Set automatic replies” option.
You can additionally pick out the “Settings” choice and then go to the “Options” accompanied by way of “Organize email” and then “Automatic replies” option.
How to use the automatic replies for your related information?
In this section, you will get to learn which automatic reply option stands for the relevant information that you want to send the sender.
Don’t send automatic replies: For this, you need to select this labeled option to turn off the automatic replies.
Send the automatic replies: You can choose this option to turn off the automatic replies.
Send replies during a specific period: Just select the checkbox and then set a specific time frame to control the automatic replies. If you do not set a time your automatic replies it will remain until you turn off.
Send a reply to every sender in my agency with messages: For this, you simply have to use the textual content container to create a message that is solely despatched to the senders in your respective organizations.
Send an auto-reply message to the sender outdoor my organization: For this, you want to choose the checkbox that you desire to ship the senders backyard the organization. From the list available, you can choose “Send replies to all external sender” option. Doing this, you can ship the exterior senders.
Send a reply to each sender outside the organization with the following message: If you select the option labeled as “Send replies to all external senders” option.
Note: There are more commands that are available on the official website. You can go to the internet site to examine the instructions alongside with the methods to do it.
In a conclusive viewpoint:
It is important to learn the steps to set automatically reply in outlook app so that if you are not working around then your senders get the message. Remember, you can always get the best guidance from the office experts and professions from the Customer support page via the official website office.com/myaccount.
1 note
·
View note
Text
How Do I Replace My Microsoft Office To 2019 Or 2020?
Microsoft Office has currently launched its up to date model Office 2019 and 2020 with all new facets and specifications. There are three Office variations that one desires to improve to Office 365, Office 2019 and Office 2020.
If you are curious about upgrading to the modern-day variations of Office software program then in this article you will locate the answer for the identical and get to get entry to the facets for the same. So, besides any lengthen lets get into the theme associated to how to replace my Microsoft Office application. office.com/myaccount

What is Office 2019 all about?
Office 2019 is an man or woman and standalone model provided by using the Office software program suite. It is the perpetual launch as soon as you very own it invariably regardless of simply having it yearly and paying an annual subscription. You get the license to use the software program on your PC, tablet, and smartphones. You get all the functions such as Word, Excel and a lot more.
What are the device necessities for Office 2019?
If you are one of these who are searching for the options to replace my Microsoft Office 2007 to 2010 or to the up to date model of Office 2019, Office 365 or Office 2020. Remember, it is on hand in the variations of 32bit and 64-bit versions. For the up to date variations for mac, you should have the most current variations of Mac OS such as Sierra, Mojave, and Catalina. Moreover, the Office running gadget makes certain you have the most up to date OS and points that help the up to date software.
How to replace my Microsoft office?
Remember though the Office 2019 is an up to date model it can't change Office 365. The Microsoft Office 2019 is an up to date model that is a standalone package deal that is in particular designed for the Private customers and the enterprise who do now not have get right of entry to to the web that is required to use the Office 365 variations of these applications.
Due to this, there are many elements on Office 365 that are no longer and can't be described in the Office 2019 specifically when we discuss about the collaborative features.
Moreover, Microsoft makes it clear whilst down load or putting in the up to date versions. The Office will acquire the normal safety fixes as soon as you installation Office 2019. Office 365 nonetheless appears ahead to the new updates by using ordinary month-to-month updates. Office 2019 can't exchange Office 365 however it does have all the up to date facets if you have been the use of Office 2017, 2016 or the different formerly versions.
How to replace my Microsoft workplace 2019?
Before you commence to recognize the principles to replace your software program to Microsoft Office 219 on your PC, Mac or your Windows working structures then make positive the software program meets the machine necessities of your computer. If you are at the beginning putting in Office then you have to function some steps to set up first. Just go to the authentic internet site to installation the up to date model and then set up the software program via following the recommendations on-screen.
However, if you are reinstalling the Office software program which you have priorly redeemed a product key and you have the license then we endorse you to go to the area labeled as “sign in and set up MS Office on your Mac PC.
https://activationmsoffice.blogspot.com/2022/10/how-to-redeem-microsoft-rewards.html
In A Conclusive Viewpoint:
We hope that this article has furnished you the terrific answer associated to how to replace my Microsoft office. However, if you nevertheless have confusion or doubts associated to the theme mentioned or you are caught in between the steps referred to in this article. There you will discover out the specialists and consumer aid executives who will grant you the first-rate viable alternatives.
1 note
·
View note
Text
How To Buy And Renew Microsoft Office Subscription?
Microsoft Office is a well-known product when we talk about office productivity tools. It covers all the basic as well as advanced applications under its umbrella that are needed by a working professional, student, home, or educator. The most recent updates in the Office productivity suite are being utilized at a high level by the customers who are working remotely.

Microsoft Office has built such applications that allow several users collaborate with each other on a higher level. Moreover, you get enough cloud storage in MS OneDrive to store your work at a single spot. Therefore, you might buy a Microsoft 365 Office subscription to build up your skills and take your productivity to a new level.
Steps to buying Microsoft Office 365 subscription
To buy Microsoft Office products or subscriptions, you just need to follow the steps given below:
(Note: Make sure to create an account on Microsoft Office platform because you will need it during the buying process)
First From your preferred web browser, Visit to the official website of Microsoft via office.com/myaccount.
Here, you will see a number of Office products key, plans, and subscriptions.
From the list of products, locate the desired one. It could be Microsoft Office 365 or any other product.
Further, you need to Press on the ‘Buy Now’ option.
As soon as you do so, you will be redirected to the Microsoft Office login page.
Here you need to enter your registered email address and click ‘Next’ option.
After this, enter your password of this account and press ‘Next’ option.
You can also press on the ‘Create a new account’ option.
Once you log in Microsoft office successfully, you will need to complete the payment process.
When you are complete, you will receive the Microsoft office product key in the mail of your registered email address. Also you can buy a subscription from third-party suppliers such as Amazon or buy from a retail store.
Also Visit Here - : What is the Method to Fix WORKER_ INVALID BSOD Error?
How to renew Microsoft 365 Office subscription?
To renew MS Office 365 subscription, you can follow the simple steps given below:
First of all, go to the official renewal page of Office i.e. www.office.com/renew
Log in to your Microsoft Office account when prompted.
Locate the subscription you wish to renew.
Now, prefer the desired plan, monthly, or pay for a full year.
Choose either of the two; ‘pay now’ or ‘Renew with a monthly subscription for $XX.XX per month’.
Select the first option in case you wish to pay for a full year.
Now, you go to your cart and review the Microsoft subscription details.
Make your payment and complete some essential steps to end the process.
1 note
·
View note
Text
How To Protect A Word Document With A Password?
The second you make a Microsoft Office document you ought to keep it password safeguard so nobody can penetrate the information that you have entered or put across in that specific document. It is vital to encrypt your data with the password as there tried numerous users who wish to duplicate your important data for their uses.
We likewise recommend safeguarding each and every data that is related with your organization or to your work so nobody can arrive at it.
In this article, you will figure out how you can secure that important informative document and safeguard it with the password. These are the basic stages with combined methodology to protect the data from the other unknown clients. The highlight recall is that the means for the two Windows and Mac operating systems will be talked about here. Office.com/myaccount
So, without any further do let us start the topic and take it additional.
How to protect MS Word doc on Windows?
Double-tap on MS Word document and afterward tap on the blank document to make the one.
In the next step, you have to tap on the “File” choice.
Presently, you have to tap on the “Info” tab choice.
Just tap on the “Protect Document” choice until you see the drop-down menu on-screen.
Tap on the “Encrypt with Password” choice and follow the on-screen prompts.
Enter the password and press on the “OK” button.
Re-enter the password when prompted and afterward tap on the “OK” button.
Note: If you wish to erase the saved document you can undoubtedly do it without entering the password.
How You can protect Microsoft Word doc in the Mac OS?
For this, you want to follow to the directions given beneath:
Open the MS Office document.
Tap on the " Review" button and snap on the " Review " prompts on the screen.
After this tap on the " Protect Document" and afterward you will see a pop-up window.
In the next stage, you need to enter the password in the field provided on-screen.
Follow the on-screen prompts and press on the " OK " button.
Eventually, just re-enter the passwords promotion then tap on the " Ok " button.
Doing this will confirm your password decisions.
Highlight remember: Once you close the document, no other person can re-open the file without entering the password.
Also Read - How you can Remove Local Users in Window 11?
In a conclusive viewpoint:
It is vital to to protect your created documents utilizing MS Office application (mostly the MS Word) to keep the significant data and shielded and protected from the breacher. We hope that by following the steps mentioned here in this article, you will get to safeguard your made information. www.office.com/myaccount
1 note
·
View note
Text
How To Setup Microsoft Authenticator With MS 365 Office?
It is the need of great importance to keep our computerized effects in a locked space so it's not possible for anyone to utilize them. Other than keeping our gadgets locked with passwords and finger impression confirmation, we should likewise give notice to getting the information, applications, programming, or projects accessible on them. One such programming that contains exhaustive insights concerning our business is Microsoft Office. Click Here - Office.com/myaccount
A huge number of individuals from around various corners of the globe utilize this program to do different undertakings utilizing the applications present in this single programming. These clients generally utilize these applications to make business related records, business introductions and monitor their representatives and their work.
Subsequently, we can say that this product contains a ton of data about the work we are engaged with. Subsequently, it turns out to mean a lot to utilize the most grounded confirmation technique over these applications with the goal that no one can acquire unapproved admittance to your fundamental data.
Hence, for the very good quality assurance of Microsoft 365 or some other adaptation of Office, you should utilize one of the verification applications that are accessible in the commercial center. Also, with regards to defending your Office documents, there isn't anything that could beat the exhibition of "Microsoft Authenticator."
What is Microsoft Authenticator?
This is a cell phone application that is utilized by various associations that achieves their undertakings utilizing Microsoft 365. You can undoubtedly get this application on your gadget and utilize its confirmation highlights as opposed to utilizing a Multi-Factor Authentication convention over your gadgets. By utilizing this application, you can open your Microsoft 365 programming with a solitary snap as opposed to composing long PINs and passwords. The best thing about utilizing this application is that it doesn't cost you an extra expense to utilize it outside your locale.
Why choose Microsoft Authenticator?
Since there is an extensive variety of validation applications accessible on the lookout, hence the inquiry emerges regarding the reason why we ought to utilize this authenticator rather than others? Indeed, the solution to the equivalent is very straightforward and we have recorded a few elements on the side of something similar. These elements are as per the following:
This deals with every one of the major working frameworks including your cell phones (iOS and Android)
The authenticator works for the Microsoft Office applications as well as be utilized on non-Microsoft applications and administrations
The application upholds all Microsoft administrations alongside Facebook, Google, and that's just the beginning
You can either utilize the warning validation component or utilize the code verification capability in light of your inclinations
All you want is a Microsoft record to utilize its administrations
Setting up Microsoft Authenticator
Prior to initiating the interaction, ensure you have a Microsoft record or you can without much of a stretch make another record to benefit yourself of this help:
Snatch your PC or cell phone and open a program on it
After this, explore to accont.microsoft.com/account page
Presently, complete the Microsoft account sign-in process
Or on the other hand, go on with the record creation process
On your profile page, look down a bit
Presently, go to the "Security" area and select "Update"
From that point forward, pick the "Investigate" choice from the accessible choices
You can track down a similar choice under "Greater Security choices"
Yet again sign in to your Microsoft account, whenever provoked
Presently, tap on the "Get it currently" button to continue
Then, at that point, pick how you wish to get the application Google Play or App Store
Trust that the establishment will finish and tap "Next"
Getting everything rolling with it
After you get the application on your gadget, follow these moves toward get everything rolling with it:
Launch the application on your gadget
Presently, tap on the "Sweep QR CODE" choice from the menu
In the consent spring up, pick "Permit"
Presently, filter the given QR Code from the application and snap "Done"
Presently, on your gadget, you want to tap on the "GOT IT" button
Your record will presently be noticeable in the application
After this, you will get a warning ready which you want to support
When finished with the endorsement, click "Next"
Thus, the following time you use Microsoft 365 and send off one of its applications, you will see a warning to finish the validation interaction. Following up, we will become familiar with the total strategy to use for safe sign-in.
By the authenticator for signing in
On the off chance that you are utilizing the authenticator on a non-Microsoft, rather than getting the sign-in warning, you will get the code. To involve this code for the sign-in reason, utilize the directions given underneath:
Open the favored help which you are utilizing with authenticator
After this, you want to sign in to your record utilizing your standard qualifications
When finished with that, you will get a sign-in code
Enter a similar 6-digit code to finish the verification
Without entering this code, you won't be permitted to sign in to your record.
Conclusion-
Here, we have attempted to address the thorough subtleties on setting up as well as utilizing Microsoft Authenticator on both Microsoft as well as non-Microsoft administrations. Assuming you are as yet confounded about utilizing this, you can continuously explore to the authority site of Microsoft Office.com/myaccount.
Also read - : How you can Change Microsoft Account Password in Window 10?
1 note
·
View note
Text
How You Can Change MS Outlook password?
If you are working on Microsoft Outlook application, then at some point in time, you might need to change your MS outlook password and there can be some actual reasons behind it. Assume, if you have forgotten your password or you want to change the password to keep the security purposes then you can reset or change outlook password. for more information about Microsoft account click here Www.office.com/myaccount

You can update and change your email account password in the Outlook app or you can also modify the changes with your email provider be it Microsoft Office 365, Xfinity or gmail. You can simply change your password in one or both places. Here, we can discuss the steps to change the MS outlook password.
Why we have 2 different places to change Microsoft outlook passwords?
There are two things that you must have to access your email in MS Outlook these are:-
An email account that is associated with Microsoft Office 365.
Along with this, you must need a program that can display your emails that allows you to read and manage those messages.
Note:- The moment you change MS outlook password or reset MS outlook password, you first have to change the MS Office password with the email provider then modify the changes in the Outlook application.
When there is a need to update the password with the email provider?
You need to change or reset outlook password in the following conditions:-
If you think someone is trying to reach your data and want to access your account.
If you have received a password reset link from your email provider.
You have forgotten the email account password.
What are the steps to change Outlook password?
These steps will help you to change the Microsoft Outlook password:-
First step, you have to go to the MS account security window and then select the option labeled as “Password security”.
Now, you will be prompted to enter the associated credentials to verify your identity with a security passcode.
You need to decide how you want to receive the security code by email or by phone.
After this, you will be asked to verify your credentials and once you are done with it you have to click and select the “Send code” option.
Once you have received the code you have to enter the code and then click on the “Submit” option.
In the final step, you have to enter the New password and then enter the old password that you wish to replace followed by a tap on the “Save” option.
Tip of advice: – If you are unable to receive the code then you might be entering a wrong email address. For this, you just need to go to the “Recover your account” page and follow the on-screen instructions.
In a conclusive viewpoint:-
It is easy to change the Microsoft outlook password and for this, the steps are mentioned in the Blog Post. Hopefully, this Blog has helped you to reset or change outlook password. Visit Here - Office.com/myaccount
#Microsoft Outlook#Microsoft account#Office.com/myaccount#Office com myaccount#Office com setup#Office.com/setup
1 note
·
View note
Text
Fix "Office can't track down your License for this Application"
Over and over seeing a blunder message "Microsoft Office can't track down your License for this Application" while attempting to enact your Office membership? All things considered, a one of a kind initiation code is exceptionally important to enact your recently bought Microsoft Office item. Utilizing the initiation code, you can interface your bought membership to your record. Nonetheless, you probably won't have the option to enact your membership in light of the fact that "sppsvc.exe" couldn't run over your gadget. In this way, all things considered, you really want to make a move to effectively enact your membership.
What makes this mistake happen?
Presently, you should contemplate what this "sppsvc.exe" is? Indeed, this is a help that sudden spikes in demand for a client's gadget when he attempts to enact his membership. The assistance comes right into it when it needs to verify your Microsoft account ID with the item you have bought. In any case, some of the time, this confirmation couldn't be started and you eventually land up with this blunder "Microsoft Office can't track down your License for this Application."
Aside from that, you may likewise see this blunder message in the event that you have connected your item key to an alternate Microsoft account.
Continuing on, let us presently examine the courses through which you can dispose of this inconvenient mistake and return to utilizing your Microsoft membership by and by.
In any case, one thing important here is that the arrangements given underneath would possibly work on the off chance that you are utilizing a genuine rendition of Microsoft Office and not the pilfered one.
Managing the issue
1. Disable the similarity mode Since a clients had confronted this issue because of the dynamic similarity mode. Consequently, you ought to impair it and check for blunder steadiness. For this:
Find the Office arrangement document Track down the executable program and right-click on it Presently, click on the "Properties" choice Then, at that point, pick the "Similarity" tab Here, search for the "Run this program in Compatibility mode for" choice Deselect the checkbox present close to it Select the "Apple" choice followed by "Alright"
2. Restart the sppsvc.exe administration On the console of your gadget, press the Win + S keys In the given discourse box, enter "services.msc" and press "Enter" Explore through the rundown to find "sppsvc.exe" Then, right-click on it and pick "Properties" from the rundown To start the interaction, you should pick the "Begin" choice This choice can be viewed as under the "Administration Status"
While completing this interaction, it is a must that your gadget is running over a steady, secure, and high velocity web association. After the interaction closes, you should close every one of the opened windows and afterward restart your gadget.
3. Update your Office item For avoiding any obstacles during the actuation, one ought to continue to introduce its most recent updates. In this way, to achieve that, you should utilize the means given underneath:
Most importantly, restart your gadget Send off the Office arrangement by tapping on its symbol Presently, go to the "Document" menu and pick "Record" Then, click on "Update Options" Furthermore, pick the "Update Now" button Stand by without complaining until the interaction is settled
4. Repair Office To begin with, click on the "Begin menu" and pick "Applications and Features" From the given choices, pick "Office" Then, click on the "Change" choice Presently, hold on until the arrangement runs and pick "Fix" Followed by this, pick "Online Repair" > "Fix"
5. Contact Microsoft Support Go to the authority support site of Microsoft for example office.com/arrangement and pick the choice to "Get everything rolling." When you are associated with the help specialist, you may be approached to give your Order ID so they can affirm assuming you have bought your membership through the authorized means or not. After this, he will play out the important stages to get your Office membership to work once more. Here, we have effectively examined how you can move beyond the "Microsoft Office can't track down your License for this Application" blunder on your gadget. Attempting this multitude of arrangements individually would help you in your undertaking. Visit Here Office.com/myaccount and www.office.com/myaccount
1 note
·
View note
Text
How To Fix MS Office 365 Stuck On Getting Things Ready?
While introducing the new Office 365 adaptation, you might stall out on the screen. Numerous Office 365 clients have grumbled about an issue during the establishment cycle. As per them, during the establishment interaction of Office 365 a message "We're preparing things" is shown on their screen and they stall out en route to the establishment cycle. This is by all accounts a typical message from Office 365 however the issue happens when it continues to show the message persistently on your screen.
Along these lines, in the event that you are likewise astounded by this present circumstance, don't stress over it. Today, we are talking about what to do if Office 365 prepared stuck on getting things. This post will assist you with emerging from this stuck circumstance during Office 365 establishment. Visit Here Office.com/myaccount
Ways of fixing Office 365 stuck on preparing things
In the wake of getting Office 365 stuck issues during establishment, go through every arrangement individually that we have referenced underneath.
1: Try to run an underlying Office Repair instrument
In such a stuck circumstance you might have to fix record defilement issues on your PC. In this way, attempt to run the implicit Office Repair apparatus. To run the Office Repair instrument, utilize the means that are referenced underneath:
Explore to the inquiry bar of your PC
Type "Control Panel" and press Enter
Then, at that point, tap on Control Panel and search for Programs and Features
Presently, select the "Workplace 365" choice
Then, find and tap on the "Change" button
Presently, select the "Speedy Repair" device to begin the fixing system
When it finishes the interaction, check in the event that the issue is tackled or not
Note: After finishing the above advances the issue ought to be fixed. On the off chance that you are as yet confronting a similar issue, send off the "Online Repair" device to fix it.
2: Try to re-introduce Office 365
In the event that the Office Repair didn't address the issue, then attempt to re-introduce it on your PC. We have expressed the means that will assist you with finishing the re-establishment process.
Explore to Control Panel on your PC
Then, go to the Programs>Programs and highlights
Presently, select "Office Suite" and snap on the "Uninstall" button
Make a point to eliminate all the Office records (to do that, erase the Windows installer bundle)
Presently, explore to the pursuit bar and type %ProgramFiles% then press Enter
Then, erase the Microsoft Office envelopes and Microsoft Office bundle
Explore to the inquiry bar and type %ProgramFiles(x86)% to eliminate the Microsoft Office envelope also
Presently, send off the library manager and go to HKEY_CURRENT_USER\SOFTWARE\Microsoft\Office and erase the Office organizer
Then, at that point, explore to HKEY_LOCAL_MACHINE \SOFTWARE\Microsoft\Office and attempt to erase the Office envelope here too
Presently, explore to the Power button and restart your PC
Note: After finishing the above advances attempt to re-introduce Office 365 on your PC as it might fix the issue. Visit the Microsoft Office official site and adhere to the guidelines to download and introduce it on your PC.
3: Try to Run Office in Compatibility Mode
Running Office in similarity mode has assisted numerous clients with fixing the stuck on preparing things issue. Go through the means referenced beneath to run the Office installer in similarity mode.
Explore to the "Download" area on your PC
Then, at that point, right-click on the OfficeSetup.exe document and pick the "Properties" choices
Presently, attempt to really take a look at Run this program in similarity mode
Then, at that point, select the Windows type starting from the drop menu and snap OK
Once more, presently, right-click the OfficeSetup.exe document and pick the "Run as overseer" choice
Note: You ought to follow the means given underneath assuming you have previously introduced the arrangement document and you face this issue every so often; check the means out:
Explore to the arrangement record area and right-click on it
Presently, pick the "Properties" choice
Then, at that point, make a beeline for the "Similarity" tab and check the "Run this program" choice
Presently, click on the "Save" button to save the progressions that you have made here
Then, at that point, attempt to send off the Office installer as administrator
Check in the event that the issue has been fixed or not
To summarize, at whatever point you stall out while introducing Office 365 on your PC, you ought to understand what steps can assist you with emerging from this present circumstance. You might face such a circumstance when you didn't introduce your past Office 365 appropriately.
Here, we have referenced advances that will assist you with fixing the "We're preparing things" issue. You can attempt the Office fix device or run Office in similarity mode to fix such sort of issue. Www.Office.com/myaccount
1 note
·
View note
Text
How To Put Control On Outgoing Emails In Ms Outlook?
People who have used the Outlook application from Microsoft for years are aware that the app has no control over the time when messages are sent out. It's crucial to understand that Outlook's application will send emails instantly and isn't an ideal choice for a lot users. In this article, we'll examine the reasons why it's important to control incoming email messages in MS Outlook and how can you achieve this. Without further delay, we begin discussing the subject! Office.com/myaccount
It is crucial to have control over the email messages that are delivered via Outlook?
There are many reasons to not email immediately. Here are a few reasons to avoid sending emails immediately:
If you let the email to remain for an additional few days or even minutes, it will provide you with the opportunity to read the contents.
Certain conversations are between them and emailing without understanding what the answers are is not considered professional.
It is slower and stops playing the game of email tag.
It's quite easy to respond with an anger or rigid responses during the discussion. Giving the situation time to calm down the discussion.
How can you manage the email sent by the Outlook application?
There are methods to get in place a system of control over the emails that are that are sent through the Outlook application. Here are some ways to assist you:
You can deactivate the default settings: One of the most straightforward ways to find out when an email will be sent is to email the email to yourself, however you have to deactivate the email first:
Click to the "File" tab and select the "Options" and then choose "Advanced" in the window.
Under the "Send and receive" section click to the "Send/ Receive" button.
Check the 3 options beneath those settings of Group which are labeled by"All accounts" or "All accounts" option.
Choose the specific groups in the event that they are highlighted.
Click onto the "Close" button and then press the "OK" button.
Relay all messages come are in. Outgoing queue:
Click onto the "File" tab and double tap on the "Manage Rules & Alerts" button.
You can also select to select the "Manage Rules & Alerts" dropdown within the "Move" group on the "Home" tab.
Tap the "New Rule" button.
The Start rule blank section is where you have select"Apply rules to messages. "Apply rule on messages" option, then tap the "Next" button.
The wizard's window will appear, don't choose any option. The lower window will display "Apply This Rule After I Send The Message".
Select"OK" or the "OK" button without changing anything. Once outlook asks for confirmation, click on"Yes" to confirm "Yes" button.
Next window, and check in the "Defer delivery by a number of minutes" section.
Click on the link that says "number of minutes" and then type in the amount of time you want to count and click the "OK" button.
The link will display the minutes that you typed in.
Click onto"Next. "Next" option.
In the last window, provide the rule a name , and select on the "Turn on this rule" option.
Choose"Create a rule on all accounts" or "Create this rule on all accounts" in the event that this is what you're after.
Click on the "Finish" button and then tap the "OK" button when you are ready to make the rule.
It is quite possible that you'll choose to defer the delay.
A single message can be delayed If you're considering disabling automated messages , you can always defer individual messages. The process is very flexible. these are the steps you should follow:
Click on"Options. "Options" tab in the new window for messages.
Under the "More" options group, click on the Delay Delivery option.
In the Delivery options section, and set the date and the time that outlook will be able to send out the email.
If you decide to send the message prior to the time scheduled, simply remove your "Do not deliver before" option.
Send an email following connection After connecting: If of Outlook, you save messages to your "Inbox" when you exit the Outbox, Outlook that can send them out when you open it again Here are the steps you must take into consideration:
Click onto the "File" tab and then choose the "Options" and then tap on the "Advanced" button.
In the Send and Receive section, make sure to select on the "Send Immediately when connected" option.
Click on"OK. "OK" option.
In a conclusive viewpoint:
After reading this post we hope you're now familiar with the instructions which are outlined throughout this piece. If, however, you are not sure with the instructions to follow, then it is suggested that you go to this official web site, or the www.office.com/account for help and advice from the customer service team of experts on hand.
Read Also - How To Use Mac Recovery Mode? Www.office.com/myaccount
1 note
·
View note
Text
How To Use Microsoft Office For Free On The Web?
Are you in search of an alternative to not need to purchase Office application, but don't wish to spend money on it? Try opting for the free Office for the Web apps. The Office online application is commonly referred to as Office and is a web-based program which is accessible on the internet and is accessible via the browser. Office.com/setup
If you don't install it, you can still install the Office program on your PC simply tap on the cloud-based apps.
Instead of keeping your documents and files on your PC You can store them in MS OneDrive. The only thing you'll see within the Office for web apps that they do not contain any additional features. It's just the basic formatting and editing commands, but nothing else.
If you are looking for the most basic version of Office free of charge, then this article can help to get it.
What can you do to use MS Office for free on Web?
Within this article, you'll find the answer to using MS Office for free on the internet. Follow the step-by-step instructions carefully.
Log in to your Office account via the internet by visiting office.com/myaccount.
It is possible to build the Word document by using Office. Office application.
Open a file you've created with the Word application.
Then, click then the "List of MS services" button, which is at the top left. then tap on the app that you want to open.
The important thing to remember is that all the programs and files you've created are available online, and they are accessible via the devices connected to them or on your own devices.
In a Conclusive Viewpoint:
We hope this article will help you Use Microsoft Office for Free on the Web. If, however, you encounter any issue or interruption between the steps, then we suggest that you visit Microsoft's Microsoft official Microsoft website. For assistance, you can seek help via the help desk for customer support who are on the official Microsoft website.
If you've read the article I'm guessing you're aware what is the Microsoft Office Product Key along with Redeem Microsoft reward points. If not, take a look at these articles.
1 note
·
View note
Text
How To Check Your Mac For Viruses And Malware?
Computers and laptops are prime targets for malware and viruses. Online malware and virus attacks are major threats in the age of digitization. No matter whether you're a Mac or Windows user, knowing how to spot viruses on your device will keep you safer. In blog will provide some insight on How to check your Mac for viruses and malware.
You might be wrong to think Mac devices don't need protection. Mac devices are at risk of being infected by viruses and malware. Knowing how to identify and eliminate viruses and malware will help you protect your data. Mac users are experiencing panic due to rising online threats and scams. Apple's malware detection and file quarantine have always been a great help in protecting the device. It is a smart decision to have an extra layer of protection. Our experts will show you How to check your Mac for viruses and malware. tap on Microsoft office website at office.com/setup
How to find out if your Mac is infected by Malware or viruses?
Let's take a look at the steps to determine if your device has been infected by malware or viruses before we move on to the next step. Mac devices are programmed so that they can detect any virus or malware. The most obvious sign is slow device performance. When your Mac is infected by Virus, you will experience the following symptoms:
The system is getting slower.
Changes browser homepage.
Access to files or data is restricted.
Pop-ups and ads that are not necessary are popping up all the time.
Extensions can be added without permission.
Regular security alerts.
These will allow you to determine if your Mac has been infected by malware or viruses. But don't panic. There are a few ways to scan your Mac for malware or viruses.
How to check your Mac for viruses and malware
Technological advances are occurring everywhere. The way we view device protection has changed dramatically in recent years. It is long gone a time when the entire and only focus was on s=computed protection. Malware and viruses are increasingly infecting Mac devices. Red flags are indicators that the problem is located and the source. Our experts will be discussing How to Check Your Mac For Viruses or Malware.
Manually scan Mac
There are two methods to scan. The first is automated, the second manual. We will now discuss how to manually scan your Mac device. These are the five things you need to remember:
Inspect Browser Extensions
You will need to inspect the extensions in your browser. This will allow you to identify browser hijackers and unwelcome extensions.
Navigate to Preferences > Open Safari
If the URL is not correct, check it and fix it.
Go to Extension tab > Uninstall any unwanted extensions you did not add.
These extensions could spy on your data and access your files.
Remove Doubtful Login information
You must also remove any doubtful login credentials. You must delete all information that causes problems with the Mac's performance. These are the steps required to accomplish this task.
Go to Apple Menu.
Open System Preferences.
Select Users and Groups
Select the Login Items option.
Check all boxes.
Downloaded Files and Folders
Clear the downloaded files. The most common source of viruses on Mac devices is the.dmg file. Clearing the downloaded files, including.dmg, is a smart decision. These are the steps you need to take in order to accomplish this task.
Navigate to the Finder.
Choose Downloads
You should delete any files or folders you believe to be dangerous.
Uninstall Doubtful Applications or Programs
You should uninstall any programs or applications that you don't recognize. These programs or applications could be the cause of viruses on your Mac.
Navigate to Go first and then enter Applications.
Check the list for suspicious or unwanted apps and remove them.
Don't forget about to empty your bin.
Visit Here -:
office.com/myaccount and www.office.com/setup
0 notes
Text
Why Microsoft Surface Go 2 is a good choice
Microsoft Surface Go 2 was created by the developers of Microsoft Office products. It is a slimmer, faster, more durable, and longer-lasting hybrid tablet. The Surface Go2 has all the shine features, including a larger display and slimmer design. It also offers better performance and is affordable at $399.
The Surface Go 2 might not be as popular due to Coronavirus. This is something to consider.
The 10.5 inch display is great for viewing content. The tablet's portable design is easy to use and feels great to hold.
The battery life is at full power, so there's no need to worry about it while you work on it. This Surface device is superior to the iPad Air, and you might want to reconsider spending more on it.
Configuration options and price
The MS Surface Go 2 can be purchased for $399. The Wi-Fi model comes with an Intel Pentium Gold 4425y processor and 4GB RAM. Double the RAM storage can be purchased for an additional cost.
Design
While the MS Surface Go 2 may look identical to the original Surface Go, there are some minor differences that should be considered. However, the MS Surface Go 2 has some significant new design features.
Device ports
The MS Surface Go 2 has the same number of ports as the older models. There will be a USB-C input port and a docking port, as well as a connector port for charging and docking.
Display features
The Microsoft Surface Go 2 screen has been increased to 10.5 inches from its original 10 inch size. The screen upgrade is minimal, but viewers are always happy to see an extra screen, even if it has no effect on the cost or portability of the device.
Surface Pen
This tablet will help you create digital drawings if you are an artist. The MS Surface Go 2 S Pen costs $99 and allows you to take down all the notes.
Audio effects
The dual speakers surround the display will provide perfect sound quality and no distortion.
Cameras
The front camera will take selfies and will have a 5-megapixel sensor. On the rear, you'll find an 8MP lens. Both cameras capture 1080p video with sharp images.
Windows 10 Home in S Mode
The MS Office Store apps will not be available to you, but you can still access Windows 10 Home.
conclusive:
I hope this article helped you make an informed decision about whether to purchase the MS Surface Go 2 tablet. The MS Surface Go 2 tablet is made of premium magnesium and can be carried in a stylish, yet elegant way. You will also get a beautiful display and an IR camera for Windows.
Also Visit Here -
Office.com/myaccount
Office.com/setup
0 notes