
Statistics
We looked inside some of the posts by officialcanvasproject and here's what we found interesting.
Average Info
Notes Per Post
1
Likes Per Post
1
Reblog Per Post
0
Reply Per Post
0
Time Between Posts
10 hours
Number of Posts By Type
Text
3
Audio
11
Video
3
Last Seen Tumblr Blogs


Fun Fact
US Tumblr user growth rate is estimated to slow down to 4.1%.
Text
Is it expensive to make music?
Personally I think this can be answered both ways. I have spent the majority of my disposable income going towards various VSTs and Plugins and music equipment. But what do you actually need?
In my opinion the 2 essential things you need to get into music production are: a Digital Audio Workstation (DAW), any kind of device capable of running it (such as a pc, laptop, phone). The majority of people already have a smart device or desktop pc so it is just a matter of finding a DAW to use (2 of the most popular being Fl Studio and Ableton Live). Personally I use Fl Studio Producer edition which will set you back £142.51. However there are many free alternatives out there: Cakewalk and Reaper being popular for PC and Garage band being the most infamous for IOS - straight away, without paying a penny you already have a piece of software you can make music in.
If we talk about peripherals, things such as interfaces, mics, monitors, headphones and midi controllers it gets more complex. There is a huge market for all of these items and the price range for each is very different. I bought the Focusrite Scarlett 2i2 Studio Pack as that came with an interface, mic and studio headphones all for roughly £229.00 (making my total so far £ 371.51). You would have to so some deeper research but I saw cheaper alternatives for each item individually going for roughly £30. Anything extra such as monitor speakers, a midi controller or even sound proofing ins’t necessary to create the music itself, but can help improve workflow and quality. As my main instrument is the piano, I use a Yamaha Arius ydp-163 as my midi controller. The Decksaver Akai MPK Mini Mk2 LE is a popular low budget midi controller, they both are used to input midi data but are not vital in order to create a piece of music.
The main plugins I use are Serum, Omnisphere and Keyscape. Those alone will set you back £762.36. Do you need only expensive plugins in order to make quality music? Some people would disagree with me but I don’t think so! You are defiantly paying for quality when you buy luxury plugins, however for everyone one of these plugins I mentioned, there is a free alternative! Serum is a popular FM synthesiser which I use to dive deep into sound design and create my unique sound, however plugins such as Dexxed and Helm exist which are free and have similar features. Omnisphere is also a synth but is best known for being a large library of over 15,000 sounds. TyrellN6 by u-he often gets mentioned as an alternative but I feel like synth1 (+synth1 librarian to get better search functionality) is one of the best free VSTs out there as you can find over 25,000+ presets free and ready to download online (10,000 more then Omnisphere). Keyscape is a luxury piano collection of some of the most sought after pianos in the world, but if you are just looking for a nice, realistic piano you could download LABS Soft Piano or Keyzone for free! This is only VST instuments, I haven’t even mentioned the huge amount of free effects you can get from TAL, Maudio and everything that comes stock within the DAW itself! The website VSTs for free is literally dedicated to all these free plugins you can download and use right now (my personal favourite being a VST emulation of the Casio V1 of course).
Like I mentioned in my post talking about Rain and Windchimes, where we made use of the free VST known as Meow Synth, all you really need to make music is an imagination.
1 note
·
View note
Audio
The 3rd concept for my solo project is also similar to the previous post, however there are some differences. The commission was to create a piece of music which could serve as a theme song for a character! I was given a short description of the personality of the character and a rough idea of what they had in mind then I was free to create whatever! This felt much more free then the previous piece as it was less routed in a certain genre and meant I could incorporate my style more.
I feel like explaining how I created this one ruins the whole point of why it was created! It serves to identify the personality and traits of the character in audio form, so I will leave it up to your interpretation.
0 notes
Audio
The second idea I had for my solo project was to open commissions! How this differs from the previous post is due to the fact there would be a more specific criteria of what I’d need to make. In this example I was asked to create a piece of music for an animation - I asked where the scene was going to be set, what kind of mood were they aiming for and I asked for any reference pieces I could listen to to compare.
This example I was tasked to create a piece of music for a Diner scene where the tone was suppose to be sad and sombre! I looked into diner style music and created something I thought was akin to that but had more character and a unique flare to it. Most diner music i found heavily featured the piano so I made that the whole backbone of the track and decided to only add a few other elements which come in to add ambience.
This style of production is less to show off my own personal style, rather to show the more theory, instrumentation, arrangement knowledge and ability to research and follow a specific topic according to a given guide.
I hope to open music commissions soon. I have already been asked to work on another animation focused around the Italian Mafia which I have begun researching and I’m excited to get started on.
0 notes
Audio

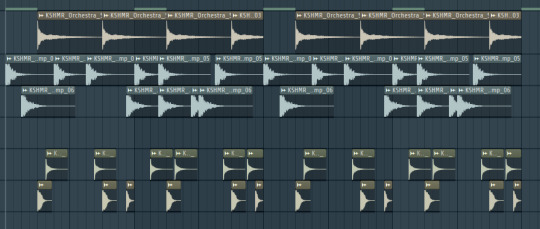
One of the ideas I had for my solo project was to home in on a specific topic and create a piece of music where the end goal is for it to be royalty free and available for people to use in their documentaries, games, videos or whatever they wanted! For this track I took heavy inspiration after watching some documentaries and videos on space, so I wanted to create a soundtrack which evokes those feelings.
I wanted to create something that gave off an ambient, floating and empty feeling so I made use of the deep library of sounds within Omnisphere to give me a set of pads and strings which were rich, textural and full of life and character. Those few sounds layered up with a simple, thick bass gave the exact feeling I was going for. Other details I added were free space ambience samples and sound effects I found online to fill up the empty space, and most interestingly some samples from actual recordings from space - this lends a sense of authenticity to the sound you are hearing. Also to note is the use of the piano playing what I’d refer to as a “beeping” or “alarm” melody where it plays at a high register and sounds like some kind of alarm or beeping device. This can be heard in the famous Interstellar main theme composed by Hans Zimmer, which is where I took inspiration.
The second half introduces a fast arpeggio and strings and is all there to add to the epic, euphoric feeling. It ends with just the piano and the space ambience playing - this contrast from the previous sections is there to illustrate the epic scale of space but also to show the large and vast emptiness within.
This is something I hope to continue more with different genres so I can have a large portfolio of specifically curated and themed pieces of music for a variety of uses.
0 notes
Audio

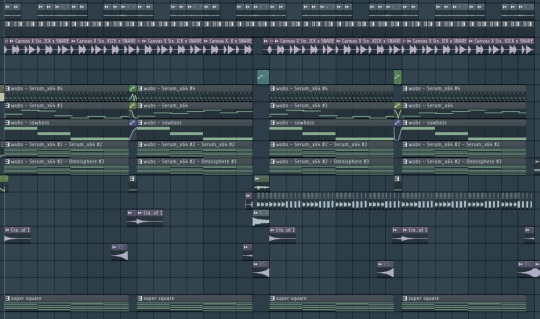
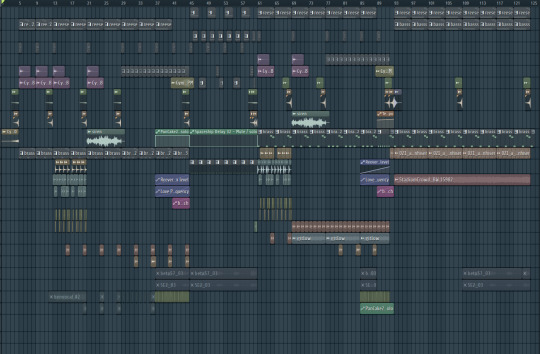
Like I mentioned in my Broken Mind post, I mainly focus on chill genres of music - I enjoy all types of music, just haven’t branched out much. My friend Launch Six is known for his heavy dubstep style music so when we started working on a collaboration, I was interested to see how it went. Like the previous track I spoke about, this is also unreleased and has been submitted to a label!
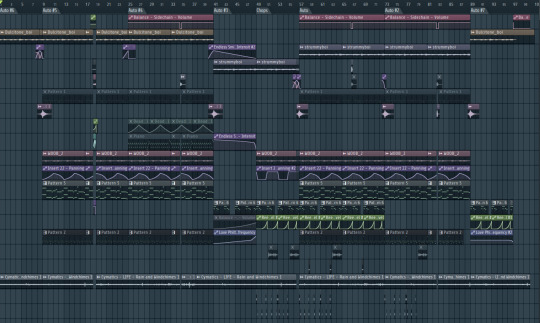
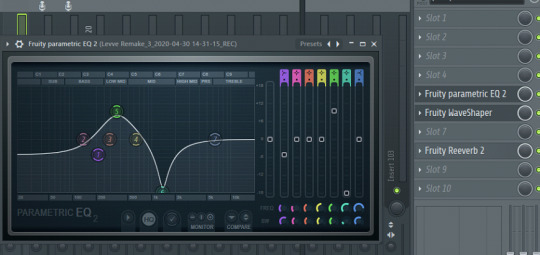
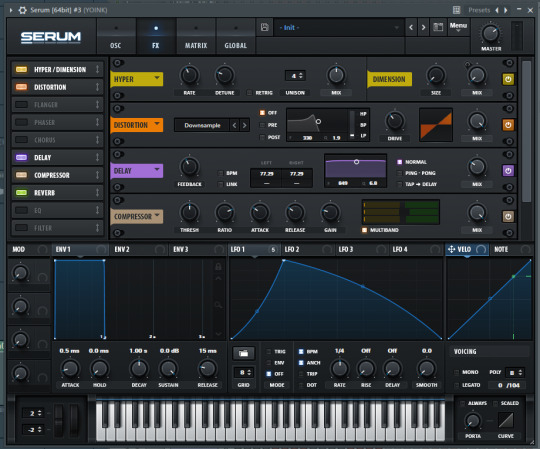
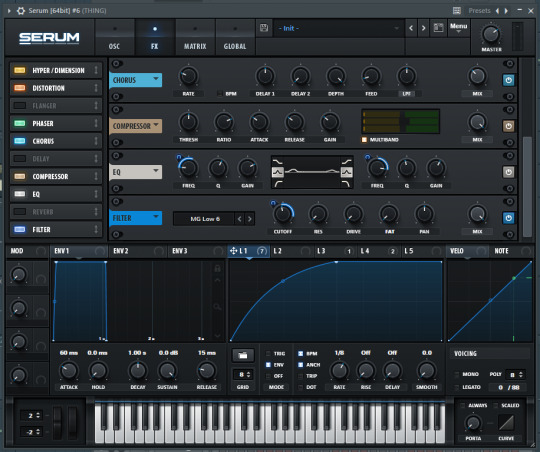
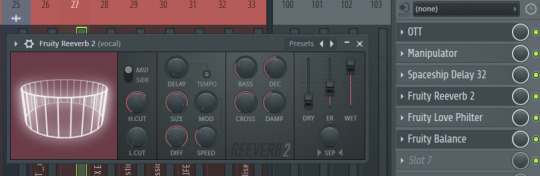
I wanted to talk briefly on all the sound design I created for this track - creating dubstep heavily relies on having a unique sound that sets you apart so I made the effort to not resort to presets and samples where possible. The main sound in the intro is a weird, breathy vocal like sample which I created using a random acapella and a very obscure plugin called “DtBlkFx” which has a setting that blurs all the audio together and creates a sound similar to a reverb wash but much more evolving and textural. I resampled and rearranged it to create a new melody. Here is the processing I applied to further shape the sound:

(essentially multi band compression and distortion to bring the sound up, reverb and delay for space, EQ to mute it slightly and finally an LFO to give the rhythm). I allowed myself the use of 2 soundscapes from Omnisphere which were used to add atmosphere. When the beat comes in, a deep reese bass also comes in. Reese basses are very characteristic of my style, along with the vocals, but there is a much bigger contrast in tone between this and some of my other tracks. I always try to make each slightly different and in example I used an LFO to control a lowpass filter cutoff at a rate of 1/4, and boosting the resonance gave a more desirable tone when distortion was added. It plays a simple patter where it slides between octaves.
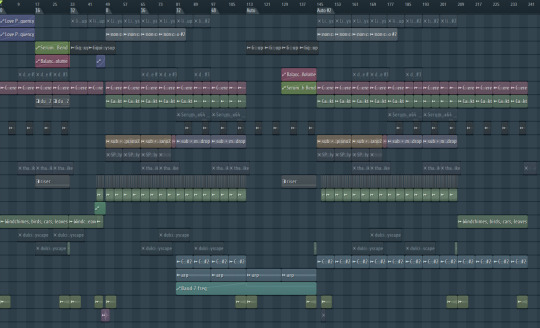
Launch worked on the first drop while I focused on the second. My sound design for this was rather similar to the sound design in Wait For You: supersaws layered with a choir, thick saw bass and legato saw lead. To fill out the drop I also added a super square and a fast bit crushed square pluck arpeggio.
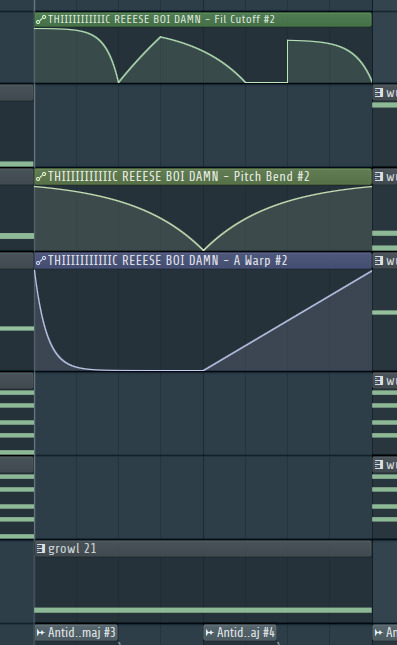
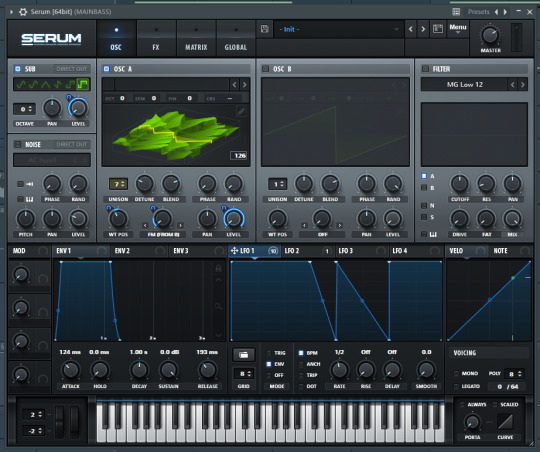
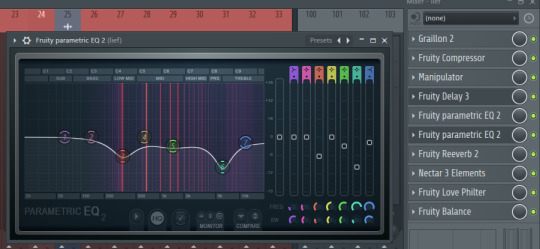
The interesting sound design comes in the growl basses. Serum allows you to import samples with many different import methods - the one I chose allowed me to import a sample of an already existing bass to create a wavetable which has the same sonic characteristics as that sample. It resulted in an already gritty sounding bass but I wanted to manipulate it further. I added all the standard processing of distortion, dimension expanding and multiband compression to start. The sound gets its shape from automating the filter cutoff, warp mode amount and pitch bend which you can see happening here:
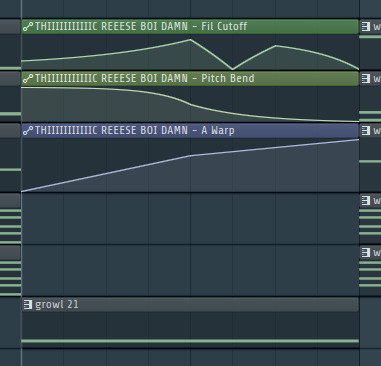
The second growl is the same patch as the first, but changing the automation drastically changes the sound.
0 notes
Audio
Working with Single Purpose (SP) just shows another example of 2 styles working well together, and the switch up in genre from Lofi to Liquid DnB helps keeps it sounding fresh and new between my releases. This hasn't been released yet as we are planning to submit this to a label.
I can briefly talk about my contributions to the track and the process it took to get made. Like my track with Tw3lv3, it began after talking to SP about ideas and sending him the solo piano section you hear in the preview - this was then the basis which we built the track around. Together we built the track up: He focused on the drums, overall structure and adding textures in the form of pads and voices while I worked on the melodic details, transitions and vocal chops. He’s also said how you can hear our two styles throughout the track and how they work together. His aggressive forward pushing drums and complex evolving baselines work to fit with, but also contrast, my soft, bright piano and angelic vocal chops and all together create an epic sounding arrangement.
We wanted this track to sound happy and hopeful. The heavy use of evolving pads and euphoric vocal samples creates this uplifting and floating sensation for the listener, which is why we named the track Ukiyo! The word “Ukiyo” is a Japanese term which means “floating world” and we thought this fit perfectly to go with the vibe of the track.
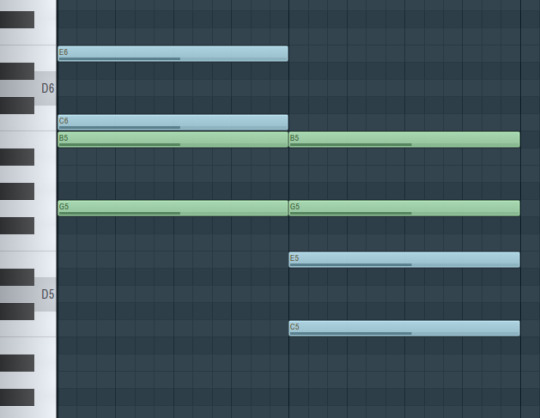
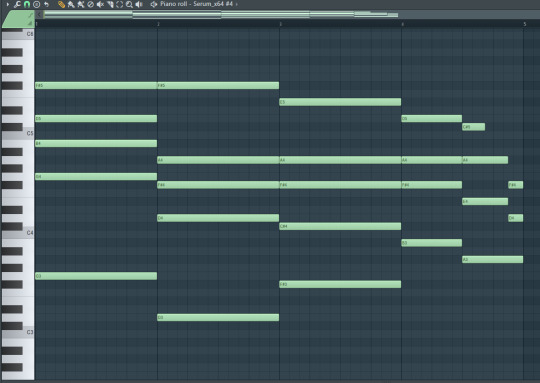
One notable bit use of simple but effective music theory can be heard in the sections where the piano drops out of the drop. Here you can see the main chord progression:
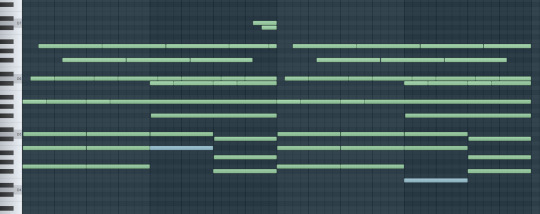
The first half is what is played by the piano throughout the intro and drop. The second half can be heard in the drop portions without the piano. The only difference between the 2 chord progressions is highlighted in blue where the B moves down to an E. The standard chord progression is Gmaj, Bmin and F#min - moving the B to the E in the second chord changes it from a Bmin to an E7(sus2) to create a more sombre and dark mood while played in isolation, but in the context of the overall chord progression, helps creates a more positive sounding resolution. Despite our struggles to get this to work practically, I’m happy we managed to include it.
0 notes
Audio
This track was created for the Vibeponiez label’s album “Skyscraper.” This was my first official released collaboration with another artist! Tw3lv3 is know for her smoothing lofi and recognisable style throughout all her tracks and combined we created a track which blends our styles together seamlessly.
The track came together after I sent Tw3lv3 the dulcitone keys section which can be heard in the intro and which is the main theme of the first half. Tw3lv3 then made a basic beat and we developed it from there. This was a new way of working for me, having to send stems and project files back and forth until we get a completed track!
The intro starts with the keys, beat and an almost vocal sounding synth I created in serum. This also uses a similar technique as mentioned in my bass design post, having an LFO gradually automate the wavetable position in order to give each not a different timbre (it also slides between each note and has an added tape delay to add to the retro feeling). Also present in the background through the entire track, in order to make it feel less empty, is “rain and windchimes” ambience which is where the track gets its name. To get this laid back feeling, Tw3lv3 played the drums in live - this adds to the grove and helps it feel less robotic by not quantizing everything to the grid. I did the same for the keys for the same effect.
To make the track more detailed and complex we used automation often. The first instance being right at the start where we automated the keys to duck down and swell back into the beat. Subtle panning can be heard on the synth as it softly sways from ear to ear and tape stops can be heard which all add extra “ear candy” to the track. Something this track is characteristic of is the repeated times the beat stops and plays a unique sample. The first time this can be heard is when a filter is applied to the keys to make it warble quickly before returning to how it was before - as we removed all the other elements, including the ambience, this makes the listener focus on that specific thing and makes it more impactful when all the other elements suddenly return. This is repeated 3 other times in the track but with different samples in order to not sound repetitive or generic (which include 2 different vocal samples and what sounds like a cute dog toy squeak).
The second half transitions with a half timed and more arpeggiated version of the keys playing at a lower register - this brings the vibe down to a slightly more sombre level and subsequently makes the brighter ending feel brighter in contrast. Tw3lv3′s and my style working so well together is best illustrated in this section - while her style is notable for the complex, yet soothing drums and very specific and intelligent sample choice and manipulation, mine can be characterised by the reliance on a strong keys focus and unique vocal chops. This final section is the amalgamation of all of these details together. I used a different method to create these vocal chops compared to my WIP remix, choosing to use the plugin SliceX to cut and organise the vocal for me automatically. Doing it this way allows me to input a midi signal and control each chop per note, meaning I can use my piano skills to more creatively come up with new patterns. The standard reverb and delay were applied to make the sound fit better in the mix, but like every sound we made sure to add little details for extra flavour. For the vocals I added the same reverb swell technique I’ve mentioned previously, to make each phrase softly flow into each other and finally rather then using an actual tape stop plugin, I got the same affect by simply automating the pitch of the last note to go down.
The vocals can later be heard in the second section where I pitched them up and drowned them with reverb so they just added more ambience and brighten this section up.

There is also a secondary piano which can be heard sometimes. It has a weird dreamlike feel to it which was achieved by having a faster arp style play style and using a popular plugin called “Gross Beat” to halftime it (meaning it basically slows it down without affecting the time signature or chord progression). Panning was also added to give it movement.
The track ends with the vocals playing with the keys as a cymbal swells us into the ambience as it ends. A detail we added for the end is a secondary synth playing the same pattern as the secondary keys - what started as a joke (as the synth we were using is a free VST called “meow synth”) turned into one of my favourite elements of the track. Adding a lowpass filter, which opens and closes in time with the melody, made it sound really unique and just goes to show you don’t need all the most expensive equipment and plugins to make good music if you can use your imagination.

Like most my tracks, I mix them as I work through them rather then doing that all at the final stage. Mastering was different this time however - for all my tracks I master using either Maximus (an Fl Studio stock mastering plugin) or Ozone (a mastering plugin by Izotope). They both have different capabilities but I prefer Ozone for it’s auto-master function, stereo width controls and how easy it is to turn it into a mono signal. However for this track Tw3lv3 introduced me to another plugin known as “Grand Finale” by Klevgr - it features knobs to easily control compression, multiband compression, I/O, stereo, bass/treble and it features a limiter. It helped bring the life into the final version of our track. Other important plugins I use when finalising my tracks are the Youlean Loudness Meter and Span frequency analyser - these don’t affect how my tracks sound but they help me compare the loudness value and frequency content in my tracks to others in the same genre.
0 notes
Video
tumblr
One of our tasks was to create all the sounds and perform them live for the short film “The Black Hole.” This included all the sound effects and Foley, creating a soundtrack and sound designing the black hole. I was tasked, along with Ben and Tommy, to create the sound track which plays throughout.
The short beings with a title screen. To immediately create a sense of unease in the listener and to foreshadow later events surrounding the black hole, I play a C major chord which is being accompanied by arpeggiated notes which make up a C augmented chord - this cases a lot of tension as the only note difference between these chords are the G and the G#, creating a dissonant and dark sounding opening. Also as the note G# is outside the scale of Cmaj, it amplifies this dissonance and gives a sense that something isn’t right.
It then transitions into a more audibly rich section as piano chords play alongside a drum beat and guitar. The vibe we were going for was almost akin to elevator style music, where it isn’t overly complex and just serves to represent how the man feels. We can see on his face and movement that he finds his job mundane and tiring, so we wanted to translate this into this section in the music. Firstly, we chose a slower BPM of 85 to symbolise the mans lackadaisical approach to his work and kept the drum beat simple to create this idea of repetition. The guitar is being played with a descending pitch modulation which gives a very sombre, falling feeling in the listener. The piano plays simple chords:

I’ve mentioned in a few previous posts about how I regularly make use of major 7ths and 9ths to create a melancholy feeling, this was no acceptation. Something new however is the use of chord inversions. Final chord plays a G, B,C and E. B and C are next to each other in the scale of Cmaj and when 2 notes are played like that together it creates slight dissonance. However, when you hear that within the context of a chord it adds an extra level of character and flavour to the chord, in this case the chord is more positive but has a slightly different feeling then simply a major chord. Not coincidentally then, G, B, C and E are all notes which make up the chord Cmajor7. We can compare the 2 chords here and see that simply the C and E have been moved up an octave:
As C is the root note, this inversion of a Cmaj chord makes it feel like both a stable and rooted chord, while also having a dissonant feel towards it.
Followed by this is a leitmotif which is used to represent the black hole (and can be heard again at the end of the short). This helps give character to the black hole and show it’s greater significance. This is a technique which can be heard in Star Wars, the character Darth Vader has a very recognisable theme which always plays when he is introduced, on screen or even mentioned by another character.
The black hole’s sound comes from a Moog synthesiser, however I processed the sound further to create a harsher sounding texture. I used many of the same techniques from my bass designs post, primarily distortion but also adding filters and reverb for width. I controlled the shape of the sound using a balance control. This allowed me to choose when I wanted the sound to play - I decided to only have the black hole make sound when it is being interacted with, as you can hear the sound gradually increases in oscillations as the man gets his hand closer and closer. My favourite part is when the camera angle is placed in the perspective of the black hole, so for those times I chose to leave the balance fully open to give the sense we, as viewers, are the black hole and are hearing what it hears. This works especially well as when it cuts to the view of the man outside again, it instantly goes silent.
The final section has the man gradually descend more and more until he is overtaken by his desire for money and power when we see him stealing form the company safe. This is started when he gets the idea, where I used a chord flourish to emphasise his movement and show he has an idea. The section then transition into the same piano, drums and guitar setup as before, only more hellish and corrupt sounding - the piano is once again focusing on this augmented interval sound while the guitar has little tonality to it at all. This all gradually increases in tempo to build the tension but to also represent the man himself - his movements increase in speed as he races to get all the money and from this we can determine his heart rate is most likely increasing also, both of these get amplified with the speed of the soundtrack increasing.
When the paper falls everything cuts out. Silence in music is often used as an impactful thing, to make the viewer focus on what has happened on screen rather then tell them how to feel about it. The short ends with the camera slowly panning away from the safe, the same leitmotif playing again, possibly implying that this was the black holes intention all along...
0 notes
Audio

I produced the remix which can be heard in the BLT One shot video in my previous post. The only requirements I had for this remix were to keep it in the same key and tempo.
The only elements I used from the original track are the guitar loop and the backing vocals. The only other elements are the drums, 808, keys and some transitional effects and fills.
The drums feature a stompy kick and a snappy snare with some extra Foley percussion to add extra grove. I was going for a “hype” style so tried to create a lot of energy where I could. The 808 bass is over driven and aggressive and focuses on the root note of G, giving the whole section a lot of stability while pushing the track forward. There are 2 sections where the pattern changes, this was to make it feel less static and add some variety (but also add sudden extra high frequency content which helps add to the hype).
A drum fill transitions us into the breakdown section. I chopped up the guitar loop into a new pattern and automated a lowpass to open gradually, building tension for the next section. A blues style piano solo is the main focus on this section - I added this as a nice contrast to the harsh trap beat it accompanies, but to also share a connection with the original song and merge the 2 genres together in a unique way. Also in this section are some backing vocals - as you can see there is a duplicate of this on the playlist, one is the original vocal and the other is the same vocal pitched down an octave. This gave this section a much darker feel and, with the added reverb and delay, made it more dreamy.
The remix ends with an aggressive DnB loop that fades in paired with a train whistle. Ben gave me this idea and I think it’s a slightly comedic but good way to transition between sections and add a touch of context from the song.
0 notes
Video
tumblr
We were tasked to create a Video which could be used on the College’s website in order to specifically highlight the music department.
I had the idea to create a one shot video, where the camera starts in one location and goes round the music department, into various rooms, to show off the facilities we have to offer and the different skills there are to learn. The song choice was an original called “Blue Line Train” which we recorded in a previous session and overdubbed for the video.
We setup speakers in every room with a mixing desk playing the completed mixdown for the entire take. This helped us line up the video with the audio during the editing stage but also meant the live performers knew when to play.


We tried to fit as many points about the music department in general and the course as a whole into the video to show how much we prevail over other college’s facilities and to encourage people to come here. Some of the main points were to show the spaces we have for both live performance and music production (including the performance stage, practice rooms, beat suites, live rooms, vocal booth and recording studios) and to show the large amount of top quality equipment we use regularly (such as both the analogous and digital mixing desks, broad range of guitars, amps, speakers and even the grand piano).
We show these off by including the band practising on the stage in the intro, a guitarist playing solo in one of the practice rooms, an engineer recording a vocalist in the vocal booth, 2 pianists playing on the grand and electric pianos, beat production in the beat suite and finally a full live performance with lights and the full setup.
I worked alongside Ben to help produce and edit the final cut. We wanted to create this sense that we were actually moving between each room, to achieve this we automated some slight reverb and a lowpass EQ to fade in and out as the camera moved in between each room. There is a section where it transitions into a trap music style breakdown, this was to highlight the beat suites and entice the producer focused students into considering the course. I will go into detail on how I produced this remix in my next post.
0 notes
Audio
We were tasked to create a Protest song on any topic we wish. Tommy and I decided to be more general with our topic and look at recent news and important impactful events. The idea was to have a rather soothing instrumental which was juxtaposed to news clips talking about real world issues.
We sampled Various news reports, speeches and documentaries detailing various subject matter including: Climate Change, Brexit, Politics, Football Racism, Terrorism. We also sampled various World leaders such as Donald Trump, Jeremy Corbyn, Barack Obama and Boris Johnson.
The song starts with a piano, playing a descending chord progression in A major - This was to help give the listener mixed emotions, creating a sombre feel. The first half of the song has more negatively focused clips, this was to immediately make the point about what we were trying to say and to display all the topics we thought needed the attention. I added a delay effect to all of the vocals, firstly to add a dream like feeling and to give them a better place in the overall mix, but also to help emphasise each point that’s being said - as I set a longer feedback, you hear multiple repeats of the sample which makes it stick with the listener and reinforces the idea in their mind. In a later section I remove all instruments and only leave the vocal delay to ring out, this focuses on the point being made specifically which again will reinforce the idea.
One of the most significant parts of the song is the main chorus. I sampled important world leaders and politicians and manipulated the clips to rearrange them into new phrases. The first half has Donald Trump singing a duet with Jeremy Corbyn where they sing “I love rich people, and I’m not afraid to say so.” This was to make a statement on how there are people who own millions and get better treatment while there are still people in the world who have nothing, not even clean water. The second half of the chorus has a sample of a news reporter asking the question “Can the country trust you” followed by clips of Donald Trump, Boris Johnson, Theresa May and Jeremy Corbyn all saying “No” in succession. I used members from different political ideologies as to not show bias. This phrase was to highlight the lies, corruption and deceit which is constantly ongoing within politics.
I wanted the song to end on a positive note, compared to other protest songs it has a much more optimistic tone to it while others usually just remark negatively on a single topic the entire time. To achieve this change in tone I selected more positive clips and news reports. I found clips of Jim Carrey and Russel Howard talking about the impact comedy has on a person, which helped bring the mood of the track to a more positive place. I also chose a famous speech from Obama about perseverance and an interview talking about the English football team rising above the racist abuse they were receiving and winning a match. I did the same delay trick as previously mentioned, this time focusing on the word “Impact” which I thought had good significance. The song ends on a major chord to symbolise this optimism and the overall timbre feels much brighter - this is due to the addition of the Kalimba playing an arpeggiated counter melody, adding extra high frequency content and making it feel less sombre.
0 notes
Audio
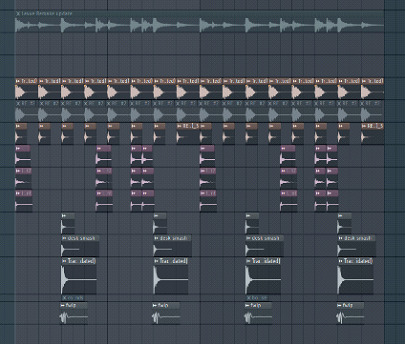
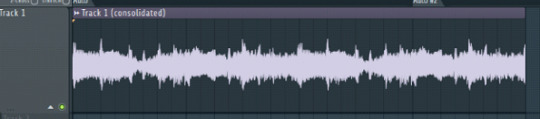
This famous Beastie Boys Song “Rhymin' & Stealin'” famously samples Led Zeppelin's "When The Levee Breaks" and also Black Sabbath's "Sweet Leaf." I started by trying to recreate the famous intro drums for my remake.
The first thing I did to recreate the drums was record various objects I could find in my house that I believed would, when excited, would give the same sonic characteristics as all the different drum parts. I started with the kick – I searched for objects with a wide surface area, thin material thickness and hard surface and the final kick is a layer of 3 recordings all together. The first is a layer of me hitting my old desktop PC case with an open hand – I added an EQ to cut some of the mid-range and boost either side to get rid of any muddiness. The second layer is the same PC case, but I decided to hit it with a closed fist, to get more of a deeper impact sound. I EQ’d this separately, removing most of the high frequency content and boosting the lows significantly. The final layer was a plastic printer top I struck in order to act as a transient for the kick – I cut the lows and added a resonant point to slightly bring out a defined peak.
The snare is made up of 4 layers: a clap sample I recorded, the sound of me punching my wooden desk, the sound of me striking a metal cylinder full of coins and finally the sound of me swiping my hand over a surface to create a “swoosh” sound. I was more creative with the sound design for the snares – I started with basic EQ by cutting some low end and boosting points to get a tone from the snare which resemble the original. I also achieved this by using a frequency shifter to change the timbre of each element and a transient shaper to make it stand out more.

The cymbals were an assortment of recordings of miscellaneous Foley I recorded from cutlery from my kitchen and layered up. I cut out sections with good transients, added a transient shaper and finally an LFO to more harshly cut up the sample at a rate of 1/4.
Once I had created all the individual sounds, I arranged them in the same pattern from the original song. I set the tempo to 141bpm and consolidated each drum, which allowed me to place a single audio file on the correct beat and have it in time. The final thing I did was create the signature delay sound effect that’s present in the original – I did this by creating a delay send and sending all the drums to it. The delay was set as stereo, no panning and a delay time of 2:9 with tempo sync – not having it on a perfect 2:0 created a subtle shuffle feeling which I could sense in the original. Finally on the master: I compressed the drums, added a slight EQ to bring the timbre more closer to the original, a convolution reverb plugin with an impulse response of a stairwell to try and match the space of the drums and finally a second convolution reverb with the impulse response of an old microphone to simulate it being recorded on specific hardware

I next set out to sample the guitar from “Sweet Leaf.” First thing I did was cut the guitar loop out of the sample and fit it to tempo.
I then used an EQ to try and remove some of the lower kick and snare frequencies from the sample, in order to create space for the other kick and snare that gets added.
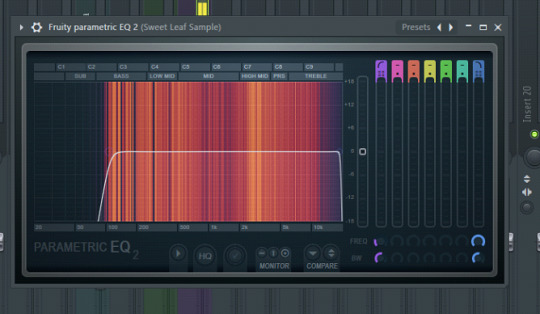
Comparing this loop to the same loop in Rhyming and Stealing, I can hear more overtones in the guitar which implies it has been distorted a lot. The effects chain I used for the guitar was: The initial EQ to remove those kick bass frequencies and to make it less muddy, Waveshaper distortion to give it more presence and add overtones, an Overdrive distortion to distort and highlight these overtones and finally secondary EQ to remove any muddy frequencies that were created during the distortion.
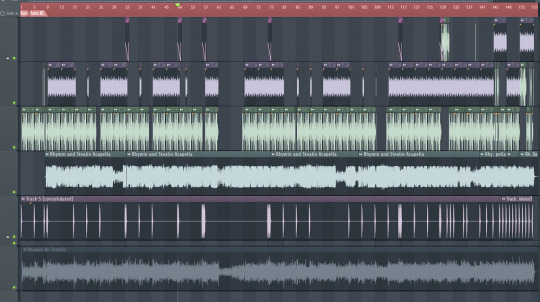
To create my remake, I first started by collecting all the samples I had. I set the host tempo to 152 (the bpm of the original song) and dragged in my edited Sweet Leaf guitar loop. I then dragged in my original Levee drums loop and tempo mapped them both, so they played in time. The original Levee song is in 141bpm meaning I had to increase the speed of the drums to fit. Finally, I dragged in the Beastie Boys acapella and the original song, Rhymin’ and Stealin’. One all the samples were in the project I began to arrange my original samples to mimic the arrangement in the original track, using the acapella as a base to work from and the original song to help me know what I was arranging. The song starts with 8 bars of the drums and ends with a drum fill – there are multiple drum fills throughout the song and I recreated these by chopping up and rearranging the individual drum hits to create a new pattern. Other things to note about the arrangement is the fact the guitar and drums drop out in certain places, leaving only the vocals – I listened to the entire song and made note of when these occur and recreated them in my arrangement. Finally, there is a memorable vinyl scratch sound effect that plays throughout the entire track – I sampled this and again, listened to the whole song and placed it down anytime it was present. The pattern is constantly evolving, sometimes it only plays once (usually ½ beat before the next bar) but a few times it repeats twice and 3 times throughout the song it plays 4 times consecutively. A minor detail I added was to automate the pitch when it repeats to descend as I could hear a slight pitch modulation in the original when this happened.
I did a basic mix down, giving aiming to give the vocals the most presence like in the original.
0 notes
Text
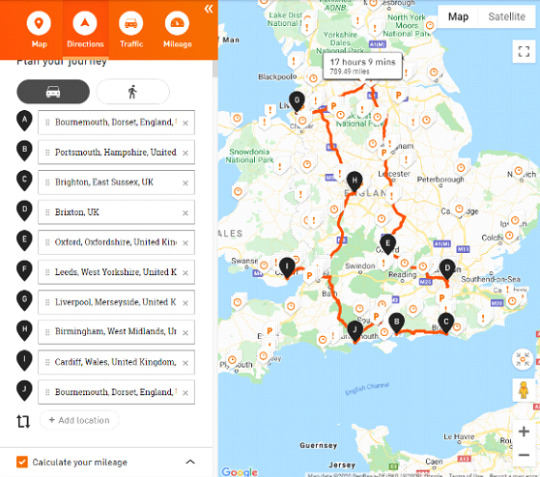
Planning a Tour
We started by looking at locations and venues. The idea was to do a loop going north and end in our home town, making the final night something to work towards and therefor keep us going.
Locations:
⦁ Portsmouth - The Birdcage (100 cap) ⦁ Brighton - Pipeline (50 cap) ⦁ London - Windmill Brixton (100 cap) ⦁ Oxford - The Bullingdon (420 cap) BREAK ⦁ Leeds - The Key Club (300 cap) ⦁ Liverpool - Eric’s (200 cap) ⦁ Birmingham - Route 44 (200 cap) BREAK ⦁ Cardiff - The Moon (140 cap) ⦁ Bournemouth (Hometown Show) - Old Fire Station (1200 cap)
These were the locations we decided on as they all flow naturally after each other. Our final show has the largest cap, this was done intentionally as friends and family are more likely to come to the most local show.
Personnel: ⦁ 4 band members ⦁ Sound tech ⦁ Van driver/merch guy
We opted to save space in the van by having the merchandise salesman also be the Van driver.
Start up costs: ⦁ Food - We will allow £10 each a day for food, so that’s £60 a day, meaning £660 needs to be set aside for the 11 days of touring
⦁ Travel - Mini-van rent £205 (ford transit 2018)- globalvans.co.uk, travel alone will cost £313.26, so we will allow £400 in case any extra travel costs.
⦁ Merch:
⦁ T-shirts are £7.56 to make each, so sell them for £15 each with £7.44 profit per shirt ⦁ Hoodies are £22.90, sell them for £30 each with £7.10 profit per hoodie ⦁ Beanies are £7.50 each, sell for £10 each with £2.50 profit per hat ⦁ Patches cost £2.025 each to make, so we will sell them for £5 with £2.975 profit per patch ⦁ On average, 30% of people buy merch, meaning 813 people could potentially be buying merch on this tour. We will take 300 t-shirts, 200 hoodies, 200 patches, and 200 hats on tour with us. ⦁ To purchase all merch, this would cost us £8753 ⦁ T-shirt profit, £2232 ⦁ Hoodie profit, £1420 ⦁ Beanie profit, £500 ⦁ Patch profit, £595 ⦁ If all merch gets sold, we would take £13500, profit comes to £4747
Start up costs total: 8753+400+660 = £9813
Ticket Prices and venue costs: ⦁ The maximum amount of people that will turn up is 2710 judging by the capacities of all the venues. If every venue sold out, charging £8 a ticket, we would take £21,680 just from tickets. If 75% of people turned up, we would take £16,260 from tickets. If 50% of people turned up, we would take £10,840 from tickets. So realistically, we will take anywhere from £10,840-£16,260. We will use £15,000 as a ballpark figure. ⦁ Venues would want 10% of ticket sales and so would promoters, meaning we pay out £1500 to each, we come back with £12,000
Takings= 13,500+15,000 = £28,500 £28,500 - £9,813 (start-up costs) – 3,000 (venue/promoter costs) = £15,687 PROFIT £15,687 ÷ 6 = £2,614.50(final pay each) ÷ 11(days) = £237.68(final pay each per day).
0 notes
Video
tumblr
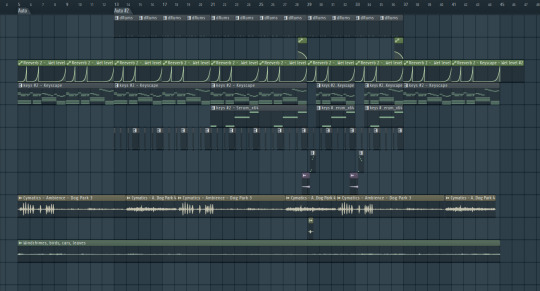
This was a song I created in 30 minutes as a challenge! This was a good way to just get ideas out quickly and stick with them. For this track I started with the drums, something I rarely do unless I have a specific groove in mind, which are made up of simply a kick, snare and a percussive hit. I used the swing feature in FL Studio to make the drums have more character and bouncy.
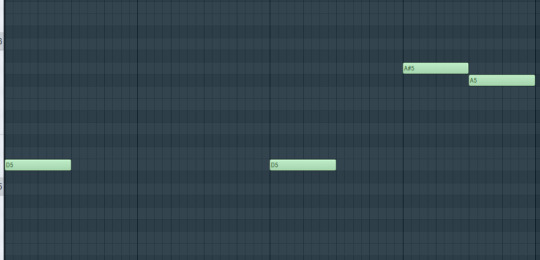
The main part of the track is the Dulcitone piano playing the chords and the melody. I was given a prompt to base and theme the track around, in this example the theme was “puppies” so I wanted to go for a happy, carefree kind of vibe. The track is in G#major and I recorded the piano part in myself and chose not to quantise in order to get this loose and happy feel. Also using a bell tone piano evokes this sense of childhood in the listener. As a final detail, I had time to add automated reverb swells which gave some extra character to the keys and kept it moving in between the gaps of the melody.
I sound designed 2 sounds in this time also. The first being a simple sub base made by drawing in the harmonics within Serum. The second being a digital sounding arp, which used this inverted sawtooth with a fast decay to make it “plucky.” I also added reverb and ping pong delay to give the sound more ambience and space. As an extra detail I used this VST called Edison to let me quickly add a large reverb tail and resample that back into the track, where I then reversed and faded it in so it swells into the arp. This detail adds a slight build up to the arp and makes it feel less unexpected (and as a final detail I pitched the second swell up 4 semitones for some variety).

Finally I added some ambience, of a dog park to fit the theme and fill up the frequency spectrum.
Doing this challenge was a good way to test my musical ability and understanding of my DAW and I am happy with the result. I hope to do this more regularly in order to increase my productivity, which will help me later as I further my music career.
0 notes
Audio
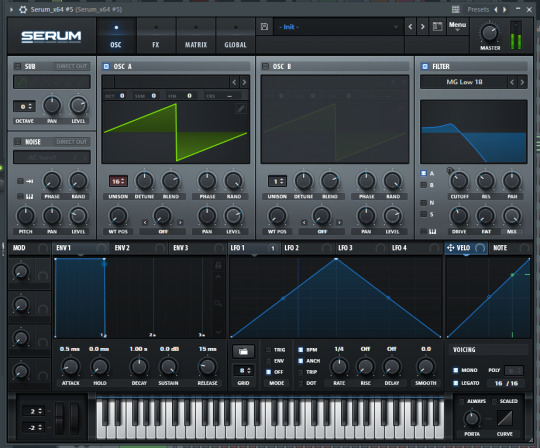
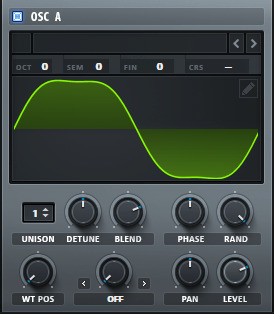
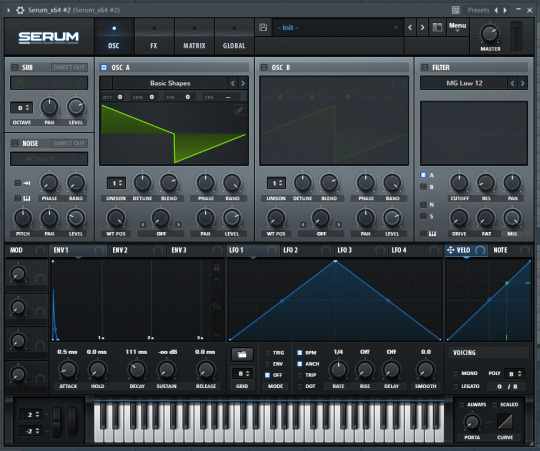
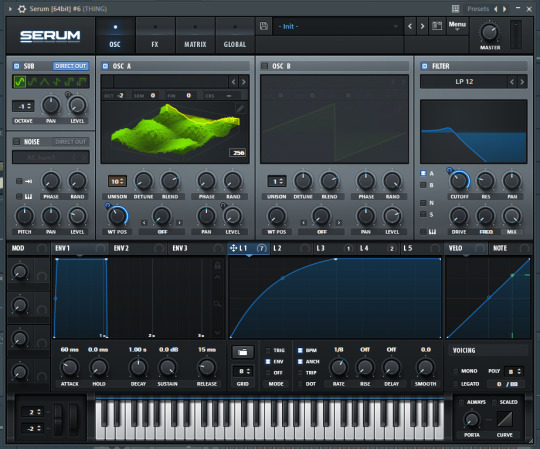
One of the first sounds you hear in the track is what sounds like a futuristic alarm sound which rings out with ping pong delay. Like I mentioned in my initial post, this song came together after a sound design session I had where all the basses were created (this being the very first). I created all the sounds using Serum, a popular wavetable synthesiser used heavily in dubstep production - here is the patch I made:
In this pic you can see the Oscillators , it is made up of 3 basic shapes. OscA being a simple detuned hybrid sawtooth, OscB being a regular sawtooth with a warping mode enabled and finally the sub Osc which is a basic sine wave. Only 1 LFO is being used which is controlling 5 different parameters all at once. It controls the level of OscA and the sub Osc, this makes the sound easier to control as moving the LFO shape can drastically change the envelope and mapping everything to the same shape means they work together nicely and sound more cohesive. Also being controlled is the cut off on the lowpass filter which helps emphasise the "womp" sound I was going for (if I wanted to exaggerate it further I could have increased the resonance to create more of a laser style effect). It is also automating the amount of warp for the warping mode, using "bend +/-" distorts the waveform in an interesting way which added movement to the sound as it gradually increases. The final thing that it is controlling is the mix of the dimension expander - this is a trick I learnt which means the sound starts thin but gains more width as the sound plays. This also brought out the tone quite a lot and added some extra grit. Something Serum is known for is it's powerful frequency modulation capabilities. Frequency modulation synthesis (also known as FM synthesis) is a form of sound synthesis whereby the frequency of a waveform is changed by modulating its frequency with a modulator. In this example I used OscB to modulate OscA - in some cases you could use the same LFO to automate the amount of FM, but for this sound I liked the timbre it produced when left at roughly 45%. As OscB is also being modulated it makes the sound evolve and sound less static. One final trick I did for the oscillators was turning down the phase and the random for OscA. What this does is make all the voices start at the same phase, and as they are detuned it creates an extra blasting effect. The effects are nothing special - hyper/dimension adding width to the sound, slight downsample distortion (which reduces the sample rate and creates high frequency artefacts which change the tone), delay and reverb for a sense of space and finally a multi band compressor which squashes the sound together and adds more clarity.
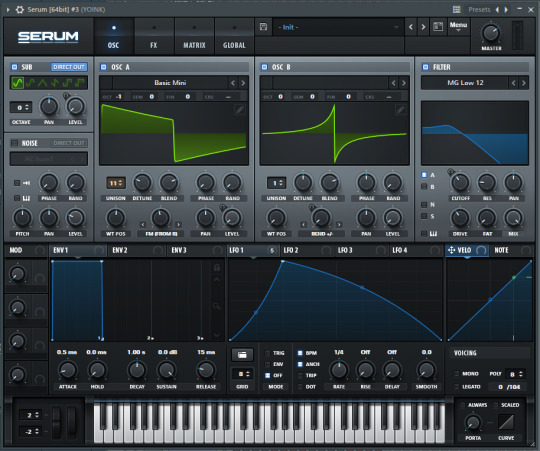
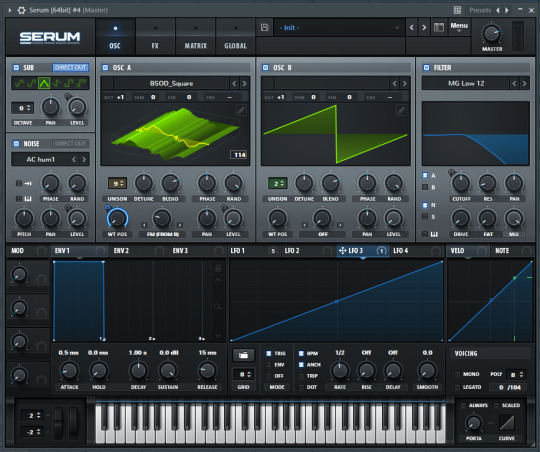
The second bass in the drop uses a wavetable which I created myself by resampling a detuned sawtooth.
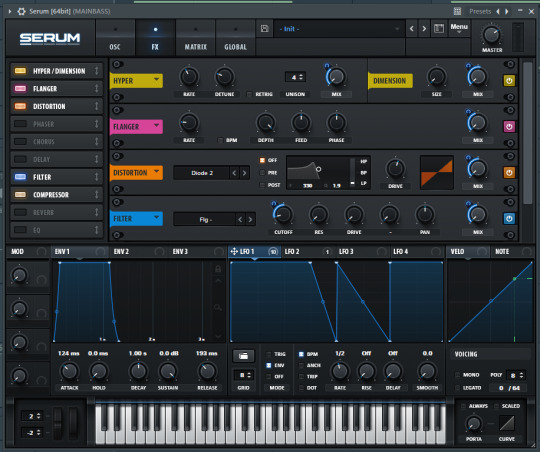
All the movement is controlled by a single LFO again which this time is controlling 10 different parameters which all add to the movement of the sound. The distortion plays an important role in this sound to give the bass alto of grit and character and I am automating this with the LFO to really emphasise the rhythm. Each effect on their own doesn't a lot, but combined they shape the sound into a more growl like timbre. Finally I use a secondary LFO which controls the pitch bend of the sound to go down 2 semitones right at the end of the phrase - this adds a bit more movement and some character to the sound, making it feel less static.
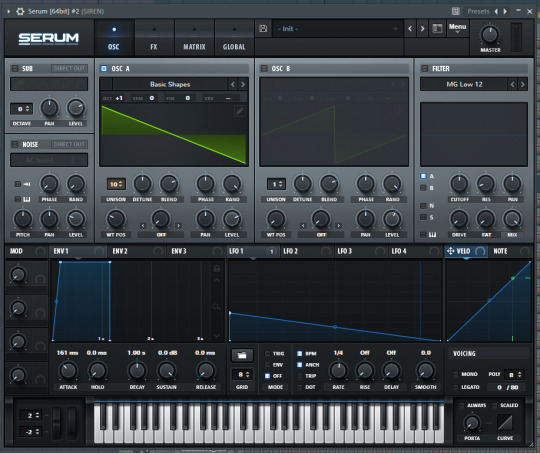
The next sound you hear in the drop is a really basic siren I created. It's simply a detuned sawtooth with a pitch envelope that descends and repeats. I used LFO1 to control this.
Next is what we dubbed the "Crow bass" because I was told it sounds like a Crow cawing! It starts off pretty standard like all the other basses, a basic wavetable with distortion, hyper/dimension, multi band compression with a lowpass filter being automated to open and close. I also added a chorus and a phaser to get a slightly different, more gargle-y texture (which I played before the compressor to really bring that texture out). The main character of this sound comes from the EQ which I applied and as you can see there are 2 notches on the EQ, which frequencies are being controlled by LFO1 - The first is being automated up rapidly while the other is being automated down rapidly so they go into each other. This creates the "wah" sound. As a final detail I set the first LFO to envelope mode, which was the one controlling the "wah" sound (meaning it only re-triggers when a midi note is input) but had a secondary LFO on the Oscillator levels, which re-triggers automatically, in a triangle shape on 1/4 notes to create the rhythm. This same bass is played at the end of each phrase, but with a faster LFO rate on the level and an upwards pitch modulation.
The second half of the drop has a different bass to add variety. It's been created like all the others but has a few differences still. I am controlling the wavetable position with LFO3 and as you can see it is a straight ramp up - when the note is triggered, it will morph through the wavetable smoothly to create a more complex and evolving sound. Setting the LFO speed to a slower rate to the LFO which is controlling the level means it will sound different between each oscillation. So in this example I have an LFO controlling the level at a rate of 1/4, meanwhile the wavetable position is being automated at a rate of 1/2 - this means you get a different timbre between each "wonk" of the sound. Finally, I added some slight white noise which I automated to only turn on during the highest peak of the LFO, this makes it more controlled but also adds high end which gets lost when using the low pass filter for cutoff movement.
0 notes
Audio
As I mentioned in my initial post about this track, I was stepping out of my comfort zone and into a genre that's the polar opposite to the genres I usually work in. My most frequented genres include Future Garage, Liquid DnB and Lofi (genres known for being more chilled) while Broken Mind is a fusion of metal and dubstep elements. The goal was to make something aggressive. This song started from a sound design session I had where I created a number of basses (I will go into detail on how I created those sounds in another post), and the song starts with a rise into a large impact consisting of: 2 Foley impact samples, one of the basses (with a ping pong delay affect added to mimic the sound of an alarm), a thick sounding brass sample - This is all supported by a distorted legato reese bass. In the second section, Orchestral/War style drums come in to evoke a sense of tribalism which I feel added to the aggressive tone of the track (this is also helped by the use of "stomp" kicks).
The precursor to the build up is a section of 8 bars is made up of some previous elements but with an added sampled police siren - This further adds to this idea of aggression as the context implies something related to fugitives and outlaws. Again the build up is standard for tension building - the reese, brass and guitar elements remain while a clap is added which increases in speed and gains a more complex rhythm and white noise that helps transition into the drop. I also took a section of a guide vocal Ben recorded where he sings the word "mind" and looped it, gradually opening a low pass, automating the wetness of the reverb to increase, panning it left and right and finally automating the pitch. Like I mentioned previously, I will go into detail on the sound design for this track in a separate post. The structure of the drop is also quite simple, the detail comes within the basses so I didn't want to distract from them. The kick and snare play on the 1 and 3 beat and there is an off beat crash cymbal and a basic high hat pattern, which is all that is accompanying the basses and designed to save room for the vocals when they are added. A reversed glass smashing Foley sample (which I used to again add more aggression) transitions the track into the next section. This section is almost identical to the previous half, however there is a greater focus on the guitar. This is where Ben's input really shined as his playing allowed us to combine the heavy style of rock/metal with the dark and gritty sub genres of Dubstep. Multiple recordings were used and layered up to create a larger, more aggressive sound which was highlighted by the distorted amp preset Ben chose. The section section also features another distorted guitar but played on a higher register, which adds more variety and highlights the melody with extra high end grit. The buildup is the same in nature for the second drop. I wanted to do something different to give the song more variety so I decided to make the second drop Drum and Bass. 150 was too slow for the style I was going for so at the end of the second build up, the tempo gradually increases 10 bpm for the drop. This section is made up of: an aggressive DnB drum loop, the same brass sample that's been present throughout the entire track and the same reese bass. To thicken this section up I added a secondary bass which plays on top of the reese and creates a much more full sound, and finally I high passed a sample of a large crowd cheering to give the drop more top end energy.
The track is in D minor and focuses heavily around the root note. As there is no substantial melodic content, the main notes that are played are D, A and A# - This focus on the root note makes the track feel very grounded but not static, as all the movement comes in the percussion and the rhythms. What adds to the darker tone of this track is the heavy use of the semitone interval between A and A# - going up or down a semitone in a melody is something that is heavily used in horror music and scores. Jaws for example, the famous shark theme's iconic phrase is simply 2 notes which are 1 semitone apart being played repeatedly - it builds tension and created unease, caused by subtle dissonance that 2 notes next to each other create.
0 notes
Text
Wait For You (ft Liefsong)

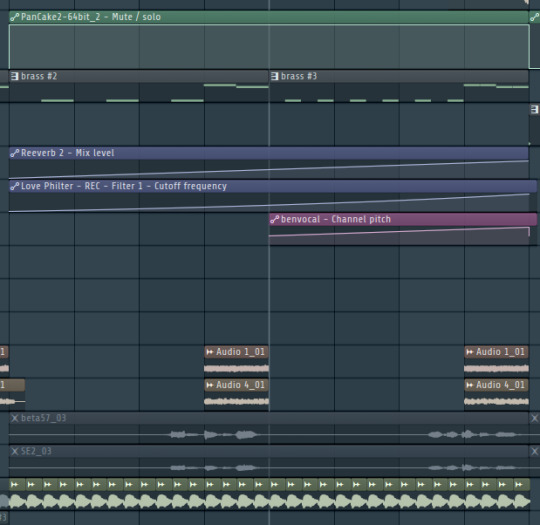
Wait For You (which you can listen to here) starts with a music box playing a slow arpeggiated melody over an analogue sounding synth, with added rain and wind ambience. There is also what sounds like a vocal which bleeds through every 8 bars - This was achieved by pasting the lyrics into a vocaloid (a generated vocal synthesiser) and cutting out a single little section out. In this example the vocal synth was singing "La" but I processed it with multi band compression, pitch and formant shifting up then delay and 100% reverb with a very long decay time so it creates this wash of sound.
The intro continues as some vocal adlibs get added and the pad drops out - a similar technique was used for the processing of these vocals, as I wanted them to be more background elements I drenched them in reverb and low passed them so they sounded more dreamlike and far away. The idea for this came when I asked Lief to listen to the track fully and just improvise whatever came to her mind - I then selected all my favourite parts, rearranged and chopped them around to create this background flavour. The main vocals come in next along with a piano, the pad from the intro, a sub bass and a legato pluck. For the vocals, Lief sent me guide vocals which I used to build the track around during the early stages of production (and fun fact: She recorded them on her phone and part of those takes ended up in the final song). The processing for the vocals was focused to make the vocals stand up front - I compressed and EQ'd them to remove some harsh frequencies, added a de-esser to remove any harsh sibilance then added the classic delay and reverb. An interesting technique I did was to use Manipulator, a vocal processing VST, to pitch the vocal up an entire octave where I then turned the dry wet to about 16%. This added some extra high frequency content which helps make it stand out more.
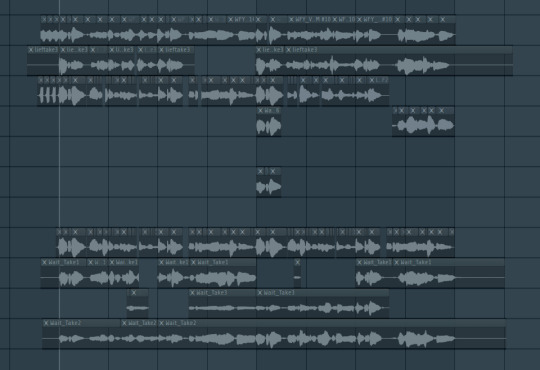
The lyric writing and recording process was rather simple, we recorded multiple takes and, through the process of comping, combined all the best ones together. You can see all these takes below:
(my personal favourite lyric is “take a breath”, as the way it is arranged leads the singer to take a breath of air before the next line. Usually you would cut out any breaths in a take but I kept one in to give this lyric this greater significance).
The build up then start. As build ups go it is pretty standard - a kick which gradually increases in speed paired with an alarm sounding pitch automated riser and white noise are the driving force and what give this tension. A tom fill and crashes transition us into what some people call a "fake out drop." During the early stages of production as an idea I created a more tropical house style drop, rather then the future chill/bass drop it is in the final version. The rhythmic piano playing a new chord progression makes the listener believe it is going down that style, before the main drop lead fades in, the rapid kicks return and another tom fill transitions us into the "real" drop. The drop is made up of a few elements: super saws, bass, fast arpeggio and the main lead. The drums are pretty simple, Kick and snare doing a basic pattern. The lead is simply a sawtooth with slight hyper dimension expanding and reverb, but the character comes due to the legato and automated pitch bends which add more emotion to the sound. The vocals return in the second half singing the title of the song, this time however I automated some distortion to come on to give it an over driven feel. Notable things to mention in the second include the strings which come in, playing a melody which I like to refer to as a "musical signature" as the pattern it plays can be heard in various tracks I've produced (including my SSI track from last year). Finally the second drop contains only kicks for the first 3 bars, this is to create more tension and make it subsequently hit harder when the snare comes back in after one final tom fill. The theory is pretty simple for this track. We were going for a "sad but optimistic" vibe so like my WIP remix I used a lot of similar techniques. The main one being the use of major 7ths which, like i mentioned previously, are a chord make up of a major and minor chord which creates this melancholy feeling. The chord progression in the drop is as followed: Gmajor 7th, then Dmajor with an extended 10th (the same note as the 7th in Gmajor, which makes the chord feel more familiar), next is a Bmin7th before ending on an inverted Amaj. Switching between major and minor chords is one way I created this effect - the chords also descend which, when paired with the lead which also descends in pitch, add to the tone and creates a sinking feeling.
0 notes