
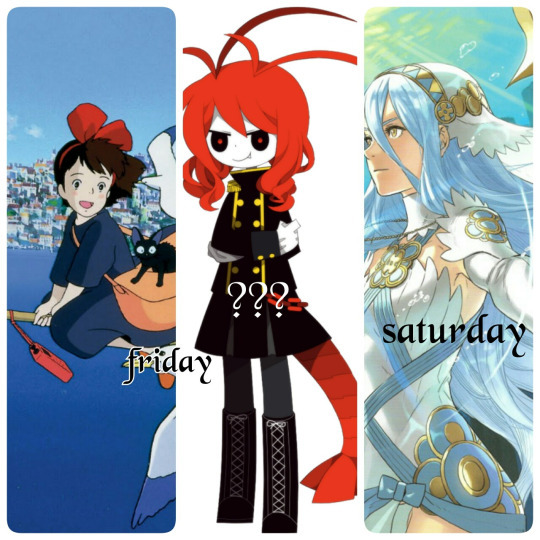
okegomcosplayhelp
Helping With Cosplay Since 2015
Just a few tips, tricks and advice to help you cosplay was Mogeko's lovely characters!
When sending an ask, please try and specify what exactly you're having troubles with! It helps me a lot, thanks!
(blog is currently under construction, forgive me for...
42 posts
Don't wanna be here? Send us removal request.
Last Seen Blogs

detoxnearme
Detox Near Me

shinomiya-sister
Love Live Booty for me

melissagracesworld
Pay to Get My Full Services

bartsimpson-irl
James Michael Stuart but you can call me Jimmy

jaybreentattooer
Jay Breen
Photo
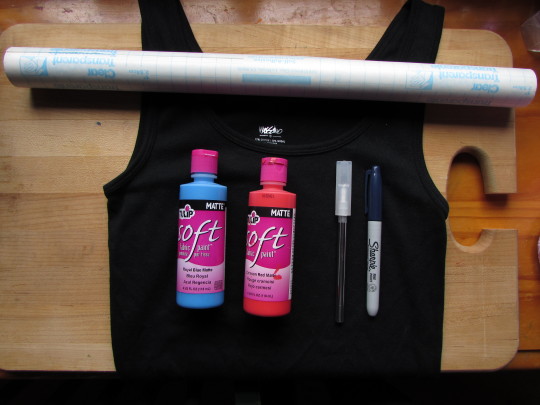
A little cosplay tip!
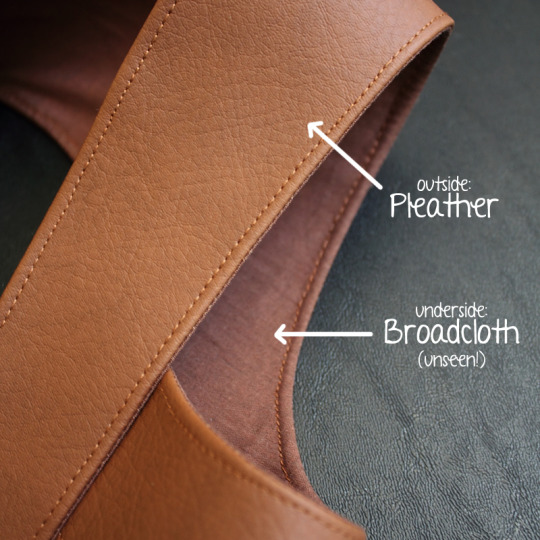
When making “leather” pieces for costumes, do any of you ever use pleather for both sides of the piece? For things like belts, I often used to sew two pleather pieces together, turn it inside out, and then topstitch it flat. Doing it this way made for a really bulky piece that was difficult to pass through the sewing machine for topstitching, even with the aid of tissue paper underneath. Same goes for any pleather pieces that I thought I could get away with just hemming the edges of a single layer. Pleather is sticky, and it made for some nasty stitch work! There are tricks out there to help pass the fabric under the needle more smoothly, but one thing I started doing instead is that I started treating the underside like lining, and started using cheap fabrics in matching colors instead.
For version 2.0 of my Zidane vest’s leather harness, I decided to “cheat” and use broadcloth in a matching color for the side that will not be seen (the harness will be permanently attached to my vest, so only the outer layer will be visible). Doing this not only cuts down on fabric bulk, but with the broadcloth being the side that’s down, it makes topstitching significantly easier (and cleaner!). Yeah, you can technically see a little of the broadcloth when you look at the piece straight on from the side, but so long as the color matches the pleather, you can get away with it. ;)
This might not work for everything, but it’s an option for things that people will only ever see one side of. I’ve done this with anything I can get away with. I even did this with the gun holster on my Yukio Okumura costume.
Many of you probably already do things like this, and I’m sure there are many more (and probably better) options out there, but this has worked well for me, so I thought I would throw it out there for other people to consider if they’ve never thought of doing it this way before. :)
-Pluto Knights
#reblogging to save a life#this shit saved me when I was making my attack on titan harnesses#I shit u not#pleather is a demon to work with
4K notes
·
View notes
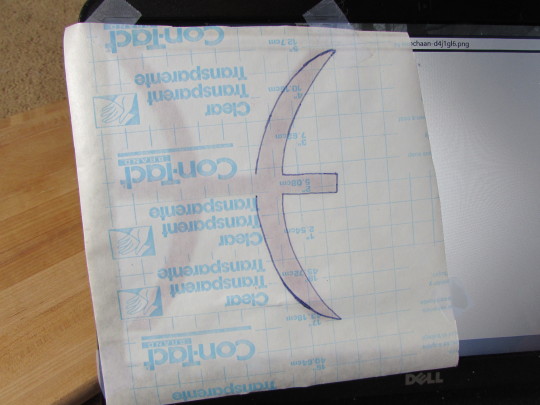
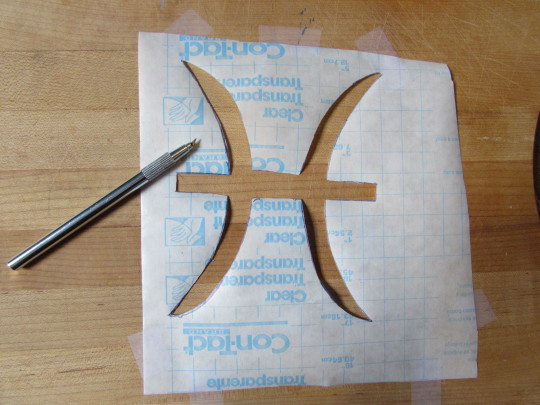
Photo


my friend @monchichitanuki made a really great tutorial on witch hats! obviously, considering the nature of this blog, i’d suggest using this as a base way to go about your hat for himiko yumeno– but obviously, it can be used for any witch hats! here’s what she had to say, right off her instagram–
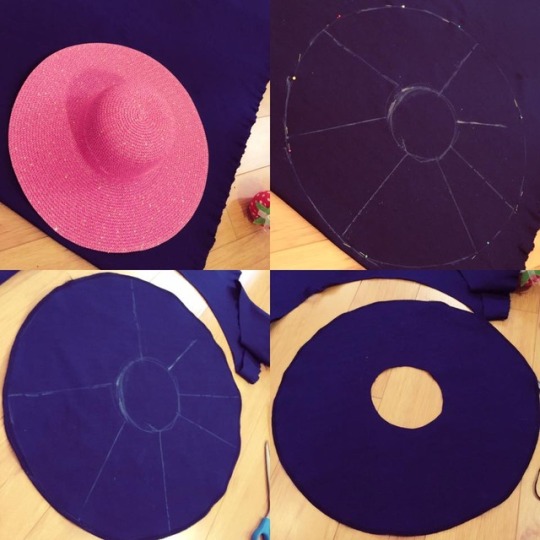
buy a sunhat online or in a 1$ store, that’ll be your base for your hat .
trace your hat onto whatever fabric your using ( I suggest using knit that stretches four ways, otherwise it’ll be more annoying to make /may wrinkle weirdly..
cut a hole in it that’s slightly smaller then the hole that’s in your hat that sits on your head and pin it , then sew the outside together and pull it inside out. then put it off to the side until later.
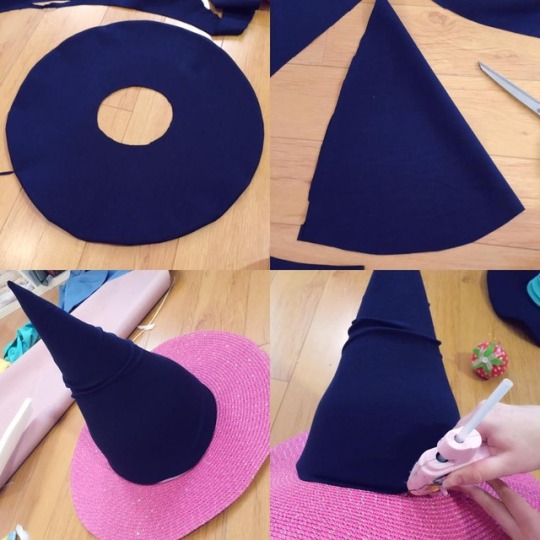
buy a ½ inch thick roll of foam and make a party hat shape , like you would with paper, then just kind of finagle and fit it around your hat until it sits right, depending on how long you want your hat to be you might need to cut it down from the top!!!
pin it closed then start glue gunning it!! You’ll have to squeeze the pieces together otherwise it’ll just fall apart and won’t stick! But be careful not to burn yourself!!!!
once the cone is glued shut , glue it down to the hat and leave it alone for like, 5-10 minutes, go get a snack during this time period lol.
cut out a triangle , that’ll either fit exactly to the foam cone you made or make it looser, it depends on what kind of effect you want your witch hat to have!!!
slip the fabric over the cone and then glue it down!!!
the circle we cut out earlier is gonna come back now, your gonna pull it right side out and iron it, then slip if over the cone and pull over the sides of the hat and clean it up so that it looks nice
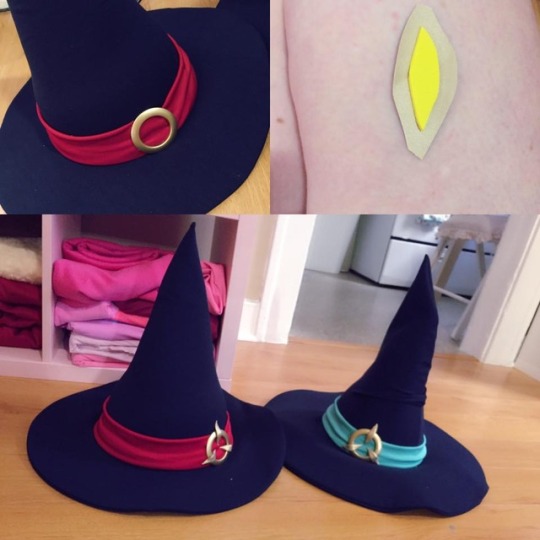
flip the hat upside down and cut about half an inch into the circle then glue down the little flaps to the inside of the hat so that it’s nice and secure.
depending on what witch your doing, your gonna wanna make a long tube out of spandex or knit to put around the hat to hide the seam where you’d glue the cone and base fabrics together.
for the gold ring I use curtain grommets that you can buy at joanns or Home Depot, and I glue it over the seam where you close the red or green band
finally , cut out little pointy ovals and cover them with gold spandex and your done!!! I hope this tutorial helped some of you guys out and if you liked this and want to help support my work feel free to donate to my koffee account and comment with what else you’d want to see and maybe I’ll make a tutorial on it!! :)
i hope you guys find this as helpful as i did!! thank you, tayla! if you have any issues with it flopping off of your wig, remember that safety pins (or even some quick handsewing) into the wefting will help you a lot! bobby pins would also work if you added in little straps or something for them to hold onto.
-mod n
167 notes
·
View notes
Text
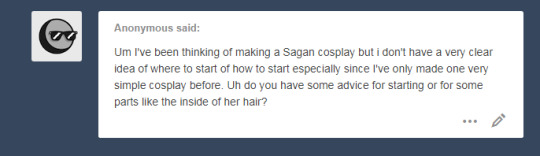
You’re just in luck! I’ve been considering cosplaying Sagan for a while!
Personally, for her dress/hat I’d use a velvet or peachskin type fabric personally because I love pile type fabrics and how they catch the light. However, they can get VERY hot VERY easily. So, if you’re not comfortable with that I’d go with something victorian era esque, such as wool (also hot), like wool crepe, or a cotton type fabric. I wouldn’t use cotton broadcloth though unless it’s for the lining.
The trim for the edge of her capelet are very simple box pleats. And her skirt looks like a pleated circle skirt with a petticoat beneath! (similar to wadanohara) To pleat, I always reference these tutorials: (1) (2). As for the circle skirt aspect, circle skirts take up A LOT of fabric, so you have to plan carefully. Here’s a tutorial for a pleated circle skirt and a circle skirt calculator : (1) (2)
As for the eyes on her skirt, I’d do a satin stitch applique. This video is where I learned how to do it by adjusting things slightly. It’s really helpful and in the end just follow the steps until you satin stitch the pupil down to the white part of the eyes and then the eyes to the skirt.
A simple scallop lace should suffice for the trim, but you’re going to need a lot of interfacing for the cuffs and collar so they don’t flop around. As an extra precaution, I’d sew snaps to the sleeves and the cuffs so the cuffs don’t flop around. Make the eyes on her hat and bow out of clay, I’d say.
I dreaded typing the witch hate part, but you know what. If I could be explained to how to do this over instagram I’m sure I can type this out.
First you’ll need more interfacing, your facing (black fabric), and your lining (the red fabric), and wire. For red sea Wadanohara, one of my friends painted the lining of the hat in order to get the eyes effect, and considering you’re a beginner that might be the best option for you. You’re going to cut your facing, interfacing and lining into a big donut and sandwich them together. With your facing and interfacing facing the same way and your lining facing up. Stitch some wiring around the brim as you’re stitching it together and then turn it out.Then you’re going to make your cone shape, which is gonna look something like the picture on the right. Cut the facing, interfacing and lining, stitch some wire up the hem and stitch the two parts of your hat together. You’re also going to need a foam cone which you can get at any craft store and stick it into your hat. Trust me, it’ll be uncomfortable sitting on your head all day but it will keep your hat shape. Also to keep it on your head, stitch parachute clips to your hat to attached to your wig.
As for her wig, I’d take a base wig and sew red wefts at the bottom of your wig cap so you kind of get the red undertones. Now, I won’t guarantee anything I say will work, so don’t sue me but you could make the eyes out of felt or something and hot glue them to the red wefts, which could guarantee an accurate placement. Or, string like ten eyes together, spaced out evenly and sew that string to your wig cap and repeat like seven times.
I really hope this helps!
#mogeko#okegom#deep sea prisoner#okegom cosplay#mogeko cosplay#deep sea prisoner cosplay#sagan#cosplay help#cosplay advice
5 notes
·
View notes
Text
Psst
Someone should send an ask bc I'm bored
2 notes
·
View notes
Note
Hey! I'm not sure if this blog is still active or not since I just discovered it, but I figured I'd give asking a shot anyway. I'm considering cosplaying Moge-ko, and while most of her outfit seems really simple, I'm having trouble with her cat ears. Would using regular clip-on ears look alright, or would you suggest anything else? Because they appear to be a part of her hair, so I'm not certain if that would look good for her. Thank you for reading this!
Hi there dear!
Sorry if it took me long to respond. This blog is /supposedly/ still active, but I haven’t many asks as of recent so there’s nothing for me to do on here. :/
If you feel alright about it, clip on ears could totally work! Though if you were going for the “hair” look what I’d do if buy white fake fur and dye it to match the wig colour and make cat ears from those before adding clips to clip on the wig or sewing them directly to the wefts.
However if you’re /really/ extra and really, really, REALLY, want to go for the “part of her hair” look I heard of cosplayers using foam in the desired shape and covering that with wig wefts and attaching them to the wig. I’m not super familiar with wig styling, it’s not exactly my forte. However there are several tutorials online for this for characters like Sailor Moon, Chibi Sailor Moon and Ibuki Mioda from Dangan Ronpa 2. I found some tutorials that might be helpful!
Or http://lunaladyoflight.deviantart.com/art/Usagi-Wig-Tutorial-by-Lunaladyoflight-480690530
Hope this helps!
-Fukami
#mogeko#mogeko castle#moge-ko#okegom#deep sea prisoner#mogeko cosplay#mogeko castle cosplay#cosplay#cosplay help
13 notes
·
View notes
Note
Hello! I'm planning on cosplaying Sin, do you happen to have any tips on making her tail?
There's a Samekichi tail tutorial, which is basically the same concept. However, you should probably modify it so the tail is more like a whale than a shark. Just a few snips here and there, nothing too complex. (http://manlybadasshero.tumblr.com/post/102850673080/pattern-making-and-the-prototype-finished-tail)I would probably make it out of fleece, myself. It's very soft and it's relatively inexpensive. It also made my Lobco cosplay a lot more comfortable to sit in! Though, be warned, it catches debree fairly easy.
0 notes
Note
Is this blog still active?
I died. :') Regardless, I don't have any asks in my inbox so I haven't answered any questions. (Please leave asks I'm very bored)
0 notes
Text
Blog Has Been Updated!
Huzzah! We upgraded from “wadanoharacosplay” to “okegomcosplayhelp!”
I’ve actually been wanting to do this for a while, but never got around to it. But with the release of General Hashasky’ Great Adventure and Carnival Rhythm (supposedly) coming up, I decided since the Okegom fandom is expanding I would expand as well.
If you want to send us an ask regarding any of Okegom/Mogeko’s characters whether from a game or not, feel free!
#wadanohara and the great blue sea#the grey garden#garden grey the#mogeko castle#okegom#mogeko#carnival rhythm#general hashasku great adventure
1 note
·
View note
Text
Ask Box Is Currently Empty!
And Mod Fukami is bored out of their mind.
0 notes
Note
Hi! Glad to know you're back. Take it easy okay? Currently, I'm making wadanohara's anchor and I'm having trouble on how to make the entire anchor the same texture before painting it (I used pvc pipes and styrofoam). Any suggestions?
Ahh! Thank you for being so kind!
Hm. Do you mean the same “smooth” texture? In that case I would paint it in very thin layers and sand it down using fine grit sandpaper which you can get from most hardware stores. Sorry I can’t help more, I’m not very experienced with props.
>Mod Fukami
0 notes
Note
umm...i wanna cosplay dolphi,can you please help me? and thanks
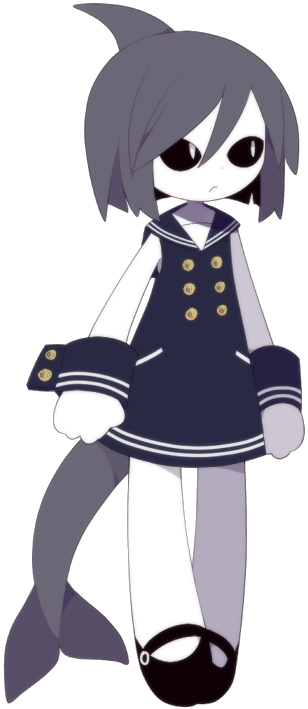
Sorry for the late reply! Is there anything specifically you need help with?
For the shoes they seem like regular old black mary janes.
As for the dress, you can pattern (or buy a pattern) of a regular wide strap dress and attach a sailor seifuku collar. Here’s a link if you want to know how: http://fattogami.tumblr.com/post/55535810171/how-to-sew-a-sailor-uniform-part-1-sewing-the (though it’s not specifically geared towards the dress itself, you can apply the same techniques.)
For the white stripes on the dress, use white bias tape.
Hope that helps!
>Mod Fukami
#dolphi#dolphi cosplay#cosplay help#watgbs#watgbs cosplay#wadanohara#wadanohara and the great blue sea#dolphi wadanohara
3 notes
·
View notes
Text
SacAnime Summer 2016
Hey! I’m also going to be at SacAnime summer this year!
Here’s a really shifty lineup for SacAnime I have currently. (since I don’t know when the different gatherings are)
I’m not sure about Lobco because I haven’t finished remaking her jacket yet but I hope to have her done by the time SacAnime comes around.
If any of you are going, stop by to say hi! I’ll be with my friends who are cosplaying as various other Studio Ghibli characters!
0 notes
Text
Apologies
I'm so sorry for my absence. School really pressured me to a point where I just didn't have the heart to run this blog no longer. But I'm back and I'm better than ever. So if you need Wadanohara cosplay advice, I'm you person! >Mod Fukami
#wadanohara and the great blue sea#wadanohara#wadanohara cosplay#cosplay#cosplay help#watbgs#dolphi#fukami#memoca#samekichi
0 notes
Video
youtube
Japanese Kimono and Obi Sewing Details
A reference video, showing the construction of kimono / yukata.
Video by: thekimonolady
Full Video Link: https://www.youtube.com/watch?v=lE0fJpQPgN8
666 notes
·
View notes
Text
Fabric Paint Tutorial: Shelf Paper Method
I know there are a million tutorials on shirt painting out there, but I’ve never seen anyone use this technique, and for me it makes things way easier and neater!
You’ll need: Adhesive shelf liner (preferably clear), a cutting board, something to cut with, fabric paint, the shirt itself, and a Sharpie
Step 1: Trace the image you want onto the shelf paper (for this I just taped a piece to my laptop screen)
Step 2: Cut it out!! I find an X-Acto knife works best
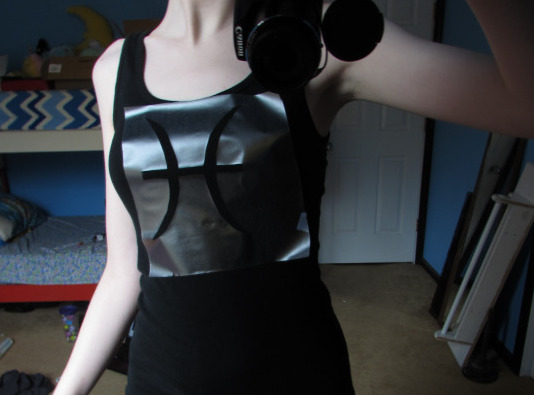
Step 3: Peel the backing off the shelf paper and stick it to your shirt. It’s important that you do this while you’re wearing the clothes to get the positioning just right, especially when working with fabrics that have more stretch!
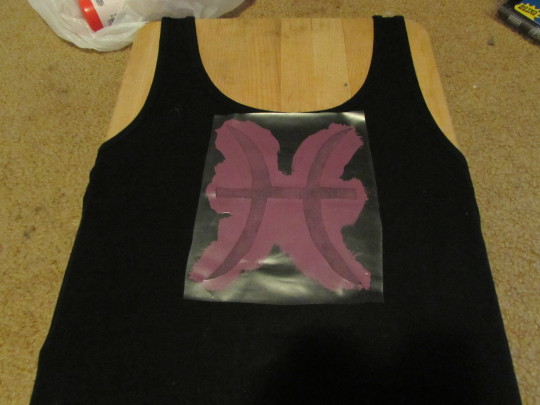
Step 4: Paint it! This is where using shelf paper comes in handy. Since it’s essentially a giant sticker, it’s very easy to stick down all the ends and get a clean final product!
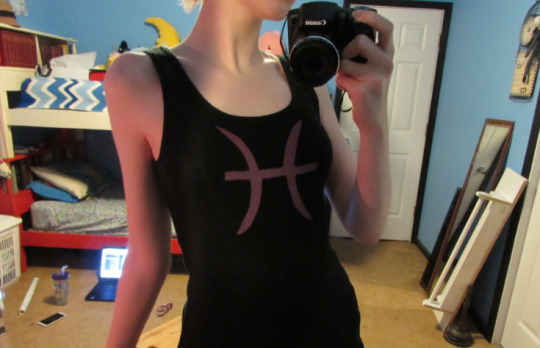
Ta-da!!
1K notes
·
View notes
Text
Merry Christmas (Eve) Everyone!
What should I do for y'all for Christmas? -live stream of me playing undertale -tutorial on something random -idk something else Let me know by dropping a message in my ask box! >Mod Fukami
2 notes
·
View notes
Note
hey hey!!! im gonna cosplay memoca and I want to stay as close to her canon outfit as possible (aka have the flippers on the sleeves) but I was worried about accessibility of stuff, cos I still want to use my hands when I have the flippers on: do you have any ideas that would let me do that??? btw this blog is rad thank u for making it :D
Thank you dear!
Hm… What I would reccomend is…
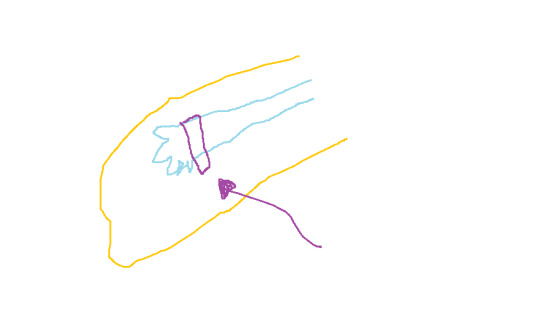
(forgive me I can’t draw with a laptop mouse on ms paint)
That purple thing the arrow is pointing at is supposed to be Velcro.
What you could do is still have the flippers over your hands, however tuck in a gap somewhere and seal it with Velcro or buttons or whatever you feel is best. So whenever you think you need your hands you can just open the gap and tada!
Hope this helps!
>Mod Fukami
4 notes
·
View notes