
Don't wanna be here? Send us removal request.
Statistics
We looked inside some of the posts by olivia99998 and here's what we found interesting.
Average Info
Notes Per Post
9
Likes Per Post
9
Reblog Per Post
0
Reply Per Post
0
Time Between Posts
2 months
Number of Posts By Type
Text
9
Last Seen Tumblr Blogs


Fun Fact
Kazakhstan’s Minister of Communications and Informatics has blocked the Tumblr site because it contained 60 sites of terrorism, extremism, and pornography in 2015.
Text
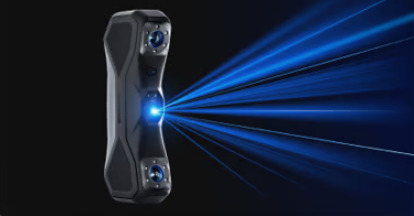
Why High Precision 3D Scanners Improve Workflow
In today's fast-paced world, industries across the board are looking for ways to streamline their operations and enhance productivity. One of the most effective ways to achieve this is through the adoption of high precision 3D scanners. These cutting-edge tools have proven to be a game-changer for many sectors, ranging from manufacturing to healthcare and even entertainment. By providing high-accuracy data, 3D scanning technology allows businesses to significantly improve their workflows, reduce errors, and increase overall efficiency. But what exactly makes these devices so valuable, and how do they benefit different industries?

One of the most obvious advantages of high precision 3D scanners is their ability to capture intricate details with extreme accuracy. Traditional methods of capturing measurements, such as manual drafting or even basic digital measurements, are time-consuming and prone to human error. With a high precision 3D scanner, the process becomes automated and far more accurate. This level of precision ensures that every detail is captured, from the smallest textures to the most complex geometries, all without the risk of misinterpretation or measurement inaccuracies.
Take, for example, the case of a prominent engineering firm that was struggling with quality control in their manufacturing process. They had relied on manual inspection methods for years, but errors were still slipping through, resulting in costly product defects. After implementing high precision 3D scanners, the company was able to quickly scan their components and compare the results against digital models. The 3D scanner provided a level of detail and accuracy that far surpassed manual inspection, allowing them to identify defects early in the process. This led to a significant reduction in errors and waste, not to mention a substantial boost in productivity.
Moreover, high precision 3D scanners are also beneficial when it comes to reverse engineering. Reverse engineering involves creating a model of an existing object, often to improve upon it or replicate it. This process, especially when done manually, can be incredibly time-consuming and fraught with challenges. A high precision 3D scanner, on the other hand, makes reverse engineering much faster and more efficient. The scanner creates a digital replica of the object, capturing every detail in a fraction of the time it would take to do manually. The resulting digital model can then be used for further design work, 3D printing, or analysis.
In the medical field, high precision 3D scanners are revolutionizing the way doctors and surgeons approach diagnosis and treatment planning. For instance, in complex surgeries that require implants or prosthetics, having accurate 3D models of a patient's body parts can drastically improve the success of the procedure. High precision 3D scanners allow medical professionals to create highly accurate models of bones, organs, and other body structures, which can be used to create custom implants or prosthetics that fit perfectly. This leads to better outcomes for patients, as the implants are designed to match their exact anatomy, reducing the risk of complications.
Similarly, in the world of entertainment and animation, high precision 3D scanners have opened up new creative possibilities. Artists and animators now use these scanners to capture lifelike models of actors, props, and even entire environments. This technology allows them to create realistic characters and scenes that would be incredibly difficult or time-consuming to replicate by hand. Whether it's for a video game, a film, or a virtual reality experience, the level of detail and realism achieved through 3D scanning has transformed the creative industry. As Hollywood filmmaker James Cameron once said, "The ability to scan an actor's performance and transfer it to a digital character has completely changed the way we make movies."
However, the benefits of high precision 3D scanners extend far beyond just the industries mentioned above. Even in everyday applications, this technology can lead to improvements in workflow. For example, architects and construction professionals can use high precision 3D scanners to create accurate models of existing buildings or sites, helping them plan renovations or new constructions with greater efficiency. Designers in the automotive and aerospace industries can also use 3D scanning to capture complex parts for analysis or testing, ensuring that each component meets the highest standards.
Another key advantage is the ease with which 3D scanners can integrate into existing workflows. The data captured by the scanner can be directly imported into computer-aided design (CAD) software, which allows for quick analysis, adjustments, or further design. This seamless integration minimizes the time spent transferring data between different systems, enabling teams to focus on refining designs rather than managing data flow.

The impact of high precision 3D scanners on workflow efficiency is not just theoretical – it has been demonstrated in real-world applications. A notable example comes from the field of automotive engineering, where high precision 3D scanning has been used to optimize vehicle design. Engineers have used 3D scanners to capture precise measurements of car parts, which can then be analyzed to improve aerodynamics, safety, and overall performance. By incorporating 3D scanning into the design process, automotive manufacturers can create better products in less time, driving innovation and cost savings.
Moreover, the versatility of high precision 3D scanners makes them invaluable tools for businesses of all sizes. Whether it's a small startup or a large corporation, these scanners can be scaled to meet different needs. The data they provide can be used across a wide range of applications, from prototyping and product development to quality control and maintenance. This adaptability ensures that 3D scanning technology will continue to be an essential part of modern workflows for years to come.
In conclusion, high precision 3D scanners are an indispensable tool for improving workflow across a wide range of industries. From ensuring the accuracy of designs to enabling faster reverse engineering, and from creating custom medical implants to capturing lifelike models in entertainment, the applications are vast and varied. As technology continues to evolve, the potential of 3D scanning to further enhance workflows is limitless. By investing in high precision 3D scanners, businesses can position themselves at the forefront of innovation, improving efficiency, reducing errors, and ultimately staying ahead of the competition.
1 note
·
View note
Text
How to Find the Most Affordable 3D Laser Scanner?
In today's rapidly advancing world of technology, 3D laser scanners have become essential tools for various industries, ranging from architecture and engineering to manufacturing and even healthcare. These devices offer an efficient and accurate way to capture the exact measurements of an object or space. However, as with any technology, the cost can be a major factor when considering purchasing a 3D laser scanner. If you're on a budget and looking for an affordable 3D laser scanner that meets your needs, this guide will walk you through the process of finding the most cost-effective options available.
Understand What You Need
Before diving into the search for an affordable 3D laser scanner, it's essential to understand what features and specifications are necessary for your projects. Different scanners serve different purposes, so it's important to match the scanner's capabilities with your needs. For instance, if you're scanning small objects with high detail, you'll need a scanner that offers high precision and resolution. On the other hand, if you're scanning large objects or spaces, a scanner with a longer range and faster scanning speed may be more beneficial.
Set a Realistic Budget
3D laser scanners can range from a few hundred dollars to several thousand, depending on the features, quality, and brand. Setting a realistic budget is a crucial first step in narrowing down your options. If you’re just starting out and are looking for a basic scanner for personal projects, you might not need to go for the most expensive models. However, if you're working in an industry where accuracy and speed are critical, you may need to invest in a more advanced scanner.
A good rule of thumb is to determine the features you absolutely need, then identify scanners that provide those capabilities at a price that fits within your budget.
Research Different Brands

When it comes to 3D laser scanners, several brands offer reliable and affordable options. Some brands are known for offering budget-friendly scanners without compromising on quality. Researching different brands is crucial in finding the most affordable scanner that fits your needs.
Revopoint: Known for its affordable and high-quality 3D scanners, Revopoint offers models like the Revopoint MetroX 3D Scanner, which is relatively budget-friendly and provides great accuracy for personal and professional use.
Compare Prices and Features
Once you’ve narrowed down your options to a few affordable models, the next step is to compare the prices and features. Many online platforms and websites allow you to compare different models side-by-side, so you can evaluate which one offers the best value for your money.
Some key features to compare include:
Scanning Resolution: Higher resolution scanners tend to be more expensive, but they provide finer detail. Decide how much resolution you truly need for your projects.
Scanning Speed: If you’re working on large-scale projects, you’ll want a scanner that can capture data quickly. If precision is your top priority, a slower scanner may be more suitable.
Portability: If you need to move your scanner between different locations or use it in different environments, portability should be a key consideration.
Software Compatibility: Many 3D laser scanners come with proprietary software for processing scanned data. Ensure that the software is compatible with your computer and easy to use.
Look for Deals and Discounts
Another way to find an affordable 3D laser scanner is to keep an eye out for deals, discounts, and promotions. Many online retailers offer seasonal sales or special promotions on certain models, which can help you save a significant amount of money. Additionally, consider purchasing a used or refurbished scanner. Many manufacturers and retailers offer refurbished models at a lower price, and these scanners are often just as good as new ones.
Check for Reviews and Testimonials
One of the best ways to determine if a 3D laser scanner is worth the investment is by reading reviews and testimonials from other users. Look for feedback on the scanner's performance, ease of use, customer support, and durability. Online forums, review websites, and social media groups dedicated to 3D scanning can provide valuable insights and help you make an informed decision.
Consider Long-Term Costs
When evaluating the affordability of a 3D laser scanner, it's essential to consider the long-term costs, including maintenance, software updates, and additional accessories. Some scanners may come with a higher upfront cost but have lower maintenance costs, making them a more affordable option in the long run. Others may have lower initial costs but require expensive updates and accessories over time.
Finding an affordable 3D laser scanner requires a bit of research and consideration, but it's entirely possible to find a high-quality, budget-friendly option. By understanding your needs, setting a realistic budget, researching brands, comparing prices and features, and keeping an eye out for deals, you can find a scanner that provides great value without breaking the bank. Whether you’re a hobbyist or a professional, an affordable 3D laser scanner can enhance your workflow and open up new possibilities in your projects.
1 note
·
View note
Text
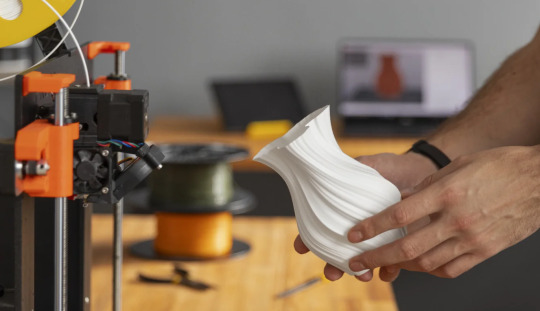
5 Tips for Optimizing 3D Printing with a 3D Scanner
3D scanning and 3D printing go hand in hand, making it easier than ever to replicate objects, customize designs, and create detailed models. However, getting the best results requires more than just scanning and hitting “print.” To truly optimize your workflow, here are five key tips to enhance your 3D printing experience with a 3D scanner.
1. Ensure High-Quality Scanning for Better Prints
A great print starts with a great scan. The quality of your 3D scan directly affects the final print, so it’s essential to optimize your scanning process. Here’s how:
Proper Lighting: Avoid direct sunlight or harsh shadows, as inconsistent lighting can create noise in your scan. A well-lit environment with soft, even lighting works best.
Stable Object Placement: If the object moves during scanning, your model may end up distorted. Use a turntable or secure the object to prevent shifting.
Correct Scanner Settings: Adjust the resolution and exposure settings based on your object’s texture and material. Shiny or transparent objects may require matting spray for better results.
By fine-tuning your scanning process, you’ll capture cleaner and more accurate models, reducing the need for excessive post-processing.
2. Clean and Optimize the 3D Model Before Printing
Even the best 3D scans often require some digital cleanup before they’re ready for printing. Post-processing your scanned model helps remove errors and improve print quality.
Fix Mesh Errors: Use software like Meshmixer, Blender, or Revo Scan to fill holes, remove unnecessary parts, and smooth out rough edges.
Reduce Polygon Count: If your model has an excessively high polygon count, it may slow down slicing and printing. Tools like MeshLab can simplify the geometry without sacrificing detail.
Ensure Watertightness: A printable model should be "watertight," meaning there are no gaps or holes in the mesh. Many software tools offer automatic repair functions to help with this.
Taking the time to refine your scanned model can make a significant difference in print success.
3. Choose the Right 3D Printing Settings
A perfect scan won’t translate into a great print unless you choose the right printing settings. The following factors can improve your prints:
Layer Height: Lower layer heights (e.g., 0.1 mm) provide finer details, while higher settings (e.g., 0.3 mm) speed up the printing process. Choose based on your project’s needs.
Infill Density: Solid objects require high infill percentages, while decorative pieces can use lower infill to save material.
Support Structures: If your scanned model has overhangs or complex geometry, supports may be necessary to ensure a successful print. Customize them in your slicer software to make post-processing easier.
Experiment with these settings to find the best balance between speed, strength, and detail for your prints.
4. Calibrate Your 3D Printer Regularly
No matter how perfect your scan is, a poorly calibrated 3D printer can ruin your print. Regular calibration ensures precision and prevents printing issues.
Bed Leveling: A properly leveled print bed is crucial for adhesion and accuracy. Check and adjust it before each print.
Extruder Calibration: Make sure your printer extrudes the correct amount of filament. Over- or under-extrusion can lead to failed prints.
Check for Mechanical Issues: Loose belts, worn-out nozzles, or misaligned axes can cause print defects. Routine maintenance helps keep everything running smoothly.
Taking care of your printer will give you consistent, high-quality results when working with 3D scans.
5. Experiment and Iterate for the Best Results
Even with careful planning, your first print might not be perfect. Instead of getting frustrated, use it as an opportunity to refine your process.
Analyze Print Failures: Look for issues like warping, layer shifting, or poor adhesion and adjust settings accordingly.
Modify the Model if Needed: If certain details didn’t print well, tweak your 3D model to enhance the structure or reduce problematic areas.
Test Different Materials: PLA is great for quick prints, but if you need strength or flexibility, consider using PETG, ABS, or TPU.
The more you experiment, the better you’ll understand how to optimize your workflow, leading to consistently better prints.
Using a 3D scanner with a 3D printer can open up endless possibilities, from replicating objects to creating custom designs. By focusing on high-quality scanning, optimizing your 3D model, fine-tuning printing settings, maintaining your printer, and continuously improving your process, you can achieve professional-level results. So, start experimenting and take your 3D printing projects to the next level!
1 note
·
View note
Text
How to Scan, Edit, and Print: Mastering 3D Scanning for 3D Printing
The world of 3D printing is a creative playground where imagination meets technology. However, many makers and hobbyists are now discovering that 3D scanning can be just as important as 3D printing itself. With the ability to capture real-world objects and turn them into digital 3D models, 3D scanning opens up new possibilities for customization, repair, and innovation. In this blog, we’ll guide you through the steps of scanning, editing, and printing your own creations using 3D scanning technology.

Step 1: Scanning – Capturing Your Object
The first step in using 3D scanning for printing is to capture the physical object. Whether you want to replicate an existing item or modify it for a new purpose, 3D scanning allows you to easily digitize the physical world.
To start scanning, you’ll need a 3D scanner. There are various types available, ranging from handheld scanners to stationary ones, depending on the complexity and size of the object you wish to scan. Handheld scanners are excellent for scanning smaller objects, while more advanced desktop 3D scanners can handle larger or more intricate items.
When scanning, it’s essential to ensure the object is well-lit and stable to avoid inaccuracies. Move the scanner around the object to capture its full geometry, paying special attention to the details that matter most. Some 3D scanners come with software that automatically stitches the scan together, while others may require manual adjustments to ensure the model is complete.
Step 2: Editing – Refining Your 3D Model
Once you’ve captured your object, the next step is editing. Raw 3D scans often need a little touch-up to ensure they’re ready for printing. This stage allows you to modify the model to suit your needs.
There are several tools and software options available for editing your 3D scans. Programs like Meshmixer, Blender, and Autodesk Fusion 360 provide powerful features to clean up models, remove any unwanted artifacts, and add or adjust features. You can fix issues such as holes or gaps in the mesh, smooth out rough surfaces, or even resize and scale the model.
One of the great things about editing a 3D scan is that you can add custom modifications to your model. Whether you’re enhancing a part, combining multiple scans into one object, or designing something completely new based on your scanned model, the possibilities are limitless. You can even make slight tweaks to the design to improve functionality or aesthetics before printing.
Step 3: Printing – Bringing Your Digital Model to Life
Now that you have a refined 3D model, it’s time to bring it to life with your 3D printer. Before you hit "print," there are a few things to keep in mind to ensure your model prints successfully.
Start by checking the file format. Most 3D printers work with STL or OBJ files, which are common formats for 3D printing. If your scan is in a different format, you may need to convert it using software like MeshLab or Netfabb.
Next, choose the right print settings for your project. Consider the material you're using (PLA, ABS, resin, etc.) and adjust the print settings, such as print speed, layer height, and infill density, to match the requirements of your design. The quality of the print can vary greatly depending on these settings, so make sure to fine-tune them based on your object’s complexity.
Don’t forget to check for any print issues before starting. This includes ensuring the printer bed is level and the filament is loaded correctly. Once everything is ready, hit "start," and watch your model take shape layer by layer.
Step 4: Post-Processing – Finishing Your Print
After your object is printed, you’ll likely need to do some post-processing to achieve a smooth, professional finish. This could include removing any support structures, sanding the surface, or adding paint for a polished look.
For items printed with resin, you may need to cure the print under UV light to harden it further. Other finishing techniques may include smoothing rough edges, filling in imperfections, or even assembling parts if your model consists of multiple components.
While post-processing can take time, it’s essential for ensuring the final product looks its best. It’s also a great opportunity to personalize your printed objects even further.
Why Mastering 3D Scanning Is Essential for Makers
Mastering the process of scanning, editing, and printing with 3D technology offers incredible advantages to makers, hobbyists, and inventors. By combining 3D scanning with 3D printing, you can create custom parts, repair broken objects, and explore an entirely new world of design possibilities. The ability to easily capture real-world objects, tweak them digitally, and print them with precision makes this combination of technologies indispensable for anyone passionate about creating.
With 3D scanning and printing, the creative possibilities are endless. By learning how to scan, edit, and print, you’ll be able to bring your ideas to life in ways that weren’t possible before. Whether you’re recreating a lost part, customizing a design, or building something entirely new, mastering 3D scanning for 3D printing opens up a world of opportunities for makers everywhere. Don’t just imagine your creations—bring them to life!
1 note
·
View note
Text
Rapidly Capture 3D Models with a 3D Scanner!
Unlock the power of 3D scanning and revolutionize your modeling process! With a cutting-edge 3D scanner, you can effortlessly capture real-world objects and transform them into detailed 3D models. Say goodbye to manual measurements and time-consuming modeling techniques. Let's explore how a 3D scanner can accelerate your workflow and bring your creations to life!
Effortless Scanning Gone are the days of painstakingly measuring and recreating objects manually. A 3D scanner enables you to capture the geometry and texture of an object with a simple scan. Just point and shoot, and watch as the scanner creates a digital replica in real time.
High Precision and Accuracy Achieve unparalleled precision and accuracy with a 3D scanner. Whether you're working on product design, architecture, or art projects, a 3D scanner ensures that every intricate detail is captured faithfully. From the finest textures to complex geometries, the scanner preserves the essence of the object in stunning detail.

Time Efficiency Speed up your modeling process significantly with a 3D scanner. Instead of spending hours manually measuring and recreating objects, a scanner can capture the entire object in minutes. This time-saving technology allows you to focus on the creative aspects of your work, bringing your ideas to life faster than ever before.
Versatile Applications A 3D scanner opens up a world of possibilities across various industries. Architects can quickly scan buildings and landscapes for accurate site analysis. Product designers can create precise 3D models for prototyping and manufacturing. Artists can capture real-world objects and incorporate them into their digital creations. The applications are endless!

Seamless Integration Integrate your 3D scanner seamlessly into your preferred modeling software. Most 3D scanners come with compatible software that allows you to process and refine your scanned data effortlessly. You can edit, clean up, and optimize your 3D models directly within the software, ensuring a smooth transition from scanning to final output.
Embrace the Future Embrace the power of 3D scanning and revolutionize your modeling workflow. With a 3D scanner, you can effortlessly capture intricate details, achieve unparalleled accuracy, and save valuable time. Whether you're a designer, artist, or engineer, a 3D scanner is a game-changer that will elevate your creations to new heights. Step into the future of modeling and unlock endless possibilities with a 3D scanner!
1 note
·
View note
Text
Unleashing the Potential of 3D Printing in Conjunction with 3D Scanning
In today's dynamic technological landscape, the synergy between 3D printing and 3D scanning has unlocked a realm of possibilities across various industries. Amid this transformative partnership, one question stands out: What is the most popular use of 3D printing today?
The answer lies in the convergence of 3D printing and 3D scanning technologies, a fusion that has propelled innovation across multiple sectors.
Prototyping and Product Development

One of the most prevalent applications of this amalgamation is in prototyping and product development. Companies leverage 3D scanning to capture real-world objects or prototypes with precision and detail. Subsequently, these scans serve as the foundation for iterative design improvements. Through 3D printing, these digital replicas are materialized into physical prototypes swiftly and cost-effectively. This iterative process accelerates product development cycles, enabling companies to bring products to market faster while minimizing expenses.
Customization and Personalization

The marriage of 3D printing and 3D scanning has democratized customization across industries. From bespoke consumer goods to tailored medical devices, the ability to scan and replicate intricate details allows for unparalleled personalization. Whether it's crafting custom-fit prosthetics or designing unique jewelry pieces, this technology empowers individuals to express their creativity and cater to diverse needs and preferences.
Manufacturing Tooling and Maintenance

In the realm of manufacturing, 3D printing coupled with 3D scanning revolutionizes tooling and maintenance processes. Manufacturers utilize 3D scanning to capture existing equipment or components, facilitating the seamless replacement of worn or damaged parts. Moreover, 3D printing enables the rapid production of specialized tooling and fixtures tailored to specific manufacturing requirements. This agility in tooling not only streamlines production workflows but also enhances operational efficiency and reduces downtime.
Healthcare Advancements

In healthcare, the integration of 3D printing and 3D scanning heralds groundbreaking innovations. Medical professionals harness 3D scanning to generate precise anatomical models from patient scans, facilitating pre-surgical planning and education. Additionally, the fusion of these technologies enables the fabrication of patient-specific implants and prosthetics, optimizing treatment outcomes and enhancing patient comfort. Looking ahead, the convergence of 3D printing and bioprinting holds the promise of generating functional tissues and organs for transplantation, ushering in a new era of regenerative medicine.
Educational Empowerment

The synergy between 3D printing and 3D scanning extends its reach into education, empowering students with hands-on learning experiences. Educational institutions leverage these technologies to foster creativity, design thinking, and problem-solving skills among students. By engaging in projects that involve 3D scanning and printing, learners gain practical insights into concepts related to engineering, design, and digital fabrication, preparing them for future careers in an increasingly digitized world.
In conclusion, the most popular use of 3D printing today transcends any single industry or application. Instead, it emerges from the symbiotic relationship between 3D printing and 3D scanning, catalyzing innovation, customization, and empowerment across diverse domains. As these technologies continue to evolve, their combined potential to reshape industries and enrich lives remains boundless.
1 note
·
View note
Text
What is the difference between a DEXA scan and a 3D body scan?
A DEXA scan, or dual-energy X-ray absorptiometry scan, is a medical imaging technique primarily used to measure bone density. It's often used to diagnose osteoporosis and assess the risk of fractures.

DEXA Scan (Dual-Energy X-ray Absorptiometry): Purpose: Primarily used to measure bone mineral density (BMD) and assess the risk of fractures. How it works: The scan uses two X-ray beams with differing energy levels to measure the amount of X-rays that pass through the bones. This information helps determine bone density.
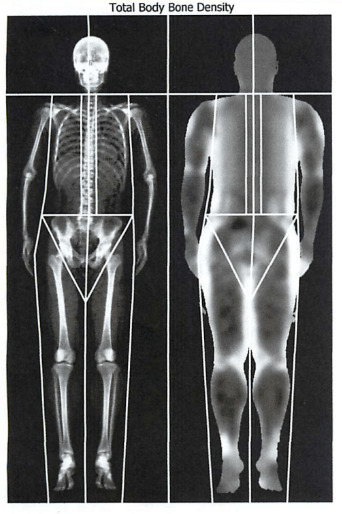
Uses: Besides diagnosing osteoporosis, DEXA scans can also be used to assess body composition, especially the percentage of body fat and lean muscle mass. Benefits: It's a quick, non-invasive procedure that exposes the patient to very low levels of radiation.
On the other hand, a 3D body scan is a non-invasive imaging technique used to create a digital representation of a person's body shape and measurements. This scan can be used for various purposes, including body measurements for clothing, fitness tracking, and visualizations for weight loss or body composition analysis.

3D Body Scan: Purpose: Used to create a three-dimensional digital model of a person's body shape and measurements. How it works: Typically, a person stands inside a scanning booth or platform while multiple sensors or cameras capture images from different angles. Software then combines these images to create a 3D model.

Uses: These scans are used in various industries, including fashion (for custom clothing), fitness (to track body changes), and healthcare (for body measurements and analysis). Benefits: Provides highly accurate and detailed measurements, which can be useful for tracking fitness progress, creating custom clothing, or planning cosmetic procedures.
In summary, the main difference is that a DEXA scan focuses on bone density measurement, while a 3D body scan focuses on creating a 3D model of the body for various applications.
1 note
·
View note
Text
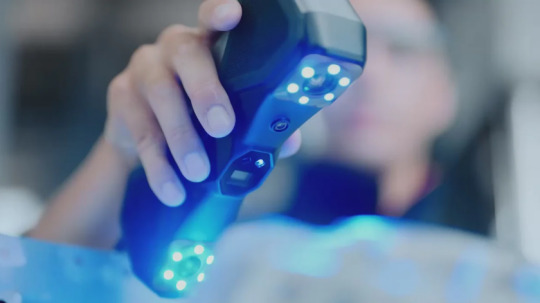
Scanning Experience Sharing
I've had the opportunity to use various 3D scanners, each with its own set of features and, in my opinion, some minor issues. Recently, a friend of mine purchased the Revopoint MIRACO 3D scanner and invited me to try it out at his place.

Right from the moment we opened the package, I was immediately impressed. The scanner features a large, foldable display screen that allows for easy adjustment of the scanning angle, and it has a solid, substantial feel in hand (slightly heavier than previous models, but I actually like this added weight).
One of the standout features for me was the wireless scanning process. Unlike other scanners that often require dealing with multiple cables, the MIRACO scanner eliminates this inconvenience, allowing for a smoother scanning experience.
After scanning, you can directly process the scans on the device itself, just as advertised, making it truly an all-in-one solution. Additionally, you can also import the models into computer software for further editing.
The scanner offers two scanning modes, making it easy to scan objects of different sizes. This versatility is very convenient. The battery life is also impressive, with a single charge lasting for up to two hours. Although we didn't use it for that long, we scanned several objects, and the results were consistently impressive.
Overall, the Revopoint MIRACO 3D scanner has provided me with an excellent scanning experience. I would highly recommend it to anyone interested in 3D scanning.
1 note
·
View note
Text
Some ways to get 3D models quickly
1. Using a 3D scanner: Using a professional 3D scanner allows you to quickly and accurately obtain a 3D model of an object. These scanners use laser or optical sensors to capture the geometry and texture of an object and convert it into a digital model. You can choose between a portable scanner or a desktop scanner, depending on your needs and budget.
2. Scanning with Structured Light: Structured light scanning is a common 3D scanning technique that captures the 3D shape of an object by projecting a light or raster pattern onto the object and using a sensor to record the deformation of the light. This method is typically fast and accurate, and is suitable for small objects or applications that require high resolution.
3. Using Photogrammetry: Photogrammetry combines photography and computer vision to acquire a 3D model by photographing multiple angles of an object. Using specific software, you can import and process these photos to produce an accurate 3D model. This method is suitable for larger objects or scenes and is relatively more affordable.
4. Downloading Existing 3D Models: There are many websites and platforms on the Internet that offer various types of existing 3D models, including free and paid resources. You can search for models that suit your needs and download them for use. This method works for some common objects and shapes and provides quick access to the required models.
1 note
·
View note