
Don't wanna be here? Send us removal request.
Statistics
We looked inside some of the posts by om-web-solution and here's what we found interesting.
Average Info
Notes Per Post
0
Likes Per Post
0
Reblog Per Post
0
Reply Per Post
0
Time Between Posts
14 days
Number of Posts By Type
Text
5
Last Seen Tumblr Blogs


Fun Fact
Tumblr was acquired by Yahoo for $1.1B in 2013.
Text
PHP Introduction
Hello Everyone,
In this blog post, we learn about PHP Introduction.
PHP Introduction:
PHP was created by Rasmus Lerdorf in 1994 but appeared in the market in 1995.
PHP is a widely used server side programming language and used to create dynamic web pages.
Before you learn PHP you should have basic knowledge of HTML, CSS, Javascript.
What Is PHP?
PHP stands for “Hypertext Preprocessor”.
PHP is a Object Oriented Programming language.
PHP is widely used open source scripting language.
PHP script is executed on the server and the result is the return on the browser as a plain text.
PHP file can have extension “.php”.
PHP is simple and easy to learn.
PHP is faster then other scripting language.
What can PHP Do?
PHP can generate dynamic web page content.
PHP can collect form data.
PHP can send and receive cookie.
PHP can add, edit, delete data into database.
PHP can support several protocols like HTTP, POP3, SNMP and many more.
PHP is a platform independent i.e. PHP can run on various platforms like Windows, Linux, Unix, Mac etc.
PHP is a loosely typed language i.e. PHP allows to use a variable without declaring its datatypes.
Conclusion:
So this blog is about PHP Introduction. Feel free to do Comment.
Stay tuned with us to get new updates on PHP.
0 notes
Text
How to Add Custom Header and Top Link in Magento 2
Hello Everyone,
In this blog, we will learn about how to add Custom Header and Top Link in Magento 2.
Header link is displayed for both guest and logged in customer.
Top link is displayed for only logged in customers.
Without wasting your time, let us guide you straight away. Follow the easy step given below to Add Custom Header and Top Link in Magento 2.
STEPS FOR ADD CUSTOM HEADER AND TOP LINK IN MAGENTO 2
Step 1: Create default.xml file
app/code/Vendor/Extension/view/frontend/layout/default.xml
<?xml version=”1.0″?>
<page xmlns:xsi=”http://www.w3.org/2001/XMLSchema-instance” xsi:noNamespaceSchemaLocation=”urn:magento:framework:View/Layout/etc/page_configuration.xsd”>
<body>
<referenceBlock name=”header.links”>
<block class=”Magento\Framework\View\Element\Html\Link” name=”header-menu”>
<arguments>
<argument name=”label” xsi:type=”string” translate=”true”>Custom Header Menu</argument>
<argument name=”path” xsi:type=”string”>*/*/*</argument>
</arguments>
</block>
</referenceBlock>
<referenceBlock name=”top.links”>
<block class=”Magento\Framework\View\Element\Html\Link” name=”top-link”>
<arguments>
<argument name=”label” xsi:type=”string” translate=”true”>Custom Top Link</argument>
<argument name=”path” xsi:type=”string”>*/*/*</argument>
</arguments>
</block>
</referenceBlock>
</body>
</page>
Step 2: Finally run the below commands
$ php bin/magento cache:flush
Step 3: Output:
https://omwebsolution.info/wp-content/uploads/2024/09/image-1.png
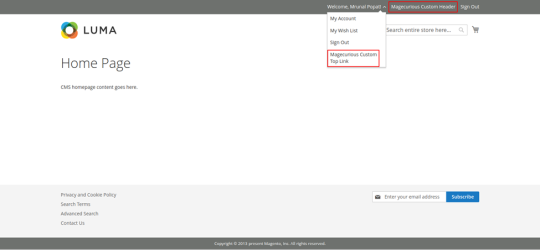
If you want to add custom block in your custom header or top link follow the below steps.
Step 1: Create default.xml file
app/code/Vendor/Extension/view/frontend/layout/default.xml
<?xml version=”1.0″?>
<page xmlns:xsi=”http://www.w3.org/2001/XMLSchema-instance” xsi:noNamespaceSchemaLocation=”urn:magento:framework:View/Layout/etc/page_configuration.xsd��>
<body>
<referenceBlock name=”header.links”>
<block class=”Vendor\Extension\Block\Customlink” name=”header-menu”>
<arguments>
<argument name=”label” xsi:type=”string” translate=”true”>Custom Header Menu</argument>
<argument name=”path” xsi:type=”string”>*/*/*</argument>
</arguments>
</block>
</referenceBlock>
</body>
</page>
Step 2: Create Customlink.php file
app/code/Vendor/Extension/Block/Customlink.php
<?php
namespace Vendor\Extension\Block;
class Customlink extends \Magento\Framework\View\Element\Html\Link
{
/**
* Render block HTML.
*
* @return string
*/
protected function _toHtml() {
if (false != $this->getTemplate()) {
return parent::_toHtml();
}
$label = $this->escapeHtml($this->getLabel());
return ‘<li><a ‘ . $this->getLinkAttributes() . ‘ >’ . $label . ‘</a></li>’;
}
}
Final Thoughts:
So this was the easiest way which we have told you in this blog. This is how you can Add Custom Header and Top Links in Magento 2. Hope you liked the blog.
So quickly go to the comment box and tell me how you like this blog?
Stay tuned with us on our site to get new updates of Magento.
Thanks for reading and visiting our site.
0 notes
Text
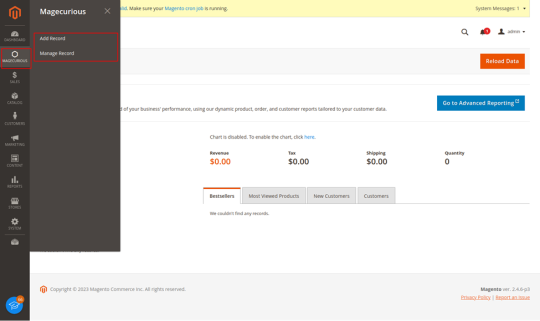
How to Add Custom Admin Menu in Magento 2
Hello Everyone,
In this blog, we will learn about how to Add Custom Admin Menu in Magento 2.
Magento gives a wide range of admin menu options although sometimes wants to add custom admin menu and submenu in the store admin sidebar.
Without wasting your time, let us guide you straight away. Follow the easy step given below to Add Custom Custom Admin Menu in Magento 2.
STEPS FOR ADD CUSTOM HEADER AND TOP LINK IN MAGENTO 2
Step 1: Create menu.xml file
app/code/Vendor/Extension/etc/adminhtml/menu.xml
<?xml version=”1.0″?>
<config xmlns:xsi=”http://www.w3.org/2001/XMLSchema-instance” xsi:noNamespaceSchemaLocation=”urn:magento:module:Magento_Backend:etc/menu.xsd”>
<menu>
<add id=”Vendor_Extension::magecurious” title=”Magecurious” module=”Vendor_Extension” sortOrder=”10″ resource=”Vendor_Extension::magecurious”/>
<add id=”Vendor_Extension::addrecord” title=”Add Record” module=”Vendor_Extension” sortOrder=”10″ action=”helloworld/index/index” resource=”Vendor_Extension::addrecord” parent=”Vendor_Extension::magecurious”/>
<add id=”Vendor_Extension::managerecord” title=”Manage Record” module=”Vendor_Extension” sortOrder=”10″ parent=”Vendor_Extension::magecurious” action=”helloworld/index/index” resource=”Vendor_Extension::managerecord”/>
</menu>
</config>
Step 2: Finally run the below commands
$ php bin/magento setup:upgrade
$ php bin/magento cache:clean
$ php bin/magento cache:flush
Final Thoughts:
So this was the easiest way which we have told you in this blog. This is how you can Add Custom Admin menu and submenu in Magento 2. Hope you liked the blog.
So quickly go to the comment box and tell me how you like this blog?
Stay tuned with us on our site to get new updates of Magento.
Thanks for reading and visiting our site.
0 notes
Text
A Full List Of Magento 2 Events and Its Uses
0 notes
Text
Useful Command List for Beginners In Magento 2
Hello Everyone,
In this blog, we will learn about Magento 2 Useful Commands for beginners.
It is not possible to keep all commands in mind when you just start a Magento 2.
So we have created a list of useful commands for Magento 2.
Without wasting your time, let us guide you straight away.
LIST OF MAGENTO 2 USEFUL COMMANDS
Setup Commands:
Cache Commands:
Deploy Commands:
Indexers Commands:
Module Commands:
Sample Data Commands:
i18n Commands:
Catalog Commands:
Maintenance Commands:
Admin Commands:
Cron Commands:
Theme Command:
Info Commands:
Store Commands:
Dev Commands:
Config Commands:
Final Thoughts:
So this was the easiest way which we have told you in this blog. Hope you liked the blog.
So quickly go to the comment box and tell me how you like this blog?
Stay tuned with us on our site to get new updates of Magento.
Thanks for reading and visiting our site.
0 notes