
hi! i'm rooha, a 3rd year computer science student. this blog is all about my project for my physical computing module! enjoy!
Don't wanna be here? Send us removal request.
Statistics
We looked inside some of the posts by pantonemoodbox-blog and here's what we found interesting.
Average Info
Notes Per Post
1
Likes Per Post
1
Reblog Per Post
0
Reply Per Post
0
Time Between Posts
7 days
Number of Posts By Type
Text
8
Last Seen Tumblr Blogs


Fun Fact
In February 2021, Tumblr had 518.6 million blog accounts.
Text
Spreadsheet 📈 Update + Testing 🧪 + Final Thoughts 💭
As I come closer to the end of this project, I think it’s best if I show you how the progress is coming along....
As you may remember, I started off with 3 initial moods, this was because I didn’t want to include too many moods to confuse the program with at first, not until I had completed the code for it and the circuit too 😊
What I have been doing lately is feeding the spreadsheet data, (see below)

As you can see, the spreadsheet which I have created on Google Sheets, takes data from the button widget I created on my phone, (see picture below for reference)

Thanks to IFTTT - this made it easier for me to record data on how I have been feeling lately (also to test it!)
By feeding it data constantly and also coding the program using PyFirmata & then testing out my mood box. I’ll show you how the box looks like now....

This image above, shows how the breadboard sits on top of the other circuit which is working perfectly fine now.
a side note: I also stuck a baking sheet to the lid so it’s not completely see through and thus it looks cleaner then.
A way to see how the Mood Box is working now, I will attach a video demonstration to make it easier to help you understand the process.
youtube
Overall, It’s been a great ride. I have enjoyed every aspect of this project, from start to beginning.
Although there were some ups and downs and things didn’t go like how I had planned initially. There were many aspects where I felt like I could’ve done so much better such as, creating an RGB LED which would correspond to the mood directly and promptly however due to lack of time I didn’t get to that stage.
On the contrary I do feel like this project has potential to become something more than just a words-omitting mood box, the purpose was to create an emotion machine, giving people an experience and prioritising their feelings. I think I did reach my goal of creating a ~mood box~ because I did get the moods to work in relation to how you are actually feeling, with a little help from Machine Learning algorithms, to predict moods for yourself in the future, it really is a work of art in my opinion. The aesthetics of it match well with what I had thought of, even if I didn’t create a lamp-shade-like-globe, I did end up with something I am genuinely pleased with and I hope you like it as much as I do too. 😌✌🏻☮️
0 notes
Text
The important part... CODE CODE CODE! 🖥
You may have heard the saying “Hardware is useless without software”, well that’s very true and to actually make anything we have to come up with good software.
I have always been fascinated by IoT, Internet of Things. Things being controlled from the internet, or as they call it nowadays, The Cloud ☁️! I wanted to figure out a way of getting the Arduino board to pick up information from an API and use the information to do something.
Arduino has a feature called Firmata, which is a way for the board to communicate with any host computer using the serial protocol. Using Firmata, the Arduino device can listen for a series of signals via the serial port (USB connection in most cases) and provides callback functions which can control pin status with both read and write access.
However, I stumbled upon another issue not far into my quest, the problem of connecting to the internet. To do this, I needed a WiFi interface for the Arduino to connect to which wasn’t available to me and since I was going to be using Firmata anyways, I looked up some libraries to help me with this by using Python. Lo and behold, PyFirmata is just what I was looking for!
Firstly, I loaded the “Standard Firmata” code onto the Arduino board to test the library, to do this you can open the Arduino IDE and navigate to File -> Examples -> Firmata -> StandardFirmata.
I could then write some python code making sure to connect to my board.
from pyfirmata import Arduino, util board = Arduino('/dev/cu.usbmodem14101') # This is your board board.digital(6).write(1); # Send a signal of 1 to pin 6
As my aim was to combine the Machine Learning aspect with this project, I wrote a simple Python script to query my API which I deployed to an EC2 instance in Amazon AWS. This meant that my API was flexible and can be accessed from anywhere without the need to install dependencies and deploying a local API instance which would introduce issues if I created multiple mood boxes.
Prerequisites:
Python 3.6
Python modules: pyFirmata, requests, json
Arduino IDE
My Arduino code was then the following:
#include #include LiquidCrystal lcd(12, 11, 5, 4, 3, 2); int lastLine = 1; float RGB[3]; const int RED_PIN = 6; const int GREEN_PIN = 10; const int BLUE_PIN = 9; void stringDataCallback(char *stringData){ if ( lastLine ) { lastLine = 0; lcd.clear(); } else { lastLine = 1; lcd.setCursor(0,1); } lcd.print(stringData); } void setup() { lcd.begin(16,2); pinMode(RED_PIN, OUTPUT); pinMode(GREEN_PIN, OUTPUT); pinMode(BLUE_PIN, OUTPUT); Firmata.setFirmwareVersion( FIRMATA_MAJOR_VERSION, FIRMATA_MINOR_VERSION ); Firmata.attach( STRING_DATA, stringDataCallback); Firmata.begin(); } void loop() { while ( Firmata.available() ) { for (int x = 0; x < 768; x++){ Firmata.processInput(); showRGB(x); delay(10); } } } void showRGB(int color) { int redIntensity; int greenIntensity; int blueIntensity; if (color <= 255){ redIntensity = 255 - color; greenIntensity = color; blueIntensity = 0; } else if (color <= 511){ redIntensity = 0; greenIntensity = 255 - (color - 256); blueIntensity = (color - 256); } else { redIntensity = (color - 512); greenIntensity = 0; blueIntensity = 255 - (color - 512); } analogWrite(RED_PIN, redIntensity); analogWrite(BLUE_PIN, blueIntensity); analogWrite(GREEN_PIN, greenIntensity); }
As the code shows, I have connected the LCD to this circuit and thus defined the pins that are being used. I have also created a RGB LED loop which cycles through various different colours to make the moodbox look aesthetic and ambient.
I then wrote the following python script to control the board using my deployed API.
from pyfirmata import Arduino, util, STRING_DATA import requests, time import json board = Arduino('/dev/cu.usbmodem14101') def msg( text ): if text: board.send_sysex( STRING_DATA, util.str_to_two_byte_iter( text ) ) else: board.send_sysex( STRING_DATA, util.str_to_two_byte_iter( ' ' ) ) def loadData(): data = json.loads(requests.get("http://ec2-3-8-139-138.eu-west-2.compute.amazonaws.com/").text) return [time.asctime()[:16], data['body']['mood'], data['body']['probability']] while (True): screens = loadData() msg("TIME") msg(screens[0]) time.sleep(5) msg("MOOD") msg(screens[1]) time.sleep(5) msg("ACCURACY") msg(str(screens[2])) time.sleep(5)
As the above code shows, the script queries the API to get the values to display, and cycles through the various information to display on the LCD display.
To run the code I did the following:
Connect the Arduino board to my laptop
Upload the code from Arduino IDE to the board
Run the python script while the board is connected using python3 myscript.py
The board should receive signals from Python and the LCD display should start to show some text as well as the LEDs lighting up
After some rigorous testing and number changing, I saw good results and the mood box functioned very well.
Overall, good results!
0 notes
Text
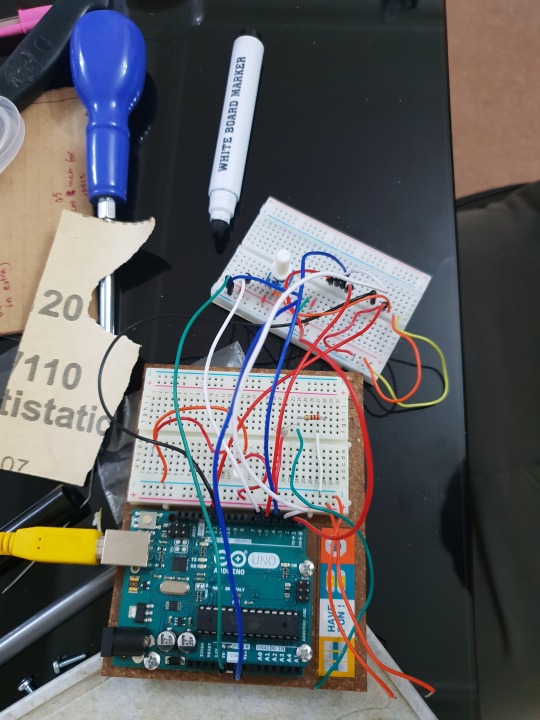
Update on the circuit 🔌⚡️
As this week went by, I decided to create a circuit where the LCD would turn on as well as the RGB LED would change colour gradually. This LED I decided to attach to the breadboard stuck onto the brown wooden casing. (See below)

As you can see from this image, the side of this casing is slightly messed up but this was because I wanted to make sure the breadboard and Arduino would sit nicely in the plastic container.
Here you can see that it sits comfortably in the plastic container. ⬇️

I also added 3 extra LED’s, this is because they were adding to the different colours and it didn’t ruin the circuit. This was an aesthetic design decision. 🧚🏻♀️
Now that the LCD was screwed onto the lid and the wooden casing was attached to the bottom of the container...

In terms of how I decided to come to these hardware decisions, As the LCD was screwed onto the lid, there was no way for me to attach both circuits on one breadboard, thats why I had to do them on two separate ones, plus the LCD itself took a lot of space on one breadboard, I didn’t want it to be messy and therefore decided to use the second breadboard for a simple circuit on the LEDs.
If you look at the pictures above, the RGB LED is attached to pins 6, 9, and 10. This is because the were the only ones left and I really wanted the colours to come through to add the final touch to the box.
Furthermore, as the LCD required a lot of pins and the potentiometer was vital for it to work, I decided to keep that the way it was and use pins 12,11,5,4,3 and 2 for them. This way the two circuits won’t get mixed up and there wouldn’t be wires all over the place! I like keeping things neat. The only time the two circuits were to meet is when I needed the power and ground wires to go to the second breadboard, this was simple to do as all I needed were 2 wires plugged into the +/- sides of both boards. I have also created a video demonstrating the hardware for visualisation purposes. This I will attach with the submission.
Also, to make visualisation a bit better I decided to create a pretty schematic of this project, to help understand the hardware components, see below.

Other than that, everything looks good in terms of hardware! Next week I will be showing you how I programmed the Arduino with my online spreadsheet (remember we spoke about it in the beginning!)
Exciting stuff!! 🥳
0 notes
Text
A few changes...😭🤯 AND a new look 😻
So, over the last few days I had planned to order a plastic sheet for the casing of my project, this was a translucent sheet which would cover all the wires and give the mood box a good aesthetic look too, however once it came, the sheet was not enough for the project and I didn’t want to waste another week waiting for deliveries.
I also came across another idea...whilst thinking of implementing the Machine Learning aspect for it, I decided to attach a LCD screen to show the mood written up rather than through corresponding colours. *shock* I know! the whole meaning behind my project idea was to have colours right? Well, reality hit hard. I also had to realise that if I wanted to put colours into the project, I’d need more than a month to work on this! 😔Nonetheless, I played around with the LCD and realised my project has more potential if it’s done through words BUT we stick to using LED’s in the background for ambiance! 🕯
Excuse the mess but, this is what I had come up with, to use a simple circuit for the LED light along with another circuit for the LCD, as this was me testing out it’s initial stages, I was finding it really had to keep the Arduino locked onto the brown casing, therefore I had to unscrew it off.
Coming back to not being able to create a plastic casing with the sheet I had ordered initially, I decided to take a practical route by using a plastic container. This way it would stay in place and it allowed me to screw the LCD onto the lid of it, Here are some pictures I took as I was creating the casing.


As you can see from the images above, the look of the actual circuit immediately changed as it started to look more clean with the plastic box. To make this look more aesthetic as I intend on keeping it in my room, I decided to add a vinyl marble sticker around the bottom part of the container, this is because my room has a white aesthetic and this way it would fit right in!

This gives it a sleek look ☝
So far I have tried to make sure the look of the casing is appropriate enough for a ~mood box~
Stay tuned to see what I come up with next week! 😉
0 notes
Text
An update on the progress 🦄
I have been playing around with some code along with some more shape ideas for my project. I discovered that creating a nicer appearance of my box would make it more aesthetically pleasing as well as a better fit for what I’m going for.
I’ll show you some pictures of what it looks like now and how it’s coming along, including the colours it changes to.

It’s a colourful bunch but its not exactly what I’m going for..although now it has a box made out of paper it does look nicer, I’m planning to create a case for it using 3D printing as it will give it a more solid casing.
There are still some key colours that i am missing, such as: - yellow - red - green - a brighter orange (as the one in the picture looks peach)
the code I was using had the following standard equation to calculate each RGB value:
RGB[0]=255*abs(sin(x*(180/PI))); // calculates brightness for red led RGB[1]=255*abs(sin((x+PI/3)*(180/PI))); // calculates brightness for green led RGB[2]=255*abs(sin((x+(2*PI)/3)*(180/PI))); //calculates brightness fo blue led
I have also been testing out ways to track mood remotely using a smartphone. I decided to make an applet on IFTTT (If this then that) which lets me click a button widget from my phone and then create a database on google drive where each mood gets stored with a date and time.

So the plan for this week is to focus on finding a way to link the arduino with this service created, buy some more RGB Led as I want the light to be brighter and to print a solid case for my arduino and breadboard...I am hopeful I should be halfway done by next week 🎉
until then, stay tuned!
0 notes
Text
A few prototypes ⚡️💡
After I figured out what my vision for this project was, I decided to play around with a bit of code and colour, I was trying out different colours using an RGB led and deciding whether I’d want the colours to change abruptly, or would I prefer it to be ambient...or maybe just one colour for an hour or two..? depending on how often you’d want to change the mood box..really it all depends on the person, right?
Let me just show you what I got up to this week!
This is the circuit I created, pretty basic and standard.

1. The first one was to do with the light being able to change slowly, kinda like mood lighting.
youtube
2. The second one is a bit different as it uses the same circuit and lamp shade I created (using scrap paper) but omits different colours and the delay time is different too.
youtube
Overall, I got in touch with my vision and understood what is it that I truly imagine this project to be in the end. I can now start on developing the next step which includes a bit of software work, along with testing out more prototypes to help me figure out exactly what I can create in the next few weeks, stay tuned! ✌🏻
0 notes
Text
Planning...📝
My first step towards creating this project is to plan my idea and write up some questions I had within myself which needed to be discussed...

Here I have my planning by hand, where I figure out what type of shape I’d like my mood box to have along with any extra additions, Let me help you understand the sketch above.
Let’s begin with the first sketch of me figuring out the kind of lamp this would be, as I mentioned in last week’s blog post, I want to create a mood box which can store how an individual is feeling alongside be able to visualise it in colours.
Another question I had was with regards to this being a ‘pantone’ mood box, where do the pantone colours go then? Will I be creating a slot for where I can pop the card in and the colour would show? Or is it just a fancy name which gives my mood box some personality? SoI did some research into this and found out that there is already a project done by somebody which uses this methodology: https://shinework.io/post/pantone-light-arduino/
This made me realise that maybe going down that rabbit hole might not be a good idea as it defeats the purpose of being a ‘mood’ box then. So I got down to some more research and more planning, where I believe I am content with the project idea....
*drum roll*
PANTONE MOOD BOX...yes the name will stay the same but that’s because I like how it sounds, also the idea of this mood box is to collect how you’re feeling throughout the day and it will showcase that in the box.
As I am integrating some machine learning into this, I am hoping to be able to control the moods via a mobile app, so you can remotely access your moods and thus emit them onto the mood box, the box will stay that colour until you decide to change it later during the day. By using machine learning, I can train the box in a way that after a week or two, it learns your mood patterns and thus tries predicting them for the following day.
To conclude, I will need to design some mock up prototypes of this project, play around with a bit of code and colour, see what I come up...stay tuned!
0 notes
Text
What is my project about? 🤔
So, I initially came up with two ideas for my project. Both related to emotions and colours!
The first one was a twitter mood box, this would use data from twitter such as hashtags, tweets and things people share all over the world, creating it into 6 different moods, happy, sad, angry, confused, surprised and in love. The box would light up depending on how the world was feeling. For example, if a football team was to lose and people were all tweeting about it, the mood box would turn orange.
The second idea was a pantone box, this would be very simplistic and minimal as it would have lights and a sensor which detects colours from pantone cards. It has no purpose as such but when it allows you to select a colour of your choice and display it via the lights. Cute and simple.
I gathered research for both project ideas and also discussed with the lab assistants, I wanted to do something complex and fun but also due to the time limitation, I didn’t want to start something I wouldn’t be able to complete. Therefore, I eventually decided to create a pantone mood box. This is sort of a mixture of the both, as instead of it being pointless and meaningless, a pantone mood box can use pantone cards to detect the light, use that to display the colour, whilst also showcasing how a person is feeling.
For example, You’re having a gloomy day, the weather is rainy and cold, you’re stuck at home. You can select a card from the pantone card box, these cards are coloured and have interesting names like ‘Love Potion’ or ‘Flame Scarlet’, sometimes they can correspond to exactly how you feel, therefore, having a box where you can insert such cards and then emit the colour through the light, to light up the room around you. It’s simplistic, artistic and helps us visualise our emotions through colours.
1 note
·
View note