Statistics
We looked inside some of the posts by patapatatasstuff and here's what we found interesting.
Average Info
Notes Per Post
0
Likes Per Post
0
Reblog Per Post
0
Reply Per Post
0
Time Between Posts
1 day
Number of Posts By Type
Text
17
Last Seen Tumblr Blogs


Fun Fact
After the announcement of the deal with Yahoo!, there were 170K signatures of unhappy Tumblr users petitioning to prevent the sale in 2013.
Text
March 1, Sketching and supervision
Before having today’s supervision we were discussing a spontaneous user testing that one of our group’s member carried out the previous day in he’s working hours.
In this spontaneous try out he found out that, 1 out of the 12 tables he tested the prototype on, grabbed the QR code to take it with them. This goes to show how this solution does not come useful for restaurants and their desire to continue receiving tips from their customers. We discussed how a possible solution for this issue could be the server having to talk to their customers or engage in conversation to sort of “push” them to receive the receipt, which we also discussed as being the opposite of our concept. We then discussed further the option of adapting the prototype to avoid the issue presented when testing or, go back to our departure point again to start sketching new ideas.
During the supervision we presented our findings and resolutions. Our plan is to continue ideating based on our concept, maybe in a more flexible manner, but always trying to find what comes closer to a final solution. Maybe a better option would be not giving so much space and time to our customers, even presenting a solution that can’t be taken home.
0 notes
Text
February 24, Visit to Restaurants
To get the restaurant’s perspective of the QR code printed in the receipt we headed towards Lila Torget and its many restaurants to interview them. After a few hours of walking through some of them, this is what we got from them:
Johan P - restaurant - $$$
They split the tips among all the staff on a monthly basis, which makes it hard to say how much each person receives as a tip, the staff wasn’t positive about it. Customer gets to punch in the total in the terminal. In order to make the customers feel less uncomfortable, the staff tries to walk away from the table as they are paying, returning when they hear the bleeps from the card machine. The staff we talked to did not believe a QR code receipt would give them more tips. Mentions that receipts are easy to throw away, some people don't even take a receipt and it is easy to forget to tip when it is done later. The staff think that the system that the restaurant has right now is working well. Thought tipping with cash is the best option.
Pronto - café - $$
Servers told us they don’t expect to receive tips and it is not part of their culture as they have a high-point salary and aren’t depending on tips in any way. If any tips at all, is because of regular clients who decide to leave some change, which winds up on the register and not shared among workers or servers but to the owners.
Lilla kafferosterier - café - $$
Rarely receive tips. It’s mostly regulars who give tips which they save in a glass jar and then use to “buy something fun for the regulars” so in the end it goes back to them again. Did not think that the QR would be a good idea at the café since it’s a place people don’t stay for a very long time and doesn’t receive a lot of service. “People get their coffee and then they go.”. Staff mentioned a system many cafés in the US use where staff can spin around their cashier iPad and let the customer fill in an automated tip (e.g. 5%) and then pay with signature. “Can everyone scan QR codes?” -interesting for us to research further!!!!
Mineral - Restaurant - $$
Received tips through the card reader which were then split evenly among the staff. Thought that the QR receipt was a good idea and might work. “interesting to see what would happen”.
My reflections about this experience are that it seems that this idea might work with cafés, where tipping is not part of their culture and could be a way for baristas to get a chance for receiving some extra income in the form of a reward. Because, on the contrary, restaurants believe this idea would not improve their actual system and could actually make it worse, mainly because the percentage of people who accept to take the receipt is in fact low. People usually get rid of their receipt without even looking at it, so the chances of getting tips through it falls short.
0 notes
Text
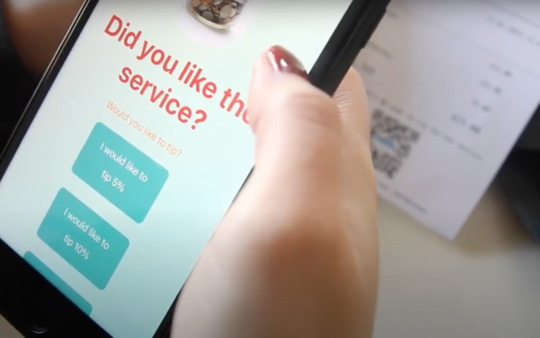
February 23, User testing
Today we tested the receipt mockup with some of our classmates. We presented the context in which our concept would be used to make clear what it was about.

photo: receipt mockup presented to users.

After this exercise we were given some of the following insights:
“less pressure, with a receipt I could just take it and not say anything” - U1
“It’s good that I could do it [tipping] somewhere else” - U2
“it’s a good thing that you can take it with you” - U1 (when asked if they would prefer it just being in the restaurant or if it should be given to every customer)
“My first impression is that if you want a set percentage to tip, you have to know how much 5% is” - U1.
After trying our prototype in a quick user testing we received feedback from a supervision prior to the concept video deadline for Milestone 2. Some of the insights and reflections we can take with us were:
Where should the QR code be? (should it be on every table? on posters on the wall? given to every customer?) - based on user testing it should be given to every customer.
Are QR codes really the best option? Are there any alternatives to the technology? (The concept isn’t relient on technology) - we should explore other options.
When you are prompted to the site where you tip, customers should get to know how much 5% is and how much the total is.
We also need to have the restaurant’s perspective which until now we do not have. We planned a visit to restaurants to ask for their perspective with the idea and what we can learn from them.
0 notes
Text
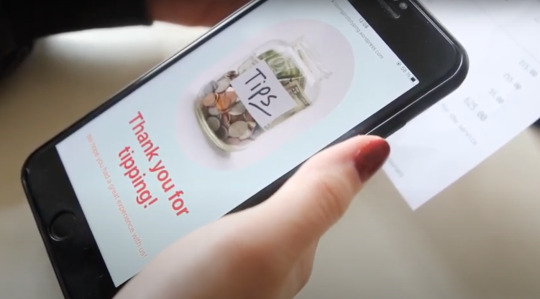
February 22, Concept Video Filming.
Today we gathered at the restaurant agreed to film our concept video. Fortunately, it was a fun and easy experience where everyone got to do their part and the result was satisfactory.

After filming everything we then grouped in one of our member’s home to revise and edit the video to get done with all the details. Here is the final result:
youtube
0 notes
Text
February 21, Supervision and Storytelling
Today I joined my group right after the supervision. They told me the supervision was somehow different from the previous in the feedback we received and how the concept seemed to be making more sense now.
We needed to go back to our point of departure and see what we needed to know we didn’t already. How might we find a balance between the restaurant’s desire to receive tips and the customer's desire to comfortably make a choice?
In our thought process and ideation we need to think about when and how the customers feel most uncomfortable. Customers feel more uncomfortable when having to tip in front of the waiter, first because of the social pressure and second for having to do the math calculations while having the terminal in their hands. We think the idea of the QR code printed in the receipt is an opportunity for customers to feel at ease with the imposed act of tipping right there in the very moment of paying for what was served, because having a receipt to do so gives them the space and time to think, which is also a choice customers can make at their own pace and the free will to do or not doing it.
In the supervision we were encouraged to think about the opposite- what would it be or look like to make the interaction as uncomfortable as possible? is there a risk in bringing the decision (of tipping) home? Do you lose the social pressure and/or comfort? How anonymous are you actually when tipping from home (how would it deal with personal information). Are you more anonymous when tipping at the restaurant?
At this point it was time to develop a storyboard for our concept video.

After finishing the details we decided we will be recording our concept video at the restaurant where one of our group member is currently working as a server. The owners happily agreed to lend us the place for shooting our concept.
0 notes
Text
February 18, Mockup & QR code
Today I find myself creating a web page mockup for our QR code to be able to display options for tipping through it when scanning. To make it simpler, we decided that this should be done with Wordpress.
First I reflected on what should be displayed, for example, options of percentages of tipping based on total amount, the idea was to have a mock-up for what it would look like to scan the QR-code printed in the receipt, to be then used in our concept video.
0 notes
Text
February 17, Design Lab
For this occasion we had to be at the design lab to work there during the day with our groups. We were one of the first groups to get a short supervision of our work thus far. We discussed our findings, our sketches and our concerns like the QR code and how we winded up with that similar idea and how we thought of it as being dull for a design solution.
Johannes encouraged us to dig into people’s motivations when tipping as in tipping to show off? Is it to reward the service? the food? something we had discussed in previous occasions after Methods II.
Clint expressed how the act of using or scanning a QR code can be seen as boring or plain and simple can make you look like a loser. In my head I never thought of myself looking like that when scanning a QR code. So the question could be: Does most people feel like that when scanning a QR code? Is there something we could do to make it funnier/not dull? change the perception of that interaction? choose something completely different from the QR code?
We as a group discussed this issue the rest of the day. No new ideas came to us, even though we agreed our design solution at the moment is not our ideal solution. We decided we could work in the wireframes of the application of the QR code and a website for the weekend and return next week to evaluate where that could lead us.
0 notes
Text
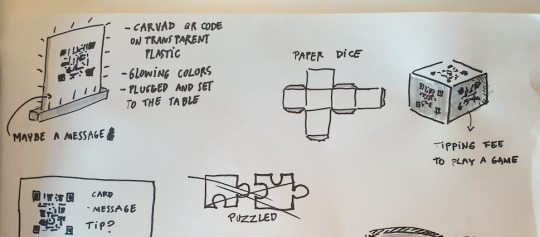
February 16, Sketching
Today we gathered to sketch our ideas. The main goal here was to have an idea that could potentially be our best solution.
As we were discussing them, we realized and caught our attention that we had one thing in common among our sketches, a QR code, which was present in different contexts of use, so we discussed a bit more about this and reflected about why this could be a potential solution.

After the sketching session, we found ourselves stuck on ideas so we decided to wait for the supervision the next day to get feedback and continue working from there.

Personally I found the QR code to be a lame idea considering our task is to find design solutions. Hopefully we can find a way to make this more interesting for us and final users, for example, something that can be physical as well as digital. Can we include a game? At the moment we just know we need to care about what is comfortable for people and can choose to tip or not.
0 notes
Text
February 15, Group Workshop - Milestone 2
Today we had the first supervision for Milestone 2. Before our turn, we gathered as a group to review what this part of the course was all about and how we were going to approach it. We followed the project guide and designed a plan to follow through this week and some of the next as well.
The feedback we received was encouraging. We knew where we were and what to do next so we focused on beginning as soon as we could. We decided upon one of our HMWs based on what could represent more design opportunities and elaborated ideas on a Miro board to have them written.
The day finished with our ideas grouped based on their similarity and with intentions to continue the next day with some sketching.
0 notes
Text
February 11, Final API Lab day-Assignment work
Today, after I injured my back, I decided to let my work group know that I was not going to be able to attend the final API Lab day. I considered not to be fair if they would do all the coding and other work if I was not going to be there and do my part so I decided to try and do it on my own at home. Unfortunately I couldn't walk for a few hours and neither was comfortable laying in bed trying to work on the assignment.
I first thought I could add an API related to games. Since we already had a joystick to play with, but a lot of them required other programs or things I did not know about and thought I did not have enough time to study them so I disregarded them, and couldn’t find a proper one that suited my needs or specifications. Maybe, and this is a reflection, I was not good enough searching for them.
After spending the whole day looking for an API that I could reflect upon, I just decided to use the one Love showed us in one of the lecture’s demos, the Open Weather API. I successfully loaded it into the JavaScript template, hoping to continue working on it the next day.
0 notes
Text
February 10, Group assignment workshop.
As a group we found ourselves quite lost at this point. We hadn’t decided on which API to use until midday, so that decision took a while. After choosing we did not know how we could use it, mainly in the part where we needed to make the joystick function with the selected API in the frontend.
The API chosen was this random selection of cats, dogs and foxes. The API was created to have these placeholders to each animal category and if clicked, an image of the animal category selected.
To get everything functioning, we needed information we were not sure we were given, so we went back and forth over the lectures to see if we had missed something, but we were stuck. In the afternoon we received the help of Love who thought our choice was perfect and then he tried to help us getting to connect it with our assignment template.

The picture is from the help Love offered us. An if else statement to access each animal placeholder and the values of the joystick to make it work.
Even though this answer seemed perfect to solve our problem and even obvious once we saw it, we were not able to continue working on it for the day. So we decided to rest a few hours to come back with a fresh mind to retake it.
0 notes
Text
February 8, Arduino as API II & III - Reading data from web serial and reading from a joystick with web serial

We first started to look at how we can read the data from the web serial from the lecture slides. We were presented with an example of an Arduino and its joystick next to a canvas spleen. The canvas will visualize the space and position of the joystick to get an understanding of how the Arduino maps the visual space. To do this, we’ll need the ArduinoJson library again.
The sketch has some variables representing the axis of the joystick and when the button is pressed, then we see a function that makes a new JSON document. The serializeJson and serial.pintln(), the last one without arguments because this will send our Json and print a new line.
The Demo
Note: The code for the demo II is almost the same as the demo III:
Joystick and LED with Json.
The main goal here is to communicate bidirectionally with the Arduino. This is the concatenated version of the first two demos combined, the main difference is that we have more functions in our loop.
I have set these like steps, for my better understanding.
The alert to make sure we can connect the serial to the browser.
The serial connection, the button, the event listener, an asynchronous function and the await to get the port. Then the baud rate and a query selector to get our connection status, and our function to read JSON from Arduino, that has an asynchronous callback with no arguments to update the data display.
To get the function to read the JSON we need the text encoder function and the line buffer. The text encoder is there so it can get values from the serial to string. If we have a callback function here, it will run the callback. The parse line will pop into the state of the joystick.
We need something to update the data so we create another function that query selects the joystick state and shows in the HTML.
We add the canvas into the JavaScript. We need a map range, and the same update canvas function to clear the screen.
We get the ‘x’ and ‘y’ axis, and arrange it to fit in canvas.
We draw a circle, and change the color.
We update the canvas to request the animation frame with the update function, then the function that creates the canvas. and finally the state, with the writing and the reading part.
The point is to control the LED with our joystick from JavaScript because in the Arduino code there are no functions to do so. The Javascript will take the joystick inputs and send them back to communicate with the LED in Arduino, so when we write Json to Arduo the button of the joystick needs to be pressed. If not pressed we want to write from the brightness slider.
I managed to connect everything correctly, followed through every step of the way and everything worked. However, I do not feel so positive about getting to understand the canvas part just as well, although I have little experience using it in previous assignments. Certainly it is something I need to dig into more if I want to completely understand how everything gets done.
youtube
0 notes
Text
February 7, API Lab - Arduino as API I
Introduction of the Arduino sketch to connect the LED to the Arduino.
In this class we had to get the ArduinoJson library v.6.19.1, compile the Arduino sketch Love prepared for us and upload it to the Arduino. He explained the code, beginning with the creation of the serial port for the browser to connect with the Arduino.
1. Request Access to a Point
The readJsonFromSerial function in the sketch is where the Arduino gets the Json document from the JavaScript frontend over the serial connection and displays the value of the LED.
It is important that the StaticJsonDocument value is <32>, otherwise we won’t get correct responses. Then, if the Json document we know has a serial we then deserialize, this to translate it, so the Arduino makes sense over the Json and the input.
The input is to extract the brightness property and give it to the LED based on the value. Then we set the pins correctly.
In the JavaScript we start with an ‘if’ to set an ‘alert’ if the browser does not support the web serial. We need a Chromium based browser. Then, we create a button with a variable to request a port with a document.querySelector and add an event.Listener with an asynchronous event. Inside of this function we are going to await for the navigator to give us a port for the serial request:
navigate.serial.requestPort
The console.dir(port); to give permission to the user to communicate with the port.

2.Make sure the Arduino is connected
First we make a state object to call on our application data, now we can reference the serial anywhere in the program like this:
state.serial = port;
document.querySelector("#connection-status").innerHTML = "Arduino is connected!";
It will be set to be our serial device, so it can change the connection status. The Baud rate is set to specify the way we want to communicate, it should be the same in the Arduino as in the JavaScript.
3.Send Data
In order to send the data we need to access the brightness slider first, and to do that we create a function (almost the same way we did with the serial port button). We select a document with a querySelector to the brightness slider and we add an eventListener for it to listen to the input event. A function for the brightness with an event to target the value, to finally get the brightness state. We also need to add a value of 0 to a brightness state. To avoid getting our values in ‘string’ we add parseInt to get number values. Now we need to send these brightness values to our Arduino, to do that we need to create a function:
write.JSONToArduino()
We call it then to be an asynchronous function that is going to take a property name. In this part we need to make sure we have a serial device connected, if not, we throw an error.
We now want to get the data so, we first need to have the data stored in an object but we can instead have it stored in the state as dataToWrite, so the code looks like this:
const data = state.dataToWrite;
To finish, we want to listen to JSON so we write a variable that stringyfies the data. The writer function was said not to be of our interest but what we need to know is that it is something in which we send the data over the serial. The writer will write whatever is in our payload and our payload is going to be a new text encoder that encodes the JSON data.
youtube
0 notes
Text
February 4 Rest APIs II - How do we use API in our Applications
In today’s lecture we are going through API Politics. Public or commercial APIs.
API as service is a defined interface offered from some company which is using it as a way to generate revenue. They provide documentation to which we need a key so as to make sure we don’t make bad use of this service. This is one kind of API.
An internal API can be the Amazon memo or a service, a backend API provider for a multi-device world, like mobile, web application or IoT devices. In this case we need to send the data to multiple devices. API is incidental, meaning that is an architectural decision on how to structure your application, it was never meant for external consumption. The wires are the same, the requests are the same, so we need to decide whether they are going to be public or if they are going to need some sort of authentication. Requests and responses over HTTP in JSON. The API here is a black box owned by the provider, but the user devices are owned by us, so we need to communicate with the API and send the data in some way.
For the data to flow internally from the API in a programmatic way we need to have access to use it. This way we can figure out the layout of the interface and reverse-engineer it, meaning that we can figure out how this black box works, understand it or repurpose it.
Love stated Canvas as an example of an internal API, but since we have access to it, requesting and receiving data, we can start breaking the black box and find out how this black box works. The API is an established way to communicate with interfaces.
At this point of the lecture, I think I know what the information means, but I’m not certain on how we can actually do this breaking of the black box. I wouldn’t know how to begin disassembling it to reverse engineer it. It sounds pretty much something a hacker would do, and may be even obvious for some people, but for me is something I have no clue about how. Hopefully with practice, this can make more sense soon enough, before going any further.
We were later presented with a case of a school platform that went really wrong on so many levels, to later be fixed by someone who actually broke the API this platform used and reversed it at an incredibly lower cost, improving everything this service offered. This made me think how the term “hacker” can be somewhat positive and not just someone who wants to break in your personal things just to do harm. I even did a little research and found the term “ethical hacker”, people who can, among other things, repair services such as this person in the school case. Something really appealing now to further understand this API world even more.
Using APIs - Applications that interface bidirectionally.
Unidirectional- moving or operating in a single direction. An example of this was presented as a Weather API. This is something we just called the information to, never sent information to it. The API pushes the data to an IoT device, but the IoT device doesn’t respond back to us.
Bidirectional communication goes both ways. We send data and receive data.
The lecture finishes with a Demo about building bidirectional communication with a Machine learning API with Open AI.

(photo: Bonus lecture on “GET” request. Fetching an Open Weather API)
0 notes
Text
February 3 APIs - HTTP/REST Protocol
API stands for Application Programming Interface. It is a set of functions and procedures allowing the creation of applications that access the features or data of an operating system, application, or other service. Libraries and APIs are a way to “fake” the experience of our prototypes. APIs can be public or private, if private I need an authentification, an API Key, so to be able to request this data we need this key to get access to it and their interfaces. Remote APIs can use web services with HTTP protocol.
The HTTP Protocol is the foundation of the World Wide Web. It represents resources or data with URLs, and is combined with REST principles.
REST is an architecture, and stands for Representational State Transfer. The data can be stored in cache memory. The state won’t be sent in petitions. I understand that I am able to define which data is allowed to be used, accessed or changed from another application, my own for example. In REST I can determine permissions. Rest defines conventions for what kind of data transfers you can do over HTTP.
There are different HTTP Methods that we can use to interact with the API:
-“GET” we request for data, we get a representation of the target resource’s state. Simple, no body, only URL. Get requests are the default requests we make to websites.
-“POST” we send data. Let the target resource process the representation enclosed in the request. Complex, body, often with JSON.
Yesterday we downloaded the chart.js file we accessed to it locally to get a graph, today we accessed the API remotely. We communicated with the APIs through these wires and requested some data, in this case in json format.
In the lecture we were presented an example of what we could build with an API, in this case a prototype system for interactive generative literature. The system required an OpenAI API key to run. When we do these requests asking for data we need to provide some data. A method to show how and authentication, POST is this method. We get some data, like JSON in dev tools for example.
The POST Request - Second Parameter of Fetch() getting local JSON files
fetch(resource, [opts]) - options here is an object. It returns a response object asynchronously.
.stringify(obj) - JSON represented as a string.
Demo - Sending a Request to the OpenAI API
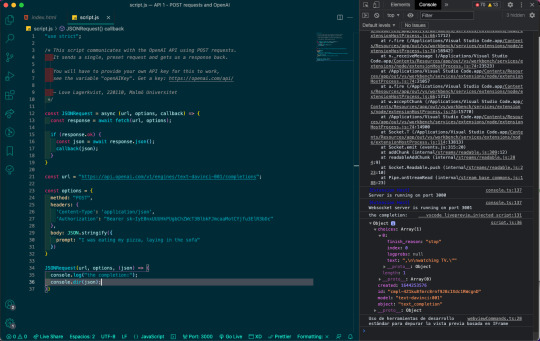
What we needed to manage here was to know where the API lives and how we can talk to it, set up our options and what we expect back. Being able to have our own authentication key, then add some data in the body with a stringify prompt. Then using an asynchronous fetch and dealing with the response to finally call the request to the API.
By the days, all this information is getting clearer in my head. I thought it was going to be much harder than expected, but surprisingly it hasn't. I can see how this can be of so much use in the future because of how I see Interaction Design and how there is so much to continue learning.
0 notes
Text
February 2 - API Lab - Libraries II
Json (JavaScript Object Notation) is the communication between system boundaries, getting data from a back end (database) into the front end and displaying it. It is a data representation format. A way for JavaScript to call objects, commonly used for APIs.
If we have a local front end application, we can ask for data that is located remotely through the internet.
When we talk about internet traffic, there is a sort of defined communication protocol, in which the data travels with, we can call these “wires”. So, the user asks the front end to display some data we need to ask for it, we request it to the back end, if it has it, the back end returns the data. For example, we request data for a user ID, we express what we want. We can’t ask for the entire library, we need to be specific and ask what we want. A way to do this is with search parameters or we send the request in a data format, in this case Json. Json then will return the data in the same format. So, we give value information and it returns value attached to it.
Json mirrors the data objects from JavaScript. JavaScript object property names become strings, a language independent representation. We need to make sure everything in Json is data.
Json has no trailing commas like JavaScript. Json files cannot have comments or functions, it specifies data, not behavior.
There are usually two kinds of Jason data. One is a top level object or a Json document with a top level array with everything that has inside. These are the two common ways to use Json.
Since we are using Arduino, we will be communicating to it through JavaScript.
To Translate from JavaScript to JSON.
The importance of synchronous communication is that we can do multiple things at the same time. If we write a local Json file the response will be instant, but we don’t know how long it can take to a remotely located file. It might never return if the system is down. So, we can act on it while working asynchronously while we wait for the data.
Fetch()
Fetch is a function to get something from somewhere, in this case a Json file. We cannot tell the browser to go and get a local Json file, it is not allowed, we have to do it through Fetch. Fetch takes a resource, a string, or an URL object, Request object and returns a Response object asynchronously. We get this response back with a property called .ok which is a boolean telling us the response is an object. To do this, we need to add a keyword to communicate asynchronously because we are communicating in functions, so the extra keyword we add it in front of our argument (async) so we don’t block other things. Another function keyword is await, we can wait another response, it will run in the background, where we cannot see and will let us use other asynchronous functions as if they were synchronous.
Fetch only works with Live Preview.
Events are asynchronous as well as async/await. This is useful if we want our interface to run smoothly. An extra timeline will be created to continue executing and and our interface will show uninterrupted, even though it can be and look more complex. JavaScript will cover this, not show us. Everything in behind will execute at the same time.
Demo - How to read a local json file
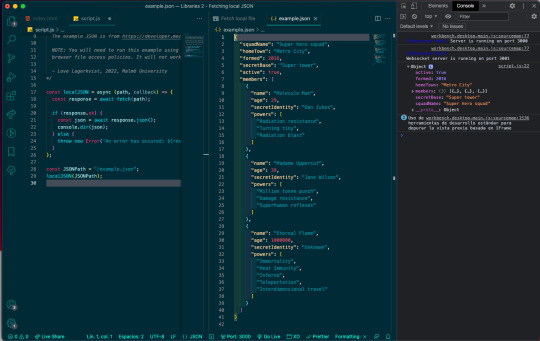
(photo: First example, object visible in the console)
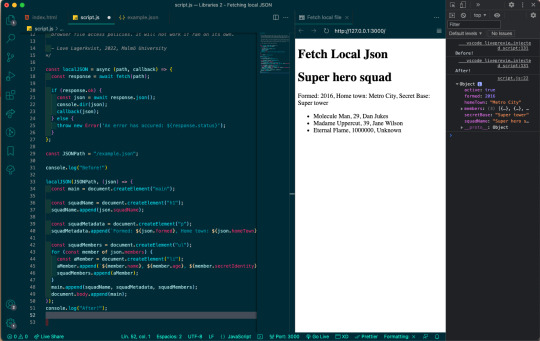
(photo: Before and after, to show how asynchronous work and shown in the console)
Guest Lecture: Tore Knudsen - Designer/Technologist working at Noodl.
Noodl is a visual programming platform to create web applications and advanced prototypes.
Tore stated the question: “Should designers code?”
In my opinion and thinking, coding depends entirely on our own expectations and desires as designers. To me, for my personal journey as designer I’d say coding is important for what I’m trying to learn and achieve. If designers should or shouldn’t code depends on the path we are choosing. If I decided to be an Interactive designer I think logically I would have to learn at least the basics in coding because it is the scope of this career in particular, or I could see it like that. As long as we can develop design solutions as well.
His recommendations as designer and what we need to know, like physical materials and depending on the area of designing those invisible materials like connectivity, Data “intelligence”.
He also mentioned how we as designers are getting more and more technical approaches and how that is taking us closer to coding.
We, as creators, need to see what we are creating, thinking in systems and rules and how when we create we need feedback, something that is hard to do when coding or different, and does not fit in a designer workflow. So, how can our perception of programming adapt to new directions?
The lecture finished with a showcase of the company Noodl and an example.
0 notes
Text
February 1- API Lab 1- Labraries
Before this first class about APIs I had no idea they even existed, so all this information is new to me, therefore, I had to put an extra effort to get what it is. APIs are interfaces, the relation between softwares that communicate and interact between them without human interaction. APIs have multiple layers of abstraction and as an interface, it basically works as a black-box. Why a black-box? In this context means that it is a system hidden from us, we don’t know or think about what’s inside or how it does what it does. And something to reflect upon is that as a programmer I don’t need to know what happens or what’s in its internal complexity.
The way an API works is we send an input, the interface is this black box which recieves this data in X shape and gives us an output of Y shape. For this to occur, APIs work with libraries. Libraries are collections of program softwares generally available in webs, designed to be distributed and used by others. Libraries enrich our toolset adding new features that communicate via functions and objects and they can be local or remote.
We can start with the most basic JavaScript language features, basic functions, data types, for example, an array and adding things to an array. This is all distributed in JavaScript system.
We can also add more to it, like browser functionality, something the browser gives us.
Mapping a library is when we create our own libraries.
Ways to add a library to JavaScript.
One way is to add another JavaScript file into our HTML. We download a .js file and we include it in our HTML file with a script tag, so we introduce it like any other JavaScript code, but sometimes we don’t need to download these libraries. The difference is the source point to a resource to access, but we can also point a resource over the web. For example, Chart.js.
Chart.js is a library where we can import code to our HTML. We use Cdnjs (Content delivery network) to point the file is in the internet and we add it just like any other URL. At the moment we won’t use NPM or NodeJS because they require other programs and other things we won’t see in this course.
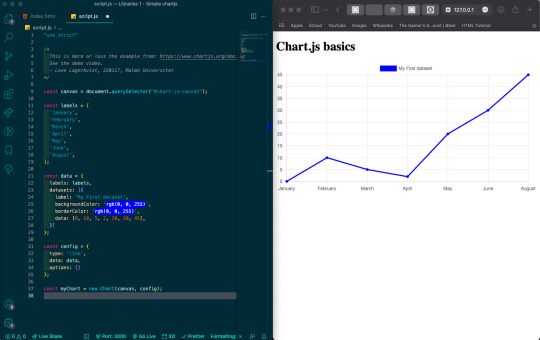
Demo- Adding Chart.js
We did exactly as Love in the Demo. Went to Chart.js, then to Get started and we created a chart. This to check we can successfully import to our code. I could replicate the example without any trouble.
0 notes