Don't wanna be here? Send us removal request.
Statistics
We looked inside some of the posts by pm-memeteam and here's what we found interesting.
Average Info
Notes Per Post
0
Likes Per Post
0
Reblog Per Post
0
Reply Per Post
0
Time Between Posts
2 days
Number of Posts By Type
Text
17
Last Seen Tumblr Blogs


Fun Fact
Tumblr’s website traffic is steadily declining.
Text
Cityscape Progression
I made some further progression with my cityscape template. This time, focusing on creating a procedural multi purpose texture.

Keeping in mind the main goal of this piece is to create a template which I can build many different cityscapes form in the future, one of the most important elements it needed was a procedural texture system.
To achieve this I used a layer texture with multiple skyscraper textures (created with AI). These would be blended via masks created by noise. Bellow is how the layered texture looks:

In it's current form, the texture only blends 5 different skyscraper textures, however in it's most powerful form it could blend over 10. If achieved, I believe this would create the required variety for a realistic looking city.
Bellow is a screenshot representing where the different textures are being mapped to, and how that looks in the render:


Currently, I believe 5 textures isn't quite enough to get the kind of result I'm after. It still needs more work! It's definitely something I'm planning to look into in the future.
However, I may have to put a pause on this project for the time being, in order to spare more time for the final major project proposal. In any case, this will definitely be something I come back to.
0 notes
Text
Now that the main cinematic is complete, I wanted to come back to this piece that I did earlier:

I really liked this art piece and felt it could be improved (also needs a paint over). However, thinking more ambitiously I thought about using this piece to create a 3D platform which I could use to create multiple sci-fi cityscapes from in the future. If I could do the technical stuff now, it would make my life easier later on.
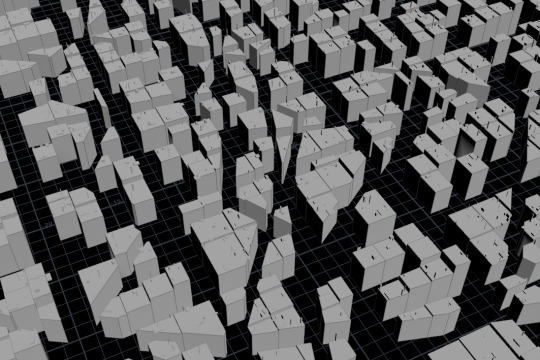
The first thing that needed to be improved in my opinion was the city itself. Currently, it is made using cubes that are instanced in a particular way as so:
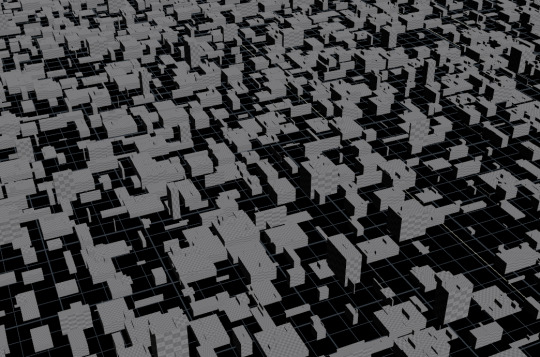
This however looks very grid like and unrealistic. I wanted to re-create this system to have various shaped buildings.
After watching many tutorials online, I figured out a way to achieve this goal using the Voronoi nodes in Houdini.
Here I have a plane which I cut into a grid, and then cut again with a Voronoi fracture. I then used some maths to calculate and delete small faces that are smaller than a particular size of my choice. The result is as follows:
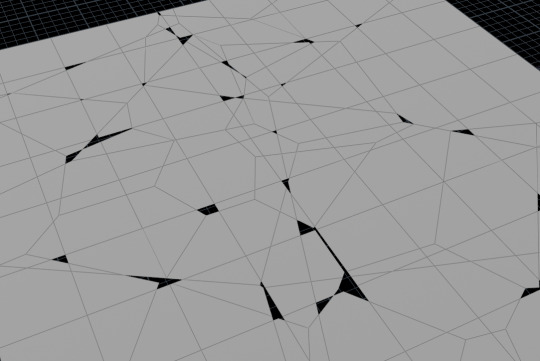
I'm then able to further subdivide this geometry and extrude it, whilst randomizing the height. This allows me to have a city that is fully procedural, but more realistic and less "gridlike" as compared to before.
I'm hoping with this setup I can create many amazing cityscapes in the future.
One of the video's that helped me achieve this goal was this video by O, song. He explains the basics about how to use the fracture Voronoi nodes in Houdini:
youtube
Furthermore, this website had tons of useful information that helped me as well:
It contains many different Houdini techniques and I found it to be a valuable learning resource. Reading through all of the techniques on the page, I felt like I had increased my Houdini knowledge substantially.
Further Notes
One of my main inspirations for this Voronoi style of buildings/cities is the work of Quentin Mabille, specifically his Procedural City piece.

Mabille employs a similar approach to mine, utilizing a Voronoi pattern on a grid structure to create building shapes that are remarkably close to real-life structures. This technique allows for generating complex architectural forms that mimic the randomness and diversity seen in actual urban environments. Like Max Hay (from my earlier blog post), Mabille leverages these advanced methods to enhance the realism and detail in her cityscape artworks.
Mabille also provides a video bellow of his process, which I watched and learned a lot from:
youtube
One further point I liked about Mabille is that he also uses Houdini in his art. He will be one Artist I keep my eye out for from now on.
Resources
Mabille, Q. (2022). Procedural City [Digital Art]. Available at: https://www.artstation.com/artwork/r9RDyE (Accessed 25th March 2024)
QuentinMabille. (2022). Why i learned Houdini - Procedural City [Online Video]. Available at: https://www.youtube.com/watch?v=gGkrVoiRfqo (Accessed 25th March 2024)
Song, O. (2023). Scatter by Density, Voronoi Fracture – Houdini Attributes and VOPs ep. 7. Available at: https://www.youtube.com/watch?v=17X9bL8KGTQ [Accessed: 25th March 2024].
Tokeru. (n.d). Houdini. Available at: https://tokeru.com/cgwiki/Houdini.html [Accessed: 25th March 2024]
0 notes
Text
Our Final Animation is finally here.
Insanely proud to be posting this. Weeks of hard work has come together very nicely!
Sh05 at 00:30 (Reloading split shot) was set up rendered by myself. (Erik Viking doing the lower half). I tried to imitate the beam and lighting of the concept whilst keeping it similar to the other shots (before and after) not to ruin the progression of the cinematic.
There are many things that could have been done better in this cinematic but I feel like what we have done in the time available is truly special.
0 notes
Text
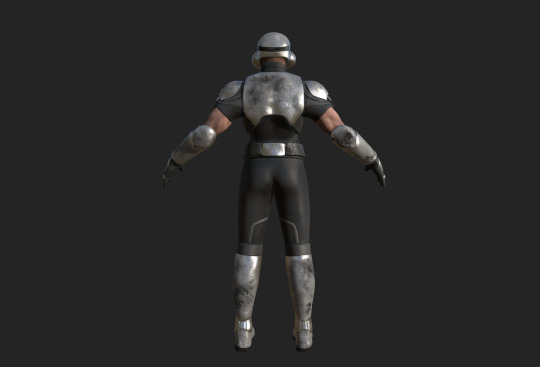
After extensive work in Substance Painter, I've successfully finalized the textures for Hansel, bringing out his intricate details and character nuances.
Through careful consideration of material properties, lighting, and shading techniques, the Arnold Renders showcase the textures in their most flattering light, accentuating the fine details and bringing out the depth and richness of the character's appearance.
Arnold Renders:


Substance Painter Screengrabs:


Further Notes
One artist who has recently made a name for himself is Smile Z. I discovered him a few months ago when his 3D art of TDK Batman gained popularity. Here's his portfolio:
This is undoubtedly one of the finest 3D characters I've encountered, with the modeling, texturing, and lighting/rendering executed at an exceptional level. The attention to detail in each aspect is remarkable, showcasing a high degree of skill and creativity. It's clear that a lot of effort and expertise went into making each element of the character come to life with such realism and precision.
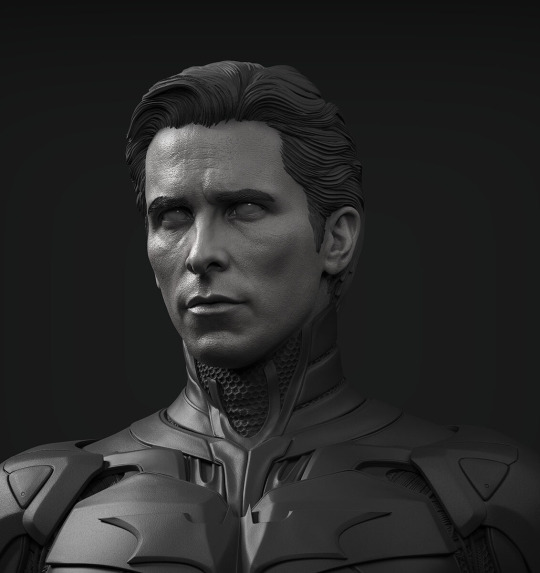
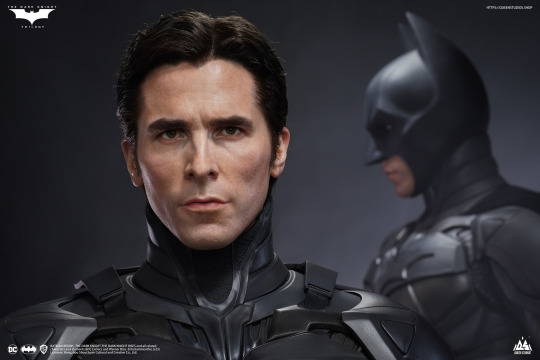

While my own character doesn't quite match the quality of Smile Z's work, it's worth noting that I completed mine in just half a week, which I think is quite an achievement! I'll definitely keep an eye on Smile Z's future projects and use them as a reference to enhance my own 3D character work moving forward. I haven't seen many artists reach this kind of amazing skill level for realistic 3D character art.
References
Allegorithmic. (2022). Substance Painter. Version 2022. Adobe Inc.
Autodesk Inc. (2022). Maya. [Software]. Autodesk Inc.
Solid Angle. (2022). Arnold Renderer [Software]. Solid Angle.
Z, Smile. (2024). Portfolio. [Online]. Available at: https://www.artstation.com/zhangxiao983 (Accessed 11th March 2024)
Z, Smile. (2024). TDK Batman. [Digital Art]. Available at: https://www.artstation.com/artwork/29aenA (Accessed 11th March 2024)
0 notes
Text
To alleviate the workload of our lone character artist, Neel, I took the initiative to create the model for Hansel. Leveraging my extensive experience with 3D modeling, I was able to complete this task efficiently within just a few days. With the model completed, Neel now has some breathing room to focus on finishing Gretel, knowing that Hansel's character is in good hands. Additionally, I plan to proceed with texturing Hansel next, ensuring a seamless transition in the character creation process.
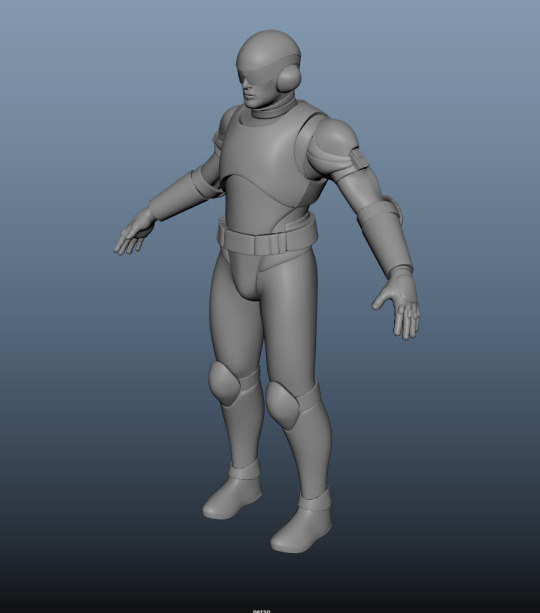
After completing the model for Hansel, I proceeded to import it into Mixamo to ensure smooth animation compatibility. Utilizing Mixamo offers a significant advantage as it eliminates the need for manual rigging or hand-animation. This streamlined process not only saves time but also ensures that our character can be animated efficiently and effectively, aligning with our project timeline and goals. By leveraging Mixamo's capabilities, we can focus our efforts on other aspects of the project while maintaining high-quality animation for Hansel.
Furthermore, I did a few renders in Maya/Arnold for fun (even though no textures or small details present):


References
Adobe. (NA). Mixamo. [Online]. Available at: https://www.mixamo.com/ [Accessed 11th March 2024]
Autodesk Inc. (2022). Maya. [Software]. Autodesk Inc.
Solid Angle. (2022). Arnold Renderer [Software]. Solid Angle.
0 notes
Text
Today marked a significant milestone for our project as we convened for our largest team meeting yet, conducted in person. With meticulous attention to detail, we methodically reviewed each shot, meticulously dissecting and discussing our work. Through collaborative efforts, we compiled a comprehensive list of feedback, addressing areas for improvement and refining our approach for the final push.
Moreover, we finalized the asset list, ensuring that all necessary elements are accounted for as we enter the concluding stages of the project. This collective effort underscores our commitment to excellence and sets the stage for a successful culmination of our endeavours.
We brainstormed some enhancements to enrich our project further. Firstly, we unanimously agreed to introduce drones into several shots. Our team member Nidhi had already prepared a model, which we eagerly integrated into our scenes. These drones will dynamically examine and fly past our duo, adding a dynamic and futuristic element to our visuals.
In addition, we explored ways to emphasize the theme of betrayal more effectively. In one of our shots (sh01), we envisioned incorporating a holographic screen featuring the Witch. As she extends an invitation into the mainframe, her voice glitches out, subtly hinting at her deceit and betrayal towards the duo. This clever narrative twist adds depth and suspense to the storyline, engaging our audience on a deeper level.
Our full notes were as follows:
Gameplay 1 (Hammad/Sai)
Character pushes button instead of taking gun out
FPS hud + FPS weapon from camera view
Environment Modelling/Texturing
Lift starting to move down
Lighting/Volumetrics. If possible, spinning maintenance light
Sh01
Character Anim
Starting position inside structure
Lighting/Volumetrics
Can add buildings to the city, so we maybe see the top of one. If possible, blinking red light on top of it
Drone from nidhi, animating up and examining them
Holographic screen with witch + glitch effect
Sh02
Pyramid. Decreased size. + Texturing
Buildings added.
Lighting/Volumetrics
Beam, electric effect from Nidhi
Sh02 same
smoke/volumetrics if needed. But hopefully everything from sh02 will work for sh03 automatically
drone flying past
Sh03 (Mainframe)
Sh04 Same
sh04
Witch modelling finish.
Witch texturing. (LED's? to make it look more like a life support machine)
Environment Modelling (More details).
Environment Texturing
Lighting/Volumetrics. Could have light coming from bellow, for dramatic/evil effect.
sh05
Changed to split view (top/bottom). Top = closeup of reload. Bottom = closeup of witch
Lighting/Volumetrics
Beam effect from previous shot added
sh06
same changes from sh02
smoke if necessary
camera change from perspective of dron
a few drones flying around
Gameplay end
Platform coming down while turrets power up, shine spotlights at them, getting ready to fire
As firing starts, characters run into cover. As they are running, cut's to gameplay
pillars could open up to reveal turrets (spiderman kingpin ref)
Assetlist
Intro gameplay room Model/Texture
Elevator model with cover
Screen (plane with witch texture)
Drone model (from Nidhi)
Beam effect (from Nidhi)
Pyramid texturing (lower priority)
Pyramid face texturing (lower priority)
Witch Model/Texture
Mainframe room Model/Texture
Animation
Character Pushing Button
sh01, characters subtle look at each other (reacting to the witch), take out weapons
Reloading animation (close up)
sh06 idle animation (lower priority)
Take cover anim/crouch
Sounds
Music 1 (slow/tense/synth)
Music 2 (combat music)
Witch speaking
Turret 1 firing
Turret 2 firing
Reloading sounds (SMG + pistol)
Drone sound
0 notes
Text
Our group has made significant progress in transferring our assets into Unreal Engine. While there are still some rough edges to refine, achieving this milestone marks a major accomplishment for our project. Having everything integrated into Unreal Engine lays a solid foundation for further development and polishing, bringing us one step closer to realizing our vision.
0 notes
Text
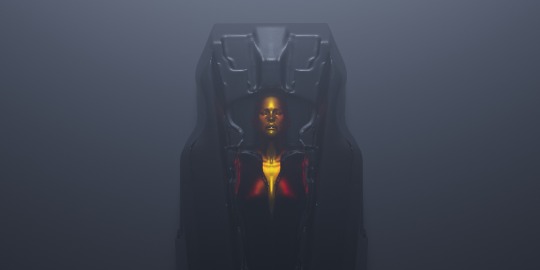
In conceptualizing the inner-mainframe, I opted for a 3D methodology, leveraging assets such as the Witch 3D Model and turret models created by our talented 3D team members. Using Maya and Arnold, I swiftly generated a preliminary environment layout that served as a foundation for our vision.
To enhance the atmosphere and drama of the concept, I incorporated volumetric light beams, strategically placed to add depth and intensity to the scene. This dynamic approach not only enriches the visual aesthetics but also contributes to the immersive experience, elevating the overall impact of the inner-mainframe concept art.

Additionally, I integrated this newly designed room into our previz, ensuring seamless continuity across all shots. As part of this update, I incorporated a blendshape animation depicting the statue's mouth closing as the duo enters the mainframe, enhancing the narrative dynamics and adding a layer of intrigue to the scene. This meticulous attention to detail enhances the overall coherence and immersion of our previz, bringing our vision to life with greater depth and sophistication.
0 notes
Text
Expanding upon my exploration of the environment, I embarked on an intriguing concept: transforming the lift into a captivating tractor beam, drawing the duo towards it with an irresistible force. Additionally, I envisioned an intriguing addition atop the pyramid—a face representing the Witch. This design choice serves a dual purpose: not only does it symbolize the Witch's stronghold, marking her as the ultimate adversary or "final boss" within the game, but it also imbues the setting with a heightened sense of eeriness and suspense, enhancing the overall gaming experience.
Once the lift goes into the structure, her mouth could close for added dramatic effect.


Furthermore, I meticulously revised the previz, incorporating the most recent adjustments and enhancements. This updated version reflects our latest creative decisions and ensures that our vision is accurately represented, serving as a valuable tool for further development and refinement of our project.
0 notes
Text
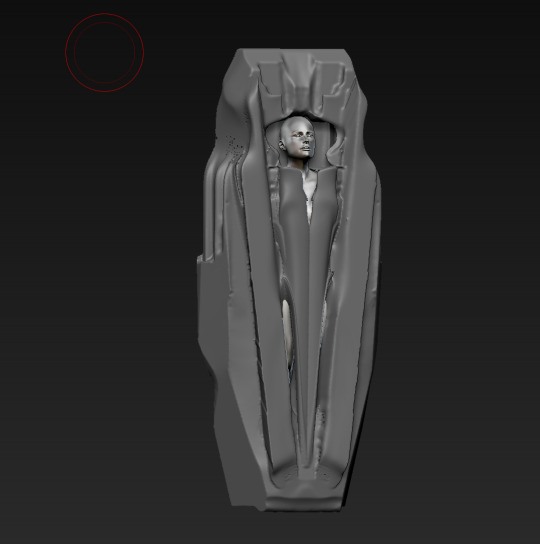
In approaching the concept design for The Witch, I opted for a ZBrush sculpting method. This decision was driven by the efficiency it offers in creating detailed models that can be easily decimated and seamlessly integrated into Unreal Engine. By leveraging ZBrush's sculpting capabilities, I aimed to expedite the design process while ensuring a high level of detail and realism for The Witch character. This streamlined workflow not only reduces the time required for completion but also facilitates smoother integration into our project environment.
Arnold Render from Maya:
References
Pixologic Inc. (2022). ZBrush. [Software]. Pixologic Inc.
Solid Angle. (2022). Arnold Renderer. [Software]. Solid Angle.
0 notes
Text
To assist our 3D Artist in modelling the turret, I supplemented the design by providing a front-view sketch. This serves to clarify the details and specifications of the turret's structure, ensuring a more accurate and cohesive 3D representation. By offering multiple perspectives and reference points, we enhance collaboration and facilitate smoother progress in the modelling phase.

Utilising the same workflow as with Gretel, I created our Hansel concept:

Ninas initial sketch:

I then generated some AI images based on her design:


Following this, I amalgamated elements from each image through photo bashing. Subsequently, I meticulously painted over the resulting composition to refine it into the final concept, as depicted in the first image of this post. This iterative process allowed me to integrate various visual elements seamlessly, achieving the desired aesthetic and enhancing the overall coherence of the concept.
References
KREA. (2024). krea AI. [Online]. Available at: https://www.krea.ai/home [Accessed: 11th March 2024]
0 notes
Text


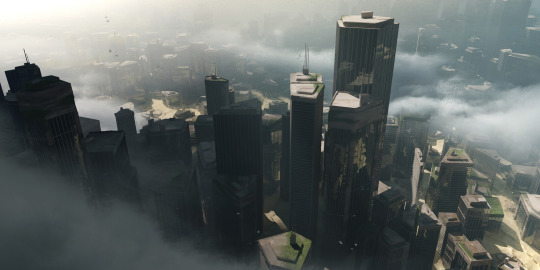
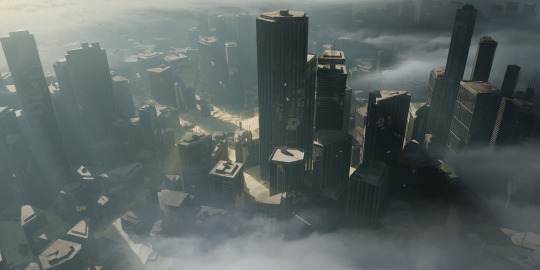
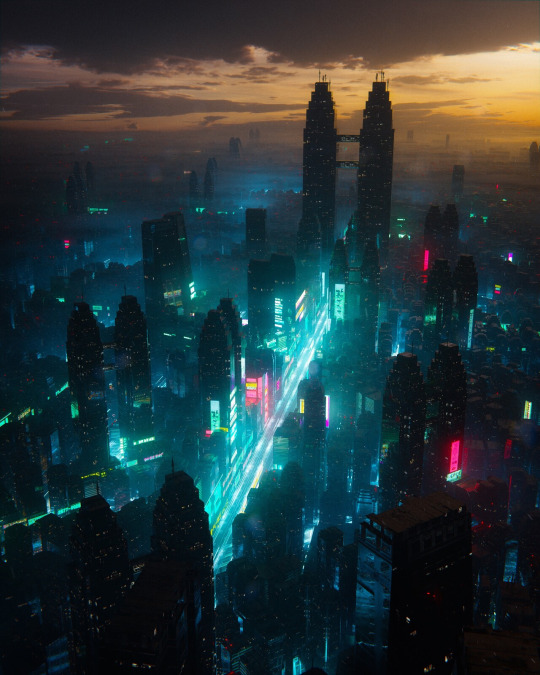
Utilizing my expertise in Houdini and Arnold renderer, I generated a series of environment concepts for our project. Opting for this approach over traditional painting methods, I believed it would offer several advantages for our team's exploration of the environment. Not only does it provide a more tangible and realistic representation of the final result, but it also enables us to seamlessly integrate the layouts directly into Unreal Engine for further development and implementation. This streamlined workflow ensures efficiency and accuracy in our environmental exploration process, ultimately contributing to the overall quality and cohesion of our project.
I have also had quite a bit of experience with creating 3D cities from my previous work as well as from my previous few projects here at Herts, all this allowed me to create these concepts very quickly.
Further Points
One of my main inspirations for this environmental piece was the work of Max Hay. His portfolio and a few of my favourite of his pieces:


Hay has gained popularity recently for his innovative cityscape concept art, among other works. He skillfully combines Blender and Photoshop, pushing the boundaries of what these tools can do. Hay excels in using every aspect of Blender, from texturing and rendering to modeling and employing plugins. He also integrates Google Maps into his process, always on the lookout for new techniques to make his workflow more efficient.
His portfolio demonstrates a robust 3D methodology, skilfully incorporating tools like Google Maps and Blender, and enhancing his 3D creations with finishing touches in Photoshop. I've learned a great deal from his techniques over the past few months, especially from his YouTube tutorials that detail his process. Here's one of my favourite videos from his collection:
youtube
My aim was to build upon his methods by integrating my own expertise in 3D art. While Blender is a powerful software, I find Houdini offers greater capabilities for those adept at navigating its complexities. With my background, it seemed natural to adapt Haye's workflow to my own style and push the boundaries of what's possible.
My plan for innovation involves using my artwork to develop a 3D template. This will allow me to craft various detailed sci-fi cities in the future, achieving a level of detail beyond what Blender can manage.
References
Blender Foundation (2024). Blender [Software]. Blender Foundation.
Hay, M. (2021). BRIGHTER DAYS. [Digital Art]. Available at: https://www.artstation.com/artwork/Vg6AK5 (Accessed 01 April 2024)
Hay, M. (2023). DISCONNECTED. [Digital Art]. Available at: https://www.artstation.com/artwork/kQeVBx (Accessed 01 April 2024)
Hay, M. (2022). ENCRYPTED. [Digital Art]. Available at: https://www.artstation.com/artwork/QnnX9r (Accessed 01 April 2024)
Hay, M. (2021). IRRADIANT. [Digital Art]. Available at: https://www.artstation.com/artwork/v268NA (Accessed 01 April 2024)
Hay, M. (2024). Portfolio. [Online]. Available at: https://www.artstation.com/max_v_hay (Accessed 01 April 2024)
May Hay. (2023). How To Create Amazing Cityscapes In Blender [Online Video]. Available at: https://www.youtube.com/watch?v=IX2gOPm5YIA (Accessed 01 April 2024)
SideFX. (2024). Houdini [Software]. SideFX.
Solid Angle. (2024). Arnold Renderer [Software]. Solid Angle.
0 notes
Text
I crafted several iterations of stepped previsualization, each offering unique perspectives on the pacing and structure of our cinematic sequence. Recognizing the need for refinement, I developed both a condensed version and a rhythmic adaptation. The shorter rendition omits prolonged combat sequences, transitioning swiftly to gameplay segments to streamline the viewer's experience.
In contrast, the rhythmic iteration synchronizes the pacing of each shot with the auditory cues of the elevator's beeping, culminating in a crescendo that mirrors the sound of an oven ping. This deliberate synchronization enhances the immersion and coherence of the cinematic, ensuring a more impactful and engaging viewing experience.
Rhythmic:
(Unfortunately I'm only able to upload one video to tumblr, so I chose the rhythmic version)
0 notes
Text
Following the blueprint of the initial turret design, I crafted a second variation, distinguished by its larger size and capability to unleash powerful plasma beams. This upgraded version not only enhances the threat level within the environment but also adds diversity to the challenges our duo will encounter.
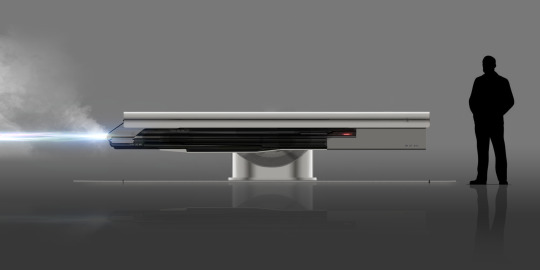
In line with the development process of the initial turret, I created a rough low-poly animation to demonstrate its emergence from the environment. This animation provides a visual representation of the turret's mechanics and how it integrates seamlessly into the surroundings, adding depth and immersion to the gameplay experience.
I found Gabriel Radic's Ion cannon to be a particularly insightful reference that resonated with my design process. The intricacies and innovative features of Radic's work provided valuable inspiration and guidance as I refined my own concepts and techniques.
youtube
Further Notes
While looking at turrets and hard surface design I found a new Artist I really liked! Sabrina Garcia. I haven't seen her before, but her work was fronted on Art station and she seemed to be a newer artist rising up and making a name for herself. I thought her concept art was ground-breaking, and presented in a excellent and unique way.
I'm unable to upload it here but this Turret includes a video with sound, of how it open out from the wall. This can be viewed here:
I found it very impressive. The design boasts excellent shape language, and I believe my own turret designs would have benefited from discovering her work sooner. My turrets seem to lack the intricate hard surface detailing that makes hers stand out. However, I intentionally opted for a more minimalist design to simplify the modeling process for our 3D team and ensure timely completion.
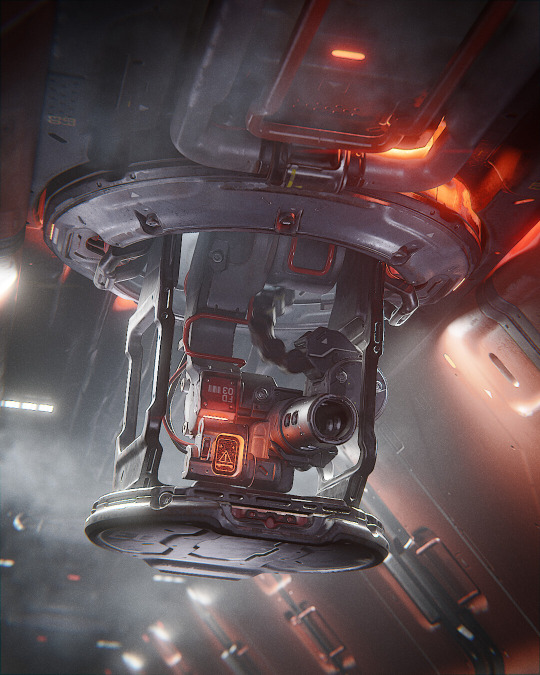
While not a turret, another concept I truly admired is this sci-fi fighter/space jet cockpit.
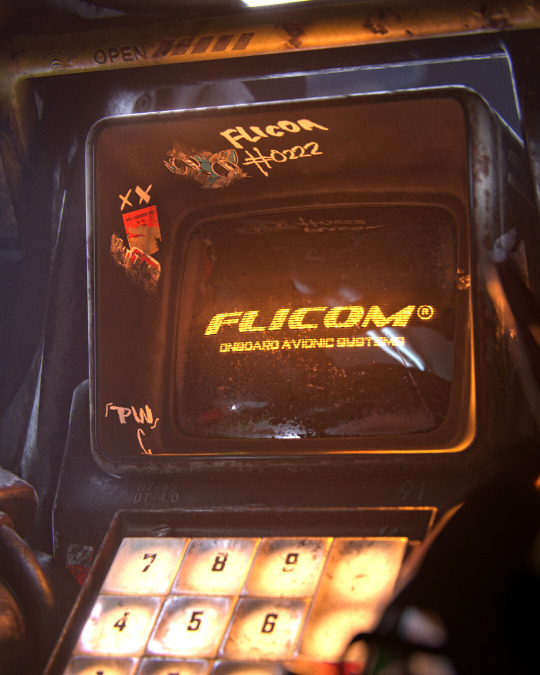
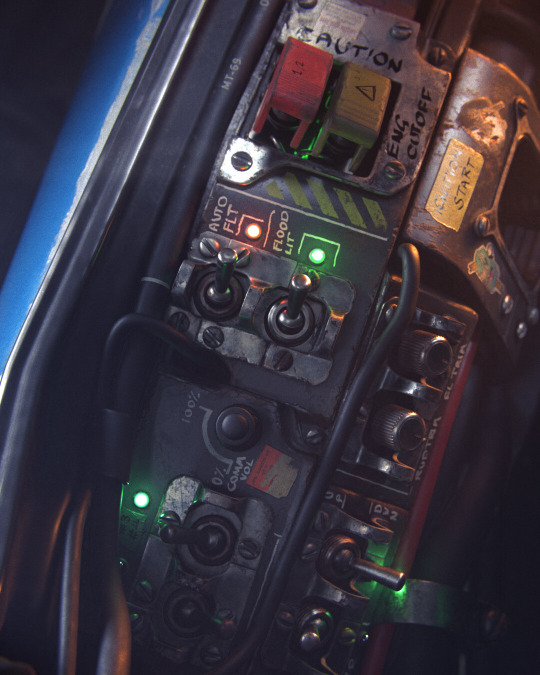
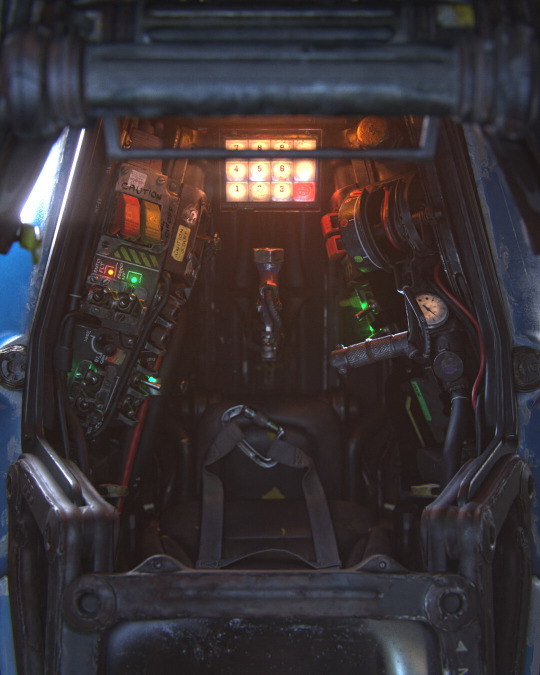
This also has accompanying video's to compliment the concept, these can be viewed here:
I'll definitely keep an eye on this artist. She has set a new standard for presenting concept art, and I aspire to reach this level of quality in my own future presentations.
References
Gabriel Radic. (2019). Ion Cannon - Retractable Turret Test Animation. [Online Video]. Available at: https://www.youtube.com/watch?v=ARLOr9aOKCI [Accessed 11th March 2024]
Garcia, S (2024). FD-03 Point Defence Turret. [Digital Art]. Available at: https://www.artstation.com/artwork/lD2k0z (Accessed 11th March 2024)
Garcia, S. (2024). Portfolio. [Online]. Available at: https://www.artstation.com/sab_3d (Accessed 11th March 2024)
Garcia, S (2023). SUPA-SONIC Cockpit. [Digital Art]. Available at: https://www.artstation.com/artwork/140YN2 (Accessed 11th March 2024)
0 notes
Text
I conceptualized a design for turrets strategically positioned within The Witch's room, poised to target our duo as they navigate through the environment. In a bid to enhance productivity, I depicted these turrets from a side-view perspective, ensuring clarity and ease of visualization in their placement and functionality within the scene. This approach not only streamlined the design process but also facilitated a better understanding of how the turrets would interact with the surroundings and the characters.

Additionally, I constructed a 3D low-poly rough model to visually demonstrate how the turret could dynamically emerge from the floor, providing a tangible representation of its mechanics.
This model served as my primary reference for the turret design, particularly inspiring me with its intricate moving parts, which I found aesthetically appealing and conceptually compelling.
youtube
References
Reanur. (2015). Foldable turret firing. [Online Video]. Available at: https://www.youtube.com/watch?v=ARLOr9aOKCI [Accessed 11th March 2024]
0 notes
Text
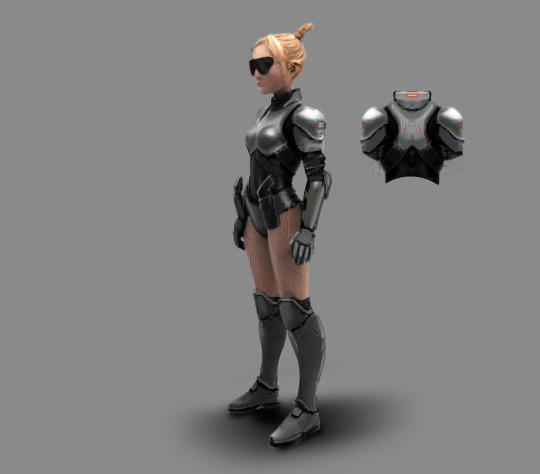
After receiving feedback in class regarding Gretel's unarmoured legs, I resolved to address this by incorporating sci-fi panel lines into her design. This addition implies that she possesses metal plating or armour beneath her skin, or alternatively, that her skin may be composed of painted metal plates.
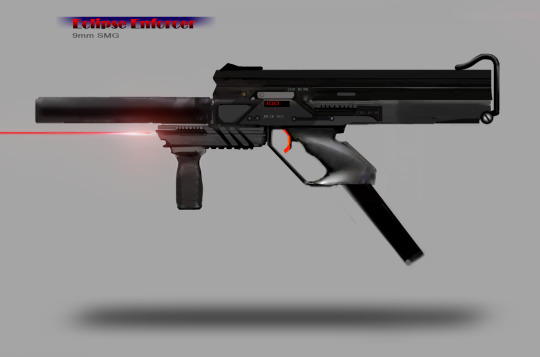
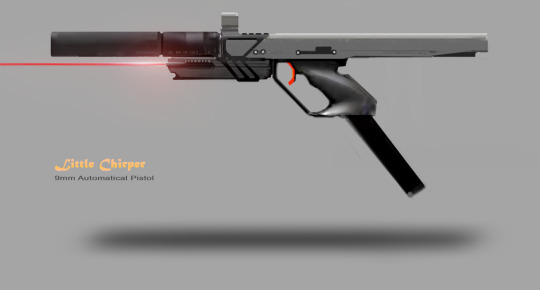
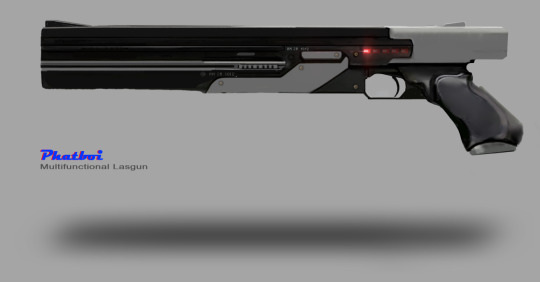
Weapon Concepts!
In addition to character design, I've crafted a selection of weaponry for our characters, including an SMG, machine pistol, and heavy pistol. To expedite the design process, I utilized a side view approach, allowing for quick sketching and iteration.
While I aimed to imbue these weapons with personalized touches such as stickers, paintjobs, or decals, time constraints prevented me from fully realizing this vision. Regrettably, I had to prioritize other concept art tasks, but I remain open to revisiting and enhancing the weapons' aesthetics in the future.
Further Notes
When finding reference images, I discovered a many new artists I really liked and felt inspired by. One in particular I felt was pushing the bar on 'amazing weapon concept art'. Daniel Kenton.
Some of his work that really impressed me:
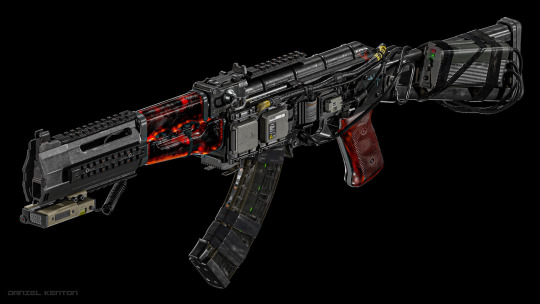
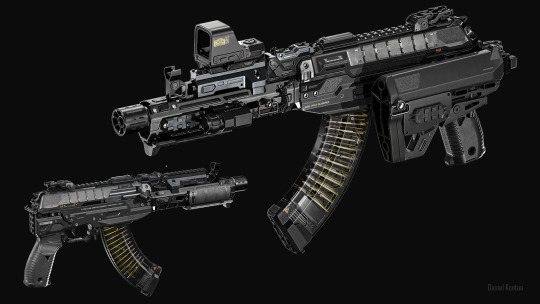
It's not surprising that I was impressed by his work, considering he has contributed to multiple Call of Duty titles, including Black Ops: Cold War in 2020 and Modern Warfare 2 in 2022. His designs definitely carry a sci-fi Call of Duty flair.
What struck me most was his ability to transform classic weapons like the AK and M4 into futuristic masterpieces. Not only is the shaping artfully done, but the weapons also maintain a practical, function-over-form design, which I personally prefer in concept art. Additionally, the detailed hard surface work on the guns is exceptionally well-executed.
I learned that Dan uses a combination of 3ds Max, Fusion 360, and Zbrush to craft these weapons. While I'm familiar with Zbrush, I haven't used Fusion 360 and 3Ds Max as much, although my experience with Maya, which is quite similar to 3Ds Max, has been extensive.
Dan Kenton is definitely an artist I'll continue to watch closely in the coming years.
References
3ds Max. (n.d.). [Software]. Autodesk.
Call of Duty: Black Ops Cold War. (2020). [Video game]. Activision.
Call of Duty: Modern Warfare 2. (2022). [Video game]. Activision.
Fusion 360. (n.d.). [Software]. Autodesk.
Kenton, D. (2020). Infinite Warfare AK VOLK (fanart) [Digital Art]. Available at: https://www.artstation.com/artwork/nYGYOo (Accessed 01 April 2024)
Kenton, D. (2020). MAXIMOV AK-47. [Digital Art]. Available at: https://www.artstation.com/artwork/188A9X (Accessed 01 April 2024)
Kenton, D. (2024). Portfolio. [Online]. Available at: https://www.artstation.com/daniel-kenton (Accessed 01 April 2024)
Maya. (n.d.). [Software]. Autodesk.
ZBrush. (n.d.). [Software]. Pixologic.
0 notes
Text
I created this character concept for Gretel:

My process began with a rough sketch provided by Nina (bottom left of the image bellow), a member of our group. I then imported this sketch into Krea AI, a tool that enables me to paint in Photoshop while sharing my screen with the AI. With the AI observing my sketching in real-time on my second monitor, it continuously generates suggestions for what to draw next based on prompts and adjustable sliders. Afterward, I refined the result by painting over it once more this time without any AI assistance.

Further Notes
One of my main inspirations for this piece was the work of Daniel Arcos Escobar. I first noticed him years ago, creating incredible pieces in 3D Coat. It has been a pleasure to watch him grow and establish a name for himself in the industry. He's become quite popular, especially compared to his earlier days. Here's his portfolio:
One of my favourite of his very recent works is this cyberpunk inspired character design.

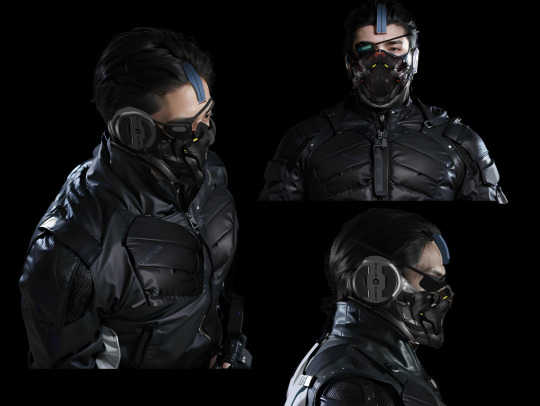
One of Daniel's standout skills is his mastery of shape language, a fundamental skill that not many artists utilize as effectively as he does. As someone who appreciates exploring the nuances of what makes shape language impactful, I often turn to Daniel's work for inspiration and guidance. Hopefully, one day with enough practise I can make art that is as impactful as his.
For my Gretel concept, I aimed to create something impactful as well, but I chose to simplify the design to assist our sole 3D character artist in completing the character on time. I feel like if I had more time and resources (perhaps more character artists on my team), I could have created a more impactful design.
References
Escobar, D, A. (2023). Cyberpunk 2077 inspiration. [Digital Art]. Available at: https://www.artstation.com/artwork/yDqbwO (Accessed 11th March 2024)
Escobar, D, A. (2024). Portfolio. [Online]. Available at: https://www.artstation.com/danielarcos (Accessed 11th March 2024)
KREA. (2024). krea AI. [Online]. Available at: https://www.krea.ai/home [Accessed: 11th March 2024]
0 notes