
Statistics
We looked inside some of the posts by pmxeditortutorials and here's what we found interesting.
Average Info
Notes Per Post
90
Likes Per Post
71
Reblog Per Post
16
Reply Per Post
3
Time Between Posts
15 days
Number of Posts By Type
Text
13
Last Seen Tumblr Blogs


Fun Fact
Total funding amounts to $125.3M.
Text
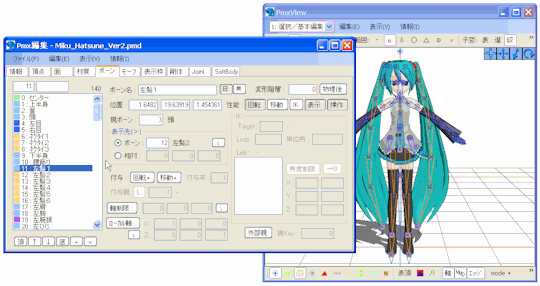
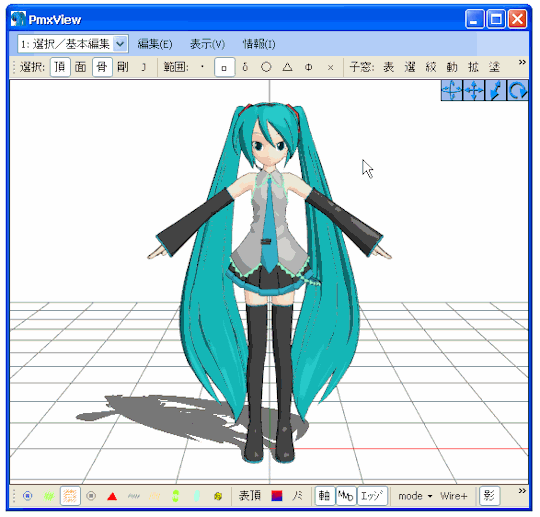
physics in mmd
what the physics do in mmd?
the physics engine helps simulate movement of objects, like clothes or hair in mmd, it makes the bones movement of the objects automatically to make animations more easily
how the physics works?
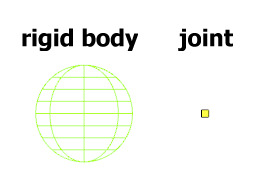
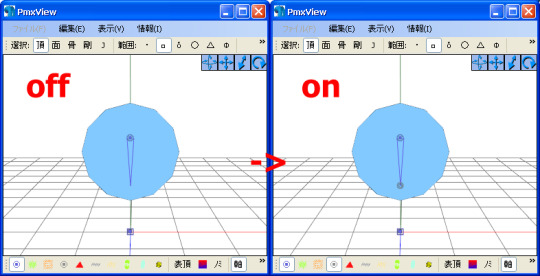
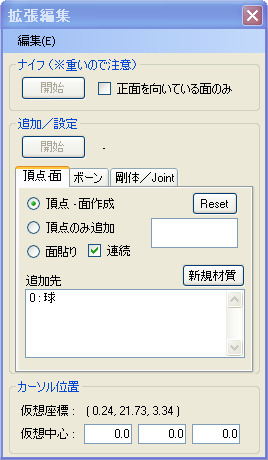
the physics engine affects two things : rigid body and joints other things doesn’t have effect on how the physics works, only those two

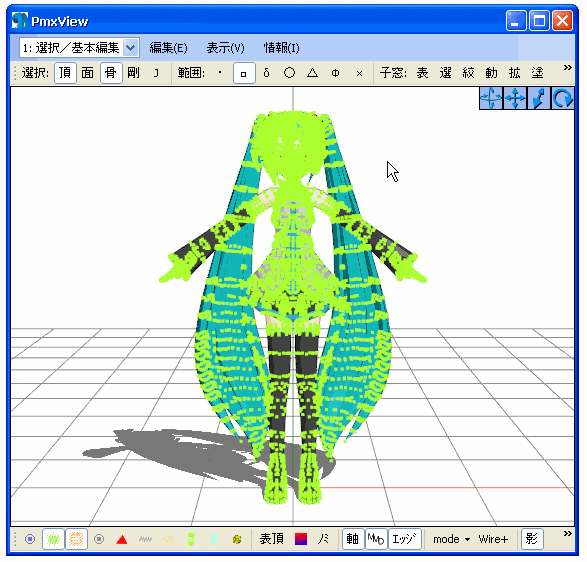
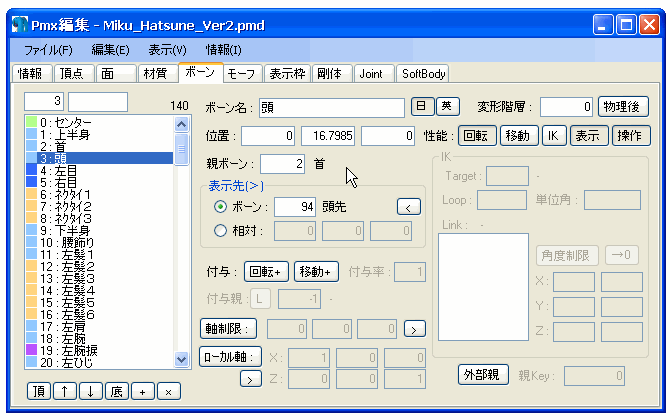
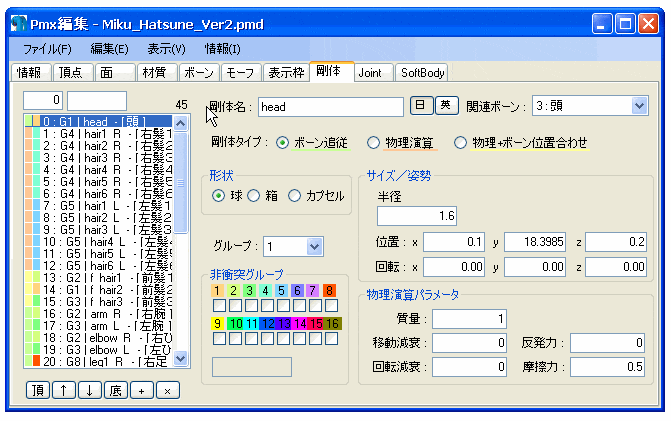
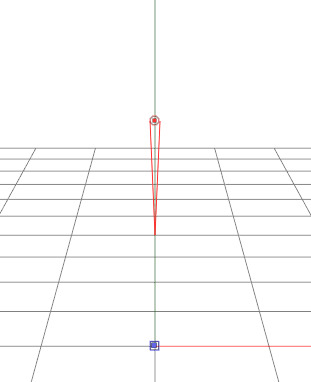
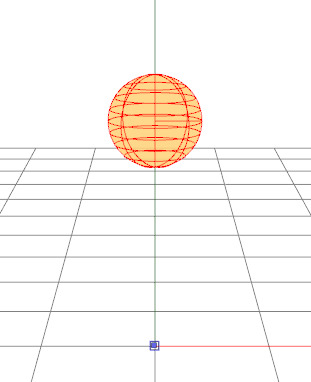
rigid body
the rigid body is a simple shape used to represent the model mesh to the physics engine
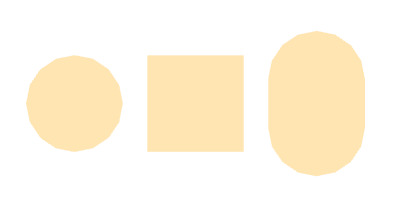
shape
the rigid body can have 3 shapes : sphere, box and capsule
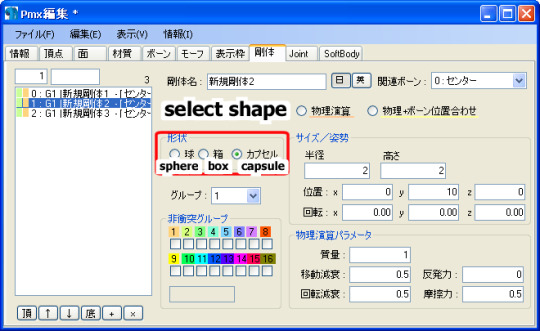
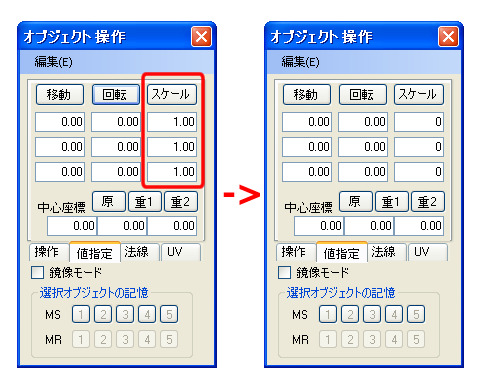
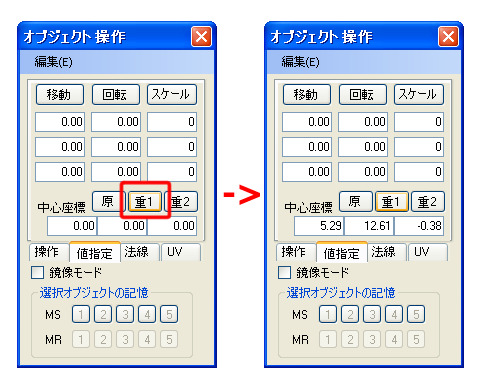
you can change the size and positon with those parameters :
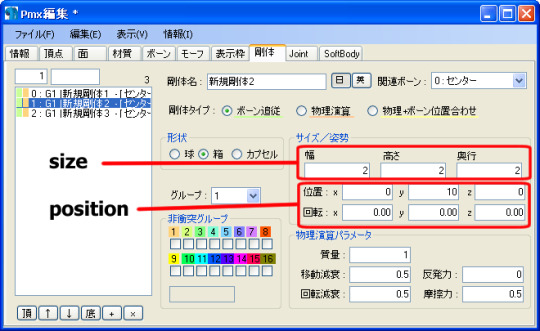
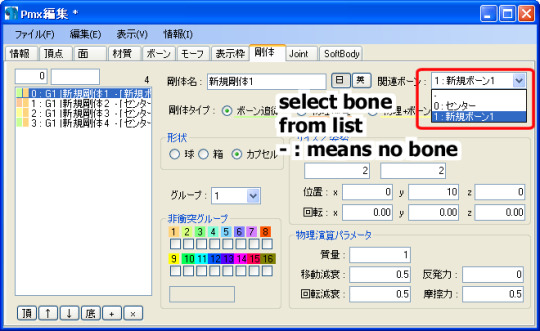
also, you can connect the rigid body to a specific bone
type
three types : bone (static), physics (dynamic) and physics+bone
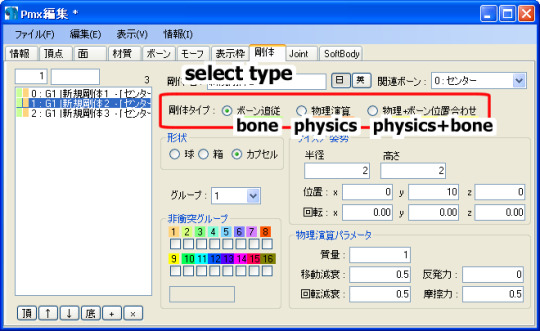
if you viewing the rigid bodys by type, each type has different color
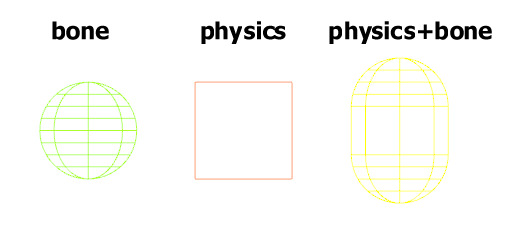
bone type - the body is static, if it it’s connected to a bone the rigid body will move when the bone moves otherwise it stays in the same place (even when physics is on)
physics type - the body is dynamic and affected by gravity, if it it’s connected to a bone, the bone will follow the the rigid body movement
physics+bone type - the body is dynamic and affected by gravity, if it it’s connected to a bone, the bone will align with the rigid body movement

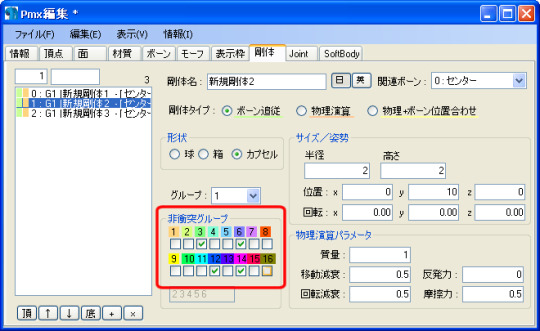
group
when dynamic rigid body collide with another(static or dynamic) they would react and move accordingly
the group type of rigid body can make them not react to the collision
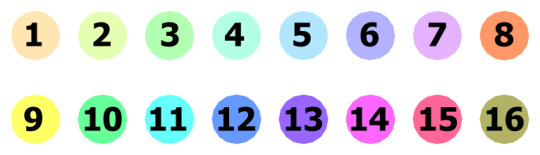
there are 16 groups, numbered 1 - 16
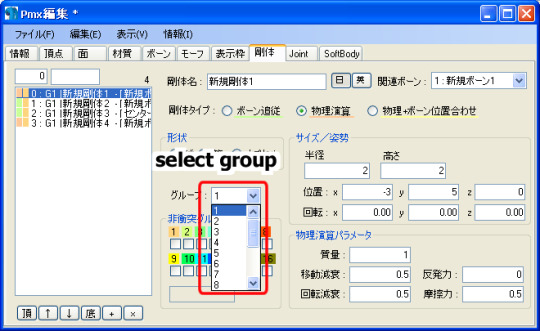
if you viewing the rigid bodys by groups, each group has different color

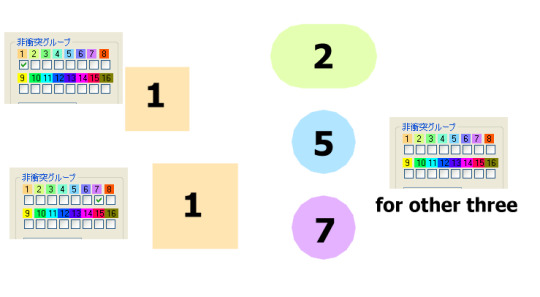
to make the rigid body not react on collision, check the number of the other rigid body in the boxes :
example :

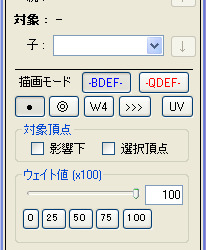
physics parameters
those parameters affects the movement of the rigid body they are usually set between 0 - 1
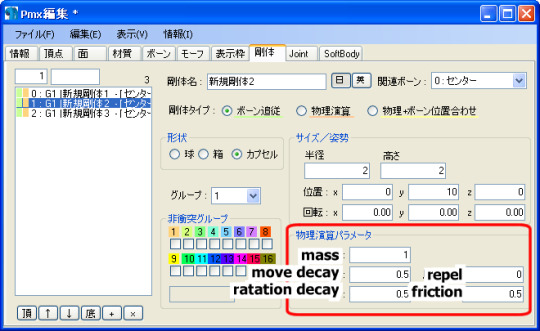
( I tried to explain a bit about the parameters but the explanation might not be very good )
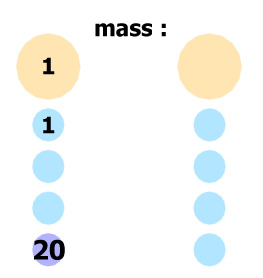
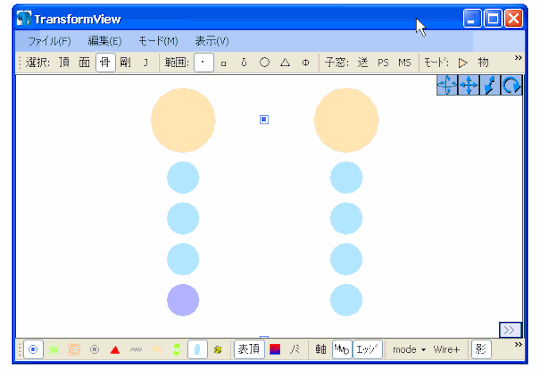
mass - the mass of the body (can be over 1) in a chain of bodys if the lower ones has bigger mass, the chain will move slower
move decay - how fast the movement of the body will dwindle closer to 1, the body movement will be brief closer to 0, the body movement will last longer
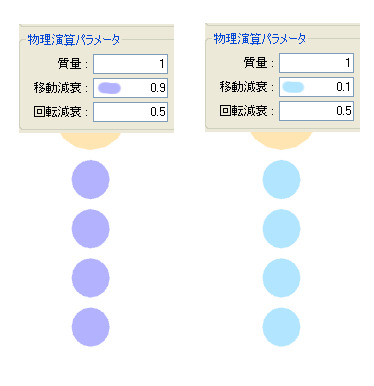
rotation decay - same as move decay but for rotation movement (those two parameters are usually the same)
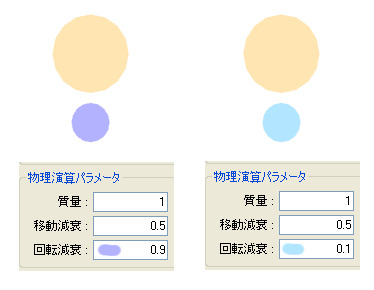

repel - make the body bounce when its collide another body (most of the time it’s 0)

friction - how slippery the body is when the body collide with another : closer to 1, the movement will stop sooner closer to 0, the movement will will take longer to stop
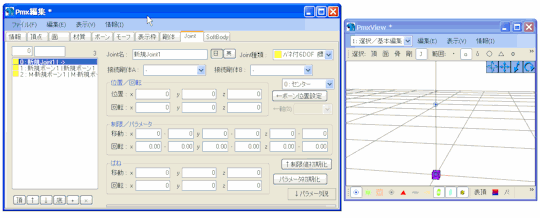
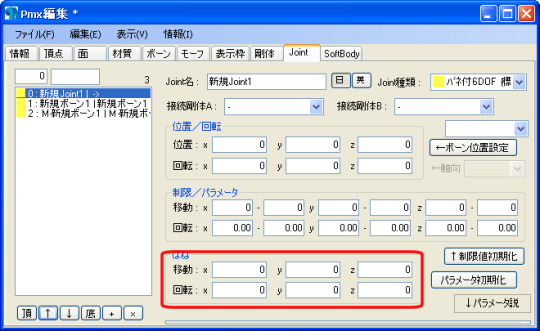
joint
joints are used to connect 2 rigid boys to move together
type
joints can have different types but they are not working in mmd (only mmm) when you change the joint type it also change the model pmx ver from 2 to 2.1
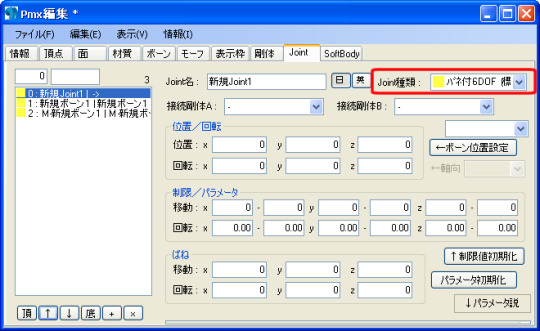
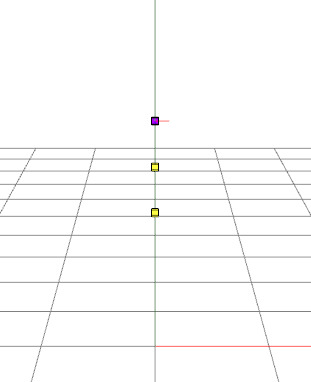
position
you can change the joint position with those parameters : (it’s better to position the joint between the two rigid bodies it will connect)
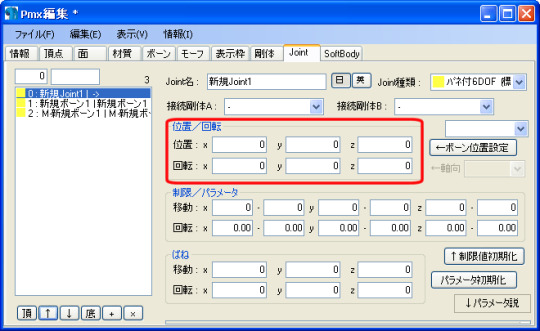
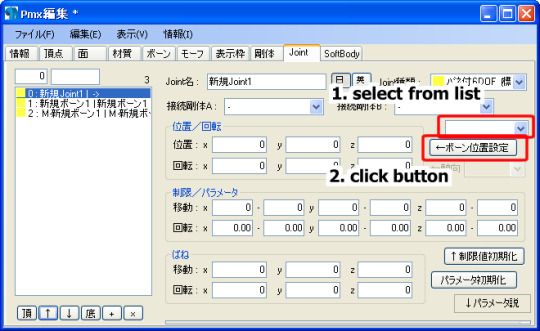
or you can take position from a bone, select the bone name from the list and click the button
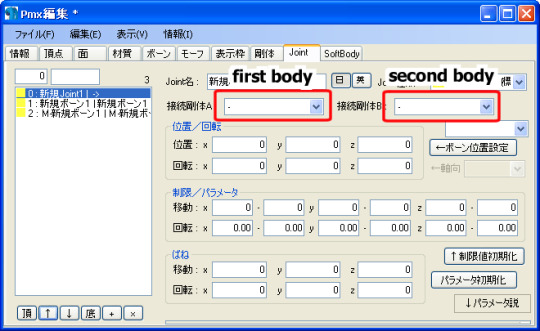
connect to rigid bodys
it's importent to connect the joint to the rigid bodies otherwise the joint is unnecessary ( joints that aren't connected to bodies cause mmd to crash )
to connect to the rigid bodies, select from the list the first body and from the other list the second body
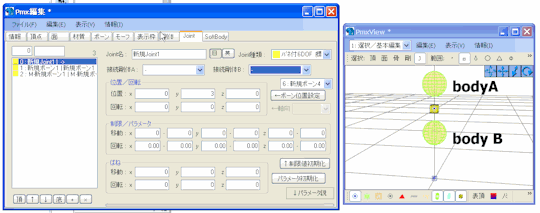
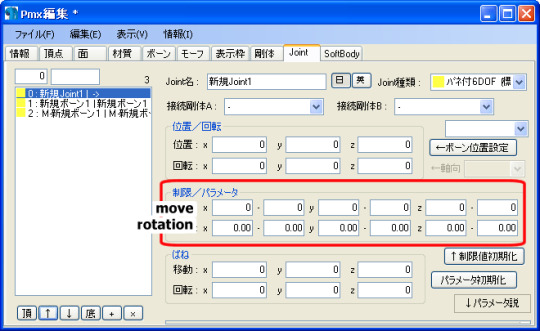
limits
this is the movement limit of the rigid body connected to the joint
move limit - how much rigid body B can move from rigid body A (most of the time it’s all 0)


rotation limit - how much rigid body B can rotate in relation to rigid body A the values is the angle the rigid body B can move in the axis

spring
I'm not sure what it does, but it seems like those parametese restrict the movement
51 notes
·
View notes
Text
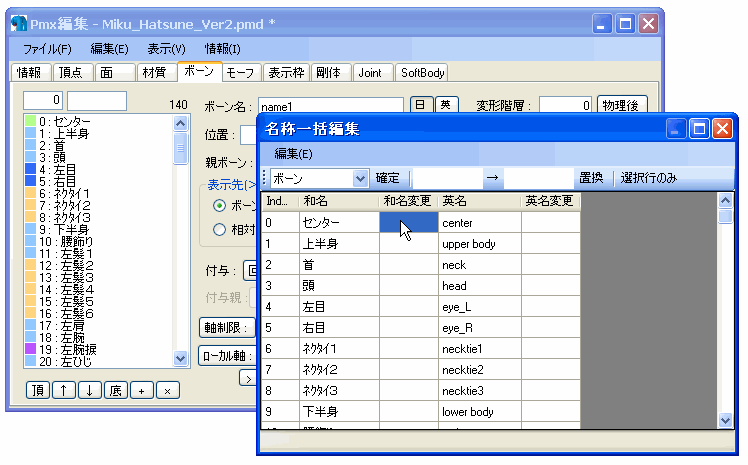
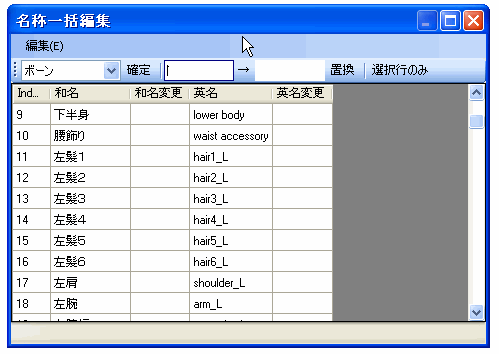
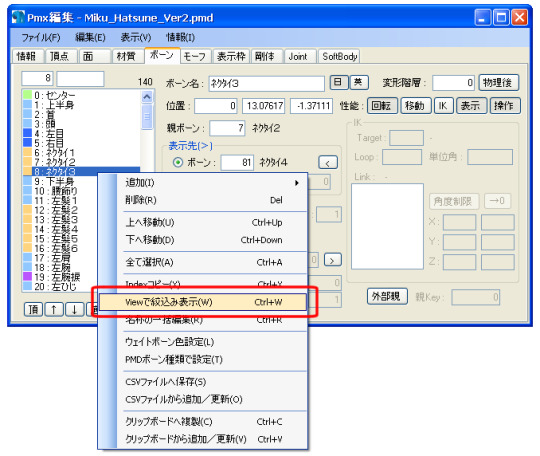
name batch modification + masking window
more new stuff but the previoues post go too long and I wanted to explain a bit more about those
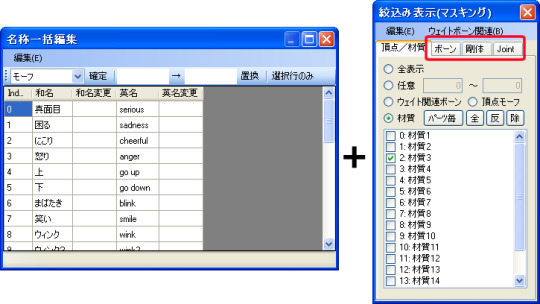
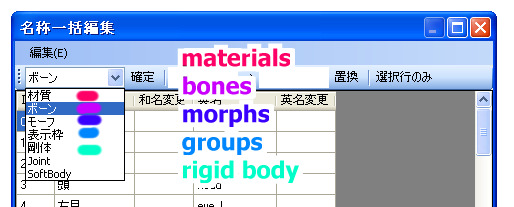
name batch modification
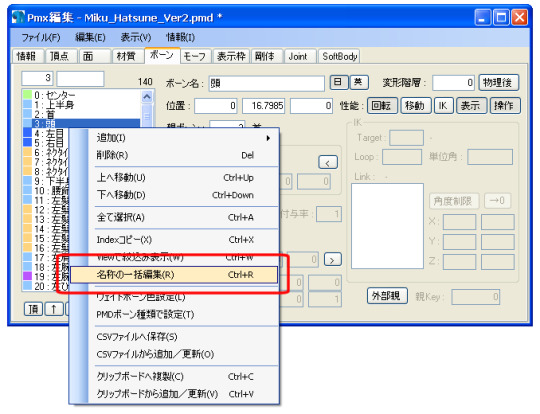
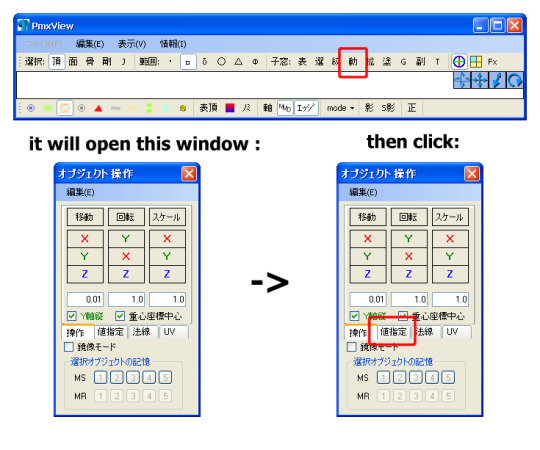
to open it click on this option (option also apprears in other tabs)
this tool let you change several names of things together you write on the right side and then press confirm
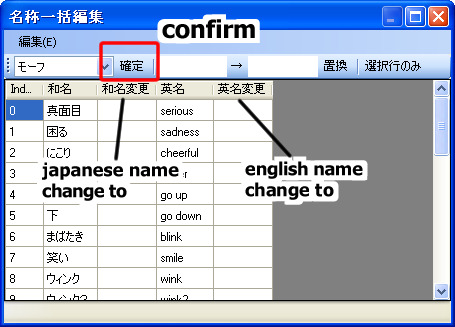
you can switch name options from the list on the left
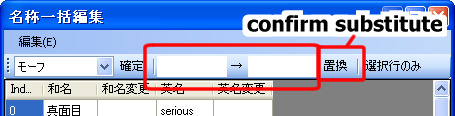
this option let you substitute certain part in name
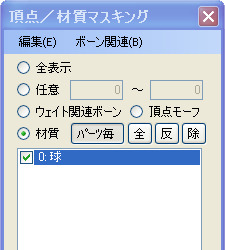
masking window
like materials you can also show/hide bones,rigid body and joints with this window if something is checked it will show if it’s unchecked it will be hidden
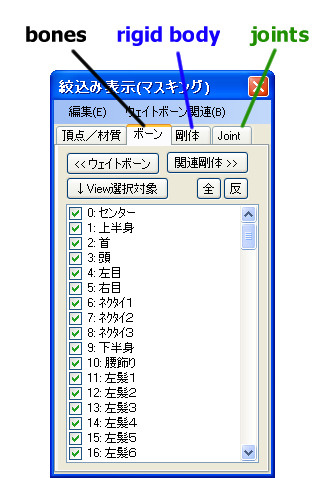
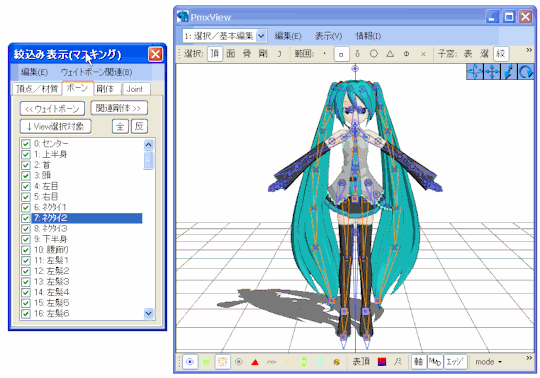
you can also select from the editor with this option (option also apprears in materials, rigid body and joints tabs)
10 notes
·
View notes
Text
PmxEditor new version
I wanted to know what was updated in the new version of pmxeditor,so I read the version update details in here : http://kkhk22.seesaa.net (I used google translate)
I didn't understand everything but here's what I did understand and how it works :
(I’m using version 254d for all examples)
version 232
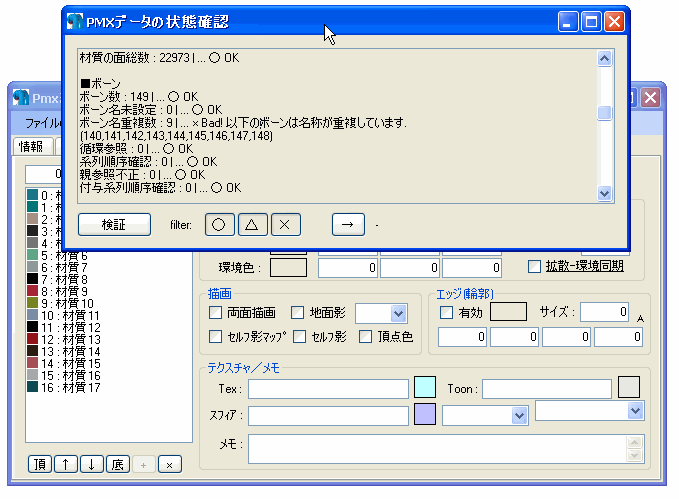
new buttons on pmx error finder to filter different errors types


version 236
selection inverse with ctrl+R and hide vertices changed to ctrl+H
version 251
label turn purple if coordinates copy possible (right click)
preview of primitive
move in lists by name

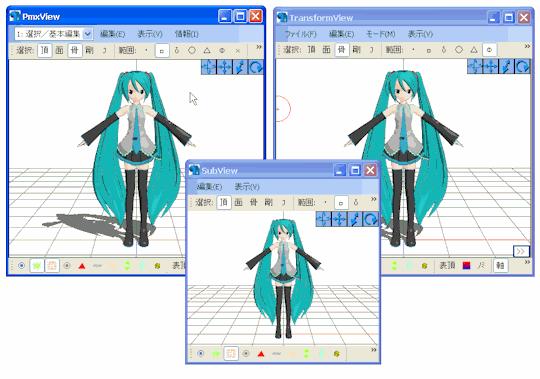
camera synchronization of PmxView+SubView+Transform
different bone weight color
the color will be random but you can change it
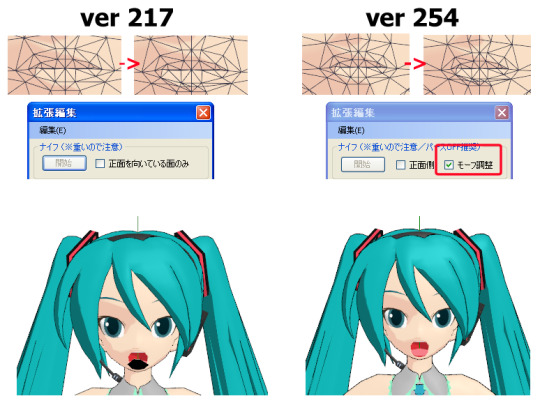
knife tool works better with morphs
pmx error finder new button, select the specific thing from error

version 254
new button, when pressed handle direction might change

5 notes
·
View notes
Text
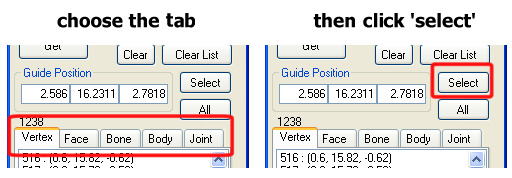
selection guide
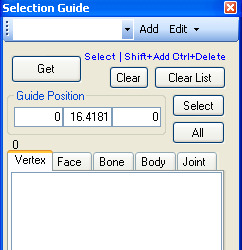
(I’m using pmxeditor 2.22 english ver)
to open it click on this button in pmx view

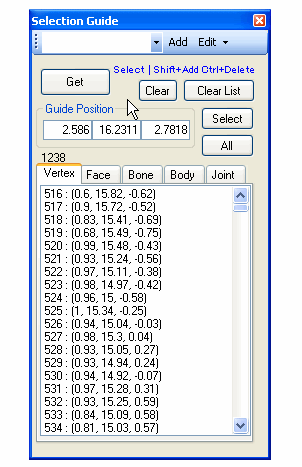
this tool let you save the area you selected and then reselecting the same area exactly more easily
let’s select some vertices
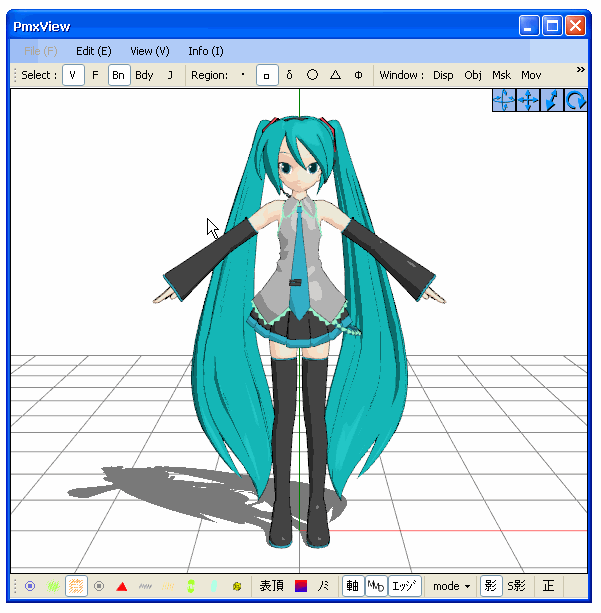
then click on the get button

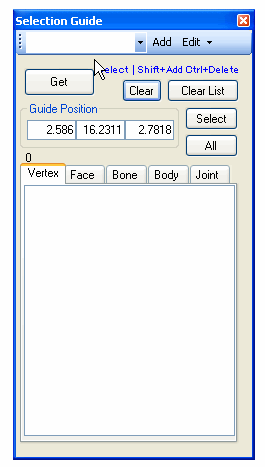
you will see a list appeared in vertex tab you can also select together bones/joints/etc... they will appear on the other tabs
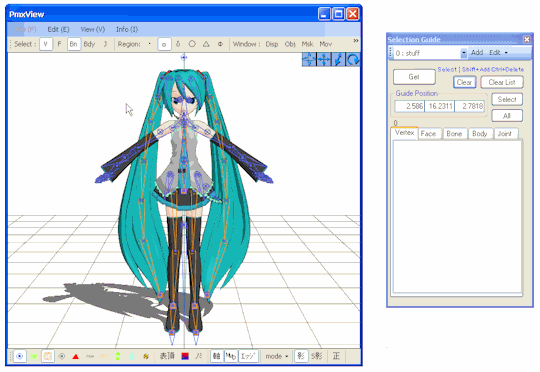
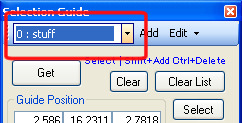
to save this selection press on add, and write a name
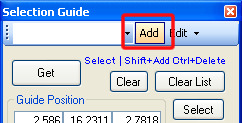
now if you want to select the same vertices again choose the selection from the list
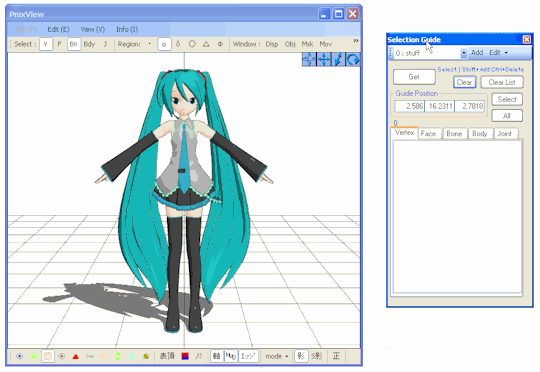
if you have different things selected together go to the specific tab of what you want to select, and click ‘select’

3 notes
·
View notes
Text
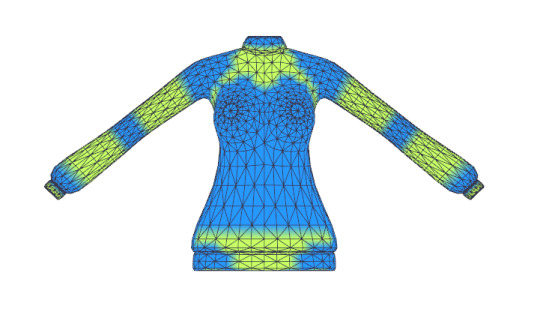
how to have better rigging when fitting clothes

( this tutorial won’t help if the rigging are bad from the start, but shows how to have less rigging issues when fitting parts )
to have less glitchy rigging you need to look at the weight of the part, and then fit the part to while considering the bones placement in the base
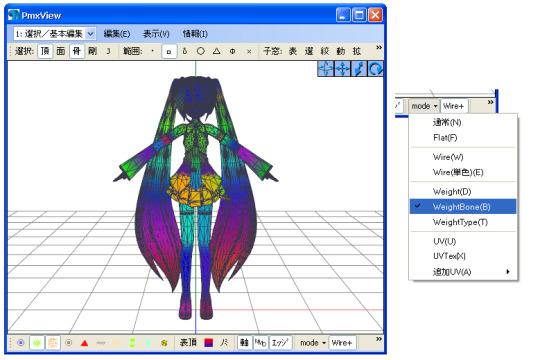
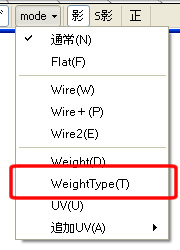
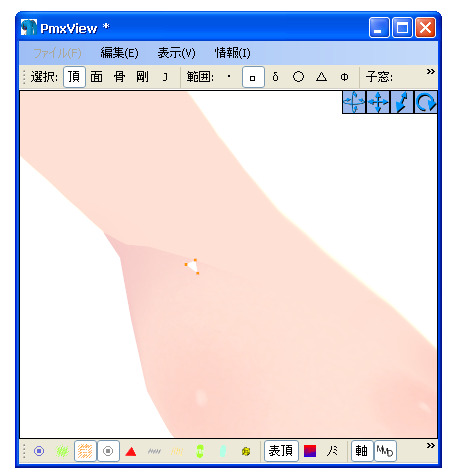
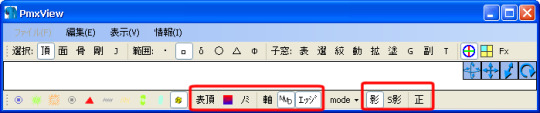
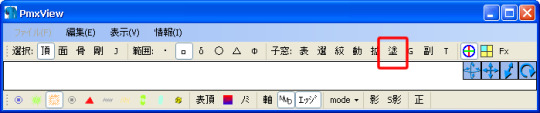
let’s look on this shirt, select the mode: weightType in Pmx View
you will see the part in green and blue colors(some times other colors but they are like the blue)
shirt by 2234083174(DA) (i edited the rigging a bit)
let’s look with a base
base by missmmd & kanahiko-chan
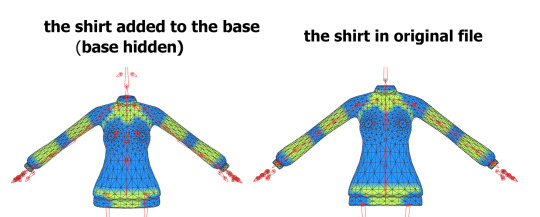
you can see that the bones are places differently with the base but the blue parts stays the same, when we fit the shirt to the base try to place the blue parts the same way they are placed according to the bones in the original
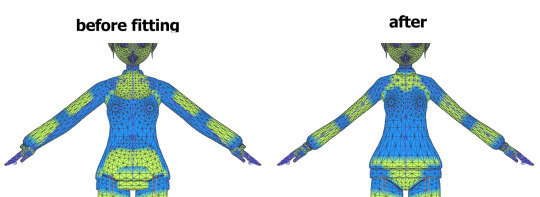
if we compare it to the original you can see that the elbow is a bit off
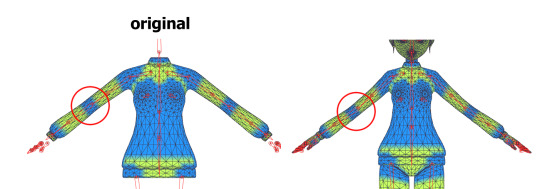
and if we test the elbow it move a bit weird
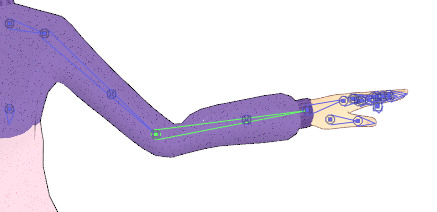
let’s fix the blue parts in the elbow (I moved the vertices)

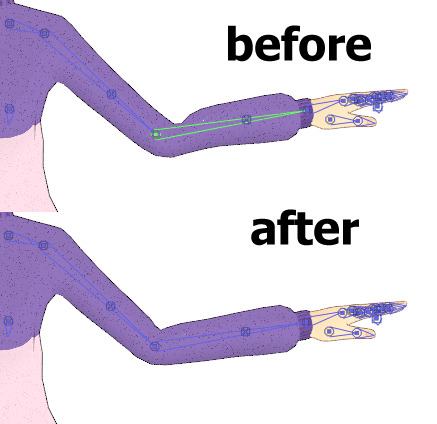
you can do this with any other parts too, place the blue parts right and you will have less rigging issues
6 notes
·
View notes
Text
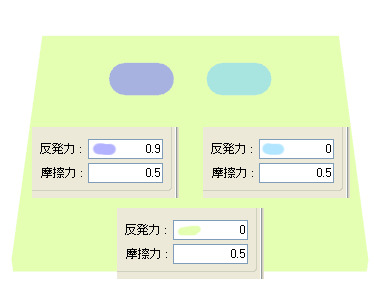
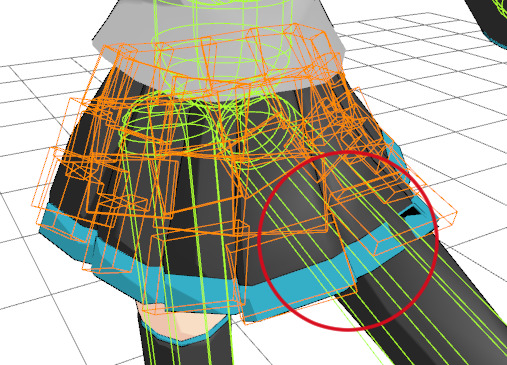
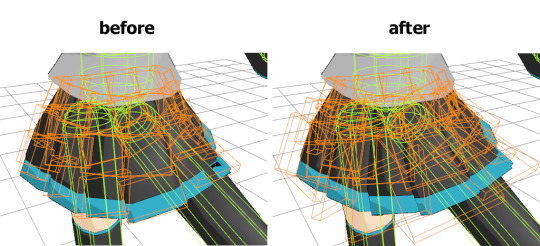
tip for skirt physics : about clipping

there are two things you can do to have less clipping in the skirt
1. editing the skirt physics
edit the skirt physics to make them longer and wider
( this tip is for when you make the physics in the skirt plugin, if you already have skirt phyics you might need to change each one or remake them )
in the skirt plugin menu go to :
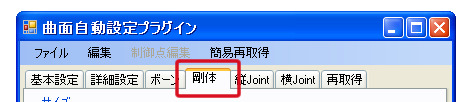
check those boxes :
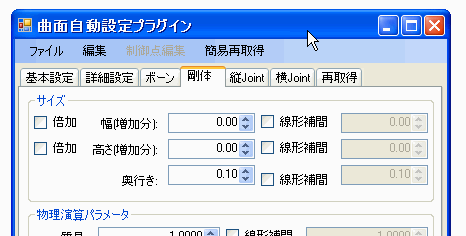
when the boxes are checked, the rigid body will gradually change according to the value on the right
and change the values on the right, the first is width the second is height : (you can put different values, what fit your model)
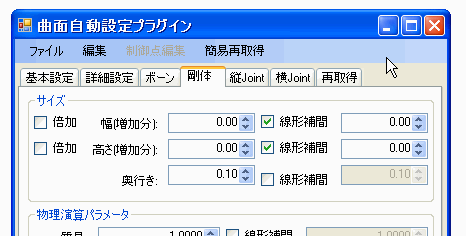
it will look similar to this :
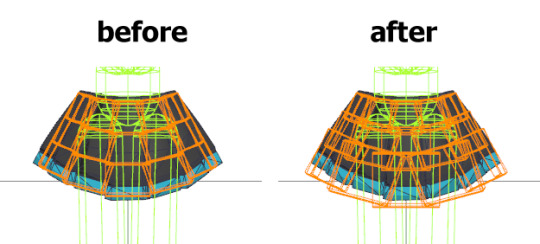
what diffrence it makes?
since the skirt physics are moving the legs sometimes stretching them and causing gaps between them (that’s why the clipping happens)
when you make them longer and wider it keep the shape even when they streched
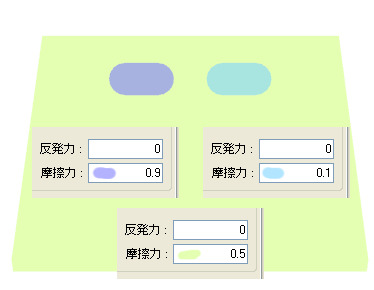
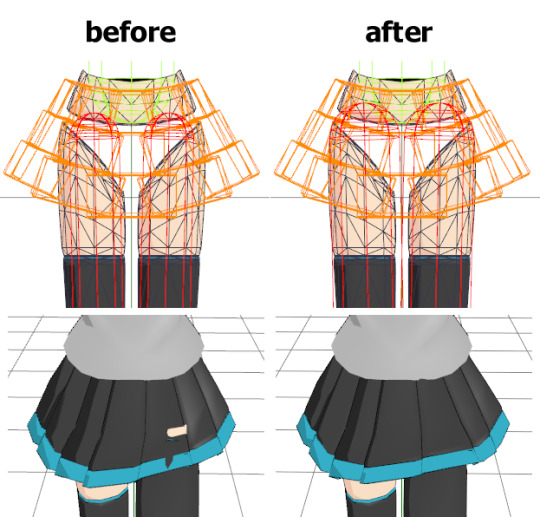
2. editing the legs physics
sometimes if the legs rigid bodys are too thin they cause clipping, and you need to make them thicker
1. select the legs rigid bodys
2. change the value (change it to something that will cover most of the leg)
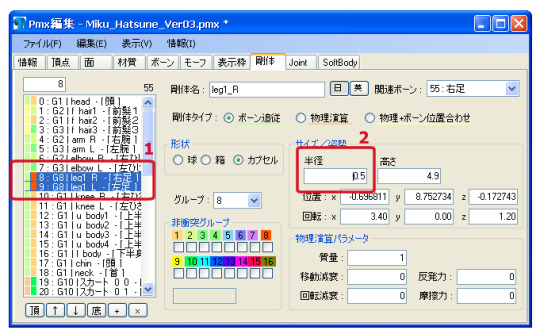
you can also make the skirt physics thicker instead
use the third option in the skirt plugin : (the same way like the height and width above)
3 notes
·
View notes
Text
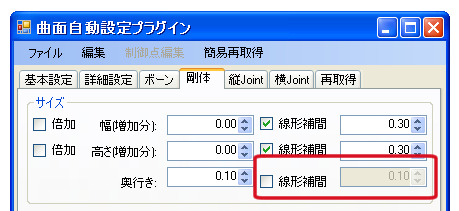
skirt plugin - saving and loading settings
you can save the setting in the tabs of the plugin and load it if you need it’s also save the shape of the joints
saving
click in the plugin window on :

then (save as for new file, save for saving in current file) :
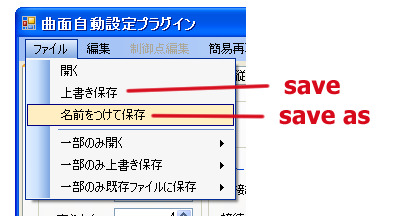
choose where you want to save the file and it’s name
loading
to load the information, click on :
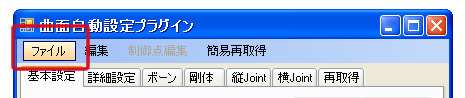
then :
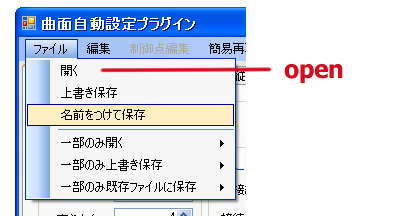
and choose the file
you can see the file name on the bottom

1 note
·
View note
Text
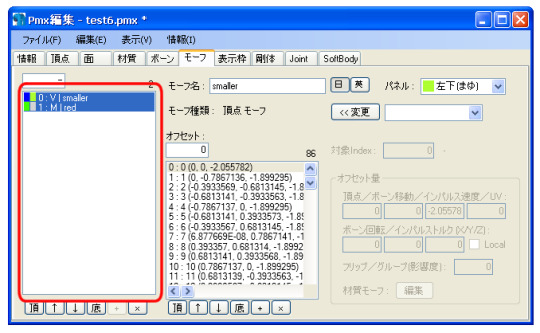
combine morphs to one
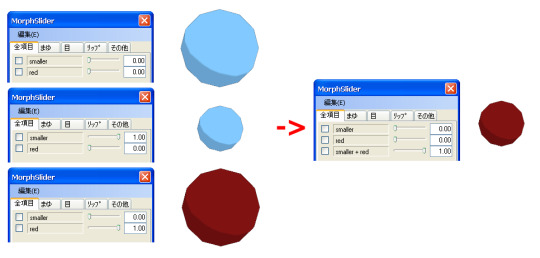
(this tutorial will show how to combine 2 morphs but it can be more then 2)
go to the morph tab in pmx editor

select from the morphs list the ones you want to combine (press on ctrl to select more then one)
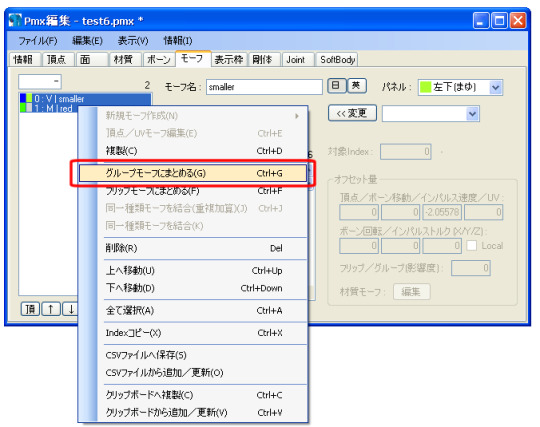
right click on one of what you selected and click on :
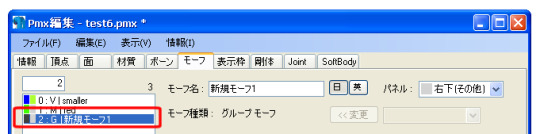
a new morph will appear at the end of the list :
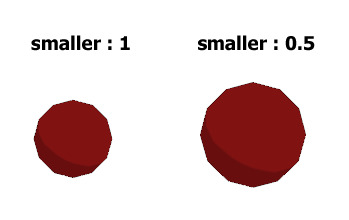
when you use the new morph it will be like you used all the morphs you selected :


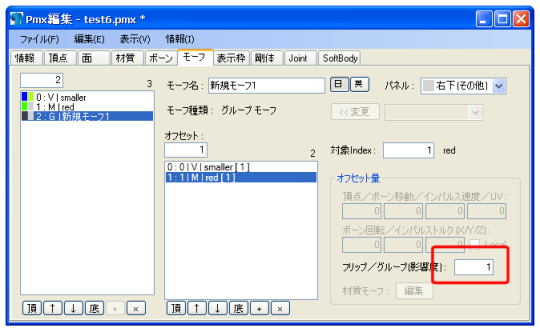
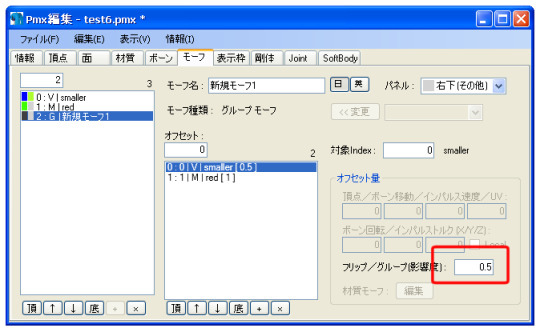
extra thing:
you can change how much certain morph will work, change the number here (between 0 to 1) :
1 note
·
View note
Text
create copy of material

go to the material tab in Pmx Editor

select from the materials list the one you want to make copy of
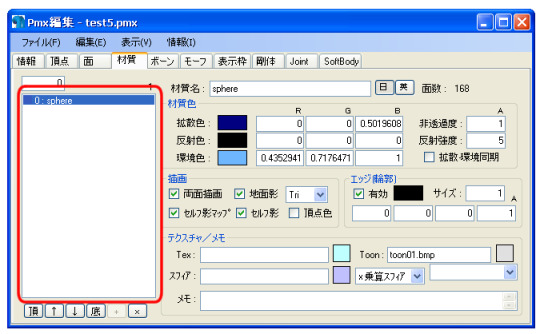
right click on it and select this option :
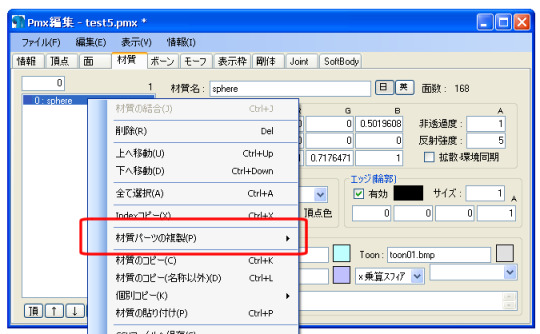
3 options will appear :
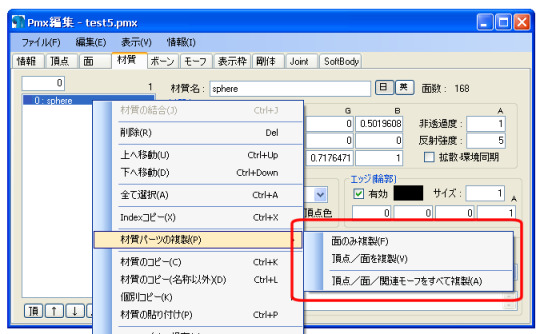
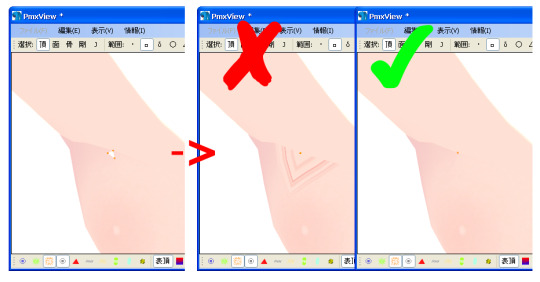
first option: will make copy of faces if the original had facials/morphs - they will work on the copy editing the copy mesh - will also edit the original
second option: will make copy of faces and vertices if the original had facials/morphs - they will not work on the copy editing the copy mesh - will not edit the original
third option: will make copy of faces, vertices and facials/morphs if the original had facials/morphs - it will make copies of the morphs (copied morphs will have + at the end of their name) editing the copy mesh - will not edit the original
(for the example at the top I chose second/third and moved the copy)
after choosing an option there will be a massage, click ok
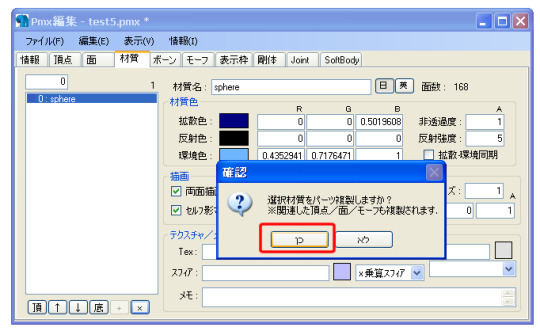
the copy of the material will be on the end of the list and have + at the end of the name

3 notes
·
View notes
Text
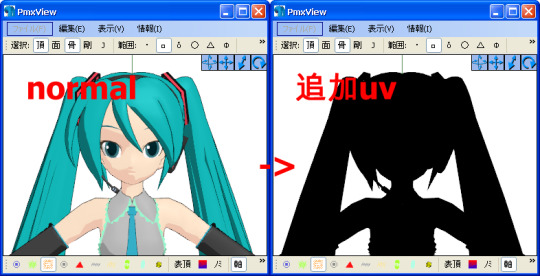
join vertices without affecting uv
select the vertices you want to join
now click :
change all the 1.00 to 0 in the marked column :
click on this button, the zeros underneath will change :
finally click this button, and the vertices will be joined
note : this method dosn’t really joining the vertices, it’s actually just moves them to the same spot so you might need to fix the noramls afterward
2 notes
·
View notes
Text
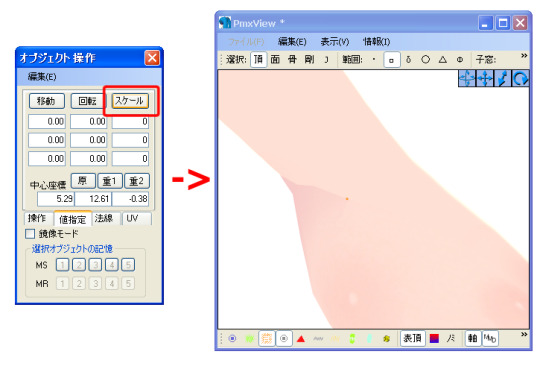
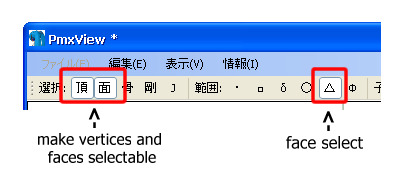
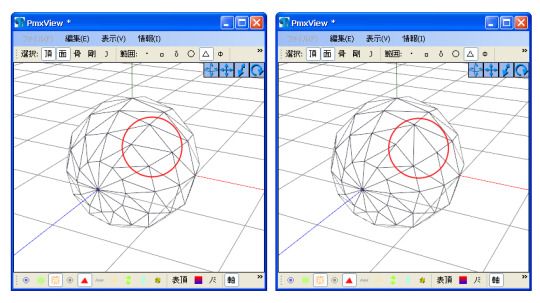
swap diagonal in mesh
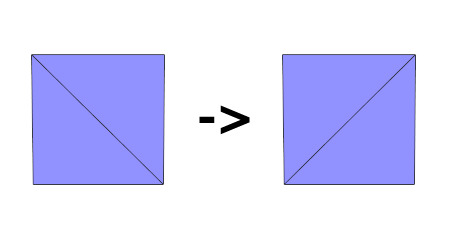
first, make sure those buttons are one
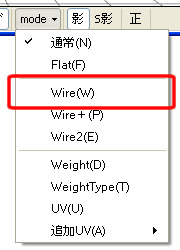
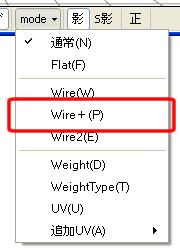
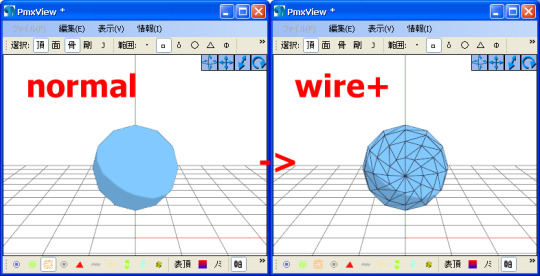
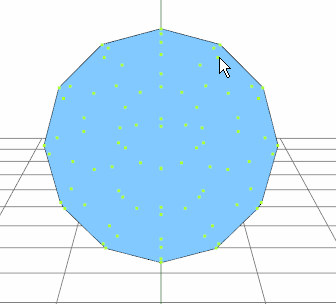
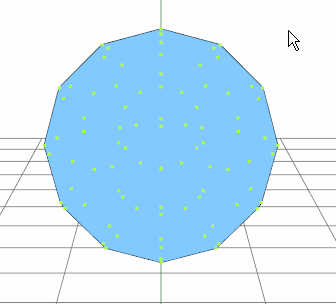
select a square (2 triangles) (to see wires click at the bottom: mode -> wire+ )
don’t select more than 2 triangles or non square shape, you will get an error :
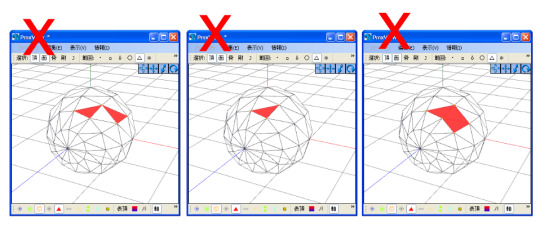
after selecting the square click in PmxView : (or press ctrl+L)
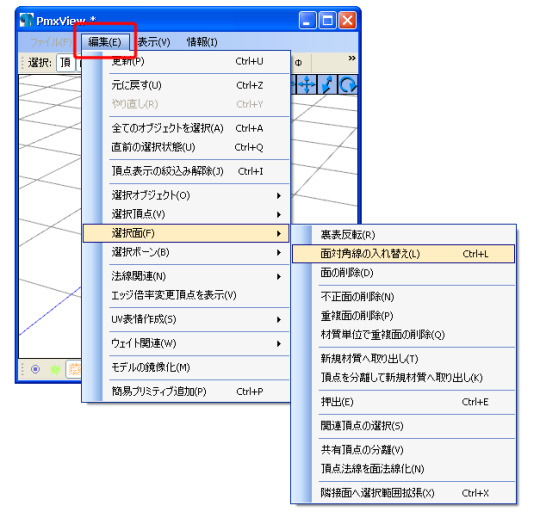
and the diagonal will change direction
2 notes
·
View notes
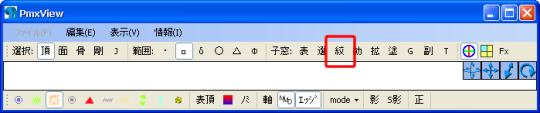
Text
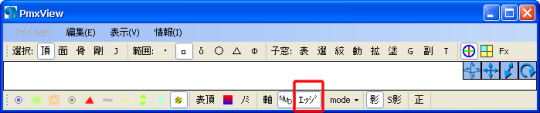
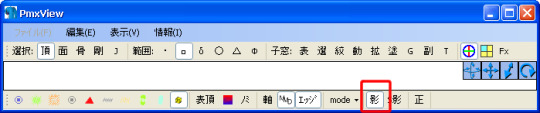
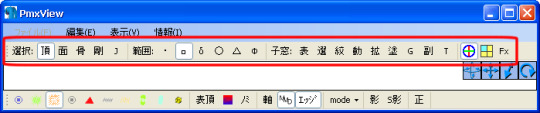
pmxview buttons (part 2)
what the buttons in pmxview do - part 1 part 2
i used some info from here - http://fav.me/d9se0pg by SteelDollS
and english names from eoscustom3d of pmx editor - http://fav.me/d8yr374
my pmxeditor ver is 2.2.2
display :
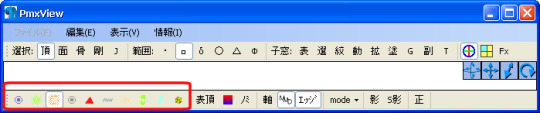
each button make certain thing visible
make bones visible :

make vertices visible (unselected) :

make selected vertices (orange) visible :


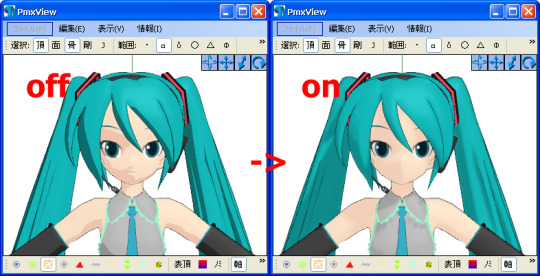
make hidden bones visible (bones must be visible too) :
make selected faces visible ��:
make normals visible :
make selected normals visible :

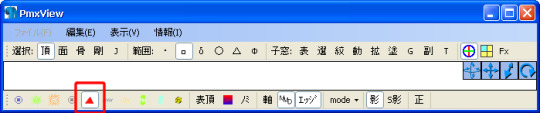
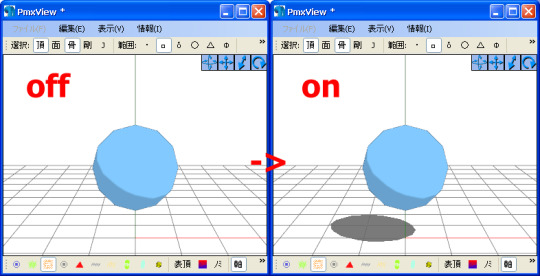
make rigid body(wire, color = type of body) visible :

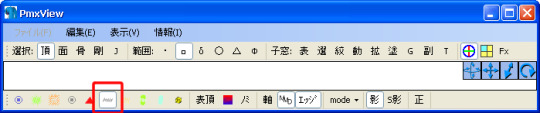
make rigid body (solid, color = group type of body) visible :
make joints visible :

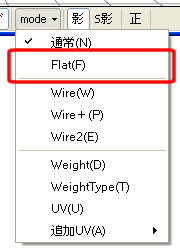
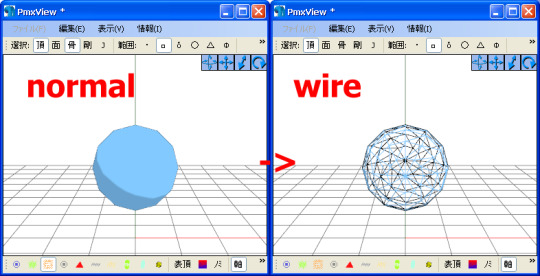
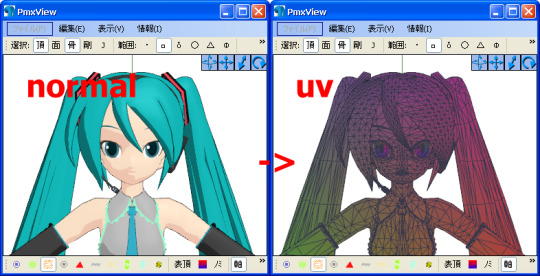
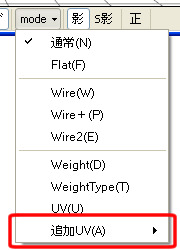
mesh display :
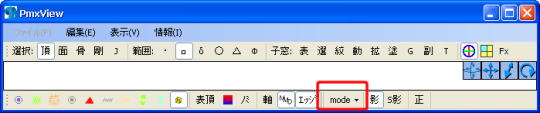
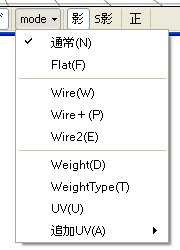
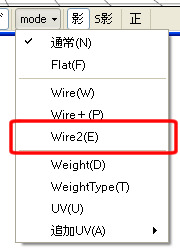
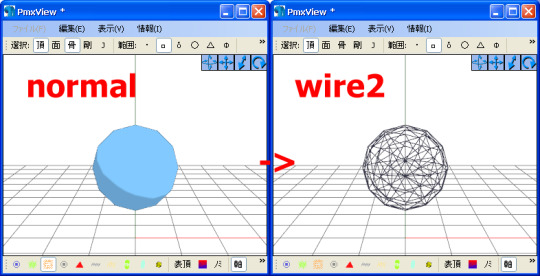
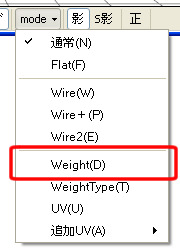
each mode from the list will change the mesh look
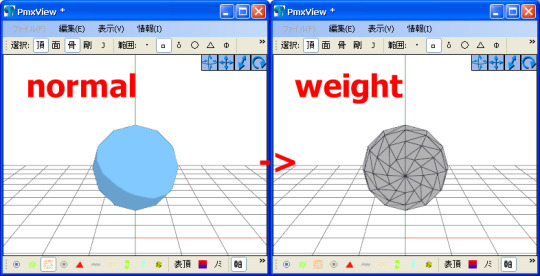


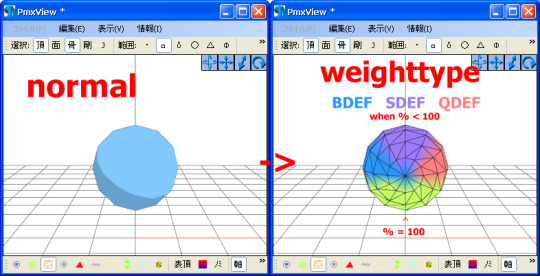

other :
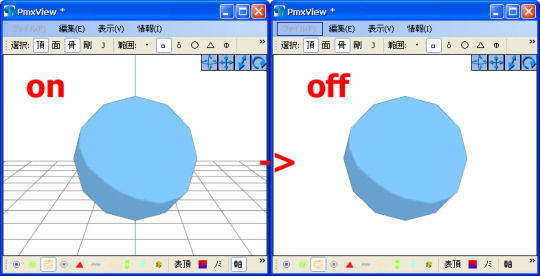
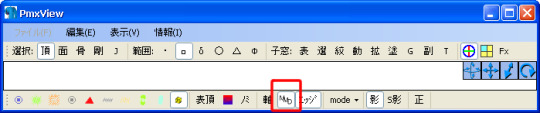
show only front vertices :


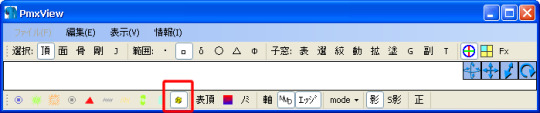
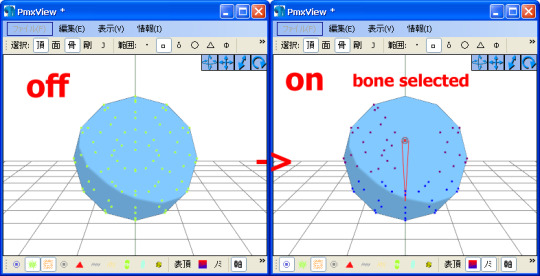
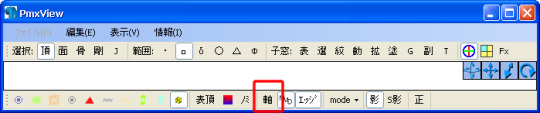
show rigg of selected bone :

show only vertices rigged to selected bone(work only with previous button on) :
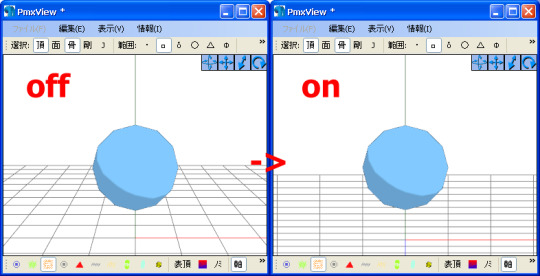
show/hide grid :
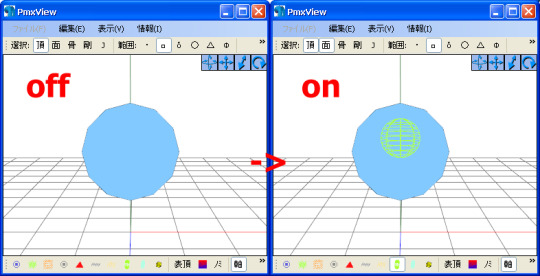
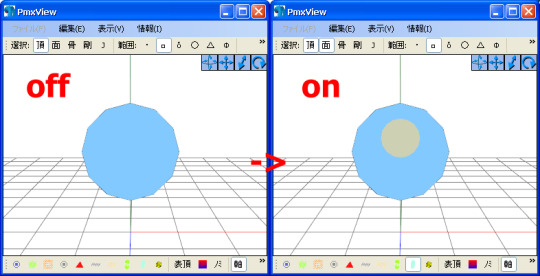
something with toons(?) :
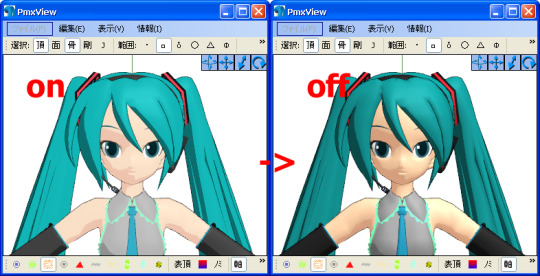
show/hide edge line :
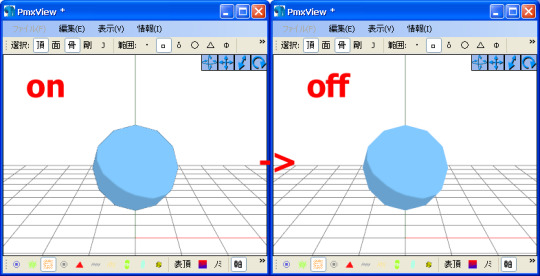
show/hide shadow :
show/hide self shadow :

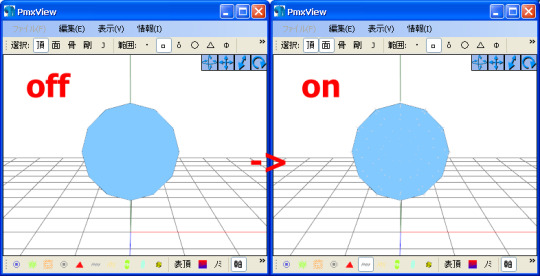
perspective on/off :

1 note
·
View note
Text
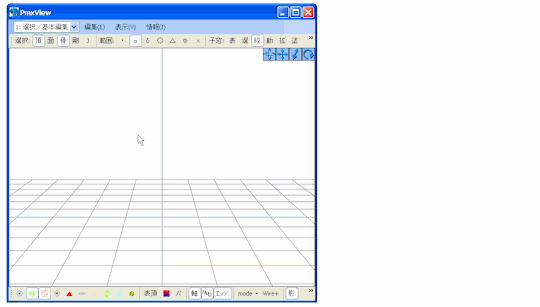
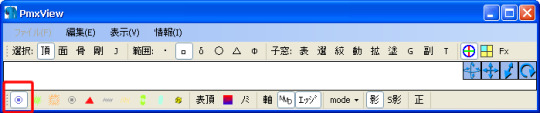
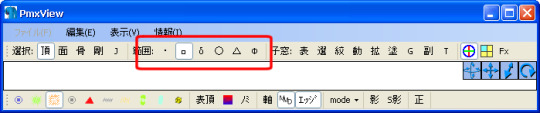
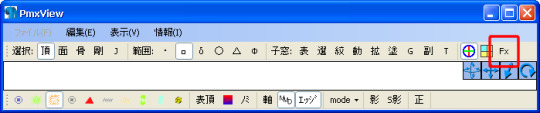
pmxview buttons (part 1)
what the buttons in pmxview do - part 1 part 2
i used some info from here - http://fav.me/d9se0pg by SteelDollS
and english names from eoscustom3d of pmx editor - http://fav.me/d8yr374
my pmxeditor ver is 2.2.2
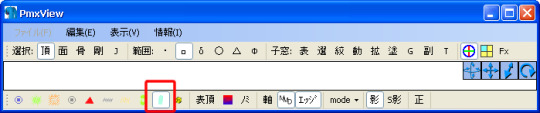
selection buttons :
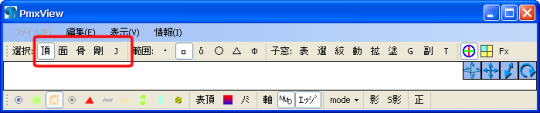
each button makes certain thing selectable for editing, when you press a button it will make what you chose visible, like bones of joints, but even if it’s not visible and the button is pressed it will be selected (if there is something)
will make vertices selectable :

will make faces selectable (only works when vertices also selectable ) :
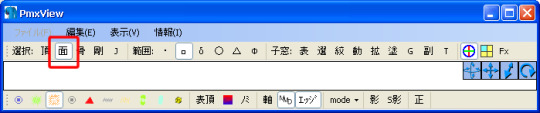
will make bones selectable :

will make ridig bodys (physics) selectable :
will make joints selectable :

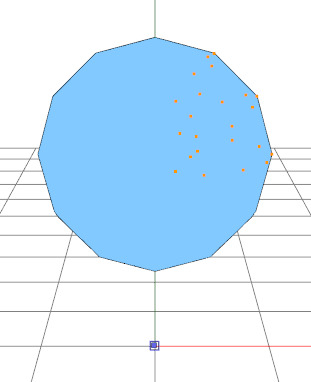
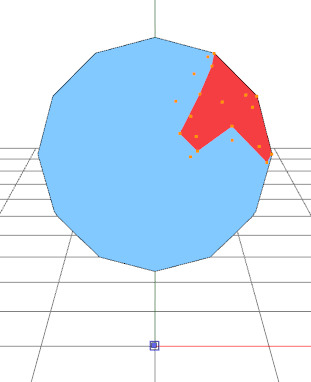
selection range :
(exmpales on vertices)
point selection, select each thing Individually :

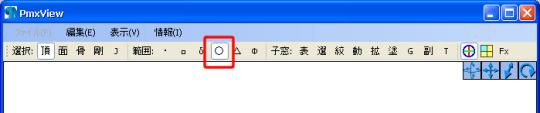
box/square selection, everything inside the box is selected :
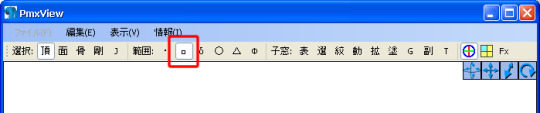
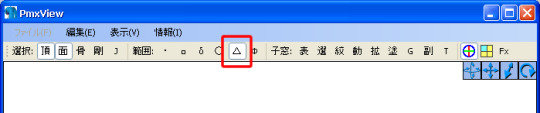
free selection, everything inside the shape is selected :
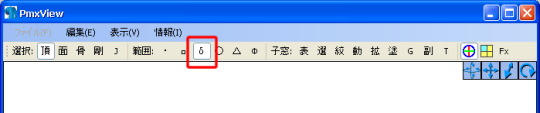
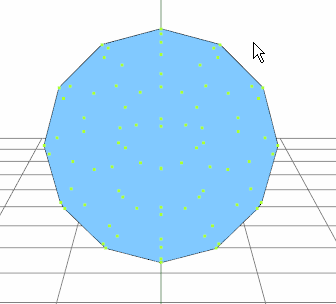
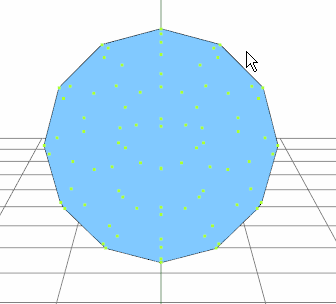
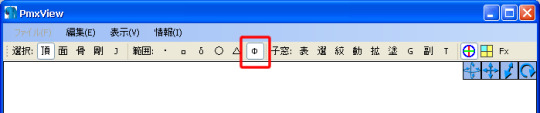
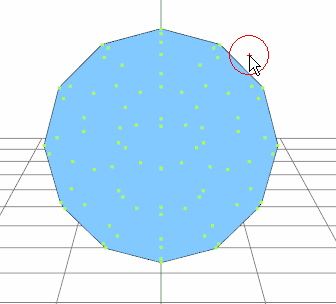
circle selection :

face selection, it will only select mesh faces :
point range selection, after point is selected you can move it :
windows open :
each button opens a new window related to certain thing
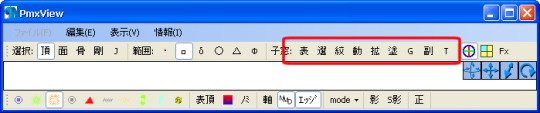
Display Settings
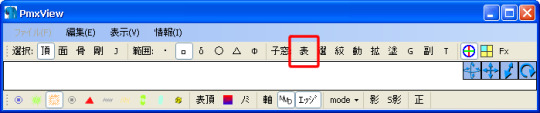
Object Management

Vertex/Masking
Object Manipulation
Advanced Editing
Weight / UV Drawing
Selection Guide

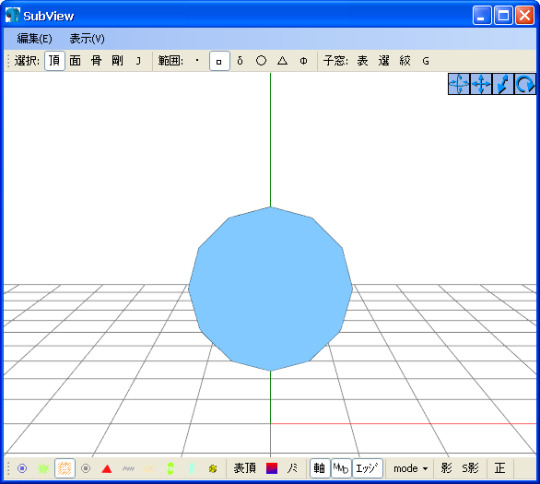
SubView, this view won’t move when you rotate/zoom/move in pmxview
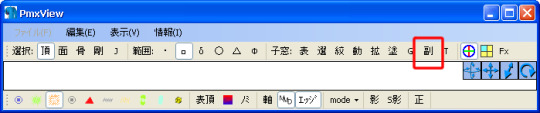

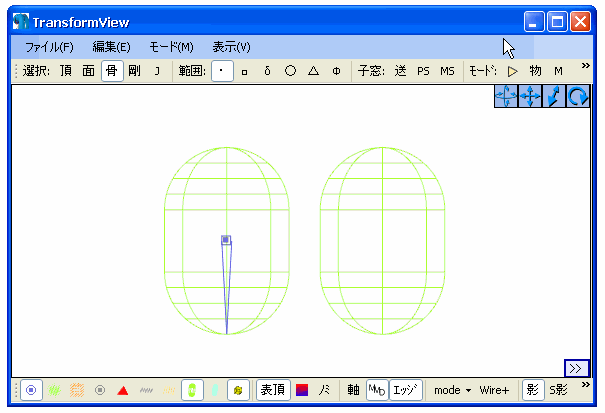
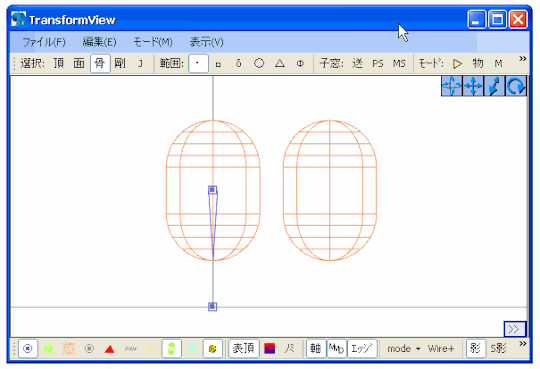
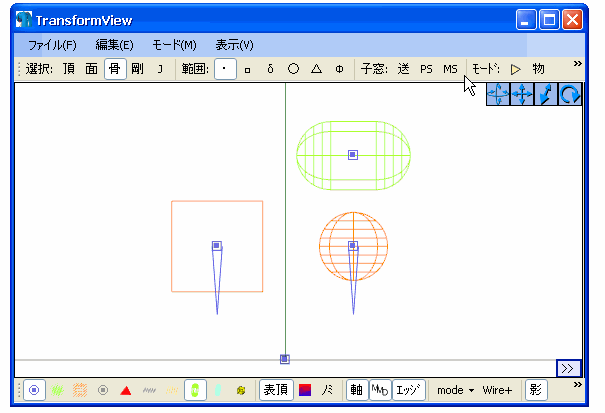
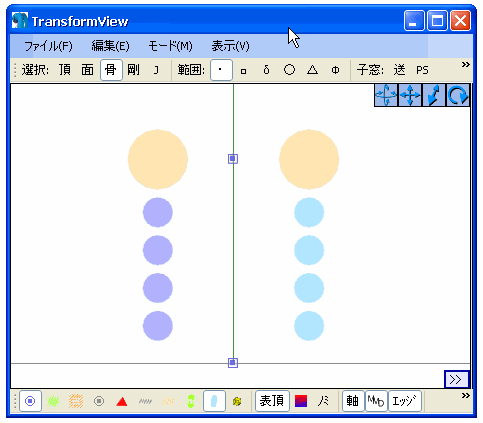
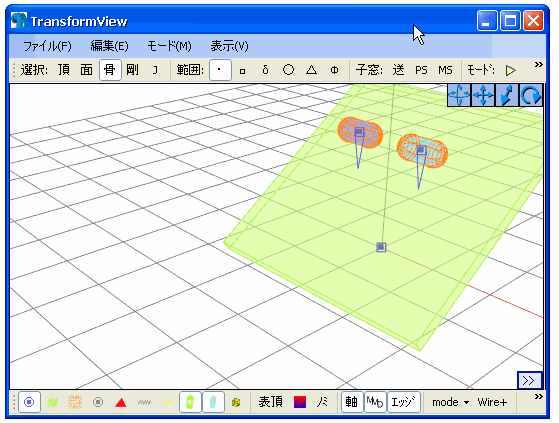
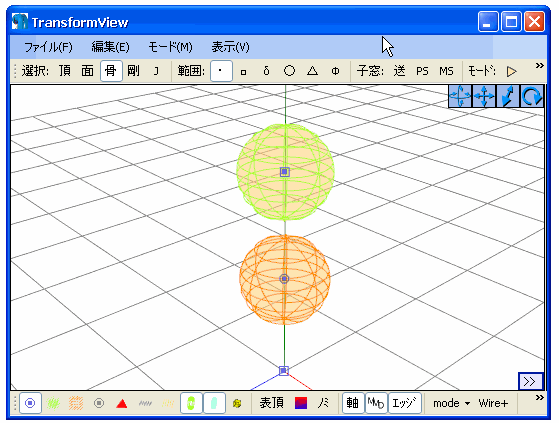
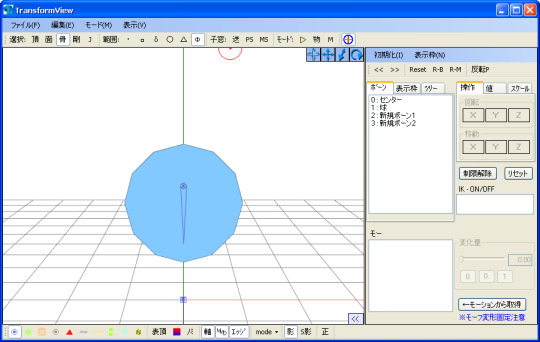
TransformView, in this view you can test the model bones/morphs/etc...

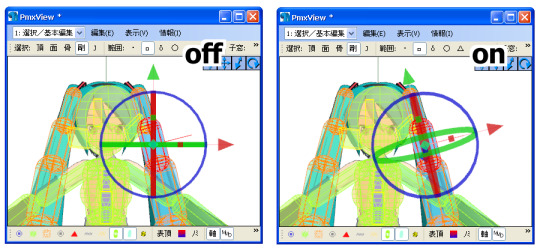
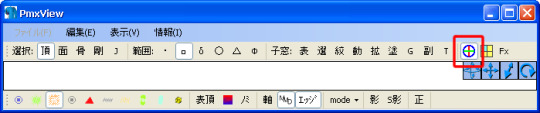
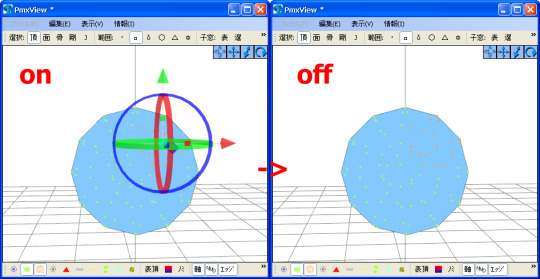
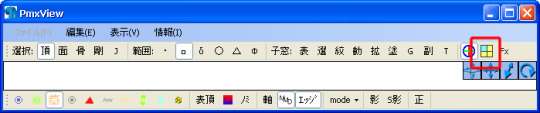
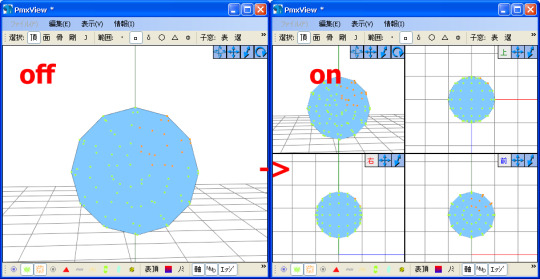
toggle :
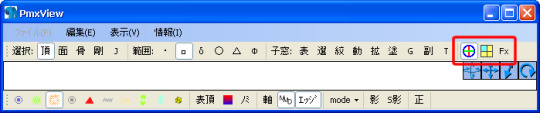
hide/show the handle :
hide/show 4 screens :
hide/show effects in model(if there are some) :
2 notes
·
View notes