Last Seen Blogs

kwallen-blauwe
Bobbing's Disco(mmunication) Club

kurumipanda5
くるみことば


austinsmixtape
Austin (:

amorreinaa-blog
✞O amor reina aqui
Text
This is my finished shirt. I am really happy with how this has turned out. I think it will give a warmer homely vibe to the overall look and I really like the versatility of the garment as it could be worn as an oversized jumper, a dress or a tucked into jeans. I find it very effective how I have tied everything back to the colour palette and original inspiration.
0 notes
Text
https://www.pinterest.co.uk/hillmancrouch/fmp-y2/
link to my Pinterest board
0 notes

Text
Final evaluation
At the beginning of the project, I explored more abstracted themes around ‘Wonderland’ with my creative photoshoots focusing on mirrors and inner reflection. After conducting a character analysis of Alice, I wanted to create a garment for her reflecting her personality traits, animals she meets, things she experiences and how this influences her.
I was greatly influenced by Tim Walker’s White Rabbit photoshoot for Vogue Italia where the models are wearing over-sized rabbit heads (1). This made me look at the novel and the different characters Alice meets in more depth - leading me to create illustrations (2), a clay model (3) and eventually the tissue and wire mask seen in the final photos. I wanted the head piece to have more of a distorted feel instead of Disney-style “cute” rabbit. I researched the masks used in the 1973 ‘The Wicker Man’ (4) and how these added to the story line. Following along from this, I looked at artwork by Paula Rego’s ‘War’ (5) depicting human-like rabbits. This really helped me with the scale and the contoured look for the head piece as well as how it could be constructed.
When looking at possible silhouettes, colours palettes and construction methods, I came across costumes used in performance - including costumes by Georgia de Chirico in the play ‘Ball’ (6) from 1929 and the 1966 televised version of ‘Alice Through the Looking Glass’ (7). I really like both of these sets of costumes because of their block colouring. I incorporated this aspect into my final piece and illustrations by having the panels over the hips continuing into the trouser legs.
I also looked into the organic and nature aspect of Wonderland. Looking at flints (8) found in the fields surrounding my home helped for colouring and texture as well as sculptures by Peter Gentenaar (9) . He creates amazing, twisted pieces by creating a structure using bamboo and tissue paper. I wanted to use this method to create my sleeves - I used dope, modelling tissue and strimmer wire (10). However, this did not have the outcome I was after, so I manipulated fabric and used plastic boning instead to create a similar look.
Maths, Religion and Science - I developed my pattern cutting and construction method using mathematical working and calculations. I also looked into the darker aspect of Wonderland by watching a TED talk about Conscious Reality and how the brain processes our own reality, what calculation the brain makes to perceive it and how this relates to religious ideas of an afterlife. This links to Wonderland because of Alice’s experience and how this could be interpreted as either something that happens to her consciously or unconsciously in a dream.
I chose to focus on costume design, making, pattern cutting and dyeing. I picked these to focus on as I have not yet done a project with very complex pattern cutting, fitting and precision and really wanted to push myself. I chose dyeing as part of my project because I really enjoyed the process of printing my own fabric for the Inside Out project and the different effects I can make. This links very closely to my future plans as I want to do Costume Construction at university.
In the exploration stage of the project, I looked at the ‘Pool of Tears’ chapter from Alice in Wonderland. This led me into looking at how to make the fabric look wet and heavy without actually being that. I experimented with resin to give this look and it worked very well. I really wanted to include this sampling in my final piece but as my design developed this looked out of place with the overall aesthetic. I also sampled fabric manipulation techniques and dope/modelling paper to give the idea of expanding and contracting (as Alice does in size).
Overall view on outcome- broken down.
The colour palette – when deciding the colour palette for my overall look, I took a lot of inspiration from what Alice would see when falling down the rabbit hole. I used earthy tones - like the golden brown and greens - as an enhanced vision of nature, going into the more pastel colours of what I imagine Wonderland would have as you look up the costume.
In this project, I really focused on the pattern cutting, fitting and accuracy (12). I chose to do curved strips over the waist and creating a V shape in the centre front in order to exaggerate the waist and, with the under structures, help give a distorted figure shape. I found it difficult to get the point in the centre front even and continue the line accurately over the hips. This shape was inspired by James Charles 1940’s clothing (11) I decided to tell the story of ‘Absolem’ the caterpillar who helped Alice. This is shown by the stripes at the waist; they are thinner here representing his segmented body and wider at the bottom symbolising his growth into a butterfly.
I wanted to include pleated shapes down the legs on the light green side panel (13). However, when I tried to create these they did not work as I wanted them to, and I had to improvise. I hand dyed and made 60 flower shapes and hand sewed these over the hips whilst keeping the stripes visible. I chose the pastel colours pink, blue, purple and green as this is what I imagine Wonderland would have looked like before the Red Queen had all the flowers painted red. (14)
The colours used for the bodice were inspired by Disney’s animated version of Wonderland that most people associate with Alice. I used the white on the bodice to represent her curiosity and her youth. This also harks back to the original illustration -by John Tennial- of her white apron (15). As this costume additionally reflects characters Alice meets and her character development, this also resembles the white rabbit and the Queens servants who were painting the white roses red.
On the bodice, I wanted to include petal-like shapes. I used batik methods and hand dyed this piece. I originally wanted to dye them the same colour as the sleeves however something went unexpectedly in the dyeing process and created this turquoise colour (16). I am really pleased that this happened as this resulting tone linked the greens in the trousers to the blues in the sleeves. Having this on the front of the bodice really tied the whole costume together as before the bodice and trousers look very separate and not cohesive. I really like how the colour transitions from white to pale turquoise, growing out from the bodice.
For the sleeves, I tried lots of different techniques such as constructing a frame using tissue paper and dope inspired by Peter Gentenaar. However, this did not work in the way I wanted it to, so I resorted to using fabric manipulation. I dyed the white cotton using the dry ice and batik method to create different tones. As this is her most well know colour, I used the blue tones to represent Alice. I was very drawn to this colour and the idea of falling down a rabbit hole and different layers of the earth you would see. When out on a walk, I found blue Anglican flint and I really loved the texture and colours and included this into the sleeves. Another reason I chose this colour was to reflect her ‘Pool of Tears’ and the power of imagination.
To complete my costume, I created a mask from wire and tissue paper. I drew inspiration from Tim Walker’s photography from the ‘White Rabbit’ photoshoot for Vogue Italia where he used oversized animal’s heads. I started this process by drawing rabbit illustrations and developing this into a 3D clay model which I used as a basis for my final mask. I really like how the mask captures the white rabbit ambiance without being too cute/”Disney” and is instead darker and dream-like. I find this very effective as the White rabbit starts her journey and almost traps her in the world of Wonderland.
Overall, in my opinion my final outcome is very effective as I capture the dreamlike quality of Wonderland, with an uneasy feel. If I were doing this at college, I think my time management would be much better as I finished the garment 5 days late. I would have spent less time on the mock-ups and fitting but I feel this was necessary to complete my garment. I would have also included different print techniques and maybe a form of metal work or vacuum forming that I could not do from home. However, if I completed this project at college, I would not have made this outcome as I have now. I am very happy with what I have achieved. If I were to make this again, I would fix the bodice as the white cotton was a bit larger than the interlining layer causing wrinkling across the chest. I would also have built in a form of structure to the bodice to bring the waist in more and to avoid the wrinkling at either side. I would change the back fastening to something strong and be more innovative with that to have a flush finish.
I would really like to improve my time management in the future and make a schedule that is more realistic but still pushing myself. Going forward into the next project I want to work on using a wide range of skills and different approaches and design I could use to create a better outcome.
0 notes


Text
Science and Religion
Is our reality just a hallucination?
This video really got me thinking of what it is to be a self and what that means. As we are all made from atoms and as atoms can not be made or destroyed, they are constantly turning into different things. So if someone dies the 70% of water they are made from goes back into the ecosystem and eventually becomes water that we drink. I found this incredibly interesting as when you think about where you go when you die, different religions have different places such as heaven, reincarnation or the generic belief of an afterlife. I also think this is because as humans/brains we cannot cope with the idea that everything just ends, that a person’s ball of energy and the thing that made them, them like memory and feels just do not exist to anyone. Knowing this would undermine most religions and the promises there built on.
This leads me onto this TED talk by Prof. Anil Seth who talks about the brain and what it can do. He talks about how you know that this is conscious reality? Is it because someone agrees with you that this is happening or something else? Linking this to Alice in wonderland- this is one of the theories around her experience.
https://www.youtube.com/watch?v=lyu7v7nWzfo&t=364s
youtube
0 notes
Text


Behind the scenes. I chose the local forset to take my final photos in as I felt it gave the twisted alice in wonderland theme.
1 note
·
View note
Text
Hemming


Hemming
To create a level hem, I pinned one side on my model. This was difficult as the inside leg seam fabric was much shorter than the other panels and I did not want it to rise too much in the middle. I then raised the hem to accommodate for this. After pinning I cut away excess fabric and turned under. I then hand stitched this to the calico layer, so the stitching was not visible from the outside. I tried to match this on the other side. As the trouser legs were now shorter, I took up the under structure as this was now visible. This really worked in my favour making them just above ankle length and not floor length as when I photographed the costume it was really muddy and avoided the dirt. Overall, I am very happy with the hem as it is very crisp, and stitching is not visible. If I were to do this again, I would use wonder web and stick this to the taffeta layer so the top fabric would be more anchored to the calico.
0 notes
Text
Back fastening


To fasten the back, I wanted something that would not pull and wrinkle so that ruled out zips and hook & eye tape as this would be too bulky, and I could not get this in time. I settled on very strong Velcro. I sewed this onto the back, so the stitching is not visible from the outside. This sat really nice and flat/flush making the point at the waist sharp. However, where this meet at the waist was taking too much strain and the inside of the Velcro was visible. I added a tape on the inside from the side seams to take the strain off of the Velcro. This worked to some extent. The Velcro also makes the crotch very bulky. This was fixed by making the seam wider to accommodate for the excess Velcro. Overall, I am very happy with this method of closure but if I was to do this again I would have added extra support and structure at the waist like a hook and eye or popper.
0 notes
Text
Petals and neck facing


After finishing most of my final costume I felt like it needed something else. On my original design I include petal shapes covering the front. To make these I used candle hot wax to create a batik look. Then dip dyed the white cotton, with what I thought was blue dye but turned more blue green. I am actually very happy with the colour as it ties the greens in the trousers and the blue in the sleeves together. I then cut these into petal shapes, zigzag the edges and starched. I topstitched these onto the front of the bodice. I also attached a facing to the neckline to avoid visible stitching. Petals inspired by this image below ⬇️

0 notes
Text
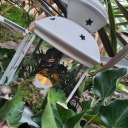
The white rabbit 🐇


The White Rabbit Head
From the very beginning of the project, I have wanted to create an over-the-top head piece that would really make an impact on the audience and communicate the Alice in wonderland theme. I was inspired by Tim Walker photoshoot for Vogue Italia with a huge hare head. Using my clay model as a reference, I wrapped pieces of 2mm wire together and shaped the main head. I then made the ears separately and then attached. I really wanted the translucent look through the mask but also to make it visible to the camera. So, I covered the wire in pieces of white tissue paper with PVA glue cutting the different shapes so that the structure of the head was still visible and made more sense to the view. After completely covering I found that as the glue dried the tissue contracted and became more translucent in places, which I found really effective as it allows you to see more of the wearer face. I hot glued a headband to the inside. To make the whole head took 7 hours. Overall, I am so happy with how the head turned out and has really added depth and clarity to my final costume and photos.

0 notes
Text
Fabric flowers


After originally dyeing the chiffon I rinsed out the excess dye. However, the dye was not fixed in the fabric and completely came out. Undoing the process, I had just done. To solve this, I boiled the fabric with more dye liquid and powder and added salt as a fixative. I then allowed these to dry outside in the sun to give an uneven finish and did not wash them as I was afraid this would happen again. On my original design I planned to pleat the chiffon on the side panels to give the illusion of floral motifs. After creating a pleating board for 2cm pleats from card and fabric, I gave this a go. However, this was very time consuming and the pleats didn’t hold, when I starched them on the board the paper melted and didn’t work. I still really wanted something down the side panels. I looked at the original illustration from the wonderland book and really like the volume of the mushrooms from the drawing and also looked at mushroom peeling from the kitchen to see the different bunched up texture- wanting to keep down the floral look as this is what I’d imagine wonderland would be like. I create the flowers by cutting 29cm squares and cutting a spiral starting from one edge to the middle, gathering and then stitching together. Cutting into shape. I chose the hip placement because it covered the lines from the bustle under structure better than the bottom and covered more surface area. I am very happy with the overall look and placement of the flowers and the abstract of them as its not obverses straight away.

0 notes


Text
26th-27th /01/2021


Sleeve construction
I started by dying my cotton fabric with snow/ice and applying powered dye and liquid dye. I then allowed the snow to melt leaving a marbled water colour effect. For my other fabric I used candle wax and liquid dye. I wanted to create the colours and shapes I found in the flint and also in Peters sculptures. After letting this dry I cut them into 20cm wide strips and hemmed. I attached the 1st piece to the arm hole but making sure not to sew this into a traditional sleeve and leave it more like a flounce. I then twisted and sewed down different areas of the fabric to give a warped organic look, like what I was going for with the dope and tissue paper. I then attached 2 more strips and repeated process . I added a channel on the first join for 5mm plastic boning to give the height I wanted. I also threaded a ribbon through the bottom of the sleeve to give a more puffed appearance. Overall I am very happy with how the sleeves turned out as it resembled the organic elements found in the earth, and water reflecting the beginning of alices journey into wonderland.
1 note
·
View note
Text
25/01/2021


After cutting all the pieces i backed them with calico. Treating the two layers as one i sewed bust darts which I had to adjust serval times as these got lost in pattern translation. I then stitched the stripes together and attached to the bodice.
1 note
·
View note
Text
23/01/2021


Finshed mock up. Taken apart and traced to create pattern adding seam allowance.

1 note
·
View note