
Don't wanna be here? Send us removal request.
Statistics
We looked inside some of the posts by pranay-bansal-idp-group-6 and here's what we found interesting.
Average Info
Notes Per Post
0
Likes Per Post
0
Reblog Per Post
0
Reply Per Post
0
Time Between Posts
2 days
Number of Posts By Type
Text
8
Last Seen Tumblr Blogs


Fun Fact
The most popular pages on Tumblr are about Minecraft, GIFs, and David J. Peterson.
Text
BLOG #8: Group experience and everyone's work
Here are my Group members and the links to their blogs
Adam: https://www.tumblr.com/blog/caixinlianggroupproject
Nidhi: https://wordpress.com/post/nkdesign7.wordpress.com/577
Sam: https://samsblogs6.wordpress.com/
Nikol: https://www.tumblr.com/blog/idpgroup6np
Everyone in my group was extremely hardworking and cooperative, and especially very friendly, and did a lot of really amazing work.
Adam worked on the storyboard and some of the 2D illustrations, and also helped with sound design rendering.


Sam worked on the 2D illustrations and helped with the sound and dome format conversion.

Nikol worked on some of the realistic space themed assets


Nidhi worked on a lot of particle effects, and helped a lot with the scene setup in Unreal.

Overall, I was extremely happy with my groupmates and the work they all put in. Everyone had a positive attitude towards our meetings and work division, and most of all, it was extremely fun to work and spend time with them.
0 notes
Text
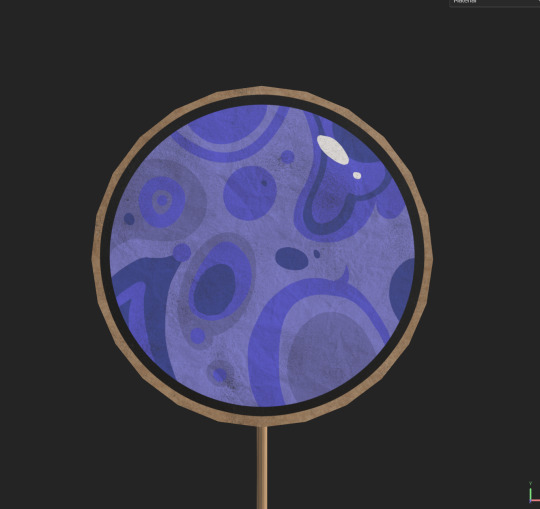
BLOG #6: Initial part setup and planet materials
After I was done with the initial paper cutout part, I started setting up the scene in Unreal Engine with all the assets I had for the initial part. This is how it looked in the Unreal layout:

After the Initial setup was done, only the realistic 3D space assets were left.
We wanted to add some planets in the realistic parts of the scene, so I referred to a few videos on YouTube in order to make some planet and sun like materials, here is what I made:


Even though we weren’t able to use the Earth asset, I learned a lot about material creation with nodes in Unreal Engine.
References:
www.youtube.com. (n.d.). Unreal Engine 5 Moon Material. [online] Available at: https://www.youtube.com/watch?v=HQJ6Or_7Yzo
0 notes
Text
BLOG #7: Final part setup and render
We started setting up the realistic part of the scene in Unreal, and arranging all the different assets we had made. This is what some of the scene looked in UE:

At this point we had started facing a bunch of issues. A lot of things seemed to not work in UE like particle effects using Niagra. Camera movement was something I struggled a lot to figure out. I tried using the CineCameraRail rig but it didn’t work properly, since I couldn’t figure out how to add the movement of the rig on the timeline.
Matching the movement of the Camera with the Spaceship window, which was like our lens to the outer environment, was also extremely challenging. The camera movement broke multiple times, and eventually I decided to attach it to the window and animate the window location itself.
After the scene setup was complete, we were only left with rendering, which was also a huge challenge. We faced a lot of issues with the render, and the output we got initially either wasn’t what we wanted, or was completely broken.
Troubleshooting and trying to figure out the rendering issues was extremely challenging but was also a great learning experience, and I definitely feel a lot more comfortable with using UE5 now.
I also had to setup the scene again in a new file, because the render would crash in our original file. We never figured out why that was happening.
After some trial and error, we were able to render the final video and get the output we wanted.
Here is the final video output we got after changing the video to a dome format in After Effects:
youtube
0 notes
Text
BLOG #5: Modelling and Texturing
I started modelling a spaceship window with the help of the references I had taken before, using Maya.
This is what the final model looked like in Maya:

After I was done modelling, I textured the spaceship in Substance 3D Painter, this is how the textured model looked.

I also made a test asset with a cardboard texture on it to make it look DIY, here’s how that looked:

After I did the test asset, I made a few cardboard-like assets using Maya and Substance 3D Painter.


0 notes
Text
BLOG #4: Referencing
We began collecting references for the spaceship and the space environment in general.

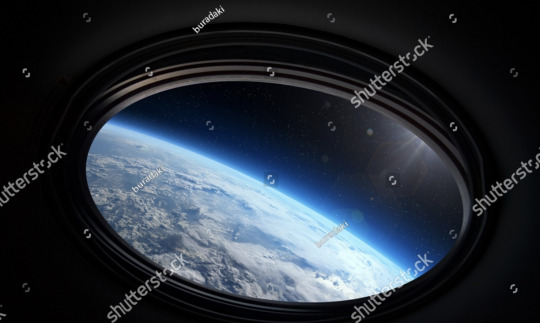
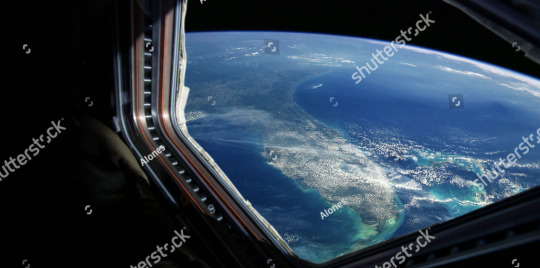
We had decided to only make the window part of the spaceship, since that is the only thing that would be visible. For the realistic environment, would be pretty simple since it would just be filled with general space-like assets.
For the cutout part, we didn’t require much referencing since I had already worked on a similar scene before and had a good idea of how it had to be made.
References:
Shutterstock. (n.d.). Cupola Porthole On Space Station Iss Stock Photo 2296383631. [online] Available at: https://www.shutterstock.com/image-photo/cupola-porthole-on-space-station-iss-2296383631
Shutterstock. (n.d.). Earth Spaceship International Space Station Porthole Stock Photo 2234515369. [online] Available at: https://www.shutterstock.com/image-photo/earth-spaceship-international-space-station-porthole-2234515369
Shutterstock. (n.d.). Spaceship Flies Near Amazing Blue Planet Stock Photo 1932527483. [online] Available at: https://www.shutterstock.com/image-photo/spaceship-flies-near-amazing-blue-planet-1932527483
0 notes
Text
BLOG #3: Finalising the Idea
Once we had the 3 ideas ready and knew the things we were working with, we began narrowing it down to reach a final idea for our immersive environment.
We presented all our 3 ideas to Ian and Luca, and they liked our 3rd Idea the most, which was a space themed environment through the perspective of a child. Ian and Luca seemed to like it the most because of how easy it would be to make and how much room it had to be creative with, since we could essentially make a lot of different types of assets to fill the scene.
Everyone in the group really liked it as well, since with this idea we could all participate equally, even the ones who are doing Animation and Concept Art as their major since we would require a lot of illustrations to place on top of the assets.
Personally, I had already made an environment which had a very similar concept, so I was already familiar how to pull it off relatively well.
This is what the small scene I had previously made looked like:

After a bit more discussion, we decided to merge our 1st idea, which was the realistic space themed environment with the 3rd one. This would enable us to explore multiple styles in our environment while also keeping it interesting.
This is what our final idea was; a space themed environment which starts off as a child’s imagination and transitions into a realistic space environment. It would be a sort of flipbook-looking environment which opens to a realistic one, with the viewer experiencing what the child sees at first and transitioning into what they imagine.
0 notes
Text
BLOG #2: Ideation and research
As we began to discuss what our immersive environment should be, we were given the task to get 3 potential ideas that we could go for.
After a lot of discussion, the 3 potential environments we finalised were:
A space themed environment, which shows an alien invasion or doomsday.
An underwater scene, where we have the viewer go through the ocean in a submarine, with a bunch of mystical elements go give a sense of mystery.
A space themed environment, but through the perspective of a child, where all the planets and other space themed assets are made from cardboard or paper.
We all liked the idea of going through a scene while being inside some sort of vessel. It seemed to help sell the idea of being part of an immersive experience more.
We also looked for a lot of references to understand what other people had already made in the medium of immersive experiences, the ones I found the most intriguing were “Beyond Van Gogh: The Immersive Experience” and “Circle of Life / Breathtaking Immersive Experience of Nature and Light”.
References:
www.youtube.com. (n.d.). Beyond Van Gogh: The Immersive Experience. [online] Available at: https://www.youtube.com/watch?v=Lxmh5m8hm8g
www.youtube.com. (n.d.). Circle of Life / Breathtaking Immersive Experience of Nature and Light. [online] Available at: https://www.youtube.com/watch?v=Q3iIOpijMV4.
0 notes
Text
BLOG #1: Group activities and personality tests
Starting the first day of our interdisciplinary project was a mix of excitement and curiosity. We began the first session by forming groups and going straight into the series of team-based tasks.
One task that stood out the most was the Egg Drop challenge, which tested our teamwork and problem-solving skills.
The main goal of this task was to protect an egg from breaking when dropped out of the first-floor window. We only had a few materials to work with, so we had to come up with a clever contraption in order to keep the egg from breaking.
In the end, this task wasn’t about the egg itself, but it helped us understand how each member contributed to the group, and also how to work as a team effectively.
It was a great help in breaking down the initial awkwardness among group members. This first day definitely set a good tone for an exciting and collaborative semester.
BELBIN AND MYERS BRIGGS TESTS
We were asked to do the Belbin and Myers Briggs tests before the first day of the interdisciplinary project. The results helped us understand more about our individual strengths and preferred working styles.
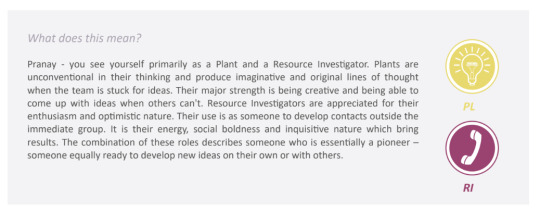
According to the Belbin test, my strengths lie as a Pant and Resource Investigator. Which means I enjoy situations where I can persuade people to take an entirely new approach. It’s a role which helps me in my creative field and enables me to explore.
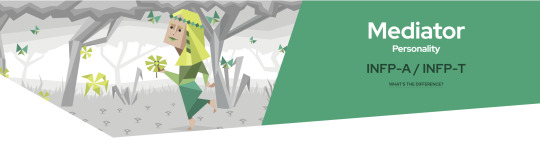
And according to the Myers Briggs test, my personality type is INFP-T, which means I play the role of the diplomat. The "T" designation, indicating turbulent traits, suggests a heightened self-awareness and sensitivity to stress.
Even though personality tests are not exact descriptions, the alignment between the Belbin and Myers-Briggs results was extremely interesting. They helped in understanding out working styles and communication preferences, and helped us understand how to collaborate effectively as well.
References:
16 Personalities (2013). INFP Personality (‘The Mediator’). [online] 16Personalities. Available at: https://www.16personalities.com/infp-personality.
e-belbin.com. (n.d.). Belbin GetSet Online Account. [online] Available at: https://e-belbin.com/GetSet/gsinvlogin.asp.
0 notes