
Information you need to help you prepare for anything.
Don't wanna be here? Send us removal request.
Statistics
We looked inside some of the posts by prepperjournal and here's what we found interesting.
Average Info
Notes Per Post
151
Likes Per Post
121
Reblog Per Post
30
Reply Per Post
0
Time Between Posts
2 months
Number of Posts By Type
Text
17
Last Seen Tumblr Blogs


Fun Fact
Tumblr has 411 employees.
Text

Turn on the news lately and it feels like we’re one headline away from mushroom clouds. Whether it’s rogue nations, unstable regimes, or saber-rattling superpowers, talk of nuclear threats is back—and louder than it’s been in years. As part of your nuclear survival plan, understanding these threats is crucial. Having a solid nuclear survival plan should be a priority for everyone. This plan helps ensure your safety in case of unexpected nuclear events. Incorporating a nuclear survival plan into your emergency strategies can save lives and provide peace of mind. Each family should have their own nuclear survival plan tailored to their specific needs and circumstances. But here’s the thing: panic doesn’t equal preparation. If you're serious about prepping, you need more than fear. You need facts, context, and a nuclear survival plan. Lastly, remember that your nuclear survival plan should evolve as your situation changes. Document your nuclear survival plan and share it with trusted friends. Awareness and education should be part of your nuclear survival plan. Your nuclear survival plan must also factor in the need for self-defense. Consider including medical supplies in your nuclear survival plan. Another component of your nuclear survival plan is gathering essential supplies. Your nuclear survival plan should also cover communication protocols during a crisis. Be sure to discuss your nuclear survival plan with family members. Regularly review and update your nuclear survival plan to ensure its effectiveness. Your nuclear survival plan should be easy to access in case of emergencies. Each section of your nuclear survival plan should address different aspects of survival. A good nuclear survival plan should include not only immediate survival tactics but also long-term strategies. Preparation is crucial, so start drafting your nuclear survival plan today. Adopting a nuclear survival plan can give families the tools they need to survive in a crisis. Being aware of the risks is key to developing an effective nuclear survival plan. In this post, we’ll break down the real risks of nuclear events in 2025, the common myths that distract preppers, the initial steps for survival, and the hard truth about what life might look like in the months that follow as you implement your nuclear survival plan. What Kind of Nuclear Threats Are We Really Talking About? It’s important to separate cinematic disaster from real-world risk. Today’s threats fall into three categories: - Strategic Nuclear War – All-out conflict between nuclear-armed states. Still unlikely but not impossible. - Tactical or Limited Use – A regional conflict or battlefield nuke scenario. - Radiological Events (aka "Dirty Bombs") – Crude devices meant more for terror than mass destruction. Any of these are serious. But prepping for one generally covers you for all. Myth-Busting: What Most People Get Wrong About Nukes - Myth #1: Everyone dies in a nuclear attack.Truth: Survival rates increase dramatically the farther you are from ground zero—and with proper sheltering, even people in metro areas can survive. A University of Nicosia study, highlighted in Wired, found people 2–7 miles from the detonation zone can survive the blast if sheltered correctly (source). - Myth #2: Fallout lasts forever.Truth: Radiation decays quickly. FEMA’s Nuclear Detonation Response Guidance states that 90% of dangerous fallout radiation decays within the first 72 hours (FEMA source). - Myth #3: There’s no point in prepping.Truth: That’s defeatist thinking. HHS's Radiation Emergency Medical Management resource notes that fallout only accounts for a small percentage of a nuclear weapon’s energy output—blast and thermal effects are deadlier. But with knowledge and preparation, even radiation risk can be managed (source). Real World Examples: Chernobyl and Fukushima The nuclear disasters at Chernobyl (1986) and Fukushima (2011) offer valuable lessons in radiation exposure, human error, and long-term survival. - Chernobyl: Despite being one of the worst nuclear events in history, many people survived outside the immediate exclusion zone. Studies showed that areas downwind with proper sheltering saw dramatically reduced exposure levels. Local knowledge and government evacuation efforts helped limit deaths—less than the public assumed. - Fukushima: This event demonstrated the importance of backup power and cooling systems, but also showcased how early evacuation and iodine tablet distribution minimized fatalities from radiation. Much of the damage came not from radiation, but from infrastructure failure and disorganization. Both cases prove one thing: preparedness, not panic, determines outcomes. Step-by-Step: How to Build Your Nuclear Survival Plan Know Your Threat Zones Use tools like FEMA’s nuclear target maps to understand if you’re near high-risk areas (major cities, military bases, strategic infrastructure). Prep Tip: If you’re in a potential target zone, have a plan to shelter-in-place and a route to get out later. Build a Radiation-Resistant Shelter Plan You don’t need a bunker. But you do need distance and shielding. Use What You Have: - Lowest level of your home (basement, interior bathroom) - Stack furniture, books, and heavy items around you to block radiation Plastic sheeting and duct tape to seal off airflow Stock Your Fallout Kit What you’ll need for 72+ hours in sealed shelter: - Drinking water (1 gal per person/day minimum) - Long-term food (freeze-dried or canned) - Radiation protection (KI pills, N95 masks, wipes) - Lighting (battery-powered or hand-crank) - Comms (emergency radio, solar-powered) Bonus: Keep a backup kit in your vehicle or bug-out bag. More on KI Pills: Potassium iodide (KI) protects your thyroid by blocking radioactive iodine from being absorbed. But timing matters—KI is most effective when taken shortly before or just after exposure. It's not a cure-all; it only protects the thyroid, and it doesn’t prevent radiation sickness from other isotopes. Every household should store enough for each family member for at least one dose, and follow official guidance when deciding to use them (FDA guidance on KI). Understand Fallout Timing and Movement Fallout doesn’t drift immediately—it takes time. Depending on weather and wind, fallout may take 30 minutes to hours to reach your location. That’s your window to get sheltered. Prep Tip: Apps like Windy or NOAA’s tools can help you track wind direction in real time. Water Safety and Radiation Standard filters won’t remove radioactive particles dissolved in water. However, you can still minimize your risk: - Let fallout settle: Wait 24–48 hours before using rainwater or surface water. - Filter particles: Use sediment filters or coffee filters to reduce physical debris. - Distill: Boiling won’t help, but distillation can separate some contaminants. - Stock sealed water: Your safest bet is commercially bottled water stored in advance. Pro Tip: Use radiation meters to test sources before use, and rotate stored water every 6–12 months. ERICKHILL EMF Meter, Detects Electric and Magnetic Fields, Handheld Digital EMF Detector with LCD Display, Sound-Light Alarm, Rechargeable Battery for Home, Office, and Appliances (Blue) - True EMF protection starts with detection. Our emf meter helps you: 1) Find dangerous radiation hotspots in your home/office, 2) Scientifically verify if EMF shielding products actually work by comparing before/after readings, and 3) Continuously monitor protected areas to ensure they stay below the 0.4μT safety standard. The smart way to shield - test first with our professional-grade detector for guaranteed results. - PRECISE MEASUREMENT: ERICKHILL emf reader built-in electromagnetic radiation sensor displays the radiation value on the clear LCD digital display after processing by a control microchip. It can test magnetic field radiation with optional units mG/µT and the electric field with unit V/m. Electric field Range: 1V/m-1999V/m,Alarm threshold: >40V/m.Magnetic field Range:0.01μT-99.99μT / 0.1 mG - 999.99 mG,Alarm threshold: >0.4μT / 4mG. - Sound and Light Alarm for High EMF Levels: When the electric field exceeds 40V/m or the magnetic field surpasses 0.4µT (4mG), the screen turns red, the indicator light flashes, and the buzzer sounds an alarm to notify you. A mute mode is available for quiet environments. - Versatile Applications for Home and Office:Suitable for detecting low-frequency EMF radiation from household appliances, including TVs, computers, microwave ovens, induction cookers, refrigerators, and power lines. It helps identify EMF sources and optimize your environment. This EMF detector is useful for home inspections, workplace safety, and even paranormal investigations. - Easy-to-Read LCD with Data Hold. The data hold function allows you to freeze readings for easy recording. The LCD screen ensures clear visibility, even in dark environments. The device automatically powers off after 5 minutes of inactivity to help conserve battery life. $39.99 Buy on Amazon Decontamination: What If You’ve Been Exposed? If you’ve been outside during fallout: - Remove clothing immediately and seal in a plastic bag. - Shower thoroughly using warm water and mild soap—no conditioner, which can bind particles. - Rinse eyes, ears, nose, and mouth. - Avoid scrubbing skin abrasively to prevent radiation from penetrating open pores. Prep Tip: Keep a decontamination kit with extra clothes, wipes, trash bags, and soap near entryways. EMP: The Invisible Threat to Electronics A high-altitude nuclear detonation could generate an electromagnetic pulse (EMP) capable of frying unprotected electronics over a wide area. This wouldn't just knock out your cell phone, it could destroy the grid, disable vehicles, and collapse digital infrastructure for months. What You Can Do: - Faraday Cages: Use metal containers (ammo cans, aluminum trash cans with tight-fitting lids, or purpose-built Faraday bags) to store crucial electronics like radios, backup drives, LED lights, and solar chargers. - Spare Electronics: Store duplicates of essential gear (handheld HAM radios, solar power banks) in Faraday protection. - Manual Backups: Keep printed copies of maps, contact info, medical guides, and any documents you’ll need when digital tools are down. Pro Tip: Don’t rely on your car starting post-blast. Many modern vehicles with computerized components are vulnerable to EMP. Keep a backup plan for transportation. What Comes Next: The Real SHTF Phase Let’s say you survive the blast and fallout. What then? Most people think of nuclear events as one-and-done disasters, but the reality is more grim. The real survival challenge begins after the initial 72 hours. Here’s what preppers need to be ready for in the weeks and months following an attack: Collapse of First Responder Infrastructure Don’t expect firefighters, medics, or law enforcement to show up. If they’re alive, they’ll be dealing with mass casualties, lack of supplies, and their own families. Prepare Now: - Trauma kits and first-aid training - Community response plans with neighbors - Two-way radios or signal methods if comms are down Widespread Power and Communication Failures EMP-like effects, grid overload, or destroyed infrastructure will likely result in long-term outages. The internet, cell service, and broadcast media may all go dark. Have Ready: - Solar chargers and backup batteries - Printed maps, books, and offline resources - HAM radio license and gear Breakdown of Transportation and Supply Chains Fuel will be gone. Roads may be impassable or monitored. Grocery stores will be empty within 24–48 hours of the event—and they won’t be restocked. Stockpile: - Long-term food (enough for 6 months) - Water purification tools - Gasoline (stabilized) and backup transport (bike, walk routes) Security and Civil Unrest As desperation sets in, crime will rise. Looting, home invasions, and violence will become daily realities, especially in urban areas. Harden Your Home: - Reinforced doors, blackout curtains, security layers - Keep a low profile—no lights, no noise, no giveaways Be armed and trained, or pair with those who are Psychological Survival Even the most well-stocked prepper can break if they’re isolated, fearful, or unprepared for the emotional toll. Stay Grounded: - Establish routines (meals, tasks, hygiene) - Practice stress management now—not later - Build community where you can Final Word: Nuclear Survival Is About the Long Game The mainstream media focuses on the blast. Preppers know better. The real threat is what comes after—the systems we rely on vanish, and we’re left to rely on ourselves. You don’t need to be a Cold War survivalist. But you do need to be ready to live independently for at least six months without outside help. Plan smart. Prep deep. And don’t waste time on fear—spend it on readiness. Related Reads: - The Sensible Prepper – Practical Advice for Tough Times - Survival Gear List – The Essentials You Shouldn’t Leave Without - Home Fortification Tips Read the full article
1 note
·
View note
Text

For years, the idea of food independence has conjured images of sprawling gardens, backyard chickens, and rows of home-canned goods. But let’s be real: not everyone has an acre of land—or even a backyard. Does that mean food independence is out of reach? Not by a long shot. In 2025, it’s time to rethink what food self-reliance looks like. Whether you’re in an apartment, a condo, or just don’t have the time or space for traditional homesteading, you can still build a pantry that’s resilient against supply chain hiccups, inflation, and shortages. Step 1: Maximize Shelf-Stable Staples You don’t need a garden to stock up on dry goods. Focus on building a pantry of essentials with long shelf lives. Stock Up On: - Rice, beans, and lentils - Oats, pasta, and flour - Shelf-stable milk and powdered eggs - Salt, sugar, and cooking oils Step 2: Canned Goods Are Your Friend Canning isn’t just for homesteaders. Commercially canned goods offer a long shelf life, convenience, and variety. Buy Smart: - Focus on vegetables, proteins (tuna, chicken), soups, and fruits - Check for sales and bulk-buy deals - Rotate stock and use older cans first Pro Tip: Don’t forget about canned butter, ghee, and shelf-stable cheese options. FIFO Countertop Mini Can Tracker Holds 30 Standard 10-24 Oz Can Sizes, White| Stackable & Adjustable Can Organizer for Pantry, USA Made, White - Mini Can Tracker: Keeps your kitchen organized by storing and rotating your canned goods on a First In First Out model saving you from expired food cost and waste - Can Organizer Easy Install: Ensures effortless installation saving you time and energy; Carefully sized dowels fit smoothly into the panels, giving your fridge or pantry a fresh new look; Made in the USA - Customizable Can Rack: Includes the following easy-fit dowels; 3 - A dowels (fits family soup cans), 6 - B dowels (fits chunky soup and fruit cans), 6 - C dowels (fits standard vegetable/soup cans) - Canned Food Organizer Capacity: Make room for up to 30 cans, preserving sodas, soups, and veggies in great harmony; Measures 16 inches long, 16 inches wide, 12 inches tall, and weighs 5 pounds - Expandable Food Storage: Expand your organized empire in your refrigerator, pantry, cupboards, and cabinets by adding panels, dowels, or even units for limitless growth $44.19 Buy on Amazon Step 3: Think Vertical—Indoor Gardening No backyard? No problem. Grow small-scale crops indoors with minimal space. Try These: - Herbs (basil, parsley, cilantro) on windowsills - Microgreens using shallow trays - Hydroponic kits for lettuce and greens Step 4: Store Water, Not Just Food Water is just as critical as food, and most urban preppers underestimate how much they’ll need. Store: - At least one gallon per person per day (for drinking and minimal hygiene) - Water filters and purification tablets as backup - Collapsible storage containers to maximize space Big Berkey Gravity-Fed Stainless Steel Countertop Water Filter System 2.25 Gallon with 2 Authentic Black Berkey Elements BB9-2 Filters - ENJOY GREAT-TASTING TAP WATER EVERY DAY AT HOME- The 2.25-gallon Big Berkey System can be used on a countertop in your kitchen or office to transform tap water into delicious drinking water that's also ideal for making your favorite beverages or cooking. - INDEPENDENT TESTING- Black Berkey Elements (the original BB9-2) are composed of a unique, proprietary blend of multiple media types backed by testing from accredited, third-party labs. Black Berkey Elements remove or dramatically reduce over 250+ typical contaminants that could be present in freshwater sources—no electricity, tools, or plumbing are required. - INCLUDES AUTHENTIC BLACK BERKEY ELEMENTS (THE ORIGINAL BB9-2)- Don't fall for lookalike filters that use our Berkey BB9-2 model number or trademarks in their titles or product descriptions to legitimize their brand as replacements or "compatible", when they are not. Black Berkey Elements are designed to work synergistically and target specific contaminants that far exceed the reduction capabilities of black filters solely composed of activated carbon. - ECONOMICAL, LONG-LASTING- Black Berkey Elements provide filtered water for just pennies per gallon. Each pair of Black Berkey Elements lasts for up to 6,000 gallons before replacement is recommended. Elements may require replacement sooner based upon the quality of influent water. Each additional pair of Black Berkey Elements (sold separately) adds an additional 6,000 gallons of contaminant reduction. - THE GOLD STANDARD IN GRAVITY-FED WATER FILTRATION- Authentic Black Berkey Elements are capable of greater contaminant reduction and a longer lifespan than virtually any of the other filter elements on the market. Berkey systems are simple and easy to use and require no electricity, costly installation, or tools, providing economical, long-lasting water filtration for just pennies a gallon. $367.00 Buy on Amazon Step 5: Get Creative with Storage When space is tight, you have to think vertically and creatively. Ideas: - Under-bed bins for bulk goods - Overhead shelving in closets or garages - Stackable containers that maximize footprint Step 6: Plan for Rotation and Replenishment A pantry is only as good as its maintenance. Maintain It: - Label items with purchase and expiration dates - Create a simple inventory spreadsheet - Set reminders to rotate stock every few months Final Thoughts: You Don’t Need Land to Be Ready Food independence isn’t just for the rural prepper. It’s about mindset, strategy, and a commitment to self-reliance—no matter where you live. By focusing on shelf-stable essentials, clever storage, and a few innovative growing techniques, you can build a pantry that stands strong against whatever comes next. Related Reads: - The Sensible Prepper – Practical Advice for Tough Times - Survival Gear List – The Essentials You Shouldn’t Leave Without Finally, remember that food independence is an ongoing journey. Stay informed about food preservation techniques, explore new recipes using your stored items, and continuously adapt your strategies as your needs evolve. This proactive approach will help ensure that you remain prepared for any eventuality, no matter where you live. Moreover, engage with your community to share ideas, resources, and even trade goods. Building relationships with local farmers or joining community-supported agriculture (CSA) programs can enhance your food independence and introduce you to fresh, local options that may not be available in stores. Regular maintenance of your pantry is essential for ensuring that your food supply remains fresh and ready for use. Consider setting up a reminder system on your smartphone or calendar to help you keep track of your inventory and remind you when it's time to check on your supplies. When considering creative storage solutions, think beyond the conventional. Utilize space in your home creatively by incorporating multi-functional furniture that doubles as storage, such as ottomans or coffee tables with hidden compartments. Every bit of space counts when preparing for potential shortages or emergencies. Another critical aspect of water storage is the need for emergency preparedness. Storing water isn’t just about filling up containers; it’s also about ensuring you have access to clean, drinkable water during emergencies. Invest in high-quality water filtration systems and purification tablets to ensure your stored water remains safe for consumption over time. As you think vertically for indoor gardening, consider the benefits of LED grow lights. These lights can mimic sunlight, enabling you to grow plants indoors even when natural light is scarce. This technology allows for greater control over your indoor gardening environment and can significantly expand your growing options. In addition to canned goods, consider freeze-dried options. These products not only have an impressive shelf life but also retain more nutrients and flavor compared to traditional canned foods. They can be rehydrated and used in many recipes, making them a versatile addition to your pantry. When thinking about shelf-stable staples, it's beneficial to explore legumes beyond just basic beans and lentils. Incorporate a variety of dried beans—such as black beans, kidney beans, and chickpeas—not only for their nutritional value but also for their versatility in a variety of dishes. Each type of legume can bring unique flavors and textures to your meals, enhancing your culinary repertoire. Consider urban gardening techniques that allow you to grow food in small spaces, such as vertical gardening or hydroponic systems. These innovations can transform a small apartment balcony into a lush, productive garden, yielding fresh vegetables and herbs all year round. In today's fast-paced world, the notion of achieving food independence takes on new dimensions. It's not just about self-sustaining your food source; it's about creating resilience in the face of global uncertainties. With the increasing volatility of food prices and supply chains, understanding how to prepare for the worst while still enjoying the best of what our urban environments have to offer is crucial. Read the full article
9 notes
·
View notes
Text

If you’ve been paying attention to the headlines lately, you’ve probably heard the rumblings about new tariffs and trade tensions. And if you haven’t—you should. Because when international costs go up, it hits you right in the gear bag. Tariffs, supply chain disruptions, and inflation aren’t just talking points for economists. They’re warnings for preppers. It means the things we rely on—tools, gear, medical supplies, even food—are about to get more expensive. Or worse, harder to find at all. So what should you be stocking up on now, before the next wave of price hikes and shortages? Here’s a rundown of items most likely to take a hit—and how to prioritize them. 1. Batteries and Power Storage Most batteries are imported, especially rechargeable lithium-ion types. From flashlight spares to solar power banks, expect prices to rise. Stock Now: - AA/AAA/CR123 batteries - Rechargeable battery kits - Portable solar banks 2. Tools and Hardware Many basic hand tools, power tools, and fasteners come from overseas. Tariffs mean that wrench set could cost double in a few months. Stock Now: - Multi-tools and manual hand tools - Work gloves, fasteners, screws, duct tape - Sharpening stones, files, and blades 3. Water Filtration Systems From Berkey filters to backpacking units, a lot of our water safety gear comes from international suppliers or has imported parts. Stock Now: - Gravity-fed filters - Filter straws - Backup filters and replacement cartridges 4. Electronics and Communication Gear Radios, batteries, solar chargers, flashlights—they’re all likely to see price bumps. Stock Now: - HAM and emergency radios - LED flashlights and headlamps - Solar panels and charging systems 5. Medical Supplies Basic first-aid gear is already seeing price pressure. Don’t expect that to let up. Much of it comes from China or uses components made overseas. Stock Now: - Gauze, bandages, gloves - Over-the-counter meds and generics - Tourniquets, trauma kits, antiseptics 6. Long-Term Food Storage Even domestic food gets packed, canned, or processed with imported components. Between tariffs and rising transport costs, food prices will keep climbing. Stock Now: - Freeze-dried meals - Canned goods and dry staples - Mylar bags and oxygen absorbers 7. Clothing and Footwear Most clothing, boots, and outerwear are made overseas—even the rugged stuff we like. Add tariffs and watch those prices climb. Stock Now: - Boots and wool socks - Layered outdoor gear - Work pants, gloves, and jackets 8. Camping and Survival Gear Tents, sleeping bags, stoves—many are manufactured abroad or with foreign parts. Stock Now: - Propane/butane canisters - Lightweight shelters - Cookware and fire-starting tools Final Thoughts: Buy Smart, Buy Soon This isn’t about panic buying—it’s about smart timing. If you’ve been waiting to replace gear, fill gaps, or build out your kits, now’s the time. Focus on the categories above, buy in stages, and prioritize quality where it matters.Tariffs and inflation are just another form of pressure. The question is—do you wait and pay more later, or prepare while you still can?Related Reads:- Survival Gear List – The Essentials You Shouldn’t Leave Without - The Sensible Prepper – Practical Advice for Tough Times Read the full article
2 notes
·
View notes
Text

Let’s be honest: prepping can wear you down. You spend years stocking up, learning skills, training your mindset—and then the world doesn’t end. In fact, it kind of stabilizes. The shelves refill, gas prices dip, the power stays on… and next thing you know, you’re asking yourself: Why am I still doing all this? That feeling is preparedness fatigue, and if you’ve been in this world for any length of time, you’ve felt it. It creeps in during the lulls—when society hasn’t collapsed (yet), and your bug-out bag just sits in the closet gathering dust. The adrenaline of 2020 has long worn off, and now it’s easy to wonder if maybe the normies were right all along. But let me tell you something: fatigue is normal—but failure to adapt is deadly. Why Preparedness Fatigue Happens Prepping is, at its core, an investment in the what if. And like any long-term investment, it can feel unrewarding in the short term—especially when the “crisis” never quite arrives. Here’s why it hits hard: - Life stabilizes. There’s food on the shelves and Netflix on the screen. It’s easy to let your guard down. - People mock the lifestyle. If you’ve been called paranoid more than once, you’re not alone. - Prepping becomes routine. Inventory checks, rotation, repairs—it all feels a little pointless when there’s no urgency. - Burnout is real. Especially if you went hard during COVID, it’s natural to ease off the gas now. But here’s the truth: just because nothing bad happened yet doesn’t mean you were wrong to prepare. It means you were early—and that’s a hell of a lot better than being late. The Cost of Letting Your Guard Down The problem isn’t that people stop prepping. It’s that they stop thinking like preppers. That mindset—that quiet alertness, the habit of asking “what if?”—that’s what makes you resilient. Lose that, and you’re just another person standing in line at the grocery store the night before a storm hits. Related: The Sensible Prepper – A Practical Guide to Real-World Preparedness How to Beat Preparedness Fatigue Without Burning Out You don’t need to live in a constant state of alert. You just need to stay sharp. Here’s how to keep the edge without losing your sanity: 1. Rotate Focus Areas Don’t try to do everything at once. Break your prep goals into monthly themes—one month is food, the next is comms, then first aid, and so on. - Keeps things fresh - Builds depth in specific areas - Makes progress feel tangible again Bonus: Great time to restock expired meds or rotate pantry goods. 2. Schedule “SitReps” Once a quarter, run a self-assessment: - Inventory your gear - Revisit bug-out or bug-in plans - Re-evaluate threats based on current events Make it a habit, not a reaction. 3. Bring Others In (Carefully) If you’ve got family or a tight-knit group, give everyone something to manage. Delegation builds resilience—and reduces the mental load on you. Spouse into food storage? Let them own it. Kid wants to learn comms? Hand them a radio and let them dig in. Related: Home Fortification Tips – Securing What You Can’t Leave 4. Do a Gear Check—Then Train With It Sometimes fatigue comes from too much theory, not enough hands-on. Pick one piece of gear this month and use it: - Build a fire with your ferro rod - Cook dinner on your backup stove - Run a dry bug-out drill with your bag Feeling stale? Put your hands on your gear. Cofiyard Propane 2 Burner Camping Stove with Carrying Bag, Portable Folding Gas Stove for Camping, Backpacking Camp Stove for Outdoor Cooking, With 17,000 BTU Adjustable Burners for BBQ, Tailgating - Foldable Design Camping Stove: The portable camping stove features a unique hexagonal symmetrical design, folds away nicely, and fits in the included carry bag. When you have limited space, everything that can get smaller is a bonus. It's one of the must-have camping essentials for outdoor adventures - The Stove is Perfect for Family Cooking: Thanks to its well-designed spacing, it can comfortably fit two 10-inch frying pans, allowing them to be centered for optimal cooking. This compact gas stove enables you to prepare a variety of meals simultaneously, making it an essential part of your camping gear - Double Burner Camp Stove: The portable gas stove features a dual burner design with two adjustable burners. You can have a coffee percolator on one side and a kettle or fry pan on the other, providing versatility for your camp kitchen - Total Output Of 17,000 BTU: This portable stove delivers powerful heat for all your culinary needs, from simmering sauces to searing steaks. Each burner has an independent control knob. Propane can last longer because of the precision heat control - Outdoor Backpacking Stove: Our foldable camping stove folds down to just 9.5" x 9" x 4.6". It's compact enough to fit in a backpack and take on the trail with you. Ideal for backpacking, camping, spring camping trips, car camping, and motorcycle camping, this camping essentials item is perfect for any outdoor enthusiast $116.99 Buy on Amazon 5. Shift from “Doom” to “Self-Reliance” If everything you read and watch is about collapse, corruption, and catastrophe, of course you’re going to burn out. Balance it with skills that build self-reliance, not just survival: - Gardening - DIY repair - Financial prepping - Off-grid projects Prepping isn’t just about surviving a crisis. It’s about living with less dependency—now. Final Thought: It’s Not About If—It’s About When You didn’t prep because it was trendy. You prepped because you saw the cracks before most people did. If nothing ever goes wrong, good. But if it does—and we both know it probably will—you’ll be ready when others aren’t. Preparedness fatigue doesn’t mean you’re done. It means it’s time to adjust, recharge, and refocus. Read the full article
1 note
·
View note
Text

Bugging out has always been a core principle in the prepping world. I have written about this in the past with articles on when to bug out and when to stay home. I’ve even argued if bugging out was really ever a good idea. When I started prepping around 2008, the concept was designed to get you out of a bad spot fast. Many people (me included) had some form of pre-prepared bag that was intended to be thrown on in seconds that contained all the supplies you needed to live off the land. This seems like a great idea but add kids or elderly relatives into the mix and it gets more complicated. Let’s say you do bug out, then what? You will never be able to carry enough food to last you more than a few days and you should banish any notion that you're going to be living off the land or scavenging for food and supplies. Bugging out has always been a last-ditch option in my mind, but worthy of consideration for a lot of us. But, Preppers should constantly be reevaluating their priorities and plans. In 2025, the playbook has changed. If you haven’t revisited your bug-out plan since 2020, you’re working off outdated intel. The last five years have brought pandemics, civil unrest, supply chain meltdowns, rising digital surveillance, and a culture increasingly suspicious of “preppers.” So, let’s take a hard look at how the concept of bugging out needs to evolve—and how to get your plan up to speed for today’s reality. Rule #1: Bugging Out Is No Longer “Cool” There was a time when bugging out was borderline fun to think about—gear testing in the woods, fantasy scenarios with your go-bag slung over your shoulder. In 2025, looking like that guy gets you followed, flagged, or worse. Modern bug-outs are low profile. No camo. No mall-ninja body armor. You need to look like someone who’s trying to get home, not someone who’s loaded for bear. Tip: Rethink every piece of your gear with the question: "Will this make me a target?" If the answer is yes, rethink it again. Rule #2: Digital Footprints Can Get You Caught You’re not sneaking through the woods unnoticed anymore. Your phone is tracking you. Your car is pinging towers. There are more cameras than ever, and you better believe AI is watching. Bugging out in 2025 means dropping off the digital map. That burner phone isn’t a paranoid option anymore—it’s baseline smart. You also need paper maps and the ability to navigate without a screen. And don’t forget cash—nobody’s scanning Venmo in a blackout. Sale Tracfone | Motorola Moto g Play 2024 | Locked | 64GB | 5000mAh Battery | 50MP Quad Pixel Camera | 6.5-in. HD+ 90Hz Display | Sapphire Blue - 6.5" HD+ 90Hz Display with Corning Gorilla Glass 3. / Snapdragon 680 processor. - 50MP sensor with Quad Pixel Photo Night Vision. / Dolby Atmos and Hi-Res Audio. - 5,000mAh battery for up to 46 hours of battery life. / 64GB of storage + 1TB more with microSD card. / 4GB RAM, expandable up to 6GB with RAM Boost. - Carrier: This phone is locked to Tracfone, which means this device can only be used on the Tracfone wireless network. A Tracfone plan is required to activate this device. Activating is easy, upon receipt go to Tracfone Website and select “Activate” and follow the prompts. - Compatible with our no-contract Unlimited Talk & Text plus Data plans starting as low as $20/month plus taxes and fees. To find the Tracfone Plans available to purchase, please go to our TF - Amazon Brand Page linked below the product title. $34.99 Buy on Amazon Related: The Great Reset – Are You Ready for a Technocratic Future? Rule #3: Gasoline Is a Liability If you think you’re hopping in the truck and cruising to a secluded bug-out cabin 300 miles away, I’ve got bad news. You’re not Mad Max, and gas isn’t unlimited. In a real crisis, stations are dry, roads are blocked, and armed checkpoints are not fiction. Pre-position fuel if you can. Know alternate routes. Have a Plan B. And maybe a Plan C that doesn’t involve wheels at all. (And no, I’m not saying bug out on a solar scooter. Let's keep it real.) Related: Survival Gear List – The Essentials You Shouldn’t Leave Without Rule #4: Local Is the New Distant Preppers used to talk about bug-out locations like real estate agents: the more remote, the better. But in reality, most people won't make it 100 miles, let alone 300. Roads clog. Fuel runs out. Bodies give out. A good local fallback beats a great fantasy retreat. A friend across town with a basement is more useful than 40 acres in another state you’ll never reach. Tip: Build a network where you are. Scout local fallback points. Train your family to move in stages, not in epic, cinematic dashes. Rule #5: Group Plans Beat Lone Wolf Fantasies The lone wolf idea was always part ego, part entertainment. In a real bug-out, going solo means you have no one to pull security when you're asleep. No backup when you're hurt. No margin for error. You need a team. Even if it’s just a buddy and a plan, that’s ten times stronger than being alone. Include: - Code words and comms plans - Shared supply checklists - Trusted people who won’t fold under pressure Prepping alone is better than not prepping—but planning together is better than both. Rule #6: Your Bug-Out Bag Needs a Reality Check You know what goes in the bag. Fire, water, shelter, security. But the sexy new trend is loading your pack with digital gadgets. Let me be clear: If it doesn’t keep you alive or give you an edge in a real-world scenario, it’s dead weight. Yes, solar chargers are cool—but I’d rather have ammo and batteries. And if you’re carrying digital copies of documents, make sure they’re actually secured, and not just floating around on a thumb drive with your name on it. Sale Energizer AA Batteries, Alkaline Power Double A Battery Alkaline, 32 Count - 32-pack of Energizer Alkaline Power AA Batteries, Double A Alkaline Batteries - Long lasting batteries provide dependable power for everyday use and emergency situations - Count on these AA batteries to power a wireless mouse, game controllers, flashlights, thermometers, smart home devices, VR controllers and more - Lasts up to 10 years in storage for alkaline AA batteries that provide peace of mind in everything from emergency situations to playtime - Includes recycled materials *Steel up to 10% Recycled, excluding 9V $15.10 Buy on Amazon Related: Home Fortification Tips – Securing What You Can’t Leave Rule #7: Don’t Bug Out… Unless You Absolutely Have To I’ll say it again: bugging out is a last resort. Leaving your home, your supplies, and your base of operations puts you at a serious disadvantage. If you’re not already using a decision matrix, here’s mine: - Is it safer to stay where I am? - Can I get where I’m going without risking more than I gain? - Am I leaving because I have to—not because I feel like I should? Bugging out isn’t about running. It’s about getting to safety—and sometimes, that means staying put and locking down. Final Thoughts: Burn the Old Plan, Write a New One If your bug-out strategy still looks like it did five years ago, you’re not prepared—you’re nostalgic. The world changed, and so should your game plan. What to do right now: - Strip down your go-bag and rebuild it with brutal honesty - Reassess routes and fallback locations - Get eyes on your local escape options - Talk to your people—make sure they’re squared away We don’t prep because we’re paranoid. We prep because reality changes—and we’re smart enough not to be caught flat-footed. Bugging out isn’t gone. It’s just grown up. Read the full article
5 notes
·
View notes
Text
How to Clean and Take Care of Your Guns
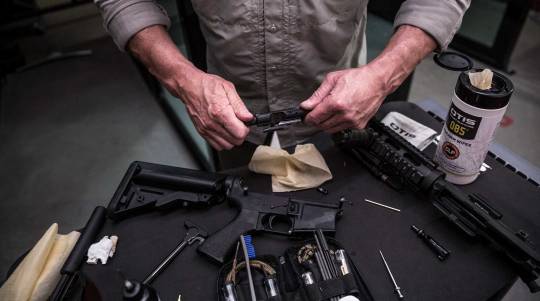
Whether you're a competitive shooter or hunter or simply enjoy going to the shooting range on weekends, taking care of your firearms is essential. You need to get the best gun cleaner and make it a habit to clean your gun regularly. However, one of the biggest mistakes most gun owners make is not taking the time to learn how to clean and take care of their guns properly. In this article, we'll show you how to clean and take care of your guns, so they stay in pristine condition for years to come. Why Clean Your Guns? There are many reasons why you should clean your guns regularly. Here are some of them. - Preventing Corrosion - When you leave your gun in its holster or case, the sweat and oils from your skin can cause corrosion. This is especially true if you live in a humid climate. Over time, this corrosion will damage your gun's finish and eventually eat through the metal, causing it to rust. - Preventing Malfunctions - Dirt, dust, and powder residue can build up in the action of your gun and prevent it from functioning properly. This is especially true for semiautomatic pistols and rifles. If you don't clean your gun regularly, you may find that it starts to jam or misfire. - Improving Accuracy - A dirty gun is an inaccurate gun. The powder residue, lead, and metal shavings that build up in the barrel of your gun can cause the bullets to deviate from their intended path. Therefore, if you want to keep your shooting skills sharp, you must clean your gun regularly. Proper Gun Cleaning Technique Now that we've gone over some of the reasons why you should clean your guns, let's take a look at the proper way to do it. You'll need the following supplies: - A gun cleaning kit - Cleaning solvent - Lubricating oil - A clean rag or paper towel. The Process 1. Disassemble Your Gun https://www.youtube.com/watch?v=HovIM4JHb8I This is the first and most important step in cleaning your gun. You need to completely disassemble the gun so that you can access all of the parts that need to be cleaned. There are a few things you should keep in mind when you're disassembling your gun: - Ensure that the gun is unloaded before you start: A fatal accident can occur if you try to disassemble a loaded gun. Therefore, you must check to ensure the gun is unloaded before you begin. - Be familiar with your gun: You should only disassemble the parts of the gun that you're comfortable with. If you're not sure how to disassemble a particular part, consult the owner's manual or take it to a qualified gunsmith. - Be careful with small parts: Small parts like springs and pins can be easily lost. Therefore, it's important to disassemble your gun over a clean surface where you can see all of the parts. 2. Clean the Barrel The barrel is the most important part of the gun to clean because it's where the bullet travels. Therefore, you need to make sure that it's free of any obstructions. To clean the barrel, you'll need a cleaning rod, patch holder, and cleaning patches. First, attach the patch holder to the end of the cleaning rod. Then, dampen a cleaning patch with solvent and insert it into the patch holder. Next, insert the cleaning rod into the barrel and twist it a few times to ensure the patch touches the entire surface of the barrel. Finally, remove the cleaning rod and patch holder from the barrel and dispose of the used patch. 3. Clean the Receiver The receiver is the part of the gun that houses the bolt and firing mechanism. To clean the receiver, you'll need a cleaning brush and cleaning solvent. First, use the cleaning brush to remove any dirt and debris from the receiver. Next, dampen a clean rag with solvent and wipe down the receiver. Finally, use a dry rag to remove any residual solvent from the receiver. 4. Clean the Bolt and Firing Mechanism The bolt and firing mechanism are two of the most important parts of the gun to keep clean. To clean these parts, you'll need a cleaning brush and cleaning solvent. First, use the cleaning brush to remove any dirt and debris from the bolt and firing mechanism. Next, dampen a clean cloth with the cleaning solvent and wipe down these parts of the gun. Finally, use a dry cloth to remove any residue from the solvent. 5. Spray & Clean the Action The action is the moving part of the gun that loads, cocks, and fires the weapon. To clean the action, you'll need a can of compressed air and cleaning solvent. First, use the compressed air to blow any dirt and debris out of the action. Next, use a rag dampened with solvent to wipe down the action. Finally, use a dry rag to remove any solvent residue from the action. 6. Discard Excess Oil & Rust Excess gunk, oil, and rust can build up on your gun over time. Therefore, it's important to remove these substances from your gun on a regular basis. To remove excess oil and rust, you'll need some supplies. First, get a clean microfiber cloth. You'll also need a good quality gun oil and/or rust preventative. Spray a light amount of oil onto the microfiber cloth. Next, wipe down your gun, paying special attention to areas that are prone to rust, such as the barrel. 7. Inspect the Screws & Bolts Tighten any screws or bolts that have come loose. If a screw is stripped, replace it with a new one. Having loose screws or bolts can cause problems with your gun's performance. 8. Clean the Magazine Remove the magazine from the gun and disassemble it. Clean all of the parts with a microfiber cloth. Pay attention to the feed lips, as they can become bent or damaged over time. Once you're finished cleaning the magazine, reassemble it and put it back in the gun. 9. Test the Gun After you've cleaned and inspected your gun, it's time to test it out. Take it to the range and fire off a few rounds. This will help you make sure that everything is working properly. 10. Store the Gun Properly Once you're finished cleaning and testing your gun, it's time to put it away. Make sure to store it in a safe place, such as a gun safe or lockable cabinet. This will help prevent accidents and keep your gun in good condition. Gun Cleaning Tips Now that you know how to clean your gun, here are a few tips to keep in mind: Never Use Any Steel Object to Clean Your Gun Since you love your gun, you may be tempted to believe that using steel brushes or other objects will clean your gun better. However, this is not the case. In fact, using steel objects can damage your gun's finish and even cause corrosion. Therefore, it's important to only use the tools that are specifically designed for cleaning guns. These tools are made of materials such as nylon and brass, which won't damage your gun. Don't Use Harsh Chemicals You may be tempted to use harsh chemicals to clean your gun, but this is a bad idea. Harsh chemicals can damage the finish on your gun and even cause corrosion. Ensure that you only use gun-specific cleaners and oils. These products are designed to clean your gun without damaging it. Be Careful with Solvents When using solvents, it's important to be careful. First, make sure that the solvent is compatible with the finish on your gun. Second, always test the solvent on a small area of the gun before using it on the entire surface. This will ensure that the solvent won't damage your gun. Use a Cleaning Mat When cleaning your gun, it's important to use a cleaning mat. This will protect your work surface from oil and solvents. It will also help keep small parts from getting lost. Ensure you clean the cleaning mat often, as gunk and dirt can build up on it over time. Sale TekMat Ultra 44 - AR-15 -Gun Cleaning Mat, Black, One Size - the soft thermoplastic fiber surface ensures your gun doesn’t get scratched - extra thick, .25” vulcanized rubber will protect your work surface and prevent the mat from sliding - keeps harmful chemicals, oil and dirt from penetrating down to your desk, bench or work area - oversized design gives you plenty of room to disassemble your handgun and to clean it without having to move parts all over - water-resistant, scratch proof, fade and oil resistant dye-sublimation printing $23.99 Buy on Amazon Invest in a Gun Cleaning Kit A gun cleaning kit is a great investment. These kits contain all the supplies you need to clean your gun, including brushes, rags, and solvents. They usually come with a storage case, which helps keep everything organized. This is a great option for those who want to ensure they have everything they need to properly clean their gun. Make It Regular Cleaning your gun should be a regular part of your routine. Depending on how often you use your gun, you may need to clean it once a week or once a month. If you live in a humid climate or if you're regularly exposed to salt water, you may need to clean your gun more often. Conclusion Cleaning your gun is an important part of gun ownership. By following the tips in this article, you can ensure that your gun is clean and in good condition. Don't forget that guns are meant for personal protection, so ensure safety at all times. Read the full article
32 notes
·
View notes
Text
Tertiary Prepper Skills – Reconnaissance
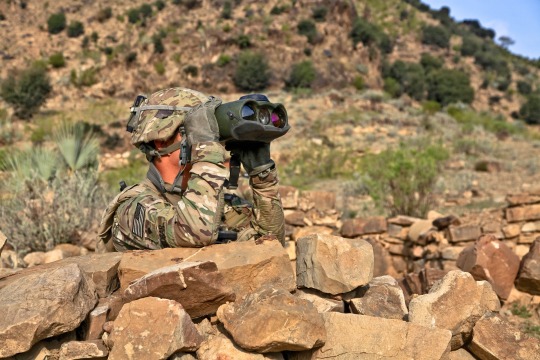
The world of prepping is constantly evolving. Just look at how far technological advancements in the past five to ten years have come and how it has benefitted not only the military and law enforcement but the prepper community as well. But alas, with every technological advance, the prior way of doing things and that knowledge tends to slowly slip away into an abyss. One major change has been in how we view defensive operations. In the “ole” days one would have to reconnoiter if you needed to gather intel. Fast forward to today and you ask any MAG, tribe, or prepper group, and more than likely they will have one, if not two, drones along with highly skilled and knowledgeable operators. In essence, drones have become a force multiplier for not only the military but civilians as well. The “eye-in-the-sky” is the new way of performing reconnaissance, but is it always the best way? DIFFERENCE BETWEEN RECONNAISSANCE, RECONNOITER, AND SURVEILLANCE: Before going further, I want to take a moment to explain the difference between reconnaissance, reconnoiter, and surveillance. Many times, these words are used interchangeably, but there is a difference between reconnaissance and surveillance. Surveillance usually involves the use of electronic equipment (drones, surveillance cameras, wiretaps, etc.). Meriam-Webster Dictionary definitions are as follows: Reconnaissance: (N) a preliminary survey to gather information Reconnoiter: (V) to make a reconnaissance of Surveillance: (N) close watch kept over someone or something (as by a detective) For the sake of this article, this tertiary prepper skill is going to be focused on utilizing old-school reconnaissance teachings to get back to the basics and not have to rely on technology, other than a comms system. If comms is not available, you could use a two-person team where one is a runner and communicates back to the team the findings of the reconnoiterer. Lastly, there is nothing wrong with utilizing drones for surveillance or reconnaissance, however learning the manual way of collecting intelligence will ultimately help you and your group in the long run, if need be, given an EMP event. Once learned, meshing both drones and reconnoitering skills during TEOTWAWKI will only broaden your offensive and defensive security plan. The Prepper SKILLS OF RECONNAISSANCE: The GoArmy website definition for the military occupational specialty (MOS) 13F, or Joint Fire Support Specialist, is: As a Joint Fire Support Specialist, you’ll gather intelligence and enemy target location to help the Army determine where and how to deploy artillery in mission-based situations. You’ll set up and operate communications systems, encode, and decode messages, assist in the preparation of fire support plans, coordinate, and target, operate laser range finders, and target devices, and determine the target’s location using computers or manual calculations. The first part where it states, “gather intelligence and enemy target location” means in layman’s terms, stealthfully seeking out your enemy’s location without giving away your position and then reporting it back to your base of operations. This is mainly for FO’s (reconnoiterer) attached to light infantry and infantry airborne units (at least it was when I was an FO). Aside from getting to and setting up an observation post (OP), one must first be proficient in the art of stealthy reconnaissance. This is not an exhaustive list, but some of the skills a forward observer needs to possess for reconnoitering are: - Topographic map reading - Day and night land navigation - Target / object distance estimation - Stealth and concealment - Radio operations (comms) - Physical and mental stamina - Ability to work autonomously - Basic survival knowledge (water procurement, wild edibles, etc.) - Intestinal fortitude In my belief, it is here that these skills should be more of a primary or possibly a secondary principle of prepping than a tertiary one. Although drones can play an important role in OPSEC (Operations Security), physical reconnaissance has now become more of a TPS, which needs to be practiced and developed. This is also one of the more elaborate tertiary prepper skills that need more attention than just a weekend or two to learn. https://www.youtube.com/watch?v=0cF0ovA3FtY SCENARIO: It has been 9 days since the U.S. descended into chaos and it is a true WROL situation. The president shortly thereafter declares martial law across the United States, and all cellular towers and internet services have been disabled. You hear chatter over the ham radio that there seems to be an estimated one-thousand-person caravan of starving people heading northbound on the major highway located five miles from where you live. The horde is 15 miles away to the south currently. There is also a secondary highway off the major northbound highway that skirts to within one mile of your bugout location. If the caravan takes the secondary highway, you might have some serious problems, as scouts will most likely be venturing out to scavenge. To add insult to injury, it is dusk and the wind is blowing at 30 mph. You are hearing reports on the NOAA alert that a hurricane is coming inland and will be a tropical storm by the time it goes over your location. (Yeah, it is a little far-fetched, but always try to incorporate Murphy’s Law into every scenario you develop. You will thank yourself later.) This is where having reconnoiter experience as a tertiary prepper skill will come into play. There are some knowns and unknowns in this scenario. The Knowns are: - No one in the group has prepared for this type of scenario. There is a potential threat approximately three to five hours away heading northbound in your direction (depending on how quickly a horde of starving people can walk). - The size of the caravan is reported to be 1k people. - You have one drone that is a long-range waterproof machine and can handle strong winds, but you risk the loss of the drone if you chance it. - It is dusk and about to get ugly outside. A hungry horde may be looking for a place to wait out a storm that could jeopardize your current location. The Unknowns are: - Is there really a large caravan of hungry people heading in your direction? Are there really 1k people or is it only 50? Is someone deploying psyop tactics in the hopes people in the surrounding area bug out and leave behind most of their prepper possessions? - Does the potential caravan threat have current vulnerabilities? Are they armed? Are they mostly women and children? Are they all on foot or using other means of travel? - Your immediate group has not assessed and has had the time to process the risk of their vulnerability and potential of being exploited by a mass of starving people. - Is it feasible to put countermeasures in place in such a short amount of time? The only way to address the unknowns is for someone from your prepper group, tribe, MAG, or even your family, to gather more intel to calculate this potential threat / non-threat and report it back to the team to take the necessary precautions. ITEMS NEEDED: Aside from the attributes above, to be successful at reconnaissance, one must start off with having the right equipment. Although this is not an exhaustive list, this should give you a good idea of what you would need in the event you or someone from your group must perform these reconnoiter duties. - A 12-hour rucksack (5.11 Rush 12 2.0 is a good example) - 1:50,000 waterproof grid map of your area - Lensatic or orienteering compass - A good pair of binoculars (w/ range finder reticle pattern if possible; 10x50 magnification is a good start) - Two (2) military protractors (they are clear; two is one and one is none) - Pace counter beads - Comms (Ham, CB, or GMRS radio with an earpiece and small microphone would be preferred to remain as quiet as possible. You will also want a long enough antenna to transmit across harsh terrains.) - Range Cards - State Highway map (check your state’s dot.gov website for free visitor state highway maps) - Camouflage face paint - .3mm drafting mechanical pencils - Grease markers (non-permanent) - Large 4mil sealing plastic bag or map case - Flashlight or headlamp with red lens - Write in the rain notepad w/ pen - Rain Poncho - Firearm (Long Rifle or sidearm depending on the mission and terrain) - Proper seasonal clothing (camouflage preferably for your area, gray man if in the city or suburbs) - Proper footwear and socks for seasonal conditions - Water - Additional Items to consider:- Ghillie suit - Night Vision or Infrared (depending on budget) - Range Finder - Water Filter (Sawyer mini or squeeze) - BIC Lighter - IFAK (Individual First Aid Kit) - Snacks - Ammo (consider the additional weight as to how many magazines you think you’ll need) - Paracord - Pocket road atlas This bag should always be packed to grab at a moment’s notice. Do not confuse this bag with an INCH (I’m Never Coming Home) bag or a get-home / bug-out bag. This bag has one purpose and that is for reconnaissance. Try to avoid utilizing all the real estate on and inside the bag. Try to keep this bag around 15 lbs. if you can. Remember, ounces equal pounds, and pounds equal pain. Being stealthy is the key to the mission. Being a minimalist is also key here, so you will want just the essentials to get to your OP or area of reconnaissance so you can grab the intel and extract yourself quickly and quietly. 10 STEPS TO GETTING STARTED: The art of reconnoitering needs to be developed over time as there are many aspects and skills needed to be successful, especially in a grid-down situation or WROL. If you are serious about having someone perform reconnaissance, here is a non-exhaustive list to get you pointed in the right direction. - Purchase as many of the above items on the list as possible (NOTE: Do NOT try to find the cheapest protractors or compasses. A protractor that needs to be “trimmed” is not worth buying. A great Lensatic compass is Cammenga. Buy once / cry once). - Invest in a 1:50,000 grid map if you can. (https://mapstore.mytopo.com/) - Purchase (or download) Map Reading and Land Navigation (FM 21-26) OR (FM 3-25.26). - Study these manuals if you are unfamiliar with map reading and land navigation and figure out your pace count and commit it to memory. - Once you have acquired your reconnoiter materials and you have familiarized yourself with the information, figure out whom from your tribe, group, MAG, or family has any experience map reading, glassing, and/or hunting and can physically handle the reconnoiter responsibilities for your group. - This one isn’t critical, but you might want to set up a code word cheat sheet for you and your group if you are planning on communicating on an unsecured radio channel during an SHTF situation. (NOTE: Please abide by all FCC regulations when utilizing open-air communication devices.) - Begin creating dry run scenarios with your group or family. Start off small, say, reconnoitering a half click (500M) to a location where you can set up a camouflaged Observation Post (OP). Use your preferred comms to call into your base station, group, or family what it is that you see. - Egress. Try to determine on your grid map an egress or two before committing to your OP. It is good practice to always think about your extraction plan as things might get squirrely once you get into position. - Red team everything. After your dry runs, get back with your group or family and assess the pros and cons of what you have just practiced. Do NOT fall into an echo chamber during this time and embrace confirmation biases. These dry runs need to be taken seriously and they need to be dissected for both the good and the bad for them to be perfected. Getting captured (or even killed) while on a reconnaissance mission jeopardizes not only your well-being but the safety of the group as well. - Practice, practice, and practice some more because Murphy never takes a day off. Ever. CONCLUSION: Reconnoitering is a tertiary prepper skill that is going to take some time to learn if you have never done it before. But be rest assured, thousands of soldiers every year learn the basic skills of land navigation and map reading and you can too. This is a skill that you will want to develop sooner rather than later, especially while times are still somewhat calm. Read up on your manuals, watch YouTube videos, and talk to military veterans to learn tips and tricks to better perform reconnaissance. Stay strong, keep learning new tertiary prepper skills, and enjoy stealth reconnaissance! Sgt. Silverman Read the full article
14 notes
·
View notes
Text
Tertiary Prepper Skills – Garden OPSEC

War. Famine. Food and water shortages. Supply breakdowns. The list goes on and on as the mainstream news and social media serve the masses a steady diet of fear and impending doom. However, every dark cloud has a silver lining or two as well. After the Covid lockdowns, there seem to be at least two good things that came out of those crazy times. First, most sane, and situationally aware people began to realize how fragile the just-in-time food delivery system was. Second, people took matters into their own hands and started planning/planting their own victory gardens. Many new and seasoned homesteaders, preppers, and survivalists alike saw the writing on the wall during these dark days and they either began growing their own crops or beefed up their current garden. THE CHALLENGES: One of the most satisfying feelings in prepping is picking your own freshly grown fruits and vegetables. To get to that point, we all had to go through the education process. Everything from questioning whether you would plant in containers and raised beds to using grow bags for some crops and planting directly in the ground for others was part of the learning curve. There were other issues to consider as well such as how many rain barrels would be needed if the grid went down and how to maximize that collected rainwater through a drip irrigation system. You may have even calculated, or at least considered, how high you wanted the chicken wire fence to go to keep the four-legged creatures out. Perhaps there was planning for the logistical placement of the crops in your field, yard, sunroom, or even your balcony to ensure your plants received the right amount of sunlight. Let us not forget the actual harvesting. You needed to decide if you would pick your crops and can them for long-term storage, or just freeze everything and vacuum seal it for a rainy day. In other words, gardening is not as easy as just throwing some seeds in the dirt. There is a tremendous amount of planning that goes into reaping what you have sown. Then there are the bugs… GARDEN OPSEC & ENTOMOLOGY: Entomology is the study of insects. Most hardcore preppers might be thinking right now, “I’ve got way too much to do than studying up on bugs as a tertiary prepping skill”. And that’s where you might just regret that decision. At the end of the day when you drift off to sleep knowing you have a tight OPSEC (Operations Security) plan for your home, there is a war being waged while you slumber. If you are thinking about planting or are already growing your own garden, it can quickly be ravaged by an army of veracious insects if you have not planned properly. These six + legged miniature demon seeds can wreak havoc on even the best laid out garden plan if you do not include a proper attack strategy. This attack strategy is Garden OPSEC. This is basically learning how to build your own miniature private army of ruthless and hungry combatants! If you can slowly learn this tertiary prepper skill, you will become more of an asset to your prepper group, tribe, or family, and you will not have to share your bumper crop with a tiny and destructive enemy. SCENARIO: After watching the news all year of potential water and food shortages, you decide it would be best to double the size of your garden as a preventative measure for next year. The fall is coming, and things are not looking great economically or politically. You take the initiative and formulate a solid plan for spring planting next year by using some online software. After testing the PH levels of your soil, you decide to grow four new crops. You have the space, and you purchase all the heirloom seeds necessary to turn your dream into a reality. But there is one tiny thing you failed to prepare for and that is the flying, crawling, hopping, buzzing army of insects that want to devour that food just as much as you. Once you plant those crops, all bets are off because be rest assured, you will have some uninvited guests come to dine indefinitely if you do not plan accordingly. NEXT STEPS: The scenario above is very common with gardeners who are just starting out and even seasoned veterans. But there is hope! Here are some suggestions to help you stay ahead of the curve. - Begin to research online the different types of insects that will feast on your current crops / future crop expansions. - Books such as, “The Vegetable Garden Pest Handbook” by Susan Mulvihill and “Rodale’s Color Handbook of Garden Insects” by Anna Carr are fantastic resources to study and have on hand, especially if there is ever an EMP, TEOTWAWKI, or grid down situation. - Make a spreadsheet such as the example below of your current planting preparations incorporating beneficial insects and plants. Plant NameZonePlanting DatesGarden LocationCompanion PlantPotential PestBeneficial Insect(s)Other natural controlsTomato7bPlant seeds in trays Feb / March Transplant / Sow in April - JuneSouthPlant dill and marigoldsTomato HornWorm, Cutworm, Stink bug, Whitefly, leafhopper, blister beetle, spider mite, leafminer, lygus bug, slug, snail, spider miteAssassin Bug, Big-Eyed Bug, damsel bug, hoverfly, lacewing, ladybug, long-legged fly, minute pirate bug, parasitic wasp, praying mantis, robber fly, rove beetle, spider, tachinid flyCover Hoops, Nematodes, Diatomaceous Earth, Oils, traps, - Start building your army! Arbico-organics sells a myriad of beneficial insects and pest control supplies that can meet most budgets. - Figure out your Alternate and Contingency plan (P.A.C.E. plan in essence). If the grid is down and you must plant crops but cannot purchase any beneficial insects or pest control, you are going to have to do things the old-fashioned way and entice beneficial insects into your garden by building “bug hotels”. You can also try to map out the best plants that will invite these predacious warriors to assist you even if it is a WROL out there. (Ex. Fern–leaf yarrow attracts lacewings, hoverflies, and ladybugs.) - Deepen your attack strategy with natural controls such as nematodes, diatomaceous earth, sprays, and cover hoops. - Figure out a way to “relocate” wasps and hornets without killing them. A garden hose will aggravate them if they are setting up shop under your porch roof, but they will get the hint and move on to somewhere else. You don’t want to kill them! As painful as they can be, they are also one of the best exterminators you can have on your property. - Try not to kill any spiders. (Did I just write that???) If you see spiders in your garden, it means there is food for them to eat. Garden spiders (yellow and black) are the best in a garden and one egg sac can have as many as 1,000 baby spiderlings ready to hatch in the spring. - Try to avoid harmful chemicals and sprays as they can kill off beneficial insects as well. - For the sake of your sanity, factor in a percentage of crops lost due to insect damage. For example, if you plan on planting “X” amount of corn, have a mental number in your head or on the spreadsheet above as to what you could potentially lose due to the corn earworm. (You will lose probably a lot of the tips, but the corn is still good and edible, but it will be a compounded loss nonetheless.) CONCLUSION: In all seriousness, Garden OPSEC is a Tertiary Prepper Skill you will want to incorporate into your prepper plan immediately. With the current food supply shortages and fall quickly approaching, having a solid game plan before spring is crucial as most of us can still purchase products without a tremendous number of issues. That can all easily and rapidly change by late fall and/or winter so try to get ahead of the curve now if you can. Stay strong, keep learning new tertiary prepper skills, and have fun building your bug army! Sgt. Silverman Read the full article
14 notes
·
View notes
Text
The Ultimate Preppers Guide for Preparing Food Reserves That Last

The future has become increasingly unstable for many of us in recent times. Therefore, it makes a lot of sense to work on building up an emergency food pantry that will allow you to survive for a very long time using your own food resources and preparing food that will last. There are a number of food storage solutions that are designed to last for many years. You can approach the task of building up a store of emergency foods in a number of different ways. The simplest way would be to accumulate an extra amount of non-perishable foods that you would eat on a regular basis. A more professional approach that is often favored by preppers would be to buy a range of special food that has been specifically designed to last considerably longer than anything you will find on the supermarket shelves. Let’s take a look at both of these methods in greater detail. There are also some pros and cons to consider that you need to be aware of when you are planning how to prepare food reserves that will last you through an emergency scenario. Work on surviving for a minimum of two weeks There are no hard and fast prepping rules when it comes to how much food you store. However, the accepted minimum is to have enough supplies to last you for at least two weeks. You should have a two-week stock of non-perishable food that is easy to prepare. That should be your base point when preparing an emergency supply stock list. It might be that you think you have a fair amount of non-perishable supplies in your cupboard a lot of the time anyway. But the average home tends to have a level of stock that would last them hours rather than weeks. DIY or prepared food kits? It is perfectly understandable that you might prefer to take what you consider the cheaper prepper route and build a DIY supply of essentials rather than pay for an off-the-shelf solution. However, you may not find it as easy and cheap as you think to go down the DIY path. Trying to work out the right balance of dry goods such as rice and beans that are going to see you through a crisis can be difficult to estimate. It becomes particularly challenging when you are also trying to fulfill your daily calorie intake requirement and eat as healthily as possible, given the circumstances. If you buy a readymade survival food kit there are a number of distinct advantages to consider. One of them is the fact that when you buy one of these kits you benefit from having a professional make all the right calculations regarding how to deliver the right calories you need each day. If you buy a typical two-week food survival kit, for instance, you can be sure that two people will enjoy a balanced and nutritional meal that is within the right calorie range. When you look at how convenient, healthy, and tasty a good kit can be, the cost can often be justified considering all the boxes it ticks. Understanding the foundations of successful prepping Once you understand the fundamental point of prepping is to minimize the disruption to your life that can come after a major event it will help you to prepare in the right way. Many inexperienced preppers tend to make the same errors when putting their contingency plans in place. A classic move would be to search out a single checklist that seems to meet your criteria and follow that path without reading in more detail about what prepping is all about. There are a couple of aspects to prepping that should be the cornerstone of plans. Make sure you have sufficient financial resources and you know your health requirements can be met in an emergency situation. Create a checklist of key points to ensure that your home is capable of sustaining you for a period of at least two weeks. Make sure you are in a position to vacate your home and implement emergency measures at a moment's notice. Learn some core prepping skills and make sure you practice what to do. You might also want to connect with some like-minded people who will be able to share their ideas and experiences. This can often make prepping seem far less daunting and give you a good sense of what you need to do without being overwhelmed. Why do official guidelines suggest 72 hours of supplies is enough? If you visit the Ready.Gov website created by the Department of Homeland Security you will see that their definition of being prepared means having enough food, water, and other supplies to last for at least 72 hours. Whilst having enough supplies for 72 hours is considerably better than not being prepared at all this advice is not supported by a number of other respected organizations. The Red Cross, for instance, now suggests that you should have access to three days of supplies in the event of evacuation and two weeks of supplies if you are staying in your home. It is hard to justify doing the bare minimum of having just 72 hours of supplies when you consider that the American military says that it will take them an average of eight days to fully mobilize a response to a major crisis. If you are waiting for help for that length of time it is abundantly clear that following the suggestion of having at least two weeks of supplies would be the better preparation plan. Preparing food that lasts Having established the ground rules for prepping, it's time to take a closer look at what sort of things you should be looking for when compiling your shopping list. There is a basic criterion that is advisable to follow so that your prepper pantry has a good stock of items that meet a variety of different storage and usage requirements. It is a good idea to search out products that offer a long shelf life. You can get free-dried food that lasts up to 30 years but, in general terms, to meet the criteria of a long shelf life a food item needs to be able to last for at least a year. Look for products that are easy to store and offer durability. Items in a can are easy to store and won’t need any special storage requirements. Be mindful that in an emergency you might not have access to cooking utensils or other cooking aids. That’s why it is a good idea to have a stock of foods that can be eaten without any preparation or need minimal preparation such as reheating or rehydrating. You also want foods to be able to meet your nutritional needs. You don’t have to stock your store with everything healthy but try and achieve a reasonable balance. If you are working with limited storage space you should consider stocking food items that are high in calorie density. That way you can get the calories you need without needing a big pantry to achieve that daily aim. There is a storage model that you might see mentioned that is FIFO. This stands for First In First Out. In other words, the idea is all about storing what you use and using what you store, on a rotation and replenishment basis. Take advantage of shelf-stable or non-perishable items You can build up your prepper pantry over a period of time by adding some extra items to your weekly shop. This helps you to budget more easily. You can also take advantage of the FIFO concept by keeping a close eye on your stock expiration dates. In principle, prepping becomes easier when your food lasts as long as possible. That is why you need to focus your attention on so-called shelf-stable and non-perishable items. What is the definition of a food item that is classed as shelf-stable? If a food can be safely stored at an ambient temperature (room temperature) or on a shelf without any need to be refrigerated these are classed as being shelf-stable. Canned goods and foods stored in jars or bottles would meet these criteria. Not all canned goods can be stored in this way and might require refrigeration. The storage instructions will be on the label and you should read these as well as looking for expiration dates so that you can select products that are non-perishable and shelf-stable for the longest possible time. It takes a little bit of extra work to search through cans on a supermarket shelf for the longest expiration date but the effort is worth it, all things considered. It should also be noted that the exact storage life of a product is quite difficult to predict with any degree of accuracy. Use the dates as a guide rather than a definitive use by date. Providing the best food storage environment As well as being diligent when it comes to selecting appropriate prepping products you also need to focus your attention on creating the best possible storage environment. There are a number of key factors that can prove highly detrimental to your efforts to create a usable supply of food that is ready at a moment's notice. You need to minimize the threats that can degrade your items. The principal threats that you need to eliminate or control are heat and light, moisture, poor oxygen levels, and pests. Large Food Organizer - Multiple Can Sizes - Designed for Canned Goods for Cupboard, Pantry and Cabinet Storage - Made in USA - Stores up to 60 Cans - Easy Organization - Our patented FIFO can-rotation is a system you won’t find anywhere else, saving you from expired food and wasted space and money! Designed to store tuna size cans all the way to 30 oz cans. Holds up to 60 cans and 100 pounds. Perfect for your pantry organization needs. - Fully Adjustable - Unlike other FIFO systems, our design allows you to adjust to your can size needs. Perfect for small chili cans, soup cans and large 30 oz tomato cans, you get to decide! - Compact Design - Product dimensions are 11” H X 30” W X 16.5” D (30" at its widest). Easily connect additional Cansolidators to expand horizontally. Units may also be stacked for space optimization. - Easy Installation - With simple instructions and dowels that click together, your new pantry organizer fits on your already existing shelves and are ready to go in a matter of minutes! - Made In USA - Built to last, this product will be a perfect solution to your kitchen organization problem. $74.99 Buy on Amazon The bottom line is that the effectiveness of your ability to reduce these main threats to the longevity and condition of your food storage will often prove critical to how ready you are when the time comes to use your food items. One solution that a number of preppers use to store dry goods efficiently and safely is mylar bags. When paired with oxygen absorbers and using sealed buckets to store your dry goods these bags will often prove to be the best way to keep everything as fresh and safe as possible. Even if you can’t run to this sort of standard it is wise to focus on creating the best storage environment you can. Also, remember that “best before” dates conform to manufacturing guidelines. In reality, there is a good chance these products will last a lot longer, provided the packaging is secure and hasn’t been compromised. A good number of shelf-stable foods can last for years beyond the expiry date printed on canned goods but you need to be vigilant as the can needs to be in perfect condition for those rules to apply safely. Grains should be a priority purchase for your prepper store Grains are almost the perfect prepper food solution. They store easily and as well as being nutritious they are versatile too. The sort of grains that need to be on your list are classic staples such as rice (all types from long grain to Basmati are suitable), rolled oats, dried pasta, dried corn, and instant grits. Beans and legumes should also be high on your list When it comes to getting the protein and fiber you need for your diet you can’t go wrong with a supply of beans and legumes from your store. Again, these are perfect prepper food solutions as beans and legumes store well and they offer a fair degree of versatility so you can choose items you really like. Typical items for your list would be black and pinto beans, kidney beans, lentils, chickpeas, and black-eyed peas. In addition to these staples, you should also look to accumulate some meats and other proteins, in cans. Canned meat is not to everyone's liking, but a country ham out of the tin can last almost indefinitely and will be a welcome addition to your menu when you are actually using your supplies in an emergency situation. If you are savvy with your food selections you should be able to create a store of items that meet all of your daily needs and will be ready to go as and when you need it. Do your research so that you can learn from other like-minded people about what works and what doesn’t when starting your prepping journey. You might also want to consider getting a helping hand with some food storage solutions that have been specifically created to meet all of your dietary needs in an emergency situation. Read the full article
11 notes
·
View notes
Text
Your Ideal Survival Kit Checklist For Mountain Bike Rides
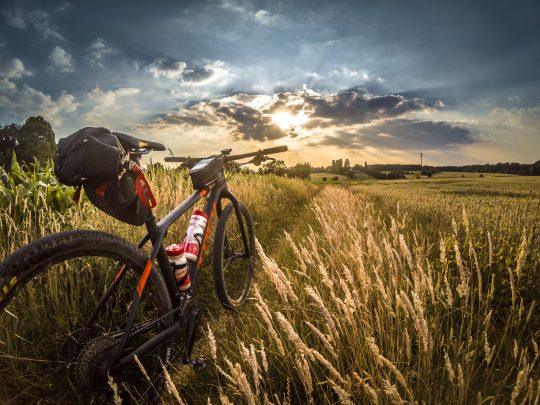
Heading out for an adventure with your mountain bike is probably one of the perks of owning one. As fearless as it sounds, you may still want to do a safety check for your experience to be good. You must be responsible when it comes to packing before you start your journey. Mountain bike adventures often take you to places where it is just you and your bike and not a single soul, which is why being self-reliant is essential in this case. Additionally, mountain bikes can be a tremendous resource to preppers in a situation where vehicle traffic is no longer possible. Prioritizing your safety, we have prepared a list of contents for survival kits that everyone should carry in a mountain bike ride. 1. Spare Tubes They may be heavy to travel with, whether you are planning to use a conventional bike or an electric bike for adults, but it really does pay off in times of a tire emergency. This is also applicable for tubeless tires. You should be prepared for the worst possible situation regarding such adventures. For example, what if your tires are beyond repair, and there’s no sign of getting possible help? Carrying the right-sized inner tubes will rescue you for sure. Make sure you check the wheel size and tire width before getting a spare one. 2. Tire Lever This may sound extra, but do not underestimate the power of a lever in times of need, that too in an isolated place. For long miles, it is ideal to carry one with you. Double flats are a common scene for mountain bike rides. If you are a beginner at this, you should take this seriously. Tire levers are absolutely necessary when they are stuck on rims. A tire lever can help you immensely to wrangle it. 3. Tubeless Repair Kit Tire punctures are common, and it is likely to happen to you on mountain adventures due to the rocky trails. It could be glass, sharp rock, snakebite, or even thorns that cause your tires to puncture. For tubeless bikes, carrying a repair kit can really help to save you from the mess. When you are on a mountain ride, you should never head out with the tubeless repair kit. It’s as simple as that. You’ll regret it for as long as you can remember. It can be very simply used by inserting a special plug tool to seal the hole for inflating your tires again. For more information, you can look up a tire plug kit, and find out how it works. For larger tire damages, plugs may not be helpful. You’ll need to opt for alternatives such as installing a tire boot and tube. In some cases, stitching the slices on the tires also does the job. 4. Patch Kit These life-saving patch kits are small in size, so carrying them shouldn’t be a big concern. Their function is to enable you to reuse punctured tubes. They are also ideal for patching inside of a tire when needed. You can choose a traditional one that includes a vulcanizing component or a pre-glued stick-on patch. Both are equally reliable. 5. Portable Tire Pump Again for punctures, a portable tire pump will save the day. Choose a high-volume option as they are more suitable for mountain bike rides. High-pressure pumps are also an option, but according to experts, high-volume pumps are better. CO2 inflator is also an excellent choice, but they cannot be reused multiple times. So, if you experience punctures more than once, they will not serve the purpose for your next mountain bike ride. 6. Chain Lubricant Pack yourself a mini-chain lube for your trip. You’ll need to grease your bike chains to avoid squeaking noises if you cross rivers or downpours. It’s a convenient product that will ensure your mountain bike is functioning efficiently and silently. 7. Phone and GPS This is a must for safety purposes. You can use your phone for navigation, but more importantly, if you are lost and in an emergency situation, your phone will be your friend in need. You can optimize your phone functionality by pre-download a few handy apps before your adventure begins, such as sharing your location with your friends and family. Opt for offline apps, as you can lose network and frequency and end up in the middle of nowhere. Make sure your phone is fully charged and carry a portable charger for emergency purposes. Otherwise, it won’t be of much help if your phone runs low on battery, and goes off when you need it the most. Another great option is to install a GPS bike computer for navigation purposes. It can help you to save your phone battery too. 8. Portable First Aid Kit Lastly, a first aid kit for obvious reasons. When you are out in isolated areas with your mountain bike, carrying a survival first aid kit is essential. The good thing is there are first aid kits specific to mountain bikers available for you to purchase online and offline. They are small and extremely useful. If you fall and injure yourself, a first aid kit will cater to your needs. Conclusion For first-time mountain bike riders, this list will keep you away from stressing about potential emergencies. Instead of stressing, you should plan accordingly, so you can spend your time enjoying yourself to the fullest. If you feel there are contents, such as a hydration pack or mini blankets, that need to be added, feel free to do so. It all depends on your personal requirements. Read the full article
2 notes
·
View notes
Text
11 Essentials For Your Nuclear Disaster Prep Kit

If you are an avid prepper, disaster preparedness will definitely include readiness for a nuclear and chemical attack. These events are rare, but you cannot overlook their possibility, specifically in the prevailing volatile circumstances. Even newbie preppers are more conscious about prepping for a nuclear disaster because the threat is more real than ever. The magnitude of the risks that follow these events can be far more daunting than you imagine. The survival scenario during such disasters is far more complex than in other events such as earthquakes, floods, cyclones, wars, and terrorist attacks. Surviving a blast and the fallout that follows is no mean feat because the safety and well-being of your loved ones are under threat. But the apt preparation and know-how can come to your rescue. Everything boils down to having the essentials in your prep kit. Here is a list you should not miss out on. Water Before anything else, you will require the basics to get through a nuclear disaster. Water is on top of the checklist because you need it for drinking and sanitation. You must have enough to cook and drink and rinse off radioactive fallout from your body. It is important to clean the exposed skin because it minimizes the risk of radiation exposure. Experts recommend having at least one gallon of water per person per day in reserve for the survival situation. Bottled water is safe because it is packaged before the disaster, so you need not worry about the radioactive material. Food Like water, food is another essential for any emergency kit. You will probably have to stay in for a few days after the first blast, so have enough supplies for your family members. Packaged food is the safest for the same reason as packaged water. Look for non-perishable and nutritious items to keep you full and healthy while cooping inside your home. The last thing you should do is use veggies from your kitchen garden because they will surely be contaminated. In fact, you must steer clear of using fresh fruits and veggies for a long time. Wait for the orders from the authorities before you start cooking with them again. Essential medications Disaster preparedness is about being ready for the worst, so you must stock up on your essential medications. Have enough to carry you for several days because the home is the safest place after a nuclear event. Consider storing medicines for common health conditions like fever, cough and cold, diarrhea, allergies, and pain. You must also stock up on prescription medications for everyone in the family because you cannot afford to run out of them during an emergency. Plan for the special needs of the elderly, the little ones, and sick family members. Besides the essential medications, keep a well-stocked first-aid kit at hand to deal with unexpected injuries. Potassium Iodide tablets Surprisingly, a pack of pills can offer viable protection against the aftereffects of fallout. Potassium iodide pills can prevent the absorption of radioactive iodine by the thyroid gland. It lowers the chances of getting thyroid cancer and other diseases due to nuclear exposure. So you must have a few packs of these tablets in your kit. Also, know how to dose them for your family members. However, remember that potassium iodide protects only the thyroid and not the rest of the body from the radiation. You still have to follow the other essential precautions like staying indoors and avoiding the use of contaminated water and food after fallout for an optimal time. Personal protection equipment The best way to stay safe during a disaster and fallout is by staying inside. Even better, coop up in your basement because the exposure is likely to be minimum there. But you will have to evacuate eventually if in a war-like situation. The good thing is that radiation levels drop after a couple of weeks, and you can leave for safer grounds once the local authorities allow moving. But you must buy personal protection equipment like gas masks and hazmat suits to protect yourself from the radiation that still persists in the atmosphere. Consider these accessories, as a small investment for the health and safety of your loved ones. A radiation filter Although radiation levels drop consistently after the initial event, you cannot expect the area to be safe altogether for the foreseeable future. Having a radiation filter in your nuclear preparedness kit is a good idea as it protects you even if your area is subject to radiation exposure for the long haul. The device removes radioactive particles such as Radium, Radon 222, Cesium 137, Uranium, Strontium, Plutonium, and radioactive iodine from the water. You cannot rely on packaged drinking water forever, so a filter is essential to resume your supply in the long run. A battery-powered radio Communication is another essential factor when it comes to nuclear disaster survival. The event can cut you off as you have to hunker indoors, but a battery-powered radio keeps you connected. A hand-cranked device is the best option. You can use it to get emergency broadcasts and instructions from the local authorities. Besides using the radio inside your shelter, you will also require it during evacuation to find the safest exit routes to get out of the fallout zone. Although a cellphone may suffice, radio is always better because cell towers may be affected due to the electromagnetic pulse, power outages, or high demand. Decontamination supplies Your nuclear disaster kit must also have adequate decontamination supplies. Surprisingly, cleaning up can lower the risk of nuclear exposure to a significant extent. You must do it first thing after the blast, so it is vital to have enough supplies to clean yourself properly. You do not require a long list, as only soap, water, and moist towelettes suffice. You may even find products for radioactive decontamination, but procuring them is not easy. They are not available to consumers but are sold to first responders. However, you may look around for options if you foresee an impending nuclear disaster in your area. https://www.youtube.com/watch?v=X8988d1zgDk Plastic bags, gloves, and accessories It is easy to overlook smaller stuff when you think about the essentials for nuclear preparation. But these items can be lifesavers in the long run. You must have enough plastic bags at home as you will require them for disposing of contaminated clothing, wipes, and gloves. Look for ones you can mark and seal so that it is easy to identify nuclear waste for you and the others. But trash bags are also good to manage if you do not have sealable ones. You only need to be careful while disposing of the contaminated stuff because it can be harmful. Also, have disposable vinyl gloves to handle and wash things after the fallout. Plastic sheeting and duct tape Although your home is the safest place to be after the disaster, you cannot rely only on the concrete walls to offer protection from the atmospheric radius. Choose a room without windows and ventilators to keep the harmful radiation out. Even better, take shelter in the basement because the risk is minimal underground. But you must go the extra mile to seal the area. So you must have plastic sheeting and duct tape in your emergency kit to cover the openings and keep the harmful particles out. The simple practice can be lifesaving, so do not skimp on the basics. General emergency supplies Do not forget the general emergency supplies, as you will require them inside the shelter and during the evacuation. You can check your regular emergency planning checklist to ensure everything is in place. The list is a long one and has simple stuff, so it is easy to miss out on these essentials. You must be extra careful about stocking up on these items. A flashlight, batteries, and matches are on the top of the checklist. You must also have a multi-tool device to handle tasks like opening cans and repairing small stuff at home. Have extra clothing and shoes, sleeping bags, cash, emergency contact information, and copies of personal documents, such as proof of address, birth certificates, passports, and insurance policies at hand when you need to evacuate. A whistle in your kit can help first responders locate you if you are stuck somewhere. Disaster preparedness is not a one-time thing, so you cannot leave it to chance. It becomes even more critical when planning for safety against a nuclear event. You must stay ahead of your supplies and take stock often to ensure you have everything. Preparing in advance always gives you an advantage because you cannot expect to gather stuff after a disaster hits. If you have a kit ready, you will not need to step out and expose yourself to the dangerous radiation. The good thing is that you do not have to spend a fortune on these essentials, so you need not worry about the expense. But having these items can save you and your loved ones even during the most critical situations. Read the full article
3 notes
·
View notes
Text
8 Things You Should Avoid Doing With Your Compound Bow

There are mainly three types of bows that archers use: recurve, compound, and crossbow. Each comes with its perks and disadvantages. Have you seen archery in the Olympics? Then you’ve probably seen the bows that the archers use. These are called compound bows. Don’t they look amazing? If you have decided on getting a compound bow to start practicing archery after watching them shoot incredible shots, then you should know what you need to avoid doing with your compound bow. You’ll be thanking yourself later. What Is a Compound Bow? A compound bow is used in modern archery for target practice and hunting. It consists of a system made of strings and pulleys to bend the bow and fix the shot. A compound bow is much more compact and shorter than traditional bows. While a basic compound bow only consists of the levering system, a professional, comprehensive compound bow comes with many other gears such as a release-aid, peep sight, fiberoptic sight, etc. Although you may be planning to buy one or are already practicing with one, there are things that you should avoid doing to your compound bow so that it lasts longer. Using It Without Proper Knowledge Using a compound bow without having proper knowledge of its parts and how to use it can be disastrous and quite costly. While some compound bows come with all the parts included in their boxes, others only come as just the bow with the cables and cams. If you’re a beginner, you need to know beforehand the parts that you need to practice and hunt effectively with a compound bow. You can check out Bowaddicted to get guidelines on using your compound bow and which will be the best ones for you. Starting Overbowed You shouldn’t take a bow heavier than the weight that you can lift easily, which means the weight of the draw shouldn’t be greater than what you can take. If the draw weight is heavier than your wrist can hold, the bow will tremble, and you’ll not be able to balance it. If you shoot an arrow in this situation, you’ll misfire, or you may even get hurt. Not Tuning the Draw Length One of the advantages of a compound bow is you can adjust its draw length and draw strength according to your comfort. However, this is a common mistake that many archers make when using this bow for the first time. https://www.youtube.com/watch?v=XvgyI-Zyf-U Another thing you should avoid is getting a compound bow whose draw length is greater than the length of your arms or shorter than that. Get the draw length adjusted by a professional according to your maximum stretch, as there are a lot of bolts and screws to work with. Along with the length of the string, they can also adjust the tightness of the bow with an Allen wrench for maximum performance. Dry Firing Your Compound Bow What does dry firing mean? It’s when you draw the bowstring and release it without an arrow. Drawing the string produces a great tension, which needs a proper release. Without an arrow, the energy from your arms will transfer entirely to the bow and string, which will damage them badly. You don’t want that, right? Using Arrows That Don’t Match Your Bow’s Quality It’s crucial that you use arrows that match the quality and specifications of your bow if you want your bow to function correctly. An arrow will only perform well if it matches your bow. Otherwise, the bow may slip or break. Not Maintaining It Properly You sometimes will need professionals to fix and maintain your compound bow. An expert will understand how tight the string should be or how long it should be able to stretch after examining your physique thoroughly against the bow. They may also recommend you a better bow option. Compound bows need proper maintenance if you want them to last you for years. And if you fall in a situation where you need to fight as well as survive, then compound bows are the better choice for the SHTF scenario out of all the other types of bows. But only if maintained properly. Storing It Anywhere but Its Case If you’re thinking that you’ll just take off the cables, disintegrate the parts and store them or carry them compactly, that won’t work. Fixing it will take an expert hand and machinery, and you don’t want to go down that expensive road. Because of how awkwardly shaped it is, you can’t store compound bows just anywhere you like. It will end up bruising the bow badly. You need to keep the bow in its box along with the arrows and gears. It’ll be heavier to carry, but it’s still worth it. Using It as a Beginner Although more accurate and faster to shoot with, compound bows can be difficult for beginners due to their structural complexity. You’ll have a terrible start to your training. Besides, it’s a good idea to build your strength and sharpen your aim with a recurve bow. Choose a bow with draw weight and draw length that’ll resonate better with you so that you can work your way up to the strength and expertise to shoot with a compound bow. You can later adjust your compound bow to your level of expertise as you gain more experience. With more knowledge and experience, you can upgrade to better, more stable compound bows and become a better bow hunter. Conclusion As fun as archery is, you need a lot of training to master the skills. Your bows back you up. In this case, to help you achieve your desired goal. Buy the right compound bow that will match your fitness and stretch, avoid doing the things we have discussed in this article to your compound bow, and follow some safety rules. You’ll do well with your compound bow, and will get satisfactory results over the long run. Read the full article
5 notes
·
View notes
Text
DIY Bunker: Turning Your Basement Into a Survival Shelter

Most people think that bunkers are only used during wars, however, they apply to everyday life and basements can serve as a survival shelter offering protection during an SHTF situation. If you’re thinking of creating a bunker, don’t just dig a hole in your backyard and set up an underground bunker. First, you should have a viable survival zone. If your home has a basement, then you may already have what is needed. Bunkers can be used in many situations, such as hurricanes, tornadoes, or civil unrest. So, here are some tips on DIY bunker and how to turn your basement into a survival shelter. With our tips, you will learn what mistakes to avoid, as well. Take Care Of The Basement’s Moisture Usually, basements are full of moisture and dampness since their below ground level, so it’s hard for water to dry or evaporate. Moisture can be a big problem if you’re planning to turn your basement into a survival shelter. In addition, water and moisture can lead to mold and mildew growth. This is dangerous since mildew spores can cause respiratory problems. If someone has a pre-existing respiratory condition, such as asthma, mold and mildew can be especially hazardous for them. The best way to fix the water problem in your basement is to find the sources of where it comes from. If the water is seeping through the concrete walls, then strip the walls and use waterproof paint before installing insulation and replacing the drywall. Another option is to purchase a dehumidifier to keep the space dry. It’s essential to have a dry and safe environment in order to create a surviving shelter for you and your family. Inspect The Basement’s Foundation Before you start turning your basement into a bunker, take your time to inspect the basement’s structure. It’s important to make sure that the basement is structurally sound before you use it as a survival shelter. Inspect your basement from floor to ceiling. Look for any cracks on the floor or walls. Also, check if there’s any sign of water leakage. Any structural instability should be fixed before turning it into a bunker. You don’t want to hide somewhere where it’s already unstable. If this process seems confusing to you, think about hiring a building inspector to help you complete this important step. By having an expert look around, you can rest assured that everything is safe and ready to be turned into a survival shelter. Manage Temperature with Insulation In catastrophic situations, it’s not uncommon to be left without power. That means that you will feel hot summer and freezing winter even in the survival shelter. That’s why it’s important to add insulation before installing drywall. Insulation, with the soil surrounding, is a great way to regulate the temperature in your bunker. Also, insulation is helpful for keeping your food supplies edible. Make sure to stock enough sleeping bags, pillows, and blankets to stay warm. Manage Air Quality Managing air quality is an important step because you don’t want to bring poisonous air from outside after a nuclear explosion or airborne viral threat. Self-contained air storage and recycling system will get rid of dangerous particles in the air before it enters your bunker. However, in case of a nuclear event, it might be best to ask for the help of an expert or someone with more knowledge than you. Having an adequate air filtration system is essential to stay well protected in your survival shelter. Air quality and recycling should be a priority when turning your basement into a bunker. Keep in mind that you can only survive three minutes without air. So, this step is the most important one. In addition, some plants may help in converting carbon dioxide to oxygen. However, they alone are not enough to provide and process all the air in your survival shelter. But they can be a helpful addition to an air filtration system. It is recommended that every emergency survival shelter has a thermometer, a carbon dioxide alarm, a low carbon monoxide detector, a humidity gauge, an oxygen depletion gauge, a smoke alarm, and a radon detector. Determine Water Resources While you’re in the shelter, it’s important to stay hydrated and learn how to stockpile drinking water. In case of emergency, a bunker is a place where you wish to stay as long as possible. Typically, a person should drink one gallon of water every day. The other half is used for brushing your teeth or washing your hands. In case of a catastrophe, municipal water will be unavailable or dangerous to drink. So, you will need to find another source of drinking water. A basement well can’t be an option, as well. You and your family should have enough water for everyone. For short-term storage, jugs of water are enough to survive. However, in the long run, you will need to find something more cost-effective and substantial. A good idea for storing tap water is a waterBOB or 55-gallon drum. WaterBOB bag holds 100 gallons of water and is free from any spills or odors. Your water will stay safe and free from any toxins or germs. Determine Food Storage Having a supply of food in case of emergency will save you from running around looking for food. Emergency food supply should include canned fruits and vegetables, bulk dry food, and freeze-dried foods. If you’re preparing for an extended stay, then you should make a list and have an organizational system. This system will keep you away from wasting any food. Make sure to look at expirations dates. So, if you find something that is going to expire soon, then bring them to your regular pantry and replace your supply with a new one. Remember that canned food can be quite heavy. So, install some heavy-duty shelves that can hold your emergency food supply. If you live in an earthquake-prone region, then make sure to secure your shelves. Using camp stoves in your shelter is not something you should do. A build-up of carbon monoxide in an enclosed space is fatal. Instead, choose MREs or eat cold canned food without heating it. Grow Food in Your Bunker Even though you will have canned foods and bulks of rice, you will crave something fresh. It may sound impossible, but you can grow some plants without sunlight. The main thing you need is a source of water and an off-grid power source. The power source will keep your plants growing by giving them light. If your bunker has enough space, you can pretty much grow anything you want. In worst-case scenarios, like nuclear war, growing your own food will be valuable. Since plants absorb the ground, that would mean absorbing nuclear isotopes, as well. So all of your plants around the house would be dangerous to eat. Good systems for indoor and underground environments are hydroponics and aquaponics. These systems use water instead of soil, so aquaponic can include fish, as well. The fish waste would act as a fertilizer for the plants. With a little help from solar panels on the roof, you can grow food in your survival shelter a lot easier. Solar panels would keep light running which is used for growing plants. Managing Personal Hygiene This may be the last thing on your mind when making a bunker, but an enclosed space with multiple people can become chaotic. You and your family will still need to brush their teeth, bathe and use the bathroom. Some basements already come with a bathroom, however, if you lose water and power, then the toilet can become useless. Sale Reliance Products Luggable Loo Portable 5 Gallon Toilet (5 Gallon Standard) - The Reliance Luggable Loo is the most economically priced portable toilet by Reliance Products; - The simple bucket style design and traditional snap-on lid makes this 1 of the top sellers; - The Luggable Loo is an extremely rugged portable toilet for any outdoor adventure like for hunting, fishing and camping expeditions; - Also handy to have for disaster preparedness; - Weight: 3.00 lbs; 5-gallon (20-liter) capacity. $32.95 Buy on Amazon Stock up on wet wipes and use them to keep your body clean or use a wash rag without getting into a shower. When it comes to washing your clothes, use a 5-gallon bucket that has a lid and use a clean plunger. Create Exits Your survival shelter should have ways out in case your house starts falling down on you. Make sure that you create several escape routes while making a bunker. One exit should lead to the house and the other should lead to the backyard. If your basement only has one exit, then you should add a second exit on the opposite side of the first one. Numerous exits can be very helpful in case you need to get out of your shelter. Be Smart About Sheltering Sheltering is a great way to hide from whatever catastrophic event is happening. However, you need to know when to shelter and when to evacuate, too. You should be ready for both scenarios, so you’re not surprised when the scenario happens. With these tips, you should be able to turn your basement into a survival shelter all prepared. Even if it takes time, it’s definitely worth it in case something disastrous happens. Turning your basement into a survival shelter is very convenient. It’s easy to head downstairs and close the door. With the right preparation, your bunker shouldn’t be damp or cold. Instead, it should provide you with comfort and a safe place to hide from whatever disaster is happening. Lisa Thomas Editor & Research Blogger [email protected] Don't follow me on social media! (Just kidding, I'm on social media detox) Read the full article
8 notes
·
View notes
Text
Beginners Guide: How to prepare your Home for Energy Disruptions

It's a quiet night at home - if your definition of quiet includes kid mayhem, the dog howling to go out, and you boosting the TV volume ever higher to drown out all this domestic tranquility. Suddenly, darkness. Then, an eerie silence. Finally, the realization that the power is out. It’s surprising how quickly your peace of mind evaporates when something you’ve always counted on disappears with no explanation. Even the shortest energy disruptions can be unsettling, while longer outages are both frightening and dangerous. And once the lights are back on, relief comes with a nagging question; what about next time? Taking Stock before energy disruptions Where does a prepper start? What are the “must-haves?” How long a disruption should you be ready to endure? The Department of Energy provides some basic outage tips, which include: - Having flashlights and radios nearby - Keeping extra batteries and a car phone charger handy - Subscribing to text alerts from your local government - Having a three-day supply of water on hand - Have a water filter in case your tap water becomes contaminated - Keeping your car’s gas tank at least half full - A first aid kit should always be within reach These tips are easy and inexpensive, but to make your home truly ready for the unknown, you need to go deeper. A good first step is to take an inventory of your home. Go room to room and identify everything that you use and ask how long or even if you could do without it during a power disruption, especially one that lasts a while. Could you cook? How would you keep refrigerated and frozen food from spoiling? Will you have water? What about heat? It’s easy to underestimate your needs, starting with food and water. The Red Cross recommends having a two-week supply of non-perishable foods that don’t require refrigeration, cooking, or water. That might seem like a lot until you consider the power grid crisis of 2021 known as the Great Texas Freeze. The Great Texas Freeze lasted more than two weeks, and for much of that time, Texans were freezing in their own homes with no heat, no ability to cook food, and no water because of pipes that burst. Grocery stores ran out of food, and you may have seen the reports of people descending on the San Antonio River Walk to fill trash cans with water. Anyone who suffered through that would likely have preferred to be “over-prepared.” Get Your Emergency Kit Together Once you have a handle on what you need, put together a list of essentials to create your home emergency kit. Some essentials are obvious; candles, flashlights, and plenty of extra batteries. Also important to keep on hand? - A 14-day supply of canned food - A non-electric can opener - A propane or camp stove - At least one large pot for boiling water - Matches or a disposable lighter - Headlamps - Deck of cards and board games to keep the kids occupied - Blankets to keep your family warm and your pipes from freezing - Plastic bags with ties for sanitation - A one-week supply of prescription and over-the-counter medication - Pet food - Duct tape (to fix any emergency supplies that break) - Personal protection in case the SHTF. - Toilet paper (for when the SHTF) Other items may not come as quickly to mind. Something as simple as a thermometer to put in the refrigerator. This will let you know how long the food inside will be safe to eat. An NOAA weather radio connects you to a national network of stations broadcasting non-stop weather reports. Since so many of our needs are powered by electricity, a home generator is hard to keep off any essentials list. Depending on how much you want them to do, home generators can cost anywhere from several hundred to several thousand dollars, but they can be literal lifesavers, keeping your lights on, your appliances running, and your heating and cooling system functioning. Sale DuroMax XP12000EH Generator-12000 Watt Gas or Propane Powered Home Back Up & RV Ready, 50 State Approved Dual Fuel Electric Start Portable Generator, Black and Blue - Powerful DuroMax Engine: the XP12000EH is powered by a DuroMax, 457cc OHV engine. - Dual fuel technology: the ability to run on propane or gasoline allows the freedom and flexibility of fuel choice. Protects your investment by automatically shutting the generator off when it senses that the oil is low - Plenty of power: with 12,000 starting watts and 9, 500 running watts, This unit can handle heavy loads from lights and a refrigerator to a home air conditioner and high amperage power tools. - Maximum power: with DuroMax MX2 technology, get the maximum power from each of the 120 volt receptacle. Choose between operating the generator at both 120 V and 240 V Simultaneously, or at 120 only with full power. - Powering everyone anywhere: like all DuroMax generators, the XP12000EH is EPA and CARB approved For use in all 50 States. $1,099.00 Buy on Amazon It may be tempting to use your generator, grill, or camp stove inside, but that could be a deadly decision since any gas-burning device could fill your home with carbon monoxide or cause a fire. A carbon monoxide detector on each floor is also essential - even if you haven’t lost power. If you don’t think a generator is practical, an array of fully charged power banks can keep critical devices running for some time. Jackery makes a 110-volt charger that will power your refrigerator and everything else indoors safely. Don’t want to spend $1000? A Rockpals 300-Watt portable power station will only set you back about $300. You can also charge your phone and other devices with adaptors that draw power from your car’s battery. The Heat Is On Staying warm during a power outage is more than a matter of comfort. If you don’t have a generator but do have a fireplace or a stove that burns wood or pellets, make sure it’s ready to roll when needed. Keep a month’s supply of firewood in the backyard and a pair of sturdy boots, a warm coat, and a hat near the door, so you’re ready to go out and retrieve it. Investigate non-electric portable heaters that run on propane or kerosene. Again, make sure you choose one labeled for indoor use or you risk carbon monoxide poisoning. An indoor heater comes with an oxygen sensor that will shut the unit off when necessary. Mr. Heater makes a large and smaller units to heat up a living or family room. Either one will do the trick, as long as you remember to close off all the non-essential rooms in your house. Take advantage of passive solar opportunities by opening blinds and curtains to soak up as much sun as possible. You can even enhance your home’s ability to withstand the cold through the use of energy-efficient landscaping. Many people in Texas wished they had planted more evergreen trees as windbreaks! Baby Steps Sometimes the hardest step on a journey is the first one. The good news is it doesn’t have to be a giant step. Your journey toward preparedness can begin as simply as stashing a few coolers around the house. If the power goes out, you can use them to store at least some of your perishable food. You can go even further: - Fill some gallon containers with water and keep them in the freezer (keeping in mind water will expand when frozen, so don’t overfill - Keep a few freezer packs along with a bag of ice in case you need to fill a cooler - Keep all your frozen food grouped together on a bottom shelf to keep it frozen as long as possible - Keep the refrigerator and freezer door closed. Doing so will allow the fridge to stay cold for four hours. A full freezer will retain its temperature for up to two days…longer if you have a frozen gallon jug inside. - The Food and Drug Administration warns you NOT to put any perishable food outside. Even in a blizzard, outdoor temperatures will vary, exposing thawing food to contaminants and animals that may decide to help themselves. Another easy step is to pick up a few barrels for storing water, figuring that each person in your household will need at least a gallon of water per day. This is one you can set and forget because a purification additive will keep stored water drinkable for years. Power Up When the power returns, don’t be too quick to rejoice. The majority of pipes burst during the warm-up and thaw. As you’re prepping your home for energy disruptions, you might as well prepare for flooding and everything else that happened as a result of the power outage. Fortunately, your emergency kit has everything you need. You may want to make sure you store it somewhere high and dry, so you’re ready for any ensuing emergencies. As for that perishable food that’s questionable. When in doubt, throw it out! Perhaps the most important step is to start prepping now. Those neighbors who laugh at you for going overboard will be knocking at your door as soon as the next disaster strikes. You may be surprised at how, with a little planning, panic becomes a peace of mind. About the author - Pat Woodard is a freelance writer who takes occasional breaks from high country hikes in Colorado to chase golf balls, rainbow trout, and full-bodied red wines. He's also a longtime radio and television broadcaster, documentary producer, and runner-up on “Jeopardy.” Read the full article
18 notes
·
View notes
Text
Be Prepared: 5 Emergency Tool Must-Haves

Many disasters that befall people and homes can be mitigated with some basic preparation. Every homeowner and family should have a disaster preparedness kit, complete with food and water, medications, flashlights, batteries, and an emergency tool or two. As it may seem like a bit much, there are some tools that no prepper should be without. Whether you're preparing for a natural disaster, an economic collapse, or just a sudden power outage, there's no way to tell what situation you might find yourself in. The trick to being prepared is not only having them but knowing how to use your tools. You don't have to learn everything about these tools at once; take it one day and one tool at a time. Once you think you've mastered a tool, move on to the next one. There are dozens of other tools that could come in handy during an emergency, but here's a list of the top 5 survival tools no prepper should be without. 1. Fire extinguisher When it comes to emergency tools, the first thing that comes to mind is fire extinguishers. Fire extinguishers are designed to fight small fires in their early stages. However, if a fire becomes large and spreads, you should leave immediately and let the professionals handle it. Take a look at your home and think about which areas can be potential fire hazards. The kitchen may be the most obvious with all of those appliances, but there might be other areas you hadn't considered before. The garage or workshop might have some power tools that could easily spark a fire if they malfunction. Also, check out your outdoor space for bonfire-friendly areas like your patio or deck. The key is to put at least one emergency fire extinguisher within easy reach of these rooms and spaces. A good fire extinguisher is rated for use on multiple fires (class ABC or class ABCD). This way, it can be used on all common household fires, including electrical, liquid, and oil fires. It's also essential to have a fire extinguisher with a pressure gauge to know when it is time to have it recharged. Additionally, replace your fire extinguisher if it's old or hasn't been inspected recently, and make sure everyone in your family knows how to use it properly. You can also put together an emergency "go" bag or kit with a first-aid kit, blankets, and other essentials to help you survive until help arrives in natural disasters, such as wildfires or hurricanes. 2. Power generator The power grid is a vast network of generators, transmission lines, and distribution systems designed to supply your home with electricity. But like any system built by humans, it can fail. The results can be devastating when this happens: Even a brief loss of electricity can lead to significant financial losses for businesses and individuals alike. The U.S. Department of Energy estimates that power outages cost the U.S. economy $20 billion to $55 billion each year. When the lights go out, the average business loses as much as $8,000 per hour in sales. That's why it's so important for anyone who relies on electricity to have an emergency power plan in place — and that means having a good backup power generator at your disposal. As there are plenty of battery-powered lights and portable chargers available on the market today, having a backup generator will allow you to keep important appliances running during an emergency. A generator will help you keep lights on and stay in contact with first responders if an emergency strikes. To determine which type of power generator is right for you, consider your needs and budget. If you have limited space and only need to run one appliance at a time, then an inverter generator will work better for you than a diesel generator. However, a diesel generator will be more suitable if you have more appliances running during an emergency and constantly require more electricity. 3. Water filter & purification system One of the most important things to have in an emergency is clean drinking water. Without food, our bodies can survive for a week or two, but we can only last a few days without water. If a natural disaster hits your area, you may find yourself in dire need of clean drinking water, and depending on the scale of the disaster, it could take weeks before help arrives. This is especially true if you are stranded in the wilderness, where your only water sources may be streams or ponds contaminated with animal feces or other pollutants. It's good to have a purifier water bottle like the big berkey water filter on hand rather than relying solely on iodine tablets and boiling water, which can take up to 15 minutes to kill harmful bacteria. This bottle takes the guesswork of purifying your water by filtering it and releasing iodine into the solution while you drink. 4. Emergency Kit In an emergency, you need to be prepared to take care of yourself and your family. Whether it is a natural disaster, a terrorist attack, or just a car accident, having the right tools can make all the difference. The first step in preparing for an emergency is assembling an emergency kit. A basic kit should contain, at minimum, food, water, and medical supplies. The American Red Cross recommends storing enough supplies for at least three days. You can buy a premade emergency first aid kit at almost any pharmacy or big-box retailer. These are great for on-the-go needs, like when you're camping or hiking. But these premade kits won't be enough if you need to stay put for days or weeks. What should you keep in your home emergency kit? Here are the basics: Food and Water You will need a gallon of water per person per day in your household, both for safe drinking water and sanitation purposes. Be sure to store at least a three-day supply of non-perishable food that does not require cooking or refrigeration to prepare. Include a manual can opener if you are storing canned goods. Medical Supplies In addition to prescription medications, you regularly use, including over-the-counter pain relievers, antacids, and diarrhea medications. You will also want gauze pads and bandages for wounds, antibacterial ointment for cuts and burns, and latex gloves to help prevent infection. Solar-powered lamp A solar-powered lamp is a smart addition to your home emergency kit, especially if you live in an area prone to major power outages. However, it won't provide the same kind of light as a generator, it will help you keep your loved ones safe. Imagine being able to wake up and move around your house without having to use a flashlight. That's the benefit of a solar-powered lamp. Another big benefit is that the lamp is completely portable, so you can take it if the power outage forces you from your home. 5. Multitool A multitool is just like how it sounds - it's a handy tool with multiple functions. Instead of having to lug around a large toolbox everywhere you go, you can keep just one handy tool with you. The best part about having a multitool is that they're versatile and can function as several different tools within one device. Whether you're looking for pliers, scissors, screwdrivers, or wire cutters - there are plenty of options! Something is satisfying about owning a multitool. Being prepared for any situation is empowering, and with a multitool in your pocket, you're ready to meet any challenge head-on. However, as good as they are in theory, many multitools don't always deliver. The edges of the pliers aren't sharp enough to cut through anything, the blades are too flimsy, or the tool doesn't look like it could handle any stress at all. But if you pick up a Leatherman Skeletool, you'll have an emergency tool that can actually get the job done. The appeal of multitools is that they're compact and hence very easy to carry around. If you need to do some light maintenance on your car or open up a delivery package while on the road, they can do the job quite well. They are also more affordable than dedicated toolsets. On the other hand, multitools aren't necessarily very durable. They're generally made of plastic or thin metal, such as aluminum, instead of steel or iron. Their edges are often rounded off rather than sharpened. This means they're not always suitable for more serious tasks like emergency repairs on moving vehicles or dealing with intruders in the house. But ultimately, it is worth a while. Overall, we think that having the right tools can quickly and efficiently improve your chances of getting out of a rut or just a slightly bad mood. However, no one agency can solve all problems; even if you have access to the world's supply of Scotch tape, it doesn't make your commute any shorter. If you have the right tool for the job, you can certainly get by with less hassle and stress. And who knows? That could be just what you need to get through your day. Read the full article
8 notes
·
View notes
Text
An Ultimate Guide to Help Your Kids Cope with a Disaster

Experiencing trauma in the form of natural and other disasters is something no child should go through without adult supervision. Even then, the long-term memories and effects this can manifest in your kids cannot be anticipated. According to Science Daily research, kids can recall memories tracking back to as early as two-and-a-half years of age, whether they’re positive or negative. This means that even when you help your kids cope with a disaster successfully, there may be lingering effects from the experience there to haunt them. Here is what you can do to make overcoming traumatic disasters easier for your kids so that they can fully recover from them as best as possible. Types of Disasters to Prepare your Kids For Despite what most people might lead you to believe, disasters are a real possibility and can disrupt your life on a fundamental level. According to Our World in Data, an average of 60,000 people lost their lives to natural disasters worldwide yearly. They affect low-income families and areas the most due to how unprepared infrastructure and logistics in most of those places are. While you shouldn’t fearmonger and have your kids be afraid to walk to school or take a bike to their friend’s house, some preparation is still a good idea. Here are some of the disasters which can happen unexpectedly and affect your kids in long-term: - Floods - Fires - Wildfires - Earthquakes - Tornadoes - Hurricanes - Droughts Depending on where you live from a geographic and topographic point of view, some disasters are more likely to happen than others. Helping your kids not only during but before any actual disaster happens can help them overcome the ordeal more successfully. Here’s how you can do it and have them be grateful for the effort you put into making them feel safer. What Can you Do to Help Your Kids Cope with a Disaster? Limit your Kids’ News Exposure Once disaster hits, you’ll want to stay as informed as possible about the current situation, relief efforts, evacuation routes, etc. However, your child doesn’t need to hear any of that. News stations can often be alarmists and can blow things out of proportion for the sake of ratings. Children are very susceptible to trusting the TV, especially without adult supervision. Instead of having your child listen to depressing news coverage of the disaster you’re facing, divert their eyes to more positive multimedia. Cartoons, movies, and any other form of media you may have on your smartphone or tablet device are a much better coping mechanism for kids. Filter the information you hear from news sources and only feed them the most important points based on your judgment. Help your Kids Exercise Regularly Many disasters will lead to you spending days or weeks in a shelter until help arrives or the situation deescalates. This can mean days and weeks of sitting in one place with cramped muscles and a general lack of physical activity. Don’t let your kids spend days slouched over a book or a tablet and help them exercise a bit each day. Short exercises like doing squats, push-ups, and stretching each morning can work wonders for everyone’s mood. You can make it a family habit to exercise every day to keep everyone’s spirits up and so that everyone is as fit as they can be considered. This will help your kids’ psychological health as much as it will help them feel physically empowered. Pack Your Kids’ Favorite Foods ahead of Time Sometimes, all your kids will need to feel better is some comfort food. Snacks like cereal bars, chips, pretzels, or candy bars are easy to store and last a long time if you choose the right brands. Ask your kids about which snacks they love the most and store them away for a rainy day. If a disaster hits, you’ll be able to give your kids something to snack on so that they feel at least a bit better. Some other snacks you can try getting a hold of include gummy bears, energy bars, dried fruits, nuts, etc. Make sure to pack them away properly so that they don’t go bad in a year or two at least. After all, you never know when exactly something might go wrong – all you can do is prepare on time. Make Time to Play With your Kids Whether your kids are toddlers, kindergarten age, or college students, it’s essential that they feel your presence during a disaster. There are many simple ways for you to play with your kids that don’t take up a lot of time or physical space. You can pack away a deck of cards, a simple board game, or some dice away with your disaster supplies. Think of what your kids might be into and look for toys or games which don’t require electricity to play. These games can help you and your kids pass the time during a disaster and help everyone in the shelter feel better about your situation. Not only that, but your kids will come out of it far less scathed than they would if you focused solely on day-to-day disaster survival. Keep Kids Occupied with Reading and Learning Most of the time you won’t be able to tell when the disaster will end. This means you might spend prolonged periods in a shelter with your kids and they might get bored of it. You can circumvent this by packing a few picture books, coloring books, and books in general depending on your kids’ age. If your kids are in college, tell them to pack some of their books along so they can keep themselves occupied. College students can get college papers for sale from a reliable writing platform and get their assignments done on time even without a computer. Reading, learning, writing, and other creative exercises are great coping mechanisms for kids during disasters. Talk to your Kids Throughout the Disaster As an adult, you’ll be overwhelmed with trying to make ends meet during a disaster. Keeping everyone safe, well-fed, healthy, and dry will be some of your most pressing worries. However, your kids’ mental wellbeing should be among those top-priority responsibilities. Your kids may feel isolated, scared, and helpless during disasters – you must talk to them. Ask them about their feelings, about what they’ll do after the disaster, and what surprised them the most about the disaster. Ask them for their opinions on what to do next even though they may be too young to offer any objective help. Include them even in the most minuscule tasks and they’ll appreciate it, especially when it comes to them coping with the hardships of a disaster. Help your Kids Maintain a Daily Schedule If the disaster you’re experiencing lasts for longer than a week, start organizing a daily schedule for your kids. Kids are used to going to school, doing homework, and tending to chores around the house. They’re not used to sitting in a shelter and waiting for something to happen. Instead of being content with being safe, try to animate your kids somehow with daily tasks and schedules. Brush teeth together, have lunch as a group, and clean up your space a bit every day. It’s also a good idea for your kids to know what day it is exactly and how long they’ve been in a disaster event to help them contextualize their experience. Daily schedules can help not only your kids but you as well, so try to organize your everyday lives as much as you can. Consider Therapy for You and Your Kids Once the disaster passes, it will be time for you and your kids to heal and get back to your feet. Relief efforts will help you recover from a logistical point of view but you still need to take your and your kids’ mental wellbeing into account. Therapy can be a great mechanism for kids to open up about their experiences during the disaster. It can facilitate a safe discussion space for them where you, your kids, and a therapist can talk about everything. Getting some therapy for your kids after a disaster isn’t anything derogatory or taboo – it can genuinely help them recover. Don’t let negative emotions, fears, and doubts fester in your kids’ minds and assume the best – talk to them about group therapy and help them express their feelings. Overcoming Disaster According to ECLKC studies on childhood trauma, children who experience Adverse Childhood Experiences (ACEs) risk running into health, drug, and learning-related issues if they’re not helped on time. ACEs in the form of natural or other disasters can severely hinder your kids’ mental and physical wellbeing if left unchecked. While preparing supplies such as water, dry foods, and securing a safe shelter is pivotal, so is your kids’ feeling of safety. Make sure there are plenty of toys, multimedia materials, and colorful clothes, accessories, and books available in your shelter. Depending on your kids’ age, they may even be able to help you prepare certain items and provisions, making them feel better about the prospects of overcoming these hardships. Do everything you can to alleviate your kids’ experience and help them cope. Young people are fighters and they’ll overcome any disaster given the support they need from you as their parents. Read the full article
4 notes
·
View notes
Text
Power tips for off-grid living

No matter where you live, there are a number of things you can do right now to get ready for the off-grid life. One of the most important things to consider when living off-grid is power. If you live far from grid-connected resources, power can be pretty tough to come by, making it one of the top priorities. To get you started, here are some helpful power tips for off-grid living. What is off-grid living? An off-grid residence is one that is disconnected from the electrical grid and does not have a connection to a town or regional water supply. Additionally, you will be unable to use any of the public facilities in your area, including garbage disposal. A couple of decades ago, existing without such conveniences meant living a solitary life, completely shut out of the outside world. Off-the-grid living was characterized by living without electricity, water, or phone service, which made life extremely difficult. However, in the 21st century, living off the grid may be a very pleasant and gratifying lifestyle option. Living off-grid in 2022 Being disconnected from the main power grid nowadays doesn’t mean you have to live without electricity. With solar, wind, and hydropower, you can meet your power needs or even store the electricity in batteries for later use or emergency. Batteries such as Ecoflow Delta have made life easier for many people living a self-sufficient lifestyle. Additionally, if you insulate your home the best way possible, you wouldn’t have to spend as much power on heating and cooling systems. When it comes to water, however, larger, lighter, and simpler to construct water storage tanks have replaced the heavy concrete and metal tanks of the past. Furthermore, compared to traditional septic systems, composting toilets that are currently popular are substantially less of a hassle. Living off-the-grid doesn’t mean you have to be a hermit. Thankfully, we are able to contact people all around the globe because of satellite and wireless technologies. Sale Vont 4 Pack LED Camping Lantern, LED Lanterns, Suitable Survival Kits for Hurricane, Emergency Light for Storm, Outages, Outdoor Portable Lanterns, Black, Collapsible, (Batteries Included) - BRIGHT & LASTING - Equipped with 30 crazy bright LEDs, this compact lantern cuts through 360 degrees of darkness on the stormiest, dimmest nights. Easily lights up the entire tent or room. - COMPACT & LIGHTWEIGHT - Collapsible design that reduces or increases the light as you collapse or expand the lantern. When collapsed it's as small as your phone. Easily fits in your backpack or emergency kit. - WATERPROOF - Constructed with aircraft grade materials: your lantern is able to survive a 10-foot drop and being temporarily submerged under water. - ORIGINAL PATENTED VERSION - We hand-craft each lantern with the strict quality control to give you the best gear you deserve. Do not equip yourself with inferior lanterns. - LIFETIME WARRANTY - You can rest in knowing that this camping lantern is of utmost quality. Warranted for life, it is covered against loss, theft, and defects in materials and workmanship for as long as you own the product. CE/ RoHS/ EMC certified. $16.65 Buy on Amazon These days, many more individuals are opting for off-grid lives, and it's fascinating to see how even houses with access to electricity and water from the grid have begun to include design features often found in off-grid houses, such as passive solar home design. Thoroughly research off-grid living and your options This is a piece of more general advice regarding off-grid living. Start learning as much as you can about it right now. One of the benefits of mainstream society is the vast amount of information available, so why don’t you use it to your advantage. Becoming completely self-sufficient and living off-the-grid is quite a big endeavor that you need to be thoroughly prepared for. The more knowledgeable you are the fewer issues you’ll have along the way. Plus, if something unexpected transpires, for example, your power shuts down, you’ll know how to deal with it more efficiently. Therefore, learn how to get started homesteading right away if you're serious about becoming self-sufficient. Even if you currently live in the center of a big city, there are ways for you to begin developing your homesteading and bushcraft abilities. Solar panels as a power source Installing home solar panels requires a fair amount of electrical know-how. If you are unable to install or run the system, look for a local handyman who can assist you. It's important to keep an eye on your home solar panels, particularly if you have a modest system and know that you'll have some overcast or wet days in the future. There are multiple mounting options for solar panels. Sale Jackery SolarSaga 100W Portable Solar Panel for Explorer 240/300/500/1000/1500 Power Station, Foldable US Solar Cell Solar Charger with USB Outputs for Phones (Can't Charge Explorer 440/ PowerPro) - EASY SETUP & KICKSTAND INCLUDED: The Solar Saga 100 features 2 kickstands that can be placed firmly on any surface ground. With just a few seconds of setup, you can start soaking energy from the sun for your Jackery power station. The TPE rubber handle allows you to carry around easily when taking off-grid adventures. - HIGHER ENERGY CONVERSION RATE: Covered by monocrystalline silicon solar cells, the solar panel adopts multi-layered cell technology to generate energy from the sunlight and perform better with higher conversion efficiency that up to 23% than other conventional panels. - DURABLE & SPLASH-PROOF: The ETFE-laminated case is durable enough to extend the lifespan of the solar panel. It is IP65 water-resistant that will protect from water splashing (Do not place it under the rain, or to soak in water). The zippers on the pocket can hold the power cords, and cover the power port. - COMPATIBLE & VERSATILE: This solar panel is compatible with Jackery Explorer 300/500/1000/1500 power station (sold separately), ideal for off-grid camping and unexpected power outage. Solar Saga 100 features 1* USB-C(5V,3A) output port and 1* USB-A(5V, 2.4A) output port to charge 2 small devices directly. - WHAT YOU GET: 1*Jackery SolarSaga 100 Solar Panel. $299.00 Buy on Amazon One of the most convenient ones is the ground-mounted method, which is as straightforward as it sounds - you just mount the panels on the rack in the ground. However, the most popular way of installing solar panels is to fix them on your roof which is a great way to take advantage of clear skies. The only disadvantage they have is that they’re a bit harder to maintain since it can be tougher to reach them. Cleaning your solar panels from the snow can also be a hassle, so keep that in mind. https://www.youtube.com/watch?v=jSa1tvrrFZg&t=5s Don’t rely on only one source of power Many off-gridders rely on solar power, but sometimes you just won’t get that much sun, or your solar panels will run into an issue. Even if you don’t receive a lot of wind at your location, it could be beneficial to install a wind turbine next to more popular solar panels. It would only function as a backup, collecting power during seasonal storms and when a storm passes through, you’ll be able to obtain some electricity that will be useful in the event of an emergency. When you have two sources of electricity, wind and solar, you’ll have a higher level of security. Know that when the sun isn't shining, it's possible that the wind could be blowing. Don’t waste the power on heating Heat production is always a huge issue while living off-grid. Most difficulties can be solved with solar power, but if you depend only on the panels and deep cell batteries, you won't be able to make your entire home warm and cozy during cold winters. Maintaining a comfortable temperature in your house throughout the winter months should be one of your primary goals. In your primary living space, have a slow-burning wood fire. This way you’ll keep your main living room warm and have zero power expenditure. In order for the heat to stay inside your house, it’s essential to have proper insulation for both the walls and the roof. Another idea is to have huge glass doors and windows facing the direction of the sun, which provides passive heat transfer. The location and size of the windows are truly one of the most important things you should discuss with your architect and contractor during the construction process. Furthermore, don't allow evergreen trees to obstruct your winter light. Designing your garden in such a way will make your house much colder since it’s in the shade. Consider the cost Before you set off into the journey of off-grid living, you need to take the cost of off-grid power into consideration. Oftentimes self-generation of electricity may be more expensive than using public utilities. Installing and maintaining solar panels and batteries is expensive, as is running windmills or generators on gasoline or oil. Off-grid power generation might cost a lot of money, especially in the beginning. You may save some money by making sure to have routine oil and filter changes on your generators. Moreover, the cost of solar panels has decreased significantly during the last several years. When purchasing in bulk, a 300-watt panel may cost as little as $75. Off-grid life necessitates a large investment in batteries, which may be pricey. They must be able to be recharged several times without losing their overall capacity which is why it’s essential to take care of them properly. If you rely on wind power too, you should know that windmills are generally inexpensive but they don’t generate as much power. Have at least one power generator Having your power sources dying on you can be quite stressful which is why it’s crucial to always have multiple backup plans. True off-grid living connoisseurs don’t simply rely on natural power sources, but also own a power generator. There are a variety of generators to choose from and they’re characterized by running on different types of fuels, including propane, diesel, and gas. Of course, there are advantages and disadvantages to each. For the most part, propane generators are quieter but harder to come by. Also, their price tag may easily reach tens of thousands of dollars. Furthermore, diesel generators have a tendency to last longer than other types of generators. Durostar DS12000EH Portable Generator, Red/Black - POWERFUL DUROSTAR ENGINE: The DS12000EH is powered by a DuroStar 18 HP 457cc OHV engine with automatic low oil shutoff; Fuel Capacity: 8.3 Gallons; Noise Level: 74dB - PLENTY OF POWER: With 12,000 peak watts and 9,500 running watts, this unit is a workhorse that provides plenty of power to handle multiple jobs from powering high voltage appliances to heavy duty power tools - POWER PANEL: Includes a selection of outlets for maximum compatibility in your applications including: 2 120V household outlets, 1 120V 30A twist lock outlet, 1 120/240V 30A twist lock outlet and 1 120/240V 50A heavy duty outlet; Also includes a voltmeter and 12V DC charging posts for charging external batteries - MAXIMUM POWER: With DuroStar MX2 technology, get the maximum power from each of the 120V outlets; Choose between operating the generator at both 120V and 240V simultaneously, or at 120V only with full power - POWERING EVERYONE ANYWHERE: Like all DuroStar generators, the DS12000EH is EPA and CARB approved for use in all 50 states $1,399.00 Buy on Amazon The majority of diesel generators are designed to be permanently installed in a single location. However, this makes them less mobile than gas generators. They may also be quite expensive, costing upwards of a thousand dollars. Don’t forget you’ll need to purchase a diesel fuel storage tank too, adding to the overall cost. Finally, in general, gas generators are less costly than other types of generators. Although having a built-in tank is useful, don't forget to replenish it on a frequent basis. Get direct current lights and appliances Lighting and appliances that can use direct current are essential. Most off-grid homes rely on batteries that provide direct current (DC) electricity. However, everyday appliances use AC, or alternating current normally supplied by the electrical plugs in the suburbs. If you generate your own power you have to rely on an inverter so you may use ordinary home appliances. Unfortunately, running an inverter consumes a significant amount of power. A lot of electricity can be saved by shutting off the inverter when it's not required, but that means DC power must be used for anything that is always operating. When the sun isn't shining, it's best to use DC power from the batteries for things like lighting and the refrigerator. Finding DC appliances such as freezers and refrigerators won't be a hassle, but finding DC lighting fixtures may be an issue. Thus, it's a good idea to put in light fixtures that are built for boats or RVs since they use DC electricity. Read the full article
14 notes
·
View notes