
proto-purple-sword
check out my new blog!
moved to purple-sword.tumblr.com
16144 posts
Don't wanna be here? Send us removal request.
Last Seen Blogs

berkeleysp
Untitled

imbi-butnotshy
Become Yourself

sallyoneilllove
Behind The Curtain

mplapksety
Untitled

vousmevoyez1424
1994
Text
check out the new page!
You now can find me in https://purple-sword.tumblr.com/ . see ya!
35 notes
·
View notes
Text
the weird thing is, when I view my job as some sort of background extra it becomes much more palatable. people go to a library and see me shelving a stack of books in my cardigan and glasses (now with glasses chain!) and they go “yeah, that’s exactly right. that’s how it’s supposed to be in a library.” and for some reason, that’s comforting? the work is whatever, and the customers are customers, but sometimes it feels like I’m being paid just to make sure this places looks right, and I find that very fun.
101K notes
·
View notes
Photo

192K notes
·
View notes
Text
fucking goldfish tiktok made me cry bro
172K notes
·
View notes

Video
daaamn look at his hair, he's gorgeous
Every time I go downstairs to the laundry room, this pigeon tries to seduce me.
531K notes
·
View notes

Text
Furby Tutorial Masterpost
If you want anything deleted, added, or fixed let me know and I’ll be more than willing to do so! If you use any of the tumblr tutorials, or find them helpful, please consider reblogging them from the source! Good luck with your furbs :))
Continuar lendo
8K notes
·
View notes
Text


This is her!!! Her name is Rosie and she’s a big sweetheart. I’m making her a girlfriend soon!! I’ll be sure to update if you’re interested, this took nearly all day (and then some) since she was my first and all, but I couldn’t have done it without one of my close irl friends 💕
1K notes
·
View notes

Text


Lesbian Furbys in love 🌈💖!!
Beach date + yummy banana split
630 notes
·
View notes
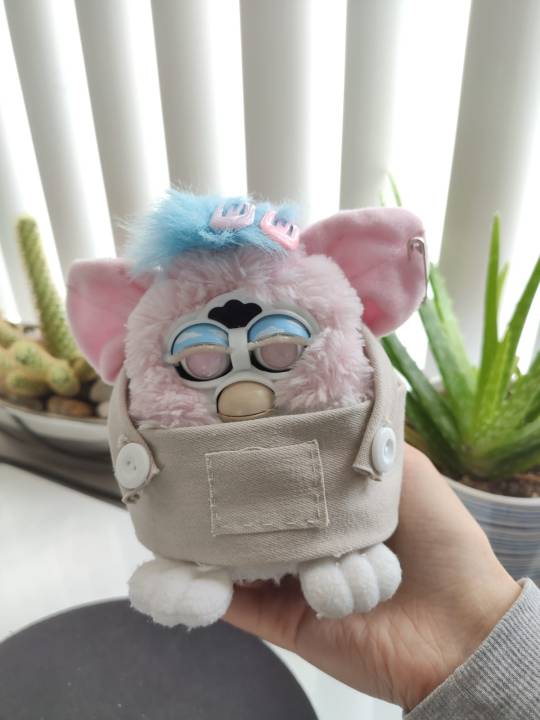
Text
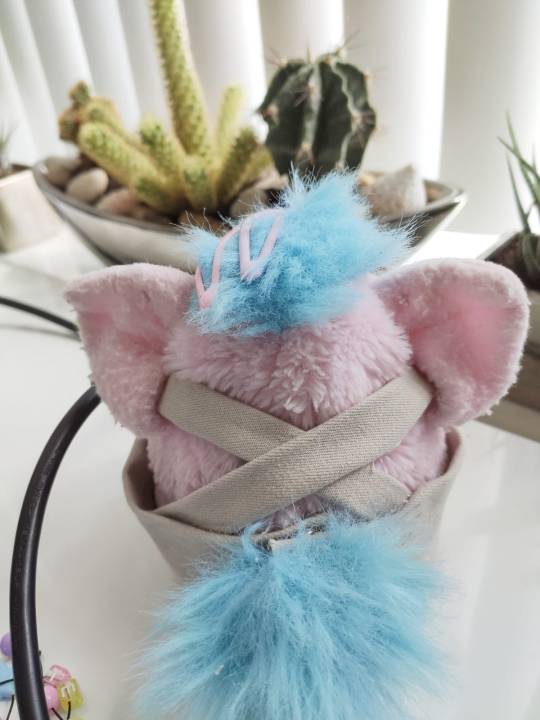
furby dungarees tutorial!
this is a tutorial for furby dungarees! these are suitable for any furby that has doesn’t have it’s ears entirely attached to the body (the straps go trough the ears!), that’s also why i don’t have any exact measurements in this tutorial.
i tried my best to make this tutorial as clear as possible, but if you have any questions, feel free to comment them of message me!
also a disclaimer: i am very new to sewing, and all the techniques. feel free to use other techniques if you think they’ll work better!
for this tutorial you will need:
- any fabric
- scissors
- needle and thread or sewing machine
- two buttons
- 2 sets of snaps (or buttons if you don’t have snaps)
- your furby
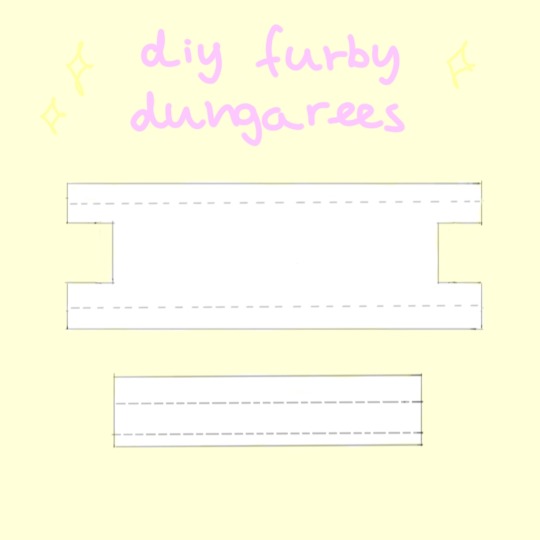
let’s start with the body of the dungarees:
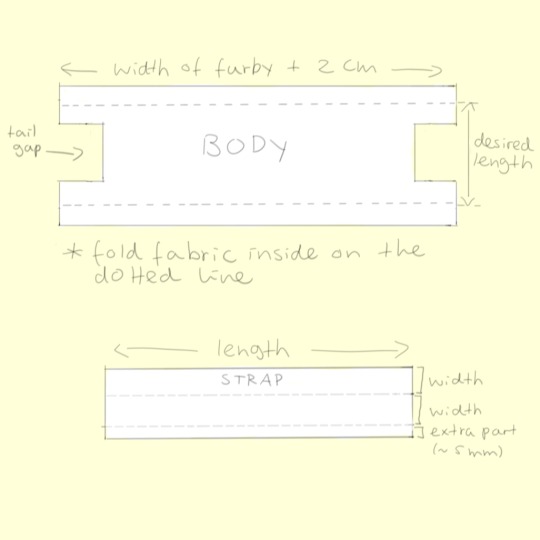
the width of the body is the width of your furby + roughly 2 centimetres,
the fabric should overlap and you need this extra bit of fabric to attach snaps to later on, this is how we will close our dungarees in the back.
you can decide the length of your body, mine cover the entire belly of my furby (from the peets to just below the beak), but you could make it shorter (or longer) to your lliking. make sure to add around 1 cm of extra fabric to each side, we will fold this inside later, for a nice seam.
the body piece will have a gap on both sides, this is where the tail of your furby will poke out. try cutting a small part out of the fabric on both sides first and see how it fits. if the gap needs to be bigger, keep cutting small pieces off until it fits perfectly around the tail. if your furby has manes instead, you can skip this part.
*** i would recommend finishing the body first, before starting the straps***
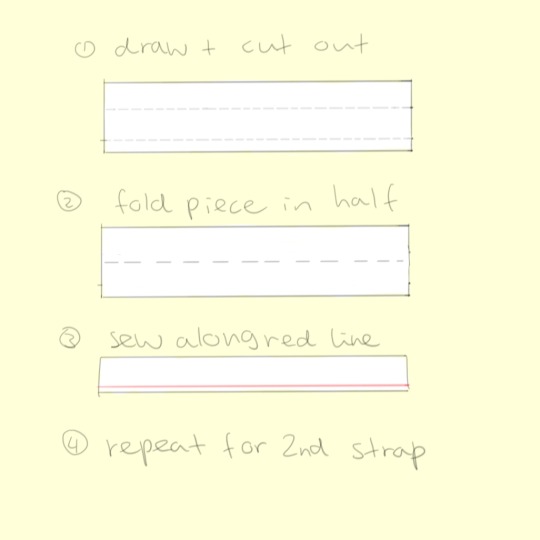
for the straps, let’s start with the width. i chose a width of 1 cm. but because we will fold the fabric in half, to create a sturdy and smooth strap, the total width of our fabric will be twice your desired width + around 5mm of extra fabric.
so that means mine are 2,5 cm total.
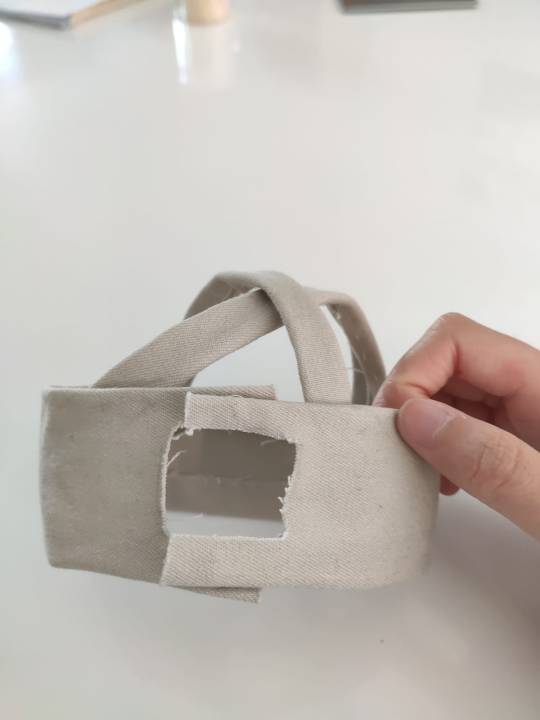
the length of the strap will be a little tricky to measure. with a measuring tape, roughly measure from the spot where you want the straps to start and end. (this might be easier if you make the body first and put it on while measuring). for reference, i included a picture of how the straps should look in the back.
make sure you make the straps longer than needed.
the next step will depend on your fabric: if you have a soft and thin fabric, fold the cut out piece with the wrong side outwards. after stitching along the length with a running stitch you will be able to turn it inside out, this way you won’t be able to see the stitching.
if you have a sturdy fabric like i do, sadly you won’t be able to turn it inside out. you’ll have to fold your piece with the right side outwards, and stitch along the length.
fold the fabric so you can’t see the seam / stitching.
after you’ve cut out the body, fold on the dotted lines and make a crease.
now it’s time to add snaps (or buttons) to the back. (on the image i accidentally wrote studs instead of snaps oops)
this part might be very confusing, so i’ll try my best to explain. lay your fabric down, with the front facing up and unfold it. on the left side, attach one side of the snaps in the same position as in the drawing.
the other side of the snaps have to be attached to the back of the fabric (aka the wrong side). these will go on the part that will be folded over, like shown in the drawing.
after the snaps are attached, fold the fabric again on the crease, and when you close the dungarees with the snaps, it should look like the picture attached further below.
now, it’s time to attach buttons to the front of the dungarees. this is how you’ll be able to put the straps on and take them off.
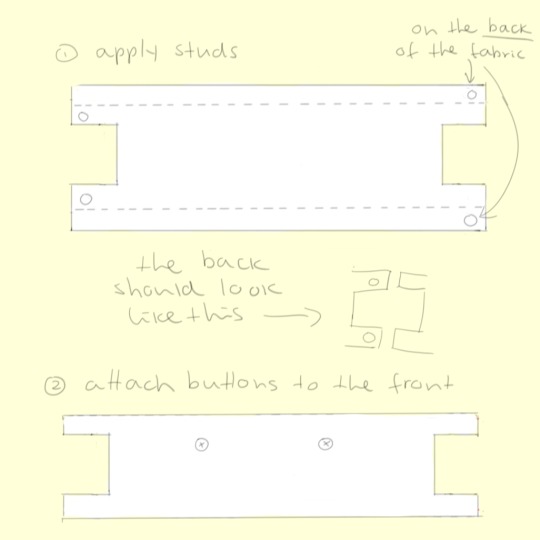
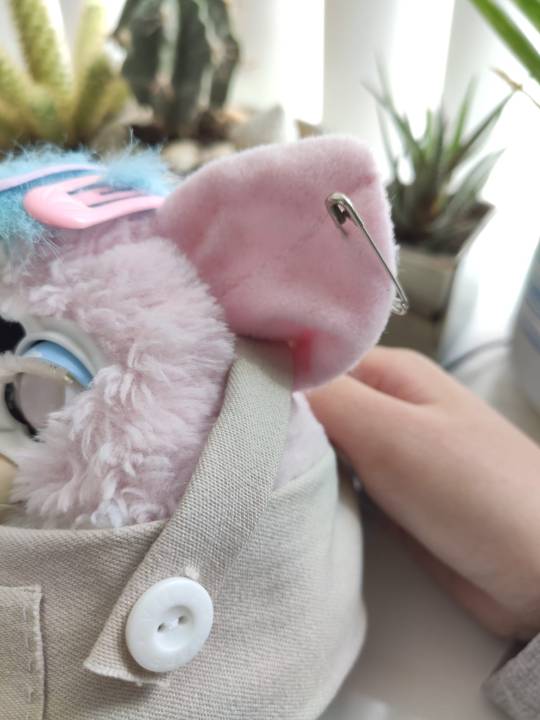
make a hole in at the end of the straps, and put the buttons trough the holes.
it should look like the picture below.
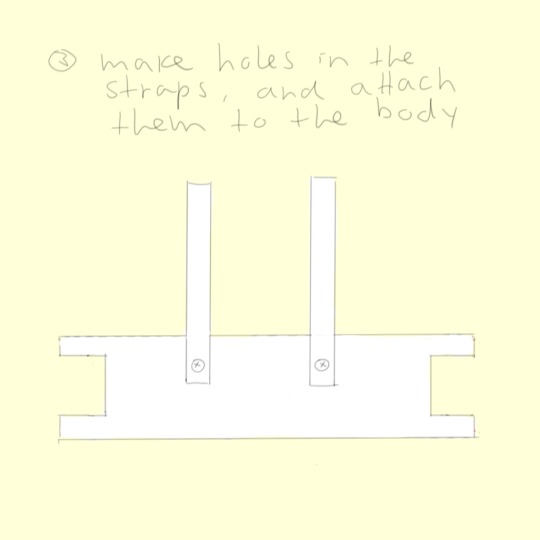
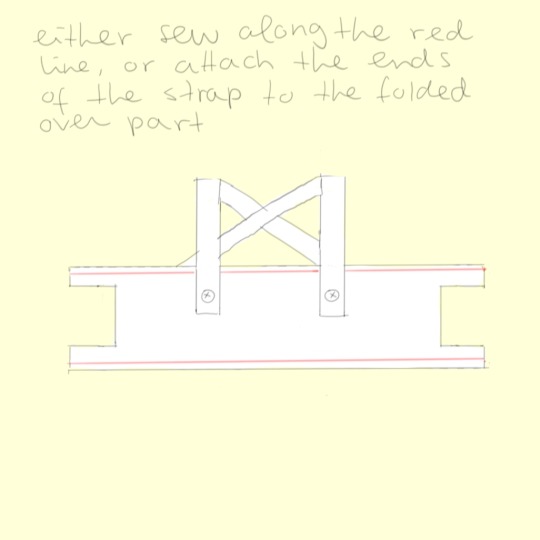
now put the dungarees on your furby and put the straps trough your furby’s ears. tuck the end of the straps under the body piece, in the place you want and pin them down.
now you can either sew along the red line as shown in the picture below or, attach them to the folded over part. (i chose not to sew along the line as i don’t know how to use a sewing machine and my hand stitching isn’t the neatest.)
add a lil pocket to your dungarees if you want to, and they should be done!
i am not the best at explaining so i’m sorry if this tutorial was messy / hard to follow. feel free to ask any questions you have or leave feedback! if you give this tutorial a try, let me know how yours turned out!
love, jessy, monstertruck and bong water <3
785 notes
·
View notes


Text


Mist the tie dye dragon is here!! 🐉
With posable wings and tail they’re probable my most ambitious furby yet and I adore how they came out!!!
1K notes
·
View notes