
Don't wanna be here? Send us removal request.
Statistics
We looked inside some of the posts by psresourcesseb and here's what we found interesting.
Average Info
Notes Per Post
86K
Likes Per Post
55K
Reblog Per Post
30K
Reply Per Post
29
Time Between Posts
2 months
Number of Posts By Type
Note
1
Photo
11
Video
1
Text
4
Last Seen Tumblr Blogs


Fun Fact
Tumblr is used by 21% of adults online aged 18-29 years.
Note
how do you reduce the gif size while keeping the same number of frames? I see that you always keep your big gifs as 60-ish frames and they have good quality.
warning: this is gonna be a long post.
there are several ways to reduce your gif size without cutting the frame numbers. aside from sharpening style, you can downsize them by selecting the right options in the save window.
first, this is the settings that take the biggest gif size (click to zoom): Adaptive + Pattern. I always use this because it makes the gifs flawless, nothing can top this.

this is the 2nd biggest: Selective + Pattern.

third, this is the setting that is most used by gif makers (I guess). i mean most of gif makers will set "diffusion" for their gifs:

but this settings have a problem, if the lighting is too contrasted there will be stains (like enamel flaws) as you can see in the picture.
so these are the most common ways to reduce gif size, but there is one method as well, you can avoid the "stains" by adding "noise".
Go to filter -> noise -> add noise, there will be 2 settings, it depends on you to choose (i added 5 for you to see the difference, i think 2 or 2.5 is alright, anw, your choice)


once you add noise, you don't have to worry about the settings in the save window anymore, just choose the "no dither" option, the gif will look fine and the file is not very big.
like this (but still, very tiny tiny stains will remain if the lighting is too contrasted but that's the source quality itself, you can't change it):

BUT, all of this can't help you then reducing the frame numbers is recommended :D
44 notes
·
View notes
Photo
Back due to popular demand!! Here’s a reupload of my gif making tutorial! 🤗After my blog @stefani-germanotta/@pixelrey was terminated by tumblr for copyright reasons, this tutorial was deleted along with it because it had a “keep reading” cut :( That really bummed me out because I spent HOURS working on this. BUT I recently managed to find an archive of the tutorial (thanks to the wayback machine archive site - a LIFESAVER), so here it is again! ♥︎ So without further ado, here’s a tutorial on how I make my gifs (including how to take screencaps) 🎉 I noticed that it’s kind of hard to find a thorough step-by-step tutorial out there so I hope this helps!
You’ll need:
Photoshop CS6 or higher. I use PS CC 2017, but as long as you have the video timeline feature you should be fine.
A video player that takes continuous screenshots.
I personally use mpv on my mac and gom player on my pc.
Keep reading
3K notes
·
View notes
Video
Here’s my tutorial on how to install MPV player on a pc. MPV player is my all time favorite video player and the best screencapping program for gifmaking in my experience. It’s minimalistic, takes sequential hq screencaps easily with just a keyboard shortcut, and has no ads. Only problem is, the instillation can be a bit confusing on the pc because you install it through a command line and the settings for screencapping are located in a .config text file instead of a menu. BUT it’s super easy to set up and you never have to bother with the settings text file again after that. This whole installation takes no longer than 5 minutes.
DOWNLOADS
⭐ MPV installer - 64-bit (x) or 32-bit (x). Choose one according to what your computer runs (don’t know if you’re running 64-bit or 32-bit Windows? Click here.)
⭐ The MPV.conf file (x). You could make your own but here’s mine. You just have to change the text that says where the screencap folder is located like in the video.
OTHER LINKS
MPV keyboard shortcuts (x). They’re easy to memorize and this is really helpful for beginners!
My gifmaking tutorial which includes how to install MPV on macs
NOTE: If you can’t find the AppData folder, it’s probably hidden. Go to View and then check off “Hidden items”

UPDATE 6/23/20 ⚠️
I’ve gotten an ask about this problem 3 times since I’ve uploaded this tutorial, so I thought I’d add this in. If you are experiencing duplicate and/or missing frames in mpv, it is a glitch with the latest version of mpv. download an older version like 0.29.0. this happened to me on my mac and downloading an older version fixed the problem.
964 notes
·
View notes
Photo

As requested by a recent anon, here is a quick tutorial on my gifmaking process! I will be using the newest version of Photoshop as of November 2022 to make my gifs, as well as mpv to take screencaps before importing to Photoshop - I recommend this tutorial to get started on installing mpv and take screencaps of the scene you want to gif.
Keep reading
171 notes
·
View notes

Photo

Tutorials included: Making a gif header for tumblr mobile (basic adjustment layers + adding a header template/creating your own border)
Knowledge needed: basic PS skills (how to make a gif, sharpening), I am using PS 2021 but I am sure this tutorial works fine with other photoshops!
+ two El Hopper Gif Headers that you can use!
Keep reading
481 notes
·
View notes
Photo

GIF ICON & HEADER TUTORIAL
I was asked to do a tutorial on my old mobile layouts where I had a gif as both my icon and header, so here we are! I also uploaded a PSD here that you can use either as a template or as a guide/reference point in case you get lost somewhere along the way.
You’ll need Photoshop and basic knowledge on how to make gifs using the timeline.
Keep reading
2K notes
·
View notes
Text
Jazz Up Your Gif Headers
Learn how to add a ripped paper edge, an outward curve edge and an inward curve edge to your gif headers. Once you learn how to do these, you can jazz up your gif headers any way you want!
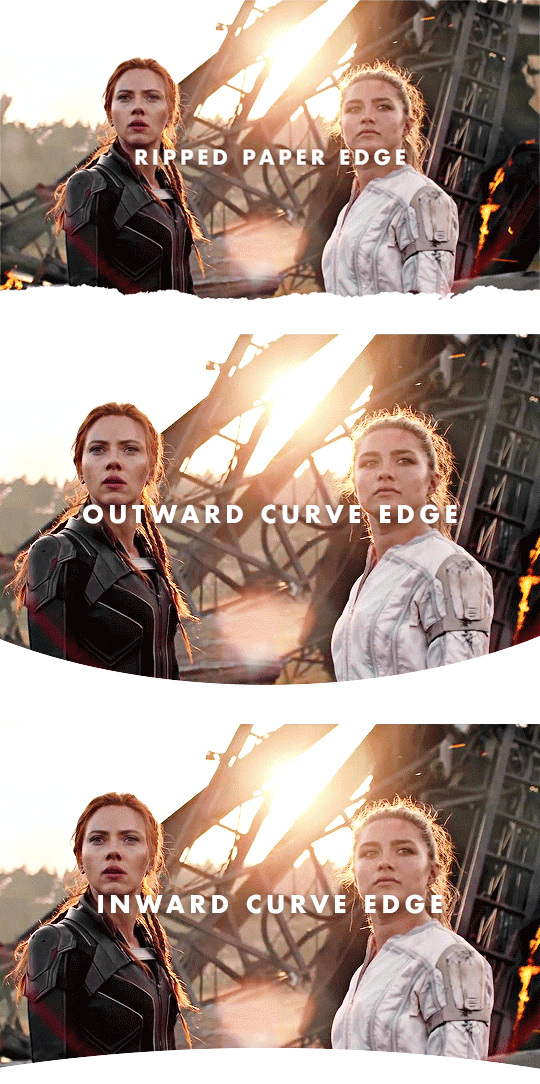
↓ LEARN HOW TO DO THESE UNDER THE CUT ↓
[1] Create your gif
Gif dimensions: 640px x 360px
Make the gif like you normally would, apply coloring, sharpen, etc. If you don’t know how to make gifs yet, click here for some great tutorials.
Assuming you’ve already converted into a Video Timeline and your layers into a Smart Object in your gif making process, let’s proceed.
[2] Make sure the playhead is at the start of the timeline
If your playhead isn’t at the start of the timeline, do this before adding new layers (which are the next steps) so the new layers will be aligned with your gif and coloring layers as demonstrated below:

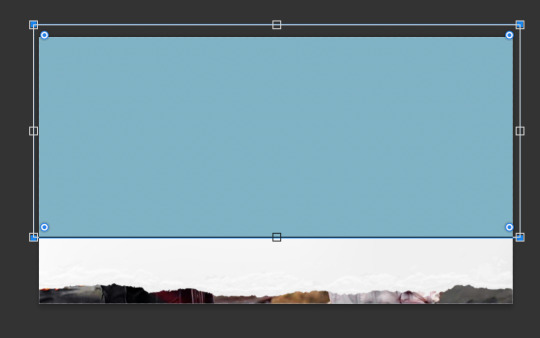
[Option A] Apply the ripped paper texture
You can download the texture I used here, which I got from freepik. I've converted some of them into png files for those who don't have Adobe Illustrator.
[A1] Place the texture on your gif file then move it near the bottom edge of your gif. To place the texture, go to File > Place or Place Embedded...
NOTE: If you're using the texture I've provided, just resize it accordingly and skip the next step.
[A2] Select the Rectangle tool (shortcut key: U) and draw a shape on the top part of your gif that isn't covered by the texture.
NOTE: The size and color of the shape doesn't matter, as long as it doesn't cover the ripped edges part of the texture.
[A3] Group your texture and shape layers

To do this:
Select both layers
Click the "Create a group" button which looks like a folder at the bottom of the Layers window
Drag the group layer to the bottom. It should be below the gif layer now.
NOTE: If you're using the texture I've provided, just skip the group part and drag the layer to the bottom, below the gif layer.
[A4] Create Clipping Mask
To do this, right-click on your gif layer and find Create Clipping Mask.
After doing this, there should be an arrow icon "↴" on your gif layer pointing down to the group/pointing down to the texture layer you're using the texture I've provided.
[A5] Add a background color
To do this, add a Color Fill/Solid Color... layer as demonstrated below:

Select your preferred color. The color should be the same as your mobile theme's background color.
Next, Drag the group layer to the bottom the same way we did in [A3]. It should be below the group layer now/below the texture layer if you're using the texture I've provided.
Next you'll learn how to add a curved edge to your gif header.
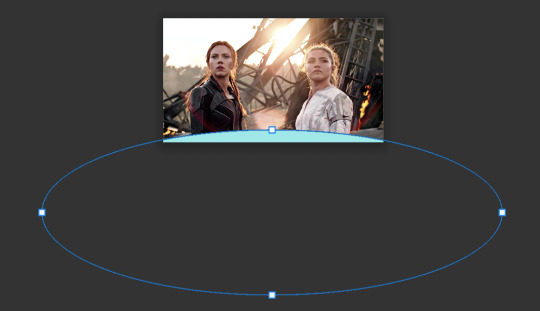
[Option B] Apply an outward curve edge
[B1] Select the Ellipse tool
If you can't find it, find the Rectangle tool first, do a long press on the button and this will come out:

NOTE: If you’re more comfortable/experienced with the pen tool, you can use that instead to create the shape.
[B2] Draw a shape over your gif like this:

NOTE: The color of the shape doesn't matter. You can resize, move and position the ellipse to your liking afterwards.
[B3] Drag the Ellipse layer to the bottom the same way we did in [A3]. It should be below the gif layer now.
[B4] Create Clipping Mask
To do this, right-click on your gif layer and find Create Clipping Mask.
After doing this, there should be an arrow icon "↴" on your gif layer pointing down to the Ellipse layer.
[B5] Add a background color
Do the same thing we did in [A5]. This layer should be below the Ellipse layer.
If you want your curve to go inwards...
[Option C] Apply an inward curve edge
[C1] Follow steps [B1] to [B2]
NOTE: If you’re more comfortable/experienced with the pen tool, you can skip this step and use the pen tool instead to create the shape then go directly to step C7.
I personally prefer the Ellipse tool because I want it to be a perfectly curved edge (with the even sides when I center it) 😂
[C2] Move the shape downwards and resize it to reach the corners.
[C3] Select the shape
To do this, Ctrl-click (Windows) / command-click (Mac) the thumbnail of the Ellipse layer which I've highlighted in blue below:

There should be marching ants/dashed lines around the shape on your gif now.
[C4] Add a Solid Color layer
To do this, check out [A5]. The marching ants should disappear after adding this layer.
[C5] Invert the layer mask
After the Solid Color layer's been added, you may notice that it has a layer mask. To invert it, make sure to select the layer mask thumbnail first then press command (Mac)/Ctrl (Windows) + i
[C6] Delete the Ellipse layer
We only needed this for the mask.
[C7] Drag the Color Fill layer to the bottom the same way we did in [A3]. It should be below the gif layer now.
[C8] Create Clipping Mask
To do this, right-click on your gif layer and find Create Clipping Mask.
After doing this, there should be an arrow icon "↴" on your gif layer pointing down to the Color Fill layer.
[C9] Add a background color
Do the same thing we did in [A5]. This layer should be below the Color Fill layer.
〰️
And there you have it! Three different gif headers. With the gif header knowledge you now have, you can use it to apply different shapes and textures to your gif header's edge :)
Please like/reblog if this has helped you and feel free to hit me up for any questions and concerns! ♥︎
851 notes
·
View notes
Text
header brushes pack!

— so i decided to immortalize these brush presets i had lying around into a pack, so that it would be easier to use! These brushes will make jazzing your headers up super easy, and will also be easier to have a definite shape without fucking around with the pen tool for four hours (since i’ve done it for you 😌). please do rb if you plan on using! credit is not necessary, but is nevertheless appreciated.

HERE IS A PREVIEW OF THE BRUSHES BELOW ON AN IMAGE: (click on the image and expand it if you’d like to get a closer look).
the file is linked under the cut and in the source of the post.

If you’d like any other presets, feel free to ask <3.
FIND THE FILE HERE !!
151 notes
·
View notes
Photo

i hate my life but look how vibrant n nice i made this gif isnt that cool :) @unstablecryptid
tomorrowi shall continue
25 notes
·
View notes
Text
How to GIF with Screencaps
So I’ve noticed increasingly more people are having issues with importing frames or just don’t like to use that method anyway. I’ve finally figured out a way that works for both PC and Mac users! If you have any requests, please feel free to drop by my ask!
You will need: • Photoshop (PC | Mac) • VLC Player (PC | Mac)

Keep reading
223 notes
·
View notes
Photo


My old tutorial! Wanna share it with you)
72K notes
·
View notes
Photo
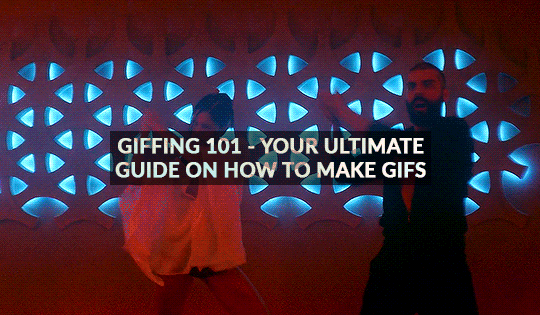
GIFFING 101 - YOUR ULTIMATE GUIDE ON HOW TO GIF
I have gotten many, many asks before about how I gif and I finally decided to make a tutorial. This is going to be very long, very image heavy and with a lot of details and examples. I mean it, I’m going through every, single aspect of giffing that I can possibly think of. From start to finish. And please read the disclaimer at the very start.
* I use a macbook pro but this should probably work on windows too!
I hate doing this but if this helped and you want to, please consider donating to my ko-fi or if you want, commission a theme or page from me at @amaanat <3
tutorial under cut, I hope it helps!
Keep reading
2K notes
·
View notes
Text
norah’s mega blending tutorial


hi guys! i’ve gotten requests from a few mutuals over the past few years on my blending and while i usually redirect them to other tutorials i decided to make a tutorial now (i am also very bored and am putting off my bio lab report)
tutorial under the cut!
Keep reading
623 notes
·
View notes
Photo

some of my friends in pscentral and an anon recently asked me on how i did the glitch effect in this gifset. i know how tricky it appears to achieve, and hopefully you’ll feel a little more confident after this tutorial <3 this tutorial will assume that you know your way around photoshop
please like/reblog if this helps, tutorial under the cut!
Keep reading
877 notes
·
View notes
Photo

BITGCCH I MADE QA GIF~!!!!!!!!!!
@unstablecryptid look. ignore the fucking flash il figure that out later but there she is also i hate mplayer im changin that
1 note
·
View note
Photo
Back due to popular demand!! Here’s a reupload of my gif making tutorial! 🤗After my blog @stefani-germanotta/@pixelrey was terminated by tumblr for copyright reasons, this tutorial was deleted along with it because it had a “keep reading” cut :( That really bummed me out because I spent HOURS working on this. BUT I recently managed to find an archive of the tutorial (thanks to the wayback machine archive site - a LIFESAVER), so here it is again! ♥︎ So without further ado, here’s a tutorial on how I make my gifs (including how to take screencaps) 🎉 I noticed that it’s kind of hard to find a thorough step-by-step tutorial out there so I hope this helps!
You’ll need:
Photoshop CS6 or higher. I use PS CC 2017, but as long as you have the video timeline feature you should be fine.
A video player that takes continuous screenshots.
I personally use mpv on my mac and gom player on my pc.
Keep reading
3K notes
·
View notes