
Don't wanna be here? Send us removal request.
Statistics
We looked inside some of the posts by purplebelievercreation and here's what we found interesting.
Average Info
Notes Per Post
1
Likes Per Post
1
Reblog Per Post
0
Reply Per Post
0
Time Between Posts
8 days
Number of Posts By Type
Text
16
Last Seen Tumblr Blogs


Fun Fact
Tumblr Inc. has $15.1M in annual revenue.
Text
Number Keyboard For Mac

Ribbon keyboard shortcuts. The ribbon groups related options on tabs. For example, on the Home tab, the Number group includes the Number Format option. Press the Alt key to display the ribbon shortcuts, called Key Tips, as letters in small images next to. Logitech - K750 Wireless Solar Keyboard for Mac - White/Silver. Details about Numeric Keypad Wireless Bluetooth Number Pad Keyboard for Apple Mac Laptops. 16 viewed per day. Numeric Keypad Wireless Bluetooth Number Pad Keyboard for Apple Mac Laptops. Item Information. Bulk savings: Buy 1. Sale ends in: 02d 01h 45m. On the Mac, use the Command and arrow keys to go to the beginning or end of the current line, and use the Home and End keys to go to the beginning or end of the current document. In some apps, controls whether pressing keys in the numeric keyboard enters numbers or moves the cursor. Currently, Apple offers only three keyboards via Bluetooth: Magic Keyboard (silver only), and Magic Keyboard with Numeric Keypad (silver or space gray).
I have a wireless Japanese keyboard like the one below. I'm operating on the latest version (10.10.5). Today the number keys stopped working. To my knowledge I didn't damage the keyboard in any way. So far I've tried:
Tip: The 64-bit version is installed by default unless Office detects you already have a 32-bit version of Office (or a stand-alone Office app such as Project or Visio) installed.In this case, the 32-bit version of Office will be installed instead. To change from a 32-bit version to a 64-bit version or vice versa, you need to uninstall Office first (including any stand-alone Office apps you. Microsoft Office 2016 For Mac free. download full Version. Pengguna mac kali ini mendapatkan kabar gembira dari microsoft. Karena sekarang, microsoft office untuk mac telah tersedia. Menurut pendapat developer program, fitur dan tools yang diberikan adalah sama seperti versi full version di pc.Jadi kalian tidak perlu khawatir, karena word, excel dan powerpoint akan memiliki semua fungsinya. Start quickly with the most recent versions of Word, Excel, PowerPoint, Outlook, OneNote and OneDrive —combining the familiarity of Office and the unique Mac features you love. Work online or offline, on your own or with others in real time—whatever works for what you’re doing. Download microsoft office for free full version mac. Download Microsoft Office 2019 Mac Full Version (Catalina) Download Microsoft Office 2019 Mac Full Version – Software ini sudah pasti kalian mengenalnnya. Seperangkat aplikasi untuk menungjang kebutuhan office kalian. Di kembangkan oleh perusahaan microsoft, sekarang software MS Office 2019 sudah dapat digunakan oleh para pengguna mac.
-checking that mouse keys were disabled (they were)
-changing batteries
-turning on / off the keyboard
-turning on / off the bluetooth connection to the keyboard
-every shortcut I could think of with the command, option, shift, control, & function keys including all the F keys, delete, & eject
-adding / changing languages
-starting in single operator mode & safe mode
-logging in with a different account
-checking the slow key mode
I tried Angryip scanner but it doesn't display mac addresses unless I've missed something.What I'm trying to do is identify the IP addresses of a switch that is sat on my desk. Scan for a mac address on the network. It provides mine and a collegues connectivity.
Also, when I hold the fn key and press 5 6 in sequence it spaces. fn and 4 5 the ¥ comes up. 0 as well as everything right of 0 still working.
I've brought up the KEYBOARD VIEWER so that I'm able to type numbers and the shift symbols on them but I've tried everything I could find online so far. Any new thoughts?
iMac, OS X Yosemite (10.10.5)
Posted on
To use a keyboard shortcut, press and hold one or more modifier keys and then press the last key of the shortcut. For example, to use Command-C (copy), press and hold the Command key, then the C key, then release both keys. Mac menus and keyboards often use symbols for certain keys, including modifier keys:
Wireless Keyboard For Mac
On keyboards made for Windows PCs, use the Alt key instead of Option, and the Windows logo key instead of Command.
Some keys on some Apple keyboards have special symbols and functions, such as for display brightness , keyboard brightness , Mission Control, and more. If these functions aren't available on your keyboard, you might be able to reproduce some of them by creating your own keyboard shortcuts. To use these keys as F1, F2, F3, or other standard function keys, combine them with the Fn key.
Cut, copy, paste, and other common shortcuts
Command-X: Cut the selected item and copy it to the Clipboard.
Command-C: Copy the selected item to the Clipboard. This also works for files in the Finder.
Command-V: Paste the contents of the Clipboard into the current document or app. This also works for files in the Finder.
Command-Z: Undo the previous command. You can then press Shift-Command-Z to Redo, reversing the undo command. In some apps, you can undo and redo multiple commands.
Command-A: Select All items.
Command-F: Find items in a document or open a Find window.
Command-G: Find Again: Find the next occurrence of the item previously found. To find the previous occurrence, press Shift-Command-G.
Command-H: Hide the windows of the front app. To view the front app but hide all other apps, press Option-Command-H.
Command-M: Minimize the front window to the Dock. To minimize all windows of the front app, press Option-Command-M.
Command-O: Open the selected item, or open a dialog to select a file to open.
Command-P: Print the current document.
Command-S: Save the current document.
Command-T: Open a new tab.
Command-W: Close the front window. To close all windows of the app, press Option-Command-W.
Option-Command-Esc: Force quit an app.
Command–Space bar: Show or hide the Spotlight search field. To perform a Spotlight search from a Finder window, press Command–Option–Space bar. (If you use multiple input sources to type in different languages, these shortcuts change input sources instead of showing Spotlight. Learn how to change a conflicting keyboard shortcut.)
Control–Command–Space bar: Show the Character Viewer, from which you can choose emoji and other symbols.
Control-Command-F: Use the app in full screen, if supported by the app.
Space bar: Use Quick Look to preview the selected item.
Command-Tab: Switch to the next most recently used app among your open apps.
Shift-Command-5: In macOS Mojave or later, take a screenshot or make a screen recording. Or use Shift-Command-3 or Shift-Command-4 for screenshots. Learn more about screenshots.
Shift-Command-N: Create a new folder in the Finder.
Command-Comma (,): Open preferences for the front app.
Sleep, log out, and shut down shortcuts
You might need to press and hold some of these shortcuts for slightly longer than other shortcuts. This helps you to avoid using them unintentionally.
Power button: Press to turn on your Mac or wake it from sleep. Press and hold for 1.5 seconds to put your Mac to sleep.* Continue holding to force your Mac to turn off.
Option–Command–Power button* or Option–Command–Media Eject : Put your Mac to sleep.
Control–Shift–Power button* or Control–Shift–Media Eject : Put your displays to sleep.
Control–Power button* or Control–Media Eject : Display a dialog asking whether you want to restart, sleep, or shut down.
Control–Command–Power button:* Force your Mac to restart, without prompting to save any open and unsaved documents.
Control–Command–Media Eject : Quit all apps, then restart your Mac. If any open documents have unsaved changes, you will be asked whether you want to save them.
Control–Option–Command–Power button* or Control–Option–Command–Media Eject : Quit all apps, then shut down your Mac. If any open documents have unsaved changes, you will be asked whether you want to save them.
Control-Command-Q: Immediately lock your screen.
Shift-Command-Q: Log out of your macOS user account. You will be asked to confirm. To log out immediately without confirming, press Option-Shift-Command-Q.
* Does not apply to the Touch ID sensor.
Finder and system shortcuts
Command-D: Duplicate the selected files.
Command-E: Eject the selected disk or volume.
Command-F: Start a Spotlight search in the Finder window.
Command-I: Show the Get Info window for a selected file.
Command-R: (1) When an alias is selected in the Finder: show the original file for the selected alias. (2) In some apps, such as Calendar or Safari, refresh or reload the page. (3) In Software Update preferences, check for software updates again.
Shift-Command-C: Open the Computer window.
Shift-Command-D: Open the desktop folder.
Shift-Command-F: Open the Recents window, showing all of the files you viewed or changed recently.
Shift-Command-G: Open a Go to Folder window.
Shift-Command-H: Open the Home folder of the current macOS user account.
Shift-Command-I: Open iCloud Drive.
Shift-Command-K: Open the Network window.
Option-Command-L: Open the Downloads folder.
Shift-Command-N: Create a new folder.
Shift-Command-O: Open the Documents folder.
Shift-Command-P: Show or hide the Preview pane in Finder windows.
Shift-Command-R: Open the AirDrop window.
Shift-Command-T: Show or hide the tab bar in Finder windows.
Control-Shift-Command-T: Add selected Finder item to the Dock (OS X Mavericks or later)
Shift-Command-U: Open the Utilities folder.
Option-Command-D: Show or hide the Dock.
Control-Command-T: Add the selected item to the sidebar (OS X Mavericks or later).
Option-Command-P: Hide or show the path bar in Finder windows.
Option-Command-S: Hide or show the Sidebar in Finder windows.
Command–Slash (/): Hide or show the status bar in Finder windows.
Command-J: Show View Options.
Command-K: Open the Connect to Server window.
Control-Command-A: Make an alias of the selected item.
Command-N: Open a new Finder window.
Option-Command-N: Create a new Smart Folder.
Command-T: Show or hide the tab bar when a single tab is open in the current Finder window.
Option-Command-T: Show or hide the toolbar when a single tab is open in the current Finder window.
Option-Command-V: Move the files in the Clipboard from their original location to the current location.
Command-Y: Use Quick Look to preview the selected files.
Option-Command-Y: View a Quick Look slideshow of the selected files.
Command-1: View the items in the Finder window as icons.
Command-2: View the items in a Finder window as a list.
Command-3: View the items in a Finder window in columns.
Command-4: View the items in a Finder window in a gallery.
Command–Left Bracket ([): Go to the previous folder.
Command–Right Bracket (]): Go to the next folder.
Command–Up Arrow: Open the folder that contains the current folder.
Command–Control–Up Arrow: Open the folder that contains the current folder in a new window.
Command–Down Arrow: Open the selected item.
Right Arrow: Open the selected folder. This works only when in list view.
Left Arrow: Close the selected folder. This works only when in list view.
Command-Delete: Move the selected item to the Trash.
Shift-Command-Delete: Empty the Trash.
Option-Shift-Command-Delete: Empty the Trash without confirmation dialog.
Command–Brightness Down: Turn video mirroring on or off when your Mac is connected to more than one display.
Option–Brightness Up: Open Displays preferences. This works with either Brightness key.
Control–Brightness Up or Control–Brightness Down: Change the brightness of your external display, if supported by your display.
Option–Shift–Brightness Up or Option–Shift–Brightness Down: Adjust the display brightness in smaller steps. Add the Control key to this shortcut to make the adjustment on your external display, if supported by your display.
Option–Mission Control: Open Mission Control preferences.
Command–Mission Control: Show the desktop.
Control–Down Arrow: Show all windows of the front app.
Option–Volume Up: Open Sound preferences. This works with any of the volume keys.
Option–Shift–Volume Up or Option–Shift–Volume Down: Adjust the sound volume in smaller steps.
Option–Keyboard Brightness Up: Open Keyboard preferences. This works with either Keyboard Brightness key.
Option–Shift–Keyboard Brightness Up or Option–Shift–Keyboard Brightness Down: Adjust the keyboard brightness in smaller steps.
Option key while double-clicking: Open the item in a separate window, then close the original window.
Command key while double-clicking: Open a folder in a separate tab or window.
Command key while dragging to another volume: Move the dragged item to the other volume, instead of copying it.
Option key while dragging: Copy the dragged item. The pointer changes while you drag the item.
Option-Command while dragging: Make an alias of the dragged item. The pointer changes while you drag the item.
Option-click a disclosure triangle: Open all folders within the selected folder. This works only when in list view.
Command-click a window title: See the folders that contain the current folder.
Learn how to use Command or Shift to select multiple items in the Finder.
Click the Go menu in the Finder menu bar to see shortcuts for opening many commonly used folders, such as Applications, Documents, Downloads, Utilities, and iCloud Drive.
Document shortcuts
The behavior of these shortcuts may vary with the app you're using.
Command-B: Boldface the selected text, or turn boldfacing on or off.
Command-I: Italicize the selected text, or turn italics on or off.
Command-K: Add a web link.
Command-U: Underline the selected text, or turn underlining on or off.
Command-T: Show or hide the Fonts window.
Command-D: Select the Desktop folder from within an Open dialog or Save dialog.
Control-Command-D: Show or hide the definition of the selected word.
Shift-Command-Colon (:): Display the Spelling and Grammar window.
Command-Semicolon (;): Find misspelled words in the document.
Option-Delete: Delete the word to the left of the insertion point.
Control-H: Delete the character to the left of the insertion point. Or use Delete.
Control-D: Delete the character to the right of the insertion point. Or use Fn-Delete.
Fn-Delete: Forward delete on keyboards that don't have a Forward Delete key. Or use Control-D.
Control-K: Delete the text between the insertion point and the end of the line or paragraph.
Fn–Up Arrow: Page Up: Scroll up one page.
Fn–Down Arrow: Page Down: Scroll down one page.
Fn–Left Arrow: Home: Scroll to the beginning of a document.
Fn–Right Arrow: End: Scroll to the end of a document.
Command–Up Arrow: Move the insertion point to the beginning of the document.
Command–Down Arrow: Move the insertion point to the end of the document.
Command–Left Arrow: Move the insertion point to the beginning of the current line.
Command–Right Arrow: Move the insertion point to the end of the current line.
Option–Left Arrow: Move the insertion point to the beginning of the previous word.
Option–Right Arrow: Move the insertion point to the end of the next word.
Shift–Command–Up Arrow: Select the text between the insertion point and the beginning of the document.
Shift–Command–Down Arrow: Select the text between the insertion point and the end of the document.
Shift–Command–Left Arrow: Select the text between the insertion point and the beginning of the current line.
Shift–Command–Right Arrow: Select the text between the insertion point and the end of the current line.
Shift–Up Arrow: Extend text selection to the nearest character at the same horizontal location on the line above.
Shift–Down Arrow: Extend text selection to the nearest character at the same horizontal location on the line below.
Shift–Left Arrow: Extend text selection one character to the left.
Shift–Right Arrow: Extend text selection one character to the right.
Option–Shift–Up Arrow: Extend text selection to the beginning of the current paragraph, then to the beginning of the following paragraph if pressed again.
Option–Shift–Down Arrow: Extend text selection to the end of the current paragraph, then to the end of the following paragraph if pressed again.
Option–Shift–Left Arrow: Extend text selection to the beginning of the current word, then to the beginning of the following word if pressed again.
Option–Shift–Right Arrow: Extend text selection to the end of the current word, then to the end of the following word if pressed again.
Control-A: Move to the beginning of the line or paragraph.
Control-E: Move to the end of a line or paragraph.
Control-F: Move one character forward.
Control-B: Move one character backward.
Control-L: Center the cursor or selection in the visible area.
Control-P: Move up one line.
Control-N: Move down one line.
Control-O: Insert a new line after the insertion point.
Control-T: Swap the character behind the insertion point with the character in front of the insertion point.
Command–Left Curly Bracket ({): Left align.
Command–Right Curly Bracket (}): Right align.
Shift–Command–Vertical bar (|): Center align.
Option-Command-F: Go to the search field.
Option-Command-T: Show or hide a toolbar in the app.
Option-Command-C: Copy Style: Copy the formatting settings of the selected item to the Clipboard.
Option-Command-V: Paste Style: Apply the copied style to the selected item.
Option-Shift-Command-V: Paste and Match Style: Apply the style of the surrounding content to the item pasted within that content.
Option-Command-I: Show or hide the inspector window.
Shift-Command-P: Page setup: Display a window for selecting document settings.
Shift-Command-S: Display the Save As dialog, or duplicate the current document.
Shift–Command–Minus sign (-): Decrease the size of the selected item.
Shift–Command–Plus sign (+): Increase the size of the selected item. Command–Equal sign (=) performs the same function.
Shift–Command–Question mark (?): Open the Help menu.
Other shortcuts
For more shortcuts, check the shortcut abbreviations shown in the menus of your apps. Every app can have its own shortcuts, and shortcuts that work in one app might not work in another.
325 infographic templates on different themes such as corporate, ecology, shopping, success, history, education, schedule, milestones and more. well-structured and organized files“Trine” Free PowerPoint Template. Annual Report Free PowerPoint Template. editable in PowerPoint, Google Slides, Keynote, Adobe CC. Editable in many software products such as PowerPoint, Google Slides, Adobe CC and more. https://purplebelievercreation.tumblr.com/post/642733855012536320/powerpoint-download-for-mac-free.
Apple Music shortcuts: Choose Help > Keyboard shortcuts from the menu bar in the Music app.
Other shortcuts: Choose Apple menu > System Preferences, click Keyboard, then click Shortcuts.
Learn more
Wireless Number Keyboard For Mac
Create your own shortcuts and resolve conflicts between shortcuts
Change the behavior of the function keys or modifier keys
0 notes
Text
Shift Command For Mac Os

To use a keyboard shortcut, press and hold one or more modifier keys and then press the last key of the shortcut. For example, to use Command-C (copy), press and hold the Command key, then the C key, then release both keys. Mac menus and keyboards often use symbols for certain keys, including modifier keys:

On keyboards made for Windows PCs, use the Alt key instead of Option, and the Windows logo key instead of Command.
When you take a screenshot on your Mac – using the Shift-Command-3 shortcut to capture the whole screen, or Shift-Command-4 to capture a portion of it – the image files are saved straight to. Displays the Mac OS X Help Viewer: Command+Shift+A: Takes you to your Applications folder: Command+Shift+C: Takes you to the top-level Computer location: Command+Shift+G: Takes you to a folder that you specify: Command+Shift+H: Takes you to your Home folder: Command+Shift+I: Connects you to your iDisk: Command+Shift+Q: Logs you out: Command+Shift+N.

Some keys on some Apple keyboards have special symbols and functions, such as for display brightness , keyboard brightness , Mission Control, and more. If these functions aren't available on your keyboard, you might be able to reproduce some of them by creating your own keyboard shortcuts. To use these keys as F1, F2, F3, or other standard function keys, combine them with the Fn key.
Cut, copy, paste, and other common shortcuts
Command-X: Cut the selected item and copy it to the Clipboard.
Command-C: Copy the selected item to the Clipboard. This also works for files in the Finder.
Command-V: Paste the contents of the Clipboard into the current document or app. This also works for files in the Finder.
Command-Z: Undo the previous command. You can then press Shift-Command-Z to Redo, reversing the undo command. In some apps, you can undo and redo multiple commands.
Command-A: Select All items.
Command-F: Find items in a document or open a Find window.
Command-G: Find Again: Find the next occurrence of the item previously found. To find the previous occurrence, press Shift-Command-G.
Command-H: Hide the windows of the front app. To view the front app but hide all other apps, press Option-Command-H.
Command-M: Minimize the front window to the Dock. To minimize all windows of the front app, press Option-Command-M.
Command-O: Open the selected item, or open a dialog to select a file to open.
Command-P: Print the current document.
Command-S: Save the current document.
Command-T: Open a new tab.
Command-W: Close the front window. To close all windows of the app, press Option-Command-W.
Option-Command-Esc: Force quit an app.
Command–Space bar: Show or hide the Spotlight search field. To perform a Spotlight search from a Finder window, press Command–Option–Space bar. (If you use multiple input sources to type in different languages, these shortcuts change input sources instead of showing Spotlight. Learn how to change a conflicting keyboard shortcut.)
Control–Command–Space bar: Show the Character Viewer, from which you can choose emoji and other symbols.
Control-Command-F: Use the app in full screen, if supported by the app.
Space bar: Use Quick Look to preview the selected item.
Command-Tab: Switch to the next most recently used app among your open apps.
Shift-Command-5: In macOS Mojave or later, take a screenshot or make a screen recording. Or use Shift-Command-3 or Shift-Command-4 for screenshots. Learn more about screenshots.
Shift-Command-N: Create a new folder in the Finder.
Command-Comma (,): Open preferences for the front app.
Sleep, log out, and shut down shortcuts
You might need to press and hold some of these shortcuts for slightly longer than other shortcuts. This helps you to avoid using them unintentionally.
How to scan for mac address on network. Download a free network analyzer to monitor, analyze and troubleshoot your network. How does it work? Choose a subnet from the Local Subnet combo box and click the Start button or F5 to execute scan. Colasoft MAC Scanner will display scan results in the list, including IP address, MAC address, Host Name and Manufacture. It will group all IP.
Power button: Press to turn on your Mac or wake it from sleep. Press and hold for 1.5 seconds to put your Mac to sleep.* Continue holding to force your Mac to turn off.
Option–Command–Power button* or Option–Command–Media Eject : Put your Mac to sleep.
Control–Shift–Power button* or Control–Shift–Media Eject : Put your displays to sleep.
Control–Power button* or Control–Media Eject : Display a dialog asking whether you want to restart, sleep, or shut down.
Control–Command–Power button:* Force your Mac to restart, without prompting to save any open and unsaved documents.
Control–Command–Media Eject : Quit all apps, then restart your Mac. If any open documents have unsaved changes, you will be asked whether you want to save them.
Control–Option–Command–Power button* or Control–Option–Command–Media Eject : Quit all apps, then shut down your Mac. If any open documents have unsaved changes, you will be asked whether you want to save them.
Control-Command-Q: Immediately lock your screen.
Shift-Command-Q: Log out of your macOS user account. You will be asked to confirm. To log out immediately without confirming, press Option-Shift-Command-Q.
Download microsoft office for free full version mac. * Does not apply to the Touch ID sensor.

Finder and system shortcuts
Command-D: Duplicate the selected files.
Command-E: Eject the selected disk or volume.
Command-F: Start a Spotlight search in the Finder window.
Command-I: Show the Get Info window for a selected file.
Command-R: (1) When an alias is selected in the Finder: show the original file for the selected alias. (2) In some apps, such as Calendar or Safari, refresh or reload the page. (3) In Software Update preferences, check for software updates again.
Shift-Command-C: Open the Computer window.
Shift-Command-D: Open the desktop folder.
Shift-Command-F: Open the Recents window, showing all of the files you viewed or changed recently.
Shift-Command-G: Open a Go to Folder window.
Shift-Command-H: Open the Home folder of the current macOS user account.
Shift-Command-I: Open iCloud Drive.
Shift-Command-K: Open the Network window.
Option-Command-L: Open the Downloads folder.
Shift-Command-N: Create a new folder.
Shift-Command-O: Open the Documents folder.
Shift-Command-P: Show or hide the Preview pane in Finder windows.
Shift-Command-R: Open the AirDrop window.
Shift-Command-T: Show or hide the tab bar in Finder windows.
Control-Shift-Command-T: Add selected Finder item to the Dock (OS X Mavericks or later)
Shift-Command-U: Open the Utilities folder.
Option-Command-D: Show or hide the Dock.
Control-Command-T: Add the selected item to the sidebar (OS X Mavericks or later).
Option-Command-P: Hide or show the path bar in Finder windows.
Option-Command-S: Hide or show the Sidebar in Finder windows.
Command–Slash (/): Hide or show the status bar in Finder windows.
Command-J: Show View Options.
Command-K: Open the Connect to Server window.
Control-Command-A: Make an alias of the selected item.
Command-N: Open a new Finder window.
Option-Command-N: Create a new Smart Folder.
Command-T: Show or hide the tab bar when a single tab is open in the current Finder window.
Option-Command-T: Show or hide the toolbar when a single tab is open in the current Finder window.
Option-Command-V: Move the files in the Clipboard from their original location to the current location.
Command-Y: Use Quick Look to preview the selected files.
Option-Command-Y: View a Quick Look slideshow of the selected files.
Command-1: View the items in the Finder window as icons.
Command-2: View the items in a Finder window as a list.
Command-3: View the items in a Finder window in columns.
Command-4: View the items in a Finder window in a gallery.
Command–Left Bracket ([): Go to the previous folder.
Command–Right Bracket (]): Go to the next folder.
Command–Up Arrow: Open the folder that contains the current folder.
Command–Control–Up Arrow: Open the folder that contains the current folder in a new window.
Command–Down Arrow: Open the selected item.
Right Arrow: Open the selected folder. This works only when in list view.
Left Arrow: Close the selected folder. This works only when in list view.
Command-Delete: Move the selected item to the Trash.
Shift-Command-Delete: Empty the Trash.
Option-Shift-Command-Delete: Empty the Trash without confirmation dialog.
Command–Brightness Down: Turn video mirroring on or off when your Mac is connected to more than one display.
Option–Brightness Up: Open Displays preferences. This works with either Brightness key.
Control–Brightness Up or Control–Brightness Down: Change the brightness of your external display, if supported by your display.
Option–Shift–Brightness Up or Option–Shift–Brightness Down: Adjust the display brightness in smaller steps. Add the Control key to this shortcut to make the adjustment on your external display, if supported by your display.
Option–Mission Control: Open Mission Control preferences.
Command–Mission Control: Show the desktop.
Control–Down Arrow: Show all windows of the front app.
Option–Volume Up: Open Sound preferences. This works with any of the volume keys.
Option–Shift–Volume Up or Option–Shift–Volume Down: Adjust the sound volume in smaller steps.
Option–Keyboard Brightness Up: Open Keyboard preferences. This works with either Keyboard Brightness key.
Option–Shift–Keyboard Brightness Up or Option–Shift–Keyboard Brightness Down: Adjust the keyboard brightness in smaller steps.
Option key while double-clicking: Open the item in a separate window, then close the original window.
Command key while double-clicking: Open a folder in a separate tab or window.
Command key while dragging to another volume: Move the dragged item to the other volume, instead of copying it.
Option key while dragging: Copy the dragged item. The pointer changes while you drag the item.
Option-Command while dragging: Make an alias of the dragged item. The pointer changes while you drag the item.
Option-click a disclosure triangle: Open all folders within the selected folder. This works only when in list view.
Command-click a window title: See the folders that contain the current folder.
Learn how to use Command or Shift to select multiple items in the Finder.
Click the Go menu in the Finder menu bar to see shortcuts for opening many commonly used folders, such as Applications, Documents, Downloads, Utilities, and iCloud Drive.
Mac Os Command List

Document shortcuts
Mac Os Shell Commands
The behavior of these shortcuts may vary with the app you're using.
Command-B: Boldface the selected text, or turn boldfacing on or off.
Command-I: Italicize the selected text, or turn italics on or off.
Command-K: Add a web link.
Command-U: Underline the selected text, or turn underlining on or off.
Command-T: Show or hide the Fonts window.
Command-D: Select the Desktop folder from within an Open dialog or Save dialog.
Control-Command-D: Show or hide the definition of the selected word.
Shift-Command-Colon (:): Display the Spelling and Grammar window.
Command-Semicolon (;): Find misspelled words in the document.
Option-Delete: Delete the word to the left of the insertion point.
Control-H: Delete the character to the left of the insertion point. Or use Delete.
Control-D: Delete the character to the right of the insertion point. Or use Fn-Delete.
Fn-Delete: Forward delete on keyboards that don't have a Forward Delete key. Or use Control-D.
Control-K: Delete the text between the insertion point and the end of the line or paragraph.
Fn–Up Arrow: Page Up: Scroll up one page.
Fn–Down Arrow: Page Down: Scroll down one page.
Fn–Left Arrow: Home: Scroll to the beginning of a document.
Fn–Right Arrow: End: Scroll to the end of a document.
Command–Up Arrow: Move the insertion point to the beginning of the document.
Command–Down Arrow: Move the insertion point to the end of the document.
Command–Left Arrow: Move the insertion point to the beginning of the current line.
Command–Right Arrow: Move the insertion point to the end of the current line.
Option–Left Arrow: Move the insertion point to the beginning of the previous word.
Option–Right Arrow: Move the insertion point to the end of the next word.
Shift–Command–Up Arrow: Select the text between the insertion point and the beginning of the document.
Shift–Command–Down Arrow: Select the text between the insertion point and the end of the document.
Shift–Command–Left Arrow: Select the text between the insertion point and the beginning of the current line.
Shift–Command–Right Arrow: Select the text between the insertion point and the end of the current line.
Shift–Up Arrow: Extend text selection to the nearest character at the same horizontal location on the line above.
Shift–Down Arrow: Extend text selection to the nearest character at the same horizontal location on the line below.
Shift–Left Arrow: Extend text selection one character to the left.
Shift–Right Arrow: Extend text selection one character to the right.
Option–Shift–Up Arrow: Extend text selection to the beginning of the current paragraph, then to the beginning of the following paragraph if pressed again.
Option–Shift–Down Arrow: Extend text selection to the end of the current paragraph, then to the end of the following paragraph if pressed again.
Option–Shift–Left Arrow: Extend text selection to the beginning of the current word, then to the beginning of the following word if pressed again.
Option–Shift–Right Arrow: Extend text selection to the end of the current word, then to the end of the following word if pressed again.
Control-A: Move to the beginning of the line or paragraph.
Control-E: Move to the end of a line or paragraph.
Control-F: Move one character forward.
Control-B: Move one character backward.
Control-L: Center the cursor or selection in the visible area.
Control-P: Move up one line.
Control-N: Move down one line.
Control-O: Insert a new line after the insertion point.
Control-T: Swap the character behind the insertion point with the character in front of the insertion point.
Command–Left Curly Bracket ({): Left align.
Command–Right Curly Bracket (}): Right align.
Shift–Command–Vertical bar (|): Center align.
Option-Command-F: Go to the search field.
Option-Command-T: Show or hide a toolbar in the app.
Option-Command-C: Copy Style: Copy the formatting settings of the selected item to the Clipboard.
Option-Command-V: Paste Style: Apply the copied style to the selected item.
Option-Shift-Command-V: Paste and Match Style: Apply the style of the surrounding content to the item pasted within that content.
Option-Command-I: Show or hide the inspector window.
Shift-Command-P: Page setup: Display a window for selecting document settings.
Shift-Command-S: Display the Save As dialog, or duplicate the current document.
Shift–Command–Minus sign (-): Decrease the size of the selected item.
Shift–Command–Plus sign (+): Increase the size of the selected item. Command–Equal sign (=) performs the same function.
Shift–Command–Question mark (?): Open the Help menu.
Other shortcuts
Shift Command For Mac Os 10.13

Cached
For more shortcuts, check the shortcut abbreviations shown in the menus of your apps. Every app can have its own shortcuts, and shortcuts that work in one app might not work in another.
And the best program to create presentations that we can download to our Mac is definitely Microsoft PowerPoint, the classic tool included in the Microsoft Office suite. Powerpoint download for mac free. When it comes to presenting a project or idea, giving a conference or explaining any concept in public, it's always a good idea to reinforce your talk with supporting audiovisual material. PowerPoint for Mac: the best tool to create presentationsEver since it first appeared in the 80s', this program has evolved constantly, incorporating improvements to adapt it to the demands and technological possibilities of each moment.
Apple Music shortcuts: Choose Help > Keyboard shortcuts from the menu bar in the Music app.
Other shortcuts: Choose Apple menu > System Preferences, click Keyboard, then click Shortcuts.
Learn more
Create your own shortcuts and resolve conflicts between shortcuts
Change the behavior of the function keys or modifier keys
0 notes
Text
Keyboard Keys For Mac

Keyboard Shortcut For Mac Lock Screen
Keyboard On Mac Not Working
The K1 comes with a full set of Mac-specific keycaps and a switch to let you choose between one configuration or the other. The low-profile keys hide blue or red switches. The blue are the kind of.
To use any of these key combinations, press and hold the keys immediately after pressing the power button to turn on your Mac, or after your Mac begins to restart. Keep holding until the described behavior occurs.
Its tools help users to quickly create, edit, view, present or share presentations easily from anywhere. Microsoft Powerpoint 2019 VL 16.36 for Mac ReviewVL 16.36 for Mac is a popular program developed for creating beautiful presentations. Students, teachers, presenters, professors, marketers, businessmen and social workers can create jaw-dropping presentations for their audience with this popular presentation maker for Mac.It offers the latest tools and features for delivering magical presentations. VL 16.36 enables users to create and show slides to support a presentation. Microsoft powerpoint download for mac free. It allows users to combine text, graphics and multimedia content to create professional presentations.
Keyboard Shortcut For Mac Lock Screen

On Apple Desktop Bus keyboards, a power key (◁), used to turn on computers that supported it (and to type the Mac three-finger salute).
Depending on the type of your keyboard, you might need to use the Control key, the Option key, or the key instead of the Shift key. If you are using a MacBook, you might need to attach a USB keyboard to use the F14 key combination.
Command (⌘)-R: Start up from the built-in macOS Recovery system. Or use Option-Command-R or Shift-Option-Command-R to start up from macOS Recovery over the Internet. macOS Recovery installs different versions of macOS, depending on the key combination you use while starting up. If your Mac is using a firmware password, you're prompted to enter the password.
Option (⌥) or Alt: Start up to Startup Manager, which allows you to choose other available startup disks or volumes. If your Mac is using a firmware password, you're prompted to enter the password.
Option-Command-P-R:Reset NVRAM or PRAM. If your Mac is using a firmware password, it ignores this key combination or starts up from macOS Recovery.
Shift (⇧): Start up in safe mode. Disabled when using a firmware password.
D: Start up to the Apple Diagnostics utility. Or use Option-Dto start up to this utility over the Internet. Disabled when using a firmware password.
N: Start up from a NetBoot server, if your Mac supports network startup volumes. To use the default boot image on the server, hold down Option-N instead. Disabled when using a firmware password.
Command-S: Start up in single-user mode. Disabled in macOS Mojave or later, or when using a firmware password.
T: Start up in target disk mode. Disabled when using a firmware password.
Command-V: Start up in verbose mode. Disabled when using a firmware password.
Eject (⏏) or F12 or mouse button or trackpad button: Eject removable media, such as an optical disc. Disabled when using a firmware password.
If a key combination doesn't work
If a key combination doesn't work at startup, one of these these solutions might help: https://purplebelievercreation.tumblr.com/post/642733704215707648/scan-for-a-mac-address-on-the-network.
Be sure to press and hold all keys in the combination together, not one at a time.
Shut down your Mac. Then press the power button to turn on your Mac. Then press and hold the keys as your Mac starts up.
Wait a few seconds before pressing the keys, to give your Mac more time to recognize the keyboard as it starts up. Some keyboards have a light that flashes briefly at startup, indicating that the keyboard is recognized and ready for use.
If you're using a wireless keyboard, plug it into your Mac, if possible. Or use your built-in keyboard or a wired keyboard. If you're using a keyboard made for a PC, such as a keyboard with a Windows logo, try a keyboard made for Mac.
If you're using Boot Camp to start up from Microsoft Windows, set Startup Disk preferences to start up from macOS instead. Then shut down or restart and try again.
Download microsoft office for free full version mac os x. Remember that some key combinations are disabled when your Mac is using a firmware password.
Learn more

Keyboard On Mac Not Working
Learn what to do if your Mac doesn't turn on.
Learn about Mac keyboard shortcuts that you can use after your Mac has started up.
0 notes
Text
Ipad Remote Control For Mac

Ipad Remote Control For Mac Download
Ipad Remote Control Macbook
Ipad Remote Control For Mac App
Remote Support Ipad From Pc
Ipad Remote Control Car
Apple Remote Desktop however only works within the same Network, and not over the internet. It is less than accurate yes. However for ARD to work over the internet several settings need to be applied on the remote router so ARD requests are forwarded to the correct machine, which may or may not be possible. Control your iPod, iPhone or Mac with this Apple remote. On your iPod or iPhone, the Apple remote lets you connect your device to speakers and then control the sound and select different tracks. When you use this Apple remote with your Mac, easily skip through DVDs and shuffle songs from a distance.
Remote access to Mac, anywhere
Jun 06, 2016 With TeamViewer installed on a Mac and the TeamViewer: Remote Control app downloaded, you can remote-control the Mac from an iPad. (TeamViewer is a free app if you're using it in a non-commercial. iTunes Remote is the best way to control Apple Music, iTunes, or the Apple TV app from anywhere in your home. Simply download the app to your iPhone or iPad, and connect directly to Apple Music, iTunes, or the Apple TV app on your Mac or PC. With iTunes Remote you can:. Access your Apple Music, A.
Get Screens and work across multiple remote Macs.
While many countries are on a lockdown due to COVID-19, remote work is becoming a lifestyle. Remotely accessing a Mac is designed to be easy. Apple has spent a lot of time ensuring anyone can log in to their Macs — both desktop and laptop — from any other Mac device, anywhere. And, besides, there are a variety of third-party apps ready to help with that too.
Still, remotely managing their Mac sounds overly complicated to a lot of people. From how you connect to sharing files or screens to using your Apple device as a remote mouse, we want to demystify the process in the easy-to-follow guide below.
Best Remote Access Apps for Mac
There are times when you want to access your Mac remotely, and there are many different solutions to remote access your Mac. Best utilities in one pack, give it a go!
How to access your Mac from another location
There're two ways: you can allow remote login to your Mac from another computer, or allow others to access your computer using Remote Desktop (it's available from the App Store).
Allow remote login to your Mac from another computer
For devices using the same macOS, you can allow remote Mac login using a Secure Shell (SSH). This enables Mac remote desktop access using a Secure File Transfer Protocol (SFTP).
To set up Remote Login:
Go to System Preferences > Sharing
Select Remote Login.
Choose which users you want to have remote access or the ability to control your Mac.
You can either select All Users, which means any other device on your network, or any Mac you own, can access and connect, or click the plus sign to pick the exact users.
When you want to remotely log in to your Mac from another device, you need to know your username (the name that appears when you login) and your computer's IP address. Write them down and keep them safe, as allowing access to your Mac does make it potentially less secure, especially over cellular or public Wi-Fi networks.
Accessing, controlling, or viewing information on your Mac can be done with a built-in Terminal or any other SSH app using your username and IP address.
Allow others to access your computer using Apple Remote Desktop
With macOS remote Mac access and control is even easier. To set up it:
Go to Menu > System Preferences > Sharing
Select Remote Management - it should appear as a checkbox.
Now you can select who has remote desktop access. Either select, All Users, which means any other device on your network, or Mac you own, can access and connect, or click the Add button(+), which gives you the ability to select who can have remote access and/or control.
If you are using a VPN or VNC viewer and want to access your Mac remotely, you will need to setup a password first. It is also possible to use iOS devices, such as an iPhone and iPad, through Apple Remote Desktop, available from the App Store.
How to stay on the same page with Screens
Collaboration has become of utmost importance to today's workplaces. And with more and more people working remotely, being on the same screen (ahem, page) is a must.
Screens allows you to work remotely with any computer regardless of your location. Whether you are on a business trip or traveling, stay confident knowing you can access any file on your home computer at any time.
This robust screen sharing tool for Mac supports:
Multiple displays
Drag-and-drop file sharing
Hiding your remote screen while accessing it
Accessing other computers (e.g. colleague's) as a guest
Alternative shortcuts (useful when connecting Mac to PC)
Custom actions in case of disconnection
To start using Screens, get the app from Setapp and configure the following:
Remote login and remote management (as per the guide above)
Install Screens Connect helper app and create a Screens ID on every machine you'd like to connect to in the future
Use your Screens ID in the Screens app and it will automatically determine which of your computers are available for connection
Remote desktop client for Mac
Control any computer remotely – a perfect way to access your Mac from anywhere without limitations.
Share files between devices
Today we have plenty of ways to send and share files. But ask someone to send something, and you are likely to get it through email. Due to the ubiquitousness of email, it's still the default method for file sharing, despite its obvious flaws and constraints.
Fortunately, there are much better ways:
Scan for a mac address on the network. The place I work at has a kind of messy network in that we have Netgear GS105 managed switches providing ports for groups of desks as the building has migrated from a chicken egg place (in the past) into cold stores into offices, so there aren't enough wall ports available.Actually since starting to write this I've had a conversation and those switches are on a different subnet to the main network (layer 3?) - I'm not very experienced with all this can you tell?I'm quite confused now and might have to do some extra reading. It provides mine and a collegues connectivity.
Native macOS File Sharing
Few people know that their Mac has native file sharing functionality built in. To use this feature, activate it in the Sharing pane of System Preferences by checking File Sharing. If you only want to share specific folders, add them to the Shared Folders list. If you only want specific users to access the folder, add them to its Users list. Otherwise, everyone will be able to access it.
AirDrop
Although not the most reliable solution, AirDrop works fine for occasional sharing a file between Apple devices. In the Finder, choose Go and then AirDrop on both the sending and receiving Mac. As soon as you see the receiver's user icon, drag the desired file onto it to send.
Ipad Remote Control For Mac Download
Read more about how to use AirDrop
Dropshare
If you don't want to send files Mac-to-Mac directly but rather through a cloud storage, there is no easier way than Dropshare. The app works with numerous cloud providers, from Dropbox to Google Drive, and saves your files for sharing by simply dragging them onto its menu bar icon.
File Transfer Protocol (FTP)
The most technical but also the most robust way to share files from your mac is to use FTP, which you could do either through Terminal or an FTP Client, the latter being much more user friendly.
There are a few popular FTP clients one could choose from. The robust file managing app ForkLift covers most of the FTP functionality but takes it to the next level and could be a viable replacement for the Finder altogether with its quick search, instant previews, and file comparison.
DCommander is another full-featured file transfer app for Mac that combines speed and reliability, able to handle thousands of files, schedule backups, and even automate transfers.
At last, when it comes to sharing the same files on different devices, an app like ChronoSync Express becomes invaluable.
ChronoSync Express is powerful tool for sharing and transferring files from Mac to Mac, or any another Apple device. With a feature called Synchronizer Document, you can select which files need to be automatically synchronized and shared between devices, just like that:
Create a new synchronizer document for each folder synchronization you'd like to perform
Name the synchronization
Change the Operation to Synchronize Bidirectional
Select folders to sync on the left and right
Test with a Trial Sync
Do you need to use a VPN (Virtual Private Network)?
Whether you are working on your Mac directly, logging into your Mac remotely, or sharing access with someone else, security should be on top of your mind.
As a rule of thumb, you should always use a VPN when connected to a public Wi-Fi network, as someone could log in and see the information you send just as easily as you do.
And with remote access — even in the View Only mode — someone can see every file and document on your Mac, except those that are password protected. Unfortunately, if you leave passwords in a visible document, you expose yourself to immense risks.
A secure VPN client for Mac like Shimo is well worth using to stop unwanted eyes from lurking around, especially if you are sharing sensitive files, financial records or customer data.
However, for extra peace of mind and security, consider firing up your VPN automatically on all networks you are not 100% sure about to keep your emails, bank accounts and personal documents safe.
To share your Mac with someone else, download a remote Virtual Network Computing (VNC) app like Jump Desktop. With full remote access and Mac remote control, the other person — or yourself connecting to another Mac — can have the same level of control as the person using that device. Except for Admin level access, since it's password protected.
Starting with Jump Desktop is easy: either yourself (gaining access) or the person you are giving a remote view or control access to your Mac, needs to add details of the device and the password.
Secure your access with VPN
Get a VPN client for Mac to avoid privacy infringement while connecting remotely. It's secure and free to try.
Free office 2010 download full version. Office is activated and ready to use. Tip: If you see an error that says the Microsoft Office installer.pkg can't be opened because it is from an unidentified developer, wait 10 seconds and move the downloaded file to your desktop.
Once permission is granted at the other end, remote Mac screen sharing or control (whereby you can use the iOS device as a remote mouse) becomes possible.
How to use your iOS device as a remote mouse
If your remote work starts on a patio hammock somewhere in east Asia, you should note that Apple iOS devices, such as an iPhone or iPad, can be used to control a Mac remotely, much like a mouse can control a desktop or laptop. Apps that make this possible work on VNC.
Free to try Microsoft Mac OS X 10.10/10.11 Version 1.0 Full Specs. Clicking on the Download Now (Visit Site) button above will open a connection to a third-party site. PowerPoint for Mac. Microsoft powerpoint free download - Microsoft Teams for Windows 10, Microsoft Teams, Microsoft Teams, and many more programs. https://purplebelievercreation.tumblr.com/post/642733855012536320/powerpoint-download-for-mac-free. Download Microsoft PowerPoint 16.35 for Mac from FileHorse. 100% Safe and Secure Create simple slideshows or complex multimedia presentations!
Remote Mouse is the easiest, most effective way to turn your iOS device into a wireless remote control for your Mac.
Although remote access through a local network would be most effective, since the closer you are to the device the quicker the connection, it's also possible from anywhere in the world, providing the network is secure and fast enough.
Ipad Remote Control Macbook
Setting up and granting access to the iOS device is the same process as when someone wants to access using a Mac. Except you need to give them a password. And make sure it is different from your primary Mac or iOS (App Store) one.

So working together or checking on your devices can be done from anywhere in the world and there are lots of ways to do that, from sharing screens and files to having complete access to a system set up far away. Setapp equips you with all the apps needed to remotely access any device you need and elevate your work to the global level.
These might also interest you:
Ipad Remote Control For Mac App
Setapp lives on Mac and iOS. Please come back from another device.
Meantime, prepare for all the awesome things you can do with Setapp.
Read on
Remote Support Ipad From Pc
Sign Up
Setapp uses cookies to personalize your experience on our website. By continuing to use this site, you agree to our cookie policy.
Ipad Remote Control Car
0 notes
Text
Heroes Might Of Magic For Mac

Heroes Of Might & Magic 5 Mac
Might And Magic Heroes 8
Heroes Of Might And Magic App
5
859.4 MB
The original „heroes“ gameplay is back. Tackle the biggest challenges together with your friends. Find glory in the arena and crush players from around the world. The universe of might&magic. Enjoy beautiful graphics & a smart combat system.
Powerpoint download for mac free. Download Microsoft PowerPoint 16.35 for Mac from FileHorse. 100% Safe and Secure Create simple slideshows or complex multimedia presentations!
Heroes® of Might & Magic® III is a turn-based strategy game, originally released in February 1999. Key Features. A new HD experience: re-live the Heroes® III in HD, a true craftsmanship which offers players updated graphics, with wide screen compatibility. Enjoy the critically acclaimed Heroes® III gameplay, with 7 exciting campaign.
Download Heroes of Might and Magic II: The Succession Wars for Mac HeroesofMMII.sit (24.21 MiB / 25.39 MB) System 7.0 - 7.6 - Mac OS 9 / compressed w/ Stuffit.
Heroes of Might and Magic II: The Succession Wars (aka 魔法門英雄無敵2:王位爭奪戰, HOMM 2, Heroes of Might and Magic II: Die Erbfolgekriege, Heroes 2), a really nice strategy game sold in 1996 for DOS, is available and ready to be played again! Also available on Mac, time to play a fantasy, turn-based and rpg elements video game title.
Developer: New World Computing
Release date: 2002
Interface language: English
Tablet: Not required
Platform: PPC only
To bookmarks
Heroes of Might and Magic IV is a turn-based strategy game developed by Gus Smedstad through New World Computing and published by the 3DO Company for Microsoft Windows-based personal computers in 2002. A Macintosh port was subsequently developed by Contraband Entertainment and released by the 3DO Company. The fourth installment of the popular Heroes of Might and Magic franchise, it is the sequel to Heroes of Might and Magic III, and was the last to be developed by New World Computing.
Microsoft Office 2016 for Mac makes it very simple to collaborate with others in your office. Download microsoft office for free full version macbook. It has got built-in template gallery that enables you to create professional looking documents, presentations and spreadsheets. Microsoft Office 2016 for Mac has got tools like PowerPoint, Word and Excel along with Outlook.
Scan for a mac address on the network. Gameplay
Heroes of Might and Magic IV introduced a number of major changes to the series.
Heroes
Unlike previous games, where they had little active role in combat, heroes became present on the battlefield with their troops. They can attack, and be attacked. If a hero is killed in combat he/she must be brought to a friendly town to be revived. It is possible to have armies with more than one hero, or with no heroes at all, although armies without a hero are incapable of performing certain tasks, such as capturing enemy towns or structures.

The skill system also underwent a significant overhaul, and all Heroes of a given class start out with the same skills. The player has significantly more control over the development of the Hero than in previous games in the series, and Heroes 'evolve' into over 40 different specialized classes. A Hero can select up to five of the nine available primary skills, and each primary skill makes available three secondary skills. Each of these 36 skills have five levels of progression as opposed to the three levels in the previous games.
Combat
Screenshots from the game Heroes of might and magic 4
System requirements Heroes of might and magic 4 for Mac Os:
Heroes Of Might & Magic 5 Mac
CPU: Power Macintosh G3 350 MHz or higher
Operating System: MacOS 9.1+; MacOSX 10.1+
Memory: 192 MB RAM or higher
CD-ROM Drive: 4X CD-ROM Drive
Free Hard Disk Space: 859.4 MB
Download more games for Mac OS:
GameHeroes of Might and Magic IISize159.76 MbRuns OnMacAvailable PlatformDOSLanguageEnglish Updated2019-10-14
While you download, remember to support GamesNostalgia
Help us with a donation
GamesNostalgia is a free site maintained by volunteers. Help us keep the site alive with a donation. Money will be used the pay the costs of the servers and improve the service
File: heroesofmightandmagic2_dos_mac.7z
Click the button below to generate the download link
How to install and play the game
Files for Mac can be run on all versions of OS X.You need to uncompress the 7z archive using the proper software (please use Keka to avoid problems). If the archive contains a DMG, double click it to mount the disk.After that, drag & drop the game icon into Applications (or another folder, Desktop will be fine too).New versions of MacOS block applications from identified developers. If you have this problem, just press Ctrl while clicking the game icon, and select Open.Alternatively you can use the “Open Anyway” button in the General pane of Security & Privacy preferences. See the Help page for more info.
Need more info about this game? Would you like to download the other files? Go back to the Game Review page
You may also like
Sid Meier's Civilization II (1996)
Might And Magic Heroes 8
Sid Meier's Civilization II, or simply Civilization 2, is the second chapter of the most famous..
Pharaoh (1999)
Pharaoh is a city building simulation game set in the ancient Egypt, developed by Impressions..
Heroes Of Might And Magic App
Warcraft II: Tides Of Darkness (1995)
Warcraft II: Tides of Darkness is the sequel to the first real time strategy game created..
0 notes
Text
Powerpoint Download For Mac Free

Powerpoint Download For Mac Free
Powerpoint Full Version Free Download
Professionals have long trusted its power and functionality to put their best foot forward. Students find it helpful as they create presentations for school projects and homework. PowerPoint 2016 is Microsoft’s latest version with new features and streamlined automation. This tool is ideal for anyone creating an impressive presentation, either with all the bells and whistles or with a simple and minimalist style. Suggested design templates help those who are not as tech savvy, while also being incredibly customizable for those who know their way around the interface. It currently occupies 95% of the world’s presentation software, solidifying its place as the industry standard. Using this program is sure to take your presentation to the next level.
Make your slides shine
Microsoft PowerPoint stays ahead of the curve as it releases innovative new features, still remaining the tried and true presentation software of the industry.
Microsoft leads many niches including the presentation software industry with Microsoft PowerPoint 2016. PowerPoint can be accessed either by purchasing a single software download or with an Office 365 (O365) subscription. An O365 subscription provides users access to the full suite of Microsoft Office products: Word, Excel, PowerPoint, Outlook, OneDrive, and Skype. Most users are opting for the Office 365 subscription as the monthly fee is low and provides access to Microsoft’s full business productivity suite.

Microsoft PowerPoint with a Microsoft 365 subscription is the latest version of PowerPoint. Previous versions include PowerPoint 2016, PowerPoint 2013, PowerPoint 2010, PowerPoint 2007, and PowerPoint 2003.
W elcome to Free Powerpoint Templates Design, one of the most usefull PowerPoint templates resource website: ALLPPT.COM!We provide you a fantastic collection of Free Powerpoint Templates Design that you can download for free and regulate for your personal Presentations. Discovering and getting the most related and suitable Powerpoint Templates are as simple as few clicks.
Some of PowerPoint’s newest and most innovative updates are only available to O365 users. Those with Office 365 also have access to Microsoft’s mobile apps, including PowerPoint for mobile, automatically syncing projects across all of your devices. PowerPoint via Microsoft Office Online allows users to collaborate within a presentation simultaneously, streamlining workflow and fostering teamwork. The latest version also offers templates in over 40 categories including business cards, calendars, flyers, photo albums, business plans, and of course business presentations.
Download powerpoint 2010 free for mac - shau.handmadematters. Prezentacje W Powerpoint Download For Mac - crackskills.over. Mac Logo png download - 512.512 - Free. Start quickly with the most recent versions of Word, Excel, PowerPoint, Outlook, OneNote and OneDrive —combining the familiarity of Office and the unique Mac features you love. Work online or offline, on your own or with others in real time—whatever works for what you’re doing.
Microsoft stays relevant with their Office Blog where users can connect with experts, see what’s new, and get the most out of their software. Microsoft provides support for large-scale presentations and offers tips on various subjects to improve user success and satisfaction. Within the software program itself, easily navigate PowerPoint’s toolbars to achieve the desired presentation. Business collaboration is upgraded with the ability to use @mentions within slide comments to notify others when you need their input.
Perhaps the most interesting new feature for business users is PowerPoint’s ink conversion capability. Users can draw directly within the “Draw” tab and PowerPoint will convert it to standard shapes. Sketch out an organizational chart within a slide and the ink converter will turn it into actual shapes and text. This takes on-the-fly edits and brainstorming to a whole new level. This feature, like many, is only available to Office 365 subscribers using Windows 10 version 1511 or later.PowerPoint is not just for your average work project though. With new features like 3-D animation and updated slide transitions, students and hobbyists can get creative as they showcase their information. PowerPoint consistently runs smoothly and quickly.
Microsoft PowerPoint 2016’s “Help” feature is enhanced from previous versions, which novices will find handy. All users are subject to Microsoft’s standard privacy policy. They do not use email, chat, files, or other personal content to target ads to users, a welcomed differentiator from other large companies such as Google and Instagram. Microsoft collects search data, location services (when activated), and stored sign-in and payment data (when authorized). Users can log into their Privacy dashboard to adjust settings, clear browsing, search, location, voice, media, and product activity. Microsoft seems committed to keeping privacy controls in the hands of its userbase.
Where can you run this program?
Microsoft Office 365 2019 (subscription) and PowerPoint 2016 (software installation only) are compatible with Windows 10 or macOS. The 32bit version is automatically installed but users can manually choose the 64bit download.
Is there a better alternative?
Google Slides and Apple Keynote are the two biggest competitors to Microsoft PowerPoint. The first and biggest difference between these three is that Microsoft PowerPoint is a paid software and Google Slides and Apple Keynote are both free.
There are also some additional capabilities that come included with Keynote but are an upgrade for PowerPoint users. Google Slides allows you to present via Chromecast, Airplay, or Hangouts, never having to connect any wires. Other than that, the abilities of each program are mostly similar, with some additions and deletions here and there.The big tradeoff lies in familiarity vs free.
Is it worth the learning curve to try Keynote or Slides? Most large companies and those with formal presentation needs will feel safer staying close to home with what they know, which is PowerPoint. With new features added with nearly every monthly release update, Microsoft simply adds to a program you already know, facilitating easier adoption.
Our take
Microsoft PowerPoint has been and will continue to be the presentation software front runner for the foreseeable future. For important presentations for business and school, reliability cannot be left up to chance. Making the leap from PowerPoint to another program may introduce risk when the stakes are already high. People like what is working for them and Microsoft is a brand people can trust.
Should you download it?
Powerpoint Download For Mac Free
Yes. Most business professionals and students are working with Microsoft Office products like PowerPoint already. You may be wondering if the O365 subscription is worth it or if you can get by with similar, free programs. That depends on your needs. Download an O365 subscription with Microsoft PowerPoint if you need a familiar, fast, and ever-evolving presentation software. Go for Google Slides if you are willing to work through a learning curve, adapt to a new interface, and if there will not be a negative reception of non-Microsoft products at your school or office. You cannot go wrong with Microsoft.
Powerpoint Full Version Free Download
2016
0 notes
Text
Download Microsoft Office For Free Full Version Mac

Microsoft Office For Mac Download is an office suite featuring integrated software, servers, and services built for Microsoft Windows and Mac OS X operating systems. Without a doubt, Office is one of the tops and most sought after software for every operating system. Microsoft Office Macintosh has many features that are available in earlier versions of Office for Windows and mobile apps for more coordination. Office 2016 is a design similar to the Yosemite operating system, in addition to which users can use features such as full-screen support, Retina displays, and multi-touch capabilities. Microsoft Office consists of Outlook, OneNote, PowerPoint, Word, Excel. Microsoft intends to release updates for this Office suite permanently.
Microsoft Office For Mac Download Full Version
Download Microsoft Office 2010. This is the final version of the Microsoft Office 2010. Oct 17, 2019 Office 2007 Screenshot Download Microsoft Office 2007 for free. The Microsoft Office 2007 version is a free one-click update if you have the older version of the Microsoft Office. If not so, not to worry, we have got you covered. The download can be done by clicking the link below and the product key will also be along with the documents.
Microsoft Office For Mac Download Tutorial to repair compressed file
Free Download Office 2013 Full Version
Note: All files placed on a secure site are either due to either your ISP (due to the cache of files) or antivirus, and most of the time when you used the cracked manager download, the latest version of IDM Download the site.
If you downloaded a file from soft98.ir and encountered an extraneous problem (CRC or password is either damaged or the file is corrupt):
Important: First download and install the latest version of Winrar on the site and test the file again. Important: Use the 7zip software to view the No Archives found the message
If the problem persists, run the WinRAR software, locate where you downloaded the compressed files, and select all the components and select the Repair option located on the top of the software. Then choose the right place to store them. When it’s done, go to the location you chose for storage and extract new files. If it was written at recovery, the recovered state means that the file is properly repaired. If it says “recover failed”, there is no possibility to repair it! So you must download the file again.
How to Crack Software Microsoft Office For Mac
To use Crack, you must put files in the Crack folder on the path that the software is installed and run the software.
To use Patch, you need to put the Patch file in the path that the software is installed and run the Patch file as Run Administrator and click on the Patch option.
To use the Loader, the loader must be loaded in the path that the software is installed and run Loader every time the software is run.
To use KeyGen, you must run the software, then log in to the software registry, run the Keygen file, and enter the generated serial in the software registration section.
Where is the software installation location?
A folder on the drive that installs Windows and is located in the Program Files folder.
Where is the software installation location in Windows XP?
Right-click on the software icon on the Windows desktop and click on the Properties option and then the Find Target option.
Where is the software installation location in Windows 7, 8.1 and 10?

Right-click the software icon on the Windows desktop and click Open File Location.
System requirements
– Mac computer with an Intel processor – Mac OS X version 10.12 – Recommended 1 GB of RAM – 5,62 GB of free hard disk space – Hard disk formatting such as HFS + (also known as Mac OS Extended or HFS Plus) – A monitor with 1280×800 resolution or higher – Recommended Safari 7
Related Article:
Related Article:
DOWNLOAD LINKS
Zip Password
The files are in the zip files and the extraction password is soft98.ir
Conclusion
Thanks for being with us! if you have any question about this guide article then please let us know or subscribe to our newsletter for more updates: Techazra.com
This is the final version of the Microsoft Office 2010 productivity suite, one of the most historically popular and useful tools in the entire personal computing industry.
Microsoft Office 2010 Business and Home includes five of the most valuable productivity apps on the market, which are PowerPoint, Excel, Word, OneNote, and Outlook. There are additional Office apps that can be acquired through the Microsoft Office 2010 Professional Plus suite.
As the latest version of Microsoft Office 2010, this release features several improvements and new features compared to the original version. For instance, Word's context menu has been improved with a number of changes, namely the ability to see changes as they happen in real time as you select potential options. PowerPoint presentations can now support videos, and Outlook includes a new feature that helps remove duplicate messages. Excel now has the ability to work with small color charts inside individual cells.
Microsoft Office 2010 also saw the inclusion of a text translation tool, as well as a tool for taking and exporting screenshots. Users can also apply effects to any images that are used in any documents. One of the best new features of Microsoft Office 2010, however, is the ability to use SkyDrive to save an online version of any document you create. This backup works exceptionally well and saves space on your local system.
Download Microsoft Office For Free Full Version Mac Download
One of the most notable complaints about Microsoft Office in the past was that the apps seemed to take forever to launch, and many of their functions slowed down the individual apps to a snail's pace. That is no longer a problem in Microsoft Office 2010. The software uses fewer system resources than older versions, and that translates to better performance and less lagging.
There are a few minor changes to the aesthetics of each app in the Microsoft Office 2010 suite, but they are relatively minimal. For instance, the contentious Ribbon interface used by Microsoft is still the primary method of selecting tools and options, but it has been redesigned with a much cleaner and simpler style. The new 'File' button replaced the old Office button, and it now shows a full pane with options to manipulate the document currently open, as well as specific information about that file.
There is no denying that Microsoft Office 2010 is the top-of-the-line when it comes to productivity suites. It has a number of improved features that make it much easier to use than its predecessors, and it offers several ways to improve daily workflows. It is the perfect professional solution for any business that needs productivity assistance. While some users might not like the presence of the Ribbon interface, it is certainly a big improvement over the original Ribbon interface, which was truly problematic.
Pros
Download Microsoft Office Mac Free
Improvements in Outlook
Video Support in PowerPoint
Translation Tool
Screen Capture Tool
Faster & More Efficient
SkyDrive Online Document Sharing
Free Microsoft Word Download Full Version
Cons
Download Microsoft Office 2013 Free Full Version For Mac
Ribbon Interface Remains
0 notes
Text
Scan For A Mac Address On The Network

Colasoft MAC Scanner is used for scanning IP address and MAC address. It can automatically detect all subnets according to the IP addresses configured on multiple NICs of a machine and scan the MAC addresses and IP addresses of defined subnets.
Locate Mac Address On Network
.Sort network list by device name, IP address, MAC address or Last Seen.Growl support for notifications of newly discovered devices and changes in device state.Right-click a device to obtain additional contextualized tool options, including Ping and Port Scan tools. This is the portable version of MAC Address Scanner, a fast and easy-to-understand program which scans a single host or entire network for MAC addresses by IP range. It includes some pretty. Advanced IP Scanner. Reliable and free network scanner to analyse LAN. The program shows all network devices, gives you access to shared folders, provides remote control of computers (via RDP and Radmin), and can even remotely switch computers off. It is easy to use and runs as a portable edition. It should be the first choice for every network. Angry IP Scanner. Despite being deceptively simple Angry IP Scanner does exactly what one would.

Scan For Mac Address On Network Linux
Scan Mac Addresses On Network
How does it work?
Choose a subnet from the Local Subnet combo box and click the Start button or F5 to execute scan. Colasoft MAC Scanner will display scan results in the list, including IP address, MAC address, Host Name and Manufacture. It will group all IP addresses according to MAC address if a MAC address is configured with multiple IP addresses. The scanned results can be exported into .txt file for future reference.
Scan Network For Mac Address
File Size: 172 MB Release Date: 06/21/2016 Latest Version: 2.3 Requirements: Windows 2000/XP/2003/Vista/7/8/10
Scan Mac Address On Network Cmd
0 notes
Text
Openvpn For Mac Client

The OpenVPN client v1 was called “OpenVPN Desktop Client” and is no longer available. It is also not safe to use this anymore as it hasn’t been maintained for many years. It was replaced with the OpenVPN client v2. The OpenVPN client v2 is called “OpenVPN Connect Client” and has been in use for many years. On your Mac, choose Apple menu System Preferences, then click Network.
Free Openvpn Client For Mac
Vpn Client For Mac Os
Key Features
Cross-Platform.
Viscosity has been designed from the ground up for both macOS and Windows, using native frameworks for perfect integration.
VPN For Everyone.
Completely configure your OpenVPN connections through an intuitive interface, without any need to know complex commands.
Proven Technology.
Viscosity has been protecting users for over a decade, everyone from home users to large enterprise, with regular updates the entire time.
Traffic Statistics.
Viscosity monitors your OpenVPN connections to ensure you know all the important traffic, network and connection details in style.
DNS. Done Right.
Viscosity's powerful DNS system allows you to ensure that all DNS queries use your VPN DNS servers, or only lookups for select domains.
Enterprise Support.
Easily bundle Viscosity with settings and connections so your users are ready to get started. Create simple deployable connection profiles.
Performance Focused.
Every component of Viscosity has been designed to maximise the speed and reliability of your OpenVPN connections.
Script Everything.
Control Viscosity using AppleScript or VBScript, and call custom scripts and actions when a VPN connection changes state.
More. Much More.
Powerful authentication options, connection folders, IPv6, traffic obfuscation, advanced networking, simultaneous connections, and more!
Powerful Connections
Viscosity is a first class VPN client, providing everything you need to establish fast and secure OpenVPN connections on both macOS and Windows.
Viscosity caters to both users new to VPNs and experts alike, providing secure and reliable VPN connections. Whether remotely connecting to your workplace network, home network, VPN Service Provider, or other setup, Viscosity ensures it's done with ease and style.

Stay Informed
Viscosity has a clear and intuitive interface for monitoring your VPN connections. Whether you simply want a quick overview of your OpenVPN connections, or want to drill down to the technical network and encryption details, Viscosity has you covered.
Viscosity's unobtrusive main menu provides an instant overview of your VPN connections, making it a breeze to monitor connection details in real-time. When more information is needed, Viscosity's powerful Details window provides a stylish traffic graph and detailed connection statistics.
Intuitive Editor
Viscosity takes the complexity out of editing VPN connections, while also adding a lot of power at your fingertips. Viscosity's connection editor makes it easy to configure new VPN connections from scratch or edit existing ones. All without needing to know complex commands.
Easily configure everything from network settings to complex multi-factor authentication. Viscosity's powerful DNS modes and traffic routing are also readily accessible to ensure that traffic goes where you want. Power users are also accommodated, with scripting and advanced command support.
New to VPN?
Viscosity makes it easy for users new to VPNs to get started. Its clear and intuitive interface makes creating, configuring, or importing connections a snap. Read our detailed 'Introduction to VPNs' guide for an extensive introduction to VPNs and how to get started using Viscosity.
Experts Welcome
As well as being welcoming to new users, Viscosity caters for power and expert users. Viscosity allows for full control over VPN connections, powerful routing options, running custom scripts, controlling Viscosity using scripting, advanced configuration options, and much more.
Enterprise Ready
Viscosity has been designed for both small business and enterprise. Easily make connection bundles for your users, or completely preconfigure Viscosity with all settings and connections. You can even auto-mount shares and open apps to make life easy for your users.
Expert Features
Obfuscation
Obfuscation helps to prevent your VPN connections from being blocked or throttled by network operators, and Viscosity has powerful traffic obfuscation features built right in. Easily integrate with an existing Obfsproxy server, or run your own, to allow your OpenVPN connections to function even when Deep Packet Inspection (DPI) is being used.
Powerful Editor
Viscosity's connection editor offers unparalleled control over your OpenVPN connections. It allows users unfamiliar with OpenVPN to quickly get started, while also allowing experts to configure all aspects of their connections.
Connection Scripts
Viscosity supports automatically calling your own custom scripts on VPN connection events. Power users can write their own AppleScript, Batch, or VBS scripts to automatically perform almost any action they want. This includes tasks like opening and closing certain applications on connect or disconnect, opening web pages, mounting file shares, or controlling other apps.
Scriptable
Viscosity is fully scriptable, allowing your OpenVPN connections to be controlled using your own custom AppleScript or Batch scripts. It also allows Viscosity to be combined with other third party tools to provide functionality such as automatically when connecting to certain WiFi networks, or when in certain locations.
Data loss is quite common. Easeus data recovery pro free. Users can efficiently and quickly restore deleted or lost data on new Mac computers in seconds. However, this new feature makes it impossible to complete the data recovery of Apple computers in the same way it was done with older models.EaseUS, as a pioneer in data protection technology, has successfully developed exclusive and safe data recovery technology to solve this issue. No technical experience required.
Complete IPv6 Support
Viscosity has complete IPv6 support. No matter whether you want to connect to your OpenVPN server over an IPv6 network, or have your VPN network support IPv6, Viscosity has you covered. Viscosity's DNS support also fully supports IPv6, including Split DNS.
Connection Folders
Easily group your OpenVPN connections into folders to make them easier to manage. This is particularly useful if you want to share credentials or scripts between multiple VPN connections, such as with a VPN Service Provider.
Full & Split DNS
Viscosity's powerful DNS system goes above and beyond other VPN clients, offering both Full and Split DNS modes. Ensure that your VPN DNS servers are used by default with Full DNS mode, or use Split DNS mode to only use your VPN DNS servers for certain domains.
Native Apps
Viscosity is written using completely native frameworks on both macOS and Windows, letting it perfectly integrate with your operating system and offer top performance. No memory and CPU hungry cross-platform frameworks are used: Viscosity offers a completely native user interface with no bloated web-application frameworks.
Simultaneous Connections
Connect to a single VPN connection at a time, or connect to multiple simultaneously. No need to switch between VPN connections when working with multiple sites remotely: Viscosity lets you connect to them at the same time and correctly routes traffic and DNS requests for each network.
Enterprise Features
Cross-Platform
Viscosity has been developed from the ground up for both macOS and Windows to provide a premier and native experience on both platforms. This makes is easy to deploy a single solution to all of your users, without the expense of having to train support staff and users in the use of multiple clients for different platforms.
Deployment Ready
Viscosity has been designed to be easy and straightforward to deploy in managed environments. Easily package Viscosity with VPN connections and settings and deploy it using tools such as Mobile Device Management (MDM) or Group Policy (GPO). Or use third-party deployment software such as Munki or Jamf to deploy Viscosity and offer self-service installation.
Bundle Connections & Settings
Viscosity can be bundled together with connections and settings, so Viscosity is ready to go as soon as it is installed, with no configuration required by end users. Viscosity also provides a number of extra customisable settings to help Viscosity fit into your networking and security environment, including the ability to change Viscosity's username and password storage behaviour and global scripting.
Supported Software
Viscosity is commercially supported software. We stand behind our products: if you run into trouble, need help, or would like advice, we are only an email away. There is no need to try your luck on mailing lists, or attempt to hunt down developers for support.
Ease of Use
Viscosity has a clear and intuitive interface for controlling VPN connections, allowing users new to VPNs and Viscosity to easily use OpenVPN on both macOS and Windows. Viscosity's Details window provides a simple interface for obtaining connection statistics and diagnostic information to pass on to support staff.
Reliability
Viscosity is in use everywhere, from large enterprise to small business, schools, universities, at home and on the road. You can use deploy Viscosity with piece of mind that it has been constantly tested and refined for almost any network environment. Viscosity has been constantly refined to automatically adjust to a huge variety of network conditions to ensure your user's VPN connections are reliable and trouble-free as possible.
Connection Profiles
Viscosity connection packages can be exported and distributed to users, providing an easy mechanism to supply users with connections (and all associated certificates, keys, and scripts) in a single package when providing a fully bundled version of Viscosity is not suitable.
Standard & Admin User Support
Viscosity can run under both administrator accounts and standard user accounts, for both macOS and Windows. This makes deploying Viscosity to machines that are not department controlled/imaged (such as machines at a user's home) much easier and simpler.
Smartcard, Token, & U2F Support
Viscosity supports PKCS#11 and FIDO Universal 2nd Factor (U2F) authentication options, allowing your users to use devices like smartcards and eTokens for authentication. You can use these devices as the sole method for authentication, or combine them with other authentication methods to create two-factor, or even three-factor, authentication. This helps you meet strict security polices, such as the Payment Card Industry Data Security Standard (PCI DSS).
Automatic Actions

Viscosity allows calling custom scripts before a connection connects, when it connects, or when it disconnects. This allows common tasks to be easily automated, such as connecting to file servers and mounting shares, opening web pages, opening applications, controlling other applications, and displaying messages to the user. Viscosity supports AppleScript scripts under macOS, and both Batch (.bat) and Visual Basic/VBS (.vbs) scripts under Windows.
Conditional Connections
Viscosity's conditional connections mechanism makes it easy to have Viscosity only connect to a VPN server on certain networks, or only in certain environments. A custom script can check for certain conditions (such as the wireless network the machine is connected to, the IP address, location, etc.) and decide whether to allow or terminate the connection attempt.
Big shout-out to @sparklabs! Viscosity is excellent with constant updates and flawless operation. #wortheverypenny #bestvpnclient
@daveprovine | Twitter
If you're using #OpenVPN and you're not using #Viscosity then you're doing it wrong :) @sparklabs - Thanks for an awesome app!
@systemcentersyn | Twitter
Just wanted to say that Viscosity is a great app. I'm very happy with its performance, ease of use, reliability, and design.
@CyborgInteract | Twitter
Every professional VPN solution I've used for Mac can't hold a candle to @sparklabs's Viscosity. Its by far the best
@JonoH | Twitter
Hat tip to @sparklabs for Viscosity. It's the OpenVPN client I'd write if I had to. Which I don't, because they wrote it.
@landonfuller | Twitter
I'm really pleased with Viscosity. It's an extremely elegant #Mac #OpenVPN client solution.
@noviantech | Twitter
PSA: The Viscosity OpenVPN client from @sparklabs is awesome - regularly updated and a great value. Recommended!
@_4bdi3l | Twitter
Love Viscosity from @sparklabs. Easy install, it just works. Reliable OpenVPN connections for Windows and Mac.
@clemensmol | Twitter
I just downloaded Viscosity after toiling with the various OpenVPN offerings.. I must say, I have fallen in love! Keep it up!
@MilesKjeller | Twitter
All Features
Authentication
Username & Password
Public Key Infrastructure (PKI) & PKCS#12
Shared Secret
PKCS#11 Token & Smartcard
FIDO Universal 2nd Factor (U2F)
One Time Password (OTP)
Dynamic & Static Two Factor
Network
Simultaneous Connections
Full & Split DNS Modes
Connect via HTTP or SOCKS Proxy
Traffic Obfuscation
DHCP IP, DNS, And Route Assignment
Complete IPv4 and IPv6 Support
Automatic & Manual Proxy Settings
Powerful Traffic Routing Options
Intelligent Server Selection & Fallback
Interface
Powerful Connection Editor
Traffic Graph & Statistics
Unobtrusive Status Icon & Menu
Customisable Menu Icons
Customisable Menu Quick Statistics
Connection Folders & Shared Credentials
OpenVPN Version Selection
Performance & Integration
Native Implementation for Each Platform
Low CPU & Memory Usage
Reliable OpenVPN Connections
Automatically Disconnect on Inactivity
Automatically Reconnect on Disconnect
Automatically Reconnect on Network Availability
Automatically Disable Time Machine Backups
Security
Latest Cipher & Digest Support
Sandboxed OpenVPN & Scripts
Keychain & Windows Password Store Integration
IPv6 Leak Protection
Enterprise
Bundling Connections & Preferences
GPO Group Policy Deployment
Connection Importing & Exporting
Admin Rights Not Required for User Operation
Advanced
Conditional Connections
Control Viscosity using AppleScript
Control Viscosity using Scripts or Command Line
Run Scripts on Connection Events
Advanced Configuration Commands
Platform Screenshots
Viscosity for macOS and Windows
Download Viscosity now to trial it for 30-days with no purchase necessary and no limitations. Purchase Viscosity to remove the 30-day trial limitation and help support its development. Viscosity is a one-time purchase, with no subscriptions or recurring fees.
Release Notes | Volume Licenses & Discounts | Upgrades & Extensions
Important
Netgate is offering COVID-19 aid for pfSense software users, learn more.
There are three client options for Mac OS X.:
The OpenVPN command line client. Most users prefer a graphical client, so thisoption will not be covered.
Tunnelblick, a free option available for download at the Tunnelblick Website.
The commercial Viscosity client. At the time of this writing, it costs $14USD for a single seat. If OpenVPN is used frequently, Viscosity is a muchnicer client and well worth the cost.
Both Tunnelblick and Viscosity are easily installed, with no configurationoptions during installation.
Configuring Viscosity
When using the Viscosity client, it can be configured manually or the OpenVPNClient Export package may be used to import the configuration. Viscosityprovides a GUI configuration tool that can be used to generate the underlyingOpenVPN client configuration. The CA and certificates can be imported manually,and all of the parameters can be set by hand. This section cover importing aViscosity bundle from the export package.
Download a copy of the Viscosity bundle for the client from the OpenVPNClient Export package
Locate the saved file, which will end in .visc.zip indicating that it is acompressed archive
Copy this exported bundle to a folder on the Mac
Double click this file and it will expand to Viscosity.visc
Double click Viscosity.visc and Viscosity will open and import theconnection as shown in Figure Viscosity Import
Therefore, macOS X Yosemite was announced in 2014 at WWDC and released the beta tester for the public.Still, macOS X Yosemite is one of the best-operating systems among the macOS. And macOS X Yosemite is the best developers for Mac users. Mac os x download iso. Now macOS X Yosemite is the 11th major release of Apple. Due to having some cool features that other macOS operating systems don’t have.
Delete the Viscosity.visc directory and the .zip archive
Viscosity will be running after import, and may be found in the menu bar
Click the lock icon added to the menu bar at the top of the screen
Click Preferences to check that the configuration was imported as shown inFigure Viscosity Preferences
Viscosity Preferences
Check the Connections area to see if the connection imported successfullyas shown in Figure Viscosity View Connections.
Close the Preferences screen
Click the lock in the menu bar
Click the name of the VPN connection to connect as shown in FigureViscosity Connect. After a few seconds, the lock in the menu barwill turn green to show it connected successfully.
Viscosity Connect
Click on it and then click Details as shown in FigureViscosity Menu to see connection information
On the first screen (Figure Viscosity Details), the connectionstatus, connected time, the IP assigned to the client, and the IP of the serverare all displayed. A bandwidth graph is displayed at the bottom of the screen,showing the throughput in and out of the OpenVPN interface.
Free Openvpn Client For Mac
Viscosity Details
Clicking the up/down arrow button in the middle of the details screen displaysadditional network traffic statistics. This shows the traffic sent within thetunnel (TUN/TAP In and Out), as well as the total TCP or UDP traffic sentincluding the overhead of the tunnel and encryption. For connections usingprimarily small packets the overhead is considerable with all VPN solutions. Thestats shown in Figure Viscosity Details: Traffic Statistics are from only afew pings traversing the connection. The traffic sent in bringing up theconnection is also counted here, so the initial overhead is higher than what itwill be after being connected for some time. Also, the typical VPN traffic willhave larger packet sizes than 64 byte pings, making the total overhead anddifference between these two numbers considerably less.
Clicking on the third icon in the middle of the Details screen shows theOpenVPN log file (Figure Viscosity Details: Logs). If there is any troubleconnecting, review the logs here to help determine the problem. See alsoTroubleshooting OpenVPN.
Vpn Client For Mac Os
Viscosity Details: Logs
0 notes
Text
Is There Outlook For Mac

In Outlook 2016 for Mac or Outlook for Mac 2011, you cannot accept a New Time Proposal from an attendee. The New Time Proposed email message displays one of the following messages: has tentatively accepted, but proposed that you. I really like the integration of the outlook app with Outlook on my Windows 10 PC, OWA and my Mac. The experience and functionality are very similar between platforms which make it easy for me to switch between them and still be productive. My biggest problem with the Outlook on iOS though is that it’s completely isolated from the rest of iOS. However, there are some differences and issues including the email size issue in Outlook 2010 for Windows and Outlook for Mac 2011. Some of the key differences are mentioned below. Both MS Outlook for Windows and MS Outlook for Mac can be used with MS Exchange Server. However, there are some differences as mentioned below. Outlook and Outlook for Mac: Update File Versions Article History Outlook and Outlook for Mac: Update File Versions. This Wiki page lists the MSI-based Outlook related file versions and updates with release dates and KB articles. Click an Outlook version to jump to that section as follows:. A complete and customizable e-mail manager, Microsoft Outlook Express 5.0.3 Macintosh Edition puts you effortlessly on board the online communication train.
Is There A Free Outlook For Mac
Is There Microsoft Outlook For Mac
Outlook For Mac Release Date
Using Outlook On A Mac
Outlook For Mac Download
Sep 28, 2020 • Filed to: Solve Mac Problems • Proven solutions Mac os x yosemite iso for vmware.
Developed by Microsoft, Outlook is a popular email client that helps us manage our mails from multiple sources under one roof. Since Outlook has so many advantages, a lot of people use it as their default mail client on Mac as well. While it runs smoothly most of the time, users seldom face unwanted problems with us. For instance, we often get complaints like Outlook not working or the Outlook calendar is not syncing. It doesn't matter what kind of Outlook issue on Mac you are facing with, we are here with all kinds of easy and working solutions in this guide.
Part 1. Outlook Not Opening on Mac?
This is one of the most commonly faced Outlook related issues with Mac. Chances are that even after some attempts, Outlook might not open or launch on your system. This can happen due to a firmware issue with Mac or the Outlook application. Here are some of the simple ways to fix Outlook not opening on Mac.

Solution 1: Restart Mac
If Mac is blocking Outlook from opening, then a simple restart would be able to fix it. This will reset its present power cycle and cache automatically, fixing app-related issues with it.
Just go to the Finder and click on the Apple logo on the top.
From here, you can restart your Mac without any trouble.
Try launching Outlook again after it restarts.
Solution 2: Run Outlook without Connectivity
Sometimes, while launching the app, a connectivity-related process can make Outlook not working. For instance, it can keep checking the scheduled emails or sending/receiving some attachments in the background.
Just press and hold the Shift key on your Mac and launch Outlook.
Once it is opened successfully, close it, and relaunch it in the normal mode.
Solution 3: Verify Outlook Identity
If you are working with an older version of Office 2011, then it can cause some clash with Outlook Identities. Here's how you can fix Microsoft Outlook not opening by verifying Office identity.
Launch Finder on Mac and go to Documents > Microsoft User Data > Office 2011 Identities.
Copy the Identity folder from here and drag it to the desktop.
Try launching Outlook on Mac again.
Part 2. Outlook Not Connecting on Mac?
There are times when even after launching Outlook, it fails to connect to the web. This stops all the prominent features of the app and doesn't allow us to send or receive mails. The good news is that the Outlook not connecting issue can easily be fixed.
Solution 1: Check the network connection
Before you take any drastic measure, make sure that your Mac is connected to a stable internet connection. You can try to open any other website on a browser to check the connectivity.
Solution 2: Check Outlook Connectivity Status
One of the best things about Outlook is that it lets us work offline. Therefore, if the connection is turned off, then you might feel that Outlook is not working on Mac.
Firstly, launch Outlook on your Mac and go to its Tools section.
Here, you can check the status of connectivity. If it is turned off, then simply enable it.
You can click on the 'Sync Error' prompt to further view and diagnose any connectivity issue on Mac.
Solution 3: Reset your Account
If your Mac and Outlook are both connected to a stable network, and you still get this issue, then consider resetting your account. To do this, you need to delete your account from Outlook and later add it again.
Open Outlook and go to its Tools > Accounts.
Go to the Account Settings and select the account you wish to remove.
Click on the 'Delete' button and confirm your choice to remove the account.
Launch Outlook again and add the account details to reset it.
Part 3. Outlook Not Responding on Mac?
Is Outlook not responding on Mac and has been stuck? It might surprise you, but a lot of people also encounter this situation. The application often gets stuck and doesn't respond to any command on Mac. The best solution to this is simply closing the application on Mac and starting it again.
Solution 1: Forcefully quit Outlook
Since Mac allows us to close the apps that are not responding, you can easily quit Outlook as well. Here's how you can fix Outlook not responding issue on Mac.
Simply go to the Finder and click on the 'Force Quit Applications' button. Also, you can press the Command + Option + Esc keys at the same time.
As the Force Quit Applications window will open, you can view the apps running in the background. Select Outlook from here and close it on your Mac.
Wait for a few seconds and launch Outlook again.

Solution 2: Boot Mac in Safe Mode
In case if there is an issue with Mac's network or security component that is making Outlook not working, then you should boot it in the safe mode instead.
Restart your Mac or turn it on, if it isn't already.
Press and hold the Shift key for a few seconds and release it once Mac boots in the safe mode.
Log-in to the respective user account and launch Outlook in the safe mode.
Part 4. Outlook Not Updating on Mac?
While working with Outlook, you might encounter that the app has stopped updating the inbox. You can also get the Outlook not updating issue with the entire app or merely a linked account. There are a few solutions that you can try to fix the update issue with Outlook.
1. Outlook Not Updating
If the entire app (including all the folders and accounts) has stopped updating, then you should try to repair or reset the app.
Solution 1: Go Offline/Online
Although Outlook allows us to work offline, sometimes it can leave the app in an inactive state.
Launch the application and go to Finder > Outlook.
Enable the Work Offline feature and close the application.
Open the app again after a while and disable the 'Work Offline' feature.
Solution 2: Run Outlook Diagnostics
This is something that even the regular users of Outlook are not aware of. Just like every other leading Microsoft app, Outlook can also repair itself. All you need to do is run the diagnostics to fix the Outlook not updating issue.
Start by launching Outlook on Mac and go to its Menu > Info > Account. In older versions, it is listed under Tools > Account.
From here, you need to open the Outlook Account Settings.
Go to the Email section and click on the 'Repair' button. Now, follow simple on-screen instructions to run the diagnostics.
2. Outlook Inbox Not Updating
Apart from that, chances are that your Outlook inbox might encounter some syncing issues as well. Here are some simple fixes for the Outlook inbox not updating problem.
Solution 1: Empty mail cache
If there is a problem specific to your inbox, then you can fix it by clearing its cache. This will only erase some temporary files and won't tamper with your overall Outlook experience.
Launch Outlook on Mac and select your Inbox from the sidebar.
Right-click to get its context menu and visit its Properties.
Go to the 'General' tab of Inbox Properties and click on the 'Empty Cache' button.
Confirm your choice by clicking on the 'Empty' button again.
Solution 2: Run Outlook Diagnostics
Unlike Windows that stores OST files for Outlook, Mac stores each data record separately. This is why multiple records can sometimes cause an unwanted clash in the system. If your Microsoft Outlook not responding, then consider deleting the unwanted records from Mac.
Close Outlook and go to Finder on your Mac.
Browse to the location ~/Documents/Microsoft User Data/Office 2011 Identities/Main Identity/Data Records/Messages.
Carefully examine the records with respect to their data and get rid of the content you no longer need.
Once it is done, launch Outlook and try to access your inbox again.
Part 5. Outlook Search Not Working on Mac?
To help us look for specific mails and files, Outlook lets us search by entering the related keywords. Sadly, there are times when users face the Outlook not searching issue. Thankfully, there are all kinds of ways to fix this.
Easeus data recovery wizard professional for mac. Rooting is often executed with the goal of removing limitations that hardware manufacturers specified on Android devices, resulting in the ability to alter system settings, run specialized apps that require administrator-level permissions.Sometimes, Android device cannot be listed in EaseUS Todo Backup after you think you already connect it to the PC successfully.
Solution 1: Relaunch Outlook
The fix to Outlook not searching is as simple as it sounds. Simply close the application (the usual way or forcefully) and wait for a while. Now, launch it again and access the search tab.
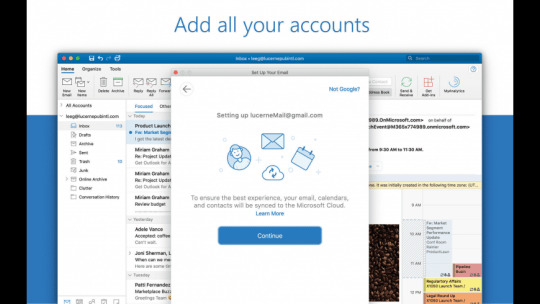
Solution 2: Move mails to a new folder
This is another easy fix that will resolve the Outlook not working problem related to its search bar.
Launch Outlook and go to your inbox from the left panel.
Right-click and choose to create a new folder here.
Select and copy all the mails from the original folder to the new folder. Once it is done, try using the search feature again.
Solution 3: Rebuild Outlook Index for Mac search
Sometimes, the index file of Outlook can clash with Mac's search database as well. If this is the case for outlook not searching, then you can fix it by following these steps.
Close Outlook and launch Finder. Now, browse to Applications > Microsoft Office 2011 > Office > Microsoft Database Utility.
As the Database Utility window will open, select the Main Identity, and click on the 'Rebuild' button. Follow the simple on-screen instructions to rebuild the Outlook index and relaunch the app.
Part 6. Outlook Calendar Not Syncing on Mac?
The Calendar feature in Outlook helps us stay organized and plan our schedule. Though, a lot of times, users complain that the Outlook calendar not updating or syncing with their mails and schedules. In this case, you can consider the following fixes.
Solution 1: Empty Calendar Cache
This will not delete all the cache data on your Outlook, but would reset the calendar cache. Once it is done, restart the app to fix Outlook calendar not syncing.
Launch Outlook and go to its Calendar > Sharing Permissions. In some versions, it is listed as 'Calendar Properties' too.
Go to the General section and click on the 'Empty Cache' button to remove the cache content related to Calendar.
Solution 2: Check Sync Services
There is an inbuilt sync service in Outlook that lets us decide what kind of data we wish to sync with the app. You can simply enable the feature for calendar to fix Outlook calendar not syncing.
Open Outlook on your Mac and go to its Tools > Services > Sync Services.
Go to the left panel and select 'Calendar'.
On the right, enable the feature to sync the local calendar as well as the Microsoft service. If you want, you can manually open files to sync from here.
Part 7. Gmail Not Working in Outlook on Mac?
One of the best things about Outlook is that it lets us sync third-party email clients like Gmail or Yahoo! mail as well. If you have already added your Gmail account to Outlook, but can't get the needed results, then consider these smart solutions.
Solution 1: Check Gmail Account Settings
Before taking any drastic measure to fix Gmail not working in Outlook, make sure that you have provided all the correct information.
Launch Outlook and go to its Tools > Accounts or Preferences > Accounts.
Select the Gmail account from the left and double-click to view the provided information.
Apart from other settings, make sure the type of Account is IMAP. Furthermore, you can also go to your Gmail account settings and under the 'Forwarding and POP/IMAP' option, select the 'IMAP' option.
Solution 2: Check for Updates
If you are running an outdated version of Outlook, then it might cause some unwanted issues with Gmail syncing. To overcome issues like Outlook cannot connect to Gmail, simply update the app.
Open Outlook on your Mac and go to its Menu > Help > Check for Updates.
A dedicated window will open where you can enable the option to get automatic updates. Click on the 'Update' button to download the latest upgrade.
Solution 3: Manually sync the account
If you have a problem with the Gmail account or the network connection, then you can try to manually sync it as well.
Launch Outlook and select the linked Gmail account from the left sidebar.
Right-click it and click on the 'Synchronize Now' option from the list.
You can also click on the sync or the update icon on the toolbar to fix Gmail not working in Outlook.
Part 8. Outlook PST, OST, Or Other Files Lost?
Sometimes, while solving issues like Outlook not working on Mac, users end up deleting some important files. For instance, you could have ended up losing some crucial OST, PST, or other Outlook files in the process. In this case, you can take the assistance of Recoverit Data Recovery to get it back. One of the best recovery tools for Mac, it can support all kinds of data files and formats. Apart from photos, videos, audios, etc. it can also get back all sorts of lost or deleted Outlook data.
Recently, Recoverit 8.0, which is the latest upgrade, is released with new and advanced recovery features. It runs a highly sophisticated recovery algorithm that can retrieve far better results in less time. Here's how you can restore the lost Outlook data on Mac using Recoverit 8.0:

Step 1: Select a Location
Install Recoverit 8.0 on your Mac for free by visiting its official website and launch it whenever you suffer from an unexpected loss of data. To start with, you need to pick a location to scan. It can be an entire disk or a particular folder.
Step 2: Scan the Location
Recoverit will perform an extensive scan of the selected location to retrieve all sorts of data. It is recommended to simply wait for a while for the scan to be completed successfully.
Step 3: Preview and Recover
Is There A Free Outlook For Mac
Once the scan is finished, the extracted content will be displayed under different sections. You can look for specific files from the search option. Select the files of your choice and click on the 'Recover' button to save them.
Conclusion
Who knew performing data recovery on Mac would be so easy? Using Recoverit, you can get back all sorts of inaccessible or deleted content. Apart from that, the guide would have helped you fix Outlook not opening, syncing, or connecting issues as well. Go ahead and try some of these solutions to fix commonly occurred Outlook issues with Mac. If you also have a tip to share with our readers about Outlook problems on Mac, then feel free to drop a comment below.
What's Wrong with Mac
Recover Your Mac
Fix Your Mac
Delete Your Mac
Learn Mac Hacks
Is There Microsoft Outlook For Mac
MS Outlook is a key product of Microsoft. It was developed to be used on various Windows based system. MS Outlook is an important part of MS Office package and provides a variety of emailing features. It can either be used as an independent application or can be used with MS Exchange Server. Today, MS Outlook is the most widely accepted email clients, mainly due to its compatibility with MS Windows. MS Outlook 2013 is the latest version of MS Outlook that is being used. However, MS Outlook 2010 is also one of the most common applications. The choice of the application totally depends upon the user preference and the platform he is using.
However, with the growing popularity of Mac OS, Microsoft initially launched MS Entourage for older Mac based systems. It was later replaced by MS Outlook for Mac 2011 for later versions of Mac.
Both of these are primarily used for emailing purposes. In addition, they provide other features including Calendar, Notes, Tasks, Journals, etc. However, there are some differences and issues including the email size issue in Outlook 2010 for Windows and Outlook for Mac 2011. Some of the key differences are mentioned below.
Both MS Outlook for Windows and MS Outlook for Mac can be used with MS Exchange Server. However, there are some differences as mentioned below.
Outlook For Mac Release Date
FeaturesWindows ApplicationMac ApplicationCommunication with ExchangeOutlook 2010 for Windows communicate with Exchange using MAPIOutlook for Mac 2011 communicate with Exchange using Exchange Web servicesMultiple Exchange AccountsSupports connecting Multiple Exchange AccountsSupports connecting Multiple Exchange AccountsOffline Address Book (OAB)Access to OABAccess to OABServer Side RulesCan Change or CreateCan Change or CreateServer Distribution ListManages SDLDo not manage SDLSync of Personal Distribution List (PDL)Does not SynchronizeDoes not SynchronizeSync of CategoriesDoes not synchronizes categoriesSynchronizes Categories except for the Master CategorySync of Contact PhotosSynchronization is not applicableSynchronizes contact photos and S/MIME certificatesRetention/ComplianceCan be applied by a userCan not be applied by a userSupport for 32 bit/64 bitSupport for both 32 and 64 bitDoes not support 64 bit applicationsVoice Mail PreviewsSupports Voice Mail previewSupports Voice Mail previewVoice Mail MessagesSupportsSupports
Using Outlook On A Mac
Mail features also form a part of both MS Outlook for Mac 2011 and Outlook 2010 for Windows. However, they differ in some aspects as mentioned below.
FeaturesWindows ApplicationMac ApplicationOutlook FormsSupports Outlook formsDoes not support Outlook formOutlook Voting ButtonSupports Outlook Voting ButtonDoes not support Outlook Voting ButtonOutlook Receipt TrackingSupports Outlook Receipt TrackingDoes not support Outlook Receipt TrackingRTF FormatRTF Message formatting is enabledRTF Message formatting is enabledThreaded View for ConversationSupports Conversation ViewSupports Conversation ViewPOP/IMAPSupportedSupportedAdvanced Searching MechanismSupportsSupportsClean up and Ignore actionSupportedNot SupportedImport PSTSupportedSupportedAttachment PreviewsAttachment previews are enabled in mail messagesAttachment previews are enabled in mail messagesDisplay PhotosDisplay Contacts Photos in mails and calendarDisplay Contacts Photos in mails and calendarMessage RecallSupportedNot SupportedExpand Distribution ListDistribution List can be expanded into individual membersDistribution List can be expanded into individual membersCalendar PropertiesCalendar can be enabled to display week numbersCalendar can be enabled to display week numbers
There are few parts of Calendar features that can be implemented in Outlook for Mac 2011 and few can be implemented in Outlook 2010 for Windows. However, some of the key differences are mentioned below.
FeaturesWindows ApplicationMac ApplicationConnection with external CalendarsShares external Calendar InformationDoes not share external Calendar information.OverlayMultiple Calendars can be seen vertically using the new Group Schedule view.Multiple views are possible except for the side-by-side viewCalendar PreviewsCalendar preview automatically displayed in the meeting requestsCalendar preview automatically displayed in the meeting requests
Some of the other features in which MS Outlook 2010 for Windows differ from MS Outlook for Mac 2011 are mentioned below.
FeaturesWindows ApplicationMac ApplicationCalendar SynchronizationCalendar Synchronization is supportedCalendar Synchronization is supportedMail SynchronizationMail Synchronization is supportedMail Synchronization is supportedTasks SynchronizationTasks Synchronization is supportedTasks Synchronization is supportedNotes SynchronizationNotes Synchronization is supportedNotes Synchronization is supportedCategories SynchronizationCategories Synchronization is supportedCategories Synchronization is supportedContacts SynchronizationContacts Synchronization is supportedContacts Synchronization is supportedDrafts SynchronizationDrafts Synchronization is supportedDrafts Synchronization is supportedDeleted Items SynchronizationDeleted Items Synchronization is supportedDeleted Items Synchronization is supportedSent Items SynchronizationSent Items Synchronization is supportedSent Items Synchronization is supportedJunk E-mail SynchronizationJunk E-mail Synchronization is supportedJunk E-mail Synchronization is supportedFind feature using the ribbon interfaceSupported by using the menus and toolbars from the main windowSupportedIntegration with CommunicatorSupports Integration with CommunicatorSupports Integration with Communicator by seeing the person presence. Communication can be started either with messages, voice call, or video callInformation Rights Management PoliciesSupports Information Rights Management PoliciesSupports Information Rights Management PoliciesContacts and Tasks display in Offline modeDoes not display Contacts and Tasks when Outlook is not openDisplays Contacts, Tasks, etc even when the Outlook is closed by making use of the My Day application.
Outlook For Mac Download
Possibility of Migration from Outlook 2011 to MS Outlook:
With increasing popularity and ease to use interface, a lot of users are planned to move from Outlook 2011 Mac to MS Outlook on Windows PC. However, both email clients are serving distinct file system so conversion becomes necessity. Some Microsoft certified vendors are providing advanced OLM to PST converter software i.e. basically designed for migration from one email client to another.
0 notes
Text
Free Accounting Software Download For Mac

Optional cookies and other technologies
Simple Accounting for Mac. 3 months free with 1-year plan. Total Downloads: 220: Downloads Last Week: 1: Pricing; License Model: Purchase: Limitations: Not available.
Free accounting software for Mac. ZipBooks is the best free accounting software for Mac. Sign up for a free account and gain access to our professional design, simple invoicing, and time tracking capabilities. ZipBooks can help your business accomplish its financial goals today.
Enterprise resource planning is the database that manages all the business processes including marketing, human resource, finance, etc. So if an accounting software is used along with ERP, it will help companies in managing their finance better. ERP accounting software, free download can be used by companies of any size. ERP accounting software demo can be used to understand how the software. Requires Mac OS X 10.13 or newer. Frequently Asked Questions. Some of the more common questions we get. Is this 100% free accounting software? You can use the desktop edition for as long as you like, use all the features and enter as much data as required. If you give away your software for free, how do. It is jargon free & very simple to use. Unlike other accounting software which is designed only for accountants, this is designed for non accountants. Express Accounts Free for Mac v.8.11 Express Accounts Accounting Software Free for Mac is professional business accounting software. This product is perfect small businesses needing to report.
We use analytics cookies to ensure you get the best experience on our website. You can decline analytics cookies and navigate our website, however cookies must be consented to and enabled prior to using the FreshBooks platform. To learn about how we use your data, please Read our Privacy Policy. Necessary cookies will remain enabled to provide core functionality such as security, network management, and accessibility. You may disable these by changing your browser settings, but this may affect how the website functions.
To learn more about how we use your data, please read our Privacy Statement.
Part 1
1. Invoice:
Features and functions:
· Invoice is one of thefree accounting software for Macwhich helps its users to create various elements and then manipulate them according to the requirement. These elements include documents, customers, tasks and projects.
· It provides the feature of giving different colors to your invoices so that you can easily recognize them and work on them.
· Helps you keep track of all the installments; paid or left over, of your customers so that you never forget to collect them.
Pros of Invoice:
· Provides a tab view for all the invoices.
· Thisfree accounting software for Macallows you to see all the invoice counts placed under various groups at one go.

· Smart folders allow you to take control over your invoices in a smarter and easier way

Cons of Invoice:

· The cross platform capabilities are missing.
Free Accounting Software Download For Mac Free
· There are not many font styles available.
· The dashboard is not up to the mark.
User reviews:
Free Accounting Software Download For Mac Os
1. Great invoicing application! Looks good, has every feature you will ever need. The developer is very responsible; the program is frequently updated.. Recommended!
Free Accounting Software Download For Mac
2. It's incredibly simple to use, and it offers a full feature set without being bloatware.
EaseUS Data Recovery Wizard is a professional data recovery tool for your Mac. Recover lost files, even after deleting a partition or formatting your drive. Easeus data recovery wizard free. EaseUS Todo Backup for Mac is a professional backup software for your backup, archive, disk cloning, and folder sync in macOS. Welcome to User Manual for EaseUS Data Recovery Wizard for Mac. With the easy-to-use and user-friendly design, EaseUS Data Recovery Wizard for Mac is one of the most powerful and successful data recovery products.
Loved this program the second I opened it. Very handy and easy to use. And boy are the people from kedisoft ever so helpful.
Free Mac Software Download Sites
http://www.kedisoft.com/invoice/
Tally Accounting software, free download For Mac
Screenshot:
In weak PC you might face problems while installing that on VMware. Vmware mac os x sierra. Table of Contents.System Requirement:Before going to install Mac OS X Yosemite you need to know something. And download the dmg file from the below if you forget to download the DMG file then you won’t be able to install Mac OS X Yosemite on VMware. So, if you make your self ready to install Mac OS X Yosemite then you need to have a high-performance PC.
0 notes
Text
Finale 2009 For Mac

fullpacrf.netlify.com › Finale 2009 Torrent Mac Lightroom █
MakeMusic has announced that it is shipping Finale 2009, a new version of its music notation software for Mac OS X and Windows.Finale is priced at $600; upgrades from previous releases and special. Free to try Coda Music Technology Mac OS X 10.5 Intel/PPC, Mac OS X 10.6 Intel/10.7 Version 2014c Full Specs. Average User Rating: 23 User Votes 3.5.
February 20, 2019,Adobe Photoshop CC 2019 v20.0.3 Mac Torrent Adobe Photoshop CC 2019, the industry standard for digital image processing and editing, delivers a comprehensive package of professional retouching tools and is packed with powerful editing featuresFebruary 20, 2019,Microsoft Office 2019 for Mac 16.22 Microsoft has announced the release of the preliminary version of the office suite Office 2019 for the Mac. The new Office for Mac is the first major upgrade packageFebruary 12, 2019,Paragon NTFS 15.4.59 Mac Torrent Paragon NTFS for Mac is fully compatible with Apple’s new security policy ensuring fast, hassle-free and safe access to NTFS partitions from macOS 10.13 High Sierra. Once the program isFebruary 11, 2019,Ableton Live Suite 10.0.6 Mac Torrent Live is a fast, fluid and flexible for musical creation and performance software. It comes with effects, instruments, sounds and all kinds of creative features, all you need to doFebruary 10, 2019,SQLPro Studio 1.0.405 Mac Torrent SQLPro Studio is the premium database management tool for Postgres, MySQL, Microsoft Management Studio and Oracle databases.
Drastic ds emulator apk free download for android full version. Some of the great features include: + Intellisense/SQL autocompletion. + Syntax highlighting withFebruary 10, 2019,Adobe Zii 2019 4.1.3 Mac Torrent Adobe Zii is a small and useful that helps you forget about all the problems with the registration of all existing Adobe products. Adobe products compatible CC so farFebruary 9, 2019,Wirecast Pro 11.1.2 Mac Torrent Wirecast is an all-in-one live streaming production application that provides the required tools to capture video, encode it and broadcast it to multiple servers and platforms at the same time.February 9, 2019,If our torrents are being blocked in chrome: Load chrome://settings/in the browser.
Finale 2014 Free Download
Select “Advanced” at the bottom of the screen. Turn safe browsing off This will stop chrome from blocking our torrent downloads. If ourFebruary 9, 2019,Adobe Photoshop CC 2019 v20.0.3 Adobe Photoshop CC 2019 mac torrent, the industry standard for digital image processing and editing, delivers a comprehensive package of professional retouching tools and is packed with powerful editing featuresJanuary 31, 2019,Download Apple Logic Pro X 10.3.2 for Mac latest free standalone offline DMG image setup for Macintosh. Apple Logic Pro X 10.3.2 for Mac is a complete recording studio providing a bundle of professional tools for musicians Posts navigation.
Written By James WoodageFinale is an application that allows you to compose music in a professional way. The program has been designed for beginners and for expert users. It can be used by people that want to learn to compose music, by teachers or even by students who are taking music classes.When you open Finale, you will have an option to create a new project from scratch, to use a template or to open an exercise, which will allow you to learn how to use the program. The program provides many guides, manual and quick-start videos, that will help beginners learn how to compose music and use the program.If you select to create a new project, you will have to go through a step by step wizard where you can choose the style of document, the layout of the page and you then have to select the instruments that you want to use. You can also set the tempo, the key and time signature, the title of the piece and the pick-up measure. Once you have done all this, you can start to add musical notes to create your song.
Finale 2009 Torrent Mac Lightroom Free
The program allows you to add lyrics, chords, tempo markings and many other things. You can also set hot-keys for the main functions. Alternatives to Finale.
Welcome to User Manual for EaseUS Data Recovery Wizard for Mac. With the easy-to-use and user-friendly design, EaseUS Data Recovery Wizard for Mac is one of the most powerful and successful data recovery products. Easeus data recovery wizard professional v18.4 mac os x. EaseUS Data Recovery Wizard is a professional data recovery tool for your Mac. Recover lost files, even after deleting a partition or formatting your drive.
Expressions
If you upgraded to Finale 2009 from an earlier version, see Finale 2009 Interface Changes to learn how expressions have changed.
Expressions are markings that tell the performer how to interpret (or express) a musical passage. In Finale, expressions are generally symbols or text placed above or below the staff. Dynamics, tempo indications (Allegro), and performance practice markings (pizz.) are among the figures added as expressions. Because of their positioning characteristics, expressions are best suited for other types of markings as well, such as rehearsal letters. (Although shapes such as slurs and hairpins are also used to communicate the manner of expression, these are generally added as Smart Shapes, whose properties are specially designed for graphical editing. Markings that apply to a single note/beat are added as Articulations.)
Because similar types of expressions usually share positioning and appearance characteristics, Finale separates the different types of expressions into independent categories. Categories permit, for example, all dynamics to automatically share the same font, size, and positioning settings. Furthermore, changes to a category apply to all expressions in that category, including those that have already been added to the score. Finale includes six categories already, each with unique font, positioning, and staff assignment settings. (Each category's settings can be changed at any time using the Category Designer dialog box).
Expression TypeExampleDynamicsTempo MarksTempo AlterationsExpressive TextTechnique TextRehearsal Marks
Additional expression categories may be added in the Category Designer dialog box, and individual expressions may be moved from one category to another in the Expression Selection dialog box.
Behind the scenes, the markings available in the Expression Selection dialog box are stored in libraries. All of Finale's expressions, articulations, and other markings are stored in libraries because different documents require different types of markings. For example, if you’re scoring a big band piece, you may want to create a library full of fall-off, bend, and “doit” markings—but you certainly won’t need those expressions when you write a string quartet. The File Menu in Finale offers two commands: Load Library, for bringing expression marks into a document, and Save Library, for storing symbols you have created or modified in a separate library of their own, ready to be imported into future pieces. Note that Document Styles include libraries, and can be used to load a collection of libraries every time you begin a new document.
A basic set of Expression markings is already included whenever you start a new default document, template, or document with the Setup Wizard. If the Expression Selection dialog box is empty when you’re attempting to place an expression in the score, you can remedy the situation by choosing Load Library from the File Menu, locating the Libraries folder, and double-clicking the correct libraries (the Articulation Library for the Articulation Tool, Text Expression Library and Shape Expression Library for the Expression Tool).
For information regarding specific markings (tempo indications, crescendos, and so on), see their individual entries.
For information regarding the behavior of expressions in linked parts, see Expressions in linked parts.
If you intend to make use of the Shape Expressions, it’s important that you assign each to a Metatool (see To create Expression Metatools for full instructions) before placing them in the score. Otherwise, you’ll find that the shapes aren’t individually reshapable; if you change one, they all change.
See also Articulations;Crescendo/Decrescendo;Dynamics; Slurs.
To assign an expression to a staff
These steps demonstrate how to assign a dynamic marking to a staff, the most common type of expression. These general steps also apply to any type of text expression; tempo markings, rehearsal letters, style markings, and performance practice indicators.
Click the Expression Tool.
Double-click on, above, or below the note or measure to which you want to attach the marking. To add an expression to multiple adjacent staves, click and drag a box around those staves. The Expression Selection dialog box appears.
Choose the Dynamics category from the list on the left (or choose Show All to display all of them). Each category represents font and positioning settings that apply to all included expressions (see Category Designer). All dynamics in the score, as well as future dynamics added, will respect changes made to the Dynamics category unless the expression has been specifically excluded from category settings in the Expression Designer (by unchecking the Use Category Fonts/Use Category Positioning check boxes).
Notice the number to the upper right of some expressions. This is the metatool assignment (see below). You can hold down this key and click to add the expression directly to the score. While viewing the Expression Selection dialog box, to assign a new metatool key to a selected expression, hold down shift and press the key (see To create expression metatools).
Click Assign (or double-click the expression) to add it to the score. Since this expression is not a tempo mark, tempo alteration, or rehearsal mark (see Score List) it can be assigned to any number of staves. Click the popup arrow next to the Assign button to choose a list of specific staves for assignment. Or click Assign to Specific Staves to define a new list. See Assign to Staves dialog box.See To assign an Expression to Multiple Staves (Assignment Lists). Finale assigns the expression according to positioning settings defined for the category in the Category Designer. An attachment indicator line displays the expression's attachment point. Click and drag the expression to change the expression's attachment point (to a different beat or measure). To position the expression relative to a different staff, drag the expression over the desired staff

The same category settings also apply to expressions added with metatools..


To add an expression to multiple staves (Score Lists)
Some expressions always apply to the performance of the full score (every staff) including tempo marks, tempo alterations, and rehearsal marks. Whenever you add an expression in one of these categories, they appear on staves selected in its category's Score List. See Category Designer.
To assign expressions to multiple staves (Assignment Lists)
Expressions that apply to single staves, including dynamics, technique text, and expressive text, can be added to multiple adjacent staves simultaneously using metatools (see To add an expression using metatools below). They can also be added to all staves, or a selection of specific staves using the Assign popup menu in the Expression Selection dialog box. Assignment Lists can be defined in the Assign to Staves dialog box.
Click the Expression Tool.
Double-click on, above, or below the note or measure to which you want to attach the marking. Or, double-click the handle of an existing expression. The Expression Selection dialog box appears.
Choose the Dynamics, Expressive Text, or Technique Text category from the list on the left. Assignment Lists are only available for categories not compatible with Score Lists.
Click the popup list next to the Assign button and choose the desired Assignment List. Finale adds the expression to the staves specified in the list. If you originally double-clicked an existing expression, Finale replaces the existing expression(s) with the newly assigned ones.
To create a new list, click Assign to Staves to open the Assign to Staves dialog box where you can define a new Assignment List.
You can also change the staff assignment of an existing expression by ctrl-clicking the expression and choosing Assign to Staves. See Expression Tool contextual menus.
Additional expression assignment keyboard shortcuts
Select an expression handle and press Option-Up arrow or Option-Down arrow to add the expression to the staff above or below (respectively).
Select an expression handle and press Option-Home or Option-End to add the expression to all staves above or below (respectively).
Select an expression handle and press Command-Option-Return to add the expression to all staves.
To add an expression using metatools
To define metatools, see To create expression metatools. To add them, do the following:
Hold down a metatool key and click to quickly add the expression.
Hold down a metatool key, then click and drag over multiple staves to add several expressions at once. See Metatools - To use an expression metatool.
Finale 2009 For Mac Pro
To move or delete an expression
Click the Expression Tool.
Drag the handle to move the marking. As you drag horizontally, the attachment indicator line jumps beats or measures to show the current attachment.
Hold down Option and drag the handle to move the marking without changing the attachment point.
Select it and press delete to remove it. Once the handle is selected, you can also use the arrow keys to “nudge” the marking for fine positioning.
Finale 2009 For Mac High Sierra
See also Align/Move Dynamics Plug-in and To adjust the vertical positioning of expressions
To create an expression
Click the Expression Tool . Double-click on, above, or below the note to which you want to attach the marking. The Expression Selection dialog box appears.
Choose the desired expression category from the list on the left.Finale will automatically apply the category's font, style, and size to the new expression. If you would like to change the font, size, or style, you can do so in the Category Designer dialog box.
Click the Create [expression category] button. The Expression Designer dialog box appears.
Choose the Text radio button and type the text to create a text expression. See Expression Designer.
Choose the Shape radio button and click Create to create a shape expression. Design the shape and click OK. See Shape Designer.
To assign a playback effect for the expression, click the Playback tab. See To define an expression for playback.
Category positioning is already defined. To change the positioning settings for the expression, click the Positioning tab. See To assign the default positioning for an expression.
Click OK. The expression appears in the Expression Selection dialog box.
Click Assign to add it to the score. If the expression is not a tempo mark, tempo alteration, or rehearsal mark (see Score List) it can be assigned to any number of staves. Click the popup arrow next to the Assign button to choose a list of specific staves for assignment. Or click Assign to Specific Staves to define a new list. See Assign to Staves dialog box.
Double-click any expression's handle (or select an expression's handle and press return) to open the Expression Selection dialog box where you can choose a different expression or edit the existing one.
Shift-double-click an expression's handle (or select an expression's handle and press shift-return) to open the Expression Assignment dialog box where you can specify positioning changes, staff assignment, and playback options for the expression.
Expressions that always apply to the full score, such as tempo marks and rehearsal marks, can be assigned to more than one staff using a Score List. You can apply a Score List to a category in the Category Designer. For more information, see Score List dialog box.
To erase Expressions from a region
Click the Selection Tool .
Select the desired region. See Selecting music for some region-selecting shortcuts.
From the Edit Menu, choose Clear Items. The Clear Selected Items dialog box appears.
Check Expressions. There are two types of expressions listed. If you choose 'Tempo Marks, Tempo Alterations & Rehearsal Marks' be sure a stack is selected.
Click OK.
To copy expressions
You can copy any musical element from one passage to another. In this discussion, the source measures are those that now contain the marking, and the target measures are those to which you want to copy them.
Click the Selection Tool .
From the Edit Menu, choose Edit Filter. The Edit Filter dialog box appears.
Select Expressions and click OK. There are two Expression check boxes. If you choose Tempo Marks, Tempo Alterations, & Rehearsal Marks, the source region will need to be a stack.
Select the source measures. See Selecting musicfor some selecting shortcuts.
Drag the first source measure so that it’s superimposed on the first target measure. If the first target measure is offscreen, scroll to it; then, while pressing option, click it. Alternatively, you can use the clipboard to copy (Command-C, then Command-V, see Copying Music).
Note: when you are done copying expressions, open the Edit Filter dialog box again and click 'All' if you want Finale to copy everything as you continue to edit your score. The configuration of the Edit Filter dialog box remains until edited manually, even after closing and restarting Finale.
To move expressions assigned to score lists
Three of Finale's default expression categories include score lists: Tempo Marks, Tempo Alterations, and Rehearsal Marks. Score Lists are Finale's way of hiding expressions on certain staves of the full score, although they apply to all staves (and usually appear in every part). See Category Designer dialog box for more information. In the score, they can be moved independently.
Drag the top Master Expression (the one assigned to the highest staff) to move all occurrences of the expression in the score.
Drag a subsequent expression (one assigned to a staff other than the top staff) to move only that expression occurrence.
Hold down ` (tilde) and drag the Master expression to move it independently.
To create a shape
See Shape Designer.
To define an expression for playback
The following instructions allow you to define an expression for playback manually. Note that Human Playback interprets expressions and performs them automatically based on the selected Human Playback Style. See Human Playback.
Click the Expression Tool . If you haven’t yet placed the mark in the score, double-click any note or measure. When the Expression Selection dialog box appears, click the desired category, choose the desired expression, click Edit, then skip the next two instructions.
Click the Playback tab. The playback options appear.
From the Type popup menu, choose the playback effect you want the marking to have. Many of these are self-explanatory: Tempo, Key Velocity, and so on. For a complete description of these items, see Expression Designer dialog box.
To set a specific value for this parameter, enter a number in the Set To Value box. The units for these items are usually what you’d expect. Tempo is quarter notes per minute. Key Velocity is MIDI velocity (0, silent; to 127, very loud). Transposition is in half steps (to transpose up an octave, type 12 in the Set To Value box). When you’ve entered a value into the Set To Value box, you’re finished defining the shape for playback. The rest of these steps deal with creating playback definitions that change over time—for example, MIDI pitch wheel data (for a pitch bend), Tempo (for a ritard), Key Velocity (for a crescendo), and so on.
If the playback parameter is to change over time, select Execute Shape, and then click the Select button. The Executable Shape Selection box appears. If the desired shape appears here, double-click it and skip to the instruction marked by the asterisk (*).
Click Create. In the next box, click Shape ID. In the next box, click Create. You’re now in the Shape Designer. For a more complete discussion of the Shape Designer, see Shape Designer.
Choose Rulers and Grid from the Shape Designer Menu. A box appears, asking you to specify the background grid increments.
Click Eighth Notes, enter 1 in the text box, then click OK. From the Show submenu of the Shape Designer Menu, choose Grid. You should now see a network of grid points; each horizontal gridpoint represents an eighth note’s duration.
Draw the Executable Shape. Again, see Shape Designer. You’re drawing, in fact, a graph whose contour Finale will follow as it plays back your music. A ritard (or a diminuendo, for that matter) looks like a straight line, or gentle curve, sloping down. A pitch bend looks like a scoop down or up. For details on these individual markings, see separate entries for Trills; Rallentando;Pitch wheel; and so on. As you draw, keep in mind that each imaginary vertical gridline represents an eighth note’s duration, and each horizontal gridline represents one change in value. If you’re creating a crescendo, the volume will increase an equal amount each time your shape crosses a horizontal gridline. If you’re creating a rallentando, the tempo will decrease each time your shape crosses a horizontal gridline. In a later step, you’ll learn how to determine the rhythmic value of these gridlines—specifying, for example, whether the volume increases every eighth note or every sixteenth note. But for the moment, realize that the height of your shape (the number of horizontal gridlines it crosses) determines how many changes in value there will be. (The shape for a rallentando that crosses eight horizontal gridlines will create eight small tempo changes when the expression to which it’s assigned is played back.)
Press return twice. You arrive at the Executable Shape Designer box. The two most important elements here are the Time Scale and Level Scale boxes.
Enter a new Time Scale, if necessary. When you created the shape, you determined how long the playback effect would last (by the number of vertical gridlines your shape crossed). The Time Scale ratio—formed by a combination of the two text boxes—is multiplied by the length of the shape you drew so that you can change the total duration affected by the shape. A 1:1 ratio means that each vertical gridline your shape crosses (in the Shape Designer) represents an eighth note duration. Suppose you’re defining the Executable Shape for a crescendo. If the shape you drew was only a quarter note long (two gridlines in the Shape Designer), the crescendo will last for exactly a quarter note—if you leave the Time Scale at 1:1. To make the crescendo last twice as long, change the Time Scale to 2:1. If you want it to last only a third as long, the Time Scale should be 1:3. The values you enter here determine the span of time affected by your shape.
Enter a new Level Scale, if necessary. The Level Scale, like the Time Scale, is a ratio. Instead of determining how long the Executable Shape’s effect will last, the Level Scale determines how much change you’ll hear (in the MIDI parameter you’ve specified). When you designed your shape, each horizontal gridline crossed by your shape represented one change in MIDI value: a tempo change from 60 to 59 beats per minute, a MIDI key velocity change from 120 to 121, a transposition down one half step. By changing the Level Scale, you can multiply that number to create more dramatic changes in the playback effect. For a ritard, you might want to specify a Level Scale of 10:1, so that the tempo drops by 10 beats per minute for each horizontal gridline crossed by your shape.
Command-click the OK button. Listen to the effect of your Executable Shape. Can you even hear your ritard in playback? If not, increase the Level Scale ratio. Is your crescendo too brief? Then increase the Time Scale ratio. If you’re still puzzled, examine one of the predefined Text or Shape Expressions that use Executable Shapes: the crescendo hairpin, for example, or the rallentando expression.
To change the default positioning for an expression category
From the Document Menu, choose Category Designer. The Category Designer dialog box appears.
Select the category and edit the positioning settings (see Category Designer dialog box).
Click OK. Existing and future expressions in the category reflect your updated positioning settings.
See also To Create an Expression
To adjust the vertical positioning of expressions on a baseline
You can adjust the vertical positioning of expressions along a baseline after they have been entered provided they have been set to Above Staff Baseline or Below Staff Baseline in the Vertical portion of the Positioning tab of the Text/Shape Expression Designer. See Expression Designer-Positioning. Then, do the following
Click the Expression Tool .
From the Expression Menu, choose Adjust Above Staff Baseline or Adjust Below Staff Baseline depending on whether you want to move expressions above or below the staff, respectively. Positioning triangles appear to the left of the staff.
Drag the positioning triangles to adjust the vertical positioning of the expressions. These triangles are handles that control the baseline for the expressions (the invisible line against which the bottoms of the letters align). Dragging the leftmost triangle up or down moves the baseline for these expressions vertically, affecting the entire piece. The second triangle sets the baseline for expressions for this staff only. The third triangle, whose effect is only visible in Page View, sets the baseline for this staff in this system only. The rightmost triangle sets the baseline for the next expression you enter. For information regarding baselines in linked parts, see Baseline Positioning in linked parts.
To create Expression Metatools
When you have many expression marks to place in your score, you can use a Metatool to bypass all the dialog boxes and button-clicks required in the expression-placing procedures described above. A Metatool is simply a keyboard equivalent for a certain expression marking; you use letter or number keys on your keyboard.
Furthermore, Expression Metatools are extremely important if you want to place more than one of any particular Shape Expression into the score. If you don’t place them into the score using Metatools, you’ll find that the shapes aren’t individually reshapable; if you change one, they all change.
Mac os x yosemite iso download for vmware. Mac OS X Yosemite settings on VMware Workstation. In this step, select processors and increase the number of processors, and the number of cores per processor. Then check to mark the. In this step, select Hard Disk (SATA) click remove, then click on Add go furthermore. Installation Process of Mac OS X Yosemite on VMware. When you have done each and everything successfully. Now you are ready to install Mac OS X Yosemite on VMware Workstation. Therefore, launch VMware and click on the power on this virtual machine. Power on the virtual machine. On the welcome screen choose your country then click Continue. Download mac OS X Yosemite VirtualBox and VMware Image The image file of macOS X Yosemite is only to install in VMware and VirtualBox. Therefore, the file is completely compressed with Winrar and 7Zip. And the image file of macOS X Yosemite is uploaded on Google Drive and MediaFire.
Click the Expression Tool .
Double-click a staff. The Expression Selection dialog box appears. Note the number or letter to the upper right of each expression slot. This is its metatool assignment.
Choose an expression, then hold down Shift and press a key to assign it to the marking. The new metatool assignment appears in the upper right corner of the slot. Repeat for any other metatools you wish to assign.
Click Cancel (or Select to add the selected expression). You can now hold down the metatool key and click to add the expression you just defined.
Alternatively, you can also assign metatools in the traditional way..
While pressing shift, press any letter or number key. The key you press is the Metatool key to which you’re assigning the marking. When you do this, the selection box appears. If the marking isn’t present in the palette, you can create it in the usual way; see To create an expression.
Double-click the desired marking. Press return as necessary to exit the dialog boxes. You return to the document, having successfully prepared the Metatool for use. You’re now ready to place the marking in the score select the proper tool).
While pressing the appropriate letter or number key, click where you want the marking to appear.
Again, remember to use this Metatool technique all the time if you plan to place Shape Expressions into the score; doing so will ensure that each occurrence of a shape is individually reshapable, because each time you use a Metatool, it creates a copy of the original shape.
0 notes
Text
Touch Drivers For Mac

Easeus data recovery wizard pro. EaseUS Data Recovery Wizard is a professional data recovery tool for your Mac. Recover lost files, even after deleting a partition or formatting your drive.

Mac os x yosemite iso download for vmware. Download the latest drivers, firmware, and software for your HP Pavilion 23tm 23-inch Diagonal Touch Monitor.This is HP’s official website that will help automatically detect and download the correct drivers free of cost for your HP Computing and Printing products for Windows and Mac operating system. Brother drivers allow your Brother printer, label maker, or sewing machine to talk directly with your device. This allows the machinery to understand data sent from a device (such as a picture you want to print or a document you want to scan), and perform the necessary actions.

Touch Drivers For Mac
NOTE: The Acoustic Pulse Recognition (APR) touch technology is not supported by the Mac operating system. Projected Capacitive touch technology is only supported on Mac Intel OSX 10.6 and above using the latest Mac touch driver.
MAC OS X (10.12): Contact Tech Support for Max OSX 10.12
MAC OS X (10.6 – 10.11 ): The UPDD_05_01_1482.dmg driver supports Mac OSX (10.6 – 10.11) on Intel-based Macintosh computers. This driver supports the following Elo touchscreen technologies: IntelliTouch, iTouch, AccuTouch, CarrollTouch (IR), IntelliTouch Plus, iTouch Plus, Projected Capacitive (pCAP), Surface Capacitive, Optical. NOTE: The UPDD_05_01_1482.dmg driver only supports single touch when used on iTouch Plus and IntelliTouch Plus products.

MAC OS X (10.4 – 10.5) for Intel-based Macintosh computers: The 04.01.10.tgz driver supports MAC OS X (10.4 - 10.5) on Intel-based Macintosh computers.

MAC OS X (10.4 – 10.5) for PowerPC-based Macintosh computers: The 4.1.1 macx.tgz driver supports MAC OSX (10.4 - 10.5) on PowerPC-based Macintosh computers.
Brother P Touch Driver For Mac

P Touch Software For Mac
MAC OS X (10.3 and below): please visit the Archived (Unsupported) Drivers and Files page
0 notes
Text
Mac Os X Yosemite Iso For Vmware

. LOOK HERE. 1. Download MAC OS X Yosemite: - Google Drive 3 parts: - MediaFire: Part 1: Part 2: http://adf.ly. Download mac OS X Yosemite VirtualBox and VMware Image. The image file of macOS X Yosemite is only to install in VMware and VirtualBox. Therefore, the file is completely compressed with Winrar and 7Zip. And the image file of macOS X Yosemite is uploaded on Google Drive and MediaFire. Therefore, Google Drive and MediaFire is a safe place for this.
Mac Os X Yosemite Iso For Vmware Download
Mac Os X Download Iso
Mac Os X Yosemite Iso For Vmware Iso
Install Mac Os X Vmware
Now ensure that the scripts has execute permissions by running chmod +x yosemite.sh and run with sh./yosemite.sh. This will take some time, so just be patient. Once done it should have created a file called Yosemite.iso on your desktop. Create a virtual Mac OS X VM. The next step should be fairly simple if you have used ESXi before. Apr 04, 2016 Install Mac OS X El Capitan 10.11 on VMware; Install Mac OS X Yosemite 10.10 on VMware; Install Mac OS X Mavericks 10.9 on VMware. There are several versions and types of Mac OS X like: Mac OS X El Capitan, OS X Yosemite, OS X Mavericks, OS X Snow Leopard. Before start installing OS X Mavericks, you need to download and extract the files. Installation Process of Mac OS X Yosemite on VMware. When you have done each and everything successfully. Now you are ready to install Mac OS X Yosemite on VMware Workstation. Therefore, launch VMware and click on the power on this virtual machine. Power on the virtual machine. On the welcome screen choose your country then click Continue.
Ever wanted to run Mac OS X in a virtual machine for developing or educational purposes? It’s actually quite easy to do.
This post is outdated! Please take a look at my revised post
One of the main reason for me to use ESXi instead of other hypervisors such as Hyper-V is the broad amount of different operating systems it supports. Not only is it able to run Windows and Linux, but I’ve been running Mac OS X and even Android for quite some time with great result. In this tutorial I’ll cover how to install Mac OS X on ESXi 5.5 or 6.0.

Mac Os X Yosemite Iso For Vmware Download
Prerequisites
You will need a server running ESXi 5.5 or 6.0 (obviously). I haven’t made a guide on installing it yet, but I might do that as well in the upcoming days. Meanwhile there are a lot of guides all over the web and the installation itself is actually much simpler then most. You will also need a real mac in order to download and convert the Yosemite installation disk.
Prepare ESXi for running Apple OS X operating systems
ESXi doesn’t support OS X out of the box. The first thing you will have to do is to download a unlocker tool from insanelymac.com. If you have ESXi 5.5 this tool is for you, or if you are running 6.0 as I am, download this version instead. Please note that you will need to register on the site in order to download these files. In order to install the unlocker tool follow these instructions:
You need to enable SSH on your ESXi host. In order to do that, login to your host using the VMware vShpere Client and navigate to Configuration->Security Profile. From here click on Properties in the upper right corner where it says Services. The dialog Services Properties should appear and from here you can click on SSH->Options and choose Start and stop with host. Click Start and then close all the open dialogs.
Depending on your operating system, you will need to download WinSCP or another SCP-client in order to transfer the unlocker-files. Make sure you extract the files somewhere on your client and connect to your ESXi host using the IP-address and the user root. Once connected navigate to /vmfs/volumes/datastore01/ , replacing datastore01 with your actual datastore name. Create a new folder called tools and transfer your unlockerXXX directory.='lang:default>
Now cd into the uploaded directory and ensure the ESXi scripts have execute permissions by running chmod +x esxi-install.sh and chmod +x esxi-uninstall.sh. Now run ./esxi-install.sh in order to install the unlocker.='lang:default>='lang:default>='lang:default>
Reboot your ESXi host
Note: 1. Any changes you have made to local.sh will be lost. If you have made changes to that file, you will need to merge them into the supplied local.sh file. 2. The unlocker runs at boot time to patch the relevant files and it now survives an upgrade or patch to ESXi as local.sh is part of the persisted local state.
Enable SSH on EXSiUpload unlocker files to ESXi

Download and create the Yosemite ISO
Now that ESXi is ready, we need to create the Yosemite ISO. For this step I use a real MacBook because I want to grab the latest and greatest Yosemite.dmg from the Appstore. From your Mac, open the Appstore and download Yosemite. Once downloaded minimize the installer.
Open the terminal and change directory to /tmp:
Create a new file for our script:
Paste the following into the file and save:
Now ensure that the scripts has execute permissions by running chmod +x yosemite.sh and run with sh ./yosemite.sh. This will take some time, so just be patient. Once done it should have created a file called Yosemite.iso on your desktop.='lang:default>='lang:default>
Create a virtual Mac OS X VM
The next step should be fairly simple if you have used ESXi before. As usual open your datastore and transfer the iso to wherever you normally store your installation files. Then create a new vm, select Typical and you should be able to select Other and then Apple Mac OS X 10.10 (64-bit). Complete the wizard, mount the ISO and install Mac OS X as usual. Please note that you must format the hard drive using the disk utility before it will be visible in the install wizard.
Configure Mac OS X
It’s very important to install the VMware Tools as soon as possible after the install has finished. Without it Mac OS X might not awake from sleep and in general be very unreliable. I also recommend to turn off sleep and the screensaver in settings as these may cause issues. Especially the screen saver takes up quite a lot of resources.
Known issues
The only known issue so far is that the virtual machine is stuck with a low resolution of 1024 x 768 unless you add a GPU to your server and use pass-through mode. I haven’t tested it, but it should work according to other users. If anyone figures out another workaround for this issue, please share it!
There’s now a way to overcome the resolution limitation using this workaround.
Related Posts
Installing OS X El Capitan or later on ESXi
Workaround for changing Mac OS X VM display resolution
Install Chrome Remote Desktop Host on OS X El Capitan
SickRage won’t start after last update
How to remove the Windows 10 Upgrade Notifications
Benjamin Krause
Mac Os X Download Iso
GeneralESXi, OS X, Software, Tutorial
Share this:
Download Niresh Mac OS X Yosemite 10.10.1 free standalone DVD ISO image offline setup. The Niresh Mac OS X Yosemite Zone 10.10 is a powerful operating system with different security updates and enhancements.
Niresh Mac OS X Yosemite 10.10.1 Review
Mac Os X Yosemite Iso For Vmware Iso
Niresh Mac OS X Yosemite 10.10.1 is a reliable environment with different security and stability updates. It provides a powerful environment with latest updates to improve the performance of the operating system. It comes up with a straightforward user interface so the users can easily work using this operating system. This release focuses in the reliability and the performance of the system.
Moreover, there are various hardware and software improvements such as Wi-Fi reliability, Microsoft Exchange Server enhancements, Mail messages improvements, remote connection improvements and much more. Additionally, various fixes are also there to make it an error-free operating system. All in all, it is among the latest operating systems for Macintosh. All in all, it is a stable operating system with a bundle of improvement and different fixes.
Features of Niresh Mac OS X Yosemite 10.10.1
A stable Mac OS X release
A familiar and attractive user interface
Improves Wi-Fi usability
Reliable Microsoft Exchange Server connection
Remote connection improvements
Improves performance and reliability
Better connectivity with the remote computers
A stable operating system with different enhancements
Various update fixes and sharing service fixes
Mac App store app fixes and Notification Center updates
Different fixes and enhancements to increase the stability
Different other powerful features and options
Technical Details of Niresh Mac OS X Yosemite 10.10.1
File Name: Yosemite_Zone.iso
File Size: 5.11 GB
Developer: Apple
Install Mac Os X Vmware
System Requirements for Niresh Mac OS X Yosemite 10.10.1
9 GB free HDD
2 GB of RAM
Intel Pentium 4 or later
Niresh Mac OS X Yosemite 10.10.1 Free Download
Download Niresh Mac OS X Yosemite 10.10 latest version free standalone offline DVD ISO image installer. You can also download Mac OS X Yosemite 10.10.5
0 notes
Text
Easeus Data Recovery Wizard Professional For Mac

How to Recover Data with EaseUS Data Recovery Wizard for Windows
EaseUS Data Recovery Wizard is a professional data recovery tool for your Mac. Recover lost files, even after deleting a partition or formatting your drive. EaseUS Recovery Data License Code is currently the best data recovery software. An extensive data recovery tool for both Mac and Windows. Usually, people will get crushed, hard disk corruption leading to personal data loss as well as professional data loss. This software now helps you to retrieve your precious information in seconds in any. Data Recovery for Mac Support Activation Activation Launch the program, find the menu bar and click EaseUS Data Recovery Wizard - Activate (or Upgrade ). Jul 05, 2020 EaseUS Data Recovery Pricing for Mac (Pro Version) In order to get fully-fledged EaseUS Data Recovery Wizard, you have to purchase the Pro version of it. Mac users can have the EaseUS Data Recovery Wizard Pro starting from $89.95, which will provide the pro features for one month. Discount Description Expires; 50% OFF: 50% Off EaseUS Data Recovery Wizard Professional 11.8-51% OFF: 51% Off Sitewide: 01/01/21: 50% OFF: 50% of Sitewide-UP TO 60% OFF.
This is a dedicated article which presents you a video tutorial of an entire recovery process and many useful tips with EaseUS Data Recovery Wizard for Windows.
Generate Error Report of EaseUS Data Recovery Wizard for Windows
Generate error report to locate the crash or hang up issue with EaseUS Data Recovery Wizard for Windows
Continue Previous Recovery Without a Rescan with EaseUS Data Recovery Wizard for Windows
Easeus Data Recovery Wizard provides the option to continue the previous recovery.
Activation and Upgrade for EaseUS Data Recovery Wizard for Windows
Activate free or trial version to full and upgrade from the old version to new version of EaseUS Data Recovery Wizard for Windows.
Easeus Data Recovery Wizard Professional For Mac Osx
Create Bootable Media of EaseUS Data Recovery Wizard for Windows
EaseUS Data Recovery Bootable Media is designed for data recovery when your computer fails to boot or you lost data from C drive (e.g. mistakenly deleted data on C drive or performed an accidental system recovery).
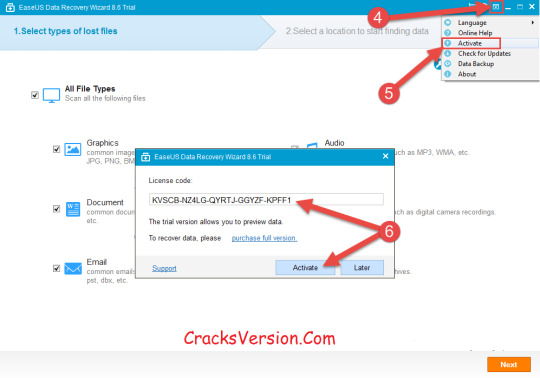
Configure a Deep Scan in 7.x Version of EaseUS Data Recovery Wizard for Windows
This is a guide about how to recover the accurate lost data with EaseUS Data Recovery Wizard for Windows 7.5 or older versions.
Create Image to Recover Data from a Bad Drive with 7.x Version
The Disk Image option in version 7.5 can help you copy the whole bad drive to a good one, then you can scan the good drive to get data back.
Troubleshooting Hang up Issue During the Scan of EaseUS Data Recovery Wizard for Windows
Follow the guide below to fix the issue that the scan of EaseUS Data Recovery Wizard for Windows cannot be completed for a long time.
How to Locate Lost Data with EaseUS Data Recovery Wizard for Windows
This article will give you some clear clues how to filter useful data from a complex scan result of EaseUS Data Recovery Wizard for Windows.
Why the Lost Data cannot be Recovered with EaseUS Data Recovery Wizard
The article mainly tells you why the lost files would be unrecoverable in some conditions.
Recover Lost Data with RAW Recovery of EaseUS Data Recovery Wizard for Windows
This article mainly guides you how to recover lost data in the case that the lost files with original file names cannot be opened or the lost files cannot be found.
Video Tutorials about Data Recovery with EaseUS Data Recovery Wizard for Windows
The video tutorials about EaseUS Data Recovery Wizard for Windows.
Solutions about Drive cannot be Found by EaseUS Data Recovery Wizard for Windows
The article offers some suggestions about drive not recognized by Windws Explorer and EaseUS Data Recovery Wizard.
How to Disable Trim of SSD to Recover Lost Data
This is an article about the introduction of Trim feature in SSD and how to disable Trim to recover lost data from the SSD.
Why I Cannot Recover Files for Free in the Trial/Free Version
EaseUS provides limited free recovery in the Data Recovery Wizard to help customers test its recovery quality before they make the purchase. This article explains how to obtain the free recovery in the Free version of EaseUS Data Recovery Wizard.
How to Locate Pictures Without Using the Recognizing Faces Feature
Recognizing Faces is a newly developed function in EaseUS Data Recovery Wizard. This artile is an instruction to guide you how to locate the images if Recognizing Faces feature cannot locate the image for you.
What is Lost Partition/Lost Disk in EaseUS Data Recovery Wizard
Lost Partition or Lost Disk is an option in EaseUS Data Recovery Wizard to retrieve the files even the entire partition was deleted or unallocated. This article explains the 2 scenarios that you need this feature to recover the files.
How to Locate Lost Data with EaseUS Data Recovery Wizard for Mac
This article will give you some clear clues how to filter useful data from a complex scan result of EaseUS Data Recovery Wizard for Mac.
Generate Error Report of EaseUS Data Recovery Wizard for Mac
The error report of EaseUS Data Recovery Wizard for Mac contains necessary info for investigating some terrible product issues.
Create Bootable Media of EaseUS Data Recovery Wizard for Mac
The Bootable Media is mainly used to recover data from the device when the computer failed to start or the lost data is saved on Mac system drive.
How to Recover Data from System Drive of Mac OS 10.13 or Higher Versions
The article will guide you how to recover data with EaseUS Data Recovery Wizard for Mac from APFS system drive in Mac OS 10.13 or higher versions.
Solutions about Drive cannot be Found by EaseUS Data Recovery Wizard for Mac
When you run EaseUS Data Recovery Wizard for Mac to recover lost files but find that the drive is not listed, you probably could find a solution here.
Video Tutorials about Data Recovery with EaseUS Data Recovery Wizard for Mac
The video tutorials with EaseUS Data Recovery Wizard for Mac
How to Recover Data with EaseUS Data Recovery Wizard for Mac
This is a dedicated article which presents you a video tutorial of an entire recovery process and many useful tips with EaseUS Data Recovery Wizard for Mac.
Load System Extension to Recover Lost Data from the Mac APFS System Drive
EaseUS Data Recovery Wizard for Mac 11.9 and higher versions provide the function of loading system drivers to scan APFS system drive directly.
How to Insall and Activate EaseUS Software for Mac

The article will guide you how to install and activate the Mac software of EaseUS in Mac OS.
Continue Previous Recovery Without a Rescan with EaseUS Data Recovery Wizard for Mac
Easeus Data Recovery Wizard Professional 12.9.1 Mac
Easeus Data Recovery Wizard provides the option to continue the previous recovery.
Recover Lost Data with RAW Recovery of EaseUS Data Recovery Wizard for Mac
This article mainly guides you how to recover lost data in the case that the lost files with original file names cannot be opened or failed to be located.
How to Recover iOS Data with EaseUS MobiSaver for iOS
Recover deleted or lost data from the iOS device, iTunes backup or iCloud backup.
How Root and Enable Debugging Mode of an Android Device
Rooting is often executed with the goal of removing limitations that hardware manufacturers specified on Android devices, resulting in the ability to alter system settings, run specialized apps that require administrator-level permissions.
Solution for Android Device Cannot be Found
Sometimes, Android device cannot be listed in EaseUS Todo Backup after you think you already connect it to the PC successfully. And this article will help you with the trouble, It nearly includes all possible situations why an Android device disappears.
How to Recover Android Data with EaseUS MobiSaver for Android
Recover deleted or lost data from the Android phone.
Allow Unknown Sources Application to be Installed on the Android Phone
The article guides you about how to allow apps to be installed on the Android phone if they aren't from the Market.
How to Recover Android Data with EaseUS MobiSaver for Android App
This article will guide you how to use EaseUS MobiSaver for Android App to perform a successful data recovery.
How to Repair Corrupted MDF/NDF SQL DataBase File with EaseUS MS SQL Recovery
This is a dedicated article which presents you a guide of an entire SQL database recovery & repair process of EaseUS MS SQL Recovery.
How to Recover/Repair Lost or Corrupted PST File with EaseUS Email Recovery Wizard
This is a dedicated article which presents you a video tutorial of an entire recovery process of EaseUS Email Recovery Wizard.
Easeus Data Recovery Wizard Technician
How to Repair Exchange DataBase File with EaseUS Exchange Recovery
Easeus Data Recovery Wizard Professional V18.4 Mac Os X
This is a dedicated article which presents you a guide of an entire Exchange recovery & repair process of EaseUS Exchange Recovery.
0 notes
Text
Java Se Development Kit 8 For Mac

Java Jdk
Java Se Development Kit 8 For Macbook Air
Java Se Development Kit 8 U 241 Mac
This page describes how to install and uninstall JDK 8 for OS X computers.
This page has these topics:
Aug 10, 2020 The Java Development Kit contains the software and tools needed to compile, debug, and run applications that you've written using Java. Enter to Search. Java SE Development Kit 8. Aug 20, 2020 Download the latest version of Java SE Development Kit 11 for Mac - Java development kit from Oracle (JDK). Read 3 user reviews of Java SE Development Kit 11 on MacUpdate. When you install the Java Development Kit (JDK), the associated Java Runtime Environment (JRE) is installed at the same time. The JavaFX SDK and Runtime are also installed and integrated into the standard JDK directory structure. Depending on your processor, the downloaded file has one of the following names: jdk-8u version-macosx-amd64.dmg. Java developer kit for mac free download - Java SE Development Kit 8, Java SE Development Kit 14, Java SE Development Kit 7, and many more programs. Java+You, Download Today! Java Download » What is Java? » Uninstall About Java.
See 'JDK 8 and JRE 8 Installation Start Here' for general information about installing JDK 8 and JRE 8.
See 'OS X Platform Install FAQ' for general information about installing JDK 8 on OS X.
System Requirements
Observe the following requirements:
Any Intel-based computer running OS X 10.8 (Mountain Lion) or later.
Administrator privileges.
Note that installing the JDK on OS X is performed on a system wide basis, for all users, and administrator privileges are required. You cannot install Java for a single user.
Installing the JDK also installs the JRE. The one exception is that the system will not replace the current JRE with a lower version. To install a lower version of the JRE, first uninstall the current version as described in 'Uninstalling the JRE'.
JDK Installation Instructions

When you install the Java Development Kit (JDK), the associated Java Runtime Environment (JRE) is installed at the same time. The JavaFX SDK and Runtime are also installed and integrated into the standard JDK directory structure.

Depending on your processor, the downloaded file has one of the following names:
jdk-8uversion-macosx-amd64.dmg
jdk-8uversion-macosx-x64.dmg
Where version is 6 or later.
Download the file.
Before the file can be downloaded, you must accept the license agreement.
From either the Downloads window of the browser, or from the file browser, double click the .dmg file to launch it.
A Finder window appears containing an icon of an open box and the name of the .pkg file.
Double click the package icon to launch the Install app.
The Install app displays the Introduction window.
Note:
In some cases, a Destination Select window appears. This is a bug, as there is only one option available. If you see this window, select Install for all users of this computer to enable the Continue button.
Click Continue.
The Installation Type window appears.
Click Install.
A window appears that says 'Installer is trying to install new software. Type your password to allow this.'
Enter the Administrator login and password and click Install Software.
The software is installed and a confirmation window appears.
Refer to http://www.oracle.com/technetwork/java/javase/downloads/jdk-for-mac-readme-1564562.html for more information about the installation.
After the software is installed, delete the .dmg file if you want to save disk space.
Determining the Default Version of the JDK
If you have not yet installed Apple's Java OS X 2012-006 update, then you are still using a version of Apple Java 6 that includes the plug-in and the Java Preferences app. See 'Note for Users of OS X that Include Apple Java 6 Plug-in'.
There can be multiple JDKs installed on a system, as many as you wish.
When launching a Java application through the command line, the system uses the default JDK. It is possible for the version of the JRE to be different than the version of the JDK.
You can determine which version of the JDK is the default by typing java -version in a Terminal window. If the installed version is 8u6, you will see a string that includes the text 1.8.0_06. For example:
To run a different version of Java, either specify the full path, or use the java_home tool:
Java Jdk
For more information, see the java_home(1) man page.
Uninstalling the JDK
To uninstall the JDK, you must have Administrator privileges and execute the remove command either as root or by using the sudo(8) tool.
Java Se Development Kit 8 For Macbook Air
For example, to uninstall 8u6:
Java Se Development Kit 8 U 241 Mac
Do not attempt to uninstall Java by removing the Java tools from /usr/bin. This directory is part of the system software and any changes will be reset by Apple the next time you perform an update of the OS.
Java Se Development Kit 8 For Mac
1 note
·
View note