
Something unique to living in or around Salt Lake and being LDS is the occasional assignment to build parade floats for the Days of 47 parade held on the 24th of July. This blog exists to chronicle the DIY adventures of amateurs building a parade float. DISCLAIMER: This is NOT an official website of The Church of Jesus Christ of Latter-day Saints, Midvale Utah Stake, or the Days of 47 organization. All content are the opinions, views, experiences, and creations of the author.
Don't wanna be here? Send us removal request.
Statistics
We looked inside some of the posts by pushinglikeatrex and here's what we found interesting.
Average Info
Notes Per Post
8
Likes Per Post
8
Reblog Per Post
0
Reply Per Post
0
Time Between Posts
11 days
Number of Posts By Type
Photo
5
Text
12
Last Seen Tumblr Blogs


Fun Fact
12.7% of mobile users access Tumblr.
Photo


7-11. Here is the hand solution, I used Great Stuff to glue on the larger block and carved it like the others. Rock got their stripes.
2 notes
·
View notes
Photo


7-10. Working with my daughter today, finishing up the glued on burlap and ringing in the flexible parts. We have to pull it out of the garage so we could lift it up to its full height to fit the burlap.
1 note
·
View note
Photo


I couldn't sleep, I put this notebook by my bed and everything I could think of that was needed to finish the float was jotted down as I though of it. I was probably at my most Howard Hughes at this point.
2 notes
·
View notes
Text
More then one way to skin a saurus
After the dust settled the next day, we needed a new solution, for wrapping. My Pa took a paper mache recipe we found at the puppethub.com and made this sample.

July 8th. I tried it out on the tail and was frustrated with the result. I ditched it for the moment and since the burlap was in 48" wide rolls I rolled out enough to wrap all the way around the frame. I scribed along the steel frame at the top and then the bottom, this made a pattern that with the ends sewn together would make a cylinder like sock we could just pull over the frame. Since the body tappered wide from the tip to the body worked our way down the trex body from the tail tip till the legs got in the way.


For the rest we measured out large pieces, rather then strips.

We used paint rollers to coat the larger sheets of burlap with our paper mache mixture.

These were stretched across the chicken wire covered frame, and held in place with hog rings, the the paper mache glue was liberally applied again after it was on to smooth it out and hide the seams.
We duct tapped the edges of the chicken wire where non glued burlap piece would go to allow for movement without catching the lose wire ends.


we would use bamboo skewers to hold the burlap to conform to the foam parts as it dried, We'd also use the skewers and poke both end through the burlap to hold the burlap against the other pieces at the seams. Most hog rings were hidden under the overlapping seams.

The rocks from heaven also got their first coat of paint.

Sound system got installed
0 notes
Text
It Takes a Village
The hardest part for me was when we had lots of volunteers, I struggled to let go of things I want to do myself to make sure they were done my way. I also worried about keeping everyone busy and organizing them, leading them. Making sure they felt they weren't wasting their time and were appreciated was by far the most stressful thing of this whole experience. The stake really came through. We had night and folks came out in force. The first big push saw a lot get done. Parts of the flowers get glittered.

We had flowers salvaged from a float for last year, we we refashioning the foam for out petals but didn't want the re-bar stems so we cut the bases off. And welded on pencil rod stems.

.

Scaffolding was erected and we cut strips of burlap and using spray adhesive we wrapped the strips to the tail.


Bad idea, by the next morning all the strips had fallen or were hanging off.

Why it failed, this spray adhesive is like contact cement it needs to be sprayed on both surfaces and let get tacky to adhere. We didn't do that. Second the chicken wire was not a larger enough surface to adhere to.
0 notes
Text
It's what's under the skin that counts
This picture was taken July 3. It was sad we weren't going to be able to do any 4th of July Parades. We had about 3 weeks left at this point. there was a first coat of paint of the wagon. Most of the foam carving was done.

There were lots of options for how to skin this metal structure. The most expensive way would have been to "cocoon" it. It would require us to more spans with the steel, and then using a crazy expensive glue to meticulous adhere expensive aluminum mesh to the frame, Then that mesh would be painted with Henry's White Roof sealant. That was the original plan, then I was trying to figure out how to make that into a skin like texture. The most cheap way would have been paper mache. and that would have been passable, but it would be as time intensive at the aluminum mesh. During a class at Modern Display, I saw a horse that Howard and his crew had made. It was exactly how I wanted the dino. It was paper mache but not paper, but burlap. Decision made. The first step was to cover the steel frame with chicken wire, the wire in the end made a nice scale like under texture. We used hog rings and spare wire bits, and covered the structure, We used two in "poultry netting" in for the body and 1 inch netting on the finer parts.

0 notes
Text
Foam Feet & Arms
Now that we were inside we could finish off the foam and start decorating, the rest of this was just big blocks the were salvaged and mentioned previously. nothing fancy for the feet, just hacked away with a saws all and the curry comb.


To smooth out the rough foam, we rubbed paint and patch non shrinking plaster into the foam and sanded it again, same with the head and arms.

I had a patter for the arms like I did for the head, but after they were on, the hands looked too small so I just lobbed them off.

0 notes
Text
Moving Day
Losing all my hard drive made rough going for doing the blog, Plus the amount to do and little time left made working on the float more a priority then documenting it. But moving day eventually came.

We attached the head and strapped it down and drove to Creative Concepts. All the neighbors who have been watching us build this thing since Feb came out a waved good bye.

It just barely fit through the door, we had two inches on each side and the top and may be 6 feet in the back and a foot in front to walk around it. We would have never built her this big if wed had a warehouse first so I guess ti worked out. Nice to get out of the weather.
0 notes
Text
Form feet and legs
It wasn't till this point we decided how to handle the legs, having done both steel rod and foam sculpture we went with half and half, thighs and calfs would be rod and feet would be foam. it was also at this point I dropped my hard drive and lost everything. all my music and freelance and last float and it would be a total wash if I hadn't had the 3d file currently open on my computer and could save to to my desktop and had put all the stuff I have up on this blog.
I had made both sides but those files were lost so I remade and printed out patterns for the legs and bent them and got them to attach, we were fortunate to finally be offered a warehouse, Russ at Creative Concepts noted he was using the vacant warehouse next to him for storage but we could use it as he got his 4th of July floats out and delivered. Still being a scoutmaster we also had Scout camp coming up and would lose 3 days so it was a crunch. to get all the welding and engineering done and get it inside. Its been a great blessing to be outside here right next to Randy's garage with every available tool we could think of.


0 notes
Text
Are--are these characters, auto... erotica?
No, no, no. We have no animatronics here.
We are doing the animation with puppetry, levers and pulleys and ropes and cables, you saw the winch previously. whats hard to show in pictures is thoughts and revisions, as things got heavier we swapped things out, I think I talked about sitting down with Phil and planning it, but Randy and Ira had to make it work. It made for a few late nights.

that winch originally pulled down on a bar about the pivot at his hips, that bar started to bend and it was getting to heavy to lift, then one night they toyed with the idea of a post with springs to lift him, but once the post was an option, Randy had the idea of a pulley on the top

and lifting the front end up instead of pulling it down with some chain pulling right at out structural reinforcements directly at the arms.

much easier and faster to lift. Eventually as it continued to get heavier we had to switch the hand winch for an electrical one.
Another revision was the side to side movement of the neck, sorry no pictures for this one is started as a lever pushing a rod attached to the neck, pushing it it toward the front made the head go left and puling toward you made it go left, but when the beast reared up the lever traveled forward with it, we replaced it with cable attached to a bar with a pivot near the driver the cabled attached at the pivot so it didn't travel as the beast moves up and down.
For the jaw and head up and down movement it is also pulleys and a lever, the lever is one of a tractor Randy had around, that required some trial and error making the stops, as you push down on the lever it raises the jaw 30º till it his a stop then ti pulls the head up and additional 30º. As it got heavier we had to switch from a rope which would stretch to a cable.
here's a video of it in action
0 notes
Photo

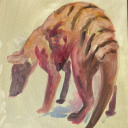
Andrea is a frugal person, not stingy or cheap, but frugal, its one of her greatest qualities, it helps when you have a limited budget for these things. I believe I mentioned how we scavenged last years floats for parts and leftover supplies which have come in very handy. I'll show off some of those in a future post. One of the great deals was she went to PPG PORTER PAINTS here in Midvale and in talking with the manager Tom was able to work out a great deal on the colors well need. The problem was I hadn't picked colors yet. Having been painted into a corner I quickly made some decisions, here is the final painting and the swatches we used to pick colors.
0 notes
Text
Bit by Bit
putting it together.
we rough fit the hand cart,

then got it on the float and welded on the arms


there will be a post running up the back to support the tail and act as a stop for the hand cart, we got it attached with bolts and roughed a tail attachment on top.

Randy fashioned hooks that we are using to bridge the gaps between the wire sculpture and the square tube frame.


0 notes
Text
some details - dutch oven
it took about a month off and on getting that head carved, lots was still going on at the float base and I put a few details together. one was a dutch oven, it was made from a round storage bin the misses found on the side of the road, I cut off the bottom where it was broken with my saw and traced a new bottom on a piece of plywood, I used GreatStuff and a couple of screw to hold it in, I cut some dowels and screwed them to the bottom, to make the lid we found a disc sled at the DI and i cut that to fit, and screwed on a rim and handle I carved from foam scraps. it got painted black and glittered.


0 notes
Text
and I’ll form the head part 3
I did some rough shaping of the top, I printed out orthographic views to aid me. My main sculpting tool is a curry comb from IFA, and my long drywall hand saw.

I also bought an electric hot knife from Harbor Freight and a hot wire cutter from hot-wire foam factory, but they were small and didn’t give me much at this scale. I tied of the pieces shifting and started to get worried about them not lining up so I brought over the steel frames for the head and jaw. I used the paper patterns to cut a channel in the back of each, the hot knife was very helpful here as the width of the blade matched the size of the steel.

Then i applied the Great Stuff, but not wanting to have the gaps I got when i tried to weigh it down this time I strapped it together.

now it was one piece I went to town with the curry comb.

Repeated the process for the top


I kept refining, I decided that when carving, you take off a bunch, and when you think you’ve taken off enough then take off more, then look at then take off some more. I see a lot of "block" heads in the parades past as people bought a square block of foam then rounded the corners and put a face on the surface. I used the hot-wire cutter to make quick teeth and used skewers and GreatStuff to attach them. I’m going to leave the GreatStuff like gums or gunk stuck between its teeth.


2 notes
·
View notes
Text
and I'll form the head part 2


So the pieces and using the pattern lined it up by the patterns, then using GreatStuff, and bamboo skewers i glued them together into four parts, head left and right, and jaw left and right. I tried to weigh them down so the seams would be tight, but it wasn't enough and some parts expanded a bit.
1 note
·
View note
Text
and I'll form the head!

so I had the paper patterns plotted out from my 3d model for 3 inch thick slices.

I taped then down

and used my pounce wheel to transfer the pattern.


I had my son trace the pattern with a sharpie so I could see it and then...


cut with a generous margin using the saws-all. I used kabob skewers to hold two pieces together and cut them at the same time

all the pieces on my back lawn.
0 notes
Photo

We got a block of foam to carve the head
0 notes