
Last Seen Blogs

gmebackup
GMEbackup

spookyleeeed
无标题


almaram-a
اللهمّ حسن الحيَاة وحسن الممَات.

4ucoupons2
Untitled
Text
Programming A Drone With Python Continued...
So you’ve seen how to control a drone with hard coding and by using input from a keyboard. Very simple yet powerful things can be achieved! Yet, we haven’t explored the power of implementing one of the libraries that we have downloaded. That library is, drum roll please…….CV2!
What is CV2:
CV2 is what the library may be called but, it’s not the actual name of the project. The project we’re talking about is called OpenCV. OpenCV is a cross-platform library which we can use to develop real-time computer vision applications. The main focus is on image processing, video capture and analysis include features such as face detection, and object detection. I will be demonstrating the face detection part in my video but both can be implemented in very similar fashion. Oh and remember when I said it was cross-platform? That’s right you fellow programmers, even if you don’t know python that doesn’t mean you can’t use OpenCV in one of your projects as its available on most of the popular languages such as C++, Java, and Python. So as everyone reading this knows Java, it might be worth checking out if you ever want to implement A.I. driven detection in a future project of yours!
What can OpenCV accomplish?
You may not be aware of this but you likely use OpenCV every single day and your about to find out why you social media superstars. You know when you pull out your phone to get that fire photo for the ‘Gram and you have so many filters that you can apply? OpenCV is probably what they are using to control all those filters. These things include but are not limited to blurring everything in the background so the focus is only on you, changing the colors of the picture/video, changing the background of the photo/video so it looks like you’re chilling on the beach instead of stuck in your parent’s basement eating pizza pops and drinking a bottle of wine alone. That’s right, that’s OpenCV! So next time you’re on snapchat sending pictures of yourself looking like a dog sticking out your tongue you can say “Hey! That technology is driven by OpenCV!”.
How we’re using OpenCV:
So now that you have a grip on what OpenCV is, how will we be using it? As you know we are programming a drone, specifically the DJI Tello drone. This drone has a camera on the front of it which we will be able to use to find a face or object and then do whatever we want with that face/object. I’ll be demonstrating with face detection only but just note that you can detect all sorts of things that may be on the face such as eyes, nose, eyebrows, lips and so on. For my needs of demonstrating this I’ll just be finding the whole face and basically draw a rectangle around which than we can use to find the center of the face so the drone will always be focused exactly on the middle of the face. Then once the drone finds the face, it will move either forward or backward depending on the size of the rectangle so the person its capturing can move around and it will follow. This is a common feature built in to most drones now as its perfect for people who may blog as they can just walk down the street and the drone with stick with them with no need for someone to control it.
How is this achieved with the DJI Tello?
If I were to tell you that in under 100 lines of code, we could have everything up and working as intended? Well that’s the case here (thank you python cv2 library). So first of all we need to import all the necessary libraries that we will be using. These libraries if you don’t remember are numpy, cv2, and djitello2 as well as time for some minor sleep commands. Next is connecting the drone through creating the object and then issuing the command connect(). Starting to remember yet? Now we start issuing the commands to the drone. The first thing is to get the drone to take off. Now when a drone takes off it only goes about 3 feet in the air so we need it to increase by another 3 or so feet so were now at a height that an average person may be at so the drone can find a face and not a crotch! Next is where the code from our CV2 library comes in! We will capture the image stream coming in from the drone using the function streamon() from the djitello2 library. This allows us to take the image it captures and render it into something that we can use. The rest is pretty intricate so I won’t go to in depth in this written blog but check out the video blog to have a full overview of the code and see it in action!
Conclusion
Are you ready to see what the OpenCV project is capable of and how we can use it to command our drone to do some pretty cool things? This is just a small snippet of what can really be achieved. As I had mentioned, OpenCV is implemented in most camera/video applications for various reasons and as detection becomes even better, more things will be possible. They may be good, they may be bad but as a whole its always super interesting to see how these technologies work. Any who, I’m sure you’re ready to actually see it in action instead of reading so let’s get to the video!
Video Link: https://youtu.be/htf8Syy_0Nk
0 notes
Text
Programming A Drone with Python Introduction
When I was a kid a prime part of my childhood was toy RC cars. The thrill of being able to drive something at a young age like that was amazing. As I grew up, I transitioned into new things like riding dirt bikes and ATV’s. Nothing has really changed as now I’m a full adult. I still love driving any sort of vehicle with an engine on it whether that be something anywhere on the spectrum of different vehicles. Now as a programmer and with autonomous vehicles becoming more popular, I thought that it would be a great time to learn how to do it as well. There are a ton of brands of drones available to purchase these days, but I will be using a DJI Tello drone to demonstrate how to program one (https://www.bestbuy.ca/en-ca/product/dji-ryze-tech-tello-quadcopter-drone-with-camera-white/12644588). They’re one of the cheaper drones a person can buy but still have a ton of features that we can experiment with so let’s get into it.
Downloading and Installing an IDE.
For my demonstration I’ll be using JetBrains PyCharm Professional. There is a free version available which will also work, it just comes with less features which won’t interfere with what were doing so this is can be done by anyone. This will work with any IDE that supports python development so if you have a preference you may use that.
Instructions:
1. Head to https://www.jetbrains.com/pycharm/
2. Download PyCharm Community Edition that is compatible with your PC.
3. Install PyCharm
Setting up your IDE
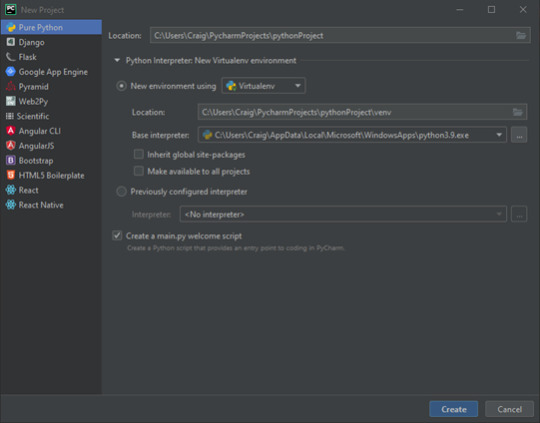
There are a few things we will have to do before we can continue into writing some code to make everything work, so at this point you will open your fresh install of PyCharm. This will prompt you with a menu where you can customize the IDE to your liking but none of this is necessary, so we wont. There is a button that allows you to create a new project so that’s what we will do. From the menu on the left select Pure Python (should be selected by default). Now we will name the project. By default, the project will be called pythonProject which you may change to anything you want. Next, we will set the environment. For this we will set it as Virtualenv. The location can just stay as it is as it will just be saved in the directory we are creating. Now we choose the base interpreter. You may not have python installed on your system so it will offer you to download the python programming language from this language. As of the time of writing this the version of python I’ll be using is 3.9 but you may choose an older version also as it will also work. If you are using windows 7 please note that 3.9 won’t run so you will need to install an earlier version. Make sure that you are installing python 3 and not python 2 as python 2 won’t support the libraries we will be using. Once all the settings are set (they should look like the picture below) we can create the project.
Alright now that we are in the IDE there is one last thing we need to do before we can start programming! We need to download a couple libraries that will make our life extremely easy when programming this drone which are djitellopy2 (used to connect and give instructions to the drone) and pygame (used to get keyboard input which we can map so you can give commands pushing keys on the keyboard). To do this on your menu bar at the top of the IDE go to File -> Settings or use the shortcut ctrl+alt+s. Now from this menu open the Project: <yourProjectName> tab and select Python Interpreter. From this menu you will be able to see all the libraries that your project is using. We need to add a couple libraries so to do this use the + button near the bottom of the screen. Now we can see all the available packages that can be downloaded for various projects. In the search bar search for djitellopy2 and install the package, then do the same for the pygame package. Now that both are installed your python interpreter page should look like the picture below.
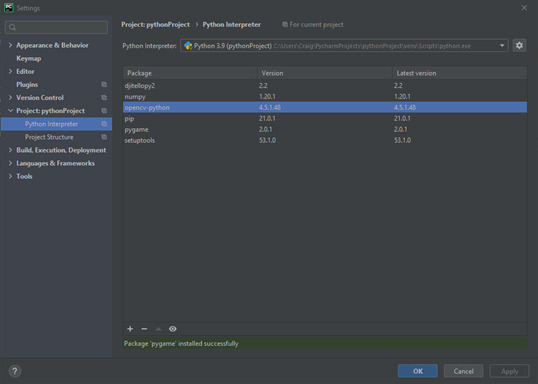
You may have noticed that a couple other packages were installed as well. These packages are being used by the libraries we just installed so they automatically get installed as well. Now we are ready to start writing some code and making sure we can connect to the drone!
Connecting to the Drone
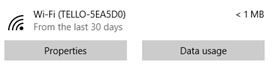
Connecting to the drone is extremely simple as it just uses a Wi-Fi connection. All you do is push the power button located on the side of the Tello drone and wait for about 10 seconds as it turns on. It will start flashing an orange light when its ready. Now go to your Wi-Fi settings and connect to the drone. You should see something like this:
Now that we are connected, we can start sending instructions to the drone! So, lets start writing up some code that will do that. You may want to turn the drone off at this point just to preserve the battery.
Coding Basic Commands
Now comes the fun part as you get to see just how easy that programming a drone can be! The first thing we are going to do is create a new python file in our IDE. To do this click on File -> New and select Python File from the dropdown list. Give it an appropriate name such as BasicMovements and hit enter. This is the file that we will use to give command to the drone for this step. The first thing we need to code is importing the package that we downloaded earlier (djitellopy). To do this we will type “from djitellopy import Tello”. This will allow our program to use the methods that are in the package as you will see in the upcoming lines. Now we need to define an object that will be the controller for the drone. For simplicity we will just define it as “drone”. Next you need to make our drone object defined as part of the Tello class we imported. We will write the code “drone = Tello()”. This now makes it so anytime we want to give a command to the drone it will use the object “drone” and use the methods provided to us in the Tello class. If you hold ctrl+click on the Tello() line in the IDE it will open the file so you can see all the available methods that we can use to give commands to our drone. The first command we need to give to our drone is connecting it to our program so we can start issuing commands. To do this we will use the method connect(). So, we type “drone.connect()” and now when we are connected to the drone on our WIFI network and run our program it will send data to the drone. Another line I like to add is checking the battery every time we run our program because there are certain commands that we can’t use when the battery drops below 50% for added safety such as doing flips. To do this we need to use the python’s built-in method print() and pass in the drones command get_battery() like this: “print(drone.get_battery())”. Now that we have setup all the basic things to connect to the drone lets write the first movement command! This needs to be the takeoff() method so the drone actually is flying before we start telling it to move. Now that the drone will be given the takeoff command we will make it move with the move() method. There are a few move() methods we can use in this case to make it move in certain directions. Choose one of these methods (move_up, move_down, move_left, move_right) and pass in the amount of centimeters you would like the drone to move. Once you have that command wrote we will get the drone to land so we can finally test the program and see if our drone is being issued these commands. To get the drone to land we use the method land (“drone.land()”). Your program should look something like the photo below.

Running our Program
To run our program, we will right click in our IDE and select the run option or in PyCharm you may use the shortcut ctrl+alt+F10. You will need to make sure that you have your drone turned on and connected to your computer through WIFI or else nothing will work, and an error will be thrown in our program.
Conclusion
So, did you get the drone to work? Can you see just how easy it is to send basic commands to the drone? Thanks to this library most of the work is already wrote and all we need to do is just call the actions. Now I will say that hardcoding values isn’t the easiest approach to controlling a drone so, I have also created a video that will explain how we can setup our code to take input from our keyboard using the other library we have installed called pygame. This will allow us to use any keys on our keyboard to give commands in real time to our drone. Thanks for reading and have a great day!
Video Demonstration of Keyboard Input:
https://vimeo.com/517967377
1 note
·
View note