
Last Seen Blogs

da3dm
DA3D

farfromhelpless
you just hit the jackpot

mammamiachefame-blog
Mamma mia che fame

cocshoes
CoC Shoes

ee88energy
Sans titre
Link
Here is a guide on how to use Autel IM608 Pro2 to add a new key for 2019 Volkswagen Golf. For more information on VW repair, see Volkswagen troubleshooting.
Device Requires:
Autel MaxiIM IM608 PRO2
`
Procedures:
Connect Autel IM608 Pro2 to XP400 programmer
Click “Universal Key” on screen
Then click “Universal Key Generation”à“Europe”à”Volkswagen”à”Type by Model”à”Golf”à”2019”à”Volkswagen Golf 2013-2021”
Put the key into the XP400 programmer slot
Click “Generate Universal Key”
Generating universal key
How-to-use-Autel-IM608-Pro2-to-add-new-key-for-Volkswagen-Golf-2019-9
Universal key generation is completed. Do you want to continue the generation?
Click “Completed”
0 notes
Text
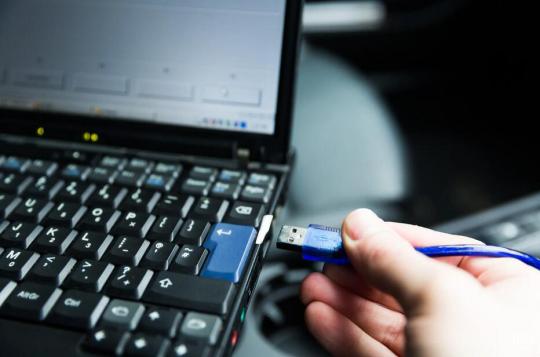
How to install the VAG COM VCDS HEX V2
The HEX-V2 Enthusiast USB Interface works with VCDS (VAG-COM Diagnostic System) via USB turning a Windows PC into a factory level diagnostic tool for Volkswagen, Audi, Seat or Skoda automobiles.
There are so many different language for you option, when you make the order you can leave massage to us which language do you need. Because we could not change the language any more when you receive the goods.
Note:
1.Pls turn off the Anti-virus Software and disconnect internet before installing and using every time , because software was cracked version, can not recognized by Anti-virus software, so some files will be reported to virus, but in fact it is harmless.
2.Systems required: (32bit/64bit) of Windows 7, Windows 8, Windows XP, Windows 10 (but not all Win10 can work). Not supported Windows on VM Systems (Parallels, Virtual Box, etc) ,MAC
3.The CD may be easily broken on the way to destination, so if CD can’t be readable, please DO CONTACT US to send you download link
So many friends when they install the vag com software,they meet some question.how to install the vag com vcds software, the way is as below.
1:Pls turn off the Anti-virus software, as you know, the auto diagnostic tool software, the anti-virus never met it, so default is as virus, so remove or damage the software.
2:pls copy the software on your laptop desktop.pls note: this model could not update the software, just can use our software.
3: there are instruction to teach how to install the software,so when you install the software you can according the instruction.
4: connect the USB Cable with the laptop and vehicle.
5:Pls install the USB Cable driver
0 notes
Text
Jaguar Land Rover DoIP VCI
Original WIFI JLR DoIP VCI interface, supports Land Rover and Jaguar vehicles till 2022 Work with original software on offcial website. Buy device get one year free pathfinder online account, is the only unit that will be compatible with Pathfinder and all JLR vehicles with the new vehicle architectures.
Original JLR DoIP VCI Powerful Functions:
• Work with all Jaguar & Land Rover models after 2005 year.
• Work with the models after 2017, support Pathfinder software application
• Work with the models before 2016, support SDD software.
• Support all of the SDD’s diagnostic & programming protocol.
• Support all of the Pathfinder’s diagnostic & programming protocol
• Support Pathfinder activation service offline.
• Support WIFI connection
• Support VBF file edit
• Support EXML file edit
• Support SDD engineering software application
• Support Pathfinder engineering software application
• Support online programming, coding & key programming
• SDD software can update to the newest version in the assistance of manufactures’ engineer, and perform online programming.
• Pathfinder can update to the newest version in the assistance of manufactures’ engineer, and perform online programming.
• Can replace JLR VCI box
• Can replace JLR DoIP VCI box
JLR DoIP VCI Application
• Jaguar XE (X760)
• Jaguar F-Pace (X761)
• Jaguar F-Type (X152)
• Jaguar XF (X260)
• Jaguar XJ (X351) – 16MY only
• Jaguar F-Pace 2017
• Jaguar SType 2017
• Evoque (L538)
• Discovery Sport (L550)
• Range Rover (L405)
• Range Rover Sport (L494)
JLR DoIP Software Download Link
Pathfinder:
http://diagnosticdelivery.jlrext.com/pathfinder/Jaguar_Land_Rover_Connect_Updater_v2.exe
SDD:
http://diagnosticdelivery.jlrext.com/idscentral
https://www.obd2tool.com/category-209-b0-JLR+VCI.html
0 notes
Text
Read and Write EEPROM Data for BOSCH EDC16 ST95640 chip by XTOOL X100 PAD3
how to read and write EEPROM data for BOSCH EDC16 ST95640 chip by XTOOL X100 PAD3.
Device Required:
XTOOL X100 PAD3 with KC501 adapter
Procedures:
Build connect between IC clip cable to KC501 and KC501 to X100 PAD3
Power on X100 PAD3
Then select “Special Function”–>”EEPROM”–>”EEPROM Adapter”
Select ”Read/Write EEPROM”–>“KC501”
Select “ST”–>”ST95640”–>”SKx16”–>”Read data”
Reading data
After finish,pls save it
For writing data back,pls go to previous option to select “Write data”
Select which file you want to write,then click “OK”
Finish
https://www.obd2tool.com/blog/how-to-read-and-write-eeprom-data-for-bosch-edc16-st95640-chip-by-xtool-x100-pad3/
0 notes
Link
Preparation
Preparation: MS80, M001A, M041
Tips
Tips: After finishing related maintenance items, pls follow below steps to remove maintenance tips.
Solutions
Solutions: using OBDSTAR MS80 to operate on【Service reset】.
0 notes
Link
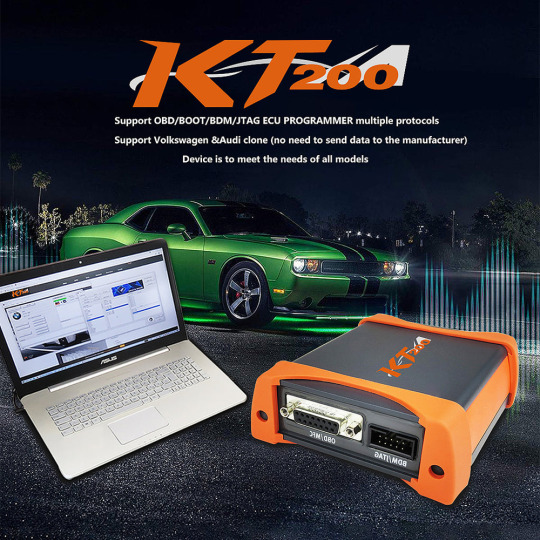
KT200 has 2 versions:
1. Car version (Basic version): Car OBD, Truck OBD, Full System, BDM/JTAG, TOOL BOOT, Bench Mode, TCU Gear
2. Full configuration Version: Car OBD, Truck OBD, Full System, BDM/JTAG, TOOL BOOT, Bench Mode, TCU Gear, Tractor OBD, Boat OBD, Motorbike OBD
0 notes
Text
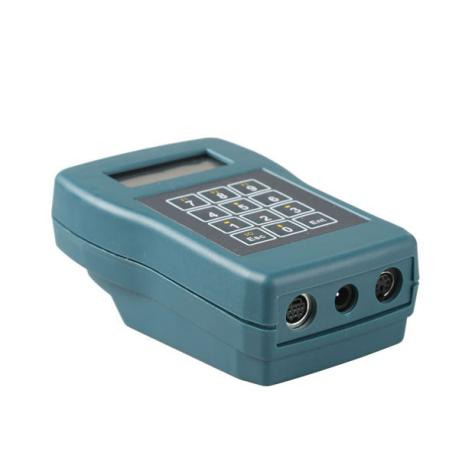
Tacho Programmer Digital Tachograph Programmer CD400 TRUCK TACHO Speedometer
1.What is a tachograph?
What is a tachograph? Basically, a tachograph is a device that measures and records the speed and distance driven by a vehicle. The data are recorded in the form of graphics on a paper disk. The new digital tachographs record those data on its embedded memory and also on the smartcard of the driver.
2.Description
2.1 Technical specifications
Graphic FSTF LCD Display: (100 x 32 pix. / 4 lines x 20 char)
White LED backlight
Size: 150 x 100 x 45 mm
Supply voltage: 9 to 30 VDC
Supply current: 12mA
Case: green-blue ABS (IP40).
Operating temp: -20…+70°C
Weight: 155g
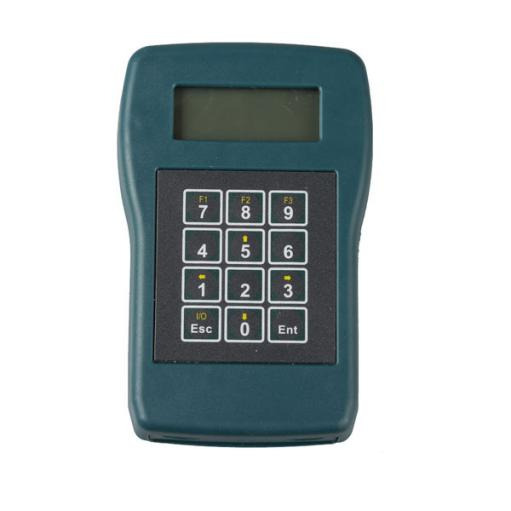
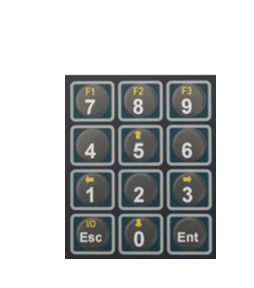
2.2. Keyboard – Alternate function keys ‘F1′, ‘F2′ & ‘F3′ are active when a function in inverted video appears on the bottom line of the display.
F1= MODIFY, F3=OK
– Alernate function key ‘↑’ & ‘↓’ are used for example to navigate the menus.
– Alernate function key ‘←’ & ‘→’ are used to select the digit in some parameters.
– ‘Ent’ (=Enter) is used to select a function or enter a value.
– ‘Esc’ key is used to go back in the menu, leave a function, to erase the last digit entered and to switch the programmer ON & OFF when powered by the battery.
2.3. Connections
– Left connector: Serial port for software upgrade (upgrade cable).
– Center connector: Connection for crocodile clip cable (K13xx/K1318).
– Right connector: Connection for tachograph cable.
3.Operation
3.1.Power supply and tachograph type detection For all tachograph types, except for the K13xx/1318 and the FTCO1319, the Key Programmer is powered by the tachograph itself. An automatic tachograph type detection is executed on power ON, so don’t switch the programmer ON, simply connect it to the tachograph with the appropriate cable. The programmer will switch ON and detect the tachograph type. In the case of the K13xx/1318 and the FTCO1319, switch the programmer ON pressing the ‘I/O’ key. If the FTCO1319 is connected, the programmer will detect it. To switch the programmer OFF, press and hold the ‘I/O’ key. If no tachograph is detected, the K13xx/1318 will be selected by default. OOn power ON, the programmer will display the product information (Software version, Serial number, etc…), then the menu for the tachograph type detected.
0 notes
Text
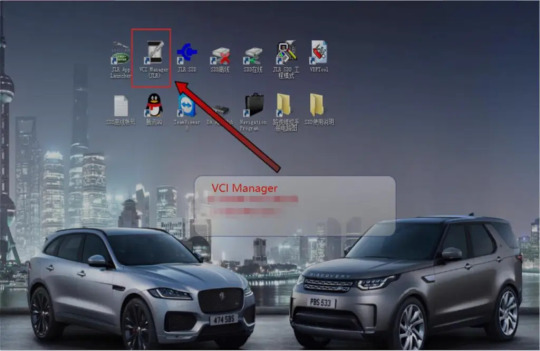
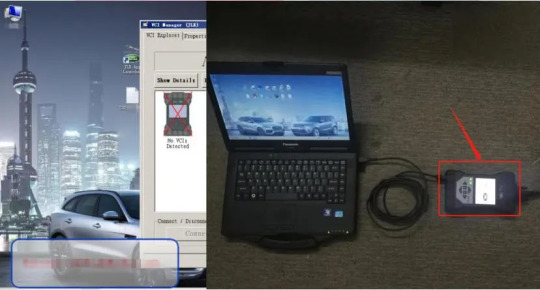
How to Update firmware of Rover DOIP
How to Update firmware of Rover DOIP
1.DOIP connects car and computer;
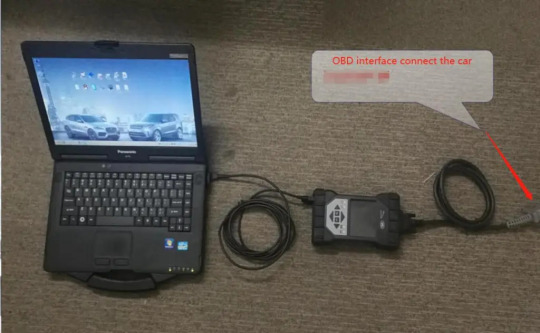
2.Open VCI Manager;

4.Start to update DOIP firmware

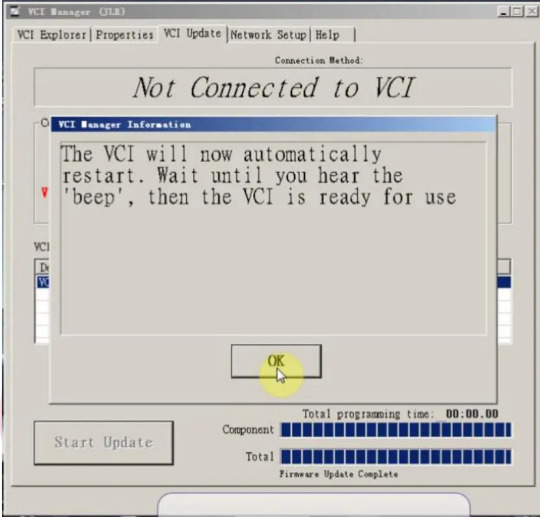
5.After the firmware update is complete, DOIP will restart, and the DOIP screen will display a Land Rover Jaguar picture.
0 notes
Text
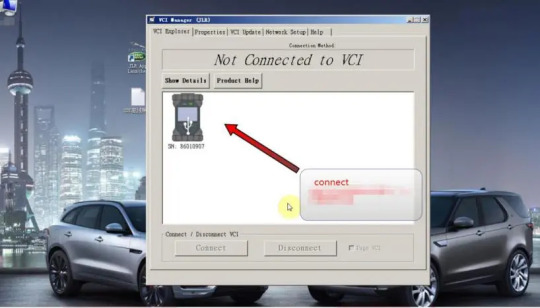
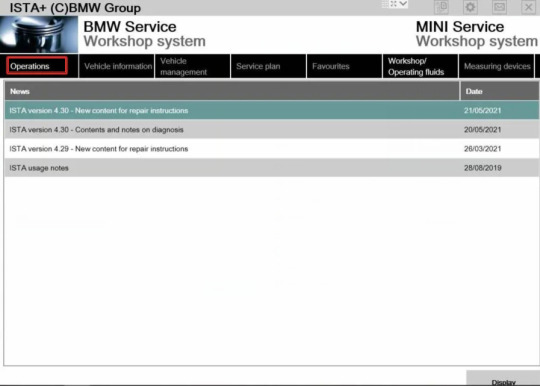
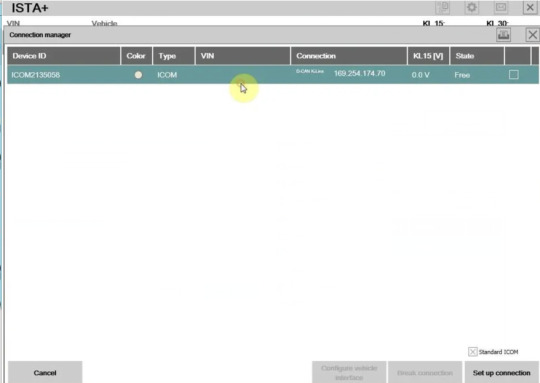
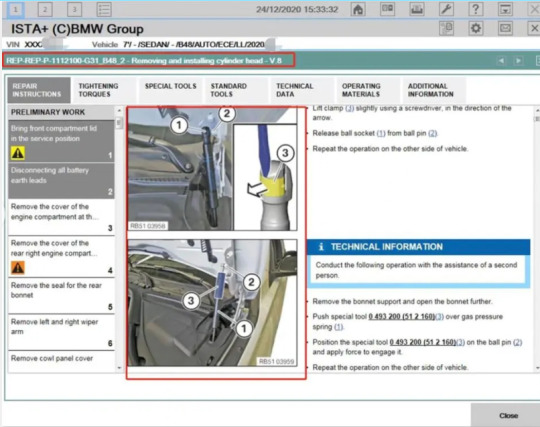
How to Use BMW ICOM Next ISTA Software Diagnose BMW Cars
BMW ICOM NEXT Latest Generation Diagnostic Head For BMW, MINI, Rolls-Royce BMW-Model. Can Replace BMW ICOM A2, including all function of ICOM A2. BMW ICOM NEXT not support WIFI. ICOM NEXT can works together with ICOM Software we provided.
1.BMW ISTA software requires BMW ISTA ICOM NEXT or ENET cable to connect to BMW cars


2. Operations-New-Read out vehicle data-complete identification

3.Connect
4. Read control unit tree(Read ecu)
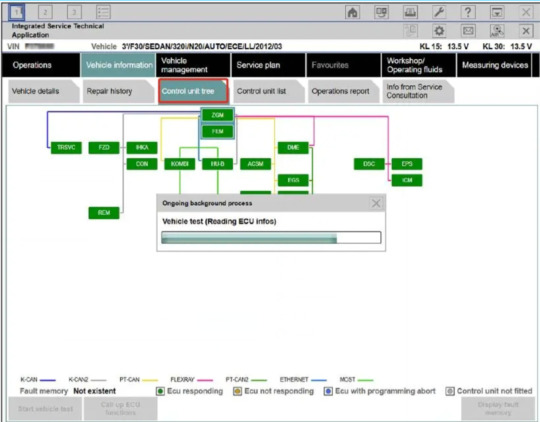
5.Read Fault memory
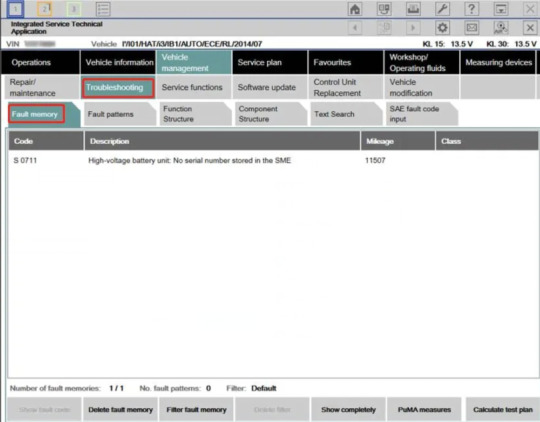
6.Test plan
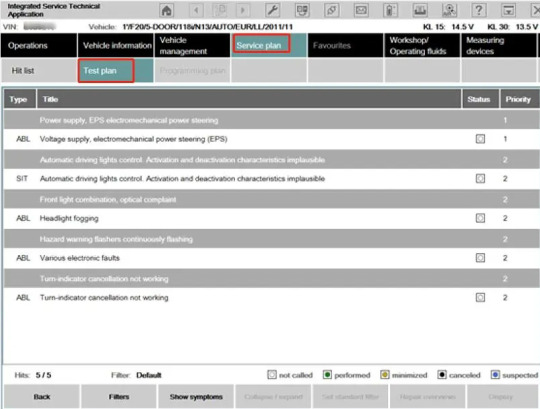
7.Wiring Diagram
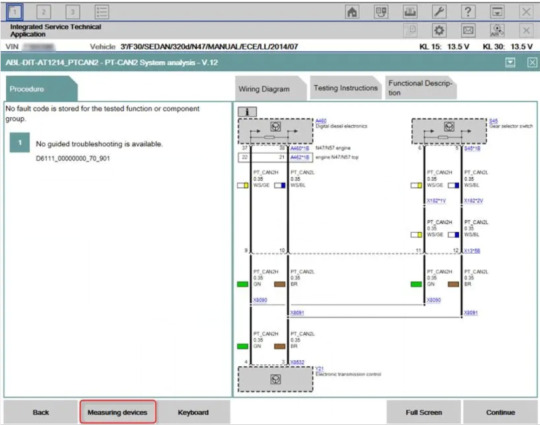
8.Demonstration of car disassembly and installation
More interesting for BMW ICOM diagnostic tools , welcome to check our website www.obd2tool.com
0 notes
Text
C4/C5 Firmware Upgrade Processure
First open XENTRY software, click Passenger, Select C205, click at the bottom of the screen
If the firmware flashes and fails, click repeat. Then will pop up a auto-write firmware after a few clicks. This way, the firmware update is completed. Pls note that this need to be fast. Since the it is very short time to indicate you to click the repeat button.
This is what shows when firmware update is complete.
If the voltage pops up directly and there is no other indication, the firmware is successful updated, then power off C5, repower C5 again.
When this interface appears, the c5 device will beep twice, so that the C5 firmware update is successful
0 notes
Text
Launch X431 V+ diagnostic tool VCI Not Connected
Customers from European countries report this error to our customer service, which means that Launch X431 V+ start diagnostic tool VCI Not connected?
How is this usage problem happening?
We can see error pictures provided below:
Moreover, the tool’s VCI connection is lost and the purple light is on.
How to solve?
We can see solution provided by tech engineer:
This error occurs is to notify customers to do the VCI firmware fix.
Go to the “Firmware Fix” interface to click on the VCI serial number and follow the instruction to do it.
Problem will be fixed as you wish.
Most customers would choose original Launch brand tools if they desire gread OBD2 car tools.
That’s all. Thank you for sharing your time with us!
0 notes
Text
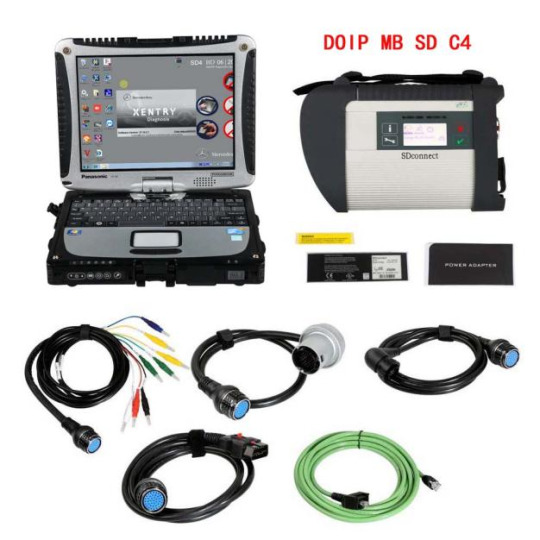
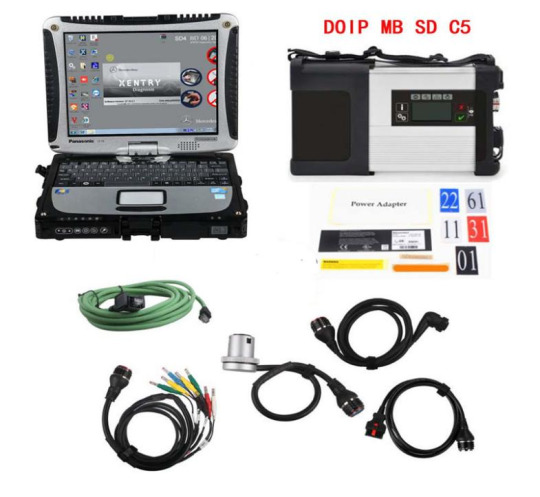
Why should you buy SD connect C4/C5 with laptop?
V2021.12 DOIP MB SD Connect C4 Star Diagnosis Plus Panasonic CF19 I5 4GB Laptop with Vediamo DTS Engineering Software
2021.12 DOIP MB SD Connect C5 Star Diagnosis Plus Panasonic CF19 I5 4GB Laptop with Vediamo DTS Engineering Software
All software pre-installed
Ready for use
Here list reasons:
–Mercedes Benz Star diagnosis C4 / C5 actually with out a laptop specifies the computer or tablet used in the SDS environment, encountering setting problem when using the star diagnosis tool, which is rather slow. But the C4/C5 Star Diagnosis software with Panasonic CF19 I5 4GB Laptop has been installed on , I can use it directly. this package offer saves you money than buying them alone.
–Bought MB SD Star C4/C5 directly installed in Panasonic CF19 I5 4GB Laptop. No Machine issues.
–The speed improvement is like night and day especially when using Xentry 2021.12
–The HDD/SSD that is pre-loaded with the software for SD Connect 4/C5 by the Seller, is inserted into the Panasonic CF19 I5 4GB Laptop… The Panasonic CF19 I5 4GB Laptop is the fastest laptop with the feature.
–The software Xentry/ DAS is fast on the Panasonic CF19 I5 4GB Laptop. So that it is worth paying a bit extra and getting them.
–I can directly use the Plus Panasonic CF19 I5 4GB Laptop With Vediamo DTS Engineering Software, it is very inconvenience.
–Plug and play! It is more convenient for users because the software for C4/C5 diagnostic tool will be pre-installed before delivery.
MB SD Connect C4 Star Advantages:
MB Star Compact-4, as a new-born and updated tool of C3, it also own its comparative advantages
is much different in the shape from Compact3
–Smaller in size, lighter in weight than Compact3
–C4 can do all the works what Compact3 does and it is the replacement of Compact3-Star
–Covers a wide range of vehicles including trucks and some cars that C3 and old C4 do not support
–Supports wireless diagnose
–Adopt Military quick swap technology, and supports 10,000 times pull plug, more stable
MB SD Connect C5 Star Doip Advantages:
–Efficient diagnostic program and complete vehicle database
–Advanced upgraded VCI+ communication interface
–The wireless connection is stable
–Including Super Engineer Software: DTS monaco V8.16.015 And Vediamo V5.01.01 Support Offline Programming
–New Xentry software released by Bennz Company after 04/2009 by diagnosis new cars
0 notes
Text
How to Solve XTOOL PAD2 “Unlock the key”
How to solve the problem in the picture below when using xtool pad2? Look at the picture below, it is “Débloquer la clé” (meaning “Unlock the key”),
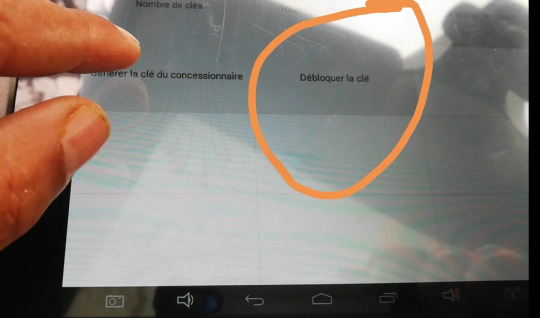
Unlocking a key means: if you want to program a key in a Fiat, for example, you have to generate a dealer key, right? If you do that, that key will be blocked for that car. If you cannot program it in this car, it will not be passed on to any other car. So this option serves to unlock the key in order to become a virgin again, and you can generate it by turning a different dealer key on a different car.
0 notes
Text
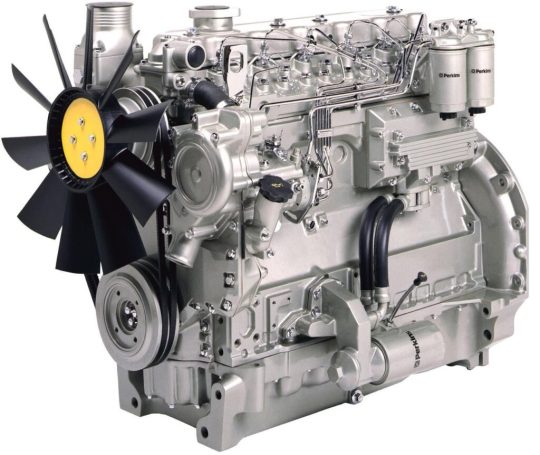
Perkins Phaser1000 Series 6 Cylinder Engine Oil Cooler Pipe Change
This is a Oil cooler pipe change/fastener change to oil components service bulletin for Perkins/1000 series 6 cylinder engine.
If you need more service bulletin for Perkins Engine,please visit below link:
https://www.obd2tool.com/goods-10032-Perkins-EST-Interface-Diagnostic-tool.html
From engine number YD—–U502358P, new oil filter heads and an oil adaptor head (that are fitted to the left side of the engine). Oil cooler housings and longer setscrews have also been introduced.
From engine number YD—–U502658S, new oil cooler pipes have been introduced for engines with the starter motor on the left side of the engine.
The part numbers of the components affected are listed in the following table.
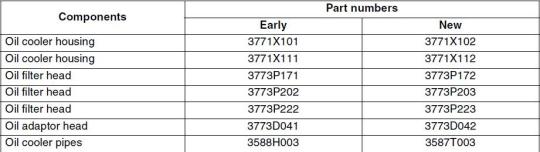
The new oil filter heads, adaptor and oil cooler housings have deeper threads in their flanges for the oil cooler pipes. The depth of the threads is increased from 16 mm (0.6 in) to 20 mm (0.8 in), the depth of the holes have not been changed.
The new pipe assembly has a cast block at each end and the pipes are flexible along their full length. When the new pipe assembly is fitted, discard the spacer fitted between the oil filter head and the oil cooler pipes.
Note: Ensure that the braid of the pipes is not damaged.
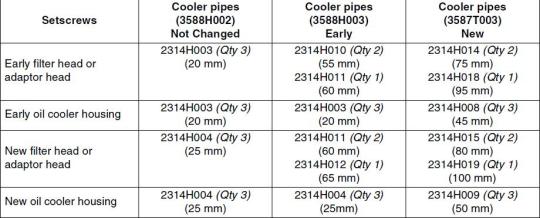
The correct setscrews are listed below, by part number and the under head length, for use with the various arrangements of both early and new components which could be used in service.
As the oil cooler housings, filter heads and the adaptor do not have their part number on them, check that the depth of the threads are correct and that the setscrews are the correct length before the oil cooler pipes are fitted.
More information for Perkins,please refer to Perkins Trouble Repair
0 notes
Text
How to get S-Sport mode & Launch Control on Ralliart using Mitsubishi MUT 3
Well, risking a $10k transmission is a daring feat when mixing different code with different models. We would never have made it to the moon if we didn’t take the risk. I promise, you will be as excited as I was when I saw the console say S-Sport for the first time and you will feel like it must be tested out. Always, be careful not to get hurt while driving. Please take care of yourself and your vehicle.
Below, will be a step by step process on how to modify your ralliart to have S-sport mode and Launch control. S-Sport mode enables your vehicle to use your cars true potential by switching gears at higher rev points vs Sport and normal mode. Launch control typically refers to an electronic aid which is used to assist the drivers of various motorsports at the start of a race. As far as we know, this will work on all 2009+ ralliarts.
WARNING: If your vehicle breaks, dies, or anything that can cost maintenance I will not take responsibility for it. I am simply giving you a guide to use at your own risk.
NOTES: Your current ECU tune does not matter in the TCU reprogramming. You can have stock, custom GST basemap, or anything you choose and you will still get S-sport mode in the reprogramming.
Please make sure to:
-Have your cars battery fully charged. If you worry about your battery dying, hook it up to a charger while performing the reprogram.
–MUT3/MEDIC 3 unit at full power.
-No faulty wires that can be bumped that can lose a connection
-Working CD-ROM drive.
-Updated Mitsubishi MUT-3 diagnostic tool. The one I used was version 3.2 update 142
If any of the above fail, you will have a damaged vehicle while reprogramming. Don’t be scared just be prepared.
Step 1 – Getting the file
-First things first download the TCU file, which is for 2009-2010 Ralliarts: 8631B001.cff (http://www.2shared.com/file/Fkz67QCU/8631B001.html)
UPDATE: For 2011+ Ralliarts download and use this file 8631B151.cff(http://www.2shared.com/file/QADp5R_9/8631B151.html)
-Burn that single file to a CD-ROM
Step 2 – Connecting
-Connect the Auto ECU Programmer MUT III VCI to your OBD2 port and turn your car to ON, but do not start it.
Step 3 – VIN setup
-Set your Vehicle VIN# via the button bottom right of the screen. This is to tell MEDIC 3 which car it is working with.
Step 4 – Programming
Before you even get to this step you need to have the CD with the file 8631B001.cff ready to go.
-Insert the CD
-Go to the “MENU” tab > click “SPECIAL FUNCTION” > click “ECU PROGRAMMING” > click “AUTOMATIC REPROGRAMMING (CAN)” > click “AT/CVT/A-T/TC-SST”
–MEDIC 3 will now check for an update > click the check mark.
-Next box will pop up indicating UNNECESSARY REPROGRAMMING from here you need to click the load icon which is to the right of the check mark.
-A list of *.cff files should pop up. We don’t want to use any of the files listed (TBA for all regions and models), we want to use the one from our CD.
-Click on the folder button at the bottom right > click on “COMPACT DISC” and then click the folder icon again. (This might take time as it needs to read the CD, give it a moment). A check mark will pop up next to the folder. Click that to start the reprogramming!
Step 5 – Wait
-The reprogramming will take 2-5 minutes so make sure to keep the radio off, fans off, etc. To conserve battery life. During the reprogramming it will be just like a reflash. Bells and whistles will be firing off. This is normal. Be patient for the programming to finish once it reaches 100%. It will have a slow start, but pick up after that.
-Once it reaches 100%, the car will finalize the reprogram and say “COMPLETED“.
Congrats your car now has been reprogrammed and has S-sport mode and Launch Control. “Crak Mode” completed.
Special thanks to the community and special remarks to: Eyedreamt, Livefast.eu, Hoobla, Beeble and Richard for getting this off the ground and getting the right info to get this done.
Please leave question or comments and experience with the guide with car year. Let me know if the guide needs an update on spelling or notes to make it easier to understand.
Since this is all so new, a lot of potential can come from this. So, please post your year and mods and tunes so see what results come from all of this.
Good luck,
Crak
PS:
Also, I want to note for everyone that has this and has the rev hunting. I did some logs of clutch slip on a normal drive and it slips between -1 and 1. When the rev hunting happens the clutch slips around 50. I do not know the units of the values but I assume that the 50 is enough to make the rpms bounce. I am no mechanical expert but I would assume that a) clutch slip is bad because it wears out a clutch and there should be no slip. and b) rpm bouncing is not a good thing to engines timing chain because of the pull n push of the rpms bouncing.
In conclusion, s-sport mode has a price. You WILL get instance clutch grabbing for your gears and launch control, but the catch is to avoid 6th gears rev hunt between 1800-2000 rpm.
The stock file for 2009-2010 RA is 8631B002.cff if you want to change back. The 2011+ file 8631B152.cff to return back to stock. Good luck folks.
Known Working Vehicles
UserYearMarketROM IDS-SportLaunch ControlTCU FileEyeDreamt2011USDM56940007YesYes8631B001.cffCrak2009USDM53600010YesYes8631B001.cffomegis2011USDM56940007YesYes8631B001.cffBeeble2009AUS????YesYes8631B001.cff
0 notes
Text
ECU Rewrite ROM Data For Mitsubishi 2009-2018
Description : ECU Rewrite ROM for Mitsubishi .
A collection of updates for electronic blocks of cars Mitsubishi Motors. It is installed only in software MUT-III. Version .
CD3E09011, CD3E10062, CD3E10071, CD3E10111, CD3E11031, CD3E11071, CD3E11121, CD3E12021, CD3E12031, CD3E12041, CD3E12092, CD3E12111, CD3E13051, CD3E13061, CD3E13111, CD3E14091, CD3E15021, CD3E15081, CD3E15121, CD3E16071, CD3E16111,SDB_E170301, SDB_E170603, SDB_E170701, SDB_E171201 , SDB_E180502 ,SDB_E171201
PRICE IN PM
0 notes
Text
NCS Expert coding detailed how-to guide – E46
This is, hopefully, the most complete how-to guide for using NCS Expert to code a BMW. I am by no means an expert, but I have recently got the BMW Diagnostic Software & a cable to code on my E46, and I struggled for quite some time on finding a really in depth & detailed how-to guide. After repeating this process with success several times, I am now confident enough to write this article to hopefully help others.
I’m not going to go into how to install NCS, or what parameters to code in this article. This is purely how to physically use NCS Expert, and how to read & write to the FSW_PSW file in order to change settings & functions on the car.
I bought my cable & software from Obd2tool.com. the installation instructors provided with the software was very good, there is no need for me to repeat them here. However, there were no instructions on how to use or code with NCS Expert, hence this article. With that said, here’s my guide
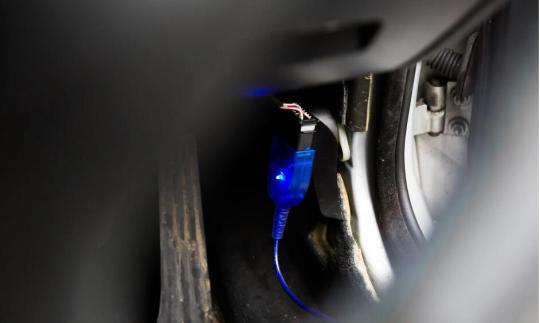
1, Get into car, ignition off, plug in lead. It should light up blue once connected, even if ignition is off. Ignore the fact my plug is hanging out my car, I had to remove some of my interior panels for another job, and I haven’t put them back yet! The plug is usually found under the dash, above the accelerator pedal
2, Plug lead into laptop

3, Turn ignition of the car on (the position before actually running the engine)

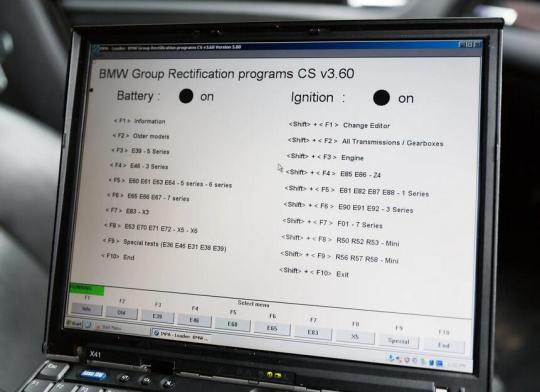
4, Load up INPA to make sure its connected. If it is connected, you’ll see Battery & Ignition dots are both black at the top
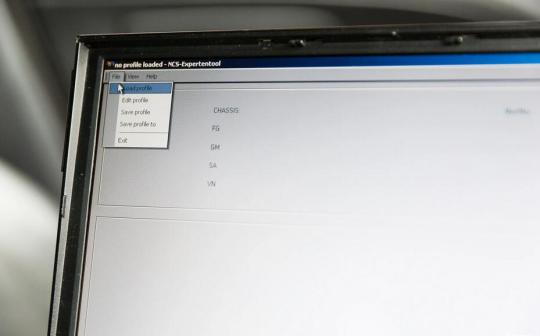
5, Close INPA, then open NCS Expert. Goto File > Load Profile
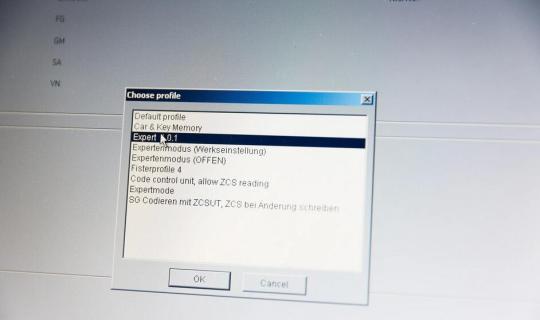
6, Select the profile. I’m using Expert 4.0.1
7, Once loaded, click bottom left button (or press F1 key)
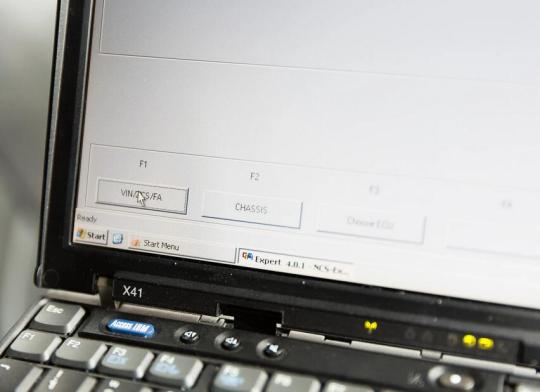
8, Then click 3rd button from left (or press F3 key)
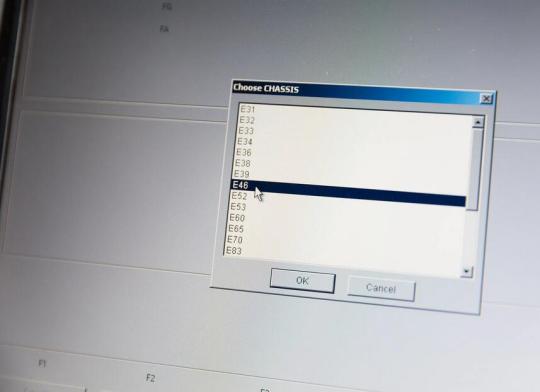
9, Clicking that button will enable you to choose your chassis. Choose E46!
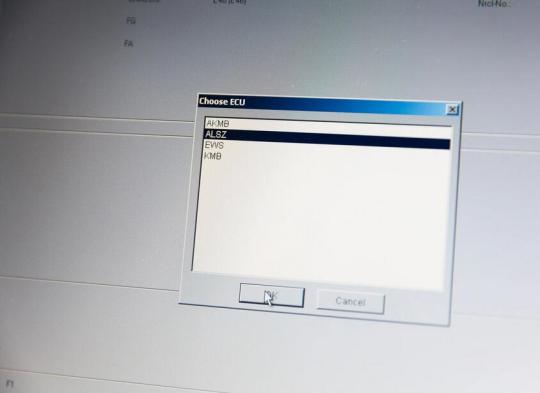
10, Another box pops up straight after, choose your ECU. Choose whichever one works for you, it doesn’t matter which one you select, this has nothing to do with which module you are programming, its just to get NCS to talk to your car. Mine seems to work with either of the top two, I choose ALSZ as that one has always worked for me
11, Hopefully it worked, NCS has now read your car chassis number & some other things (I have blanked mine out)、
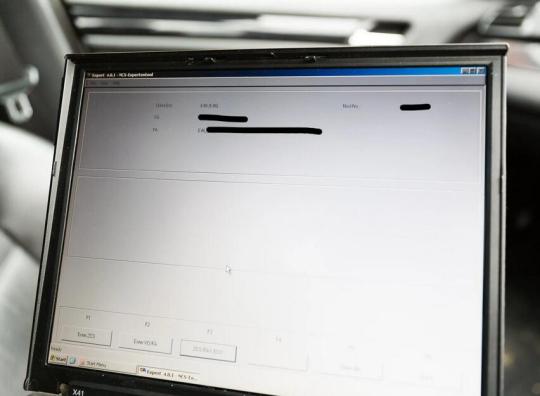
12, Click the Back button
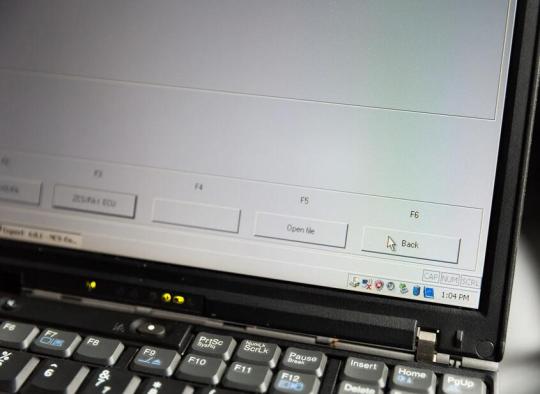
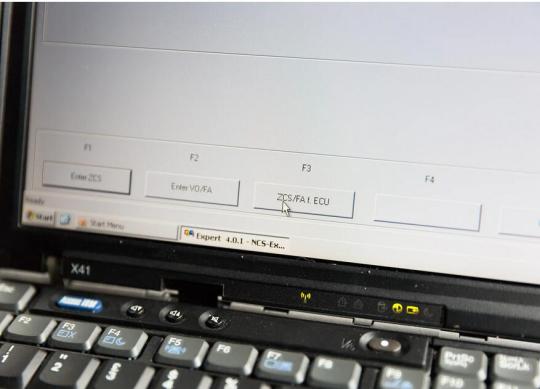
13, Click Process ECU button (or press F4 key)
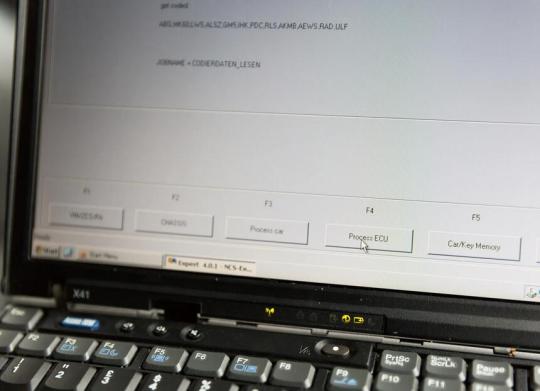
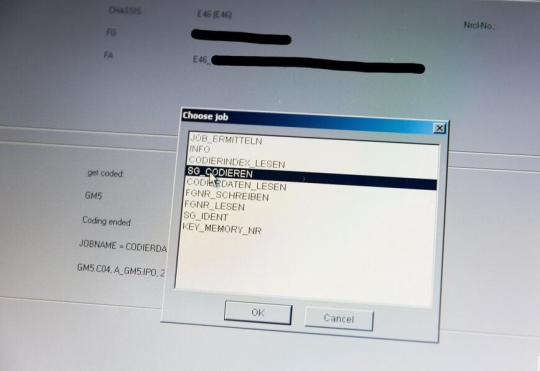
14, Another box pops up, time to choose the module you want to code. In my case, I wanted to modify something in my GM5 module
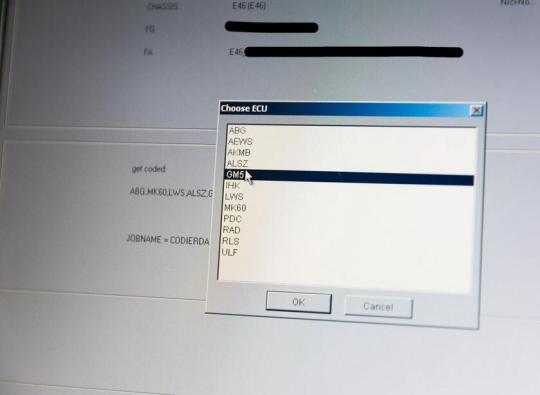
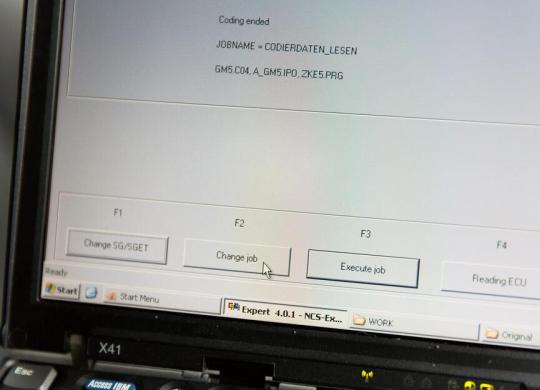
15, IMPORTANT, make absolutely sure that the JOBNAME = CODIERDATEN_LESEN. This is to *read* the ECU, not to *write* to it. If it doesn’t show up as CODIERDATEN_LESEN by default, like mine does, then see Step 24 on how to “Change job”, then select CODIERDATEN_LESEN from the list. Then continue to Step 16.

16, Then click Execute job button (or press F3 key)
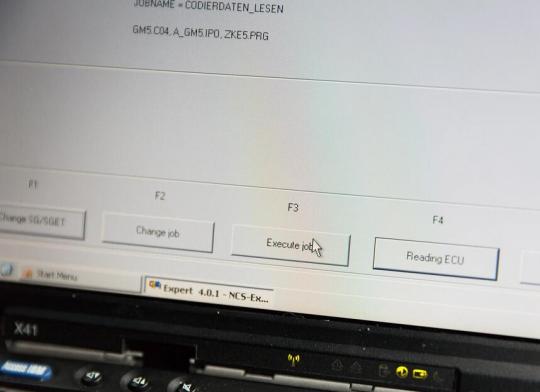
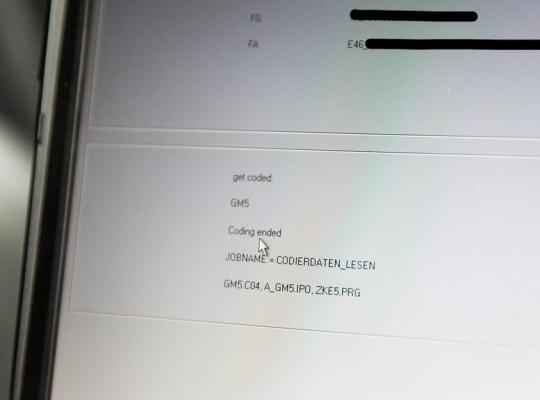
17, Hopefully it has read the ECU & NCS has written a new file. NCS should report “Coding ended” above JOBNAME
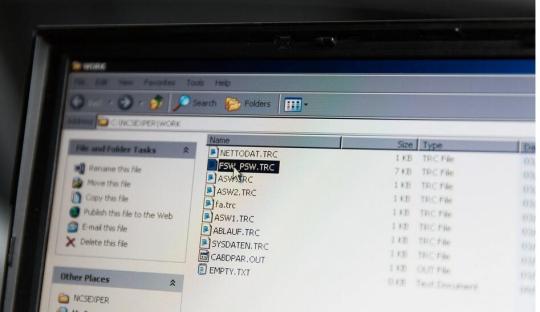
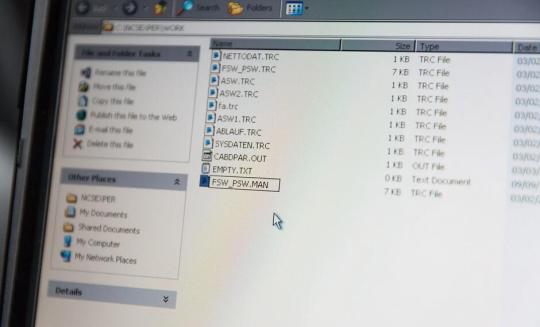
18, A file named FSW_PSW.TRC should have been written to the /NCSEXPERT/WORK folder, navigate to it, and Copy the file
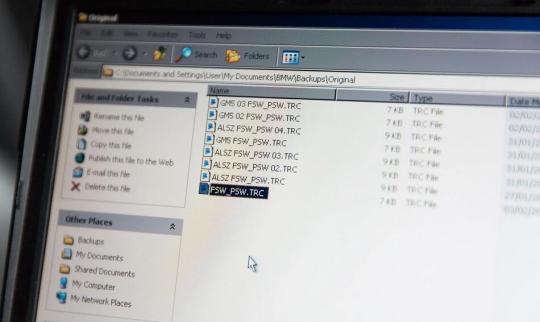
19, Paste the file somewhere safe, as a backup. This is my backup’s folder (you can see I have a number of files here). Annoyingly the module of which this file was read from doesn’t change its name, so every time I make a backup, I prefix it with the module name, so I know which one is which. You will notice different module’s have different sized file sizes
20, Navigate back to the WORK folder, and Copy/Paste the FSW_PSW.TRC file again, and Paste, making a copy of the file. Then rename the copy to FSW_PSW.MAN (same file name, different extension)
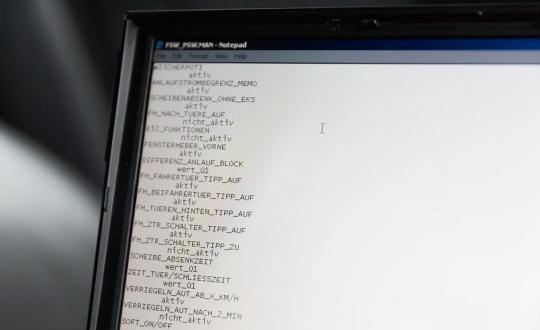
21, Open the .MAN file you’ve just made, use Notepad. This is where the fun begins. This is where you can change stuff!
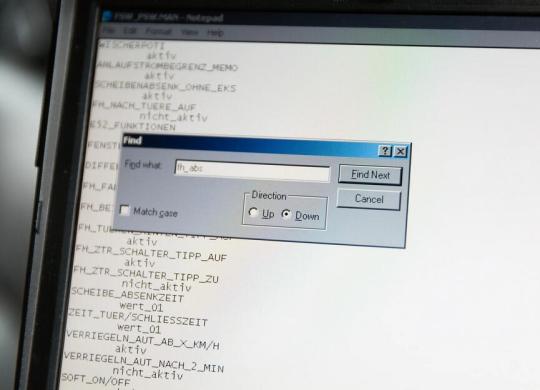
22, I find it best to search in Notepad for what I want to change. Use the Find to find what you are looking for in this file. In this example, I am making a change whereby my windows will still work up to 1-minute after ignition is off. I know the parameter name begins with “FH_ABS”, so I’ve searched for that
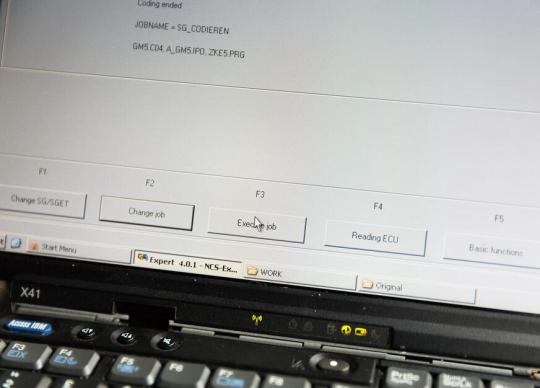
23, Make the changes you need to in the .MAN file, then Save it. Navigate back to NCS Expert, and click Change job (or press F2)
24, Change the job to SG_CODIEREN, this now changes the function of NCS to *writing* to the ECU, not reading it. So you want to be absolutely 100% sure that you have saved the .MAN file correctly, and the changes you have done you are happy with
25, Take a deep breath, make 100% sure that it says JOBNAME = SG_CODIEREN, make sure your laptop battery isn’t going to die, make sure the lead isn’t going to fall out! Then click Execute job button (or press F3)
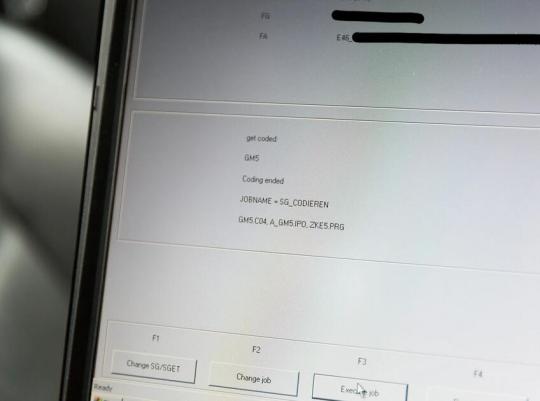
26, Hopefully nothing scary happened. It should read “Coding ended” again, just like it did when you read the file in step 17. This means NCS has looked at your .MAN file, and has uploaded it to the car’s ECU
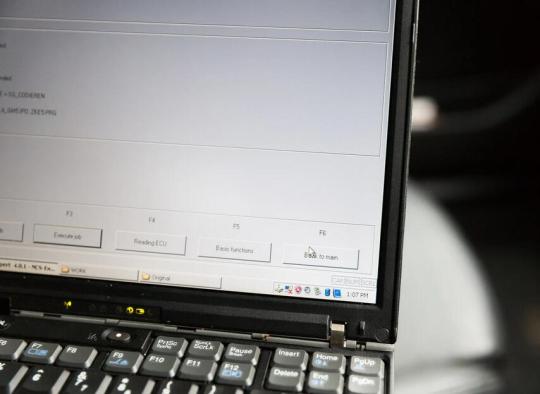
27, Click the Back to main button (or press F6)
28, Turn the ignition off on the car. Put the ignition back on if what you have coded requires ignition on. If not, you’re done

29, Unplug the lead from the laptop
You’re done! Nothing else is needed. The car should now respond correctly to what you have coded!
0 notes