
ragecro
it's hooking time.
Rage | 22 | They/ThemWas trying to learn digital art, swapped to crochet!
59 posts
Don't wanna be here? Send us removal request.
Last Seen Blogs

winter-tospring
we mend each other

king-rancho-blog
king-rancho

valeriawalker8
Valeria Walker 8

ghostlightsahead
Ghost

aurabusinessservices
AURA Business Services
Text

made a cat coaster today while watching cabaret
goal was to have 6 made before hosting a party tomorrow but no chance i have the time lol
0 notes
Text
There's so much wrong with "everyone is a little bit autistic"
Yes, allistic people might know a lot of facts about the things they like. Yes, allistic people might get a bit overwhelmed or underwhelmed sometimes. Yes, allistic people might not get an expression sometimes, mostly if it's the first time they hear it.
That doesn't make them autistic.
Those traits only make someone autistic when they become disabling. Because, big shock, autism is a disability. Yeah, even if someone is low support needs, because that doesn't mean they don't need any support at all.
Saying "everyone is a little bit autistic" is like saying "everyone struggles with this, so suck it up, you have no right to need help". Which is just pure ableist bullshit. It denies the fact that autistic people have higher support needs than NTs, no matter where in the autistic spectrum they are. We're not "neurospicy", we're disabled, and denying this fact is denying us the right to get the help we need, we deserve, to have a good life.
(yes, this rant is just because I made the awful decision of listening to "neurospicy (interlude)" by Jax. honestly I'd rather be called a slur than listen to that shit again.)
1K notes
·
View notes
Text

crocheted this today. my cats toy broke recently so i used the existing stick to crochet them a little toy. didn’t use a pattern just winged it which got my partner to tell me “now sell the blueprints on etsy”
0 notes
Text
Shout out to neurodivergent people who’ve had to change their dream career path because of their neurodivergence.
I see you. I’m with you.
#went into tech bc i was good at it#and now i’m having issues bc people don’t like my communication but won’t give me pointers#no clue what the fuck to do about that but we try
2K notes
·
View notes
Text
i wish i was someone who could do mindless crochet patterns
i need something that changes stitch regularly and has something to stimulate my brain or else i just can’t get myself to finish it
4 notes
·
View notes
Text
Shout out to the autistic who’s abilities have regressed as they’ve gotten older.
“You didn’t used to be like this when you were a kid.” I know please don’t remind me
#such random shit went back for me#my communication skills used to be so good#and then recently they just eradicated and i’ve had to work so hard on improving them and it doesn’t feel as easy anymore
19K notes
·
View notes
Text
Handicrafts like knitting, crocheting, and tatting teach you that holding good tension is a balance. You can't work entirely without tension, but you also can't brute-force tight work. You hold good tension with practiced hands, not squeezing fists.
I think there's something poetic about life there, but I don't have the braincells to express it.
3K notes
·
View notes
Text
check out my yarn haul!!

8 50g balls of merino wool. i’m going to try and make my first top ever and i have a week to do it lol
wish me luck!
0 notes
Text
goes to office, burns out
me: “hi HR, i’m in the process of getting tested for autism and i’m very overwhelmed in the office. i’m burning out, in a constant state of exhaustion and am unable to stay conscious after work”
hr: “wow that sucks! only do half days in the office”
[next year]
hr: “everyone has to be in twice a week full days. we promise a quiet room and micro breaks for our neurodivergent people who need it. also we revoke that quiet room, we want it as a meeting room”
me: “please can i have accommodations this doesn’t help me”
hr: “microbreaks”
me: “okay well i’m going to start stimming in the office now so i burn out less”
coworkers: “you look unprofessional”
0 notes
Text
it’s starting to come together!!

1 note
·
View note
Text
i would genuinely love to swap to natural yarns if i could afford it
i’m hating the acrylic fluff at the moment but also it’s the only affordable option for me at the moment
my nearest chain hobby store sells 100g acrylic skeins for £3 AND has a 3 for w deal
my local yarn shop sells merino wool for £2.70 for 50g
i can absolutely see how much nicer the merino wool is and i love it but for bigger projects it’s just not on the cards.
with the chain hobby store i can get 300g of yarn for £6 but if i went local and natural i’d have to pay £16.20 which long term just isn’t feasible
#so annoyed about it though#for small projects like bandanas i might go local instead#but for things like my star blanket there’s just no choice#rage rants#crochet
1 note
·
View note
Text

it’s alll coming together
starting my first tapestry crochet attempt!
so i've been wanting to try tapestry crochet for ages but i've had nothing in particular i wanted to make. just knew i wanted to design something and crochet it.
then i was thinking for fathers day, my dad draws a lot and i could do one of his drawings as crochet. this proved waaay harder than expected.
this is my dads art i want to create:

even after cropping, sites like stitch fiddle just didnt get it in a way where it looked clean and like i wanted SO i drew my own 64x64 pixel art!

which looks a little weird BUT i'm proud of it and i'm so hyped to crochet it. just need to get the yarn now :)
2 notes
·
View notes
Text
starting my first tapestry crochet attempt!
so i've been wanting to try tapestry crochet for ages but i've had nothing in particular i wanted to make. just knew i wanted to design something and crochet it.
then i was thinking for fathers day, my dad draws a lot and i could do one of his drawings as crochet. this proved waaay harder than expected.
this is my dads art i want to create:
even after cropping, sites like stitch fiddle just didnt get it in a way where it looked clean and like i wanted SO i drew my own 64x64 pixel art!
which looks a little weird BUT i'm proud of it and i'm so hyped to crochet it. just need to get the yarn now :)
2 notes
·
View notes
Text
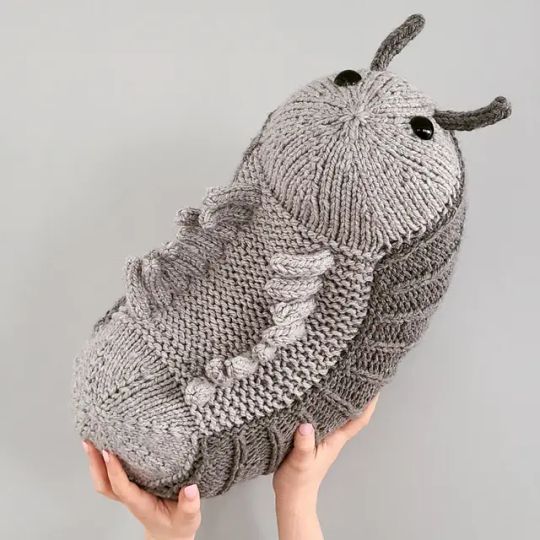
First time posting my knitting to tumblr. Look at my Bug Son
85K notes
·
View notes
Text

finally finished the star blanket!!
#I’m so happy with this!#slept with it for a nap today#then later used it for a picnic#crochet#6 day star blanket#finished project!
3 notes
·
View notes
Note
Hi! I recently found your existence and we have a shocking amount in common.
Anyway, do you have any tips regarding crocheting human shaped dolls? (you... you do them so well-) Like things with stuffing, how to get them in, how much fluff?
do you prefer stitching together limbs or crocheting it as one piece?
How do you go around tying ends?
Your method of colour changing?
How do you make clothes in their size, how do you plan/design a doll?
Any things you wish you knew when you started? Tidbits of knowledge you want to pass down?
Why, hello! Crocheting is one of my special interests, so be prepared for a very long essay because I WILL ramble.
First, I'll get started on my process for making human-shaped dolls. But I'll lead with some preamble first.
I hate sewing. It's my least favorite part of crocheting. So, if it's possible to make something one piece without compromising the cuteness of the item, I will crochet it as one piece.
This lovely doll pattern is actually one that I made myself - birthed from my hatred of sewing limbs. You start with the head, then do the neck, stop to stuff the head, and when you start doing the body, you have to stop after increasing it to match the head. I skip sections on both sides to create arm holes, then continue going around and around to make the body.
When I deem the torso long enough, I split my total stitches in half, one side of each leg. Like I did with the arms, I just skip a bunch of stitches and start working into the one I want like normal. But I stuff the body before this. Then I go around and around until the leg is long enough. I'll stuff the leg at this point. To close it, just close it off, leave a long tail, and weave it through the stitches so you can pull it closed. After, tie 2 really tight knots and then stuff it inside the leg to hide it.
Welp, we have a body with no arms and one leg... what now? Well, this is the fun part. Instead of sewing limbs on, we just put our hook in one of the stitches we skipped, pull the yarn through so we have a loop, and then just crochet like normal. Go around and around until it's the same height as the other leg, and close it off the same, too.
Now the arms. You treat them the same way as the legs. Just stick your hook in, pull through a loop of yarn, and start going. But I do want to add that on the arms, if you go purely into the stitches you made, you'll have an armpit hole. To avoid that, you have to "decrease". Basically, take the stitch next to the where the torso starts, go into a random spot of that torso section, and decrease. You'll still have the same amount of stitches, but it closes up that hole you would have had.
(I'm sorry, I know I'm explaining this badly. I'll have to write up a pattern with pictures for this. Or I'll make a video and put it on my yt channel.)
Anyways, you'll make the arms as long as you want, then stuff and close them the same as the legs.
-
Color changing tips...
There are a few ways to do this depending on the result you want. If you're making neat edges, I'd recommend slip stitching and chaining at the end/start of every round. To change colors like this. Close off after you slip stitch, cut the yarn, and leave it long enough so we can hide it in the stitches.
Then, take your new color. Like I mentioned before with putting limbs on the dolls, you just shove your hook into a stitch, pull a loop of your new color in, and just crochet like normal.
Alternatively, if you don’t like the look of starting and stopping in your rounds, you can use another method. This is for when you don't really care about having neat edges, or the bumps of the slip stitches irritate you too much. Or you have to change colors multiple times within a round. When you are doing your final stitch, stop before pulling your yarn through the loops on your hook. You'll take your new color, loop it, and pull that through to finish your stitch.
-
Stuffing tips.
The type of stuffing you use matters. Poly-fil polyester is what I use for most of my plushies. It makes them squishy and still holds shape. However, if you want a firmer and harder, use yarn scraps and yarn fluff.
Also, also, use black stuffing for darker plushies. I wish I knew that black stuffing was a thing when I started!!! It exists!!! It's so useful!!!
-
Other tidbits.
I hate weaving in ends, so I just crochet them in as I work. Just put the tail along the back of your stitches and crochet like your crocheting over wire. Boom! No sewing needles.
Speaking of sewing needles. Don't use them!!! It's a scam!!! A 2 mm hook works wayyyy better than a sewing needle. I do have a video on my yt channel that showcases me sewing pieces and weaving in yarn to make eyes.
youtube
This video actually has a bunch of those little things you mentioned and I mentioned. How to stuff, how to weave in ends, how I don't use sewing needles and just use a small hook, how to sew pieces on, how to change color, etc.
Again, I'll work on making a video on the doll. Because I'm a lot better at visually showing when I'm crocheting instead of explaining it.
But back to one question I haven't answered yet. How do I plan one of my dolls?
Let's use one I just finished as a custom order

So for this little guy, I first made the body. Then I started plucking in the hair (that wording makes no sense but it just feels like the best way to explain my little loop latch-hooking method). After that, I brushed the hair out with a pet brush. So I had fluffy hair and tons of yarn fluff to use as stuffing for future projects. Next, I took a flat iron to the hair (I use acrylic yarn for hair so it won't catch on fire).
For the clothes, there is no one design to follow, just a structure. Usually, what I do is I'll take a reference picture and free-style it.
How I structure the clothing, that I can tell you. I start by chaining, and I have to wrap it around the legs to make sure I have enough stitches and the pants will fit. Then I'll make 2 cylinders. After that, I'll sew 4-5 stitches of those cylinders together and keep crocheting around to get the hip/waist of the pants done.
For shirts, it's a similar method. I'll chain around the torso (be mindful of allowing it to fit the torso and pants) and I'll make a cylinder up to the armpits. After that, I have to work in 2 sections, the front and the back (so we have arm holes). Once I get about 3 rounds up from that, I'll chain however many stitches I skipped to leave space for the arms. And I'll just slip stitch those onto the opposing section.
Next, I'll start decreasing rapidly because we're on the shoulders going to the neck. For the naruto doll, I had to make a collar, so I just went around a few times without increasing or decreasing to get that tight collar.
For the details, I had to change colors and weave yarn in.
For the shoes, I used a magic circle and increased it. I usually put 6 single crochets and start from there. But you'll have to sew them into the legs or attach them to the pants to keep them from falling off.
The eyes are basic plastic eyes because I have no embroidery talent, lol.
I hope I answered a bunch of your questions. And again, I apologize if I didn't explain things properly. I'm better at just writing patterns or making a video.
6 notes
·
View notes
Text
Marishana Version 3, coming soon!

I’ve been thinking a lot about Marishana recently because of an amazing homebrewed D&D class I came across that’s a mix of both magic and melee fighting like the Magus class is in Pathfinder. It made me really miss her so I decided it was time to update her look. I still have a lot of details and accessories to make, but I’m excited with how she’s turning out so far!
6 notes
·
View notes