Statistics
We looked inside some of the posts by randomartfarts and here's what we found interesting.
Average Info
Notes Per Post
2M
Likes Per Post
1M
Reblog Per Post
891K
Reply Per Post
2K
Time Between Posts
20 days
Number of Posts By Type
Text
6
Photo
9
Video
1
Note
1
Last Seen Tumblr Blogs


Fun Fact
70% of Tumblr users say the Dashboard is their favorite place to spend time online.


Photo
AND THE REST……..
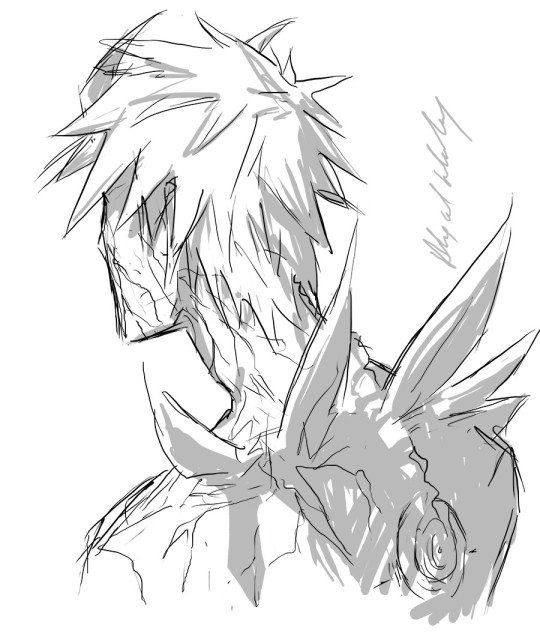
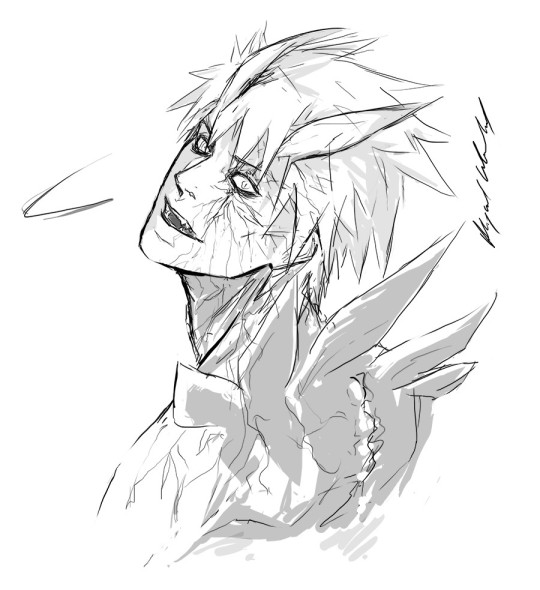


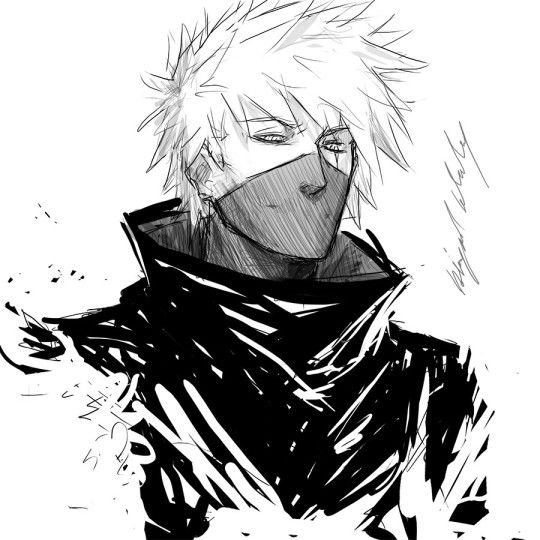
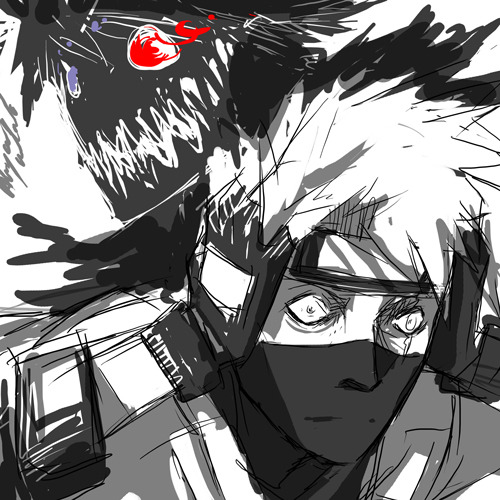
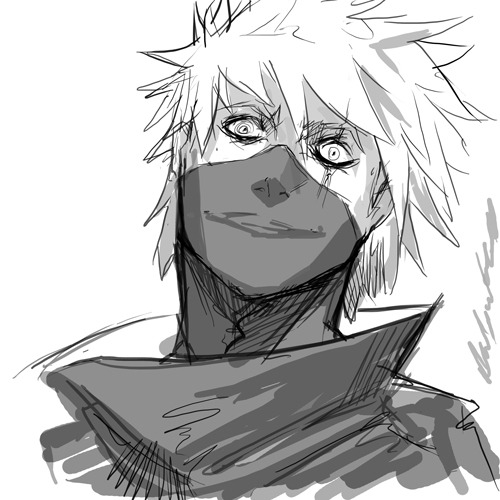
Behold…..THE KAKASHI AU MASTER-POST
8K notes
·
View notes
Text
I remember when I first found out the truth about “Somali pirates” I got chills because of how horrific the truth was and how insanely creepily well the media had twisted the situation. Every single fucking article making it seem like these “pirates” were just after money or something holding innocent people hostage and I never gave it a second thought, why would I? There was no indication that people were trying to legitimately fight off disgusting imperialism that left nuclear waste in their waters, that over 300 people have died from radiation sickness, that Europeans have been stealing Somalia’s seafood because they overfished their own waters and the indigenous fisherman are starving and so these “pirates” emerged to deal with those stealing their country’s natural resources. The truth is enough to make anyone sick to their stomachs.
263K notes
·
View notes

Video
PLS UNMUTE I’M MF DECEASED ASJAKJSASHSHASKJ
78K notes
·
View notes
Text
horses are inherently funny because they come in so many sizes. like draft horses
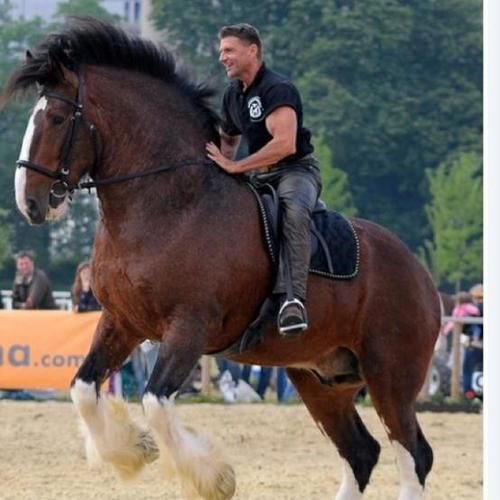
this looks so fake. this horses skull is bigger than the dudes entire torso. this horses NECK is thicker than the dudes entire BODY.
and then at the opposite end of the spectrum you have shit like this shetland pony which ALSO looks fake

what the hell happened to this thing who bred this line of ponies to be so ridiculous
286K notes
·
View notes
Text
66K notes
·
View notes
Text
Know what I’m salty about?
In all my art classes, I was never taught HOW to use the various tools of art.
Like yes, form, and shape and space and color theory and figure drawing is important, but so is KNOWING what different tools do.
I’m 29 and I JUST learned this past month that India Ink is fucking waterproof when it dries. Why is this important? Because I can line something in India Ink and then go over it with watercolors. And that has CHANGED the ENTIRE way I art and the ease I can create with.
tldr: Art Teachers: teach your students what different tools do. PLEASE.
192K notes
·
View notes
Photo
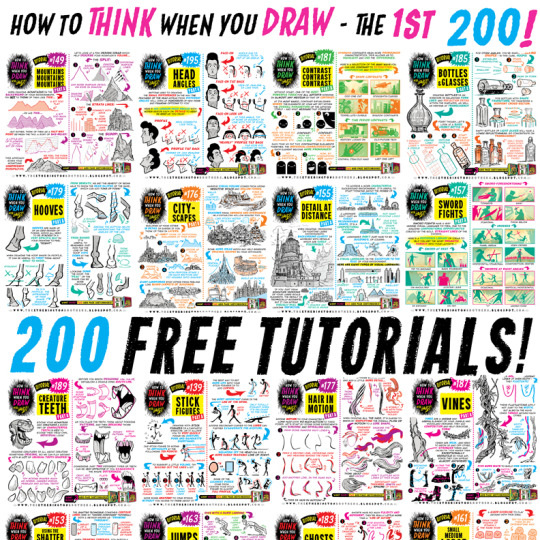
The ONLY WAY to combat the lack of funding in arts education is for professionals to take a few hours a week to share their skills for FREE, to empower and encourage the next generation of artists. THIS IS WHAT THE INTERNET IS FOR. Here’s 200 tutorials:
How to draw ANGRY EXPRESSIONS How to draw BATTLE DAMAGE How to draw BIRD HEADS How to draw BOOKS How to draw BOTTLES and GLASSES How to draw BOXES How to draw BREAKING GLASS How to draw BRICKWORK How to draw CABLES and WIRES How to draw CAR CHASES How to draw CATERPILLAR TRACKS How to draw CAVES How to draw CHARACTERS (3-SHAPES) How to draw CHARACTERS (FLIPPED-SHAPES) How to draw CHARACTER SHAPES How to draw CITYSCAPES How to draw COMIC COVERS How to draw COMPOSITION How to draw CONTRAST How to draw CONVERSATIONS How to draw CREATURE TEETH How to draw CROSS-CONTOURS How to draw DETAIL AT DISTANCE How to draw EARS How to draw FABRIC How to draw FEET & SHOES How to draw FEMALE HANDS PART ONE How to draw FEMALE HANDS PART TWO How to draw FLAGS How to draw FOOD TRUCKS How to draw FOREGROUND MIDGROUND BACKGROUND How to draw GAME BUILDINGS How to draw GEMS and CRYSTALS How to draw GHOSTS How to draw GIRL’S HAIR How to draw GOLD How to draw GRASS How to draw HAIR (1940s styles) How to draw HAIR IN MOTION How to draw HAPPY EXPRESSIONS How to draw HEAD ANGLES How to draw HOOVES How to draw HORNS How to draw HORSE HEADS How to draw IMPACT DEBRIS How to draw IN 3D How to draw INTEGRATING LOGOS How to draw INTERIOR BASICS How to draw IN-WORLD TYPOGRAPHY How to draw JUMPS How to draw JUNGLE PLANT CLUSTERS How to draw JUNK HOUSES How to draw LAMP POSTS How to draw LAVA How to draw LIGHTNING and ELECTRICITY How to draw MECHANICAL DETAILS How to draw MUSHROOMS and FUNGUS How to draw MONSTER HEADS How to draw MONSTER TENTACLES How to draw MONSTER TRUCKS How to draw MOUNTAINS How to draw NEGATIVE SPACE How to draw NEWSPAPERS How to draw NOSES How to draw OVERGROWN VEGETATION How to draw PEBBLES AND GRAVEL How to draw PERSPECTIVE BOXES How to draw PIGS How to draw PILLOWS and CUSHIONS How to draw POD HOUSES How to draw POURING LIQUID How to draw ROBOT ARMS How to draw ROCK FORMATIONS How to draw RUNNING FIGURES How to draw SAND How to draw SAUSAGE DOGS How to draw SEA WEED How to draw SHADOW COMPOSITION How to draw SHOULDER ARMOUR How to draw SIEGE WEAPONS How to draw SILHOUETTE THUMBNAILS How to draw SMALL FLAMES How to draw SMALL, MEDIUM, LARGE How to draw SMOKE EFFECTS How to draw SNOW How to draw SPACE BIKES How to draw SQUIRRELS How to draw STICK FIGURES How to draw SWORD FIGHTS How to draw THE HORIZON How to draw TIKI STATUES How to draw TREASURE CHESTS How to draw TREE BARK How to draw TREE ROOTS How to draw USING THE SHATTER TECHNIQUE How to draw VEHICLE STANCE How to draw VINES How to draw VINTAGE PLANES How to draw WATER How to draw WOODEN HOUSES
46K notes
·
View notes
Note
Artistic question: what are some advices that helped you improve your art beside the obvious "keep practicing"?
Honest and long answer ahead:
Get your head out of your own assYou may not realise when you are in your own ass, but trust me it happens. research different styles, artists, films… whatever. There are more things in life worth drawing than anime characters (talking to past me here)
Draw from life more oftenDrawing from imagination is nice and fine, but things often don’t look as what you think they look. Constantly observe how light behaves, how people move, but stay unbiased. Don’t let your expectations get in the way of observation. However drawing from life can be very difficult at first, it’s ok to start with photographs to practice.
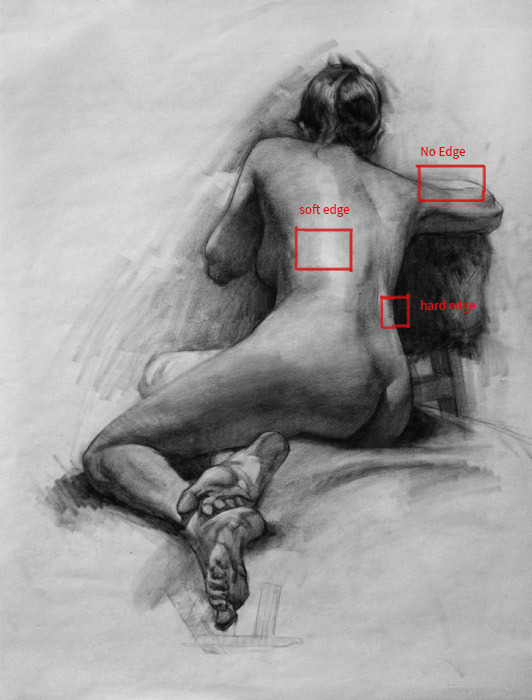
Drawing without contours can force you to practice your shading and renderingOften times when we draw we rely too heavily on outline to differentiate objects from each other. while I don’t necessarily think contours are bad, we can definitely use them as a crutch. forcing yourself not to use any outlines can improve your edgework.
What’s an edgework?Basically it’s how you render the edges of shapes, shades and objects. There are three basic types of edges: Hard edge - when one shade or object meets another, abruptly and without gradient. Like the edge of a white mug over a dark background.Soft edge - commonly seen in the shades on round objects, with some kind of gradientNo edge - a trick answer! Sometimes there isn’t an edge even when you think there is! often when the dark part of an object meets the background or vice versa. Think hard, is there really such a distinct edge here? or can I still understand the object without it?In this image I marked over a drawing by Stan Prokopenko the different types of edges (also follow proko on youtube)
5. Finish what you started (oops, change in formatting)
Sometimes it really is better to let go of a drawing that doesn’t work. But ask yourself, do you really need to move on from this, or do you just not want to deal with the rendering? Be honest with yourself. We’ve all sinned in laziness before, sketching is great and useful, but you have to do the rendering sometimes in order to improve your 3d vision.
6. Consider the whole format when planning your composition!!!
The composition is one of the most significant things that can make or break your drawing. I’d argue it’s even more important than your technique. Think of all the illustrators you know who draw in a purposefully simplistic style, their art would never be the same without their composition! If you don’t want to draw on the entire paper (as you sometimes would in a sketchbook) draw a frame within it your drawing will take up. All of my recent blue forest sketches were done this way. Think, where do you want the eye to be drawn to? Is the drawing balanced or unbalanced? Are there large areas of empty space which distract from the subject? Learning how to create good composition can be one of the hardest things to learn in drawing, the only hard rule of it is “if it works, it works”. Which is an extremely frustrating answer because it barely gives you any basis to work with. Try studying the compositions of illustrations you love, what about them works? How do they achieve that effect?
7. Shamelessly copy others
Master studies is one of the oldest and most common method of learning to draw. By copying artists better than you you can learn a lot about their methods and their composition. When you copy someone else has already done all of the annoying legwork for you, so you can focus on solely your skill na dignore anything else like expression, story, or style. (traditionally you would copy one of the great masters, but I won’t judge you if you cheat a little. But make sure you pick artists that are very advanced in their craft. despite my respect for them, the average fan artist on tumblr just won’t cut it)
8. Be aware of your weaknesses
For me for the longest time it was perspective. For a very long time I could barely create convincing perspective the moment it was more complicated than a straight railroad in the desert (or if I was feeling fancy, with an additional row of trees~!). So for the longest time I wouldn’t draw any environments for fear they would be unconvincing. But after studying more seriously for a while now I draw buildings and forests for fun. By being aware of your weaknesses you can work on them more thoroughly and they just might become your favourite thing to draw.
9. List of useful youtube channels
Of course the ideal is to take a class in person to get some personal one on one tutoring, but it’s not always an option. So here are a few channels I follow that can help instead:
Istebrak - drawing fundamentals, rendering, and occasionally characterisation.
Mateusz Ubanowicz (polish names are hard) - More illustrative work, drawing architecture and working with watercolours.
Proko (whose drawing I used in the example) - Drawing fundamentals and anatomy. Often has guest artists and interviews as well.
Aaron Blaise - Former disney animator, probably worked on several of your favourite 2d disney films. Drawing mostly animals, and animal characters.
Mattias Pilhede - Offers a unique perspective as someone who decided to learn to draw at a later age than most.
Well that was quite the wall of text I just gave you. I think this is a very good question that often gets a one line unsatisfactory answer. Of course you can only get better by practicing, but it’s not an automatic recipe for success. If you don’t practice smart you can find that your art still stagnates at the same level.
I wish you the best of luck, and I hope I was helpful!
3K notes
·
View notes
Photo


Back muscles!
SKELETAL LANDMARKS

shoulder blades: most of the upper back muscles attach to them directly, placement is affected by the arms. They can get obscured on very muscular backs, but most people these are the most dominant features!
7th cervical vertebra: neck bone that sticks out in most people, it sits in the center of that diamond shaped tendon in the middle of the trapezius
Also, obviously always keep the general shape of the ribcage and spine in mind, it was too much of a pain to draw them all in lol.
BACK MUSCLES

Erector Spinae: make the column-like structures around the spine, they extend all the way up to the neck, but you really only see the bottom part.
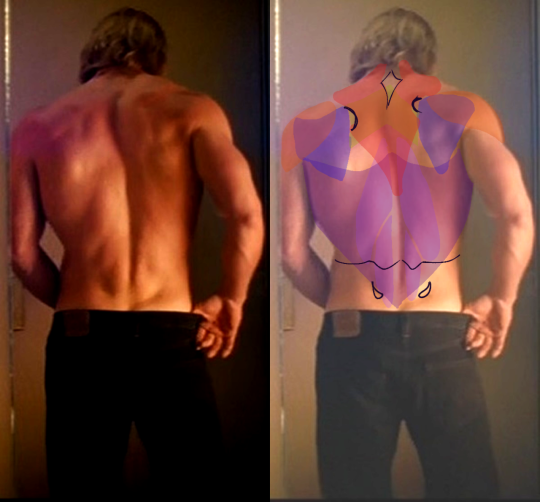
Latissimus Dorsi: are very thin, so most of the time you only see the structures underneath (such as the erector spinae). But when flexed, (for example, when climbing), you can see here on Jimmy Webb’s back that swooping curve it makes under the armpits.

The lats are also responsible for most of a person’s upper body strength and are the “V” shaped part of the back. For example, it’s how Bruce Lee was so strong despite being a small guy. Just look at those wings, man.

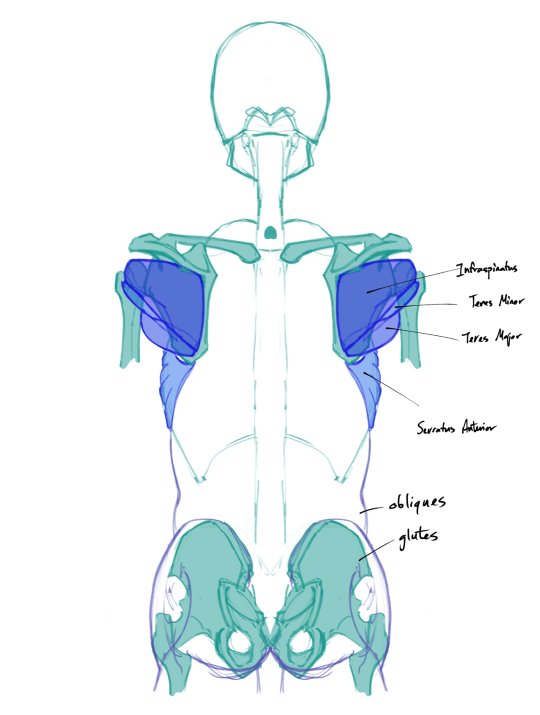
Infraspinatus, Teres Minor, and Teres Major: sit on the shoulder blade itself, and connects it to the top of the arm bone. These are responsible for a lot of the crazy shapes you see in bodybuilders’ backs.
Underneath them is the serratus anterior, which technically isn’t a back muscle but sits on the side of the ribs. These form that zig-zag pattern on the ribs that makes people look super ripped when visible with the external obliques, both wrapping around the sides of the torso. They’re not technically back muscles but fill out the silhouette, so it’s good to keep them in mind.
the glutes/butt muscles… they go farther up the back than one might assume and they, along with the pelvis, do affect the surface appearance of the lower back.

Rhomboid: simple shape, attaches from the inner edge of the shoulder blades to the middle of the spine at the 7th cervical vetebra to about the 4th or 5th thoracic vetebra. It does not overlap with the latissimus dorsi

Trapezius: divided roughly in the top, middle, and bottom sections. The top is quite thick and cylindrical and makes the sloping shape from the neck to the shoulders.
The bottom part is very thin; like the latissimus dorsi, the forms underneath it are visible when relaxed, making the rhomboid visible if it is flexed and the traps are not. Also not where the bottom part’s tendons attach to the shoulder blades; it outlines the curve of the shoulder blades even in people who are covered in brains muscles.
When fully flexed, it doesn’t taper into a point, but makes a small “w” shape at the bottom.
The 7th cervical vertebra sits at the center of the diamond-shaped tendons between the first and second sections of the trapezius. This part appears recessed in very muscular people.

Deltoid: not really a back muscle, but they overlap with the Infraspinatus and insert into the upper ridge of the shoulder blades, so it’s good to see how they interact with the others.
Ah, now for an example, featuring Thor himself. Note the curve where the traps meet the shoulder blades, the diamond-shaped tendon, and the rough “w” shaped contour of the lower back. Also note the two dimples, which is formed by the pelvis bones. They tend to be more prominent in women, although they are found in both men and women.
Try to find the back muscles on other people yourself, and then GET DRAWING
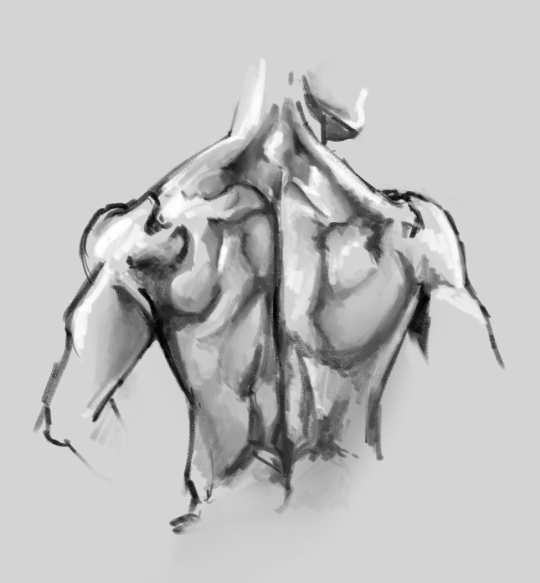
(PS, Generally it’s best to be able to simplify the forms instead of trying to render straight away - that’s how you know you really internalized the anatomy! I… honestly still don’t understand the back enough to do that yet, hence the lack of examples, unlike with the forearms post. But nonetheless, I hope that this is still useful as a general reference. I know it’s helped me at least remember what the different parts are, even if I don’t yet have a grasp of how they interact in motion!)
10K notes
·
View notes

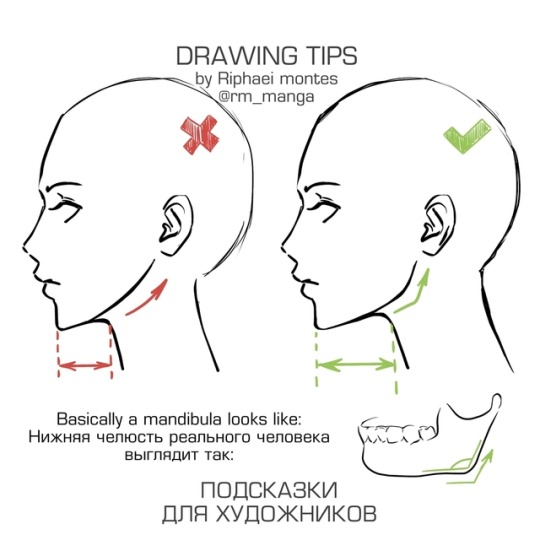
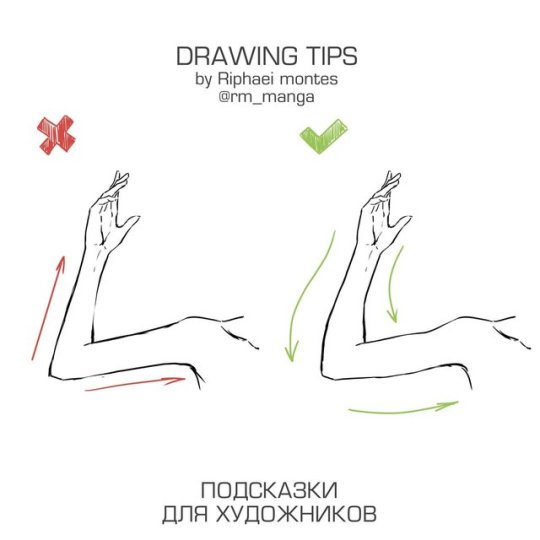
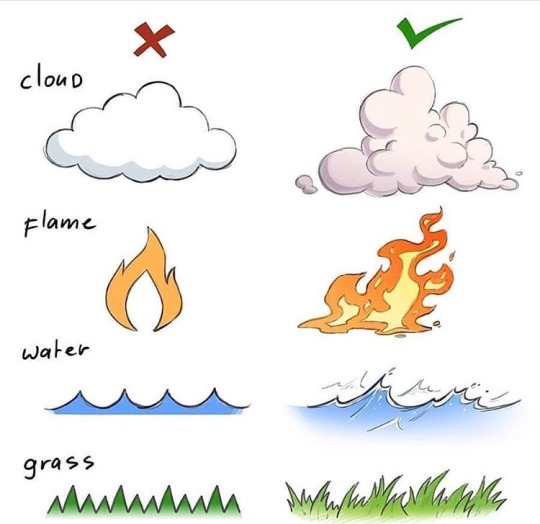
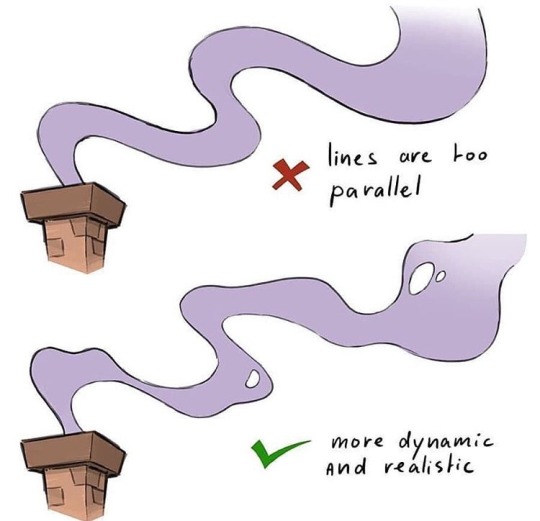
Photo


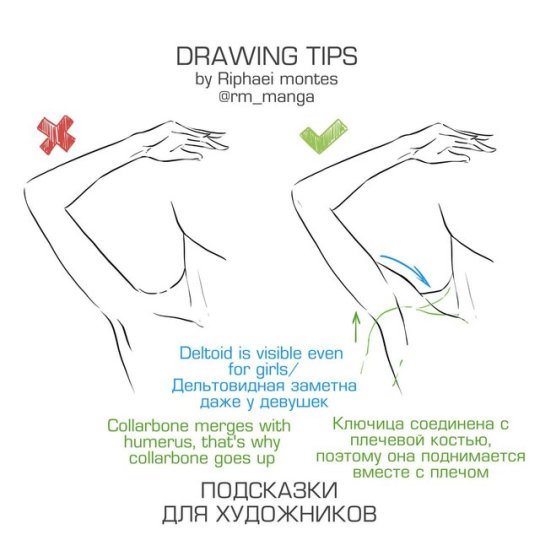
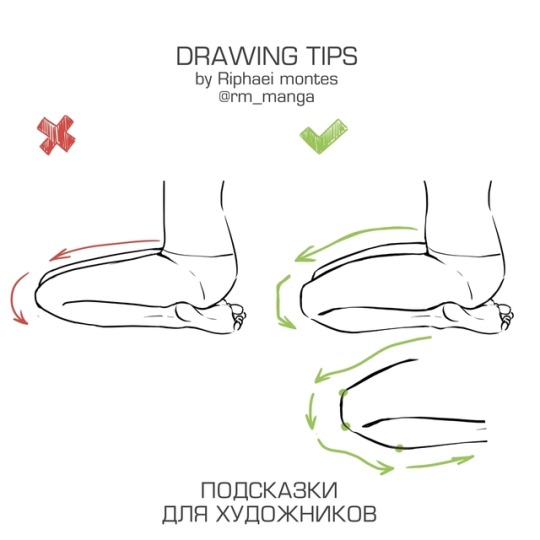
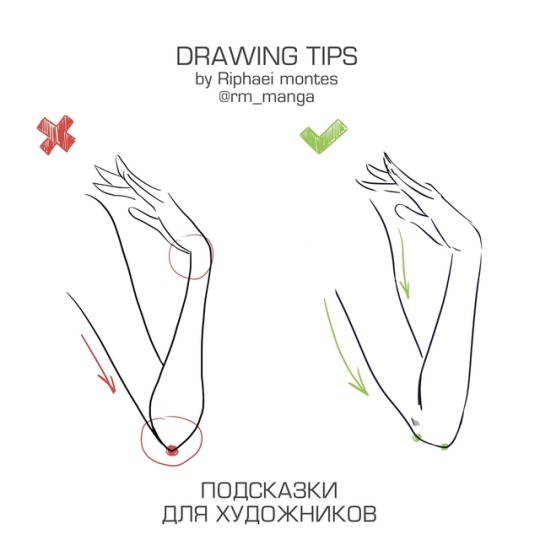
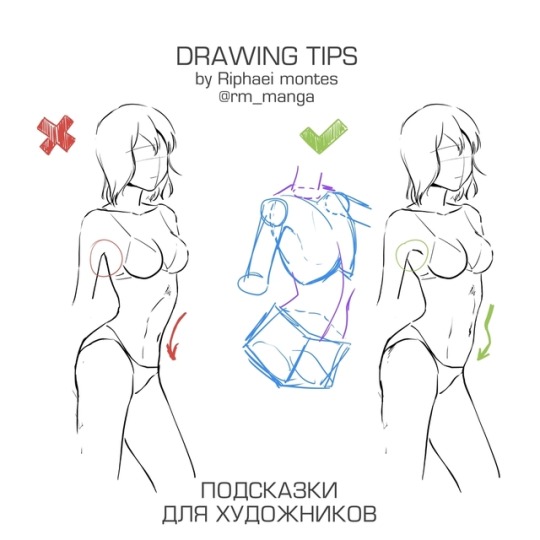
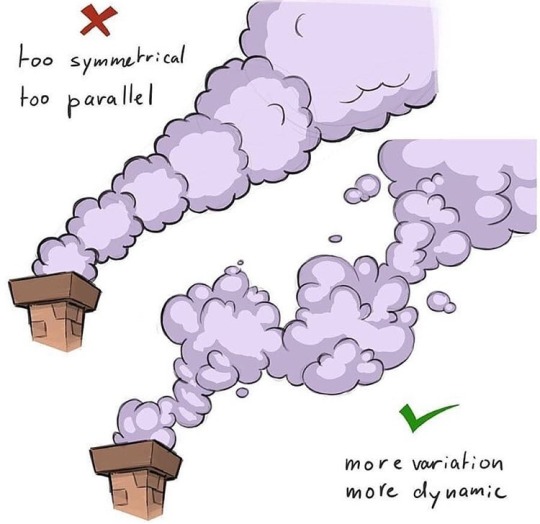
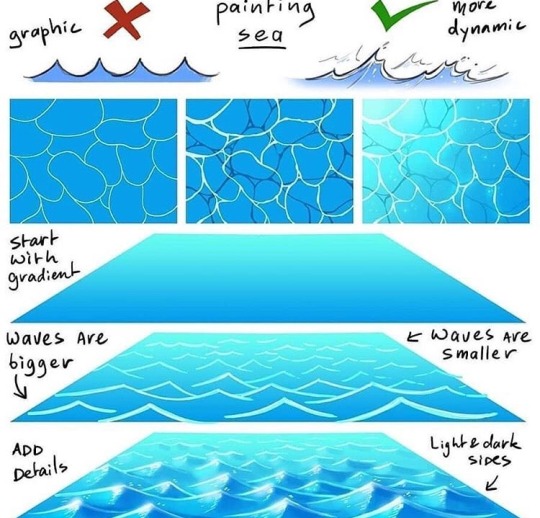
Some drawing tips previously posted on twitter. More drawing tips on my patreon. Hope some of these can be helpful.
82K notes
·
View notes
Photo
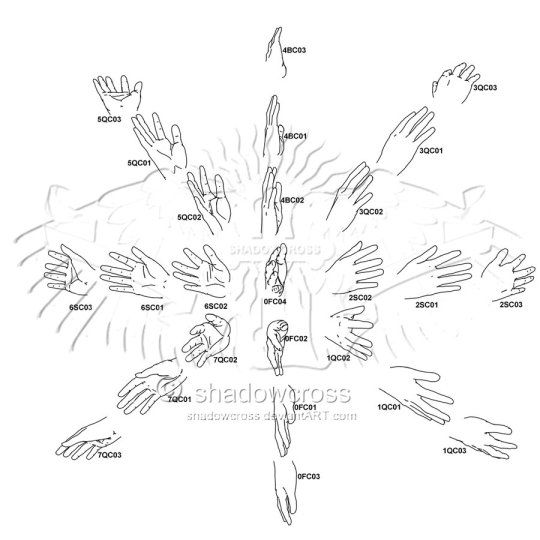
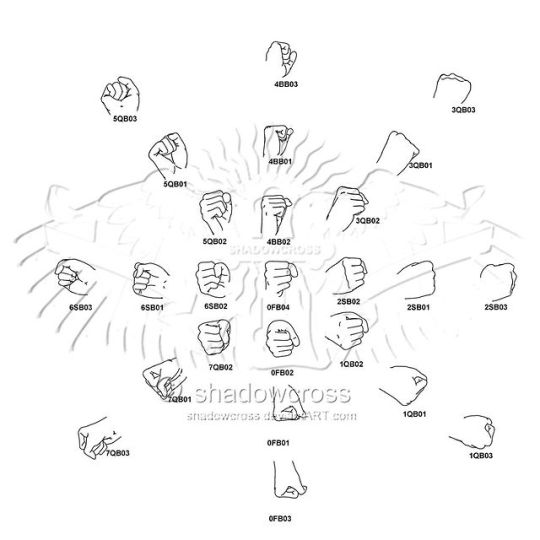


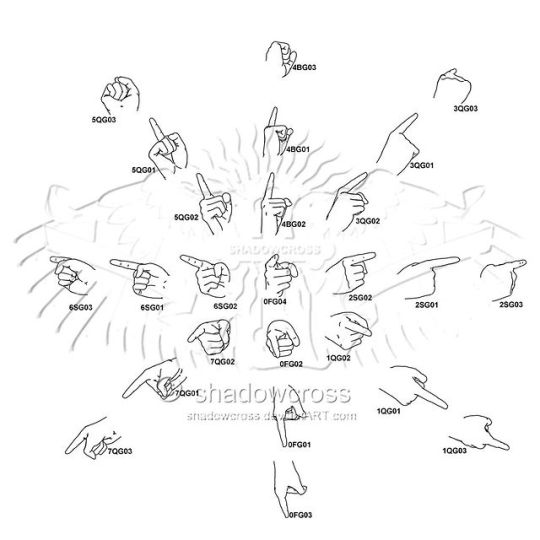
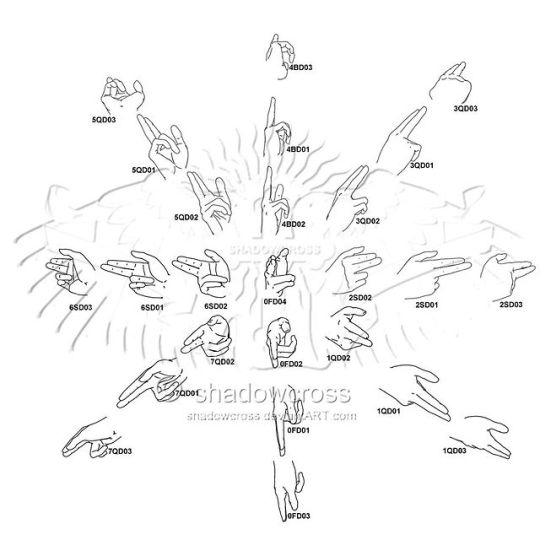
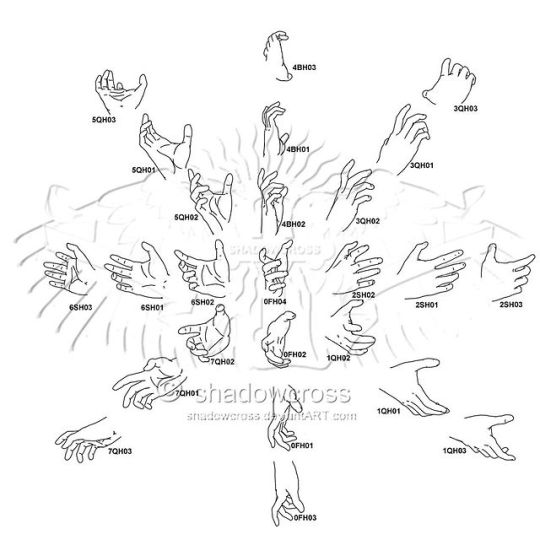

A mouth-watering fuck-ton of hand angle references.
By Shadowcross on DA.
264K notes
·
View notes
Photo

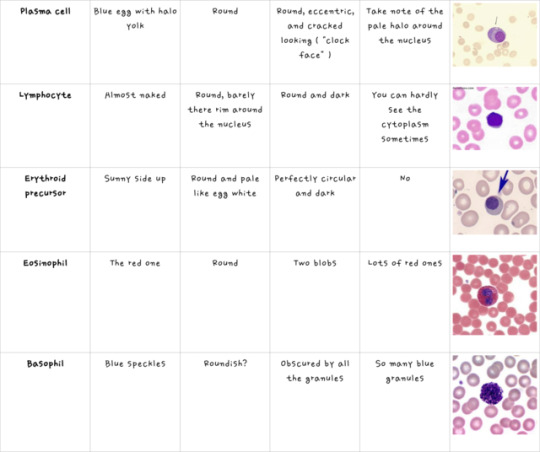
after spending a week in the lab, i’ve finally figured out how to identify the different red and blue spickle spockles!
919 notes
·
View notes