
Hi there! I'm an artblr. (Profile pic and header image by me so don't take please!)
Don't wanna be here? Send us removal request.
Statistics
We looked inside some of the posts by rinsartendeavors and here's what we found interesting.
Average Info
Notes Per Post
644K
Likes Per Post
343K
Reblog Per Post
301K
Reply Per Post
276
Time Between Posts
2 months
Number of Posts By Type
Text
11
Note
3
Photo
3
Last Seen Tumblr Blogs


Fun Fact
Forty percent of Tumblr users are between the ages of 18 to 25.
Text
Wow it’s been a while
Might start posting art on here, because my mom and aunt found my Instagram and followed it and I need to post vent art.
Hello again!
0 notes
Note
Any tips for a newbie trying to write a comic?
maybe...
Start now!!! Perfect will never come. A year from now you'll have learned more than you ever would have by waiting to be good enough to let yourself start in the first place.
Starting small is generally good advice, but really you should start with the story you're actually excited to make.
Every scene is there to accomplish a specific goal, and that goal CAN be accomplished in more than one way. Don't go ahead with a scene you don't love because you "need" it. Plan ahead, and edit with a machete.
If you don't love a scene, your readers won't love it either.
You have to be your number one fan, keep your number one critic to yourself. Putting yourself down doesn't make anyone want to read your comic.
The process that works for you is NOT what will work for others! Be patient with yourself as you figure out what does work, it takes a long time.
Clarity is far more important than anything else. Your comic doesn't need to be gorgeous, what it NEEDS to be is clear, direct, and effectively show the reader what they need to know.
Characters need to show their emotions and actions
Backgrounds need to tell us where we are
Paneling needs to show us which order to read things in
Using photos, 3d models, or copy/pasted assets is all perfectly fine and acceptable. As long as you own the rights to use the images or models, you're allowed to use them however you see fit. It's not cheating.
Do not start making comics for money
Don't start making comics for fame
Comics aren't a stepping stone to adaptations. If you want an animation, make an animation.
Get into comics because you love comics and you've got a story that you simply can't go another day without telling.
Make comics!
334 notes
·
View notes
Text
I recommend you all hop over to art station for their learning platform.

What an incredible place for inspiration and tutorials by industry experts.
See ya there!
- Al
1K notes
·
View notes
Text
Character Development : A Collection of Resources

Patreon || Ko-Fi || Masterlist || Work In Progress
–
Resources
Resources For Creating Characters
Resources For Describing Characters
Resources For Writing The Mafia
Resources For Writing Royalty
Commentary on Social Issues In Writing
General Tips
Guide to Character Development
How To Fit Character Development Into Your Story
Tips on Character Consistency
Designing A Character From Scratch
Making characters for your world
Characters First, Story Second Method
Understanding Your Character
Tips on Character Motivations
31 Days of Character Development : May 2018 Writing Challenge
How To Analyze A Character
Alternative Method of Character Creation
Connecting To Your Own Characters
Interview As Your Characters
Flipping Character Traits On Their Head
Character Driven vs. Plot Driven Stories
Traits
Tips On Writing About Mental Illness
Giving Your Protagonists Negative Traits
Giving Characters Distinct Voices in Dialogue
Giving Characters Flaws
Making Characters More Unique
Keeping Characters Realistic
Archetypes
Writing Good Villains
Creating Villains
Guide to Writing The Hero
Positive Character Development Without Romanticizing Toxic Behavior
Tips on Writing Cold & Distant Characters
Balancing Multiple Main Characters
Creating Diverse Otherworld Characters
Foreshadowing The Villain
–
Masterlist | WIP Blog
If you enjoy my blog and wish for it to continue being updated frequently and for me to continue putting my energy toward answering your questions, please consider Buying Me A Coffee, or pledging your support on Patreon, where I offer early access and exclusive benefits for only $5/month.
Shoutout to my $15+ patron, Douglas S.!
8K notes
·
View notes
Text
How to get back into a WIP when inspiration is lacking
1. Character exploration
You may be feeling uninspired because you find it difficult to enter your characters' minds.
A great way to dive into a character's point of view is writing a paragraph from their perspective on a topic like death, the meaning of life, loss etc.
I usually do this before I start a project, but it can be a great way to get back into the swing of things in the middle of a book.
2. Character songs/playlist
A lot of people write with music, curating playlists for their WIP.
I don't write with music, but it can be great to listen to a song or two before writing a specific scene or character's POV.
Curate a Playlist for your POV characters and listen to it when inspiration is running low.
3. Fake promotional material
This may just be a weird thing I do, but I love it.
When I really need a motivation boost, I create fake promotional material or swag designs for my WIP. Mock covers, bookmarks, posters, ads etc.
It reminds me what I'm working towards and that can help a lot.
4. Moodboards
Creating physical mood boards for your WIP or specific characters/locations and putting them up int your work space can do wonders for inspiration.
Every time you look at the moddboard, you're taken back to the moment when the idea first got into your head - a moment when you had oodles of inspiration.
You can also add to those mood boards whenever you need an extra shot of inspiration.
5. YouTube
Every time I watch an Authortube vlog, I feel motivated to work on my own writing.
Pick an Authortuber who resonates with you and has the life you hope to build. Watch one or two of their vlogs and that should light a fire under you.
Reblog if you found these tips useful. Comment with your own ideas. Follow me for similar content.
6K notes
·
View notes
Text
I think everyone should make dumb ugly zines and bad music and write shitty books with weird premises and publish them for pay what you will online. I think people should write plays that are only ever intended to be performed with their friends in their living rooms. I think people who like ttrpgs should explore bizarre itch.io games and new systems that have no affiliation whatsoever with any major publishing house. If youre lucky enough to have a cool local community radio station nearby you should listen to that and what people close to you have to say and what they're creating that has no focus on being nationally appealing. I just think creation should be more joyful and local both in a geographic sense and a personal and social sense and unconcerned with whether or not it will be commercially viable or slick or even good beyond your own pride in it. And I think it's good to seek out art that exists for its own sake or to appeal to the community it was created within
75K notes
·
View notes
Text
random sites that are extremely helpful
animation screencaps
body visualizer
create infographics
desktop goose
help with writers block
boil the frog
professions based on your personality
best dictionary ever
fighters block
writing tool
slides go
slides carnival
online library
free movies and tv shows
free movies and tv shows #2
worldbuilding website
make music online
human pose reference
email signature
cool design templates
animation tool
18K notes
·
View notes
Text
“i don’t like writing about my day, but i want to keep a journal”:
quotes and copywork. when reading, if you find something you enjoy, just copy it into the notebook. you can copy a whole chapter if you wish, highlighting what caught your attention the most.
definitions. look up on a dictionary and copy it. you could write your own dictionary as well, making up definitions for words.
lists. a classic, write movies to watch, books to read, the playlist of the month or just the groceries you have to buy.
maps. when going somewhere, you could draw the route you took or just a map of the place itself. just look up the place on google maps and copy it. you can draw a little map of all the places you have lived or the schools you have attended as well.
photos
take “notes” as you watch movies / documentaries. write down phrases that caught your attention or doodle.
illustrations and clippings. if you see an image or piece of art that you liked, put it in your journal. if it’s from a book or from a magazine I would recommend scanning it, tho’. it will serve as a record of what kind of art you enjoy through the years.
newspaper clippings from the day.
tickets and pamphlets. from movies, museums, transportation.
postcards
records. you could record for a month what the temperature was when you woke up and when you went to sleep. if you do that for a year, it gives you a better notion of the passing of seasons. you could record rainfall and other seasonal changes as well. you could choose something (an animal, a plant, an item or object) and write down every time you see it.
rubbings of leaves, coins, landmarks.
count. there’s a scene in the movie Coraline (2009) where Coraline’s dad tells her to go count the windows. you could do the same type of counting game if you are bored and write down.
mindmaps/sketchnotes + timelines of books, movies, music albums.
collages
pressed leafs and flowers
your collections. if you collect anything you could write down an inventory or maybe try to draw the items.
recipes. write down recipes and give it a score every time you try it. you could do the same for drinks you try out.
stickers
comic strips. you can find a bunch of it online, glue your favorites in your notebook.
51K notes
·
View notes
Text

For the first time since 2018, I painted one of my own cats! This is Daniel ❤️ she enjoys burrowing under blankets and being queen of the cat tower.
I painted this portrait of Daniel as an example of what you can create using my new brushes for Procreate. The best part is that the brush set is free! To help show the 12 brushes in action, I recorded the process as a time-lapse:
youtube
You can download the brushes here:
553 notes
·
View notes
Photo
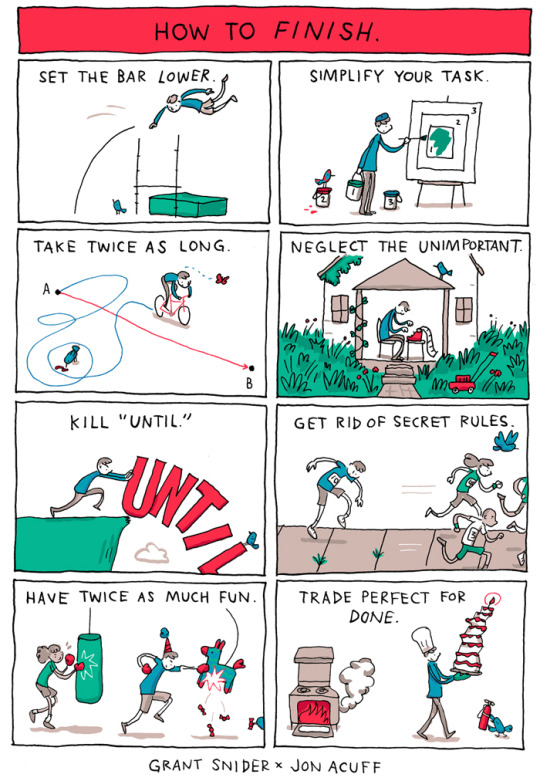
How to Finish
I drew this poster for Jon Acuff and his FINISH book tour. Big thanks to Jon for this collaboration, his book has some great ideas about how to complete creative and life goals.
450K notes
·
View notes
Note
Hi Bri! I hope you're doing well during summer-it's been hecka hot lately. I was wondering if I could possibly ask your advice on how to structure and schedule a visual development project. It's totally okay if you're busy to do that--regardless, you're one of my inspirational visdev artists and I hope you have a good day!
hello and thank you for your kind words!! i hope the weather is treating you okay too. it is too hot here in LA :’( i wait until the evening to go for walks but then i'm assaulted by mosquitos and gnats.
this is a great question and there isn’t one answer to it! so i’ll just talk about the process i follow and stuff i teach my students, but there is no “right” way to approach a visdev project!
step 1: story
if there is one thing that i could scream from the top of the hills it would be this: STORY IS EVERYTHING!! story and, by extension, character and emotion, will drive your entire project. it’s how people connect to the art. so, whether you’re doing a story from scratch or interpreting an existing story, you want to sit down and plan some stuff out. if a story has a lot of characters, which are you going to include? which moments of the story move you the most or you find the most interesting? what are the highs and lows of the story? what sorts of color palettes would help tell this story visually, and why? etc. write all these down in any way you want. the more notes, the better. be on the lookout for repeating themes or things that you are REALLY excited about. remember that the emotional core of the story will be your weathervane for every other decision you make after this. if you’re ever stuck, go back to the emotional core.
step 2: research
make mood boards! read books! save any and every little thing that inspires you or that you want to include! the more research, the better. you want a very deep pool to constantly draw inspiration from as you move forward. keep constantly adding to this pool as you continue with the project.
step 3: planning
now onto the actual planning. the first question you want to ask yourself is: what is my goal with this project? i mean specifically, WHY are you doing it? is it for pure self enjoyment? it is a portfolio piece? is it for an internship or job? for the purposes of the rest of this ask, i’ll assume it’s a portfolio piece since i think a lot of people reading this will be students or novices.
so, let’s say it’s a vis dev for your portfolio. the goal with that would be to get the audience interested in your project and your ability to visually convey a story. so you need to choose your elements based on that goal. you can consider a vis dev project to be like a “sizzle reel” or a trailer. you want to show the highest drama, the highest action, the highest emotional impact, the most aesthetically gripping or beautiful scenes. put your best foot forward all the time. here is where you want to start making choices and paring things down.
characters: typically you want at least 4 characters in a “lineup”. there is no maximum amount, but i’d say the average is between 4-6. you don’t want to overload your audience with information, and introducing too many characters will get them confused. for my class, we do 4 characters.
keyscenes: aka story beats or story moments. these are the actual illustrated moments of your story. same principle as above, you don’t want too few or too many. i’d say between 3 and 5 is the sweet spot. and you want variety here with regards to composition and feeling. if possible within the limits of your story, you want a mixture of happy scenes, sad scenes, intense scenes, calm scenes, an environment shot, a character-driven shot, a close-up, a far shot, etc. obviously you don’t need ALL of these, but keep in mind that these will be viewed as a group. you want to show as much range as possible within that group.
it’s a good idea to have every character in your lineup show up in a keyscene at least once. it can be confusing for a viewer to see a character in the lineup, but then not in the story.
technically, you only need a character lineup and some keyscenes to have a great vis dev project! but here are some more things you can include if you want:
color scripts: sort of a “color storyboard”, usually for the entire project. this is great for showing how color changes throughout the entire project to show changes in mood, atmosphere, and circumstance. typically i start by writing down important story moments, then editing to make sure i have a good breadth. then i quickly storyboard them all out and do color thumbs, then add detail at the very end. this helps with the flow of the entire script. a color script can be as short or as long as you want, but i’d recommend between 12 and 24 panels.
props: props are a super powerful way to show not only drawing and design skills, but worldbuilding that might be hard to fit in with just keyscenes. if your story takes place in another time period or a specific culture, props can really convey what life is like for your characters. and unlike with characters, they don’t really need to appear in your keyscenes. so have fun with them! when i do prop sheets for vis dev i usually just pick a certain character or place to focus on. it can be a great exercise to just draw every object in a character’s bedroom, for example.
storyboards: just like color scripts, without the color! boards can be your strongest tool for helping to tell a story, but they’re also a bit of a double edged sword because they take up valuable space and they’re really not part of the “design” portion of animation (story and design are different departments in the pipeline). i would only include boards if you want to go into storyboarding, or if you keep it to a minimum. i wouldn’t include both boards and a color script because they’re redundant.
sketches: some people really like sketching more than finishing stuff and i’m all for it! recruiters and ADs really love to see sketches, so don’t be shy about including these at all. they’re also great for showing your thought process and creative decisions. but, since these aren’t the star of the show, make sure you don’t include too many. i recommend placing them throughout the project rather than all at the end (ex: showing your finished character lineup, then character sketches, then the next finished item) again for the sake of flow.
then from there, the process is really up to you! some people like to work on everything at once, some people like to totally finish one portion before moving onto the next. my usual workflow would be this: writing down story beats, character sketches, keyscene sketches, character lineup, props, color script, keyscenes. i would probably continue to sketch throughout the entire process though, i find it keeps me interested during the tedium of painting.
as for scheduling, i think it’s important to set deadlines for yourself. it’s hard to finish things, especially big projects, without setting limits unless you’re supernaturally motivated. i usually take things in chunks; i’ll set a specific goal and make that the next thing i do when i work on the project. like “by saturday, i’ll sketch all 4 characters and paint 1”. etc. it’s up to you to set your own schedule since you know how you work best. but if you’re a procrastinator like me, having a hard deadline can really motivate you more than “i’ll do it when i feel like it.” planning out your entire project upfront will probably help, but always remember to take it in tiny bites. if you're overwhelmed by the scale of the project, you might freeze up and not do it.
something i learned from a friend that i also do sometimes is that, if you REALLY want to finish something, tell a friend or loved one that you’ll give them a certain amount of money if you don’t finish by a specific date. it’s much easier to finish a painting if $100 is on the line.
at the very end, don’t forget to do fun stuff like a title treatment, splash page, and page arrangement if applicable! keep text to a minimum (people generally don’t read it. but if it’s for a personal project, then go wild), but have fun with the actual design of the elements and how you present them. how will you arrange your character lineup, for example? i had one student a few years ago do her characters as tarot cards, and i thought that was really clever and engaging. you can really take the design aspect of your project as a whole and let it sing. i usually leave this part for last, because by the time you’re done you’ll probably have a big visual language going on that you can pull from.
that’s all i have, i think!!! please let me know if you have any other questions, and best of luck with whatever you’re working on!!
425 notes
·
View notes
Text

Pt 1 | pt 2

School related
Emails to make your life easier
college tips for english majors (or other reading heavy humanities)
School tips
Guessing strategies for multiple choice questions
Shit grade?
Things i wish i knew before going to university
5 things you can do to prep for the next academic year
Psychology practicals tips
Studying Tips
Understanding over Detail
Study tips for ex gifted academics
Study in a brain friendly way
Study tips that aren't bullshit
Emmastudies' study tips masterpost
Study Methods
How do i study for _____?
Study tips for accounting students
How to study for a subject you don't take a fancy for
Think like a four year old method
How to study hundreds of pages in the shortest time possible
Online Learning Related
Managing attention for online learning
random things I do to fool my brain into staying interested during online study
How to survive online school
How to make online learning easier
Study Breaks
Self care during study
Self check in during study sessions
Study break ideas
Other
Types of motivation
Guide to studying well (masterpost)
Should your notes be pretty?
How to fix your study schedule
How to deal with study burnout

Languages
Books for self studying chinese
Books
Replacement bookshop if u don't want to buy from amazon
Free books
ADHD specific
Reading with adhd
ADHD resources
Get stuff done adhd edition
Other
Bored/artsy masterpost
Boredom cheat sheet
Vaguely academic things to do to keep yourself entertained

Life outside of academia
How to live in the ghibli aesthetic™
Dealing with the worst case scenario
Apartment hacks masterpost
How to put "ran a studyblr" in an application
Resume writing for someone with no experience
Studyblr related
Editing studyblr pictures
How to start a studyblr 101
Misc
Debunking productivity myths
Using the memory you have
Masterpost of everything
1K notes
·
View notes


Text


05.05.2021 // does your brain ever just start making that whirring noise that laptops make when they get too hot bc same
1K notes
·
View notes
Text
WQA’s Guide to Internet Research
One thing I hear a lot here at WQA is, “I Googled such and such topic and I didn’t find anything.” Regardless of what the topic is, I know that’s not true because there’s a ton of information about every topic imaginable on the internet, all of it accessible via a simple Google search. So what’s happening here? Simple: people aren’t sure what they’re looking for, don’t know how to find what they need, or they’re overwhelmed by the pages and pages of results. But, honestly, researching your topic via the internet isn’t that difficult. Here’s what you need to do…
1) Know what you’re looking for.
The first thing you need to do is create a small summary of exactly how your topic fits into your story. For example, “My story is about a woman who survives a laboratory accident, but she becomes permanently blind due to eye trauma experienced in the accident. Now she must learn how to cope with losing her eyesight and learn how to navigate her world without it.”
2) Break it down into sub-topics.
Now that you have your topic sorted out, break it down into sub-topics that will make the research easier to do. In the above summary, there are three obvious phases of this woman’s situation. There was the initial trauma where the eyesight is lost, there’s coping with learning that her eyesight is lost, and there’s learning how to live without her eyesight. So, the sub-topics would be:
- losing eyesight due to trauma
- coping with lost eyesight
- learning to live with lost eyesight
3) Identify keywords, key phrases, and key questions.
The next thing you want to do is boil your topic summary and sub-topics down to keywords, key phrases, and questions that will help you find information. Start by underlining the important things in your summary:
My story is about a woman who survives a laboratory accident, but she becomes permanently blind due to eye trauma experienced in the accident. Now she must learn how to cope with losing her eyesight and learn how to navigate her world without it.
Keywords:
Blind/blindness eye trauma eyesight loss Key Phrases:
Coping with loss of eyesight Living with blindness Key Questions:
How do people learn to live with blindness? What happens when someone becomes blind? What is it like to permanently lose eyesight? What is it like to be blind? How do you adjust to being blind?
4) Go to Google and search.
Go to Google and type in your keywords, key phrases, and key questions. Not all at once, obviously, but one at a time. It works best if you tackle one sub-topic at a time. Sift through the first few pages of results and use “right-click, open in new tab” to open the most promising links.
Keyword: blindness (click here for example)
Keyphrase: living with blindness (click here for example)
Key question: What is it like to be blind? (click here for example)
5) Sift through the results.
Here are some of the results for “what is it like to be blind?”
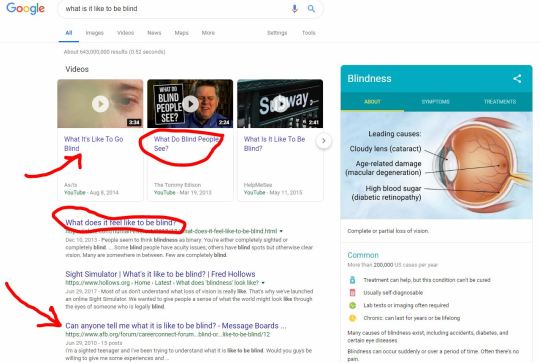
Just on the first half of the first page there are already resources that would be very handy, including videos, an in-depth article, medical information, and a forum thread which may have some firsthand experience.
6) Read, watch, and take notes.
Now it’s time for the hard work. You need to go through the most promising results, read through them, watch the videos, and take notes. Remember to focus on one sub-topic at a time. You may want to get a multi-subject spiral notebook with folder dividers, which will allow you to organize your notes by sub-topic, and if you want, you can print out any interesting articles and highlight the important details. Be sure to take notes while watching videos, too. You may want to create a folder in your browser where you can bookmark articles/sites/videos you’ll want to refer back to.
7) Resources to look for…
Articles - online newspapers, magazines, and news sites often post in-depth articles about a variety of topics. These articles often boil topics down to their most important elements. Sometimes they zero in on specific points of a topic, which can be really helpful when doing research.
Reference Sites - there are lots of different online references that cover a variety of topics. Encyclopedias, like the Encyclopedia Britannica, are available online. There are also wikis like Wikipedia, and topic specific wikis like TV Tropes and recipe wiki. Educational Sites - lots of topics, especially those having to do with health, lifestyle, and medical issues, have web sites dedicated to educating the public about that topic/issue. For example, the American Heart Association has a site dedicated to teaching people about heart disease and heart health.
Enthusiast Sites - sometimes, enthusiasts of a particular topic will put together a whole website dedicated to delivering information about that topic.
Blogs - blogs dedicated to a particular topic can be an incredible resource. For example, if you’re writing about a character who is living on their own for the first time, I guarantee you can find blogs written by people who are living on their own for the first time, all about their experiences and the ups and downs.
Forums - forums are another great place to find information. Not only are there forums dedicated to just about every topic imaginable, but if you have a question about that topic, odds are good someone has had a similar question and asked it. When you can find a forum dedicated to your topic, you can do a search there on your keywords or your specific question and see if someone already posted about it.
Videos - YouTube, Vimeo, MetaCafe and others offer videos on every topic imaginable. Sometimes you can find actual documentaries on your subject. Other times you can find overview videos. You can also find panels, exposes, lectures, and other videos about various topics.
Google Maps and Google Earth - if your topic relates to a place, viewing it in Google Maps or Google Earth can give you lots of interesting information. Not only can you get a street view of the location, but you can also get pictures and other important information. Some places like museums and historical sites even have online walk-throughs.
Online Exhibits - if your topic is something related to arts, science, or industry, there’s a good chance you can find an online exhibit relating to your topic via a museum online. For example, the fashion and textile museum has a digital collection you can look through. The Dittrick Museum of Medical History has several online exhibits an photo collections.
Digital Books and Magazines - sometimes you can find digital books and magazines dedicated to your topic. For example, if you’re writing about an 1800s whaling captain, you may be able to find digitized books about whaling, sailing, and life in the 1800s.
8) Other places to look.
Although this post is about doing internet research, remember that there are other places to look for information about your topic. Here are some to keep in mind:
The Library - whether it’s your school library or your local library, libraries are still one of the best places you can go to get information about any topic. Not only are the chalk full of books, references, and other resources, they’re staffed with knowledgeable people who are trained to help you find the information you need. Even if you plan to research your topic online, don’t hesitate to stop in your local library for supplemental information. Librarians want to help you! That’s what they’re there for!
People - the people in your life have had a variety of different experiences and learned all different things. Look for people in your life who might have firsthand information about a particular topic. For example, maybe your friend’s grandfather is blind. Perhaps you could ask for an interview, or talk to her family members about what they know about his experience.
Books - obvious, I know, but you’d be surprised how rarely people think of finding books about their topic. The library is obviously a good place to start, but sometimes you can find pertinent information in books already on your shelves. If not, see what’s available on Amazon. Sometimes you can get used copies at a reduced price. Or, go see what’s available at your local bookstore.
TV Shows and Movies - while you should certainly never assume something you see on TV or in a movie is real or accurate, they can still be a great place to go to get a general overview about a particular topic. Watching a movie about a blind person can give you insight that will help make your research a little easier, because the topic will be more familiar to you.
Museums, Historic Sites, and Other Locations - if you can learn more about your topic by visiting a place, and if you can get to that place, go! If you’re writing about a noble woman who lives in a big manor house, nothing beats visiting an actual manor house for an idea of what that might be like. Even if the manor house (mansion, estate, etc.) you have access to isn’t quite like the one you’re writing about, just being there can still give you vital details that will help make your story more authentic.Or, your museum might have an exhibit on furniture from the Edwardian era. Getting a look at all that fancy furniture will help you recreate those details in your story’s manor house.
The most important thing of all is to not get frustrated. Take the time, do the work, and research can be the most rewarding part of writing your story! :)
3K notes
·
View notes
Photo


More pages from my “gardenning diary/sketchbook”; I made a lot of mistakes with my seedling ^^’
1K notes
·
View notes
Note
Hey there! Random question but I'm curious, how would you go about drawing chainmail? I have a D&D character that has chainmail under their armour and every time I try to draw them I'll start off by drawing all the links by hand then it gets way too tedious so I go look for chainmail pattern on google and paste it lmao but it feels like I'm cheating by doing that, and it clashes with the style I'm going for. I was wondering if you had any tips or tricks?
I don’t feel particularly great at drawing chain-mail either but there’s a technique I learned from a tutorial a bunch of years ago that I think makes a pretty good texture. It’s fast and the end result is cartoon-y enough to match a less photo-realistic style. I can’t for my life find the tutorial so I’ll recreate it here (using Photoshop):
1. Fill your canvas with black or white. Filter -> Render -> Clouds

2. Filter -> Filter Gallery -> Glass (under the Distort category)Keep smoothness as low as possible, play with the other settings
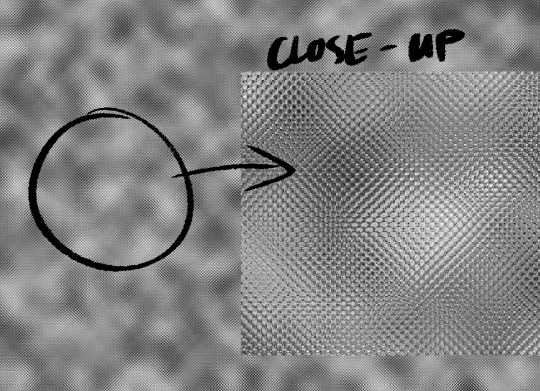
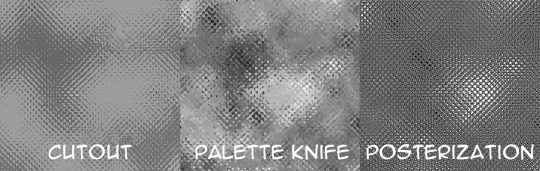
3. Find a filter in Filter Gallery that you like and apply it. Combine them, if needed.
4. When applying texture to the drawing, use Edit->Transform->Warp to make it fit the shape you’re trying to convey

You can stack more filters on after the texture is placed or draw over it with a textured brush to make it look less uniform if that’s what you want. Add a shine to it with a big soft brush, colorize it, go crazy. I go with whatever looks best to me atm.
This is how I did Geralt’s armor too, though since I knew the final print will be smaller than 1.5″ I didn’t worry about details much.

Hope that helps!
18K notes
·
View notes