
riverlandfarm
Riverland Farm
My family's go at becoming self sufficient on our own little piece of terra firma
234 posts
Don't wanna be here? Send us removal request.
Last Seen Blogs

giuliapratesisworld-blog
Shiver

restshooting
Restaurantes de Recomendación

videobokeperopa-blog
VIDEOBOKEPEROPA

fallen-queen-angel
Fallen Angel (Queen)

falling-for-a-soldier
In his wake, he left a beautiful disaster.
Photo


The giant Pterodactyl for Dylan's birthday. I'm also making a trex, Stegosaurus, brontosaurus, and triceratops skeleton as part of the decoration for his party. This guy's a little big, he's almost 6 feet across!
9 notes
·
View notes
Photo


A custom order for Harrington Lane Farms
Come check out the rest at
https://www.facebook.com/UnderTheSunCreations
5 notes
·
View notes
Text
how to make butter
How To Make Butter Written by Kristen If you're new here, you may want to sign up for FREE weekly updates delivered to your inbox featuring Real Food recipes, nutrition & health articles, and the latest in sustainable agriculture, food politics & philosophy. If you haven’t already, you should learn how to make butter. It’s so simple that I believe everyone needs to do it at least once. To experience the best of what homemade butter can be, I only bother making it if I’ve got some extra raw cream from grass-fed cows on hand. Otherwise, I buy Kerrygold Irish Butter or Organic Valley’s Pasture Butter. Both are rich, yellow butters from grass-fed cows. They’re just not raw. (For online sources of butter from grass-fed cows, check out the listings on Resources Page.) I also like to experiment with my butter. You can make butter from sour or sweet cream, with or without salt, and with or without various herbs and spices. However you do it, the same general method is used. How To Make Butter: The Players Any amount of cream sea salt (optional) How To Make Butter: The How-To Begin by pouring your cream into a blender or food processor. Here I’m using slightly soured raw cream. It’s too far gone to be happy in coffee, but it’s not quite solid enough to be served up as sour cream. Blend your cream, and be sure to have someone do the all-important job of keeping the lid on. (My four year old was eager to volunteer.) After five or more minutes, the butter will start to separate into butter and buttermilk. When you notice that happening, stop the blender and let the cream sit for a minute or two as the butter rises to the top. Pour the buttermilk into another container, using a spoon to press as much buttermilk out of the butter as possible. You could call your butter done at this point, but if you want it to last for more than a few days you need to wash the butter. Pour ice cold water into the blender and blend for another thirty seconds. After you’ve washed the butter, pour off the water. Use a spoon or a spatula to squeeze out the last dregs of the buttermilk. What’s left is butter. I mix in sea salt with a spoon. Now it’s ready to spread on a delicious slice of sourdough bread made with sprouted grains, or melt over steamed vegetables
2 notes
·
View notes
Photo


The frog Prince. Part of a custom order that's a WIP. COME CHECK OUT THE REST AT www.facebook.com/UnderTheSunCreations
3 notes
·
View notes
Photo


Come check out my page! I'm doing Christmas hat pre orders! Find me here facebook.com/UnderTheSunCreations
2 notes
·
View notes
Photo
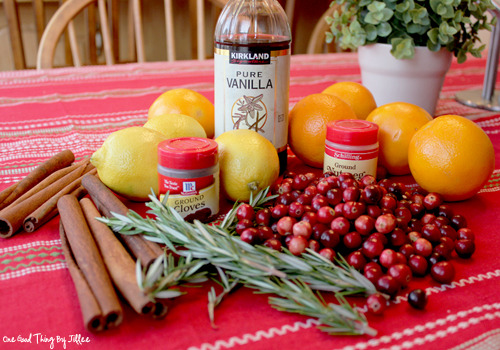
DO YOU HAVE COMPANY COMING OVER, BUT YOUR HOUSE SMELLS LIKE SMOKE OR YOUR MOLD EXPERIMENTS OR CAT PISS OR SOME BULLSHIT LIKE THAT?
WELL SLAP MY ASS AND CALL ME BRILLIANT, BECAUSE THIS SHIT ISN’T EDIBLE, BUT IT’LL MAKE YOUR HOUSE SMELL LIKE A GODDAMN CHURCH CHOIR SINGING HALLE-FUCKING-LUJAH IN YOUR NASAL PASSAGE! (YOU SHOULD GET RID OF WHATEVER’S STINKING UP YOUR HOUSE IN THE FIRST PLACE AS WELL, MORON)
RUN YOUR CLASSY ASS OVER TO THE STORE AND MAKE SURE YOU’RE PREPARED FOR THE MIND-FUCK OF THIS SHIT. YOU’LL WANT 1 ORANGE, A SMALL BAG OF CRANBERRIES, 3 CINNAMON STICKS, GROUND CLOVES, NUTMEG, 2 LEMONS, ROSEMARY AND VANILLA.
THERE ARE TWO VERSIONS OF THIS THAT YOU CAN COOK, BECAUSE CLASSY-ASS MOTHERFUCKERS NEED VARIETIES IN THEIR LIFE!
THE FIRST IS ‘CHRISTMAS’ AND THE SECOND DOESN’T HAVE A DAMN NAME, BUT IT’S FUCKING WONDERFUL.
ONLY HAVE ONE POT OF THIS SHIT GOING, IT’S CRAZY POWERFUL.
“CHRISTMAS”
CHOP UP THE ORANGE, SKIN AND ALL, BECAUSE YOU DON’T JOKE AROUND WITH THIS SORT OF SHIT.
USE YOUR WARRIOR STRENGTH TO BREAK THE CINNAMON STICKS IN HALF, LIKE YOUR CHILDHOOD MEMORIES OF SNAPPING THE FEMURS OF DRAGONS BEFORE YOU SUCKED THE MARROW OUT.

THROW THE ORANGE AND CINNAMON STICK PIECES INTO THE POT, OR IF YOU’RE NOT CONFIDENT WITH YOUR AIM, YOU CAN SET THEM GENTLY INSIDE. SHOVE A SMALL SPOONFUL OF NUTMEG AND A SMALL SPOONFUL OF CLOVES INTO THE POT.
THEN FILL THAT FUCKER UP WITH WATER UNTIL THERE’S ONLY AN INCH OF LEEWAY BETWEEN THE WATER AND EDGE, BECAUSE YOU’RE A DAREDEVIL MOTHERFUCKER.

NOW SET YOUR STOVE TO A LOW-MEDIUM SETTING, AND LEAVE IT SITTING THERE TO MARINATE IN IT’S OWN QUIET ACCEPTANCE OF DEATH. DON’T COVER THIS FUCKER, BECAUSE THE SMELL OF IT IS GOING TO INVADE YOUR ENTIRE GODDAMN HOUSE.
THAT WHICH WILL NOT BE NAMED
THE OTHER VERSION OF BOILING POTPOURRI ONLY HAS LEMONS, ROSEMARY SPRIGS AND VANILLA.
RIP THE LEMON INTO CHUNKS WHILE SOLVING THREE UNSOLVED MYSTERIES IN YOUR HEAD AND YELLING AT YOUR FLATMATE TO LEAVE YOUR OTHER EXPERIMENTS ALONE, THEN BE A CHAMPION BY NOT USING A MEASURING TOOL WHEN SPLASHING 1 TABLESPOON OF VANILLA INTO THE POT.
TOSS IN THE ROSEMARY SPRIGS AFTER YOU’VE STARED THEM INTO SUBMISSION.

FILL THAT SUCKER WITH WATER AND PUT IT ON THE HEAT.
YOU LEAVE IT ON FOR 2 HOURS AT THE START OF THE DAY, THEN TURN IT ON AGAIN AN HOUR BEFORE GUESTS GET TO YOUR HOME AND LEAVE IT ON ALL EVENING.
TAKE A WHIFF UP CLOSE EVERY FEW HOURS, BECAUSE THE FRUIT WILL START TO SMELL WEIRD AT THE END OF THE DAY AND THAT’S WHEN YOU TURN IT OFF.
WHEN YOUR GUESTS ARRIVE THEY’LL HAVE TO STEP BACK AND EXCLAIM “HOLY MOTHERFUCKING TITS, THIS IS ONE CLASSY HOME”
139K notes
·
View notes
Text
Your body is made of the same elements that lionesses are built from. Three quarters of you is the same kind of water that beats rocks to rubble, wears stones away. Your DNA translates into the same twenty amino acids that wolf genes code for. When you look in the mirror and feel weak, remember, the air you breathe in fuels forest fires capable of destroying everything they touch. On the days you feel ugly, remember: diamonds are only carbon. You are so much more.
513K notes
·
View notes

Photo
(ONLY THE PICTURE WILL APPEAR ON YOUR BLOG)
BREAKFAST:
apple stuffed french toast
baby step buns
banana pancakes
breakfast bread
dairy and gluten free pancakes
double whole grain pancakes
eggie veggie bake
egg white crepes
egg white veggie omelet
english muffins
fluffy canadian pancakes
ginger bread oatmeal
gluten free banana bread pancakes
gluten free coconut pancakes
granola
oatmeal pancakes
pancakes
turkey breakfast sausage
vegan and gluten free peach crisp
vegan banana oatmeal waffles
vegan crepes
whole grain pancakes
LUNCH:
asian chicken salad
baked zucchini fries
bbq tuna fritters
bread biscuits
crispy eggplant with spicy tomato sauce
fajitas
grilled fish tacos
hawaian chicken kabobs
quinoa tortilla
skinny tuna melt
soft pretzels
sushi
sweet potato chips
taco salad
tuna salad
vegan falafel
vegetarian sandwiches
vegetarian sloppy joes
whole wheat and honey pizza crust
DINNER:
baked basil zucchini
baked macaroni and cheese
baked salmon
baked squash
baked turkey burgers
bbq lime and mango turkey
bbq rosemary sweet potato
black bean veggie burgers
chicken, avocado salad
chicken nuggets
citrus grilled chicken
dinner rolls
garlic and lime shrimp
garlic and parmesan turkey meatballs
garlic and rosemary chicken
gnocchi
moroccan apricot chicken tenders
mushroom pizza with caramalised onions
oven fried eggplant
pecan crusted dover sole
pineapple pork kebobs
pork fried rice
roasted rosemary root vegetables
seasoned potato wedges
slow cooker meatloaf
slow cooker pineapple chicken verde
slow cooker pulled pork sandwiches
slow cooker rosemary chicken
slow cooker two bean chicken
sticky rice
thai spiced bbq shrimp
tuna stuffed zucchini
vegan lasagna
veggie lasagna
zucchini sticks
DESERT:
banana almond and chocolate ice cream
banana berry soft serve
banana split cheesecake bites
blueberry-pomegranate ice lollies
chocolate hazelnut ice cream
chocolate mousse
creamy baked pears
fruity popsicles
grilled peaches with gingersnaps
healthy brownie
no bake peanut butter nuggets
nutella fudge pops
pecan pie
peanut butter and chocolate ice cream
peppermint meringues
raw carrot cake
raw tropical ice cream
roasted maple papaya
sweet potato pie
vanilla ice cream
vegan and gluten free, peanut butter, caramel cheesecake
watermelon tart
SNACKS:
88 healthy snacks under 100kcal
almond joys
apple cupcakes
apples peanut butter slices
banana bites
caramel chews
caramel popcorn
chocolate bar
chocolate chip balls
chocolate chip cookies
cinnamon fruit kebobs
eggplant chips
frozen banana bites
frozen fruit pops
frozen yogurt blackberries
frozen yogurt strawberries
fruity fun skewers
kettle corn
meringue cookies
no bake healthy protein bars
peanut butter cups
pizza roll ups
roasted chick peas
skinny coconut cupcakes
strawberry and mango fruit roll up
DRINKS:
berry watermelon smoothie
blueberry banana smoothie
blueberry coconut water frosty
chocolate cranberry smoothie
chocolate milkshake
citrus frosty
coco-berry smoothie
coconut hot chocolate
cranberry and banana smoothie
fresh orange juice smoothie
grapefruit pink smoothie
green lemon and pineapple smoothie
green tea mango smoothie
healthy vegan breakfast smoothie
mocha coconut frappuccino
mocha madness recovery shake
peanut butter, banana green smoothie
purpose smoothies
strawberry, blueberry smoothie
strawberry lemonade frosty
strawberry shortcake smoothie
sweet pomegranate smoothie
sweet potato hot cocoa
tasty fruit smoothie
vegan almond butter banana shake
vegan cashew ripple strawberry shake
vegan chamomile banana shake
vegan chocolate raspberry smoothie
vegan chocolate s’mores shake
vegan chocolate, strawberry, banana shake
vegan double chocolate chip shake
vegan peaches and cream smoothie
vegan peachy hemp protein smoothie
vegan secret ingredient matcha shake
vegan secret ingredient vanilla shake
vegan wild blueberry shake
virgin peachy lychee daiquiri
watermelon frosty
whipped strawberry lemonade
CONDIMENTS:
bbq sauce
chocolate peanut butter
fig jam with lavender, thyme and walnuts
hummus
peanut butter fruit dip
spinach dip
BASICS:
almond flour
bread
bread crumbs
condensed milk
housewarming bread
pizza dough
GREAT HEALTHY FOOD BLOGS:
displayed by calories
everything
desserts
164K notes
·
View notes

Photo
I'm totally thinking about turning these into stuffies what do you guys think?


Jack Skellington and his whacky company go on their biggest adventure yet when he and his friends hit the dancefloor.
43K notes
·
View notes
Photo
Beautiful crochet rug

i didnt know this pattern!why omgf this is so beatiful and small and the shape i love<333
free pattern & credit goes here<
EDIT: OH NO :C ITS NOT ENGLISH AND THERE IS NO CHART…M YEAHR T IS BROKEN THIS WAS SO PRETTY
40 notes
·
View notes
Text
How to Make Cream Cheese
Anybody else noticing the price of groceries drastically increasing in their area?
Lately when I’ve gone to the grocery store and walked down the aisle, I’ve been so thankful that we are able to produce a large amount of our food ourselves. We’re not 100% self-sufficient quite yet, but it’s such a relief to be able to skip the dairy, meat, bread, and egg sections of the store…
Last week while I was strolling down the dairy aisle, I couldn’t help but notice that the price of those little 8 oz cream cheese bricks was up to $2.50 per package. Yowza! Not too long ago, I would stock up on those guys for 99 cents each…
Since I am currently milking Oakley twice daily and have an abundance of cream (for the first time in a looong time…), I decided it was time to try playing around with making my own cream cheese.
And, let me just say that it couldn’t be easier!
First, some clarifications…
Number 1: there seems to be about a million different methods for homemade cream cheese out there. This is the method I prefer, and it’s pretty darn simple.
Number 2: Many, MANY “cream cheese” recipes out there are actually yogurt cheese recipes. I’ve made a lot of yogurt cheese as well, and it’s great– but not the same as real cream cheese. The flavor and texture are notably different.
Number 3: I used my fresh, raw cream for this recipe. However, since you are adding a culture to it, you could use store-bought, pastuerized cream if you had to. Or even half & half would work. Just try to use the highest quality cream that you can find.
Homemade Cream Cheese
1 quart of cream or half & half
1 package (1/8 teaspoon) of Mesophilic starter culture
Fine cheesecloth (Find out how to improvise your own cheesecloth)
Sea salt to taste (optional)
Make sure you are using a glass container to hold your cream. Gently stir in the starter culture.
Loosely cover (not airtight!) and set it on your countertop to culture for 8 to 12 hours. (It may take more or less time, depending on the temperature of your kitchen.)
You’ll know it’s done when it has set up and somewhat resembles yogurt. (It might not be a perfectly even consistency, but that’s ok.)
Dump the thickened cream into the cheesecloth and allow it the whey to drip out for at least 12 hours (the longer it drips, the firmer your finished cheese will be).
You might have to get a little creative with your drip set-up. I don’t have any knobs on my cabinet doors, so I tie the ends of my improvised cheesecloth around a wooden spoon and allow it to drip into a pitcher.
My not-so-fancy dripping set-up
Once it has reached the desired consistency, scrape it out of the cheesecloth and lightly salt it to taste. The salt is optional, but it will help it keep slightly longer. Store in an airtight container in your fridge– it will get firmer as it chills.
I usually get 1 1/2 to 2 cups of cream cheese out of 1 quart of cream. Yields will vary slightly.
Kitchen Notes:
I get all my cheesemaking cultures and supplies from Cultures from Health. Love them!
I’ve seen several recipes that use cultured buttermilk instead of the mesophilic culture. I haven’t personally tried it, but it would probably work just as well. Add 1/8 to 1/4 cup of buttermilk to your quart of cream to try this method.
You can spice up that cream cheese with all sorts of different flavors! Mix in cinnamon, fruit preserves, or even some chives and onion powder for a unique treat.
To make yogurt cheese: Follow this exact same method, substituting the quart of cultured cream with a quart of yogurt (homemade or storebought) instead.
Wondering what to do with the leftover whey? Here are a bunch of ideas– don’t toss it!
If you *ahem* accidentally forget about your cream cheese and leave it culturing or dripping for longer than stated above, don’t sweat it. It won’t hurt it and the worse that will happen is that it will just be slightly tangier.
Let me just say that this stuff is infinitely better than the storebought version. You’ll want to scoop it out of the container and eat it plain… Or smear it on some chocolate zucchini bread… Or make a pumpkin cheesecake… Or….
- See more at: http://www.theprairiehomestead.com/2012/10/how-to-make-cream-cheese.html#sthash.CsMMYiNo.dpuf
2 notes
·
View notes
Text
DIY Unpaper Towels (wihout a sewing machine)
Confession: I Have A Stack Of Paper Plates . . .
Sitting in my pantry, because as a soon-to-be-mama of three I have no illusions about how far my super powers go. Sometimes victory looks like scrambled eggs for dinner, you know? Ain’t nobody got time to do a load of dishes just to have something to serve them on!
Ahem.
Most days, though, I try to make more eco-friendly choices: cloth diapering, composting, local food, using real dishes, and avoiding paper towels where possible. On that last one, my strategy until recently was to use old rags and tea towels while keeping out the real deal for guests. Truth be told, though, I missed the convenience of tearing a towel straight off the holder, so when I came across the unpaper towel concept I knew I had to try it!
Problem Is . . .
I don’t have a sewing machine. And unless you count homemade beauty products, my crafty score is 0. Fortunately, with a little help from Youtube I was able to straight stitch my way to unpaper bliss. (What, you DIDN’T learn how to sew on Youtube? Pshaw)
How To Make Unpaper Towels
Supplies/Equipment:
2 yards terry cloth/flannel (Note: Though the terry cloth pictured is light in color, I’m making some with chocolate terry for messes that are likely to stain)
2 yards cotton fabric of your choice
sharp scissors
needle
thread (preferably something that matches your fabric)
ruler or 12×12 stencil (I used a square book)
57-63 snaps (you might want a few extra to practice with)
snap applicator (I used Babyville pliers, but the KAM applicator looks really good, too. Make sure you get one that is compatible with your snaps)
plastic canvas (2-4 sheets of 12×6 sections)
embroidery thread (optional)
superglue (optional)
Makes about 18 unpaper towels
Step 1: Wash & Dry Both Fabrics
That way if one or both of them shrinks it happens before you sew the pieces together!
Step 2: Cut Cloth Into 12×12 Inch Pieces
I found it helpful to use a stencil and trace on the back of the fabric before cutting. On or our old vacation photobook was just the right size – scrapbook paper is usually 12×12 too!
Note: You can adjust the size as needed, but keep in mind that the unpaper towels will be slightly smaller than the size you begin with.
Step 3: Sew A Straight Stitch
Lay the pieces together so that the fabric you want displayed is face down against the terry cloth/flannel and sew a straight stitch about 1/8- 1/4 inches away from the edge. Leave a 2-3 inch gap on one side so you can turn your towel inside out. Don’t know how to sew a straight stitch? It’s really, really easy, just watch the tutorial below and you’re on your way.
Here’s how the last corner should look when you’re done.
Optional Step: If you don’t feel quite confident that your stitches are super sturdy, you can apply a little liquid stitch around the seam. It’s not the “greenest” thing in the world, but I consider it a good tradeoff considering all the paper towels you’ll be saving.
Step 4: Turn Unpaper Towel Inside-Out
Trim any excess fabric that may create unwanted bulk, then pull your fabric through the gap you left so that the decorative part of the cloth is now facing out. Close up the remaining hole with a straight stitch.
If you would like, you can add a second later of stitching for decorative effect and to reinforce the edges. I chose not to, but this blanket stitch might be pretty with some embroidery thread.
Optional Step: Iron your towels so they will be nice and flat.
Step 6: Apply Snaps
Because it was cheaper, I started out using this snap applicator, but found that the unpaper towels were too thick for it to work properly. I ended up going with one like this. Though it was a bit tricky because my snaps were for a different applicator it was much easier to use! Here’s what you do:
Each unpaper towel will need 2-3 sockets on the right and 2-3 studs on the left so that each towel can attach to it’s neighbor. I chose to use three on each side.
You want the holes evenly distributed, so measure where you want them to go and then poke a little hole with the awl (pointy thingy that came with your pliers) to mark your spot. Place the cap through the hole and – using the instructions that come with your pliers – secure the snaps in place. If you have the Babyville pliers you may find this video tutorial helpful.
Step 7: Create Paper Towel Dowel
Now onto the last step: creating a sturdier version of the cardboard tube that holds paper towels in place. Some tutorials use PVC pipe, but when I went to my local hardware store to buy some I realized I had to buy an 8 foot pole and ask them to trim it into a 12 inch section for me. The rest would be thrown away, so I decided to try to find a less wasteful option and came across this tutorial, which uses plastic canvas.
Not only is this method easier, it saves you a trip! You can pick up plastic canvas at the fabric store while you’re picking out your fabrics. Here’s what to do:
Measure the height of your unpaper towels. Using that number, cut a section of plastic canvas that is (your unpaper towel height) x 6 inches. Mine was about 11.5×6.
There are several ways to attach the canvas so that it becomes a tube. There is this tutorial, which I planned to use until I realized that the snaps wouldn’t go through 4 sheets of canvas. Because I wanted a pretty sturdy dowel, I attached three studs to the outside sheet for the unpaper towels to connect to and then superglued the canvas together
Now just put your unpaper towels on the dowel and you’re done!
2 notes
·
View notes
Photo


The newest addition to my boys Angry Bird Star Wars crochet set R2D2 the egg
Check out my other creations at
www.facebook.com/UnderTheSunCreations
#riverland farm#underthesuncreations#amigurumi#star wars#angry birds#crochet#handmade#toys#dolls#for my boys
2 notes
·
View notes
Photo


My latest crochet project a star wars angry bird piggy for my boys
check out my other creations at
www.facebook.com/UnderTheSunCreations
21 notes
·
View notes
Link
How do you live in a small apartment, and still have the opportunity of having a bed, a nice big couch, and even the possibility of having friends over. I solved the problem with two normal mattresses . I put legs on the mattresses with hooks to keep it all together during the night. We have the...
5 notes
·
View notes