
Don't wanna be here? Send us removal request.
Statistics
We looked inside some of the posts by robyngoodallfutureworks-blog and here's what we found interesting.
Average Info
Notes Per Post
8
Likes Per Post
8
Reblog Per Post
0
Reply Per Post
0
Time Between Posts
10 days
Number of Posts By Type
Text
17
Last Seen Tumblr Blogs


Fun Fact
28.6 is the average number of monthly visits per US mobile user.
Text
Final reflective post - XB2001 - Modular level environment
What went well and what did not?
So with my modular environment finished I wished to post what I felt went well and what didn’t. My end result I felt was a good example of how a modular asset pack can turn from something so small into such a large level/area. I felt my assets worked well together and fit together almost like a puzzle. This made it very easy to assemble the environment and white box it correctly. I put maybe too much time into my models, but this meant i was overall satisfied with the end result/aesthetic and felt it matched my theme and research.
With the above in mind however, i felt my mechanics suffered greatly. This was due to poor time keeping and planning. I concentrated too much on the models and environment and left the mechanics to the last minute. Although I was happy with my keypad system it wasn’t enough to make it ‘fun’ or implement the puzzle game feel i was initially going after which was a shame. My poor time keeping meant things got rushed at the end and i wasn’t able to put in any audio, which i feel would of definitely helped.
Lighting was also unfinished although i did attempt to in still some moodiness with my placement of spotlights.
What would you do differently next time?
Next time I will make sure to pace myself better and work on better time keeping. I will also make sure i plan and research my mechanics and level design better beforehand to ensure a completed experience is created that portrays my initial vision for the project. The implementation of fun puzzles was my goal and something i’m going to continue working on
I would also like to attempt some color blocking/texturing so the player can differentiate between different assets.
Also audio and better lighting i think would make the experience 10x better.
Final Screenshots


1 note
·
View note
Text
High poly asset - XB2002 - 19/01/18
For my high poly model, I have chosen to create a replica of D.Va’s Light gun from Overwatch (Blizzard entertainment).

Below are some images of my progress over the last few weeks up to the last image taken today. I have currently been modelling in Maya but now intend to export it as an OBJ. file into Zbrush, dynamesh and add detail.

The above image is the beginning of my model sans reference images. I started in sections, dissecting the gun into pieces and creating them individually.

The above image is a quite throw together of all my created pieces so far.

The above image is the parts disheveled so that I could inspect the face/vertexes closer and make sure it is assembled neatly.

The above image is the final assembled gun after a polygon cleanup.

The above and below image is the gun finished in maya, with different coloured Lambert material attributes given to the separate pieces to make spotting them easier and to make sure they are lined up correctly.

Now it is time to export into maya and work with a higher poly count and create finer details.
0 notes
Text
DD2000 - Route to Industry - Presentation/Job role research
For this module, I have decided to focus on a general 3D artist/modeler role (with progression into prop/environment or character artist). Whilst doing my research, I have come across various job listings, portfolios and interviews that have helped assist my research further and give me more of an insight into this sector of the games industry. I have included my intended progression as these are specific to my work and show my clear path of intentions when it comes to job roles I wish to fill. I also haven’t limited my research to only UK job as I am flexible with my job location (I will elaborate on this further).

The definition of both roles:
3D Artist/Modeler:
“You create three-dimensional computer models. Your models represent an object from all angles, and give viewers the ability to digitally enhance those angles so they can better understand the object. Your skills as a 3D Modeler are demanded in all sorts of industries—you might create 3D models of human organs to help in medical research, model potential video game characters”- chegg.com
Character artist:
“A Character Designer creates the look and feel of animated characters. Character Designers are only found in certain cases where characters are complex and important enough to merit specialized attention. When that happens though, a Character Designer is hired to blend skills from across fields to create vivacious, well rounded characters. In this role, you work mainly in video games, animation, and illustration.”- chegg.com
The job listings I have included below are examples of jobs that I would take an interest in and are good representations of what job listings for these roles typically look like:

3D Artist (text taken from bossa studios 3D artist job ad) :
Responsibilities:
Reporting to the Lead artist and taking direction from our Senior members of the team where required.
Able to create a range of 3D assets, hard surface, environment, character etc when required, based upon concepts produced by the concept artist and production team.
Ensuring that all models produced are efficient and take into consideration the limitations of the target game engine or platform.
Collaborating with the development team to ensure that all assets fit their requirements.
Assisting and working on several aspects of the production pipeline, including modelling, texturing, rigging, etc and other art requirements when needed.
Excellent knowledge of real time engines such as Unity or Unreal.
Being creative and having great ideas about the design aspect of our games.
Keeping up to date with latest games industry trends and techniques.
Expert knowledge of relevant software for the creation of game art, Photoshop, Maya, Zbrush, Substance Painter etc.
Traditional art skills, colour, form and anatomy.
Previous experience of working in a games studio is essential, along with a portfolio of released titles.
Able to quickly turn their hand at new skills and techniques.
Requirements:
Passionate about making game art
Excellent time management skills
Focused, but adaptable, flexible and open to change.
You take pride in your work and strive to continually improve your skills.
Be able to supply solutions and ideas to problem
Be interested in many areas of games art and the visual world.
Be a team player who goes above and beyond to support those around them

Character artist (text taken from EA/Bioware careers site job ad):
Who You Are:
The rendering of a character is vital to the believability of our Characters. Creating visually stunning, immersive games is an art that takes a tremendous amount of skill and talent.
The portfolio should highlight the artist:
Ability to present, light and render realistic humans
Advanced surface shader work
Ability to craft low resolution, complex hard surface shapes
Use of character models in low, medium, and high polygon counts
Clean texturing and material work
Ability to work from reference materials, such as concept art or photogrammetry
Assets authored for a physically based environment
Assets rendered with individual material channels (diffuse albedo, roughness, normal, etc)
What skills and qualifications do we look for?
Exceptional problem solving skills
Experience with shaders, physically based rendering and material authoring pipelines
Excels in Maya, experience in Max, XSI or Modo is a plus
Exceptionally skilled in Substance Designer/Painter
MEL, Python, HLSL scripting knowledge is a plus
Strong organizational skills (pipeline optimization, goal setting, writing documentation, etc.)
Strong ZBrush or Mudbox experience
Experience with organic and inorganic modelling
Frostbite/Unreal experience
3-5 years or more experience
Education required: completion of high school, some college, vocational training or University or equivalent work experience/training
Companies of interest:
There is a quite a lot of studios in the UK and abroad I would be ecstatic to work for. As I am aware that I will need experience for more high paying and specialized roles, I understand the fact I may need to put taste and preference aside for a good role at a studio that will take on graduates and people with my skill set. I also believe dedicated Character artist/Prop artist roles in smaller scale/indie studios are more rare as they normally have an all rounded 3D artist to work on not just characters but props, environment etc at the same time.
I believe this sort of specialized role will be reserved for bigger scale, bigger budget/AAA title related studios who have dedicated artists for each individual part of the modelling pipeline e.g. Concept artist > Character face sculptor/modeler > Body sculptor/modeler > Hair sculptor/modeler > Clothing sculptor/modeler etc.
Companies of interest I have decided to look into/research their roles are:
Bioware
Bossa Studios
Blizzard Entertainment
Playground Games
Pixel toys
As well as the above studios, I will also look into freelance roles and examples of freelance artists who have accumulated decent portfolios without being employed by a studio directly/salary style.
Research into portfolios and 3D artists:
For research, I have also been looking at online portfolios owned by industry and freelance 3D artists. Some are a more general example of 3D modelling whereas some are more of a specific type of modelling e.g. Prop/Character/Environment etc. Some of the names are:
3D artists:
Sengjoon Song (Blizzard Entertainment)
Kyle Hall (Junior 3D Artist at Clever Beans)
Julien Kaspar (freelance)
Zacharias Reinhardt (3D Artist & Certified Blender Trainer)
Joern Zimmermannm (Designer / 3D Artist)
Prop artists:
Clinton Crumpler (Microsoft Studio's)
Michael Fleming (freelance)
Kimmo Kaunela (3D Environment / prop artist at Planetrism VR)
John Valenti (‘World Artist’ at Bethesda Game Studios)
Nathaniel Flower (freelance)
Character artists:
Patrik Karlsson (Principal Character Artist at BioWare)
Andrea Orioli (DOTA 2 skins specifically)
Shane Hawco ( Lead Character Artist bioware)
Jude Leong (Character Artist – EA)
U Ri So (Senior character artist at BioWare)
Kelvin Tan (Senior 3D Character Artist at Blizzard Entertainment)
Sulhwa Hong (freelance 3d Character Artist),
Artur Tarnowski (3D Character Artist/3D Generalist)
Vimal Kerketta (Freelance Digital Sculptor/Character Artist)
Kris Kelly (Lead Character Artist at Synchrony Studios)
I also plan on messaging some of the artists for help and advice for this assignment. I hope to be able to communicate with them and be able to ask questions about what it is like as a character artist/3D Artist and ways to build a portfolio tailored towards this specific roles.
0 notes
Text
Games specialism - XB2178 - Brief 2 - Research for concepts/inspiration for my model


http://statisticsfag.tumblr.com/post/152562916501/vivenne-from-dragon-age-inquisition-in-a-jean
http://www.pgmdressform.com/muslin-draping-fabric-c135/
http://blackforest.su/forum/index.php?topic=6205.40
1 note
·
View note
Text
Games Specialism - XB2178 - Brief 2 - Research in design and workflow in the industry

When researching workflow and the 3D production pipeline, I stumbled upon a wordpress blog by Isabel, an author of 3D production blogs on her wordpress. Looking into the various stages of the 3D production pipeline, I delved deeper into the following areas:
Pre Production
The result of this phase is certain to have a big effect on the later stages of the production pipeline. This phase revolves mainly around the creation of concepts and designs for the 3D production. This can include anything from storyboards, concept art, sketches and even quick 3D sculpts. These are key partd of the pipeline. They shape the outcome of the final product, and in effect, how the audience will receive and react to it. Concept artist’s create the design which the 3D artist’s will use as a reference.
3D Modelling
“At this stage, a balance between performance and aesthetics must be found. The 3D Modeller’s will usually take a pre-existing base model for characters and build from that. Sometimes, in the case of creatures and environments, the artist will be required to model from scratch, which is often deemed a challenging, yet rewarding, task. In this phase, the 3D artist’s will continue to work closely with concept artists to achieve the perfect look for the characters, environments and creatures. It is vital, for both films and games, that all the models remain faithful to the art style and approved concept designs.” - taken from the wordpress blog
UV Mapping
“In this stage, the 3D models are “unwrapped”, meaning that the the surface of the 3D object is mapped to a 2D UV Layout. For most UV Maps of complex models, this process is accompanied by marking seams or breaks on the model to prevent texture distortion. Seams are preferrably kept to a minimun in a UV map. The reason why a UV map is created for a model is so it can be textured. The UV layout is simply a 2D representation of the model’s geometry, which will, in the next stage of the pipeline, have textures painted onto it”- Taken from the wordpress blog
Texturing and Shaders
The UV map created in the previous section will be used as a texture map in this phase. There are many ways to paint textures for models, and many programs to do so in, one of the most popular being Photoshop. Shaders will also be applied to the 3D model along with the texture. The type of shading applied will depend on the nature of the asset.
0 notes
Text
Games specialism - XB2178 - Brief 2 - Specifics of my project
For this project, I will be producing a finished high poly character model, but also acting as the key concept designer of said character too. My first project taught me the basics of character modelling in zbrush, retopology and texturing in substance, with these skills I wish to build upon this and create a detailed character model, not just a bust but full body and clothing included.
My workflow for this project will be different. My first project taught me certain sections needed more time than others (e.g. retopology and texturing need more time as opposed to multiple weeks being spent on the modelling itself). I will build upon what I researched and learnt in the first project and perfect my workflow this time round. Furthering my research and documenting it.
I will begin my project from the starting point of Character concept artist once again. I will once again begin character design sketches with my mood board and research as inspiration. My theme will be established in the research/mood board phase of the project. I intend to build on my mistakes from the last project and get myself a lot of references to work from whether they be my own or online (if taken online these will be referenced)

^ (Vivienne concept designs from Dragon age: Inquisition, detailing different Armour ideas)
After my concept designs are finished and a final character design is decided upon, I will take these ideas and translate them onto a 3D model in Zbrush (Zbrush I have found is my preferred program to model with and I have basic knowledge of it now so there is no learning curve to overcome). However, I have never created clothing in zbrush yet, or even arms/legs etc, so this will be new to me this time around.


^ (Vivienne further down the pipeline, sculpted and clothed)
I have higher expectations for this model. I do not intend to make it stylized in the way my first project model was. It will be more accurate to human anatomy and the clothing/hair will reflect that also. I will also re write a schedule accurate to the allotted time we have, with iterations based on my reflection of the first project, allowing more time for areas like texturing and less time for modelling in ZBrush etc.
In Zbrush, I will create a 3D model accurate to my sketches, ready for retopology in Maya and texturing in Substance Painter using my experience from the last project. I also given myself stretch goals of creating a small asset pack/weapon for my character or a non-humanoid companion also created in Maya or zbrush and textured. As I am unsure of how long things will take me (even adhering to a schedule) I will consider this a stretch goal I want to achieve.

^(example of UV mapping and clean topology, but of a more low poly character model)
With everything done, I will organise it all to be presented and handed in accordingly. I would like to present my model nicely on somewhere like sketchfab or art station, also create a PDF document of Mesh, Beauty and UV shots.
1 note
·
View note
Text
Games Specialism - XB2178 - Brief 2 - Character Artist
For brief 2, my project is still focusing on character design/art with improvements being made to my workflow. My improvements will be planned and decided based on my feedback for my 1st brief of the character bust i sculpted in Zbrush.
I felt confident in my last brief as a character artist , as I found the process/workflow of researching and producing a character art piece enjoyable and extremely interesting.

^ (My first ever bust sculpted in Zbrush, intentionally stylized and poly painted also in Zbrush)
My aim for this project is to make improvements on my workflow, research for concepts and references and sculpt/texture a character art piece (head to toe, with clothing). Again looking at job advertisements for character artists, I have dissected and educated myself on the responsibilities and expectations of my role. A short snippet of the job ad from Creative Assembley:
“You will be a key member of the team and create highly detailed, believable 3D character models and textures for use in-game. You will own character models from conception to final game model and work to schedule in producing and delivering of character assets on time” - Creative Assembly
Link to the Job Advertisement: http://jobs.jobvite.com/careers/creative-assembly/job/oNId6fwy?__jvst=Job%20Board&__jvsd=glassdoor
Looking at various examples of expectations for this job role has helped me narrow down key areas to focus on and develop for example:
- Concepts/research for a reference to make workflow/sculpting more efficent
- Good understanding of topology and why clean toplogy is needed
- Developing skills in industry standard tools, such as Max/Maya, Photoshop and Zbrush
- In-depth understanding of human and animal anatomy
I would also like to keep a diary/journal of all my work as it would be a good thing to have to reflect on at the end of my project and see where mistakes were made.
0 notes
Text
Games Development - Brief 2 - Group Project - Design and Development Document - Reflective Blog 3
Self evaluation
What Would I do differently next time ?
Next time, I would focus more on quality not quantity. Although happy with my models, I would of enjoyed to focus on fewer and commit more time to them, however, I am aware in this case and probably more in the future, this could not be done, due to team size, work allocation and time constraints. I would also discuss level design more with the level designer, to get a more pin pointed list of models. This would prevent models being done late in the process and having to be rushed.
Workflow
I am happy with my workflow. Apart from not having a more solid list of planned models, my process of research > concept > modelling > uv > texturing > export > render, really worked well for me and kept me organised. I delivered my models on time and had spare time to work on any mistakes or errors in engine.
Overall (How do I think it went)
Overall I am happy with my results and process. I believe I have produced models ready for in engine and believe they follow the tmeams expectations and planned aesthetic. My organisation gave me time to make improvements and changes when needed, and even gave me time to help others.
0 notes
Text
DD2000 - Essay research journal
For my assignment I have chosen the title:
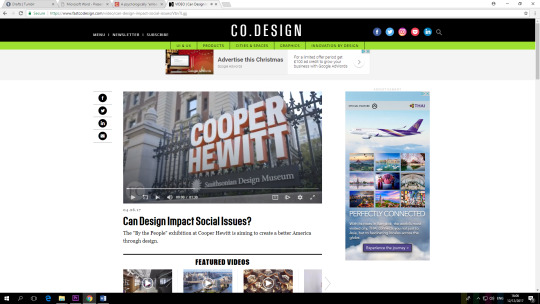
‘Games make change’: Tackling social issues through design’
My inspiration for this title was my consideration of the ‘design and seriousness’ and ‘design and the human’ topics. Also, upon discovering a book called ‘Critical play’ and ‘Embedded game design', A Dartmouth study journal.


Considering the wider design continuum, I first looked into how design in general can affect society, whether it be good or bad, intentional or unintentional. Bias’s and issues such as racism, sexism, homophobia, xenophobia, and taboo issues (child death, sexual illnesses etc) can be sometimes targeted or used as narrative or visual input in things such as video games, advertising, fashion design, graphic design and even architecture.
With the above in mind, I would then lead into an analysis of the Dartmouth study and also an analysis of the critical play books main contents and points. Choosing key points and sentences targeting design practices, I will quote them and help them support my essay further.
When referencing back to the video game industry, I have found games like ‘Gone Home’ by Steve Gaynor and ‘Papers, please’ by Lucas Pope are good examples for my analysis, and are good developers to quote also.


0 notes
Text
Game development - Brief 2 - Group Project - Design and Development Document - Reflective Blog 2
Moving on from my research and concept designs I straight to producing the assets that would be implemented into the game engine to join the other group members work.
My workflow looked something like this: Reference research and concepts > Model in Maya > UV in Maya and export as FBX. file > Import into substance and bake > Texture with smart materials, alphas and add emission maps, alter opacity and roughess > export textures into a file accompanying the correct FBX export.
Below are my resulting models, with textures applied. Some are more simple than others, with some only being used a filler for decor, and some being important pieces of equipment (collectibles) for the player character to implement into the mechanics.

The above image is my cargo crate. This was a decorative piece to add bulk and shape to the environments. I based the shape off my research from serenity and Syd Mead artwork, and added emission maps to give a nice light source in our dimly lit level. This was modeled by starting with a cube, adding in extrusions, offset and altering thickness to create the indentations for the emission lights and protruding edges. I then beveled the edges for a sliced look. I mostly used stained steel, rust and paint smart materials and alphas in substance. The colour scheme for this shaped every other asset piece thereafter.

The above image is my boltcutter tool . This was a an important piece to the mechanics and add to the player edperience. These would be used to crack and make openings available, and be a collectible kept in your inventory.
This was modeled by starting with two cyclinders, rescaling them into longer and thinner cyclinders, extruding from the sides to create connections where they would be pieces together, and extruding to create the blades and rubber grips. This was imported and textured in substance. I first baked and used the red painted steel texture, adding a rust material and detailing to the blade, screws and rubber to the grips to give it a more realistic feel. You’ll notice certain props are red, this means they are an important collectible.

The above and below image are my simple beaker and contents of the water bottle/filtration system challenge. The above model was started as a simple cylinder, extruded on both ends, beveled and shape into the model you see here. A simple glass and low opacity was added to it in substance. This was inspired by beakers used in science fields e.g. chemistry. The below image are my cylinders of gravel, sand and activated carbon intended to be included inside a water bottle, in our water filtration puzzle. These were simple cylinders with materials applied in substance such as rough fabric and concrete to mimic the above materials.


The above image is my key card. This was used as a collectible to open doors that allow access to other parts of the level in game. This was modeled by shaping a flat cube and scaling into a rectangle, extruding, off setting and then pushing in faces to see the thinner sections you see. In substance I added a plastic material all over, lowered the opacity in certain areas and added low emissive maps. I finished with alphas of finger prints, symbols etc for a decorative finish. It was red, the same as the other collectibles.

The screwdriver above was also a tool/collectible in game. This would be used to unscrew bolts and reveal pathways to other locations. This was extruded from a cylinder and beveled in the appropriate locations to give smoothness. In substance i added rubber to the grip, stained metal to the end and alphas of scratches and finger prints to make it feel worn.
The below images of my cryo pod. This was an important starting point for the player so i made the door and pod separate meshes to help an animated event be possible in engine. This was made from various edge loops and extrusions from a large cylinder. The pipe was made from bridging and bending two cylinders and adding extrusions and beveling. It was textured in substance re using stained steel textures, dust materials and alphas of scratch, hand prints and a padded backrest for a realistic touch.


The above and below images are variations of my bed model. This was solely decorate. Made from rectangles, beveled and extruded. Textured in substance with stained steel, a fabric burlap material with altered values to create a rough bed texture, same used for the pillows. I added clinical effects to the med bay variations of the bed, with blood and a red cross. There was also a coffee stain for a more lived in feel.

The below image is my torch used as a collectible and tool in game. This was very important tool as it would be the sole provider of light and navigation. It was made from extruded cylinders, edge loops and beveling. I used a plastic and rubbed off plastic material for the main handle and outer casing. The light top was made semi transparent to be able to see the main bulb inside. I used a glossy glass material for both of these. Again this was chosen to be red as it was an important collectible.

The below image is my gas canister and mouth piece used as a tool in game and resource important to the player. This would be a provider of oxygen and longevity to the player. This was made from a cylinder, beveled and extruded. The piece was two cylinder bridged and bent with a mouth piece extruded on the end. Again, I re used the red stained steel texture and re purposed black latex for the pipe and mouth piece.

The below image is my console, toolbox (and Easter egg appearance of my crate, canister and screwdriver!). These were decorative but served a purpose.The console was the provider and entry to our system log events. This was created from a cube, beveled and extruded to create buttons and screens. In substance it was textured with scratched steel, glass with emissive maps for the screen and scratched painted metal for buttons.
The toolbox was solely placed for an area to showcase the screwdriver. This was a simple to cube toolbox textured with hammered steel and painted steel textures.I used plain steel on the hinges and clasp.

The below image is a large decorative console. This was used to bulk out the level, the same as the crates in a sense. I used the same technique as the smaller console but scaled bigger and instead used the vintage painted steel material to switch it up a little.

The below image is three simple bin/containers that are meant to house the gravel, sand and activated carbon. These were simple cylinder with handles from bridged cylinders also. These were textured with scratched steels and chipped paint alphas.

The below image is my chair. Only used as a decorative piece, and a way to bulk out the level and make it feel more lived in. Textured in substance with leather and scratched worn steel materials, this was made in maya using cubes, scaling and extrusions.

The below three images are variations of the water bottle used in the water filtration system. These variations were needed as they would replace the prior to show the steps through the process. The bottle was made from a cyclinder and scaling edges formed from edge loops. Textured with a glossy plastic material and given a lower opacity.

The above bottle is worn and stained, achived using alphas in substance.

The above bottle has a dirt smart mask layered on top in substance.

Lastly the above model is a coffee filter used in the bottom of the water bottle in the filtration puzzle.
0 notes
Text
Game development - Brief 2 - Group Project - Design and Development Document - Reflective Blog 1
With my chosen role as a prop artist, I decided to research the role and see what the main responsibilities were. An image taken from the blizzard careers site helped me understand my main responsbilities were:

This helped me then move onto my research for my actual props, converse with the others for my deliverables list and assist in additional responsibilities i may have been needed for.
Firstly, for my role I decided to start with visual research. After rehearsing film, tv, games and art for our game aesthetics, mechanics, layout, genre and audio as a whole, I decided to pinpoint my research towards props, as this was specific to my role. With our sci-fi, futuristic theme decided on, I looked at art from the likes of Syd Mead, films such as Alien and Serenity, and props from games such as the newly released Tacoma, The fallout series and freelance projects from 3D artist portfolios online.
With the help of the teams Environment artist, we decided on a colour scheme (Dark grey, greens, black, strictly sticking to cool tones, but using red as a colour for collectibles to stand out), an aesthetic which pointed more towards an industrial, workshop feel and less like the smooth, streamlined aesthetic of many other futuristic interiors. We wanted to keep our interior very square, with clean lines and bulkiness. With all the above in mind I proceeded on with sketches and commenced the creation of my models. The below images are some of my inspiration that i kept as reference through my entire process. As you can see, they inspired my resulting assets immensely.

The ‘Firefly’ ship in Serenity was a big source of inspiration for my overall aesthetic. I liked the imperfect, shabby, non cohesive style and the way it seemed they valued resources over neatness etc.

The above terminal/ fan art made by shiloh steinhebel, a freelance 3D artist, was a great source of inspiration and texture ideas. The colour way ended up being chosen as a constant through my asset pack. (https://sasteinhebel.wordpress.com/portfolio/fallout-nv-prop-replica-computer-terminal/)

Syd mead (art above) was a major source of inspiration. His art depicting futuristic interior design and prop design helped me create clean outlines for my assets and placement of features.

Above is another terminal i liked, created by Ally Albon (http://www.allyalbon.com/computer-terminal-fallout)

The image above was taken from the game Tacoma. The feel of the environment feeling ‘lived in’ inspired me to add more mundane items into my asset pack e.g. chairs, beds etc even if i did end up putting my own spin on it. (Image: https://www.theverge.com/2017/8/2/16083312/tacoma-review-xbox-one-pc)
The three images below are all examples of work from a prop artist called Kimmo Kaunela. His art-station was a goldmine for prop inspiration, from colors to extrusions and beveling of edges.

https://www.artstation.com/artwork/3nQaJ

https://www.artstation.com/artwork/3nQaJ

https://www.artstation.com/artwork/3nQaJ
0 notes
Text
Group prototype progress - XB2001 - Asset/Prop Artist - Sci fi/Traditional Torch

Above and below image are the intractable torch for our group project. Keeping with the red colour way as it is an intractable item. Textured in Substance.

1 note
·
View note
Text
Group prototype progress - XB2001 - Asset/Prop Artist - Sci fi/Traditional screwdriver (worn/distressed)

The images above and below show my final screwdriver for our group prototype level. This will be used as a interactable prop/tool within our level.
Both images are progress photos in Substance Painter

1 note
·
View note
Text
Group prototype progress - XB2001 - Asset/Prop Artist - Sci fi/Aircraft cargo crate
The images below show my final cargo crate for our group prototype level. This will be duplicated and used multiple times within our game.

Both images are progress photos in Substance Painter

2 notes
·
View notes
Text
XB2178 - Games Specialism - Project 1 (Character art) - Final evaluation and work

The above image is my finished poly-paint version of my bust model. And the image below is my finished Substance Painter model.

1 note
·
View note
Text
XB2178 - Games Specialism - Project 1 (Character art) - Polypaint and Substance Painter

The image to the above is my finished for the poly-paint version of my model which definitely accurately portrays the stylized theme of my project. I used poly-paint with a stylized ‘sketch’ material to help with outlines. Poly paint was very similar to manual brush strokes seen in other texturing programs e.g. Substance, Photoshop etc

The image above is my in-progress substance painter version, displaying the texture and model. I used a flat skin texture and custom textures with different alphas and brushes for the rest of the eyes, lips, skin etc. I also added freckles for a younger feel. The re-topology could of helped this be better if it was re-done. But due to time constraints I had to just settle for this version and texture it in hopes of fixing the problem. I have since learnt from this and brushed up on my re-topology knowledge.
The image below is my finished substance model with its wire mesh enabled.

0 notes
Text
XB2178 - Games Specialism - Project 1 (Character art) - Retopology in Maya and UVing

I imported my high poly zbrush model as an obj. file into Maya and began to retopologize the model ready for substance. I used quad draw for this. At first I found this slow and difficult but soon realized why it was necessary. I referred to older human head models for guides of re-topology catered to human heads.
The above image is the mesh for my low poly model and the below image is my high poly mesh. As you can see it was so high poly it was difficult to see individual faces

I was soon left with a high poly model (left) and its low poly sister (right). They were ready to be imported and baked in substance, and then ready to be textured. However, alongside this I was painting the model in poly paint for practice and experimentation purposes.

0 notes