
Don't wanna be here? Send us removal request.
Statistics
We looked inside some of the posts by roshanp5425080 and here's what we found interesting.
Average Info
Notes Per Post
57
Likes Per Post
31
Reblog Per Post
0
Reply Per Post
26
Time Between Posts
5 days
Number of Posts By Type
Text
10
Last Seen Tumblr Blogs


Fun Fact
Tumblr is used by 21% of adults online aged 18-29 years.
Text
Week 10 Reflection
This course enabled me to learn a little bit about a lot.
All the way from pen and paper drawings to 3D printing, I feel I am more capable than ever of expressing my ideas.
Along what felt like a short 10 weeks, we explored many different ways by which to communicate visually. I also learned that all of these methods are relevant in their own way and that there is a creative process that dictates how to use them.
Orthographic drawings were a little tedious, but nothing compared to perspective drawings. Both of which I learned to love due to the satisfaction of doing it right, free from wrinkles and pen marks, and of course in the correct conventions.
It was quite fun drawing our perfume bottle concepts and then digitally illustrating them, highlighting that drawing on illustrator isn’t all that bad after all. However, I will still be avoiding it.
This was followed by more perfume bottle business, as we now had to make them out of foam. I would rather have used timber, but it was fun to employ a new material and techniques regardless of the strange smells it produced.
3D modelling was not easy, and as you can tell by my comments about illustrator, I prefer using my hands, but this really made me reconsider, because 3D printing something is pretty cool and it turned out to be a lot easier than I had thought.
Along the way I got introduced to 3ds Max which was quite intuitive. It was nice to learn the basic functions and go on to design a more complex model with these skills. This eventually resulted in a ‘Proud’ 3D printed perfume bottle that is small enough to be a key-chain.
Using Tumblr as a means to share our work made it easy to learn from one another, through insightful reflections and comments we had to leave. This prompted us to think of something substantive, underlining the important analytical aspect of design.
If I were to do this course again, I would hope to have a greater respect for this fact as reflecting on our own work and being able to provide relevant feedback to peers is pivotal in being a good designer.
The course flew by, as orders of design communication were explored in an way by which they flowed, resulting in a meaningful learning experience and a great time with fellow peers.
Thank you Gonz, Rob and Sarah.
2 notes
·
View notes
Text
Week 9/10- Preparing a 3D scan for printing
This week informed us on how certain programs can be used in unison to complete certain tasks. Since our goal was to print a scanned model, we had to perform quick modifications after quadifying the model in order to fix dents and smooth any imperfections.
After scanning my perfume bottle model, I imported it to Rhino where I used the Quad ReMesh function to wrap my bottle in a triangulated mesh as we did for the previous shape in Rob's demonstration.
Next I imported this into 3ds Max and corrected the orientation. My model didnt require much modification as I used wood to create it, resulting in a more even surface lacking imperfections.

Finally to prepare my model for 3D printing, I exported the file and took it to Cura. I was rather unfamiliar with Cura since the induction I did was so long ago. As such, I asked the friendly staff at the DFL to assist with the printing of the bottle. They helped me place the model flat for printing as this was the best way to do it. Additionally I minimized the amount of infill and scale to save time.


The print took just under an hour and after peeling off the remnants of the backing, I was left with a model that was small in scale and fairly smooth in finish although the corners could have done with more sanding.

It was eyeopening to see that these programs arent as complicated as I thought and got a quick hang of the file types and process that goes behind 3D printing something. I feel that I have learned an important skill that I can benefit from by using it in projects to come, as the last few weeks have warmed me up to 3D modelling more than ever and to see how easily a 3D model can be printing is a great thing to know.
6 notes
·
View notes
Text
Week 7- Model Making
I found this week to be very relevant and informative given our upcoming assessment for Studio this term. It provided us with time to think about our models as well as improve our craft through taught techniques regarding the hot wire cutter and finishing with sanding.
I experimented with the hot wire cutter but soon realized a modular approach would be far easier given the stacked nature of my model. as such I used long scrap strips of blue foam and cut them into my desired length.
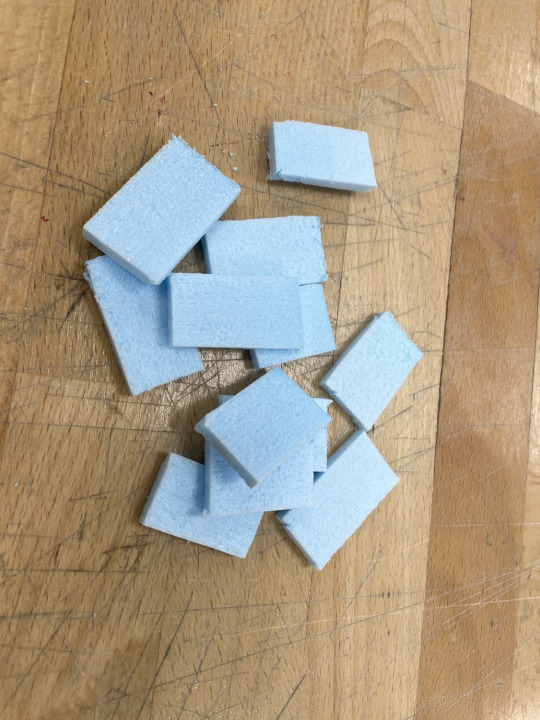
Next, I learned the hard way that superglue is NOT to be used on foam as it had soon eaten a hole through my bottle. Hence, I started once again but this time using a simple glue stick to stick the layers upon one another.
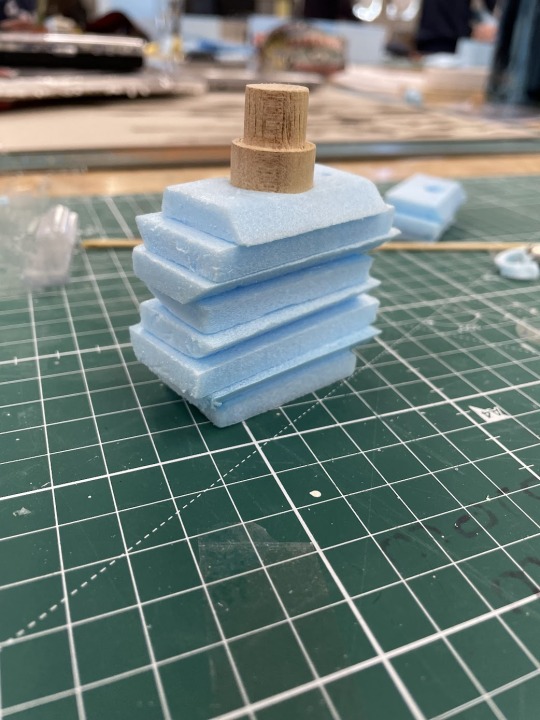
Finally after making a hole for the atomizer to sit in, the model did in fact resemble a 50mL perfume bottle, which I was happy with. I went on to sand the edges which helped the final appearance of the bottle as it looked more resolved and comfortable in the hand. Lastly, for the sake of it I went on to make a very rudimentary stand. This took multiple attempts believe it or not, as I was experimenting with different joints and many of them didn't work. And of course I could not leave the bottle sitting there with out a cap so I quickly whipped one up in the little time I had left.
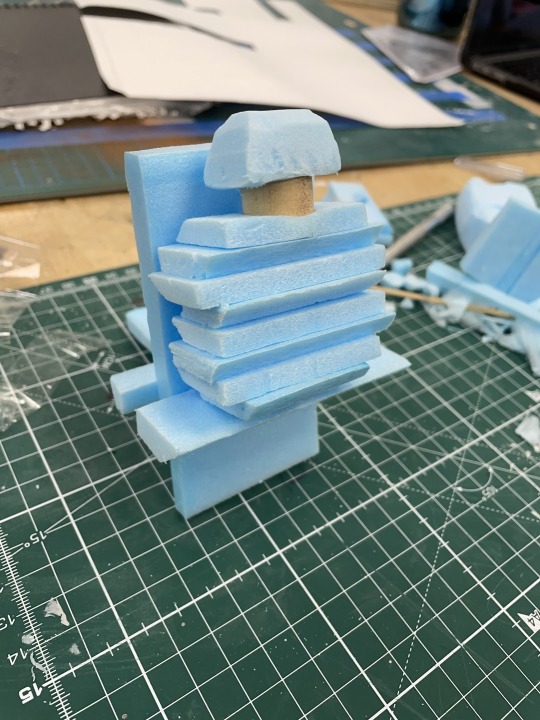
To conclude, this lesson was a fun shift into physical modelling and it was nice to work at the DFL and get to working with your mates, regardless of the strange smell of melting foam. Both of my design relevant subjects were merged in a sense for the day which provided for a unique and fun experience and I definitely feel more confident to use foam in the future.
10 notes
·
View notes
Text
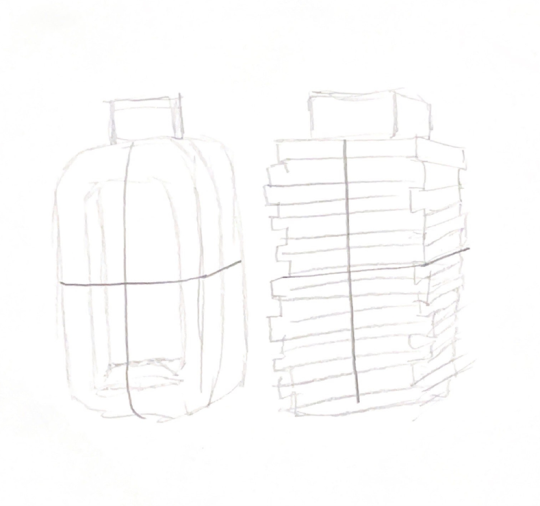
Week 8 - Digital Iteration
In recent weeks I have been fascinated by the interrelationship of modes by which models can be produced, digitally and physically. This was explored through the creation of our perfume bottles and the subsequent render which seemed looked far better than the models we made. As such I am keen to dive into 3ds Max regardless of my lack of experience as I wish to expand on my digital modelling skills.

Part 1 had us follow some simple steps as a sort of warm-up into 3ds Max. I am still a novice at this software so this introduction was useful and informative. The first few exercises helped us learn how to navigate the software and our work itself; basic skills that we wont forget now that we have done them. Then we went on to some actual modification of the sphere as can be seen below.

I tried a variety of modifications and stuck with the ones I thought looked cool and different from one another. I also played around with the colours and views to produce this particular picture.
We then moved on to part 2 after watching some informative videos which payed dividends later as I chose to model a rather complex form (for me at least).
I attempted to turn basic shapes into my perfume bottle rather than the suggested lounge chair or toy duck. This bottle was living in my head rent free so I thought that I may as well model it.
Due to this lapse in judgement I spent hours on end trying to model this bottle to perfection from the various angles being not lining up to figuring out how to fillet and chamfer.

To conclude, this week proved to be a splendid learning experience as in the past I had always found 3ds Max rather intimidating due to my lack of experience. The arduous task of making my perfume bottle has helped with this feeling of intimidation, as I had every right to find the software daunting since I didn't know how much fun it might be. I look forward to 3d printing the projects I model using the software, opening up a whole new realm of creation for me.
5 notes
·
View notes
Text

Week 6 - Digital Sketches
This week we continued on from week 5's tutorial with the help of Rob's video tutorials on how to create concept sketches on a computer.
I found the activity to be fun and informative as I learned quite a bit about Photoshop through Rob's easy to digest videos. Particularly shading with white and black and varying the opacity. Although the shading on my bottles didn't turn out as vivid as I had hoped I look forward to refining this skill in particular.
6 notes
·
View notes
Text
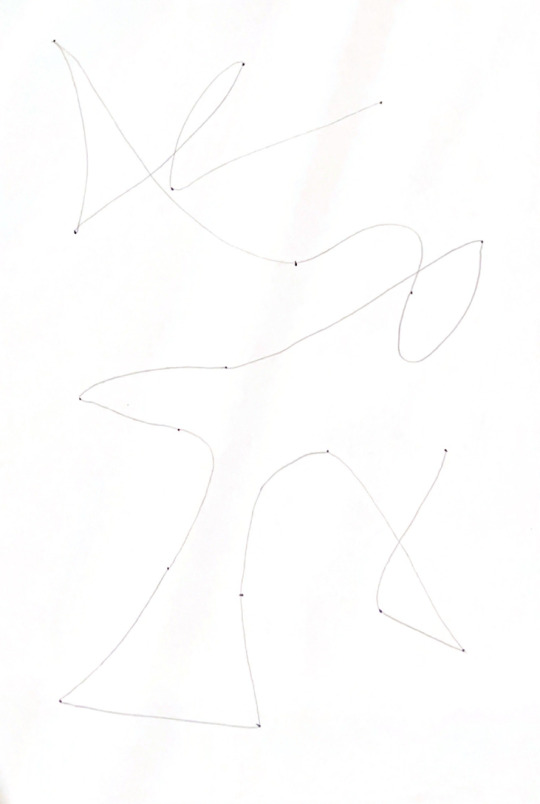
Week 5 Studio Tutorial – Sketching
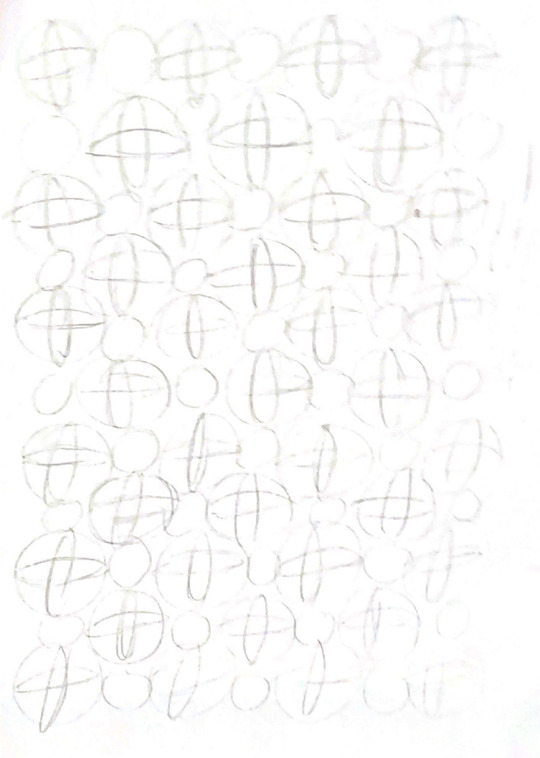
This weeks tutorial began with some rather trivial drawing warm ups as can be seen below. These did in fact warm up my hands to sketching as it had been a while since I had last drawn anything.
We completed in freehand, a grid, line drawing, and a series of circles and ellipses.
This was a fun activity with no real pressure on being precise and neat like some other tasks.

Next on a 4 x 3 grid I sketched some concept models for a perfume bottle, a task given to us for Studio this term. After carefully creating this grid, I had a great time exploring creative bottle designs and thinking out of the box. I got a bit carried away with that and may have added more detail and shading than necessary but it was worthwhile none the less.
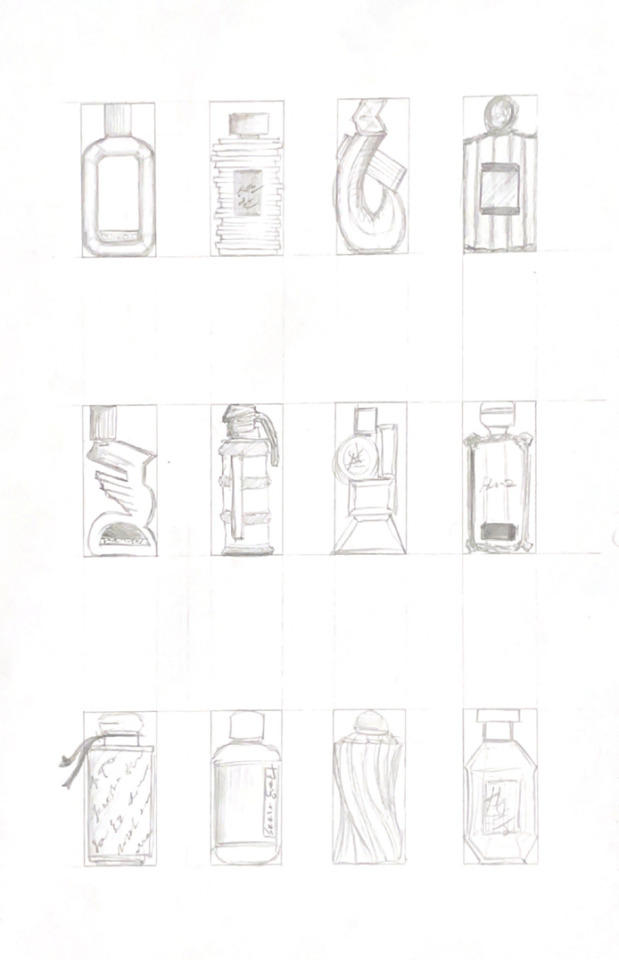
Lastly, I redrew my favorite designs and drew some of them in perspective to give a better idea of their design.
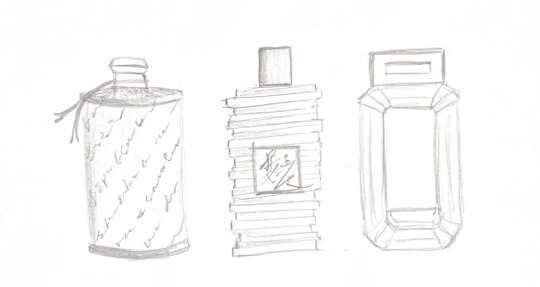
In conclusion, week 5's tutorial was both fun and challenging. I enjoyed the actual sketching but found myself a bit stumped when it came to generating original ideas for the bottle designs. As such some of them look quite abstract while some are unique and bespoke.
9 notes
·
View notes
Text
Week 4 Studio Tutorial – Perspective Drawing
Week 4's exercise involved a series of perspective drawings, a challenging yet important skill for designers to posses as often we must represent #Week 4 Studio Tutorial – Perspective Drawing 3D objects in 2D.
As such Part 1 had us draw a box with a chamfer using this 2 point perspective technique using provided measurements. Although a little bit challenging, it proved to be quite fun when resolved.

Part 2 had us expand on this. Students were required to recreate the shape without the chamfer and show extrusions on each visible face. This proved to be more challenging simply due to the fact that there were a lot more perspective lines.

Lastly, we were tasked with drawing a cube using 2 point perspective and demarcate where the major and minor axis via ellipses on each face. This was fairly simple and straightforward.

All in all, I enjoyed this weeks exercise, a lot more than I did orthographic drawings and look forward to expressing more complex structures using the skills I learned.
4 notes
·
View notes
Text
Week 3 Studio Tutorial – Section and Auxiliary Views
This task furthered students knowledge of orthographic drawing as we were required to build upon the skills we learned in week two, but this time with a more complex and angular shape.
Challenges presented themselves through the quantity of measurements and mental imagining one must complete in order to encompass the three required views.
All in all, although tedious and time consuming, it proved to be a valuable and informing exercise.

4 notes
·
View notes
Text
Week 2 Studio Tutorial – Orthogonal Projection & AS1100 Standards
Week 2's lecture informed students on orthogonal projection and how one can represent 3D objects via 2D drawings in a standardized manner whilst illustrating the conventions used for dimensions and layouts.
Part 1 required a box to be made, one which sits atop a selected small object, in my case this was a can of Redbull.
This was fairly straightforward as the provided exercise sheet had steps that were very easy to follow.


Part 2 was to draw the selected object by hand as to plan the layout for the more detailed and refined orthographic drawing in part 3.

Part 3 required students to create a resolved orthographic drawing incorporating the conventions we learned in class. This proved to be the most challenging as a great degree of precision is expected as such with any orthographic drawing. Luckily, my chosen object was a can and not something more complex, meaning I only needed a few measurements.

7 notes
·
View notes
Text
Week 1 Studio Tutorial – Drawing Instrument Exercises
After a brief introduction to the course, students were required to complete a fairly straightforward exercise with a high level of precision as to replicate what is desired in more complex and challenging orthographic drawings.
Part 1 asked students to illustrate two of the provided shapes with accurate dimensions and neat line-work.

This task was fun to carry out as I had to focus on attention to detail and use new tools such as the circle template and T square, as well as the cool compass which is far better than ones I've used in the past.
Part 2 required students to draw a particular shape multiple times as they were to be cut out and interlinked; seamlessly. This proved challenging as slight errors in cutting or measurements would result in gaps between the shapes.
Although it took me a few tries, I eventually got a reasonable tolerance between each of the shapes. This task challenged my cutting skills as well as the accuracy of my measurements, be it angles or side lengths.

4 notes
·
View notes