
Statistics
We looked inside some of the posts by rpritchardjournal and here's what we found interesting.
Average Info
Notes Per Post
5
Likes Per Post
5
Reblog Per Post
0
Reply Per Post
0
Time Between Posts
1 day
Number of Posts By Type
Photo
1
Text
14
Video
2
Last Seen Tumblr Blogs


Fun Fact
There are dozens of funny blogs to kill time on Tumblr.


Text
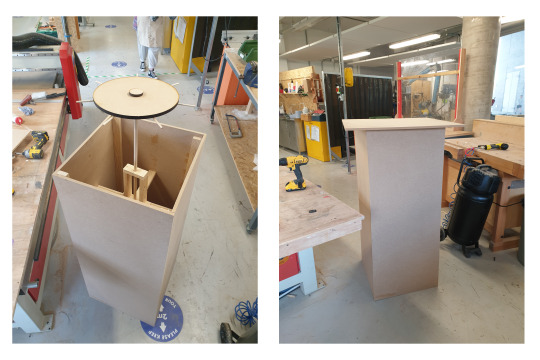
Making my Final Zoetrope - Step 5: Constructing the plinth
One the laser cut zoetrope was complete, I reached back out to Dan for advice about constructing the plinth that would hold the zoetrope in place and enable the viewer to spin it.
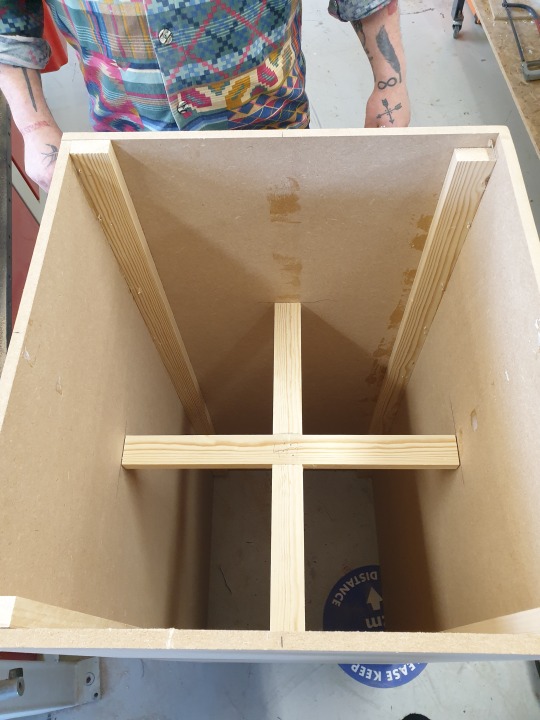
Dan and I arranged a session in the 3D workshops to start constructing the plinth on the 6th of May. In this first session we built the basic structure, cutting the sizes out of 12mm MDF. We decided on a very simple construction, using reinforcing beams and a nail gun to secure the MDF walls together.
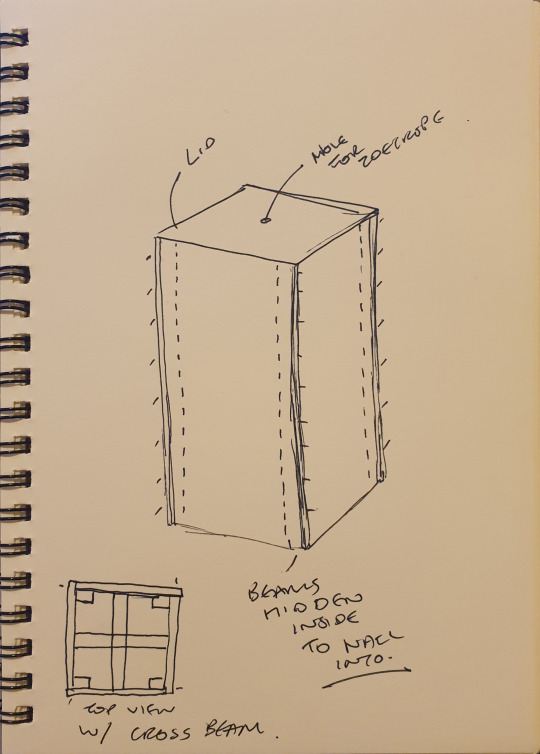
Wanting the zoetrope to sit roughly at eye level, we made the plinth quite tall. In retrospect, I perhaps would have made the plinth shorter, as while me and Dan are quite tall, this makes the work slightly taller than I think is accessible for the average individual.
After this first session we agreed to meet again on the 7th of May, and construct the internal structure for the plinth that would allow the zoetrope to spin. This was a simple mechanism made of timber, that holds the zoetrope dowel steady, while allowing it to spin.
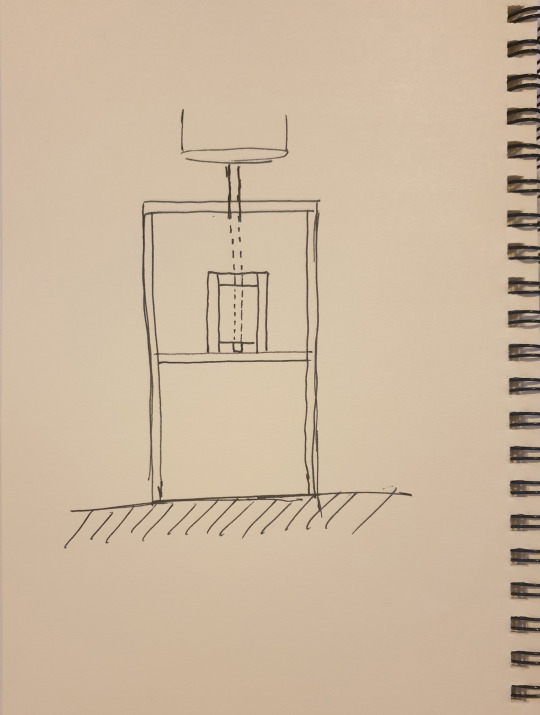
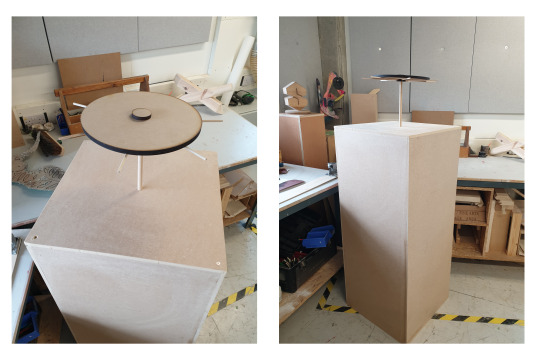
Using forstner drill bits in varying sizes, first drilled a hole in the base of the internal mechanism to hold the dowel in place. The internal mechanism would be drilled down onto a centre cross beam, acting as a butt to the dowl.
Secondly we drilled a hole through the top of the mechanism, which would further stabilize the dowel- while allowing it to spin. Finally then we drilled a hole through the lid of the plinth, that would allow the zoetrope to protrude out of the top of the plinth.
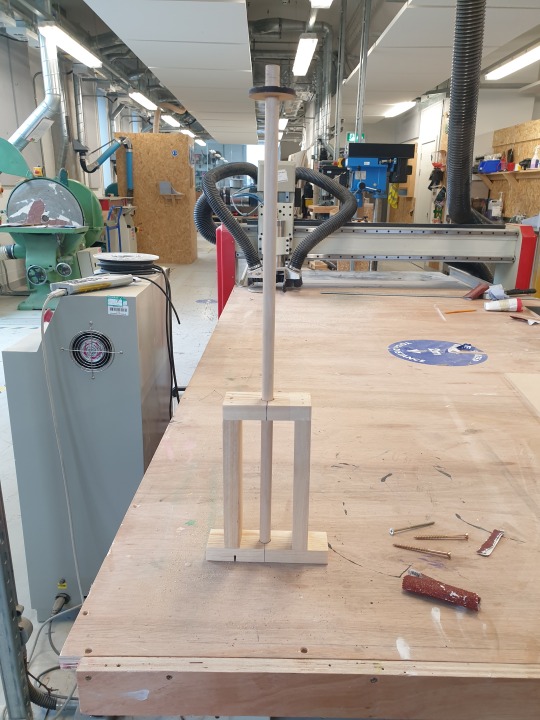
Kostas suggested at this stage also apply carbon powder to the mechanisms, as this would help reduce friction between the moving wooden parts, so I was tasked with sanding down a graphite stick to produce a carbon powder that we could use.
Lining up this internal mechanism was one of the trickiest parts of the process, and we realized that the slight discrepancies in the measurement of the lid were too large to work around. At this stage Dan suggested we use a larger piece of MDF, cut the hole for the dowl to exit- line everything up, and then use a hand held cutting tool to cut exactly round the edge. While completing this stage however, the drill bit broke and needed replacing, so finishing off the construction had to wait until the following week.
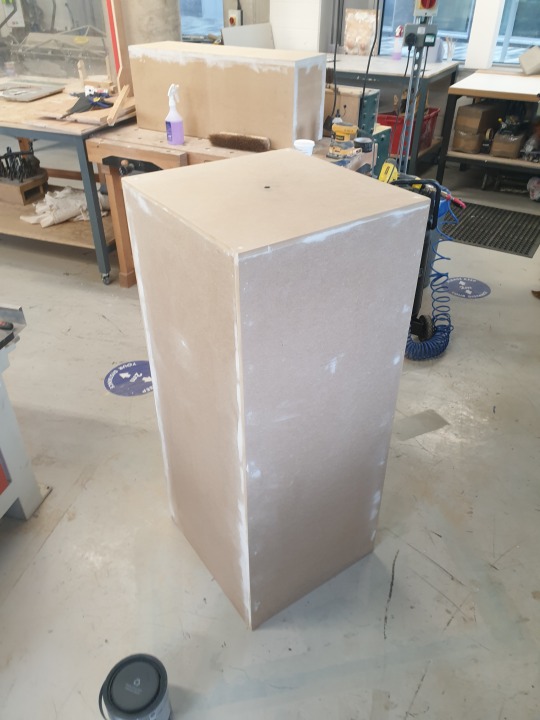
On Tuesday 11th of May, I went into the 3D workshops and Dan had been able to complete the process of cutting the lid, and the plinth was now ready to be fully secured, as we knew it all lined up, screwing the lid down, and filling any small imperfections. Once filled, I would be able to come in and paint the plinth. Dan filled the plinth for me on Wednesday, allowing it to dry overnight, and I returned on Thursday 13th to paint the final structure.
On Thursday I was able to paint the plinth using a matt emulsion and finish assembling the zoetrope, and see the final result.
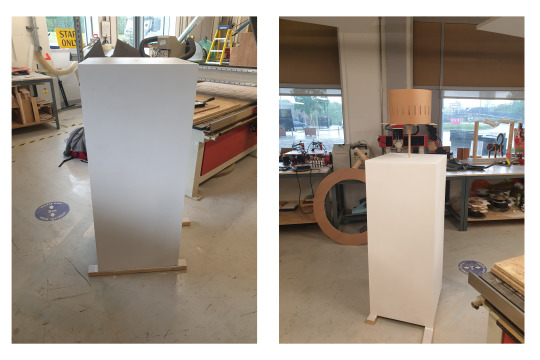
While this was quite a long process of building the plinth, interrupted with technical hiccups, overall I’m really glad I spent the time using the 3D workshops and the laser cutter to construct a piece that is much more refined.
There are a few technical issues with the zoetrope itself, for instance, the double sided tape Kostas and I initially used to secure the card to the MDF elements of the cylinder, peeled away while the zoetrope was in the studios- and this meant the card got slightly creased in places. If I were going to repeat the process, I would either use a material like plastic- which would prevent creases, or I would use a material like super or hot glue to secure the card to the MDF more securely.
The plinth itself is also very large, which will make moving it quite challenging in the future. I think if I was going to repeat this construction process again I would actually construct a much smaller spinning device - like a lazy susan- which the Zoetrope could sit on top of, rather than a large plint as this would be much more manageable and give more options for presentation.
0 notes
Text
Revisting My Glimpses Video: Sound
Waiting for my train into the studios one day and listening to the sounds of the trains go past while waiting at the station struck some interesting ideas in relation to glimpses.
I had already noted the relationship between the footage visually, and the idea of trains moving, the layering flickers and slots coming together to create a piece that was reminiscent of watching trains speed by. Listening to the layered sounds of trains moving around me, I thought that these sounds would work well the the footage. Ideologically, I was drawn to the idea of trains as well, as trains represent movement, progress, journeying on. Waiting at a platform, stagnant in this liminal space between destinations, is like we are now- between a past from which we can distill and imagine a future, liminally caught between the two, yet needing to strive for a then and there destination.
I was really drawn to the idea of experimenting with adding some sound to the piece, so I decided to book the Zoom H4n mic from the specialist equipment stores, carrying it with me on my journeys in and out of the studios, and recording my waits at platforms and journeys on the trains.

After a week of recording, I reviewed my audio files and began to export them into Premiere Pro to use with my video. Using the in and out tool, as with editing footage, I isolated segments of the audio that I felt were the most effective and added these to my timeline. I decided to build layers of audio, mirroring both my experience at the station- with multiple trains around me making noise at different distances, and mirroring the layering effect of the footage I was working with. I started to recreate this effect sonically by picking longer clips of background noise- trains idling, or quietly moving, and letting these run the length/majority of the video.

There was one segment of audio in particular I was drawn to that I had recorded quite early on, before I had gotten the hang of the Zoom mic fully, and the combination of the overly loud recording volume, and the wind on the platform makes the audio really blown out. I found however that I quite liked the overblown and distorted effect of the sound, and by using at a slightly lower volume alongside the other clips within the video, it added to the effect I was trying to create- layering the train sounds and creating a sense of build up, a crescendo that is never quite climaxed. I liked this effect as it almost creates this drive, a sense of urgency- to act and enact a queerness here and now, while also being quite uncomfortable and overpowering to listen to- reflecting the way Munoz describes the here and now’s ‘totalizing rendering of reality’.
While using these loud, overblown sounds however I did take extra care to pay attention to any distracting pops that took my ear out of the almost mesmerizing hum. Under the audio tab in Premiere Pro, I added keystones (ctrl) to manually tweak the volume levels within each clip, adding in controlled fade-ins and fade-outs to let the audio flow, so no clip came in too jarring strong. Taking the extra time and care with this step makes for a much more polished final product, emphasizing the deliberateness of the decisions I made when editing the audio. If I had included the blown out clip- but the editing in general hadn’t had the same attention to detail, fading the clips, i think it would have been much easier to assume the blown out clip was unintentional or ill informed, but used in combination with rigorous editing, I think its inclusion feels considered and intentional- adding to the overall experience.
I am really pleased with this piece overall, and I have enjoyed the process of making it over several weeks.
0 notes
Text
Presenting the work: feeling utopia in the here & now.
Thinking about my degree show proposal, I realized I really wanted to present my wok in a way that creates space for queerness to be inhabited and felt.
I thought about submitting my zoetrope for the degree show, as I do feel it is a refined, finished piece that due to its nature, being something the audience has to participate with, would work well in the exhibition. I don’t feel however, that it is particularly reflective of my studio practice as a whole, and I don’t think it is necessarily the piece of work I want to be representative of me in that way.
I did discuss with Dan options for showing the zoetrope with a video- building a shelf into the plinth that a projector could sit inside- however I have in the past tended towards trying to do too much at once, and I think I would rather focus on presenting one piece really effectively, rather than trying to over complicate things.

Presenting a video- Then & There- feels much more fitting as this has predominantly been my output over the last three years, and it is the element of my work that I feel is strongest.
vimeo
I am also really happy with Then & There as a piece- I’m really proud of the attention to detail, shooting, and refining that went into getting the piece to this polished result and I think it will be really effective in an exhibition setting.
Secondly, presenting a video allows me to project it into a space- transforming that space into one where queerness exists here & now - directly relating to my research and ideas that underpin the work, adding an extra layer of strength and depth.
I am drawn to the way artists like Rosie Hastings & Hannah Quinlan and Jenkin Van Zyl presented their work at Kiss My Genders- creating a bespoke setting that acts to transport the audience to a place that resets the boundaries, hierarchies, and gaze at play.


(Rosie Hasting & Hannah Quinlan’s Install at Kiss My Genders)

(Jenkin Van Zyl’s Install at Kiss My Genders)
Hito Steyerl’s work at the Venice Biennale is another example where the setting I feel transports the audience:

(Hito Steyerl Venice Biennale Instal)
Entering, and following the pathway, you feel like you’re entering into a new space that exists beyond the gallery you just came in through.
I think this sense of transportation, allowing the viewer to feel moved to a place where this work is taking place separately, is something quite important, and that is not something the zoetrope achieves.

(In my proposal I just having a curtain that creates that dense of transportation- the audience having to physically enter the space, choose to move into it, in a darkened space, I hope that the mesmerising blue shapes of my work, create a transportive experience)
In my tutorial with Jill we discussed ways of perhaps incorporating the text I’d like to include into the presentation of the video- and I did consider these options; thinking about ways of designing the text almost like an opening credit shot. However I didn’t want to take away from the loop of the video, as the notion of the continuous loop is one that I think is very important- the nod to the fact that chasing utopia is a continuum, not a destination. Therefore I want to project the video on a continuous loop- so that the audience can come and go from the film, let themself sit in the environment it creates, and there are no constraints on the space; reflecting once again the notion that the space the work creates exists outside of the societal structures and pressures we feel elsewhere.
0 notes


Text
Making my Final Zoetrope - Step 4: Using the Laser Cutter
With my image strip printed I was able to confirm that it was 40 x 40 mm when printed, and would match the measurements I had been working to on Illustrator. I also took my Illustrator files to Kostas prior to my session on the laser cutter, to check that they were set up correctly. It looked to Kostas as if I had calculated the diameter of my circle incorrectly, but this was only a small issue that could be fixed in the session with the laser cutter.
My session on the laser was booked for Wednesday 28th. I was excited to use the label cutter, and the first stage of this process was to load the AI files, onto the computer associated with the laser cutter. Together, Kostas and I double checked the measurements of the AI file, before moving the AI paths to the laser cutting software and programing the speed to be compatible with the card we were cutting. With this first completed laser cut of the zoetrope drum, we could see that the image strip and the slits lined up well and everything seemed to be measured correctly. We did however realize there were some changes that needed to be made.

I had not included a space to attach the two sides of the drum together, working to the exact measurements of the image strip. To rectify this, we extended the length of the panel slightly in photoshop, and added a red line to mark the original length. The red line could be programmed in the laser cutting software to cut with less pressure and only score the cardboard as a marker of where the two slides needed to be joined. A further change that needed to be made, was that I had not accounted for the space needed to attached the base to the cardboard drum walls. Because the base needed to be quite solid and secure, we decided to use 2 rounds of 6mm mdf for this. This meant adding an additional 12mm extension to the base of the drum. We also found, when looking at the image strip and the space at the base of the drum, that because the measurements were so precise in this space, the image strip would need to be glued exactly. Ths being quite challenging, we decided to add more space, to give us more room to glue the image strip and the base, and potentially attach a small cap to sit on top of the dowel and hold it in place. With all these considerations accounted for, we ended up adding an additional 20mm to the height of the drum in total.

With the AI file amended, we then followed the same process, importing the paths into the laser cutting software, then programing the speed for each line- remembering to only score the line in red. With this second drum panel cut we were much happier with the results and could go about cutting the base and beginning to assemble.
We recalculated the measurements for the base- finding the correct radius by dividing the circumference by 2π: 960/6.28 = 152.87. With this recalculated radius, we were then able to draw a correct circle in Illustrator, using the shape tool.

Firstly, because the zoetrope was going to be attached to a centre dowel we used calipers to measure said dowel, and add a center circle that met this width; 15 mm. Because we had discussed the fact I wanted this zoetrope to spin manually, we had decided that spindles may be the best way to achieve this. To attach the spindles, we decided to include etched areas in which the spindles could be attached on the underside of the base. We used calipers to measure the width of the dowels we were going to use for the spindles, finding them to be 6mms. We drew a 6mm wide rectangle that ran the length of the radius of the circle, then used the rotate effect to add 6 more evenly spaced around the center point.

We layed up the laser cutting workspace with two of the same sized circles, one plain with just the hole for the centre dowel, and the second with the channels for the spindles, which we programmed to be etched rather than cut. We then cut these out of the 6mm MDF using the laser cutter, and began to prepare the other components.

I used doubled sided tape to adhere the image strip to the laser cut drum panel. I did this carefully and slowly to ensure it was evenly attached and remained at an equal distance from the slits.
Once the base circles were cut, we used super glue to glue these two together, and inserted the thicker centre dowel through the hole. Kostas explained that the laser doesn't always cut exactly in a vertical line, and sometimes, more notably when cutting thicker materials such as MDF, the slight tilt of the line could mean things were not quite as precise as they needed to be. When inserting the center dowel, there was some resistance, however it was not a major problem and having a snug fit actually meant to we could keep the dowel securely in place without gluing it down yet, which would give me more flexibility in the future when making a base for the zoetrope to sit on.
Once again using double sided tape, we attached the base to the drum, again paying close attention to detail and holding the base very steady to attach it evenly. Having the dowel attached was really useful as it enabled one person to hold the base steady and rotate it onto the taped section, while the other could focus on making sure it lined up and was sticking securely. We also then used double sided tape to attach the two sides of the drum together. At this stage we could see that everything lined up and the last step was to attach the spindles.
To help the spindle dowels stick better to the MDF surface, I sanded two sides down to make them more flat. We used the band saw to cut them down to size, and I sanded the tips of the dowles to ensure they weren’t rough, as these were the components that anyone interacting with the work can touch. Again, we used super glue to secure these dowels in the channels etched out for them by the laser cutter.
The final step was just to create two smaller rounds to help hold everything in place. We made these in the same way as the larger rounds, one with the hole through the centre and channels etched out - and one identically sized one with no channels. The only difference here was that for the second round without channels, rather than completely cut the hole through the centre, we only etched the hole, so it would sit on top of the dowel, rather than have the dowel run through it. This would help to give the piece a much more finished look.

Again, at this stage we assembled the zoetrope completely with the round and the centre dowel in place to ensure everything fit together as intended, but we did not glue to give more flexibility when assembling later down the line.
With the Zoetrope now fully assembled however, we were able to test how well the moving image worked. The results of this zoetrope were far better than any I had made on my own and I am extremely pleased with the results, the moving image is much clearer and the construction of the piece gives it a much more finished and polished look.
0 notes
Text
Making my Final Zoetrope - Step 3: The Image Strip.
With my measurements for the barrel itself calculated, I now knew the measurements I needed for the film strip also.

Having decided to keep my Image strip 24 frames, I could use the PSD file I already had with the 24 frames layed out in order, I just had to scale it to the correct side.

I did this by creating a 960mm by 40mm document in Adobe Photoshop, and then importing my layed out frames and scaling them to fit this canvas. I checked the resolution, to ensure the images were 300dpi and high enough quality to print at this scale, and once I was happy I then set about reaching out to Alex in digital print to arrange a time to come in and print my images high quality.

In order to book the right printer I first had to know what I wanted from my finished result. I knew I wanted to print on Satin finish paper. With the images being quite vibrant and abstract, I wanted something that would render these colours in a really rich way, but without too much glare off the surface, as I knew the zoetrope would need to be well lit from above, and I didnt want any glare to potentially disrupt the moving images. Satin here was a good middle ground, with the rich colour capability of a gloss finish, but minimising potential glare. I also knew I wanted, if possible, to print my entire 960mm strip on one continuous piece of paper. With these factors in mind, I needed a printer that could print satin paper that was large enough to print my 960mm image. Both the Epson 9900 Inkjet Printer and the Epson P8000 Inkjet Printers were available and fit these requirements, so I booked a slot on the Epson 9900 Inkjet Printer on Monday 26th.
Knowing the max size the Epson 9900 Inkjet Printer could print was 1118mm, I then laid out a document with a couple strips for my zoetrope, in case I needed duplicates, and some other images I wanted to print while I had the booking to maximise the paper usage.
On Monday I was then able to go into digital print with a solid idea of what I wanted. Once the roll was loaded into the printer, I only had to adjust things slightly to the exact width of the paper which differed slightly, and then follow the instructions to prepare the document for print.

Overall I’m really pleased with these prints, and I’m glad I took a little bit of extra time to print them in digital print and select a high quality finish as I think it will make the zoetrope much more impactful.
0 notes
Text
Making my Final Zoetrope - Step 2: Designing in Illustrator
Getting the measurements precise and attention to detail was something very important with this piece. In many ways, designing the Zoetrope in Illustrator allowed me to work with a lot more accuracy than just using a ruler and pencil, as there will always be a margin of error when working by hand, as I discovered when making my drafts.

The first step to designing the Illustrator AI version of my Zoetrope was calculating the correct measurements. Following my consultation with Dan and Kostas, I knew I wanted to increase the size of the frames from the 33mm I had been working with. I decided to work with a simple even number, and increase the frames to 40mm each. This would make the images much more legible, and give the finished zoetrope a good presence.
To work out the circumference of the zoetrope from here, I multiplied 40 (width of frames) by 24 (number of frames), to get 960mm.
With this established, I was then able to create a canvas in Illustrator large enough to contain a 960mm shape. I then created a rectangle using the shape tool that was 960mm wide.
For the height of this rectangle, I needed to calculate further measurements. Firstly I knew that the frames, as squares, would also be 40mm tall. To calculate the height of the slits (that from my previous experiments I knew I wanted to be 4mm wide), I multiplied 40 (height of frame) by 1.5 (as I had found this was a good slit height in my prior mock ups) to get 60mm. Adding together these two measurements, 40mm + 60mm, currently my barrel only needed to be 100mm tall, however, I knew I wanted to include a crown above the slits, both to provide the piece with more structural integrity, and also to prevent the viewer from looking over the rim of the barrel as this would detract from much of the concept of the work, that the movement can only be glimpsed from outside. I decided therefore to add a further 100mm to the height, bringing the total height to 200mm.

I was able then to set the measurements of the rectangle that would serve as the outer edge of the zoetrope barrel to 960mm wide by 200mm tall.
Within this rectangle I needed to include the 24 slits, matching the number of frames. I already knew the measurements I wanted for these slits, 4mm wide by 60mm tall, but more critical was the spacing of these slits. I knew each slit needed to begin at 40mm up the barrel rectangle, as this was where the image frames would end. I made a guide at 40mm up the barrel. I could use this to position the slits correctly. Calculating and drawing the measurements of the slits was definitely the most challenging element of the zoetrope when working by hand, but I was surprised at how easy it was in illustrator. In Illustrator, you are able to position objects by their centre point and this made the process much simpler. I didn’t have to calculate the distance between each slit while accounting for the slit measurement to work out where the slit should start, as instead I could just space the slits at 40mm distances as they were positioned based on their center point, not their farthest side.
The only complication to this, was that I wanted to make sure my first slit started halfway through the first slide, at 20mm, as I had found this the best method while constructing my zoetrope mockups to ensure everything lined up with ease when assembling.
I draw the first 60mm by 4mm rectangle, at 40mm height on the original barrel rectangle, using the shape took, and positioned this 20mm from the left hand edge of the rectangle, then I was able to place an additional 24 of these slits at 4mm intervals from this first rectangle, using the transform tools in the properties tab.

For every shape I ensured that the stroke was set to black and 1pt, while the fill was set to None.

At this stage I had a mathematically sound illustrator file of my proposed zoetrope which I could take in to show Kostas. As long as there were no issues with these files, these could then be used to dictate where the laser cutter would cut the card, making for much more precise and accurate cuts than I could achieve with a craft knife.

0 notes
Text
Making my Final Zoetrope - Step 1: Consultation with Dan Pickles & Kostas
After experimenting with the zoetrope idea, and finally being back on campus with access to the workshops, I knew I wanted to make a more professional and fully finished version of my Zoetrope Mockups.

In order to do this, I reached out to Dan Pickles via email, with my Ideas. In this email I included images of my drafts and my ideas thus far. I also mentioned the possibility of laser cutting this design as, when working with such small measurements, I had learnt the significance of precision. Over email we discussed a few ideas about how the zoetrope could be assembled and which equipment we may need to use. Dan cced Kostas into our conversation to advise on the laser cutter and we agreed a time where the three of us could meet and discuss the work further.
We met in person on Tuesday 20th, and I bought along my mock ups and notes so far. Looking over these, we discussed measurements and possibilities and what I would need to do going forwards.
The first stage of this was to determine exactly what I wanted to create.
After discussing options with Kostas for the size, I explained that I was considering making the work larger, potentially by adding frames to the image reel. After talking this through with Kostas however I decided it would be better to keep the reel at 24 frames, particularly as I already had an animation I was happy with at this scale. This is because 24 frames per second is the minimum speed needed to capture realistic movement - by adding frames, but not speed (the zoetrope only being able to spin so fast), this would impact the flow of the moving image and possibly the illusion of movement. After discussing this with Kostas, I decided it would be better instead to increase the size of the zoetrope by scaling the frames up slightly, as this would also add readability to the images as they are quite abstracted.
We then looked at different material options. We looked at both polypropylene sheets, and the different card options. I hadn’t really considered colour options beside black for this piece of work, however Kostas had some really nice tan card that we looked at and felt would work quite well with the blue and magenta tones of the image strip. At this stage we decided that it would be best to make a version in card to start with, to check the measurements and construction worked - following on from this if I did decide I wanted to make a version in plastic or a different colour, then I could do so without working about having to buy materials and potentially wasting them at this stage.
Lastly we discussed the construction of the zoetrope in more specific detail. We talked about whether I wanted the zoetrope to be motorized or spun by hand and I expressed that the views’ ability to control, and turn the zoetrope- almost like swiping digitally through instagram, tiktok, tinder etc, was important to me. To facilitate this we talked about spindles being the best option, so that the person viewing the work could spin it without damaging the barrel. These could be made from thin dowels, with a thick dowel being used to attach the zoetrope itself to some kind of plinth.

With this plan of action, I booked in to use the Laser cutter to make the card version of my zoetrope on Wednesday the 28th. Before this session I have two tasks, firstly to make an AI file with my zoetrope components designed and laid out, and secondly, to print a full size image reel to go inside this zoetrope that would fit with my measurements.
0 notes
Text
I’ll Be Your Mirror- Site Specific Digital Installation.
The site-specific digital is avaliable to view here: https://www.rtpritchard.com/mirror
(Only avaliable in browser)

Following my reflection on my turntable piece ‘I’ll Be Your Mirror’, I thought it would be interesting to try combining the work with music, and creating an experimental ‘site-specific’ installation on my website.
Thinking about how effective I had found Libby Heaney’s site specific work on instagram, I thought equally it may be interesting to explore embedding the work onto my website, and creating an in browser endlessly looping queer dance party of sorts.
In a nod to Nan Golding, I curated a short playlist of songs that I felt related to the themes of the work, and contained within them inherent nods to queerness or associations with queer history.

(Link to playlist: https://open.spotify.com/playlist/1y7MMN7kgqJPOOtID32uUp?si=3bca320769784034)
Designing the space on wix, I set a small looping section of my video as the background of the webpage- fixed and constantly spinning.

The implication of the piece was something I really enjoyed about this work- being that, in the digital space where the turntable is always spinning, queer utopia exists- even if no oneis watching it spin, or listening to the curated playlist. Somewhere in the digital ether, queer utopia is a constant force waiting to be found and existed within.
It relates to my proposal for the degree show in a way- creating a darked ‘space’ digitally, that by existing makes space for queerness at its core, like Rosie Hastings and Hannha Quinlan’s work at Kiss My Genders which I felt queered the space, subverting the power dynamics at play in society, and appropriating the digital space to centre queer expereince over hetereonormativity.
This piece is mostly a fun experiment, to see how a digital installation of the work might work, but I do think there’s something really enjoyable about the magical hiddenness of it- existing to be stumbled upon by someone to enjoy and feel safe within. There’s something fun in the knowledge that anyone at anytime could log on and enjoy a queer dance party, where ever and whoever they are.
I also think theres scope perhaps for this to be a collaborative piece- I’d be interested in adapting the ideas further, thinking more about queering digital space, and perhaps working with other queer musicians to curate their own ‘DJ sets’ for the queer dance party, or incorperate other visuals. I’d be very interested to expand the concept of the work in this way.
0 notes
Text
Naming & Refelcting on Turntable Zoetrope Video
youtube
I exported my final edit and I am really pleased with this work. I think it would be interesting to pair with music- Nan Golding’s Ballad of Sexual Dependency coming to mind, the slide show accompanied by a curated playlist, setting the thematic tone of the images. I think showcasing this work with music, maybe in a space where the audience could dance would be really fun- creating that glimpse of utopia that I want within my work, and centering queer joy.

I decided to give the piece a name that referenced this music link- naming the piece I’ll Be Your Mirror, after the Velvet Underground song. This title references back to to the use of reflection in my other work, and the potential space mirrors evoke, while also hinting at the power in queer collectivity- the way we find queerness reflected in each other, in those we love, and in the quotidian (Also reminding me of the quote hanging over bloom street at Manchester Pride: ‘The Pride I Feel For You, Fills Me With Pride’).
View this post on Instagram
A post shared by Row P. (@_ibangthings)
I also felt this was fitting, as Andy Warhol had originally suggested adding a built in crack to the end of the record of I’ll Be Your Mirror, so the final line “I’ll be your mirror / Reflect what you are,” would repeat endlessly until the turntable needle was removed. My endless loop of the spinning zoetrope becomes a re-imaging of this idea.
https://doi.org/10.13110/criticism.56.3.0457
0 notes
Text
Filming & Editing the Turntable Zoetrope Video
Filming this piece turned out to be a reality complicated set up. I imagined it shot from overhead, looking down perfectly at the record player spinning from above. To do this I needed to use my tripod, and DLSR, and film on a completely plain background. One of the trickiest aspects of setting up the shot was getting a perfect aerial shot of the record player that didn’t also include the legs of the tripod.

After fiddling with the set up however, I was able to record the circular zoetrope spinning on the turntable, achieving some footage I was pleased with.
I loaded this footage into Premiere Pro, and I decided that the best way to ensure the footage continuously looped perfectly was to isolate one rotation, using the in and out tool, and then repeat this short section, this way the clip could endlessly loop perfectly without jaring cuts or lighting changes etc. impacting the shot.
Before repeating this shot however, there were a few edits I wanted to perform. The most critical step I took was cropping the turntable itself, isolating it against a plain background. I really liked how the turntable stood out on a black background, with the purple and blue really punctuating the otherwise monochrome shot; reflecting the warm bright illumination of a queer horizon on the ‘quagmire of the present’.
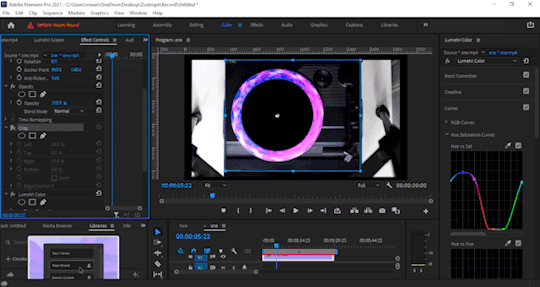
I made a few colour corrections (colour--> lumetri colour--> basic correction) just to really intensify the impact of this; adjusting the contrast, blacks & whites, highlights & shadows. There were also a few red tones in the work that I found a little distracting, so using the hue and saturation curves I desaturated the tones I wanted to remove. Taking time and care with these little adjustments I’ve found across my work really works to elevate the work, giving it a much more refined finish. I’ve found that using similar colour editing across my video pieces also really ties the pieces together - relating to each other - and really allowing them to sit together as a cohesive body of work.


0 notes
Text
Testing & Refining my Turntable Zoetrope.
When testing my circular vinyl style zoetrope on the turntable, I found that using the 24 frames, the images were too small really to be easily read by the eye. I decided to redo this process, cutting my 12 frames in half and working with 6 at a time, to create a circle with only 12 frames total. I could already tell this was going to be more effective, the images appear much larger on the screen. I also decided to add a marker in illustrator to mark the central point, this would make it much easier to find the central point of the circle when it was printed and I was trying to cut out a small hole to put the zoetrope on the turntable.

At this stage, I tested the 12 frame version on my turntable and I thought the effect was really interesting. I thought it would be better if i could print some higher quality versions of the circles in digital print, and use those as higher quality prints with a truer black would really do the image justice and it could be quite striking.


I printed my circles in digital print on a satin paper, and I was really pleased with the high quality finish on them. They really made the colours stand out and I thought it could be really effective as a video piece.

(Test Image)

(Satin Prints)
0 notes
Text
Turntable Zoetrope Idea & Editing in Illustrator
While researching zoetropes, and exploring ideas around the medium, I came across vinyl zoetropes, working similiarly to phenakistoscopes, where vinyl records are printed with zoetropic imagery, that when the record is played on a turntable, becomes animated and creates the illusion of movement.

(Animated GIF of Prof. Stampfer's phenakistiscope)
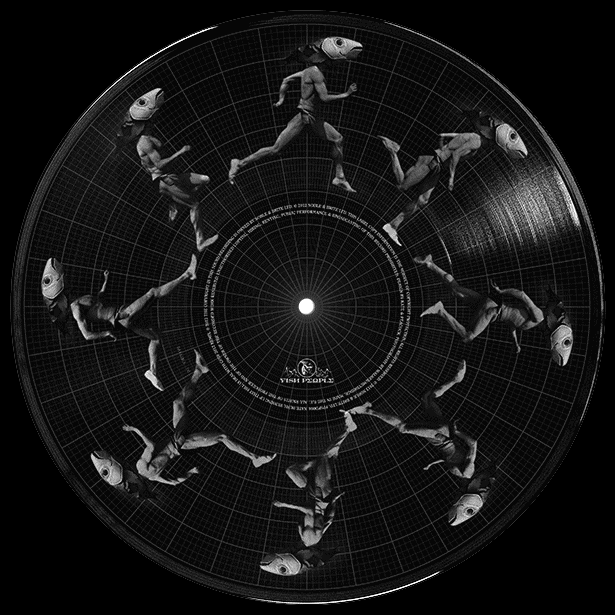
(Animated GIF of Kate Bush’s Running Up That Hill Picture Disc Vinyl)
I was drawn to this as I liked the idea that the movement is dependent on music playing. My ideas around visualising utopia stemming from the closing of LGBTQ+ spaces, particularly night clubs where this feeling of queer futurity can be glimpsed, and my visual language for exploring this stemming from images of queer dancing, I was drawn to the idea that by playing music- the driving force of nightclubs and an important element of queer culture in its own right- the illusion of movement, within my work allowing the viewer to glimpse utopia, is created. I thought this could be really interesting to explore further, so I began to develop a round disc that I could place onto my record player and spin to see how effective this was.

I developed these discs in Adobe Illustrator from the same strips I had already developed to use within my traditional zoetrope. I went through several stages of trial and error while developing these discs. First I started with my 24 frame strip, and I used the Object --> Envelope Distort --> Make with Arch.
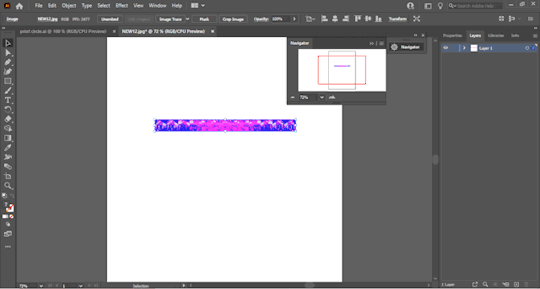
I did this by starting with the first 12 frames of the full 24 frame strip, then I applied the envelope effect, applying the bend 100% horizontally. I could then copy and paste, rotate, and alight this to form the full circle.

When researching the best way to do this, this was the method that I seemingly worked best, however I did find that, after joining the two strips, the circle created was not quite perfect- which I would need it to be to rotate and create the sense of movement on my turntable.
After thinking through different ways of fixing this, I relaxed. I needed an internal circle of blackness, that would sit on the turntable, with a hole in the centre to sit like a record would. Using this black circle, I could trim the interior edges of the images- ensuring this was a perfect circle.
I made this circle with the ellipsis tool, double clicking to type measurements, and making a mathematically perfect circle. Scaling this circle while holding shift, I knew this circle would maintain it’s perfect dimensions. I scaled the circle and repositioned it, until it sat well, minimising overlap with the images, while ensuring the inside circle was now perfect. I then adjusted the fill to black, and removed any stroke.


I then placed another circle- this one larger, to do similar to the outside edge. With the black circle hidden, and the arches grouped, I set the large outside circle to stroke only- and with both layers selected, under properties, used the pathfinder--> more options--> crop tool, to clip everything outside the stroke I had created.


Now I could unhide the black circle, and print this to cut out and test on my turntable.

https://happymag.tv/a-quick-insight-into-mind-warping-animated-zoetrope-vinyl-labels/
https://en.wikipedia.org/wiki/Phenakistiscope
3 notes
·
View notes
Text
Research & Thoughts: Scrolling, Looping & Searching.
Something that I have been interested in throughout my work is the idea of searching- and filling voids. It is something I notice that I use social media for- constantly scrolling, swiping left & right, these little inane actions with our hands that mean so much more.
As a digital creature myself, I spend a lot of my free time scrolling, swiping, tapping- and these modern day gestures that transport us through dating, intimacy, and friendship (swiping on tinder, flicking through instagram), gaming (games like angry birds and doodle jump that are pure escapism), and entertainment (tiktok, instagram).
Over lockdown this has become even more obvious- we escape to the digital ether at every opportunity to escape the monotony of day to day life, and to connect with others. As a queer person, it has been interesting to see everyone begin to gravitate digitally in this way, as for me, the digital has often provided an escape from my physical situations where I didn’t feel seen, or where I couldn’t locate a physical communitiy.
We use the digital to fill voids; and the constant scrolling is indicative of that. Chamath Palihapitiya, former Vice President of User Growth at Facebook, describes this act of endless scrolling as “short-term, dopamine-driven feedback loops”. That search for dopamine, craving for connection, attention, to feel at the centre of things, is something that the digital can make obsessive- our phones perhaps being the devices we are most intimate with; the average time spent on a phone equalling over 2,600 daily touches.
This constant searching is something that I am really drawn to exploring in my work- as for me it reflects the never ending push towards a utopia. These ideas are integrally linked in my mind, as, for me, the process of searching on social media is tied to queerness, searching for connection, community, recognition- things I wouldn’t need to search for in ‘another world’, a queer utopia, as there would be no ‘othering’ and societal disconnect that keeps me distant from those things.
In my zoetrope idea, the nod to these ideas is entangled in the act of spinning the drum- the movement of the images dependent on that gesture from the viewer. In my other work, I have begun exploring these notions through looping.
The idea of looping, to me, ties quite directly to José Esteban Muñoz’s metaphorical description of queerness as a horizon that I explored in my X-Collab work. The idea that queerness as a horizon means it can only be viewed from a distance- you can never be at the horizon- it depends on that distance. The suggestion that Utopia can’t be achieved- but is found in the chasing, is one I feel quite attached to- that it is in the endless looping- the constant chasing- that utopia is really located.
“Moments of queer relational bliss... ‘ecstasies’, are viewed as having the ability to rewrite a larger map of everyday life.” Munoz, Queerness as a Horizon, Cruising Queer Utopia p.25
This is something I am really keen to continue honing in on in my work- and consider when thinking about presenting my work to an audience.
Cruising Utopia: The Then and There of Queer Futurity - José Esteban Muñoz
https://advice.theshineapp.com/articles/heres-why-you-cant-stop-scrolling-on-your-phone/ https://sitn.hms.harvard.edu/flash/2018/dopamine-smartphones-battle-time/
https://www.youtube.com/watch?v=55NHsB1KQ8A&t=1645s
0 notes