Don't wanna be here? Send us removal request.
Statistics
We looked inside some of the posts by rtfmp2021 and here's what we found interesting.
Average Info
Notes Per Post
15
Likes Per Post
15
Reblog Per Post
0
Reply Per Post
0
Time Between Posts
1 hour
Number of Posts By Type
Text
17
Last Seen Tumblr Blogs


Fun Fact
Tumblr has been banned in Indonesia for providing people with access to pornographic content.
Text
I will also do research into the WDOYP book, Don't Panic, general inequalities, colourful equality graphics, repeat patterns and neon signs.
1 note
·
View note


Text
Inner Space - Process 1
Shoes - Illustrator

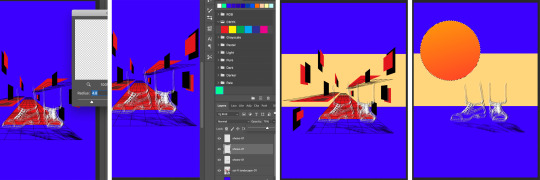
To create my inner space piece I began by tracing over an image of men's formal shoes, I did this using the paintbrush tool in Illustrator and a touchpad. I could've used a tablet to have more control and smoother lines, but with the grungy sci-fi style I'm going for, the naturally jagged lines from using the touchpad are perfect. I wanted the illustration to be balanced between messy and clear, so once I was happy with it I grouped all the objects together into one. Next I opened this into 'effect > 3D > extrude & bevel' which allowed me to adjust/experiment with the options, here I set the surface to 'wireframe', increased the extrude depth, re-angled all 3 dimensions etc. Once finished I exported the piece as a PNG with a high resolution, I also set the background as transparent so only the drawing is saved.
Grid Landscape - Illustrator

The other aspect of the outcome is a grid landscape which I created using the perspective grid tool, this displayed a temporary grid but not with the correct perspective I needed. To change this I went into 'view > perspective grid' and selected 'one point perspective', a more corridor like perspective.

Next I used the rectangular grid tool to draw out the surfaces, doing so I varied the size and placement of these grids to keep it more interesting. I really like how some of these platforms look like they're floating, because it adds sci-fi and mysterious aspects to the piece.

I then used the rectangle tool to draw out more floating shapes on the sides, I think this looks more interesting than if they were solid walls on the ground because it defies reality. With the same tool I replaced the fill with bright red and laid them over the black shapes, depending on the placement I rearranged some of them to the back. This adds colour to the piece rather than covering it, especially important for the grid pattern to show through.

Last but not least I incorporated shadows to create a more realistic look, although the landscape is very surreal, by adding realistic features, the piece comes to life as we can relate our reality to it. To do this I used the pen tool the draw the shapes of the shadows accurately, with this I opened the 'gaussian blur' effect which softened the edges as a shadow doesn't usually have clear, crisp edges. I then set the opacity to 50% so they only affected the colours, not covered them. The placements of these shadows were carefully decided, I imagined light coming from the left which helped me see where they must go. Once I was happy I again exported it as a PNG, with no background and a high resolution.
Editing - Photoshop

Having created both the shoes and landscape in Illustrator, I brought them both into Photoshop which had a background fill of rich blue. I placed the shoes on top of the platform so it looked like somebody's standing on it, I also added a duplicate with a white colour overlay because of the darker colours behind. I think having the black version of the drawing slightly offset behind, is a subtle but effective way to enhance the contrast and clearness even more.

Next I created a shadow for the shoes by duplicating and flipping it vertically, I then selected 'edit > transform > perspective' which allowed me to drag/slant the object sideways. When doing this I kept in mind the direction of light, so like the previous shadows it would cast to the right. Because it's a shadow you would only see it on a platform, therefore I used the polygonal lasso tool to delete any of the shadow outside of the floor.
For a more realistic shadow I then softened it using the 'gaussian blur' filter and opacity, this made it stand out less as it's important but not the main focal point. I also incorporated a strip of light colour through the middle of the canvas, bringing in contrast as I think the background looked too boring/plain. Next I drew a circle with the ellipse tool and filled it with a gradient, this represented the sun and source of light which form the shadows.

After this I felt that the piece had too many dark and rich colours, which resulted in looking too busy, messy and unclear. Therefore I selected all the red with the magic wand tool and filled it with light turquoise, however where the shadows were already made on the landscape it didn't select this section. Therefore I selected around these shapes with the polygonal lasso tool, filling them in with the same turquoise as shapes. I then blended it using the 'soft light' option, so it remains a darker shadow. Because this and the beige strip is a light colour, I has to swap the black shoes to lie on top of the white to make it clearer.

0 notes
Text
Inner Space 3D Wireframe - Outcome

I have created this inner space outcome using both Adobe Illustrator and Photoshop, it involves multiple different processes which all come together in the end. This piece has a sci-fi quality which I think is really intriguing and surreal, it was fun working with a different and less modish style as I was able to experiment with new techniques. However I found it difficult to then connect a message about equality with this style, because I needed it to be strong and clear but also not depressing.
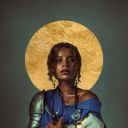
In the end I thought of how women are made to feel smaller than men, and so similarly to some of Rhonan McGarry's work, I compared the woman figure's height to a commonly small object which creates this tiny effect. I used men's shoes and trousers to represent the man and decided to only draw up to the shin, I think this was more powerful than drawing the whole body because it's more symbolic and leaves some to the imagination. With these shoes you can feel intimidation and power because the woman is the size of a bug compared, I think this is a good analogy for how women can be treated which is without respect or care, like an insect.
Overall I think the outcome is okay, but as I see it there are many things I would change/add if I had more time. For example I don't think the woman figure isn't the most perceivable, but I do think some kind of pattern would improve the piece by subtly filling the empty space.
1 note
·
View note
Text
Rhonan McGarry
Rhonan McGarry is a digital artist from Scotland who uses comics, sci-fi, pop art and surrealism to inspire his work. He has a series of artworks named 'The Boys in the Lab', in which you will consistently see two small men figures in each piece. I think the concept is intriguingly strange, but in a minimal and simple way so it's clear. The bold colour themes, layouts and imagery amplifies the art further, making it eye-catching and fun to view. In his sketchy lines and rough textures you can see a grungy aspect, which I think adds character and interest. What I like about his work is how it makes you think about the art rather than just view it, this is because we see human figures as familiar but not the surreal, sci-fi imagery. Therefore when combined it feels familiar yet abnormal, leaving the viewer to figure out what's going on.
The Boys in the Lab
This collection of artworks focuses around the concept of 'boys' scientifically experimenting, investigating and exploring, of which could involve shrinking, explosions, sea life etc. The art outcomes look like a still image from a scene, which helps tell a story and communicate the concept.
Genomics
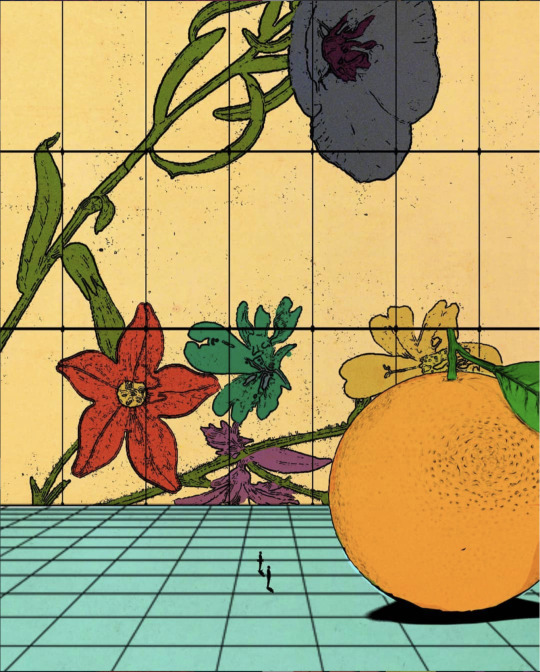
This first piece displays two tiny men standing besides an orange, using an ordinarily small object helps exaggerate their size as it's the size of a tall building compared to the men. Another aspect that shows the figures as tiny is the space it's located in, because the tiles look like kitchen tiles and a countertop of which these men are standing on. Therefore having a familiar setting and imagery helps the viewer to understand the art, whereas the surreal concept of minuscule men walking along the kitchen countertop brings us curiosity and wonder, when combined together it's super intriguing. I also think the harsh size difference between the men and orange is important, because a smaller contrast would look less effective and therefore less interesting. So when I create my own outcome I want to display the figures significantly small, to really exaggerate the concept and make it clear.
Infrasonics
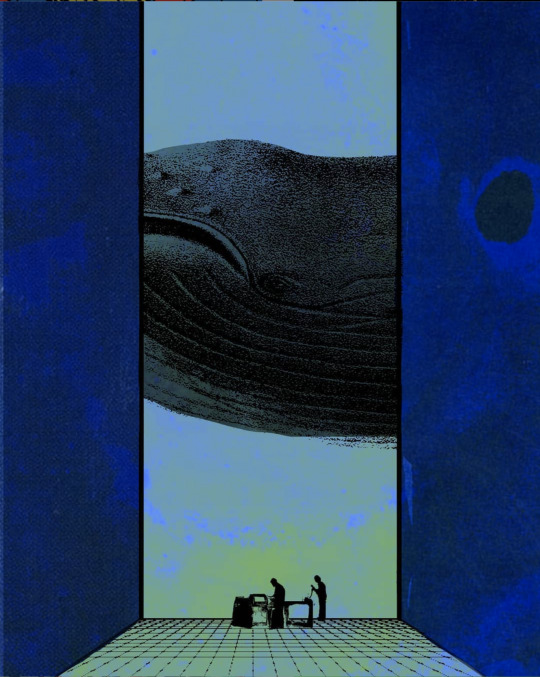
My next example shows two men standing at machines as they investigate 'infrasonics', this represents the sound waves's frequency below the human audibility. What I love about this piece is the layout of everything, I think it look really pleasing and satisfying because it's centred and equally proportioned. I also think only showing a portion of the whale is a more suitable design choice, because not only does it fill the space more it also expresses the large size of the animal. Looking at this work it feels strong and bold, but peaceful at the same. One explanation is because whales are powerful animals, however the colour scheme is filled with rich and light blues that represent and provoke different feelings. E.g. light blue portrays peacefulness, while dark blue signifies depth and power.
Potential Difference
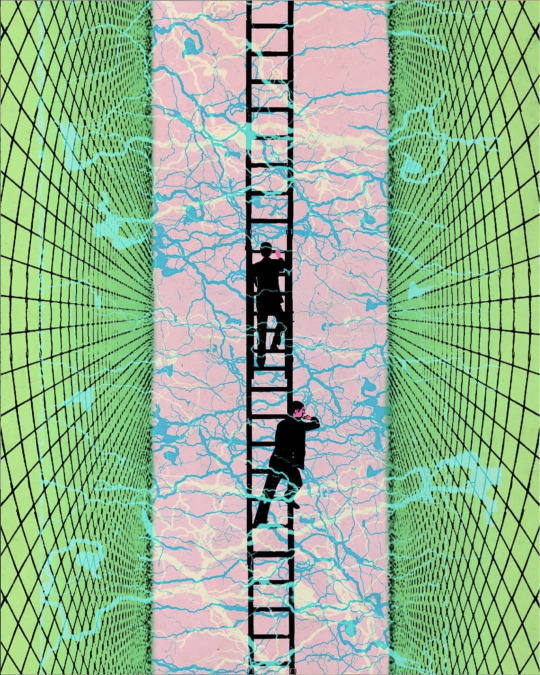
The third artwork involves the men climbing up a ladder, through somewhere that looks filled with electricity. You can see these bolts of electricity connecting from both sides of the walls, leaving a thin slot in the middle similarly to the previous piece. I really like how these bolts lightly fill the space, done by colouring, layering and blending these repeated squiggly lines. I especially like how there is energy both in-front and behind the men, and how the foreground electricity blends into the background as it isn't a solid object. In all of these outcomes are the men, however in this piece you can for once clearly see that they're wearing suits. I think combining formal attire with such bizarre and exciting situations creates a contrast, making it even more surreal and dreamlike. I also love the colour scheme used, it immediately caught my eye as I was searching for examples of McGarry's work, and kept me interested as I was viewing it.
Superpositions
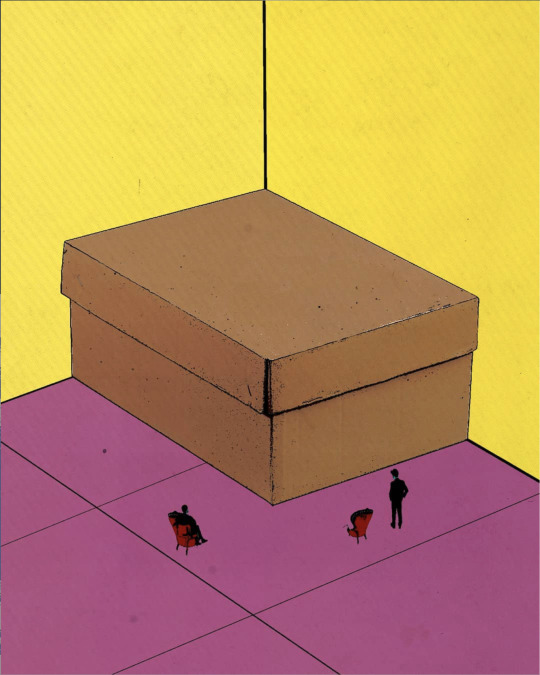
Here is one of McGarry's simpler pieces, which isn't to say it's less commanding because sometimes less is more. Displayed is the two 'boys' who're viewing a shoebox, and like before the ordinarily small object is now the size of a house compared. However this time the height difference isn't as distinct, but still enough to be effective. Other than this there are two tiny chairs and a background to show the corner of a room, leaving the box to really stand out as the focal point even though it's such a basic item. This is only possible because the rest is so simple, otherwise a busy background would completely take the attention away from the box. Nevertheless, this would put the art in danger of looking boring or too simple, therefore McGarry added a horizontal line pattern which lightly but clearly covers the entire canvas. I think this subtly adds character and interest, because the walls are no longer plain but still an overall one colour.
Oncology
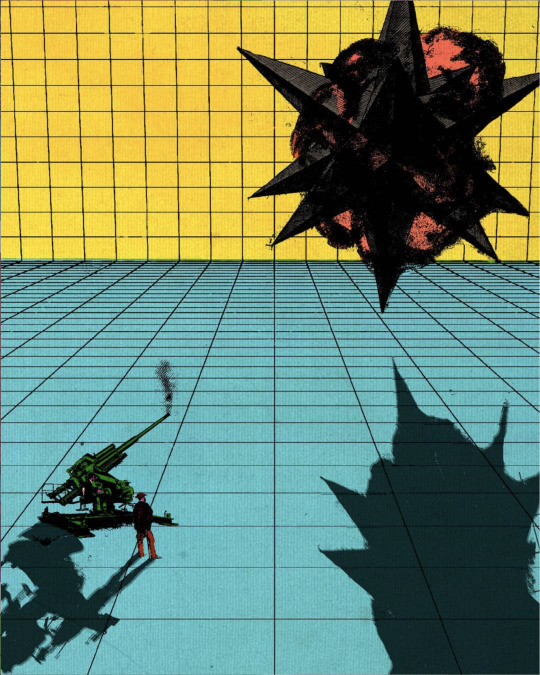
Lastly is this piece, it shows the men testing a large weapon which results in an explosion you can see up in the air, I think this incorporates movement in the art because you can see the impact made. Especially having included smaller details like the smoke, it really does look like a freeze-frame of the event. This as well as the grid floor and wall can be seen in all of these artworks, however in this piece these squared are far more notable. I really like the grid background is in this piece because it gives the action a space to be in, whilst still featuring a mystery aspect as it's an unidentifiable location. Another aspect that stands out to me is the shadows because it's detailed, clear and covers a lot of space, without these shadows the space would look far too empty, even though it's only a change in lighting. However, the most beneficial thing about these shadows is they show a difference between what's grounded and what's high up, so you can get the full effect of the explosion. Both the use of grids and shadows from this piece inspires me, so for my work I will experiment with the same ideas but in my own way.
0 notes
Text
Blended Typography - Infinite Outlines

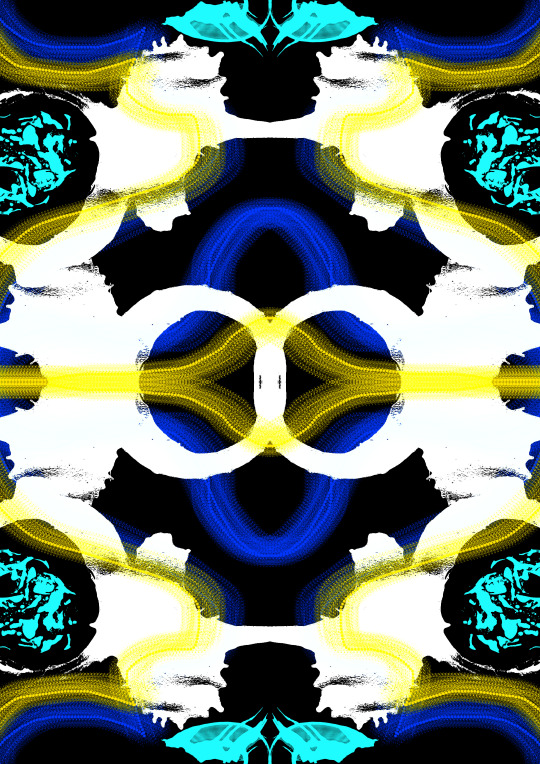
I have created typography with infinite outlines and shadows, this has a trippy/optical illusion effect and really pops out like 3D. Although this piece is simply made of black and white outlines, the interference created by this contrast is super eye-catching and intriguing. I chose this serif typeface because it has lots of angles and pointy details, this causes the outlines to display distinct shapes and sharp angles. Overall I am really pleased with this outcome as it's simple yet bold and stands out, the effect could also be used for many different artworks in a variety of ways. However I think by completely filling the canvas with the pattern, the effectiveness of the illusion increased which keeps the viewers viewing.

To begin with I typed out the word 'equality' in illustrator, using a font I downloaded from dafont.com. I placed a grey shape on a new locked layer to cover the canvas, because the white text wouldn't be visible against the white background. It's also light enough to see the black text clearly, meaning you can see the whole effect building as the process goes on. The original word I typed had a black fill and no stroke, with this I copied it, pasted it in place and changed its fill to white. Selecting only the white text, I went into 'illustrator effects > path > offset path' which allowed me to visually thicken the path, I chose a number that was simple to remember and at a fitting size (3).

Next I arranged the white text to the back so you can see it surrounding the black type, however once I repeated the process multiple times you began to see the interference effect. The only differences I'm making in each step is the fill colour by alternating between black & white, and the offset size which increases by 3 for every line. I could have stopped at 8 or 9 outlines as it looks clean and bold, but I wanted to continue until the canvas was full.

Although the process takes a while for individually adding each line, I think you get a stronger effect with more lines seen simply because there's more of it. Therefore the shapes created by sharp angles and corners are clearer, especially after the next step. To add the shadow aspect I simply selected all objects and opened 'stylise > drop shadow', here I could adjust the setting to enhance the shapes and bring a whole 3D effect. Not only does it make the main word pop out, each line looks more separated and the overall piece is less flat and unclear.
1 note
·
View note
Text
Blended Typography - Inside Lines


Here are two blend typography outcomes I created by blending a big and small letter with lines, this all remained inside of the text where you can see twisting and turning in every direction. The top image is the first type of outcome, where you can see all of the lines internal and external of the type. Whereas the bottom image shows a more edited version with a clean shape, bold outline and overlapping placement. I think this version popped out more as it looks very put together and finished, whereas the original outcome does look appealing but isn't quite as interesting. It also looks like it could be a logo or something similar, because its simple but unique and bold.

I started by writing the word 'equality' in Illustrator, creating outlines and ungrouping the object. This allowed me to select the closed counters with the direct selections tool, leaving me with filled letter shapes of which I turned into a stroke with no fill.

I then went into 'transform effect' and set the number of copies to 12, this displayed a smaller version of the letter once the blend ended, however it didn't always work out. With the 'E' and 'U' I placed the smaller letters on the outside, otherwise the blend looked too messy and unbalanced. Whereas in the other letters you can see little letters displayed inside, with which I could set a rotation to add more interesting blend patterns/directions.

Next I added a black background and changed the text's colour to white, although I wanted to add a gradient but only on the lines. To do this I first created a gradient filled rectangle, using the radial gradient for a central blend. Once I was happy with the colours I dragged the shape into 'swatches' with which I could select the object, choose the gradient swatch and the text is coloured. I did this with two different combinations as the first blue and pink looked too dark against the black background, therefore I should have moved it onto a new artboard with a white background.

Afterwards I expanded the appearance and ungrouped the object, this separated every line which you could move, duplicate, recolour etc. Holding down shift I selected all the lines on the outer edge of each letter, with which I grouped together so I had an object of outlines.

Next I copied the outlines, pasted it in place and set the colour to white, leaving me with a white outline around the blended text. I then selected each letter with its outline and make a clipping mask, this cropped the shape to fit within the outline and removed anything outside it. In the end this resulted in normal shaped letters with a funky blend design inside, I think this really cleaned it up and made it even more appealing.

To overlap the letters I pasted the outline twice, one for a white outline and one to fill with black. This was so I could send it to the back and group all the layers from each letter together, and finally I placed the letters over the next from left to right and arranged it to the front. Every time I overlaid the next letter I was selecting all the letters before, and I repeated this until the whole word was connected .
1 note
·
View note
Text
Basic Pattern Typography


I have created a selection of basic pattern typography, differing in distortion and dimension. I like how parts of the letters are plain and others filled with the stripy pattern, it's a small detail but it adds an interesting aspect to the text. However, I think having the pattern and solid sections separated makes it much more attention-grabbing, because this also creates unique shapes which is a simple but effective distortion. As for the 3D effect, I think displaying a different perspective makes the type look less simple and predictable, giving it more character. Overall I think the design is appealing because of its modern style, however on its own as black and white is too simple. Therefore if I were to use this again, I would incorporate more aspects like colour, blended layers or more complicated patterns.

To begin with I typed out the word 'Equality' in Illustrator and selected 'create outlines', this allowed me to edit the word as an object rather than text. I then used the line segment tool to draw lines over each letter, this would determine where the letters are split. With all the objects selected, I used the shape builder tool to click in the sections I wanted to subtract from the original. This left me with only sections of visible text, although the rest is still there it's just transparent.

Next I ungrouped the object to separate all of the different sections, this was to have all the black and all the transparent parts as two objects. However this meant each letter was also separate, therefore I selected each object with the same fill by holding down shift and grouped them together.

With the transparent object selected, I opened up the swatches window and found 'basic graphics_lines' in 'patterns > basic graphics'. Here I chose the '10 lpi 60%' pattern which brought lines into the cut out section of the text, I used this specific pattern because of its fitting ratio as it blends with the solid black and shows clear white lines.

Next I opened the transform window whilst selecting the pattern object, and ticked 'transform pattern only' as I didn't want the shape to be affected. In here I set the rotation to 30° which tilted the lines diagonally, I think this flowed much better with the shape of the text and its splits.

I duplicated this outcome as it could be considered complete, however I wanted to experiment with other digital techniques. Firstly I moved the object apart from each other, accentuating the split in the middle. Then I also took the words into '3D > rotate' where I could play around with the rotation/perspective of the object, this also placed the separate layers in different positions that look layered and overlapped.
1 note
·
View note
Text
Flipbook Typography


I have created two typography outcomes in Illustrator that display the flipbook effect, this gives the illusion of words/letters flipping over like pages in a book. I think both coloured and uncoloured pieces have their benefits, like how the bright pink is super eye-catching but the black fade enhances the 3D effect and makes it really pop out. The first outcome is really clear in what the word says, whereas the 'W' in the other piece could be mistaken for an 'M' so isn't as clear. Overall I am happy with these simple but effective artworks, although they could've been edited in Photoshop to have more interesting aspects and catch the viewers attention.
Equality Flipbook

First I typed out the word 'equality' and created outlines, this turned the type from editable to a vector path. Meaning you can now alter the shape and path of the word, but no longer the font and text itself. I then rotated the text 90° anti-clockwise, and with the free transform tool I distorted the text to stretch inwards.

Once I was happy with the contortion I duplicated and resized/squished it, this looked like the word is standing at a straighter angle and so represents the middle of the flip.

Next I selected both words and made it into a blend object, then in blend options I set the specified steps to 2 so each word is clearly seen. However, because they lay at different angles the words don't look equally spaced apart, therefore I used the anchor point tool to spread them out to where I thought looked best.

Afterwards I duplicated the whole section and vertically reflected it, with this I placed it directly next to the original which created the entire flipbook effect. However I thought it could be even more effective by incorporating shadows at the bottom of the text, but with black text already it won't work. Therefore I added a black background shape and changed the colour of the text to white, I then added a gradient fill where the black faded the text into the background. For the other side I did the same but set the angle of the gradient to 180°, otherwise the shadow wouldn't fade from the middle nor look symmetrical.
W for Woman Flipbook

For the next outcome I repeated the same process of creating outlines, duplicating, squishing and making it into a blend object. However this time I placed the two 'W's close together, having the blend steps overlapped rather than spaced out individually.

Next I expanded the selection and added a gradient fill, but set the angle to 90° so the darker colour was at the top as the flip is vertical. I then added a black background and edited the colours of the gradient, displaying a pink tinted white and a vibrant, rich pink. Although this doesn't give the effect of the text coming out of the background, you still have the shadow effect that enhances the flipping effect.

Finally I duplicated, reflected and placed it directly above the other, I then ungrouped this object to delete some of the layers as I didn't quite get the flipbook effect with them all. Once I regrouped them I placed the whole thing in the centre of the canvas, leaving blank space around it to narrow the focus onto the typography.
1 note
·
View note
Text
Isometric Blend Typography

I have created this 3D layered blend typography piece, made to spread the message that 'Black Lives Matter' in a simple but bold manor. I think this effect looks really interesting and unique, especially with some layers being pulled out which makes the stack less plain. I chose to use 'BLM' because it's short but powerful and meaningful, a short word works much better for this effect because as a stack it will fill more of the page and be easier to read. Since the typography itself is quite busy I thought I would keep the colour scheme to black and white, otherwise patterns or multiple colours could take away from the effectiveness. Overall I'm really pleased with this outcome, it stands out and gets the message across clearly.

I began by typing 'BLM' with the type tool in Illustrator and filling another layer with black for the background. I then added a white stroke to the type, making sure it was thick enough to be clear but still leaving a lot of black. Once I was happy I duplicated the object and placed it directly underneath the original, this determined where the top and bottom of the blended shape would be.

Next I selected both objects and made it into a blend object, I then went into the blend options where I set the specified steps to 45. I chose an amount that was high, leaving a small but clear gap of space between each layer.

With this I expanded the blend object and ungrouped it once, this was so each BLM would be separated and if I'd ungrouped it twice, each individual letter would've been apart. Next I went 'effect > 3D > extrude & bevel' which allowed me to edit the group as 3D objects, so I set the position to isometric top and the extrude depth to 0. The isometric top position angled the text in a perfect diagonal showing all 3 sides equally, and the extrude depth determines how thick the 3D element of each object would be. However for this piece I wanted to eliminate it and simply have the original outlines, because I think the whole stacked effect looks 3D enough.

Finally I used the direct selection tool to click of individual layers and drag them out of the stack, displaying more of the layers therefore more of the letters.
2 notes
·
View notes