
Last Seen Blogs

autofantasy7
Emmanuel Tejada Photography

viclatt
another hopeless romantic i guess

odekoekubo
百田夏菜子のペヤ

ndnbebeysd
제목 없음

littleleftofcenter
Lions make you brave
Text
Tiny11 major update: trimmed-down any Windows 11 editions
Tiny11 major update: trimmed-down any Windows 11 editions
Windows 11 streamlined tool Tiny11 has received a major update.
Developer NTDEV announced a comprehensive transformation of the Tiny11 builder to make it more flexible and easy to use. The updated Tiny11 can streamline any version of Windows 11 system image, greatly enhancing its applicability.
According to NTDEV, this breakthrough was due to their change of the scripting language from the old version of Batch to the more powerful PowerShell. This not only makes Tiny11 compatible with all Windows 11 versions and languages, but also supports x86 and ARM architectures.
However, it should be noted that since the entire program is written by a PowerShell script, the user needs to install PowerShell in advance and set the execution policy to "unrestricted" to avoid script running errors.
NTDEV also mentioned that the new version of Tiny11 only contains a small number of external executable files, including oscdimg.exe, which is used to create a bootable Tiny11 image, and files used to bypass Microsoft account forced login.
Tiny11 has been a great tool for streamlining Windows 11 systems so that they can run on low-end hardware. Over the past year, NTDEV has continued to challenge the limits, creating a streamlined version that can run with only 2GB of memory or even 100MB of memory (although the 100MB version removes the graphical interface), demonstrating the powerful streamlined capabilities of Tiny11.
It is worth mentioning that NTDEV hinted that a more complete version of Tiny11 will be launched in the future. Tiny11 has not been updated in over a year, so this update is certainly welcome.
IT friends who want to experience the latest version of Tiny11 only need to download the Windows 11 image from Microsoft's official website (https://www.microsoft.com/software-download/windows11) and follow NTDEV's instructions via github.com/ntdevlabs/tiny11builder
If you want to activate the Tiny, it is depend on what Windows 11 edition you based on, then you can buy a Windows 11 key from the Microsoft Partner store keyingo.com to activate the latest Tiny11 edition.

0 notes
Text
How to enable and use 256-bit BitLocker in Windows 11
How to enable and use 256-bit BitLocker in Windows 11
How to enable 256-bit BitLocker in Windows 11
BitLocker is a built-in encryption tool in Windows 11 that helps protect your data by encrypting your whole operating system and files within it. In case you lose your computer, your data will be protected. However, the feature is exclusive to Pro and Enterprise editions of the Windows operating system.
We strongly recommend specifying the encryption method. By default, BitLocker uses XTS-AES-128. You can opt XTS-AES-256 for stronger security.
If you already have enabled BitLocker on your PC, you will need to unencrypt your drives, enable 256-bit encryption in Windows group policy, and then re-enable BitLocker. If you haven't enabled BitLocker on your PC yet, follow the steps below to enable 256-bit encryption:
Press Windows Key + R to open the Run dialog
Type gpedit.msc and press Enter
Go to Computer Configuration\Administrative Templates\Windows Components\BitLocker Drive Encryption. Look for the "Choose drive encryption method and cipher strength" option for the most recent operating version. For me it was Windows 10 (1511) and double click it.
Make sure you choose the correct options:
It is best to use XTS-AES-256 for operating system drives and fixed drives. Use AES-CBC 256-bit for removable drives so it is more compatible with other devices.
How to Use Bitlocker in Windows 11
Windows 11 allows you to enable BitLocker for operating system drives, fixed drives, as well as removable drives. To turn on Bitlocker on a drive, follow these steps:
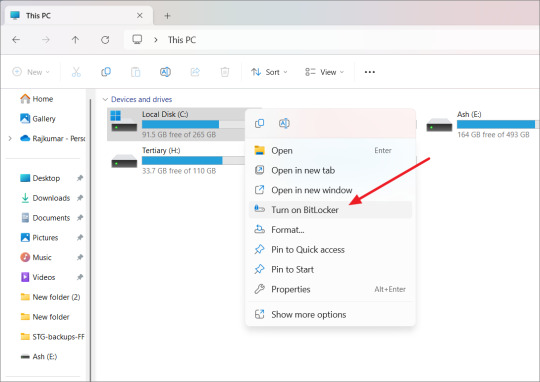
Open File Explorer and right-click on the drive you want to encrypt, then select 'Turn on BitLocker' from the context menu.

When you open the BitLocker Drive Encryption wizard, choose how you want to unlock your drive and click 'Next'. You can pick either a password or a smart card to unlock the drive:
Password: Create a password using a mix of capital and lowercase letters, numbers, spaces, and symbols.
Smart Card: You can use a Smart card along with a PIN to unlock the encrypted drive. The card needs to be inserted into your computer every time you want to access the drive.
Select how you want to save your recovery key, which you can use to unlock your drive if you forget your password or lose your smart card. There are a few ways:
Save to Microsoft Account: If you're signed in with a Microsoft account, you can save the recovery key there.
Save to a file: Save the recovery key as a document on your computer.
Print the recovery key: Print the recovery key on paper.
After backing up the recovery key, click 'Next' to continue.
Select how much of the selected drive you want to encrypt and click 'Next'.
Encrypt used disk space only: This is quicker and good for new computers or drives. Only the space with data will be encrypted.
Encrypt the entire drive: This is slower but better if you want to encrypt everything, even unused space. It's best for drives you've been using for a while.
BitLocker will keep encrypting new data as you add it.
Select an encryption mode:
New encryption mode: This is advanced and better for fixed drives on Windows 10 or 11.
Compatible mode: Use this for portable drives you might use on older Windows versions.
If you would like to run a system check before encrypting the drive, check the 'Run BitLocker system check' option and click 'Continue'. This system check ensures whether BitLocker can read the recovery and encryption keys properly.
Click 'Restart now' to continue. After the restart, the system will automatically encrypt the drive.
By the way , if you need Windows 11 Product key to activate your Windows 11 PC, you can get it from the Microsoft Partner Keyingo.com with discounts !
0 notes
Text
How to Speed Up Your Windows 11 PC
1. Manage autostart programs-disable unnecessary startup program.
Here is how to stop a program from starting automatically
Select the Start button, then select Settings > Apps > Startup .In the Startup Apps area, find the program you want to stop from starting automatically and set it to Off.
2. Clear memory via disk cleanup
To delete temporary files:
In the search box on the taskbar, type disk cleanup, and select Disk Cleanup from the list of results.
Select the drive you want to clean up, and then select OK.
Under Files to delete, select the file types to get rid of. To get a description of the file type, select it.
Select OK.
If you need to free up more space, you can also delete system files:
In Disk Cleanup, select Clean up system files.
Select the file types to get rid of. To get a description of the file type, select it.
Select OK.
3. Uninstall obsolete programs
Select the Start button, then select Settings > Apps.
Find the programs you don’t need, click on it and then select “uninstall”
4. Turn off shadows, animations, and visual effects
In the Windows 11 search box, type sysdm.cpl, press Enter, and then click the sysdm.cpl icon. That launches the Control Panel’s System Properties dialog box. Click the Advanced tab and click Settings in the Performance section. That brings you to the Performance Options dialog box. (Make sure you’re on the Visual Effects tab of the dialog box.) You’ll see a varied list of animations and special effects.
These are the animations and special effects you’ll probably want to turn off, because they have the greatest effect on system performance:
Animate controls and elements inside windows
Animate windows when minimizing and maximizing
Animations in the taskbar
Fade or slide menus into view
Fade or slide ToolTips into view
Fade out menu items after clicking
Show shadows under windows
However, it’s a lot easier to just select the Adjust for best performance option at the top of the screen and click OK. Windows 11 will then turn off the effects that slow down your system.
5. Turn off background apps
Select the Start button, then select Settings > Apps .
Scroll to the entry of the background app you wish to adjust settings for.
Click on the three-dot icon and then on “Advanced options”.
In the “Background apps permissions” section, select “Never”.
6. Turn off app notifications
Select the Start button, then select Settings > System> Notifications, and move the slider to “Off”.
7. Make sure you have the latest updates for Windows and device driver
Select the Start button, then select Settings > Windows Update > Check for updates.
Select the updates you want to install, then select Install.
Restart your PC and see if it seems to run better.
8. Check for low disk space and free up space
You may improve performance if you free some disk space on your PC.
To check for low disk space
Select the Start button, then select Settings > System > Storage .
Open Storage settings
Your drives will be listed in the Storage area. Note the amount of free space and total size for each drive.
9. Pause OneDrive Syncing
On the taskbar, look for OneDrive near the notification area.
Select OneDrive > Help & Settings > Pause syncing,and then choose how long you want to pause syncing your files.
10. Check for and remove viruses and malware
Running a system scan to find viruses and malware. If you’ve already installed a security suite such as Norton Security or McAfee LiveSafe, you can use that. Windows 11’s built-in anti-malware app, Windows Defender, also does a great job.
Just type Windows Defender in the search box, press Enter, and click Scan Now. Windows Defender will look for malware and remove any it finds.
11. Last but not the least , if your have a non-genuine Windows 11 on your computer , please activate it with a genuine Windows 11 Key from the Microsfot partner store keyingo.com
1 note
·
View note
Text
How to install the Office 2024 Preview
Microsoft Office LTSC 2024 preview version is now available for free
We are pleased to announce that the commercial preview of Microsoft Office LTSC 2024 is now available for both Windows and Mac. Office LTSC is built for specialized use cases that require a long-term servicing channel such as regulated devices that cannot accept feature updates for years at a time,
Microsoft Office 2024 continues to deliver the most secure, productive, and cost-effective Office experience, and positions customers to unlock the transformative power of AI with Microsoft Copilot. And with device-based licensing and extended offline access, Microsoft 365 offers deployment options for scenarios like computer labs and submarines that require a solution other than a user-based, always-online service. However, Office LTSC 2024 will be a valuable upgrade for customers who need to keep their Office apps on-premises.
The following products are available as part of this preview program:
Product key for office 2024 preview version
Office LTSC 2024 commercial preview
2TDPW-NDQ7G-FMG99-DXQ7M-TX3T2
Project 2024 preview
D9GTG-NP7DV-T6JP3-B6B62-JB89R
Visio 2024 preview
YW66X-NH62M-G6YFP-B7KCT-WXGKQ
Install Office 2024 LTSC preview by using the Office Deployment Tool
The Office Deployment Tool (ODT) is a free download from the Microsoft Download Center. Always download and use the most current version of the ODT. The ODT is used to download and install Office products, such as preview products, that use Click-to-Run installation technology.
After downloading the file, run the self-extracting executable file, which contains the Office Deployment Tool executable (setup.exe).
Create a configuration.xml file to define the installation settings. Choose which preview products and languages to install, select the architecture (32-bit or 64-bit), and specify where to install and update the preview products from.
For more information about using the Office Deployment Tool and the settings available for your configuration.xml file, see the following articles:
Copy the ODT (setup.exe) and your configuration.xml file to the device. From an elevated command prompt, run the following command to install the preview products:
setup.exe /configure configuration.xml
And if you need previous office 2021 version or Microsoft 365 version , you can get them from the Microsoft partner keyingo
1 note
·
View note
Text
Microsoft install Copilot app to Windows Server 2022 systems
Microsoft install Copilot app to Windows Server 2022 systems
Microsoft quietly added the Copilot application to the Windows Server 2022 system, but it does not take effect at this stage, and user clicks have no effect.
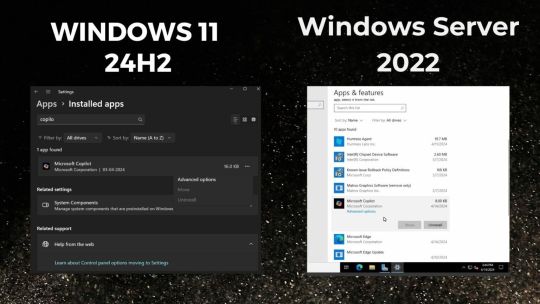
Microsoft recently distributed the Copilot application through Microsoft Edge browser updates. Windows 11 and Windows 10 system installation updates will bundle the Copilot application with a size of 16KB.
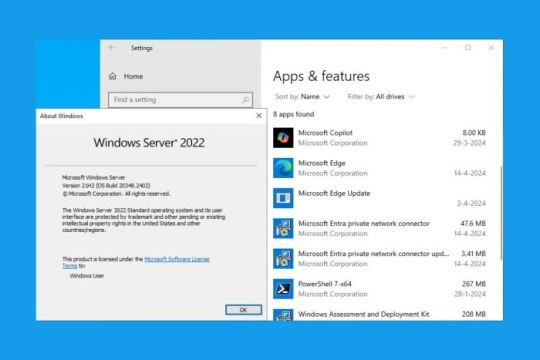
Microsoft quietly pushed the Copilot application update to Windows Server 2022 users without informing them, but it is only 8KB. Users can find the application on the “Apps and Features” page.
Microsoft previously tried to promote Copilot in the Windows Server 2025 preview version, but Copilot has been removed from the taskbar in the latest preview version of Windows Server Build 26085.
And you can download Windows server 2022 from keyingo.com
1 note
·
View note