
Don't wanna be here? Send us removal request.
Statistics
We looked inside some of the posts by rwhiteside123 and here's what we found interesting.
Average Info
Notes Per Post
4
Likes Per Post
4
Reblog Per Post
0
Reply Per Post
0
Time Between Posts
1 month
Number of Posts By Type
Text
16
Last Seen Tumblr Blogs


Fun Fact
Hackers stole 65M passwords from Tumblr in 2013.
Text

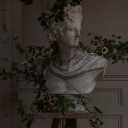
1. This one is a headshot of my friend Jackie! I wanted to create a very aesthetic look against the white flowers in the back with white scarf around her head to give it a dreamy look.
0 notes
Text


Ruslana Whiteside
Date: May 14 2024
ART: 130
Final: Black-and-White Photograph
Experience:
What I have learned in the black and white photography class is to be really patient with the process and the chemicals. The timing is very important to the prints that are made in the lab. We had to read a safety manual and guidance to use safe equipment. One thing that I have struggled with during the process, I had a little trouble with the film rolling process. First, you take your roll of film on the film camera, put the film into the camera, take pictures. take out the flim and start the process. I will go more into detail in just a moment. I took this class before and Once I learned to manage to roll on my own, I thought I knew how to do it, but it was a while and I had my teacher help me with the first roll of film. After the first one it got easier because of the muscle memory and feeling the roll of the metal against your thumb and your fingers. Did I get super frustrated, of course I did. It wasn’t fun at first but once I got the hang of it, it was a lot easier and calmer. If I didn’t know how to roll, I would probably go nuts on my flim and I would destroy it or really damage it by forcing it into a metal roll tool. Wish using the chemicals and developing my film was very easy and really understanding the instructions for the filmmaking process. But at the same time, your flim can get overexposed or overexposed depending on your time frame for those time measures. Really understanding the way of thinking of the process while developing is crazy. I ever thought this was a thing in the first place. I thought it was something just in the books of old times. Anyways, back to the experience. Using the black room / what they call it dark room. We used that to roll out film and print our images. There is an orange light to use while in the dark room to protect the print and the paper from exposing it in the harsh light, why do they have it dark? It's because of its light sensitivity on the paper. There is a door that closes the room to make sure all the lights are off and everything. The sliding door with a round noble keeps the light coming into the room. This experience was definitely one of my favorites and knowing how to use the developer, the stopper, and the fixer. It was my favorite to see the end result of the film itself.
Process of the prints/ Images:
The process was very interesting and magical when putting the prints into their own chemicals and seeing the reaction of the prints to give it the power of magic of the dark room. Giving the opportunity to get this experience and get it really well known is a very old-fashioned way of printing. First of all the process was very interesting and I learned new skills by understanding different different types of photography that we use today. While doing the images, I frist out with having two films and started to shoot my final. I wanted it to be portraits of people that are my friends. I didn’t have any time for the theme or anything for this final project, and I wish I did. But at the same time, I wanted to go through and see if I can achieve different types of images I don't normally do. Black and white film is much harder when digital because of how it is built and manually. With the film camera, you would have to get to know how it works before you go and take pictures. While I got the hang of it, I started to do my first film and thought those pictures came out great, but after math and developing. It really got my attention on how I should be taking those pictures. Poses, light, and composition of the subject. By using different types of clothing or who’s I’m taking the picture of. The teacher mentioned, maybe look at the lighting on the meter of the film camera, and start from there. After that, it clicked for me. I know what to expect next for my next film. Remind you I did over 10 films and it was very expensive plus the paper alone. It was about $200 worth of equipment not including the tools of the project. This class was more expensive then my other classes I have ever had. Just keep trying and trying my best to get the best prints and it wasn’t happening for me. I have messed up so many prints and films. That part wasn’t as fun or just wasting a lot of money and being broke. That’s fun. For my last film, I decided to go again and print my last prints and see where this will take me. I definitely had to reshoot because for my final it wasn’t the best prints that I had. So I went reshoot with my best friend Jackie! and we definitely knocked out out of the park. It was super fun, super experienced and something different. I definitely think these prints has improved my photography and different types of skills using through black-and-white photography. I definitely love this type of work and the more you do the more it gets better and understandable. I at least got some good prints at the end of the semester and learned a lot through this class alone. I’m very proud of Accomplishments for this class and I wish I can continue doing black-and-white photography because it is super fun. Thank you professor Neil for all of your help and achievements.
1 note
·
View note
Text
0 notes
Text


Project # 2
For this project, I wanted to create a variety of nature that we see normally on the ground or far away. Where we’re located and what we see as humans with our eyes exploring about the possibilities of understanding, natural and life things on this earth and still life. I got lots of pictures of rocks trees animals landscapes outdoor. Throughout the process I wanted to capture mostly the outside and the outdoors, like mostly landscapes and trees and branches and other things besides just that but landscapes as well. In the laboratory, I experienced a lot of different types of tones in the pictures learning how to understandable lighting in different situations dark light to complete neutral black-and-white. Some images are completely dark, and some images are super bright. This projects has was a little bit difficult because I made more print than usual because I wanted to test out how, it could affect my photos to negative and positive. These pictures were taken at Oakhurst, which I never been to and it’s been very fun experience and different scenes to look at. 
Laboratory:
In the laboratory room, the black-and-white room, I started to do my images and using the chemicals to make my images. During that time spent a lot of hours and focusing on how can I make these images more popping. I used the three filter for all my images because mine images didn’t have the contract that I needed to make the White. Most of my images are a little flatter than I expected to be. I wanted them to really enhance the black-and-white. I don’t know what I did wrong, but I will figure it out for my next project. Each image that I did maybe 3 to 4 times just to see the border and how it looked in the chemical using a lot of strips to navigate my final photo. Black and white photography. It is a little bit difficult difficult, and I am still learning and wanted to pursue learning more about it and getting better at it. Thank you.
0 notes
Text


Black and white photography
Ruslana Whiteside
Art :130
- Project 1
Hello,
This project I wanted to make everything different conversations of my black and white experience by taking different subjects. Flowers, people, and landscapes. Having those subjects, was very fun to take on my own time and willing to understand how to use film. I used flim before this class, I took it three time already, in high school and two times in college. so I know the process of flim making. This time I was Easter and much better experience than I expected. But with the photos, I did well, but taking my photos on the film camera was little challenging then I thought. I thought I learned the steps of taking pictures but, I didn’t fully understand the whole story of taking picture using the ISO, aperture, and speed. wile taking those pictures I wanted to do a lot of landscape, more then taking pictures of people, wish I’m not a landscape type of girl. I love taking pictures of people, doing projects. That my type of photography.
Anyways, wile I finished my pictures, I started to go to the dark room, start my project. I had a easy time doing the film 🎞️ roll process, once I went in the dark room, i started to roll my film, I got so frustrated and cried, so I let the teacher help me out with the frist one. I didn’t want to mess it up because I had good pictures on it, especially Victory E! (our school mascot) but unfortunately it was underexposed. :/ bomber! But oh well, that happens on your frist try. It is what it is!! :) I pictures that I processed in the dark room was fun and really understanding getting from a different teacher learning. I learned a lot tbh from him! Thank you BTW! You’re the best teacher so far that I know of! Haha. 🤣
When I was making my photos, I did mess up on my first one, the second and my third. Ugh! I guess we all have problems with making photos in the dark room! My contact sheets, didn’t turned out very good! They are all white and very underexposed squares/film.
My pictures turned out fairly well and very proud of them. I got a lots of black and white tones and some got very flats on the image. Wish I didn’t like, but that’s the full experience on filming.
Frist image: landscaping was really fun, went on a little hike, and really was a nice day. Got really nice pictures.
People: I got to ask a lot of different people and started to take pictures of them. I had to ask before talking those picture.
Flower: I took this flower picture that is white on campus. I didn’t want to do it but wanted to see if it turned out will in the room.
For my next project, I wanted to possibly do something different and something that I normally don’t ever do. But I’m not 100% sure what I wanna do for my next project. I’m still kind of on a lookout of possibilities but knowing from now on, I might have an idea.
0 notes
Text
My 8 Artist Research.
https://docs.google.com/document/d/1-T5FV6ZwRLxcx43b68n9UWz0jSEtb3yiJqLOGoT3McU/edit
0 notes
Text


1. This project is called gum printing. First of all, I just want to say this project is probably the most hardest of all of the projects I have ever experienced making. It’s because dealing with different types of paints and toxicity when my teacher said you can cause cancer by making this type of imagery. I was scared and terrified oh what this would do to me. So I stood up and stared the process.Once I started, I didn’t quite understand the process and it was super frustrating to the point that I would literally cry, but at the end of it and made more sense understanding how to do the process. I had to ask questions and writing things down in a notebook, it was super helpful to get the ingredients correctly by measure out everything to the point of making this mistake. I’m not going to lie, this project took over a century to finish. When the students in my class took over 40 hours or more just to make the perfect images. I was impressed by his work and intelligence for being the first time using this type of lab work.
Steps for this project:
1. Crop, frame and print. First, take the photo of any kind of your favorite image that you have taken in the past or recently put it into Photoshop. Second; crop your image in Photoshop. Make it black-and-white or split channels if preferred. invert your image after that, select all your layers and flatten the image. 
2. Print; once you’re done with the Photoshop, and everything else you have done for your photo, go to the printer, set up the settings and print your image to a negative.
3. Cut paper; take your paper take your negative lay on top of the paper to see what size you need before cutting. Cut your paper to the size of the negative make sure you have little bit of paper left in the corners to fit the negative.
4. Shrink your paper; once you’re done with all the paper, cutting and cropping, you go to the dark room and put your paper into soaking hot water to let the paper shrink for 30-1 hour.
5. PB8; once it’s done soaking you get the PBA make sure it’s all coded twice before exposing your paper into the V LIGHT. (Let it fully dry)
6. Expose V LIGHT ; put the negative onto the white piece of paper that you just coded with then expose it to one to two minutes depending how much you want to expose your picture.
7. Almost there; Put it into the chemicals and see the magic happen.
8: DONE: Get it out of the chemical, put it in water. Let it soak for three hours or overnight for the better results.
Note:
Well, you’re exposing your pictures you want to write down some notes in your journal to remember what you did and what exposure you have done so you can make sure you get the exposure correct on this second image.
Images:
Most of my images are people and portraits that I have done in the past or recently just to give a closer. Look on how I done the images. I only done two layers on one or two of the images because it is a lot of time and effort.
Overall for this class
Overall, I have really enjoyed this class by learning a lot of things how to print images from decades, and willing to understand what people had to go through to make their images. I enjoyed every single process and learning to accept the hard times and failures. Not only is frustrating but the same time it’s fun and time-consuming knowing that people have done this to give credit and just enjoy the process of making magic through chemicals and experiments of working in the lab.
Teacher:
I just want to say thank you so much for always helping, and helping others to an extent of really getting the knowledge of photography. You’ve been such a great help and everyone seems to really had a good time in this class. I know I did.
1. The first image is a baby. The baby is my friend child. It’s a boy in a crib.
2. The second image is me in my front yard. I thought it would be pretty to take a picture before of all the different colors. Wish I have put more effort to add more colors.
3. The third image is my sorority sister, on a balcony of Pismo Beach. I wanted to take a picture of her, just looking out and viewing the ocean. Thought it would be nice. I had two colors in here: ten and red together and it blend out nicely together.
4. The fourth image is a picture of my friend Ashley. She’s been in my pictures a lot and she helped me build my portfolio because she wants to become a model. I have two colors, red and blue and I forgot to put yellow to make her face pop.
5. The fifth image is a baby eating a cake with his fingers. He’s sitting on a ground with a tent behind him. it was his birthday that day. He’s so cute. I wanted to do a red because I thought it would look something cool and different. I like the dark and light from the behind. 
6. My other images are just images that I done just to sample and practice on my skills of this project.
Thank you for listening and caring.
This semester was really fun!
0 notes
Text
Salt Paper
Ruslana Whiteside
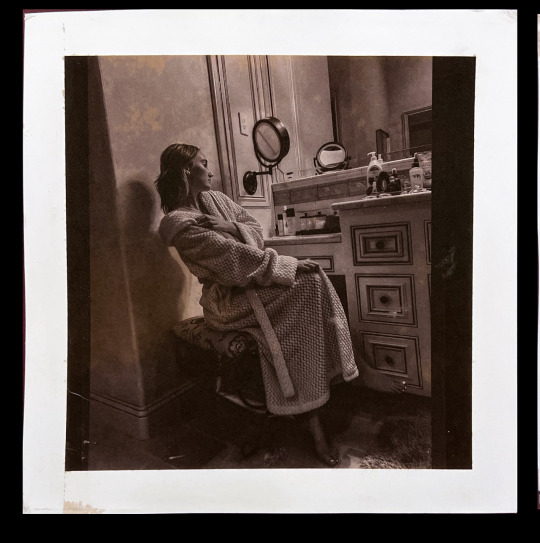


This image is a female that is sitting in the bathroom, looking very confused and wanting to understand what she's going through life by just understanding why is she in this position? - this photo has taken me to understand the techniques of the colors and willing to put a lot more effort on this post and creating a very sharp image towards the salt making process.
The second image is one of my girl sitting in the mountains, glaring out, looking at the view, and having a peace moment with her self. - this one I wanted to make a large piece of image to get a sense of the landscape and the person that is sitting with the landscape.
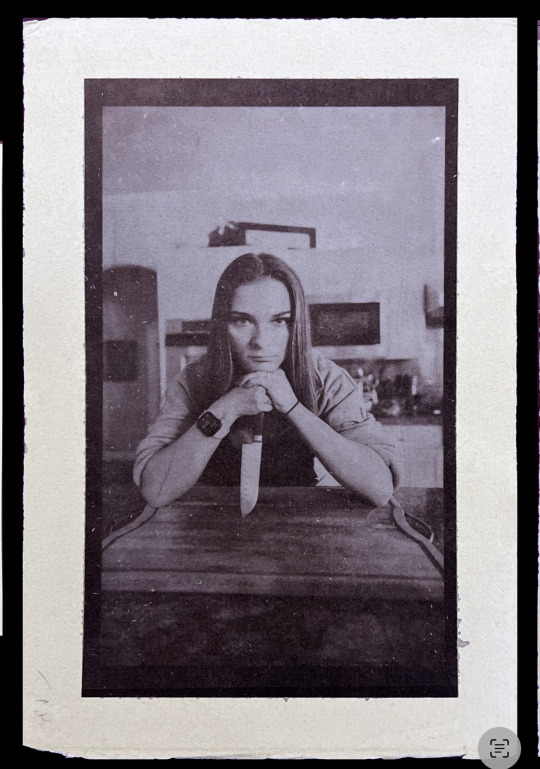
This image is a picture of me with a knife, going down a cutting board, feeling very dedicated and willing to get a specific image that I wanted and create some thing, so motivating and capturing a moment of motivation. - this image took me once, and in a blue moon to understand, giving it a different color paper alternative, and it turned out the way I wanted it to be.
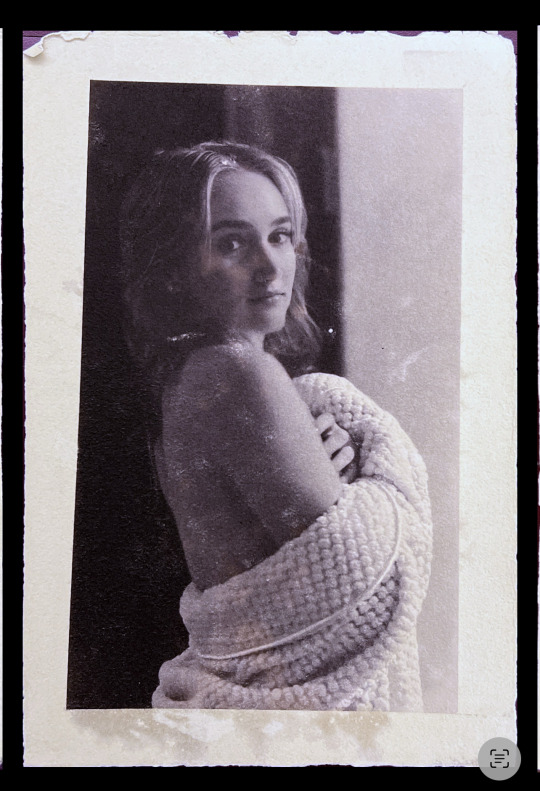
The fourth image is a picture of a woman, staring directly onto the camera, giving it a soft texture look, giving it a motion of love and self-care - this image took me three times to achieve, but I wanted to make this image understand the worth of the beauty and the texture of the lightning and giving it a beautiful outcome.
the last picture is a picture of a woman giving a fashion onto the clothing model outcome. I wanted to give a different color of black and white/Tan. That's how it turned out during the process of doing salt paper. - this one only gave me one try, and I really like the finish look of the image. Gives a brown and black and white tone throughout the whole image.
Overall
Overall, the salt paper was very difficult in the beginning to understand how to do the brushstrokes, but after that, I understood the process and the steps of doing salt paper. I really enjoyed this type of understand, mint of using salt and other chemicals, combining all in one to make an image. I do believe if making more I will be able to really get some good images in the future. I'm super excited to learn more about salt making and making big images for fun.
0 notes
Text


A little boy drawing with a firework on the ground. - I only did this once and it turned out not the way I wanted to. I tried to fix it by doing another one but that didn't work out.
This is my friend Jackie! We went to an elementary school and i saw this wall light where the door is and just took it there. - This image only took one try and it worked very well. I used more of the dark side in this image.
This is a mom-and-son moment when this baby turns 1. We had a photo shoot in their backyard. - this one i would have may right now it with the bleach but, I wanted to see it final result. I turned out OK. go to mess with the curves to make it better to get more good highlight.
This girl is name is Ashley. We went out for a hike and decided to take pictures. Give me this image of a dreamy you look. - this image took me two tries to perfect it, but the second one didn't turn out the way I wanted to, but this one is the final result. I don't really like how the foot is. It's a little too bright overexposed. If I'd mess with the curbs a little bit, I would've had fixing it.
ASHLEY - I wanted to do a different picture, but in a different setting. I wanted to achieve a different type of image but horizontal.
Overall I tried my best and it was definitely fun to work with the chemicals and see the process using the V light and the actual son outside. I have never done anything like this and it was a fun experience and I can't wait to do salt images next.
Thank you.
Ruslana. W
0 notes
Text
Project 1 : Cyanotype
Hello everyone my name is Ruslana Whiteside
I am an art major at Fresno State University. I do a lot of photography, drawings and videography. I enjoy lot of portrait images of students or people. Mostly what I do is anything in between graduation, weddings, events, baby’s, and a media director. (Fresno Sate) I always like taking pictures outside with real sunlight and natural lighting. I also like black-and-white photography. Those picture show my true photograrty and how i work with the camera.
Image of me:


0 notes
Text

1. Dreading homework.


2. Capture the moment train on a firetruck. 
3. Sunset (6:57 PM)

4. Girls celebrating each other.
5. Sunset (6:45PM)

I don’t understand why the window opener is on my passenger side and not in the window side? 


0 notes
Text

Hello my name is Ruslana Whiteside.
One thing you should know about me first is I love photography. Photography is my passionate and therapist. I love art and all kinds of art media and also art drawing. Knowing me, the art girl in the art building with her art toolbox and a photography camera. In this picture you will see my dog Luba. She’s literally the sweetest dog on this earth!
1 note
·
View note
Text

Graduating with his best friend. I took this on their graduation day and it was very special to capture the moment. 
0 notes
Text

This is my friends baby I took for her son Myles on this birthday. I don’t know if you can see on his left leg there is some crumb cake. He was turning one that day. He’s so cute and very patient.
0 notes
Text

These roses are my backyard Decour. I saw the perfect lighting I wanted to take the perfect image. And these roses were the perfect subject for this picture. 
You can see how light the roses are compared the background that is completely dark goes into a dark mode. Wish I really like. 
0 notes
Text

2 notes
·
View notes