
An Art Exhibition Concept for the NGV showcasing abnormally large Sponge Furniture.
Don't wanna be here? Send us removal request.
Statistics
We looked inside some of the posts by s3667967 and here's what we found interesting.
Average Info
Notes Per Post
1
Likes Per Post
1
Reblog Per Post
0
Reply Per Post
0
Time Between Posts
1 hour
Number of Posts By Type
Text
2
Photo
15
Last Seen Tumblr Blogs


Fun Fact
Tumblr is available in 18 languages.
Text
Final self-reflection and evaluation...
I am just speechless right now. Maybe because I feel so mentally and physically exhausted in this moment, due to all these sleepless nights lately getting all of our assignments submitted on time... but overall, I am feeling a huge sense of accomplishment and I feel amazing. Being able to step back, and look at the work that I’ve produced throughout this course has just been absolutely incredible and fulfilling. The final outcomes for this project in particular, I am so so happy with how it all turned and came together. From the many initial inspirational imagery in stage 1, to the beautiful and heartwarming feedback that I received for my project in stage 4, it has been such an amazing experience. I feel like I have learnt and discovered a range of new skills and techniques in terms of photoshop editing such as how to create shadows and scale imagery, as well as further developing my 3D-modelling skills and management of material. I have also learnt how to better manage my time and plan things out. Overall, I am very happy and satisfied with how my creative project turned out! Thank you for following my journey.
1 note
·
View note
Photo


Lastly, here are some screenshots with conversations with some other friends via iMessage.
The summary fo the constructive feedback from these messages includes:
-Taking more photos inside the room, rather than above it.
-Exploring the use of 3D modelling programs such as Blender or AutoCAD
These are very true. I attempted to take photos within the model itself, however with the huge size of the DSLR camera it was a struggle. I think to combat this in the future, I should create more “gaps” within the walls to allow me or the viewer more access to the model itself and allow more immersion.
I also definitely want to explore the possibilities of 3D modelling programs! Hopefully in the future I will be able to experiment with these programs as I feel like they give me a lot more room to play around with and explore in.
0 notes
Photo


I posted my work on the Cert IV Discord group and received lovely feedback!
The summary of constructive feedback includes;
-If the material was applied to the real world; viewers might have a hard time identifying the material as sponge since the artworks would be so large.
-The furniture pieces themselves have a Brutalist aesthetic to them. This is a very interesting and true point that I didn’t even consider! I guess from afar the viewer would simply assume that these are ordinary green structures, however as they come closer to the large furniture pieces, and inspect the material up-close, they would then realise that it’s all made out of a green sponge.
Now that it’s been mentioned, I only just now realise my furniture pieces do seem Brutalist in nature, and the reason for that is because, I think I intuitively always seem to gravitate towards without even realising it... I've always been a huge fan of the architectural style and movement.
0 notes
Photo


For the Stage 4 review process... I sent my work to some friends of mine via Instagram and this is what they had to say. It was absolutely beautiful and heartwarming to hear all this feedback! Some constructive feedback that pointed out a few things include: -The photography of the 3D models as a whole could have been executed a lot more professionally and more clean. -Type adjustment and resizing could be further explored. The photography space for the 3D model was completely makeshift and took place in my bathroom, so I agree that it does not look as professional. I think the flooring does make it look a bit odd and not completely white and clean like my other outcome images. Also, again I agree, the type could be made larger since it is in fact a poster, and print needs to be legible from far away.
0 notes
Photo


FINAL OUTCOMES: 1. 3D MODEL
2. POSTER, FLYER & MOCK-UP DESIGN
3. INTERIOR MOCK-UP
0 notes
Photo


In order to create realistic looking images of what my art exhibition might actually look like and to showcase the unique scale of the furniture in relation to people... I had to search up shadow-building techniques on Youtube. I found a very helpful tutorial by Photoshop Training Channel on how to go about it I followed along the video and applied the effects onto my own imagery. It was a very lengthy process that required a lot of experimentation and playing around. However I’m really thrilled about the end result!
0 notes
Photo

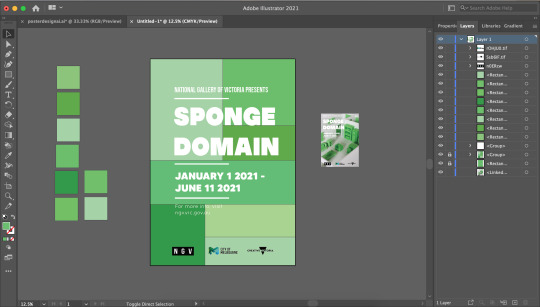


Here is my process of creating my art exhibition poster design as well as a little flyer to go along with it. Originally I was just going to create a standalone poster however I found an incredibly helpful free mock-up poster template from Behance by Mockups Design. I first opened the image in Adobe Illustrator, cropped it and added some typography. I experimented and played around with the positioning, looking at online references and NGV’s own poster designs in the past for inspiration. I then added in some logos at the bottom to give it a more “official” look. I came up with the name “Sponge Domain” for the art Exhibition and I think it fits quite nicely. I then created a design for the flyer which features multiple coloured green squares which I guess resembles patchwork of multiple sponge surfaces. I basically came up with that idea on the spot and just went with it. I am very happy with how the final mock-up image turned out. Looks super cool.
0 notes
Photo

After selecting my final 3 images, I uploaded them into Adobe Lightroom to slightly adjust their levels, lighting and contrast to ensure an extra boost in colouring and image quality. I didn’t want it to look too white and glowing, so it was a bit of a balancing act trying to find the right consistency but I got there in the end.
0 notes
Photo


After I completed finished the model, it was time to take some “professional” photos using my Canon DSLR using the same set-up and photography space in my bathroom. I took about 150 photos of all different angles, lighting and settings, and then used a process of elimination to determine which ones were the final images that I will be using for the NGV Poster mock-up design. In the end, I chose 3 high quality photos that I believe I can edit, manipulate and adjust to what I need for the final digital graphic design outcome.
0 notes
Photo


DONE!!!!!!! Here are some photos taken on my phone of my finished 3D NGV Sponge Exhibition Model. Absolutely over the moon of how much I’m loving how it all came together.
The “photography space” is basically my bathroom with these super large pieces of styrofoam squares that I used to achieve a clean, white background. placed my model on this white table tray that was very handy and allowed me to change the position of the model with ease. Also my bathroom gets amazing natural lighting during the day, so that was a bonus.
0 notes
Photo


This is 2 of 2 of my furniture design and construction process entry. These photos depict the creation of my bookshelf, couch and bathtub. More details about this process can be found in the 1 of 2 entry. Also, I didn’t record/capture all the furniture creation process as I believe that would’ve been way too much, however the majority of the pieces are recorded here in these entries.
0 notes
Photo


This is 1 of 2 furniture entries as Tumblr wouldn’t allow me to upload them all in one single post.
Once I got the floor-plan model finished, it was time to create all the individual furniture that will fill up the space. The process of designing and creating the sponge furniture includes; drawing up a rough sketch of the furniture design and working out what their measurements are going to be. I used my prototype furniture as reference as I reckon they’re already a perfect size for the space so I went off those measurements. There was a common size of using 35mm-40mm cut pieces. And also I made sure that once the base piece was cut, I would place it in the exhibition space just to ensure that its size was relative to the space. A huge part of this design and production process was purely intuitive. Then, once I was happy with the measurements, I then cut the pieces and used super glue to glue them together. And slowly but surely, I started to fill up the exhibition space with my sponge furniture. As I mentioned in Stage 2, working with sponge is interesting and a learning process. At first, I found it difficult to manage and cut it, however over time and with practice I began to find it very easy to cut the material and work with it. I find that it is extremely difficult to get accurate measurements however, because it is sponge, it is able to be squished and sometimes forced into a size or space.
0 notes
Photo


Now that I’ve got my floor and walls ready to go, it’s time for the construction phase... I started with the bathroom and bedroom wall. I also placed one of my prototype pieces within the build just to see how it would look and already I was very pleased with how it looked with the white foam board. I then slowly went around and added in the walls piece by piece, ensuring that they all aligned perfectly. There were definitely some instances where the measurement was too much and so I had to trim a few millimetres off but thankfully there didn’t need to be any drastic recutting of any pieces. I used super glue to glue and fasten all the pieces together. The glue works really well with foam board. Once I glued all the pieces together, the 3D model of the NGV floor-plan was completed! Stepping back, I was very happy with how it turned out! And what I absolutely loved and did not expect was to see real, natural light hitting the walls and doorways of the model and casting real shadows. It was super cool to see and made me feel very happy. The bottom photo I took on my phone was very, very cool. I placed a large piece of foam board on top to act as a ceiling and angled my phone upside down so the camera was at it’s lowest point and took a photo. And by doing so, it kind of looks like my mini model is a real room! Very cool and very happy with how it turned out. The shadows and lighting in this looks amazing.
0 notes
Photo


For the walls, I designed them to be 140mm tall. I then referenced back to the NGV-redesigned floor-plan and worked out where the doors and entrances are going to be. I have also made sure there is a distinct differentiation between “viewing points” and “doors”. Viewing points are going to be parts of the model where there isn’t a wall at all. The purpose of this gap is to allow viewers to be able to peer inside the model with ease as well as take photographs up close easily. Then, the doors are going to be the model representation of where the visitors will be coming through from. I didn’t have any trouble creating these. It was pretty straight forward. It was also very satisfying cutting out the door frames for some reason.
0 notes
Photo


And so the process begins... I first start with a single piece of A2 5mm foam board. I then look at the NGV floor-plan redesign reference that I created in Stag 2 and decided on some measurements. I also wanted to ensure that there was straight-forward flow for visitors within the space, as you can see in the bottom sketch. Once I locked in the measurements, I started to cut the bottom pieces of the floor-plan. I used my prototype sponge couch as reference to see if the size of the furniture in relation to the space looked okay, and I found that it was perfect. Keep in mind, the furniture in the art exhibition concept is designed to be abnormally large, and therefore people will be smaller when compared to it. I used super glue to attach the pieces together. I then realised that I could’ve actually just cut two of the pieces from the same one piece, however it was too late but worked either way. I flipped over the conjoined piece and stuck white tape just to add more security and ensure the pieces were completely fastened together.
0 notes
Photo

This is a complied list of the materials and equipment that I will be using, as well as their prices and the total cost of this project. Majority of the material and equipment I already have, so therefore I wrote n/a. WHS COMMENTARY:
There are few materials and equipment that require me to comment on their WHS. Firstly: The NT Cutter must be used safely. And that means, cutting away from the body instead of towards, using a cutting mat to prevent damage to furniture, ensure the blade is tucked away when not in use, and lastly, making sure the blade is stored in a safe and stable location where it will not accidentally fall or cause injury. Super glue must be carefully applied and managed. Keeping the glue away from the eyes and mouth is a must. Also ensuring glue make the most minimal contact with the skin as it can cause injury and damage to skin. Gloves could be a solution/preventative when handling with super glue.
15 minute breaks from using the Laptop, iPhone and programs are essential. Staring at a screen hours on end can cause the eyes to become strained and become damaged over time. Eye exercises can ensure that the eyes are exerting their full range of zoom and focus. Seating and standing positions when cutting, drawing, etc. is also very important to keep in mind. As prolonged incorrect body posture can cause stiffness, soreness and pain. Again, 15 minute breaks such as lying down or ensuring posture is correct can help alleviate this.
0 notes
Text
Transcription and response to feedback session with Ruth
Albert Calusin Jr 29 Sep at 21:06: Good evening Ruth. Sorry for the late submission for my stage 2! My stage 2 features; materials and processes that I will use in order to develop my scale model of my exhibition space featuring sponge furniture. Please feel free to provide feedback. Thanks!
Ruth Wellington 08 Oct at 10:24: Albert you have created 10 posts for Stage 2, but I am still not sure about the concept or idea for this project. You needed to transcribe our conversation into a feedback post for Stage 2, or as your first post in Stage 3. Exhibition spaces are large empty voids, so either architecturally or interior design wise, they do not present a creative challenge. If your project is an art installation, then it has to have a reason for why you are creating it and a concept/idea behind it. If it is an interior design project, then you need to pick a room or space to design, such as a retail shop or lounge room, etc. Please make a decision which one you are doing and focus on that for Stage 3. Response:
After reflecting through stage 1 and 2, my concept and idea is about designing, creating and presenting a 3D model of an art exhibition concept that will be held at the NGV. The exhibition itself will feature original “sponge furniture” designs that will be laid out in a typical home layout (living room, kitchen, bedroom, bathroom). The sponge furniture itself comments and explores the question “what if everything in a house was made out of sponge? And how would that look?”. I think this will be a playful and whimsical idea and trigger philosophical self-reflection as the environments that we are subjected to influence our behaviour, emotions and perception of reality. The furniture will also be abnormally large, making the viewer within the exhibition feel small and almost like they’re Alice in Alice in Wonderland.
I will be creating a 3D floor-plan of the gallery layout and the sponge furniture which will be placed within the 3D model floor-plan. Then, I will be presenting the final outcome/s as high quality photographs from various angles using my Canon DSLR, as well as creating poster advertisements that showcasing the exhibition as well as displaying exhibition information such as dates, etc.
I believe this entire project will demonstrate; my ability in model making and planning, photography and photo manipulation skills and lastly, my knowledge in graphic design and typography layout.
0 notes