
Statistics
We looked inside some of the posts by sadghoblin and here's what we found interesting.
Average Info
Notes Per Post
0
Likes Per Post
0
Reblog Per Post
0
Reply Per Post
0
Time Between Posts
4 days
Number of Posts By Type
Photo
17
Last Seen Tumblr Blogs


Fun Fact
Kazakhstan’s Minister of Communications and Informatics has blocked the Tumblr site because it contained 60 sites of terrorism, extremism, and pornography in 2015.
Photo


Outcome Process: Final Paintover
I threw together a quick worksheet to showcase the Blender process and a small breakdown of why I was working in 3D, how the scene was composed and the purpose of the separate renders.
After taking these different renders into Photoshop, I was able to overlay the mist pass to add a greater sense of depth that separated the foreground from the background, and the clown pass greatly sped up my workflow, as I decided not to redraw the whole scene (as I had done with the Clip Studio character) - instead I painted directly on top of the renders in order to be more time efficient. The clown pass was a life saver for this process, as I didn’t need to spend a lot of time carefully creating lasso selections when working with separate elements in the scene, as all my elements were all represented by different colour sections, which can be quickly selected by ‘turning on’ the layer, using the magic wand tool, and then ‘turning off’ the layer to keep painting.
I’m happy with the final outcome and the mood it represents - the only thing that I feel needs more work is the main figure, as I found it quite difficult to paint over his forms and properly detail the character. Regardless, I learned a lot from seeing this process through, and I’m happy with the progress made from working on this project.
0 notes
Photo


Outcome Process: Raw Renders
These are the renders from Blender - with the very first image being a quick and dirty overlay to use as a base starting point for paintover.
The renders came out decent enough for me to work with for the paintover - but I started to face a lot of problems as it came to adding in the volumetric fog and lighting for the scene. As I had a lot of figures in the scene, it added up to be a lot of polygons, which meant that my PC couldn’t handle previewing the render in real time, where I would normally be able to experiment with lighting and fog. But, as these are intensive processes, it would lead to Blender crashing every time I tried to preview in real time, meaning that I needed to fully render out the image every single time I wanted to change something. I also had to settle with a simpler solution for setting up some fog in the scene.
Although this made my life a lot more difficult, I now know for next time that it would be best for me to start with the environment and lighting first, and then adding the more detailed elements later on once they just need to be placed into the scene.
The next stage is to move into Photoshop to start the painting.
0 notes
Photo


Outcome Process: Composition block in
From my previous thumbnails, I decided on the one that centered more around the worship of the egg hosts - and so I decided to first block this out in Blender to help me experiment with composition.
Blender was a great tool for this process, as it was fairly simple to block in all of these forms to represent the objects in my scene, and then decorate the scene using particle systems and some assets from Daz and Quixel Bridge (similar to how I did in my previous experiments earlier in the project). I could then drop a camera in the scene and play around to find the best angle that worked for the image - I really focused on trying to create a good sense of depth and scale, and aimed to seperate some of the layers within the scene with atmospheric fog.
0 notes
Photo

Live Industry Brief: ‘Admiration’ Final Piece
My final painting for the Clip Studio Illustration brief: ‘Admiration’
The painting is inspired by Anthony Jones’ creature paintings - an artist I admire and whose videos has helped me with my digital painting techniques and overall artistic goals. The creature and it’s pose is also a nod to the theme of ‘admiration’, as it loosely ties in with my Studio Project themes of ‘religious idols’ - as ‘admiration’ can sometimes cross into glorification and idolisation.
0 notes
Photo


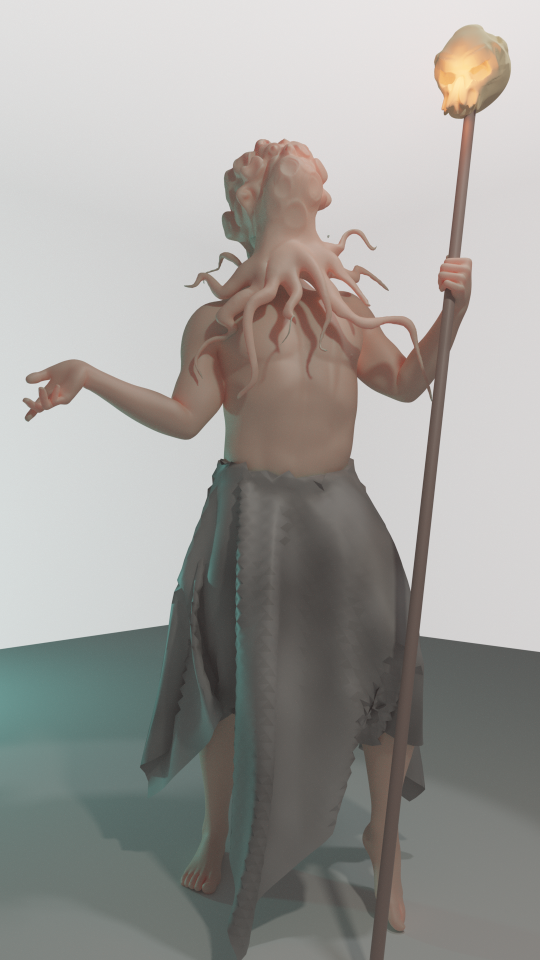


Live Industry Brief: ‘Admiration’ Progress
This series of images shows my process of moving from my initial sketch through to the finished painting.
The 1st image was a continuation of the first initial sketches that I had, painting using reference. My progress was slow, and I felt as though I was spending far too much time rendering and re-rendering the same details - which is why I decided to make use some of the techniques I was incorporating in SP4 and instead flesh out my character in 3D.
I took a standard male base model into blender, used a cloth simulation for the skirt, and added a placeholder for the staff. I then added a sphere over the base models head, and used the sculpting tools to create the monster head. After then dropping in some lights and setting up a camera and some volumetric fog, I was able to pull out some renders to use as a reference, (img 2-3)
Initially, I tried to paint on top of the rendered images, but it just felt as though I was fighting the 3D render and trying too hard to make it feel like a painting with limited success. (img 4-5)
Therefore, I just used the render as reference for my lineart and started the painting from scratch - first creating a mask for each section of the character, before starting in greyscale to work out the form and values.
Lastly, I was able to start layering in colour using gradient maps and blending modes, before finally painting over the image with more textured brushes to refine and control some of my edges.
0 notes
Photo

Outcome Process: Final Composition Thumbnails
As we’re starting to round up the project, I want to bring all the painting practice and experimentation together to work on a final painting.
Focusing on the ‘Parasitic Society’ concept from my previous post, I want to try and communicate some of these themes and elements into a painting. Starting with some thumbnails, I focused on a finding key focal point, and building a scene with strong shapes to try and compliment that.
I selected a few narrative elements from my earlier [CONCEPT SHEET] (found here), to focus on:
Primitive hut houses
Eggs as a decoration, to add atmospheric light
Deceased ‘bad’ hosts, hung and waiting for the eggs to be harvested
Worship of ‘good’ hosts, who carry the parasites and eggs
These 4 thumbnails covered my initial ideas surrounding these themes. I think that the bottom 2 thumbnails are the strongest in terms of composition, and I particularly like the theme of the bottom right. However, I think that the top left also could have potential to create a lot of depth and atmosphere.
The next step is to tinker with these a bit more to find a composition I am happy with, before I move on to trying to push it towards a finished painting, using the workflows and skills that I have been developing throughout this term.
0 notes
Photo

Painting Practice: Figure Painting
More sketches to keep myself in the habit as I didn’t have too much time to work last week. Exploration of some characters and poses, trying to refine my painting workflow - I was quite happy with how the stocky guy in red turned out, and I really enjoyed the brush that I used to render the character.
With that particular character, I tried adding a new step between greyscale -> gradient map, when adding colour. I built up some colour layers, using the layer style sliders to control what values the colour would blend with - allowing for more control over each value and colour. Once building up a good variance of colour, I then added a subtle gradient map on top, which gave the colours a sense of harmony. I felt like this works a bit better, as it looks more like a painting in colour, rather than just a gradient map overlay.
0 notes
Photo


Live Industry Brief: Clip Studio’s Illustration Contest: ‘Admiration’
These are my first initial sketches for the live brief:
With the theme being ‘admiration’, this all came together as I was sketching whilst listening to one of Anthony Jones’ class demos on YouTube (RobotPencil)
When I was younger, I admired the art in games and the work of the artists who worked on games that I liked - but it always felt like an unattainable level of skill and therefore not a realistic goal. When I think of admiration as an emotion, it connects me to that almost-childlike sense of wonder that I had back then.
Since that time, I’ve changed my outlook on ‘art’ and ‘skill’ after reflecting on the teachings of other artists, like Anthony Jones. One of the things he stands by is that talent is somewhat a ‘myth’, and that through patience and persistence, you can keep working and practicing in order to reach your goals.
Because of this, I wanted to paint something for this brief inspired by the work of Anthony Jones, as I admire his work and teachings as it gave me the confidence and motivation to improve my digital painting skills, which is something that I always wanted to do, but always counted myself out before I had even tried.
0 notes
Photo


Painting Practice
These are 3 practice paintings in preparation for my final pieces for this project - experimenting with different techniques and brushes (as well as procrastinating)
Each image shows the finished sketch first, followed by the first pass sketch. These took around 60 minutes per painting.
The aim of these paintings was to practice creating a full composition, with colour and texture. I tried different approaches for each of the images, and I feel that the blue cave piece (which was the last of the 3) was the most successful - I was thinking more about the overall ‘picture’ and working in pure values first to try and best define the subject of the piece. I also found that trying to limit the colour palette to just a few colours also works a lot better for me personally, rather than trying to inject a wide variety as I did in the forest piece (which was the first painting that I did, out of the 3)
Because of what I have learnt, I think it would be a good to pick a few select colours to fit the theme of my final pieces, and then create a gradient map from them. Then, I can start the final pieces in black and grey to focus on my values, and then overlap a gradient map once I have the foundations of the painting laid out.
0 notes
Photo

Process Development: Confidence
More warmup sketching and practice as I’m starting to become more confident with the tools I’m using. I’ve found that trying to paint with more confidence leads to more defined strokes, shapes and gestures - which leads to a more effective use of my time as I am more comfortable with the tools and techniques I’m using.
I’ve also learned to try and not erase as much, as any mistakes can either be painted over, or pushed around with the mixer brush or smudge tool to create some interesting textures.
0 notes
Photo


Study: Landscape Painting
Another daily study.
This time I started in greyscale to try have better control over my values - focusing on lighter values with little contrast in the background, and some darker values with more contrast in the foreground.
This helps separate the foreground and background, which helps add more depth and atmosphere to a painting.
I’ve included WIP shots to better show the process of the painting, but I still find myself feeling that I need to try and loosen up in order to make the piece more interesting.
The reference is from Daniel Nadler’s travel photography photos, at nadlerphotography.com. He has a lot of interesting photos that I’m hoping to continue doing studies of.
0 notes
Photo

Process Development: Brush Experimentation
Again, just some more experimenting with painting techniques and playing around with different brushes to find a few that I feel comfortable using for my final paintings. Through these studies and sketches, I’m slowly putting together my own set of brushes that I like to paint with, tweaking the brush settings within Photoshop to better suit the way that I paint.
With practice, I aim to become more comfortable with these selected brushes, as this will improve my brush work and the efficiency of my brush strokes. This is important to my practice, as the style I admire is very ‘painterly’ and ‘expressive’ - and a lot of this comes from confident and efficient brush strokes.
0 notes
Photo


Study: Morocco Painting Study (not related to my narrative development - just a practice piece, with reference included)
Just a quick painting study for some practice- looking to primarily improve my edge control and brush work. I’ve tried to resist just copying from the image, and instead I’ve tried to only select the details I found interesting, then create an interesting painting through the use of colour, texture, and combination of hard edges and soft edges.
I’ve included some process images, where it more clearly shows how I approached the painting - first blocking in the shapes, progressing into adding texture, blurring and smudging some areas, and then finally adding some adjustments layers with layer masks to unify the painting.
0 notes
Photo


Process Development: Thumbnails
As I will soon be starting on producing some paintings for the visual art book - I’ve started the thumbnail process for one of the first pieces: a small village within a swamp/forest, where I aim to set the ‘mood’ for the world.
As I had mentioned in one of my earlier entries - I’m new to any kind of environment painting, so I had to do some research in order to learn more about the process. I watched a master class demo by Andreas Rocha, called ‘Painting a Fantasy Landscape and Creative Process’ from IAMAG. In the class, he demonstrates his process for painting, which starts with thumb-nailing.
I used his process to create the 8 thumbnails that I’ve uploaded - beginning working at a 50% zoom level within Photoshop to focus on big shapes whilst using 3 grey swatches in order to try and control the values. This worked really well for me, as I usually get slowed down trying to tinker with details early in my paintings - but working this far zoomed out allowed me to focus on the the bigger picture (literally) and not pay too much attention to little details. The next step of this process is to zoom in a bit more, iterating on the piece and adding some details. This is then repeated until the thumbnails are refined enough to begin experimenting with colour.
0 notes
Photo


Process Development: Painting & Anatomy Practice
More sketchbook pages, trying to build on the things I had picked up from the anatomy studies that I did recently - focusing on creating interesting forms and shapes.
The first page I was thinking more about anatomy, and specifically what some of the characters from my world would be built like - this developed into the idea of a malnourished villager, who must give the majority of their food to the chosen Hosts of the parasites in order to fatten them up for possession. Since the parasites cause the Hosts to grow eggs on them, similar to boils, I also started to explore how this could create an interesting silhouette for some of these characters.
Whereas, with the second page, I wanted to focus more on my painting technique and so I started building some characters without any reference, focusing on pushing and pulling forms with values. This was good practice to see if I could implement some of the new things that I had learnt about anatomy.
0 notes
Photo


Process Development: Mixer Brush Experiment
In the previous concept piece, I dabbled with Blender and Quixel Megascans to start visually exploring the environment of this world. This time around, I wanted to try making more use of the Mixer Brush tool in Photoshop, using some images as a base.
As with the previous painting, this is also not a ‘finished concept’ that represents the actual environment - but instead a visual exploration of the area, where I can continue fleshing out the narrative whilst practicing some techniques and processes.
I’ve included some process shots that breakdown the general process that I went through - I started with no particular ideas in mind, except that I liked the primitive style huts in IMG 3, and the colours in IMG 1. As I moved through the process, ideas started to develop, and the mess of shapes and textures started to spark ideas, where I could then start to visualise the environment within the world. I did try injecting some elements of ‘life’ within the painting, by adding a fishing platform, and some silhouettes of people - but the painting started to get a bit muddy and I hit a bit of a wall with this piece.
For next time, I think that I need to better distinguish my values in order to create a better sense of depth, and to make the focal point more clear - however I am happy with the overall mood that the painting gives.
0 notes
Photo

Studies: Anatomy
Some more studies, this time focusing on the upper body and some of the basic muscle groups in that area. I decided to cover this, as I will be looking to have some close ups of characters within my final illustrations - and after going over some initial concepts, I will be looking to have some characters infected with growths/eggs/infections/etc. (rather grim), and therefore, I need to be able to construct and render these forms. It was also good painting practice trying to “push” and “pull” some of the muscles and forms with dark and lighter values - building on the process of ‘painting like a sculptor’, which is something that I started looking into last year.
To develop on this further, I’m aiming to jump into a 3D sculpting software just to try and experiment with these forms further, and potentially looking at ‘blocking out’ a character from my concept.
0 notes