Statistics
We looked inside some of the posts by sandstormstormy and here's what we found interesting.
Average Info
Notes Per Post
33K
Likes Per Post
27K
Reblog Per Post
6K
Reply Per Post
29
Time Between Posts
2 days
Number of Posts By Type
Photo
12
Text
5
Last Seen Tumblr Blogs


Fun Fact
The KCSC sent more than 20K requests to delete posts related to prostitution and porn to Tumblr from January to June 2017.
Photo

Golden Fruit - Submitted by Nookisms
#A57B08 #BF9E32 #F2E468 #B5D25C #74A22F
643 notes
·
View notes
Photo

Amaranth - Submitted by Nookisms
#CC3A8A #B90F6F #A21465 #820253 #59133C
1K notes
·
View notes
Photo

Dusty, but still there - submitted by Nookisms
#DD7B60 #DF9351 #D0C973 #94C37F #96B7DB #BC86B4
3K notes
·
View notes

Photo

Useless fun fact: The Grateful Dead has played the song “Johnny B. Goode” live at least 283 times. - Submitted by: fastman27
#E2E8D8 #C9E4DC #A1C8CC #9DB4BF #968692
2K notes
·
View notes
Photo

Toasty! - submitted by Nookisms
#E05709, #F26303, #FDA408, #FFC713, #FFFA2B, #FFFD95, #FFFECA
874 notes
·
View notes
Photo

Will you descend? - submitted by Nookisms
#FEF3B4 #FFDE91 #FFCB70 #E47042 #A81F46 #691034 #38032D
3K notes
·
View notes


Photo

Shot From a Cannon - Submitted by SeesawSiya
#160808 #9c2215 #c58636 #d4c2b4 #dbe0e4 #6382c3
1K notes
·
View notes
Photo

BUCKLE UP ‘CAUSE I’M ABOUT TO GET STUPID - Submitted by: fastman27
#0B050A #3E0614 #C91616 #F45342 #FFC48D
2K notes
·
View notes
Text
How I Draw: PART 2
I’m currently a poor college student battling through final exams — and as if that wasn’t enough, one evil professor is making us undergrads write a full research paper on top of it all. So yes, it’s been a rather painful time... which sadly means I haven’t been able to draw much lately. But! Once June is over, I’ll finally be free! I’m hoping to dive back into drawing a lot more then.
Anyway, thank you so much for all the love on my last art post. It’s honestly been years since I wrote a post like that, so it was a pretty fun experience for me too! Today, I thought I’d continue the series — this time diving into the highlights of my process: coloring and post-editing!
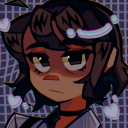
…So, in my last post, I covered everything up to laying down the base colors. Now, it’s time to add some shadows!

When adding shadows, I only use Multiply layers. I usually pick low-saturation colors for this step, pretty much the same way I do when laying down the base colors. If needed, I’ll also use a watercolor edge effect.
To be honest, there’s really nothing too special about my process. After all, I’m not someone who’s formally trained in art. So no fancy, elaborate techniques here when it comes to adding shadows! (As for considering the direction of light�� well, I sometimes try to think about it when adjusting the overall colors later on. But most of the time, I don’t bother too much — and this particular piece is one of those cases.) I simply go by instinct and paint the areas where shadows feel right.

Anyway, that’s how I go about coloring the clothes as well.

There was a little something special when it came to coloring the gloves. To give them a slightly transparent look, I added a light layer of green.

Once I’m done adding all the shadows, I move on to adjusting the line colors. Well, anything looks better than plain black lines, after all.
So at this point, this is what the piece looks like. Now, let’s move on and make it even prettier.

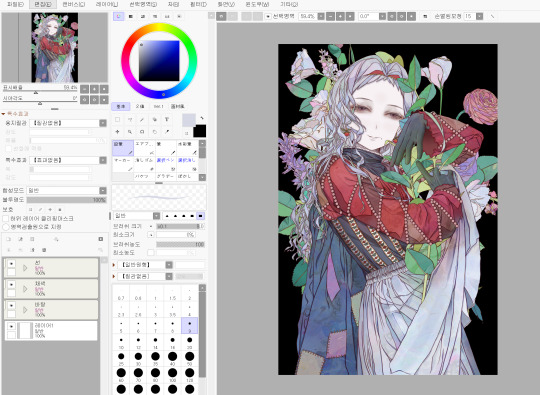
Use Ctrl+A and Ctrl+C to copy the entire coloring layer. Then, paste it and apply a blur effect to the copied layer (this is a feature available in SAI 2).

Now, copy the blurred layer as well. Set Blurred Layer 1 to Multiply, and Blurred Layer 2 to Overlay.
Then, adjust the opacity of these layers to your liking. This creates an effect where the image looks slightly soft, yet the colors become more vivid at the same time. It’s a technique often used to give artwork a bit of a retro vibe.

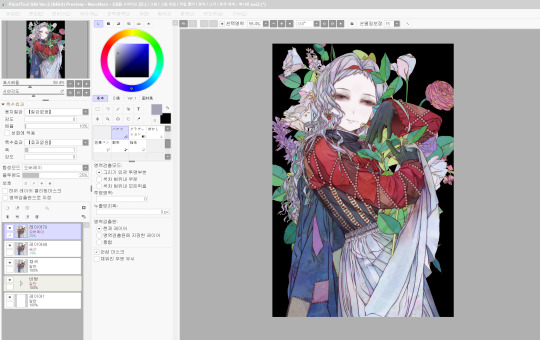
Next, use the Multiply and Overlay layers to adjust the overall color tone. With Multiply, you can create a darker, moodier atmosphere across the whole piece. And with Overlay, you can tweak the color tones to get the look you want.

(That’s right — just changing the color on the Overlay layer can completely change the color tones of the piece.)

For the finer details, keep using Overlay, Multiply, and Screen layers to refine the look.
-If you want to brighten certain areas, use a Screen layer. -If you want to adjust colors or add light and atmosphere, go with an Overlay layer(The image above is an example of this). -And if you want to deepen the shadows, a Multiply layer is your friend.

After that, I do some additional color adjustments in PaintShop Pro(If you have Photoshop, that would actually be an even better tool for this step).
In my case, since I was planning to lower the saturation later on, I intentionally boosted the saturation a bit during this stage. And don’t forget — before moving on to the next step, it’s a good idea to add an overall paper texture to the piece(Of course, this is a built-in feature in SAI).
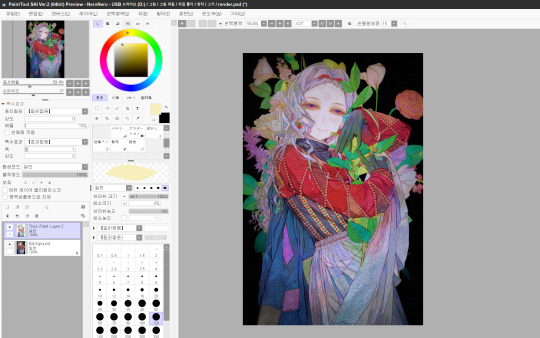
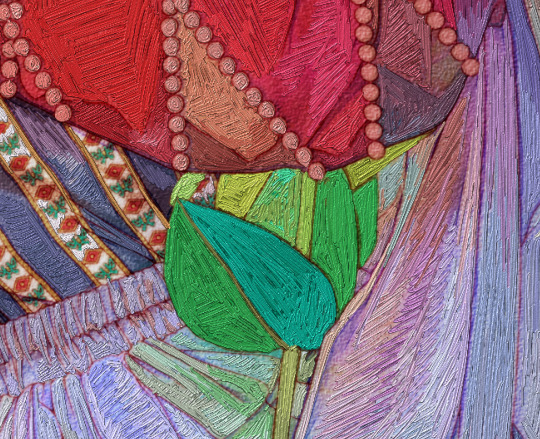
From here, I use Corel Painter’s Thick Paint feature to add visible brushstrokes. The process of picking colors with the pipette tool and painting over them takes quite a long time.
In my experience, if you carefully paint with the smallest brush size (1.0), it gives the piece a texture that feels almost like embroidery. On the other hand, if you use a slightly larger brush and paint more loosely, it ends up looking more like an oil painting.
And if you duplicate the layer where you used the Thick Paint brush, you can get some really fun effects during the editing process.
Then, it’s really a matter of lowering the saturation, adding layer effects where needed, and repeating this process until you’re happy with the result. As I always say — I don’t have any strict rules for this part. It’s all based on personal satisfaction. For this particular piece, I went through even more steps (and a lot more second-guessing!) than usual.
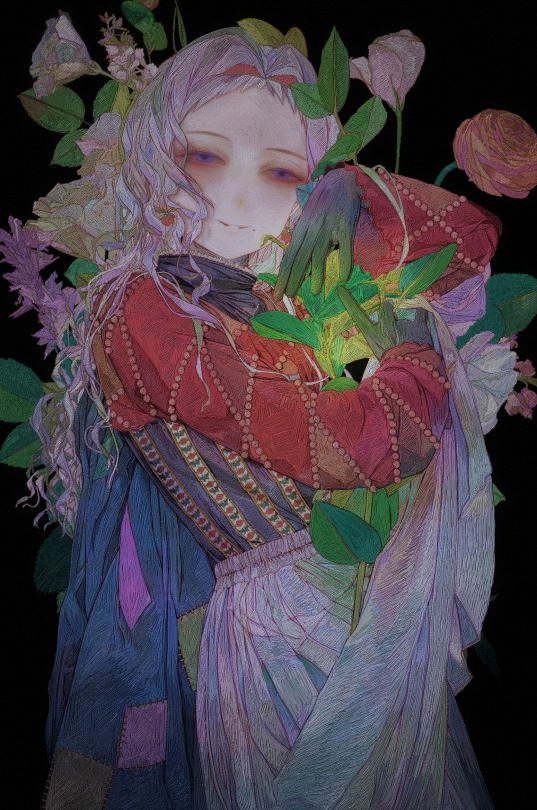
And that’s it — the piece is finished! Thank you so much for reading all the way through.
As I was writing this, I realized that a lot of my process is based on instinct, so this post might not have been all that helpful in a step-by-step sense. But if there’s any part you’d like me to explain in more detail, please feel free to ask anytime!
40 notes
·
View notes
Photo

Come Tie Your Little Ribbons Around My Neck, And I’ll Tell All Of The Stories I’m Scared To Retread - submitted by @lumi-of-cal-fame9
#E84068 #F4976C #499C78 #6070E1 #783BBD
4K notes
·
View notes
Photo

People just love to play, haven’t you heard? - Submitted by: fastman27
#7F6D9F #C29CD6 #D8B2C0 #F2CAC5 #FFE1DA
3K notes
·
View notes
Photo

We’re doing fine, I’ll see you on the night line - Submitted by: fastman27
#F6AFAB #EF7878 #B23965 #6C2270 #3A0D30
3K notes
·
View notes
Photo

You’ve turned all my memories grey… - Submitted by: freshfragrantegg
#d45c64 #eb7b64 #fba38b #8b8b8b #70687b #584e57 #484047
4K notes
·
View notes
