Statistics
We looked inside some of the posts by sarah-itgm-blog and here's what we found interesting.
Average Info
Notes Per Post
0
Likes Per Post
0
Reblog Per Post
0
Reply Per Post
0
Time Between Posts
24 days
Number of Posts By Type
Text
17
Last Seen Tumblr Blogs


Fun Fact
In 2020, 27% of US Tumblr users had an annual household income of over $100,000.
Text
Interactive/Game Senior Studio II ITGM 465 [Day: 5]
Postmortem-
This is the point in the quarter where I always go back over my design process, and analyze it from a fresh perspective so I can make any changes I need to to continue on with the project in the future. Breaking down what you've already done, and then asking yourself: "Hey, if I started this project with the knowledge that I know now, how would I have done things differently?" You can usually find a nugget of inspiration that will re-invigorate your design process and help you tie down any loose ends in your project to get it on step closer to being a finished and marketable product.
Now that I have a clear idea of the environment design of the project, and have a clear idea of the steps I need to take to reach that acquired goal; my thoughts are now turning to how I can implement this project into my portfolio website.
----------------------------------------------------------------------
http://www.sarahspolygons.com/

I have a space saved in my portfolio specifically for this project, and plan on expanding the base idea of the project to make more sense with my chose career as a Technical Artist.
----------------------------------------------------------------------
My new plan is to create an environment with a unique shader set that unifies the whole scene, and then to duplicate the scene and make a new shader set that gives the same scene a completely different look and feel.

With a shader, you have the power to make a model look realistic or artistic. I want to use the same garden scene, rendered with the same models and different shader networks, in order to showcase the power of shaders and my abilities as a shader artist.
Overall, my project went as planned this quarter despite changing my project weeks into the quarter and having to lose weeks of work on another project that I'm not continuing on with until my graduation from Scad. I have ten more weeks to complete this project, and I have a long road ahead of me! Keep checking back in the coming weeks for new updates on the project, and e-mail me at [email protected] if you have any questions or comments about the project! Namaste, my fellow life adventurers!
0 notes
Text
Interactive/Game Senior Studio II ITGM 465 [Day: 4]
Technical Artists and Shader Design
It takes a lot of people, with a lot of different talents from all over the art, sound, design, and programming spectrum to make a game work. It takes an even more talented team to make the game fun and enjoyable, and fun is a very relative term and idea.
I personally, find interactive experiences fun. Some people don't agree with me, they think it takes mechanics and levels or else it's not even an experience worth considering. However, for those of us that enjoy the little things in life, the breaks from this fast paced technology driven society like sunsets and the sound of a flowing river; there are art games. [Also known as interactive experiences.]
As a game designer, I have a formal understanding of how to make a digital or non-digital game experience. And I have found my niche in the Technical Artist category as a shader programmer and designer. This project will be encompassing everything I've learned through out my programming and design education at SCAD, and will give me an understanding of the process and pipeline a shader artist and programmer goes through in order to create a final product.
--------------------------------------------------------------
What is a Technical Artist?
http://www.sarahspolygons.com/
According to an article on Creative Skillsets, a technical artist is a bridge between the artists and programmers working on a game. They ensure art assets can be easily integrated into a game without sacrificing either the overall artistic vision or exceeding the technical limits of the chosen platform.
-------------------------------------------------------------- My personal technical artist statement reads:
"As a technical artist, I have cross-disciplinary experience in the fields of Art and Programming in relation to Interactive Design and Development. I seek to proactively solve issues that may arise in a CG Pipeline, while having the foresight and flexibility to research, design, and implement cutting edge tools before the artists even require them. I am skilled in problem solving, facilitating communication between departments, and the ability to self-manage and make responsible decisions about deadlines and project priorities. I have experience in 3-D software suits such as Maya, and with programming languages such as C++ and CG." -Sarah
--------------------------------------------------------------
Shaders I've Written:


Overall, I utilized 3 different shaders in this mushroom design project. I incorporated the idea of lerping and using multiple texture and normal map slots in the same shader in between numerous lighting models such as the Cook-Torrance model, as well as Blinn, Phong, and Lambert. I plan to replicate this template in my current project, creating a shader network that will be able to be utilized over multiple assets, in the same way I pay attention to the poly-counts on my models. This helps with the optimization of the game.
--------------------------------------------------------------
Example of Multi-Purpose Code:
/************* INPUT MATRICES **************/
float4x4 gObj2World : World; // points from obj to world float4x4 gObj2WorldIT : WorldInverseTranspose; // normals from obj to world float4x4 gWorld2Obj : WorldInverse; // points from world to obj
float4x4 gWorld2Cam : View; // points from world to cam float4x4 gWorld2CamIT : ViewInverseTranspose; // normals from world to cam float4x4 gCam2World : ViewInverse; // points from cam to world
float4x4 gModelView : WorldView; // points from obj to cam float4x4 gModelViewIT : WorldViewInverseTranspose;// normals from obj to cam float4x4 gModelViewProj : WorldViewProjection; // points from obj to clip float4x4 gModelViewI : WorldViewInverse; // points from cam to world
/************* EXPOSED PARAMETERS **************/
/* high-level "knobs" for tweaking contributions of components */
float Kamb < string UIName = "Ambient Coefficient"; string UIWidget = "slider"; float UIMin = 0.0; float UIMax = 1.0; float UIStep = 0.01; > = 1.0;
float Kdiff < string UIName = "Diffuse Coefficient"; string UIWidget = "slider"; float UIMin = 0.0; float UIMax = 1.0; float UIStep = 0.01; > = 1.0;
float Kspec < string UIName = "Specular Coefficient"; string UIWidget = "slider"; float UIMin = 0.0; float UIMax = 1.0; float UIStep = 0.01; > = 1.0;
float Knmap < string UIName = "Normal Map Blend Coefficient"; string UIWidget = "slider"; float UIMin = 0.0; float UIMax = 1.0; float UIStep = 0.01; > = 1.0;
float Knmap2 < string UIName = "Normal Map Blend Coefficient2"; string UIWidget = "slider"; float UIMin = 0.0; float UIMax = 1.0; float UIStep = 0.01; > = 1.0;
/* surface material related */
float3 mSpecularColor : Specular < string UIName = "Material's Specular Color"; string UIWidget = "Color"; > = { 1.0, 1.0, 1.0 };
float mSpecularPower < string UIName = "Material's Specular Power"; string UIWidget = "slider"; float UIMin = 1.0; float UIMax = 300.0; float UIStep = 0.01; > = 30.0;
float2 mUVScale < string UIName = "Material's Scaling for uv's (tiling)"; > = { 1.0, 1.0 };
/* textures */
texture mDiffuseTexture : Diffuse < // Texture for the Mushroom Top string ResourceName = ""; string ResourceType = "2D"; >;
texture mDiffuseTexture2 : Diffuse < // Texture for Mushroom Bottom string ResourceName = ""; string ResourceType = "2D"; >;
texture mMatteTexture : Diffuse < string ResourceName = ""; string ResourceType = "2D"; >;
texture mNormalTexture : Diffuse < string ResourceName = ""; string ResourceType = "2D"; >;
texture mNormalTexture2 : Diffuse < string ResourceName = ""; string ResourceType = "2D"; >;
/* samplers */
sampler2D mDiffuseMap = sampler_state { // Top Texture = <mDiffuseTexture>; minFilter = LinearMipMapLinear; magFilter = Linear; };
sampler2D mDiffuseMap2 = sampler_state { // Bottom Texture = <mDiffuseTexture2>; minFilter = LinearMipMapLinear; magFilter = Linear; };
sampler2D mMatteMap = sampler_state { Texture = <mMatteTexture>; minFilter = LinearMipMapLinear; magFilter = Linear; };
sampler2D mNormalMap = sampler_state { Texture = <mNormalTexture>; minFilter = LinearMipMapLinear; magFilter = Linear; };
sampler2D mNormalMap2 = sampler_state { Texture = <mNormalTexture2>; minFilter = LinearMipMapLinear; magFilter = Linear; };
/* light related */
float3 ambientLight : Ambient < string UIName = "Ambient Light"; string UIWidget = "Color"; > = { 1.0, 1.0, 1.0 };
float4 lightPos : Position < string Object = "PointLight"; string UIName = "Light Position"; string Space = "World"; > = { 100.0, 100.0, 100.0, 1.0 };
float3 lightColor : Diffuse < string UIName = "Light Color"; string UIWidget = "Color"; > = { 1.0, 1.0, 1.0 };
/************* DATA STRUCTURES **************/
/* data passed from application to vertex shader */ struct app2v { float4 Pobj : POSITION; // position in obj float4 Nobj : NORMAL; // normal in obj float2 UV : TEXCOORD0; // texture coordinates float4 Tobj : TEXCOORD1; // tangent in obj };
/* data passed from vertex shader to fragment shader */ struct v2f { float4 Pclip : POSITION; // position in clip space float2 UV : TEXCOORD0; // texture coordinates float3 Pworld : TEXCOORD1; // position in world space float3 Nworld : TEXCOORD2; // normal in world space float3 Tworld : TEXCOORD3; // tangent in world space float3 Lworld : TEXCOORD4; // light vector in world space float3 Vworld : TEXCOORD5; // view vector in world space };
/************* AUXILIARIES **************/
/* lighting functions, for modularity and readability */
float3 ambient_term() { return( saturate( Kamb * ambientLight ) ); }
float3 lambert_term( float3 N, float3 L ) { float diff = saturate( dot(N,L) ); return( saturate( Kdiff * diff * lightColor ) ); }
float3 phong_term( float3 N, float3 L, float3 V ) { float3 R = normalize( -reflect(L,N) ); float spec = pow( saturate( dot(R,V) ), mSpecularPower );
if ( dot(N,L) <= 0.0 ) { spec = 0.0; } return( saturate( Kspec * spec * lightColor ) ); }
/************* VERTEX SHADERS **************/
v2f base_vs( app2v IN ) { v2f OUT;
OUT.Pclip = mul( gModelViewProj, IN.Pobj ); OUT.UV = IN.UV;
OUT.Pworld = mul( gObj2World, IN.Pobj ).xyz; OUT.Nworld = normalize( mul( gObj2WorldIT, IN.Nobj ) ).xyz; OUT.Tworld = normalize( mul( gObj2WorldIT, IN.Tobj ) ).xyz;
OUT.Lworld = normalize( lightPos.xyz - OUT.Pworld ).xyz;
float3 camWorld = float3( gCam2World[0].w, gCam2World[1].w, gCam2World[2].w ); OUT.Vworld = normalize( camWorld - OUT.Pworld );
return OUT; }
/************* SHADING MODELS **************/
float4 SM_top( float3 N, float3 L, float3 V, float2 coords, float3 wT, float3 wB, float3 wN ) { float4 col; float3 Nmap = normalize( 2.0 * tex2D(mNormalMap,coords) - 1.0 ).xyz; float3 NmW = normalize( mul( Nmap, float3x3(wT,wB,wN) ) ); float4 dmap = tex2D( mDiffuseMap, coords );
float3 Nn = lerp( wN, NmW, Knmap ) ; float3 ambient = ambient_term() * dmap.rgb; float3 diffuse = lambert_term(Nn,L) * dmap.rgb; float3 specular = phong_term(Nn,L,V) * mSpecularColor.rgb;
col.rgb = ambient + diffuse + specular; col.a = dmap.a; return( col ); }
float4 SM_bottom( float3 N, float3 L, float3 V, float2 coords, float3 wT, float3 wB, float3 wN ) { float4 col; float3 Nmap = normalize( 2.0 * tex2D(mNormalMap2,coords) - 1.0 ).xyz; float3 NmW = normalize( mul( Nmap, float3x3(wT,wB,wN) ) ); float4 dmap = tex2D( mDiffuseMap2, coords );
float3 Nn = lerp( wN, NmW, Knmap2 ) ; float3 ambient = ambient_term() * dmap.rgb; float3 diffuse = lambert_term(Nn,L) * dmap.rgb; float3 specular = phong_term(Nn,L,V) * mSpecularColor.rgb;
col.rgb = ambient + diffuse + specular; col.a = dmap.a; return( col ); }
/************* FRAGMENT SHADERS **************/
float4 combined_fs( v2f IN ) : COLOR {
float3 N = normalize( IN.Nworld ); float3 L = normalize( IN.Lworld ); float3 V = normalize( IN.Vworld ); float2 coords = IN.UV.xy * mUVScale.xy; float3 wN = normalize( IN.Nworld ); // orthonormalize the basis float3 wT = normalize( IN.Tworld ); float3 wB = normalize( cross(wN,wT) );
float4 matte = tex2D( mMatteMap, coords ); float4 col1 = SM_top( N,L,V,coords, wT,wB,wN ); float4 col2 = SM_bottom( N,L,V,coords, wT,wB,wN );
float4 col = lerp( col1, col2, matte.b ); return( saturate( col ) ); }
/************* TECHNIQUES **************/
technique combined { pass { VertexProgram = compile vp40 base_vs(); FragmentProgram = compile fp40 combined_fs(); DepthTestEnable = true; DepthFunc = LEqual; CullFace = back; } }
0 notes
Text
Interactive/Game Senior Studio II ITGM 465 [Day: 3]
Understanding the Oculus Rift Distortion Shaders
http://rifty-business.blogspot.com/2013/08/understanding-oculus-rift-distortion.html
A major part of my environment design project involves learning the science behind how the Oculus Rift works, and understanding how to craft environments with elements that don't cause motion related stress on the player.
http://static.oculusvr.com/sdk-downloads/documents/OculusBestPractices.pdf
The practices listed in the Official Oculus Rift Development Guide iterate on the fact that you, as a designer, are in complete control over the comfort level of your player once they put the device on. When I first conceived of this project I was not aware of this information, and though that developing and environment for the Rift was going to be similar to designing game environments in a normal engine. As a Shader artist, I try to create interesting Shaders that involve vertex displacement or texture panning. However these concepts need to be carefully manipulated and modded into the Rift so that the shifting in the textures and form of the object do not jar the player's vision.
---------------------------------------------------------------------- According to the article Rifty Business, the Oculus Rift distortion shader is a key to what makes this new rendering technology possible, and understanding how the Oculus works behind the scene.

The render above shows an example of the pincushion distortion effect. As you can see, the scene when viewed outside of the headset is viewed with a fish-eye effect.

Pincusion Distortion
According to the article, the basic idea of what's going on is that the Oculus view causes a pincushion effect and to counteract this affect; a barrel distortion must be applied to the shader itself.

Barrel Distortion
The article lists the practices, and gives examples of code that will help you port your shaders over to the Oculus Rift Device. This article and other related articles will be a big help to me later on in the project when I begin to write my shaders.
0 notes
Text
Interactive/Game Senior Studio II ITGM 465 [Day: 2]
Assets in the Garden

----------------------------------------------------------------------
Asset List:
- Japanese Maple Tree [2]
- Japanese Cherry Blossom Tree [1]
- Tiered Tree [2]
- Leafy Bush [1]
- Fern Bush [3]
- Flowers [larger, centerpiece] [3]
- Flowers [small, group] [6]color [6]style
- Buddha Statue [1]
- Lantern Statues [4]
- Varying Stone [8]
- Centerpiece Boulder [2]
- Mushroom [2]
- Wooden Fence [1]
- River [1]
- Pond [2]
- Paths of Sand [zen] [3]
----------------------------------------------------------------------
Making an Asset: The Process

When conceiving of an asset, the process starts out with the creation of a moodboard which sets the feel for the way the props are going to be developed. In the case, this was the moodboard for my statue assets. The statue on the left was picked to be the center-piece for he whole garden. The concept is then taken into Maya and blocked out into simple polygonal shapes; such as spheres and cylinders. Once the model is blocked out, the rough model is taken into an organic modeling program such as Z-brush and filled out to fit your desired shape.

Once the mole is finished, it is UV'd and a shader is applied to the model. The Shader will handle the texture maps and the normal maps, which will give more realism and depth to the model as it exists in the picture above. The model is then placed in the scene, and the final product comes out pictured below. Since these assets are being optimize for a game,I take special care in making sure I keep the poly-count and information in each asset as condensed as possible.

I follow this process for every asset I create, and this is an example of the pipeline I will be following throughout this environment design process.
0 notes
Text
Interactive/Game Senior Studio II ITGM 465 [Day: 1]
Zen Garden: The Experience

Goal for the Final Product: A Meditation Garden scene that is fully modeled, UV’d, and textured utilizing custom shaders and assets; imported into Unity and integrated in the Oculus Rift Headset. The focus of this project will be on the way that the Shaders unify the whole garden scene and bring a sense of harmony and balance to the viewer.
-1 Player Interactive Experience for Oculus Rift/Windows.
Overall, the goal of this project is to explore development for the Oculus Rift device and learn how to write distortion shaders that do not cause motion sickness within the users of the VR device. I want to create an interactive visual and audio experience that leaves the user with a sense of peace and serenity.
----------------------------------------------------------------------

Moodboard: The moodboard for the project encompassed the main features of the Zen garden that I plan to incorporate into my environment design. The design is loosely based off of a combination design of a Japanese Rock Garden and a Japanese meditation garden. This means my design will incorporate elements of rock and sand, as well as flowers and foliage.
The garden will represent the harmony of natures elements as a whole.The sand garden will contain meditation lines and rocks that symbolize mountains and sand that symbolizes the earth. The perimeter of the garden will contain a river with two containing pond that represent water and the flow of life. The spaces in the trees and foliage, and the lines drawn in the sand represent the air, and the candles surrounding the fountain and the Japanese Lantern House statues guarding the entrance to the garden represents fire.
The player will start out at the hojo of the scene [the place in the garden where it is meant to be viewed from,] but will be able to move around the scene freely using an Xbox 360 Controller and the Oculus Rift VR Headset device.
0 notes
Text
Interactive/Game Senior Studio ITGM 405 [Week: 10]
Postmortem:
Overall, this quarter did not go exactly as planned. As our team expected, we ran into a lot of dead ends on my end of the hardware/technology end of the project. I didn't know enough about my subject matter until it was too late, and after the way this quarter played out and the postmortem discussions with our professor; I believe that I will be working on my own solo project next quarter. However, we did get art assets and sound and interactivity implemented into the Alpha-Build (which is what our target goal for the quarter was.)
For our Alpha-build, we decided to keep the prototype on a cart, using a bucket in place of a sink and a monitor in the place of a mirror.
As far as the Game Design goes, I do not feel like our mini-games have a unifying or appropriate theme that makes sense in the context of our project. This is a frustrating issue that has caused our team quite some strife, and I hope it can get resolved over the winter break, and also Winter is coming.
However on the hardware/platform end of the project, I feel like Matt and I have been working very hard on researching and testing motion sensing technology and I now feel like I'm well educated enough to hold a legitimate conversation with others that are well versed in the subject, which could come in handy for my personal and future career endeavors. It also helps that the President of Scad played our game and enjoyed the idea and message behind it, that gives me motivation to continue on with this project in the light of our teams recent struggles.
Our plans for next quarter involve a complete and total re-design of the project, which with the knowledge I have now I believe our iterations will able to be quicker and more productive.
I want to gameify the world.

Final Interactive Installation:

Final Screen Shot:
Learning from your mistakes and moving on from failures is hard to do, but I'm up to the challenge and am looking forward to working with the Oculus Rift next quarter.
0 notes
Text
Interactive/Game Senior Studio ITGM 405 [Week: 9]
Learning the Concept of Sound Design in 1 Week:
As the project reached a conclusion, we decided to settle on a webcam instead of the IR sensors for the final Alpha-Build of the quarter. Since our programmer was busy implementing the webcam into the code, I decided to tackle the position of sound designer [even though it was getting late into the quarter.] I have been a visual designer my whole life, so design is an unfamiliar territory for me. I studied up on sound theory and how to edit seamless sound loops for games, as I knew we needed a walking and running loop for the main character of our prototype.
Unfortunately the art assets had not been completed by the time I started my sound production work, so I was just kind of shooting in the dark as far as what types of sounds I needed. I knew we had a bunny character so I created an animal running and walking sound, a hawk screech, and ambient background music to compliment the mysterious but upbeat environment of the game.
In the end, I wound up comping a song of my own on a midi-keyboard using Adobe Audition, and I also learned sound theory and the idea behind creating seamless loops in sound.
[I will upload the song I composed for our introduction screen in a separate post through Tumblr.]
I'm looking forward to being able to implement sound in a more standard pipeline next quarter, I enjoyed working with the tools necessary for sound design work and wish to pursue this interest in the future. :)
3 New Mini-Games:
Even though I'm not in charge of the game design pipeline of our project, we've still been collaborating on the effort together and I think we may need a different direction for the theme of our mini-games, which is feedback we've received numerous from numerous play-testers and fellow classmates.
Our first mini-game idea is to have a hawk chasing a bunny in a forest or something, while you're washing your hands in the bathroom.
Our second mini-game idea is to have a monkey climbing up and down a rope while a plant is trying to eat him or something, while your washing your hands in the bathroom.
Our third mini-game idea is to have a flower with bees getting chased away from a flower, this one would at least stroke the Scad ego a little bit as our mascot is a bee.
I feel like these mini-games will be a good place to start building our system, but we should have another discussion about the flavor the art direction should take so that our project has a concise and unified theme.
0 notes
Text
Interactive/Game Senior Studio ITGM 405 [Week: 8]
I wrote a simple sketch in Processing to test out the Passive IR Sensor I bought that had a built in debug light to let me know when the motion sensor was turned on and off.
I wired it up to my Arduino and got a prototype working and we found that the sensor did indeed detect heat; so the running water in the sink would not be an issue with this option. However since it still early in the project we have a few other ideas for directions we could go with the hardware, and by the end of the week we will come to a conclusion about the technology we will be using for the Alpha Build.

Code:
import processing.serial.*;
import cc.arduino.*;
Arduino arduino; int ledPin = 13; int pirPin = 2;
void setup() { //println(Arduino.list()); arduino = new Arduino(this, Arduino.list()[0], 57600); arduino.pinMode(ledPin, Arduino.OUTPUT); arduino.pinMode(pirPin, Arduino.INPUT); }
void draw() { //if PIR sensor is triggered ( HIGH ) if ( arduino.digitalRead( pirPin ) == Arduino.HIGH ) {
//this turns the led on arduino.digitalWrite(ledPin, Arduino.HIGH);
// wait 1000 microseconds delay(1000);
// turn the led off arduino.digitalWrite(ledPin, Arduino.LOW);
// wait 1000 microseconds delay(1000); } }
Our Sensor Options:
After weeks of research, I have now narrowed down my findings to a short list of possible options to get our Alpha Build done before November 21st, and now it's time to bring my findings to the next SCRUM meeting.

Passive IR Sensor-
Pro- Won't detect water.
Con- Has too far of a range that can't be adjusted.

------------------------------------------------------------------
Active IR Sensor-
Pros- Would be the simplest sensor to code for.
Cons- The range is too short and is not accurate enough.
------------------------------------------------------------------

Ultrasonic Sensor
Pros- Would be able to write our own algorithm and create a more natural and custom hand-washing mechanic.
Cons- More complicated to understand and use.
------------------------------------------------------------------

Webcam
Pros- Matt found some code to work off of that's exactly what we need for our project.
Cons- Wouldn't translate over too well to a bathroom scenario.
------------------------------------------------------------------
0 notes
Text
Interactive/Game Senior Studio ITGM 405 [Week: 7]
Difficulties with the Leap Motion:
One of my first experiences using the Leap Motion involved me turning on the device and entering the Airspace of Leap Motion, which was a HUD created by the developers to house apps developed specifically for the Leap. In this HUD display, the Leap motion cycled through a number of pre-programmed applications that introduced you to the range and feel of the motion detecting device. (A concept which we later implemented in our playtesting demos.) -----
However, even with this first interaction I was able to see that this technology would not support the mechanics required to complete our project. The sensor wold display a model of a hand just fine if the hand was static and in perfect view of the small sensor sitting on the table. However once your hands were brought together in any sort of hand washing motion; the fingers sensing would stop being tracked and the illusion of hand-washing would be ruined on-screen. After further testing, I realized that the Leap wasn't able to detect your hand motion through your other hand, which was a problem for the main mechanic of our game. ----- After the first playtest, I decided that we should move in a different direction with the technology of our project and bought a passive and and active IR Sensor.
It's time for a new direction.
Passive vs. Active IR Sensors:
Active sensors are sensors that transmit some kind of energy ( microwave, sound, light) into the environment in order to detect the changes that occur on the transmitted energy; it transmits and detects at the same time .
Passive sensors don't transmit energy, they only detect the energy transmitted from an energy source, like motion detectors, which are mostly passive infrared sensors.
From my initial research, I feel like a passive sensor is a good place to start for the new direction of our project. I went to Microcenter and bought a Parallax Passive IR Sensor that is compatible with my basic Arduino Uno microprocessor. I got a prototype for the sensor up and running with a LED light for debugging purposes. The passive IR sensor has a 15 foot and a 30 foot range. In order to change the sensitivity on the sensor; soldering is required, so I will have to acquire the necessary tools in order to complete my task. I'll save my breakdown summary and opinions of this sensor until next week's post.
0 notes
Text
Interactive/Game Senior Studio ITGM 405 [Week: 6]
Introduction to the Leap Motion:

I've been looking forward to having a chance to develop for the Leap Motion since I first became aware of it's existence back in a Physical Computing class my senior year at SCAD. However, most of my interest in the device lies outside of it's purpose as a motion sensor in our hand-washing installation. Unfortunately our first prototype with the Leap wound up utilizing a mechanic that we did not necessarily intend to use. The sensor tracked your hand movement from the left side to the right side of the sensor bar, and that would dictate the direction the platform tilted in the game. Your goal was to keep the baby from falling to it's doom, but this idea was quickly iterated on and scratched.
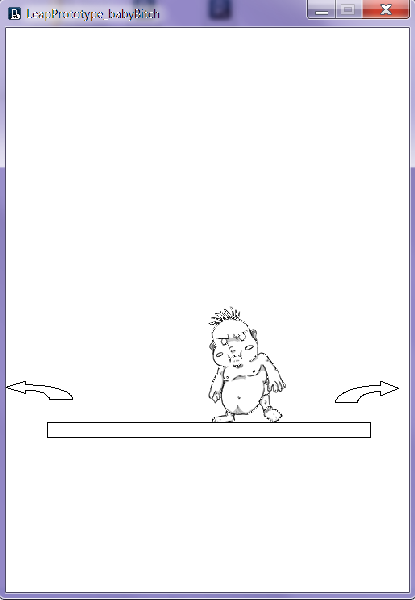
As you can see in the picture below, the Leap Motion works just fine as a motion tracking system when your hand is flat and extended over the sensor. However, once you put your two hands together the tracking on the fingers stop and you only see the model of the wrist and hand on the screen. As the lead technology director, it's my job to figure out a different solution for our project that doesn't not involve using the Leap Motion Sensor.

Design Direction:
I think that our original 'Wash your Hands, Save the Princess' concept was a much stronger idea than the direction our design team seems to currently be going in.
-----------------------------------------------

Save your Princess from the germs... while washing your hands! I feel like this is an example of the direction we should be taking for the art direction behind our project.
-----------------------------------------------------------------
I personally think that we should do a project to appeal to SCAD's ego, because once we graduate SCAD will no longer be a resource to us, and I appreciate everything this school has inspired me to achieve and all of the resources I have utilized in my 5 year college career.
No matter what direction we decide to take with the game design, I'm still excited about the possibilities this platform we're creating has to offer. :)
0 notes
Text
Interactive/Game Senior Studio ITGM 405 [Week: 5]
From Conception to Alpha Build: ITGM Senior Studio I: Fall 2013
-The purpose of this blog is to document my personal contributions to my final ITGM Senior Studio Project. My teammates and I decided to undertake an Interactive Hand Washing Instillation Piece that encourages people to wash their hands after they use the bathroom. Our main goal is to try and attempt to make a daily, mundane task fun. My personal goal is to Gameify the world, and manipulate people into healthier behaviors by bringing whimsy back into their lives through fun and game related scenarios.
--------------------------------------------------------------------------------
Project: Oasis- Members:
-Matt: Project Lead, Programming/Tech
-Josh: Programming/Tech, Graphic Design
-Brice: Art Lead, Design
-SARAH: Programming/Tech, Design, Documentation
Week 1 Original Concept: Wash your Hands, Save the Princess

Original Project Concept Art
VVVVVVVVVVVVVVV

Final Installation (Alpha Build) Concept
- Intro to the Project: The original concept for the game was to use a universal 'Save the Princess' theme to make a short little game that would encourage people to wash their hands after they use the bathroom. The technology in our prototype involves a Leap Motion, a Projector, and other related IR Sensors and the Arduino.
SET-UP:

We decided to set our prototype up in the SCAD bathroom. Since Interactive/Game Design is an iterative process, the specifics of our projects will be changing as the weeks go on. However, we have our core design goals that will not change: Make a boring, mundane, repetitive task fun. [Gameification.]
0 notes
Text
[ITGM230: Blog Entry 10]- Final Thoughts
0 notes
Text
[ITGM230: Blog Entry 9]- Project 3 Post Mortum
Final Images:


0 notes
Text
[ITGM230: Blog Entry 8]- Project 3
There wasn't a physical project sheet issued for Project Three, but
I chose the MMORPG Maplestory to base my interface re-design off of. I looked into outside websites related to character creation and Maplestory, but the only website found was a scene editor, Banned Story.
Inspiration:


0 notes
Text
[ITGM230: Blog Entry 7]- Project 2 Post Mortum


I re-designed my entire project at the last minute, as I realized a little too late into the process that my design was looking too girly and not professional enough.
I decided to add a pocket of negative space to the top of my composition


*****


**

Starting off Weak:


0 notes
Text
[ITGM230: Blog Entry 6]- Project 2
We did not receive a project sheet for project 2, but in class Professor Spencer described the project as:
"
Inspiration:
My insp
The Five Hat Rack Metaphor:
There are five ways to organize information: location, alphabet, time, category,and continuum.
0 notes
Text
[ITGM230 Blog Entry 5]- Midterm Project
Midterm Exam:
"For your project-based take-home exam you will create an informative educational piece that EXPLAINS the SCAD ITGM curriculum. By now you (should) have some ownership of the content, and all of the specific data is easily obtainable. Much like the data visualizations and infographics we’ve discussed, your work will present all of the courses in the program. Ideally you will present them in a way that includes chronology or categorization. Think Minard map, without all the suffering and epic defeat.Think about the likely target audiences. The work should present the curriculum and be digestible for prospective students as well as students currently enrolled in the program. While not required, I would suggest you also think about an ancillary layer of out-of-major elective courses. Reflect on your own discovery of this data: what would you like to see?
We have examined many media types. The platform for your solution can be a poster, a kiosk, a website, or a mobile application. You’re only designing the information in the timeframe allotted. While the work doesn’t need to be technically functional the designs must communicate the information design effectively. If you create a poster, you must build it at a suitable resolution. If you make a website or application, you will need to create an effective presentation simulating the workflow."
Inspiration:

My inspiration for this project came from this poster that I came across:
I originally wanted to create a physical product for the

Final Product:


0 notes