
Don't wanna be here? Send us removal request.
Statistics
We looked inside some of the posts by scalytail1312 and here's what we found interesting.
Average Info
Notes Per Post
14
Likes Per Post
12
Reblog Per Post
2
Reply Per Post
0
Time Between Posts
35 minutes
Number of Posts By Type
Text
5
Last Seen Tumblr Blogs


Fun Fact
Tumblr was acquired by Yahoo for $1.1B in 2013.
Text
Default Cube Part 1: Let's Begin!

Now that we have Blender set-up, press Ctrl+N and start a new Blender file. Blender's window is made up of many "editors," and these are all moveable and interchangeable. The largest editor currently open is the 3D Viewport.

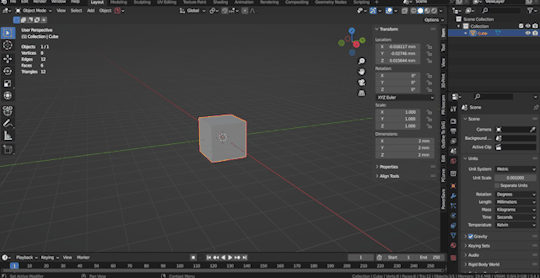
The top-right editor is the Outliner, and the bottom-right editor is the Properties. In the 3D viewport, the "default cube" is highlighted in yellow, and "Cube" is highlighted in the Outliner. This means that the default cube is currently selected.

In the 3D Viewport, press ctrl+I. Your selection has been "inverted"; you will see in the 3D Viewport & in the Outliner that the two other objects than the cube are now selected. The object on the left is a Camera, and the object on the right is a Point Light. These are used for rendering purposes.


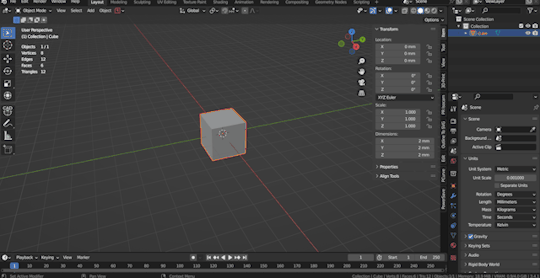
Press X, then click Delete. (Alternatively, simply press the Delete key.) The camera & point light are now deleted from the scene.

Click on the cube to select it. Press G, move your mouse around, then click. G initiates the Grab/Move function on whatever you have selected in the 3D viewport, and left-clicking confirms the movement. Press ctrl+Z to undo the movement.


Repeat as before, but with the R key, then the S key. R rotates, and S scales. These are all of the "transform" keys! Press ctrl+Z until you have undone all of the transformations.
Next: -Press G, then Z, then move the mouse and click. -Press R, then X, then move the mouse and click. -Press S, then Y, then press 2 and hit Enter.
This is how to transform while constraining that movement to an axis, and now you know that you can type numbers in for precise transformations. Press ctrl+Z to undo all transformations.

Press G, then press Shift+Z, then move your mouse around and click. Shift plus an axis while transforming is how you lock an axis while moving. Shift+Z means that you are moving the cube on the X-Y plane, the "ground" plane, without moving the cube up or down. This is very useful!

Highlighted is shown the Sidebar. Press N to open the Sidebar if it is not visible. The N key opens and closes the sidebar. Optionally, type 0 into each of the Location & Rotation fields and 1 into the Scale fields to reset the cube's transforms.

The T key opens and closes the Toolbar on the left side of the 3D Viewport.

The highlighted tools are the transform widgets. Feel free to play around with these, but I literally never use them, opting instead to use the transform hotkeys.
Press on the second button on the toolbar, then click around. This is the 3D cursor button, and you are placing the 3D cursor in the scene. This can be used to orient transformations (e.g. as a pivot point for rotations); we will use the cursor in future tutorials.

Do the following commands: -Use the mouse wheel to zoom out. Alternatively (e.g. with a graphics tablet), use ctrl+middle-click then drag the mouse. -Press shift+middle-click and move the mouse to pan the view. -Click the middle mouse button and move the mouse to rotate the view.
I recommend playing around moving the view a LOT. Viewport navigation is the absolute most important set of controls for any 3D application.
That's that! In the next tutorial, we'll start using Edit Mode. Feel free to play around in Blender, try some other tutorials, and look up some 3D art. Have fun!
7 notes
·
View notes
Text
I'm a beginner by the way, but this blog was inspired by Tufts University's original written Blender tutorials, which are no longer available. That's how I originally learned Blender 2.6 8 years ago. Life happened, and I'm pretty much starting over from square one again in my 3D learning journey, but I know all of what was in those tutorials and a little bit more :) Congratulations on finding my page, and I hope we learn a lot together :3
0 notes
Text
My Add-ons
I've only recently really gotten into using add-ons, but they are essential to using Blender in a quick and easy way. This is a comprehensive tutorial on activating/installing all of the add-ons which I use. I currently use only free add-ons, but eventually I will be posting tutorials using paid add-ons. I will probably also post free versions; we'll see. For my own convenience, I will be listing all of the add-ons I have activated, including the ones I don't really use, as I don't have the foresight to know whether I might cover them in the future.

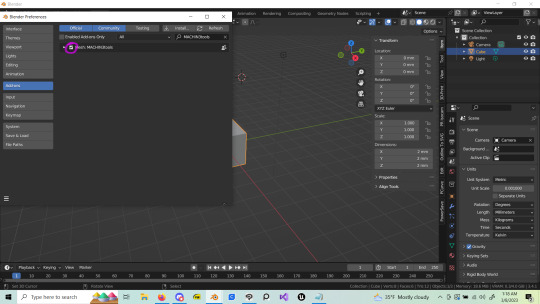
Back in the Preferences window, go to the Add-ons section. You will see that several add-ons are already activated; leave these alone.
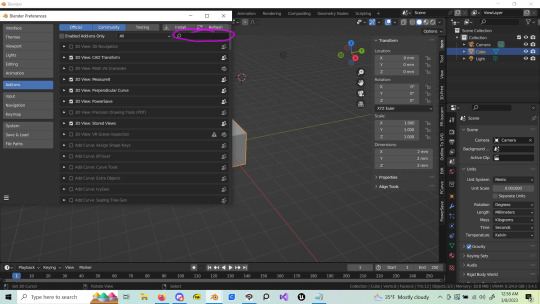
In the top right of the Add-ons section, there is a search bar. Feel free to use this, and activate the following add-ons: -3D View: MeasureIt -3D View: Stored Views -Add Mesh: Extra Objects -Import-Export: Export AutoCAD .dxf Format -Import-Export: Import AutoCAD .dxf Format -Import-Export: Web3D X3D/VRML2 Format -Interface: Copy Attributes Menu -Interface: Modifier Tools -Mesh: Edit Mesh Tools -Mesh: F2 -Mesh: LoopTools -Mesh: TinyCAD Mesh Tools -Node: Node Wrangler -Object: Align Tools -Object: Bool Tool

These are my downloaded add-ons. Below, I will explain how to install non-built-in add-ons. First, download the following add-ons. These will be either .zip or .py files. -CAD Transform https://blender-archipack.gumroad.com/l/nQVcS -Perpendicular Curve https://makertales.gumroad.com/l/FKzcF -PowerSave https://blendermarket.com/products/powersave -Bolt Factory MT Edit https://makertales.gumroad.com/l/CBpYCD -Create ISOCam https://www.reinerstilesets.de/anderes/blender-addons/create-isocam/ -Outline To SVG https://makertales.gumroad.com/l/O2SVG -MACHIN3Tools (free version) https://machin3.gumroad.com/l/MACHIN3tools
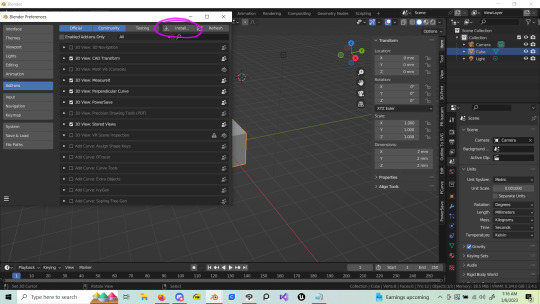
To install externally downloaded add-ons, first click the "Install" button at the top of the Add-ons section of the Preferences window.

To proceed, find the downloaded add-on's .zip or .py file in your files, then click the "Install Add-on" button.
To finally activate the now installed add-on, click the checkmark box next to its name. Repeat this process to install all of the downloaded add-ons.
We will now be changing a few of MACHIN3Tools's settings:

To open MACHIN3Tools's settings, click the arrow on the left of its name. Under Tools, activate "Smart Vert," "Smart Face," and "Clean Up."

Activate all of the pie menus down to "Cursor and Origin manipulation."
Now you are done setting up Blender for use in my tutorials. Next, a REAL tutorial, where we will be messing around in 3D!
5 notes
·
View notes
Text
Scaly Tail's First Blender "Tutorial": Opening Blender & Preferences
Before you follow my tutorials, you will want to make sure that you have the same controls and set-up as me. It's not exciting, but it's necessary if you don't know the basics well enough to use alternate ways of doing what I will be showing you. My add-ons will be covered in the next post.
This tutorial assumes that you have already downloaded and installed Blender. [https://www.blender.org/download/]

When you open Blender, you will be greeted by a splash screen (the pretty rectangle in the middle). For now, click anywhere to close the splash screen.
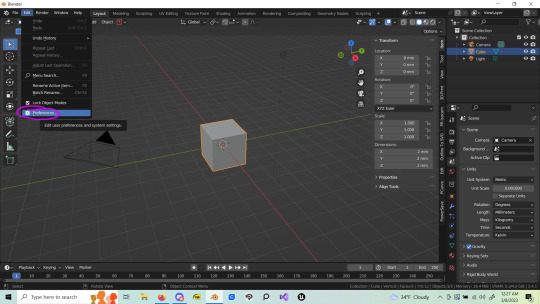
Click Edit on the top of the screen, then Preferences.

Blender's preferences will open. Ignore the Interface section.

(Optional) In the Viewport section, feel free to turn up the graphics settings if your machine can handle it.

In the Input section, you may want to activate "Emulate 3 Button Mouse" if you don't have a 3 button mouse, or a graphics tablet/pen with buttons capable of middle- & right-clicking. [A link you may find helpful: https://gamefromscratch.com/using-blender-on-a-laptop/]

In the Navigation section, I recommend activating "Orbit Around Selection," deactivating "Perspective," and activating "Depth."

In the Keymap section, change "Spacebar Action" to "Search."

In the System section, I recommend activating your GPU (do not activate both the GPU and the CPU). Shown are my settings. I also recommend increasing the number of Undo Steps. Mine is set to 128. The more undo steps, the more RAM Blender uses.
That's that! In the next post, I will be covering the add-ons I use. After that, we can get to some actual do-along-with-me tutorials!
0 notes
Text

I am Scaly Tail, and I will be writing Blender tutorials for you! Congratulations for finding me! I like hot girls and wish my dead rats were stil alive!
2 notes
·
View notes