
shitmographics
SHITMOGRAPHICS
Or shit I learned while working in the motion graphics field.
25 posts
Don't wanna be here? Send us removal request.
Last Seen Blogs

mygwdesign
Miyagawa Design

alieisntdead
alieisntdead 🏳️⚧️

thecraftyhistorian-blog
Crafty Historian

dragondom55
My lifestyle SEX&DRUGS&ROCK´N ROLL

donaturian
Donat
Text
Kyle Cooper at OFFSET
Kyle Cooper-Vimeo from OFFSET on Vimeo.
0 notes
Text
Copy Illustrator Path to AE Path
Copying paths from Illustrator to After Effects usually just creates masks. There's a good way around this to create paths instead.
Create a new shape layer from the layer menu. Open up the contents drop down and hit the arrow next to Add.
Add>path and you've created an empty path in the shape layer. Scroll open the path option and click on the property, "path". This is where you need to paste your path from Illustrator. Now all you have to do is add a stroke or fill and you're all set!
0 notes
Text
Ray Dynamic Color Plugin for AE
This plugin comes from Sander van Dijk who currently owns at Buck.
Ray Dynamic Color allows you to change global colors in your comps with the click of a button. Great for projects that have a certain color palette to follow.
Check out the video below to see it in action. Buy it here for only $30 bucks!
0 notes
Text
Compositing Optimization in Nuke
Here's a handy article describing tips to optimize performance and quality when compositing. Highly suggest reading it all.
Nukepedia - 10 tips to optimizing Nuke
0 notes
Text
Reset PRAM on Mac
Sometimes computers get all bogged up. One way to make sure your computer is in tip top shape is to reset the PRAM. It basically completely resets your RAM manually.
Just hold CMD+Option+P+R while booting up and wait until it chimes twice to release. That completes the reset and hopefully you're on your way!
0 notes
Text
HelloLuxx's iSculpt Training
HelloLuxx has set We Are Pitch Black's Sculpting training to free! This is a really good way to get up to speed sculpting in C4D. Grab it quickly!
0 notes
Text
Beeple's Everyday's Retrospective
Beeple has been creating an image a day for over 2750 days without breaking. The Creator's Project has an awesome article with Beeple talking about that and how he did it.
Beeple on the Creator's Project

0 notes
Text
Quickly Replacing Textures in C4D
0 notes
Text
V-Ray Dynamic Memory Limit Calculator
So here's a very undocumented feature of V-Ray and specifically V-Ray For C4D.
The Dynamic Memory Limit dictates how much memory is split up into different sub processes for V-Ray when rendering. The short description is that it can speed up rendering with the proper settings.
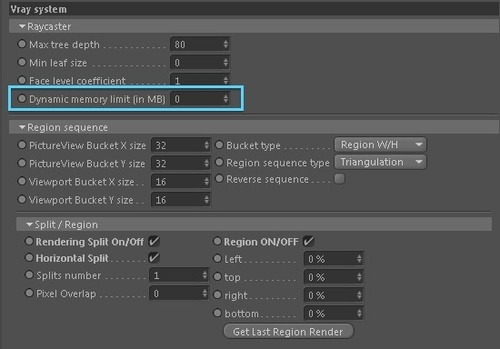
CGPinoy and Reygerali have posted this super helpful calculator for it.
V-Ray Dynamic Memory Limit Calculator
Just plug in how much ram your computer has (keeping in mind that you should really only have C4D open when doing this) and set your OS option and you have the amount of ram you can dedicate to it!
Side Note: Mac OSX is roughly the same as Windows 7.
0 notes
Text
Duplicating Comps - Quick Tip
Duplicating comps is extremely helpful when working on large projects or multiple small pieces to make a whole. Luckily there are two great ways to duplicate comps.
The easy fast way to duplicate a comp is to just CMD+D the comp in the project panel.

There's also a more robust way to duplicate comps which includes every single comp and file inside it. This can be quite helpful and quite messy at the same time.
True Comp Duplicator
This awesome plugin gives you tons of options to duplicate comps with files and even has some really good search options.
0 notes
Text
Complete IOR List
Index of Refraction is really important in the 3D world to realistically simulate fresnel values existing in real life. This list I found is a really large compilation and is easily the longest one I've ever seen.
http://forums.cgsociety.org/archive/index.php/t-513458.html
With great power, comes great responsibility.
1 note
·
View note
Text
Alberto Mielgo
Check out this amazing artist/director/animator's reel. Amazing stuff there.
REEL from alberto mielgo on Vimeo.
0 notes
Text
Hiding selections in Sketch and Toon
Here's a quick tip on how to hide unwanted things in the Sketch and Toon shader.

Selecting the unwanted edges or faces allows you to create a selection tag and exclude it from showing up in the sketch and toon render.


1 note
·
View note
Text
Pixel Art in After Effects
Taking pixel art created in photoshop into after effects usually ends up in a horribly resampled image due to AE's nature of using raster images. This simple trick lets you resize the pixel art without having to create high res versions of anything.

Changing the quality and sampling button on an individual per layer basis allows you to resize and keep the pixelated edges.
0 notes
Video
vimeo
Simon Holmedal from ManvsMachine shows off some sick xpresso and python action for a couple of projects he worked on.
0 notes
Video
vimeo
Ryan Summers presents 50 tricks in Cinema 4D that are literally mind blowing.
0 notes
Text
Cineware Camera Issues to After Effects
Cineware has made the jump from Cinema 4D to After effects generally much easier even though it is still far from perfect (especially rendering C4D files through AE which is ridiculously slower and devoid of options).
I recently had to use a front camera in Cinema 4D to render out some animation to give me the flat look that I needed. I then used cineware to import the camera and compositing nulls needed for the project and realized that they didn't line up in any way.
I troubleshooted the setup down to every detail and found out the reason it wasn't working properly.
Here are the camera settings before I switched over to Left view in the projection field.

Here they are after. Notice anything interesting?

Switching the camera to left view doesn't change the physical properties of the camera. All the coordinates and focal length are the same even though it should have changed technically.
This results in the camera being imported into AE that doesn't match the perspective of the left, front, right, back camera views in C4D.
The quick fix is to zero out your camera's settings to match the view you are currently using for rendering in either AE or C4D.
#aftereffects#Cinema4D#tutorial#cineware#Motion Graphics#motion design#design#shitmographics#dmoreno
0 notes