
Don't wanna be here? Send us removal request.
Statistics
We looked inside some of the posts by shotsyshadow and here's what we found interesting.
Average Info
Notes Per Post
1
Likes Per Post
1
Reblog Per Post
0
Reply Per Post
0
Time Between Posts
6 days
Number of Posts By Type
Photo
17
Last Seen Tumblr Blogs


Fun Fact
Tumblr Inc. is funded by 13 investors.
Photo
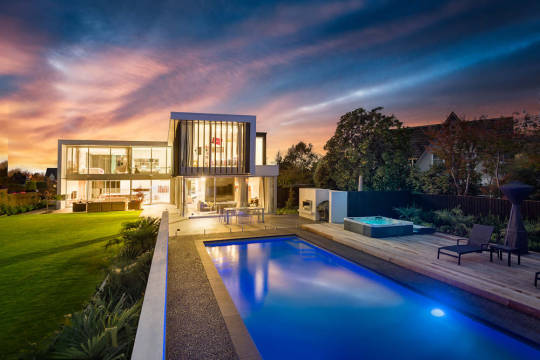
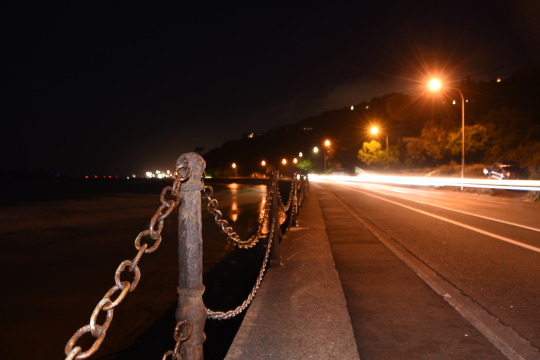
From Snap Architectural Photography - https://www.architectural-photography.co.nz/ This image Inspires me to do similar images, how the Twilight hour impacts to the south and how the darkened sky allows the light of the subject to be in full view, The different colors throughout the image, with the grass to the left and the water to the right, the Image feels warm and welcoming, My eyes every few seconds keep getting drawn back to the building and how amazing it looks during this time of day. Though one little thing that distracts a little from the building is the light in the pool, it catches my eye and takes me away from the building itself.
0 notes
Photo
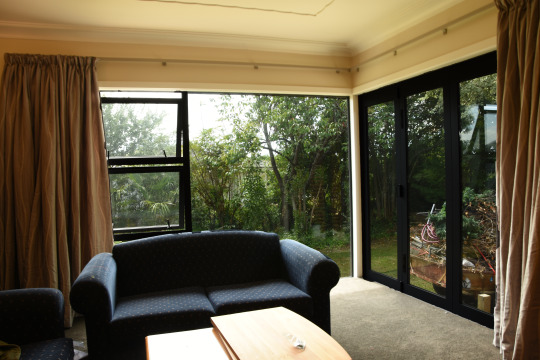
I managed to get a great Exposure of the outside, and an okay exposure of the inside, Merging the two photo’s was not the easiest as the tree’s move in the wind and so HDR was out of the question so i went for a layered merge that came out like this, I did some vibrancy and saturation touch ups as it didn’t quite look right
0 notes
Photo

Set this up on my desk using 3 sheets of A3 paper, a lamp with an A4 paper in a frame to even out the light, ISO was set to 100 and the Shutter speed was set to 2″.
0 notes
Photo
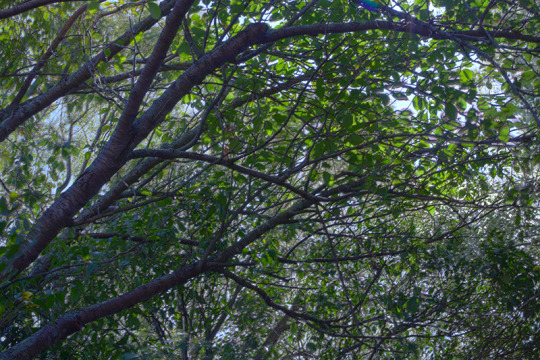
Used my Nikon D7200 with a 32mm Lens, Took multiple shots changing the Shutter speed to get under, over and good exposed images, could of chose a more stagnant object that did not blow in the wind
0 notes
Photo


Used a Canon D200 with a EFS 18 - 55mm Lens Inside Shot Set the ISO to 100 F22 Aperture of 1″6 Outside shot
Set the ISO to 200 F22 Aperture of 1/6 Should of Taken the shot of the outside earlier in the day where the sun would of been over the front of the house, however I was a little pressed for time and had some bad luck the following day.
0 notes
Photo


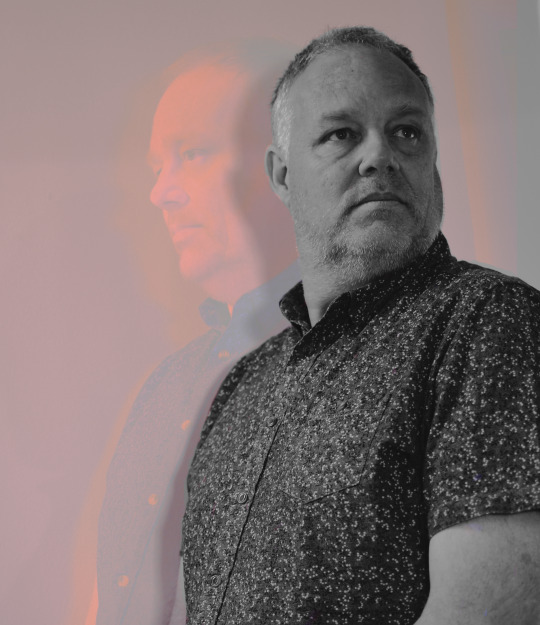
I used a Nikon D7200 with an AF-S NIKKOR 35mm 1:1 Prime lens, the ISO was set to 100 the Aperture was set to F2.2 and the shutter speed was set to 1/13.
I set up a light to be a direct light source for the two images I took and positioned it just behind and to the right of the camera, I took two images of the subject facing different ways, first in front of himself to the left of the image and then looking over above the light source to my right. The photoshop work went amazing and I started off by using a Color blend on the back image then adjusted the curves to darken the image and bring down the highlights before bringing down the saturation by -37 and took the lightness up by +6, I then added a black and white over the top of the base image that's in front and used the eraser tool to remove any additional colors and lines that were left on the Image
0 notes
Photo
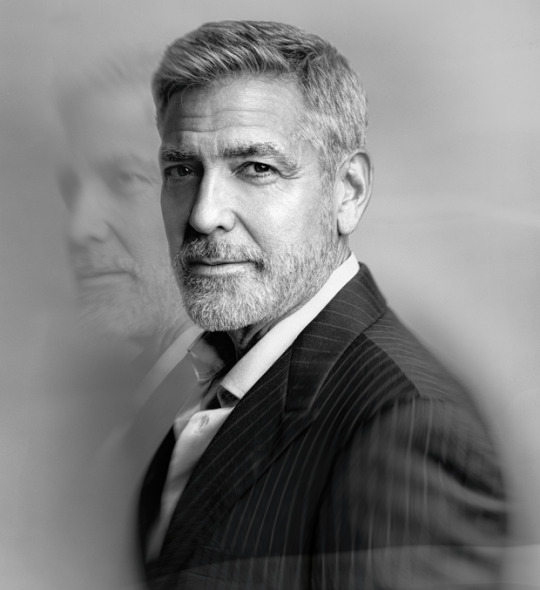
Image By Marco Grob, https://www.marcogrob.com/ This really Caught my eye with the way he Used the long exposure to capture his subject looking in two different places, and I feel a certain impact from the subject of this Image with them looking into the camera. However there has been a Line that was either Intentionally or unintentionally left there that kind of takes you out of the Photo, If I were to recreate this I would make sure the line was not there
0 notes
Photo

Overlay Attempts Camera: Nikon D7200 Lens: 18 - 200mm ISO 100 F/3.6 Purposefully overexposed the Sky to get the Overlay effect in post ---------------------------- PhotoShop Changed the Saturation up by 10 Changed the Vibrancy down by 4 Used the Hard light Setting to get the Neon lights to come through on the Tree
0 notes
Photo
Camera: NIKON D7200
Lens: AF-S DX VR Zoom-NIKKOR 18 - 200mm f/3.5 - f.6 IF-ED Using Flash ISO - 100 Shutter speed set to 5″
Aperture f/3.5
0 notes
Photo
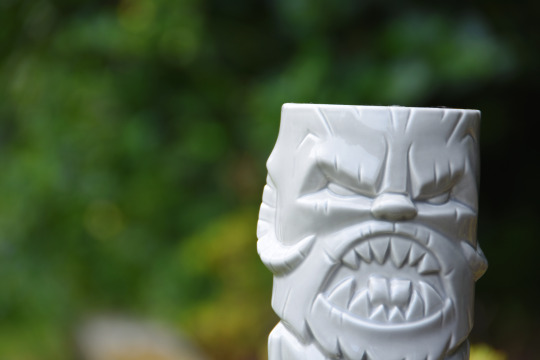
Camera NIKON D7200, f/5.6 Aperture, 1/160 Shutter speed, ISO 100, Focal Length 200.0mm, Lens: AF-S DX VR Zoom-NIKKOR 18 - 200mm f/3.5 - f.6 IF-ED
In Photoshop Used Curves to bring out the lighting, used the sharpen tool to get the Wampa within Focus, took the saturation up by 25 and the brightness up by 2
0 notes
Photo
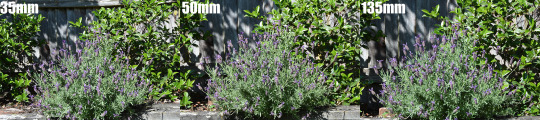
Focal length experiment
Camera: Nikon D7200 Lens: AF-S DX VR Zoom-NIKKOR 18 - 200mm f/3.5 - f.6 IF-ED
ISO:100 Aperture f/10.0
Shutter speed: 1/25
0 notes
Photo


2nd Photo Choice from the day of Photography
Camera Information
Canon
ISO 100
f/10.0
1/25
Focal Length: 18.0mm
Lens EF-S10-18mm f/4.5-5.6 IS STM
f/5.7
Date Captured: 02/11/2019
Edits with in Photoshop
Brightness -27
Contrast +25
Saturation +12
Made the background Black and White like the images that Sebastiao takes, however I decided keep Eragon (The Focus) In colour to create more of a Focal point, I could have used the Smart select more precisely but overall I am happy with how this turned out
0 notes
Photo


1st Photo Choice from the day of Photography
Camera Information
Canon
ISO 100
f/10.0
1/25
Focal Length: 18.0mm
Lens EF-S10-18mm f/4.5-5.6 IS STM
f/5.7
Date Captured: 02/11/2019
Edits with in Photoshop
Brightness -28
Contrast +36
Saturation +19
Selective Colour
Cyan -12
Magenta +1
Yellow +8
Black +81
This photo is inspired by the pictures that Sebastião Salgado produces with wildlife (Although this is just a house cat), I want to capture the free nature of the animal that Sebastiao managed to capture with his photo of the leopard swimming through the water, Although I do wish to keep the colour in the photo as I enjoy the dark ginger and blond fur Saphera has..
0 notes
Photo

This photo from Sebastiao Salgado draws my eyes to the swiming leopard, it reminds me of all the photo’s I take of my cat and inspires me to take more, the lovely patterns on the back of the Leopard draw my eyes and is enhanced with the lack of colour in the photo Photo take from: https://www.google.com/url?sa=i&source=images&cd=&ved=2ahUKEwjDwKXU77_lAhVFeysKHcCsA4cQjRx6BAgBEAQ&url=https%3A%2F%2Fenvolverde.cartacapital.com.br%2Fem-exposicao-e-a-venda-fotos-ineditas-de-sebastiao-salgado-e-araquem-alcantara-irao-ajudar-na-preservacao-do-pantanal%2F&psig=AOvVaw0Mn_b5xSSxO5fIpDHLJu62&ust=1572383214498456
1 note
·
View note
Photo

This photo form Sebastiao Salgado really drew my eyes the built up Ice is a unique shape to the thicker ice on top looking like a Castle or some sort of fortification. Original photo from: https://ascmag.com/blog/johns-bailiwick/sebastiao-salgado-and-the-spectre-of-hope-part-2-genesis
0 notes
Photo

Used Black and White filter on the image changing the percentages to 38% Red, 49% Yellow, 40% Green, 53% Cyan, 20% Blue, -200% Magenta Then I used the warm filter at 60% density Used a Canon 200D to take the Shot with a EF-S10-18mm f/4.5-5.6 IS STM
Had the ISO maxed out at 25,600 at f/4.5 and 1/30 Shutter speed
0 notes
Photo
Photo 1 taken with a Canon D200 Lens: EF-S18-55mm F/4-5.6 IS STM f/5.6, ISO 100, 1/320 Focal Length: 55.0mm
Exposure: Auto at 100
Photo 1 Saturation +16. Curves Input and output Layer. 1st Input 27, Output 24, 2nd Input 98, output 122, 3rd input 163, Output 206.
Photo 2 taken with a Canon D200 Lens: EF-S18-55mm F/4-5.6 IS STM
f/22.0, ISO 100, 1/15
Focal Length: 55.0mm
Photo 2 Curves Input adjustment layer 1st Input 26, Output 24, 2nd Input 59, Output 84, 3rd Input 182, output 174. Saturation +28
0 notes