
This is Emmy's Simblr, currently only playing ts2/ts3 but i've posted a lot of general ccfinds for 2-4 so. Learning how to make my own cc right now.
Don't wanna be here? Send us removal request.
Statistics
We looked inside some of the posts by simmyemmy and here's what we found interesting.
Average Info
Notes Per Post
5K
Likes Per Post
4K
Reblog Per Post
1K
Reply Per Post
111
Time Between Posts
6 days
Number of Posts By Type
Video
1
Text
15
Note
1
Last Seen Tumblr Blogs


Fun Fact
Tumblr.com rank in the US is 25.
Video
youtube
How to build a walkout basement in The Sims 2 🌼
I didn’t think of this when I was making the video, but if you use the flowers I used, sims won’t be able to water them without the water inaccessible flowers fix
Another option is to use the perfect plants mod
You can also use custom flowers that don’t need watering, I recommend these & these
472 notes
·
View notes
Text
Yet Another Package Editor

Download the latest version here
YaPe is a modern package editor for DBPF (.package) files
Features:
Edit any package - FAST
List and edit resources in a package
Filter resources by type
Easy editors for several resource types
Supports opening ANY DBPF-coded .package, .dat, or .sc4 file
Easily reduce texture size, add/remove/recreate mipmaps, change texture format
Import textures by dragging, export DDS
Native on Windows and Linux
Why make yet another package editor?
Simply said, because SimPe can be kind of cumbersome especially on Linux, and package editors other than SimPe (s3pe, s4pe, iLive's Reader etc.) do not support Sims 2 resources.
To illustrate, I timed someone shrinking a texture (convert RawARGB32 -> DXT1, shrink 2x) in both SimPe and YaPe:
SimPe + GIMP: 1m 30s
YaPe: 10s
Originally this started as just a way to easily test if my DBPF library was doing the correct thing, but over time it has grown to become a half-decent editor suitable for more general use.
Tutorial / usage tips
Here I will explain how to shrink and convert textures in YaPe because that's what I imagine most people will use this program for right now, but of course you can use it for other things as well.
Let's get started by getting the program to look the way you want to: use the options in the top left to change the scale of the interface and switch between dark and light mode.
Now drag a package file into the program (don't worry about closing the sims except when you save the package), a list of resources in the package will be visible. You can find out what the abbreviations mean by hovering your mouse over them; in general I try to add tooltips like this to buttons or options that are unclear.
Don't be afraid to mess around and make changes! The changes you make are never saved unless you press the save button, so if you simply drag your package file into YaPe again without saving you will get your original package back (there is currently no undo function, but it is a planned feature).

All these resources are great, but we're only interested in the textures for this tutorial so let's set a filter. Right click on a texture (TXTR) and select "Filter on type".

Great! Now you can only see the textures we're interested in. You can disable this filter by unticking the "filter" option at the top.

Now click on the "TXTR" to open the texture, it will open a new tab in the lower half of the window by default. If your window is not very big (like mine is for this tutorial) you might have trouble seeing the texture and all the options. You can drag the tab around and put it somewhere else in the program, I'm going to put it on the right and make it a little bigger so we can see what's going on.

Okay, now we can see all the options, and well... there's a bunch of them. We'll go over some of the options that you'll likely want to use but feel free to experiment of course.

First, let's have a look at the texture viewer at the bottom: you can zoom in on the texture by holding control and scrolling, and you can change which mipmap is displayed by clicking the radio buttons above the texture.

But wait, this texture does not have enough mipmaps to show up in game! (post by @pforestsims) Let's fix that right this instant by clicking the "Add missing mipmaps" button in the middle.

Okay, now the mipmaps will show up in game, which is good... except that this mipmap is really blurry. (post by me) Luckily we can fix this really easily, just click the "Recalculate all mipmaps" button.

Much better!... except that we've created a new hidden problem: the leaves will disappear when zooming out in game (blog by lisyarus) but even this problem can be fixed. We can actually preview what the texture will look like when zoomed out by switching the format to DXT1 since DXT1 has binary transparency, just like alpha tested textures like leaves and grass.

Right, so the leaves have a bunch of holes that don't look right when zooming out, let's change that. Above the "Add missing mipmaps" button there is the "Preserve transparency" slider: try changing it to something like 120-170 and click "Recalculate all mipmaps", you can see that the transparency changes, if it's still too thin/transparent set the value higher and recalculate again and so on.

Have a look at all the mipmaps (zoom levels) and once you're satisfied with the transparency change the format back to DXT5.

This texture will now look great in game! But it is also quite large, so we can reduce the size 2x smaller without sacrificing very much in terms of looks (sorry to all the cc authors who love their large textures). Click the "Remove largest texture" button, which will make it so that the first mipmap becomes the largest texture effectively reducing the size by 2x. Like mentioned it does use the first mipmap so make sure to fix any blurry mipmaps first.
You can repeat the same process for the other textures in the package, and then we're done. Save the package by clicking the save button in the top bar, and have a look in game at your beautiful textures.
Another option is to drag images/textures you've made somewhere else into the program (with special support for dds files), for a full lists of supported image formats you can look here. (image-rs documentation) The image/texture will currently go into the firsts open texture resource tab because of UI framework limitations.
Here's a look at some of the other editor currently implemented:


Enjoy :)
195 notes
·
View notes
Note
Hi! I adore your lighting mod and I was wondering... Is there a version of that/shader fixes that keeps the snow blue? I've been trying to use every possible combination of shader mods and I can't find a way to maintain blue snow.
Okay so I went in to answer this question but this would end up being a masterlist instead. You can use the individual mods on this list if you want the other fixes without the blue snow.
TS2 Shader Mod Masterlist
@criquette-was-here‘s Shader Mods: Neighborhood Lighting Remedy, Better Nightlife, Seasons winter road fix
@simnopke‘s SkyFix, Sim Shadow Fix, Accurate Neighborhood Terrain Lighting (technically not a shader mod but it counts too)
@lazyduchess's Overly Bright CAS fix and Lot Lighting Fixes (has versions (combined with my no blue snow fixes)
If you want brighter roofs, you can use Niol’s Roof Color Fix OR Deastrumquodvicis’s Brighter Roofs…But Not Too Bright!
If you want to change the hood and lot water, @an-elegant-simblr‘s Water Overhaul or Niol's Water Mod
Shader Mods by @crispsandkerosene: SimStandardMaterial Shader Mod (I personally use the Brighter Sims version), Standard Material Shader Mod (conflicts with the Overly Bright CAS fix and my own shader fixes for it so they also have versions with both lazyduchess's fix and also combined with my no blue snow version)
@pineapple5050's Post-Processing Mod (contains the Sky Fix, better Nightlife, Niol's roof mod, and Voeille's water mods)
my No Blue Snow mod (combined with several other shaders) + my post-processing mod edit
64 notes
·
View notes
Text
Quick Tips for GIMP
"These tips are for GIMP, but I have been learning from tutorials for PS as well, and have been applying them in GIMP. I found these two programs to be quite interchangeable, which makes sense, because GIMP was made as a free alternative for PS."
30 notes
·
View notes
Text
What's the status with SFS? I've been mega busy so I've heard about the hacking/malicious files but how is everyone else approaching this? Is it mostly fixed now depending on the creator or do I still need to avoid SFS at all costs?
0 notes
Text
I'm going to try to finish the Linux with Steam+Proton install guide this weekend, I'll post it to this tumblr when its ready.
0 notes
Text
I've got the Steam Proton version of TS2 Legacy Collection working on Linux with BodyShop/Sims 2 Pack Clean Installer (no Lutris involved). Would anyone be interested in me making a guide? I've gotten a lot of disparate forum posts and had to go on Reddit for help. I wouldn't mind writing up a more central guide if anyone is interested.
3 notes
·
View notes
Text
GUID Database Revival
I've finished setting up a way to revive the GUID database, albeit not an automatic one, it is low-key, but rather simple. Instructions are on the pinned post. [It's a Dreamwidth community, basically one webpage where people can dump their GUID info, straight from Excel or a list].
It is searchable with multi search add-ons for browser. Search for multiple entries in one go.
Avoid conflicts with originally registered GUIDs (Not foolproof; assuming GUIDs where assigned in a certain way).
Avoid conflicts with new random GUIDs (that are in the DB).
Creators are indexed - see if your favorite active creators are on there.
Everyone can join, but only members can post. Happy Simming! https://sims2-guid-database.dreamwidth.org/ Example:

Obligatory CCR music:
youtube
75 notes
·
View notes
Text
For Linux Simmers Running TS2:LC on Steam
It's funny that right when I was getting into Linux is when the big buzz about running TS2 through Wine started going around. I was never a victim of pink soup myself but am afflicted by the intense need to play my silly little games on every system possible, and it just so happens I bought a 2017 Macbook Air to run Linux Mint on. I had seen TeaAddict's video where she used Lutris to play the game, but I wasn't able to get LC working on Lutris through Steam but since I have a Steam Deck remembered that it runs games through its own version of Wine called Proton. Observations from my experience installing it so far below:
If you go to game settings for TS2:LC in your Steam library under compatibility you can try (I used version 9.0.4) and I was able to get it to work decently on my Macbook. It doesn't run as good as on my desktop of course but I only really noticed a problem with camera controls and edge scrolling. This is without mods.
Obviously I wanted more! I craved mods! Unfortunately the way Proton works is it makes a separate file path to mimic the Windows one so I had to scour my file system to find the Documents and Program Files TS2 folders. I ended up just searching the computer to find the folders and made linked folders (kind of like shortcuts) and put them on my desktop. I've managed to get CC and CEP working.
Currently the secondary programs are a work in progress. Each game has its own little Proton set up so I can't just install the Body Shop installer .exe through Steam. I did a search and found a reddit post talking about protontricks, a program that uses proton outside of Steam, to install a second program within a primary program's profile. I managed to get the installer to work with manual install once I figured out the proton file path for my game folder.
I've not been able to get it to run yet, it ran an error saying "Direct3D returned an error: D3DERR_INVALIDCALL! The application will now terminate”. According to another reddit post I need to get the DXVK vulkan support working, this is still a work in progress. I will update with my progress but wanted to share so other people that purchased TS2 through steam can get the game running on Linux with mods.
0 notes
Text
Update, so I did a quick search and found the directories for downloads. I'm going to try installing CEP to see how it goes. After that I'll try to figure out the sims2pack clean installer and Body Shop. I know there's a way to add external programs to Steam but I don't know if you can run them with Proton. Only one way to find out I guess?
I'm only just getting back into the game from the Legacy Collection and I've been able to get it working with Steam on a Macbook Air 2017 running Linux Mint and I know the general tutorials just use Lutris but I couldn't figure out how to get Lutris to work with Legacy Collection so I just did it with Steam and Proton. Only problem now is there is no EA Games/The Sims 2 Legacy/Downloads folder. What I've googled about people using it with UC is that the folder is just supposed to like be there? Am I missing something?
1 note
·
View note
Text


Have you ever spotted a pretty cc to download only to know afterwards that it's for another game? In a downloader's POV yeah, it sucks. But as creators, we can avoid such confusion if we label it with the correct game. So here's some banners you can use as supplement image to help downloaders confirm they're getting the cc for the right game. These are actually inspired by these banner images made by @2fingerswhiskey, but put game logos instead for easier identification.
Here's alternate Mediafire links if tumblr somehow degrades image quality:
TS2 banner | TS3 banner | TS4 banner
And a happy boop-filled simblreen to everyone! 👻😼🐾

753 notes
·
View notes
Text
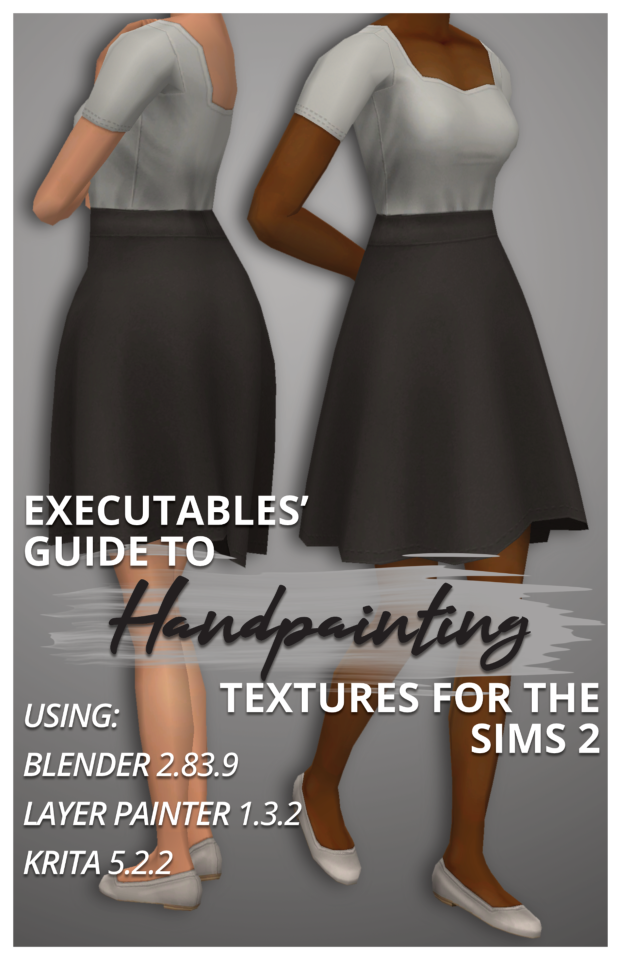
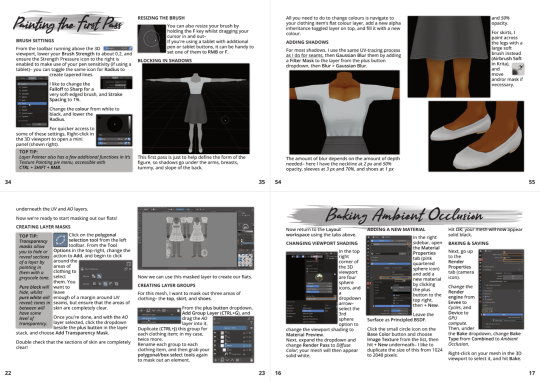
Executables' Guide to Handpainting Textures for The Sims 2 | Download PDF (65 pages)
Have you ever wondered how to paint clothing textures from scratch?
I've been using paid software like Milkshape, Photoshop, and 3D Coat Textura to texture Sims 2 models for years, but I've managed to translate my process to completely free open-source software!
I've broken down the entire process from start to finish for complete beginners (who may never have made a clothing recolour package before), but more experienced CC creators can skip around as needed using the PDF bookmarks.
You don't need a graphics tablet– but you may want one once you've played around with this! :)
The clothing shown on the cover is also downloadable through the document.
Hope this inspires you to make something! :D
317 notes
·
View notes
Text
Extended StandardMaterial Shader for the Sims 2


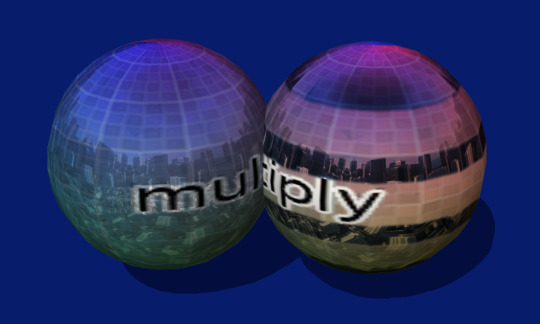
A Shader Edit/Default Replacement "StandardMaterial" is the shader commonly used by sims objects. It tells the game how to render them, and by default offers features such as making them glowy or transparent. However, most of its effects apply to the whole material at once. I figured out how to edit it! So here is my improved version. It now supports: - An "additive" texture map, lighting up specific areas of the material. - An envCube mask, controlling the intensity of this effect via a texture. - Two new envCube modes, and improvements to an undiscovered one. + "Blend" replaces the base texture by the envCube's. + "Multiply" multiplies them together (duh). + "DiffuseRadiance", which already existed in the shader, adds the envCube texture to the light received by the material rather than its already lit texture. All three of them support the envCube mask and the envCubeCoef parameter. The envCube modes are mutually exclusive, but all effects can otherwise be used with each other. The download itself contains the shader package, a pdf ReadMe listing features and material parameters, and examples showcased on my envCubeTesterObject (also included). The readme lists the specific shader files I've edited, in case anyone else made an incompatible mod. (I've not included the recolours from the first preview pic as they're kind of lame lol + I had to make a CEP extra for the robot.) I'm hyped to see what cool objects and recolours people will make with this! And I'm probably forgetting information.
-> Download Everything at SimFileShare --------------------------------------------------------------------------- If you use LazyDuchess' Overly Bright CaS Fix, download this version instead. It combines the two mod, so you should delete LD's original package file. -> Download Everything at SimFileShare -> Download Just the Mod Package at SimFileShare If you use DreadPirate's ShaderFixes with LazyDuchess' Overly Bright CaS Fix, download either of these versions instead. Delete the shaderfix "main" package. These combine the three mods into one. -> Download Everything (both versions included) at SimFileShare -> Download Just the Mod Package (edited lot skirt) at SimFileShare -> Download Just the Mod Package (Maxis lot skirt) at SimFileShare The other versions of DreadPirate's mods (including any of the water, roof and hood shaders) don't modify anything mine does. They should be useable alongside each other no problem. (l'll do more merging with incompatible mods as they're reported to me.)
573 notes
·
View notes
Text

I've put together some of my favourite shiny TXMT settings - these are for TS2 CC creators /anyone editing recolors in SimPe.
I've included two custom envcubes.
Also recommended: my Shine Removal Kit.
Shine TXMT Settings
Download: SFS | BOX
These settings should be added to TXMT with 'merge' button /not 'import'/. Instructions are included.

As is the case with StandardMaterial, envcube reflections get much stronger outdoors. This pack includes various TXMT settings for opaque object recolors, to simulate materials such as glass, porcelain, gold, polished metal, stainless metal, cars and other glossy outdoor objects.
Shine settings can be merged with all kinds of settings (tinted, transparent, with textures, or textureless).
stdMatEmissiveCoef and stdMatDiffCoef brightness might affect the intensity of reflections
Please note my shine settings can also be used for SimStandardMaterial stuff BUT results will be a little different /CAS accessories using that shader look the same indoors and outdoors/.
One of the setting files features my custom greylivingroom-envcube, it's based on TS2 gothlivingroom_01-envcube, which I very often use for glazed pottery or glass bottles -BUT it doesn't have any brassy tones, unlike original.

And there's also pfmall-envcube which I created for cars displayed indoors, but it's not exactly how I imagined it - I haven't found much use for it so far. Both custom envcubes are tiny, 64x64 px DXT5.

A Bit Of Gloss: porcelain / glass kind of shine, good for small objects, I often use it for bottles
A Bit Of Neutral Gloss: same as above, but no warm hues
Cool Sparkles: highly polished surface effect, good for small and larger objects
Shiny Gold & Stainless Steel Shine: what it says on the tin
Subtle Shine Blueish: barely visible indoors, this one is good for outdoor metals
Car Varnish Glossy Outdoor: reflection with green grass, trees and sky
Glossy glowing: for lit panels and such
193 notes
·
View notes
Text
Why I started using DXT1 texture format for TS2 CC again (sometimes)
In the past I discouraged ppl from using it. But it has one benefit, which TS2 CC creators shouldn't ignore: DXT1 textures are about half the size of DXT3. DXT1 is best for stuff that is not meant to be looked at from close distance - where you don't need high quality, but you need original texture - 1024x or even 2048x - to keep it crisp. Large and very large CC hood decor, for example.
There are two facts about textures that some ts2 cc creators and cc hoarders are probably unaware of:
Lossless compression (compressorizer etc) significantly reduces file sizes, but it does NOT help texture memory, because texture files get uncompressed before being stored in GPU texture memory cache
Byte size does NOT equal resolution. For example: Raw32Bit texture takes up around four times more space in texture memory cache than DXT5
DXT3 2048*2048 px takes up ~4MB, but DXT1 2048*2048, thanks to its harsh 8:1 compression, takes up only ~2MB of texture memory cache, which is an equivalent of two makeup textures 512*512 px Raw32Bit format (TS2 makeup creators' favourite :S ).
@episims posted a comparison of DXT formats here - but please note Epi compared texture sizes after those were compressorized.
To change texture format in SimPe you need to install Nvidia DDS utilities, which can be downloaded here (SFS).
*This is about GPU texture memory. As far as I know, it's unclear how internal TS2 texture memory works - does it benefit from lossless file compression or not? No idea. But IMO we don't have a reason to be optimistic about it :/ What we know for sure is - the easiest way to summon pink soup in TS2 on modern systems, is to make the game load large amounts of texture data (large for TS2 standards anyway) in a short amount of time.
DXT formats use lossy compression which affects texture quality - this compression matters for texture memory.
DXT1 512*512*4 (4 bytes per pixel) / 8 (divided by 8, because of 8:1 compression ratio) = ~131 KB
DXT3 512x512 px (4:1 compression) = ~262 KB
Raw32Bit 512x512 px = ~1MB
2048x1024 px DXT1 texture takes up around as much texture memory as 1024x1024 px DXT3 or DXT5 (non transparent*) = ~1 MB
*DXT5 has 4:1 compression just like DXT3 but it can store more data in alpha channel, and that allows for much better looking transparency (if smooth alpha is present, size is increased). DXT1 does not support transparency.
I don't want my game to look like crap, but if texture looks OK as DXT1, then why not use it. Aside from hood decor, I've been reconverting some wall and floor textures for myself to DXT1 recently, instead of resizing.
Some ppl might cringe on seeing 2048x2048 skybox textures but to me large texture is justified for such a giant object. I cringe at Raw32Bit makeup.
I'm slowly turning all Raw32 makeup content in my game to DXT5 (no mipmaps). I've edited enough of those to know, that quite often the actual texture quality is not great. If a texture has been converted to DXT3 at some point, alpha channel is a bit choppy. "Upgrading" such texture to Raw32 doesn't do anything, other than multiplying texture size by four. I don't know how 'bout you, but I only use one or two skyboxes at a time, while my sims walk around with tons of face masks on them, so it's a real concern to me. And don't make me start on mip maps in CAS CC. Textures more blurry on zoom-out, and at a price of 33% larger size? What a deal :S
Note: Raw8Bit (bump maps) / ExtRaw8Bit (shadows etc) are also uncompressed formats, but don't contain color data and weight around as much as DXT3.
/I've taken out this part from a long post I'm writing RN /
131 notes
·
View notes
Text

Merry Christmas Everyone!!
I've been pretty quiet on here, but that doesn't mean I've stopped simming! First up I'd like to say thanks (and sorry!) to all the lovely people who've sent me messages :) I'm gonna try my best to reply to everyone asap!
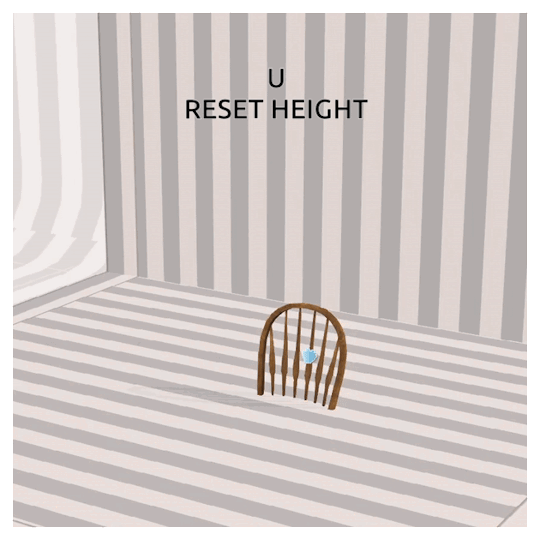
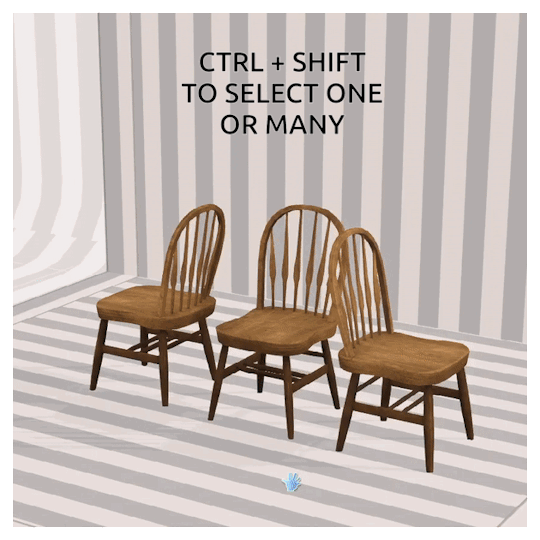
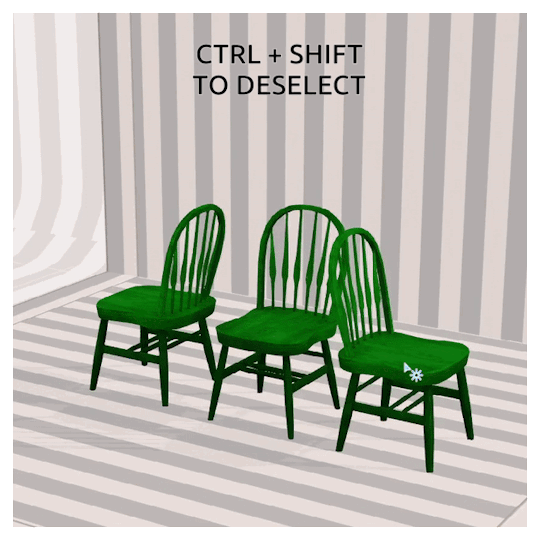
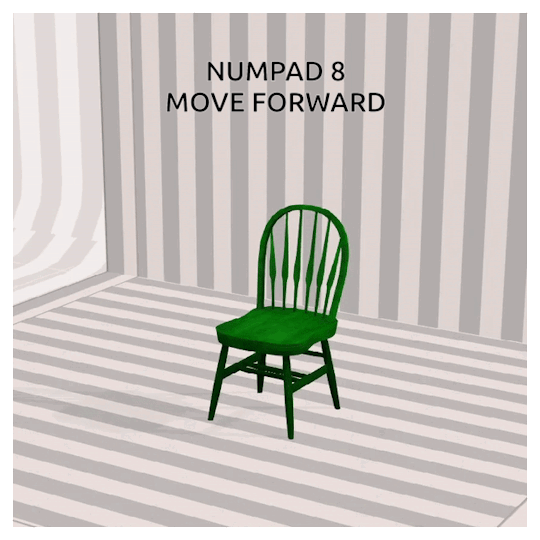
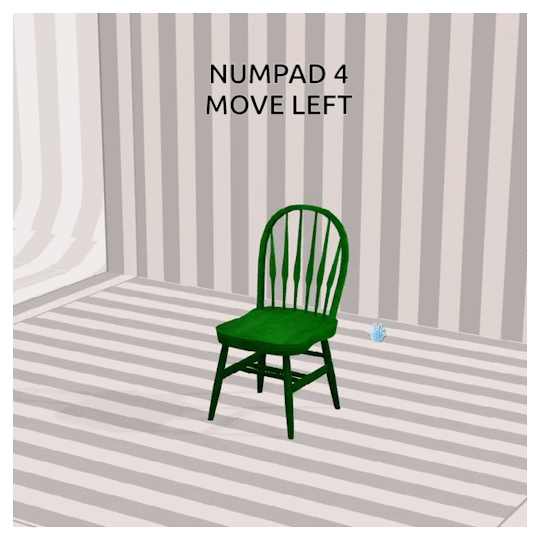
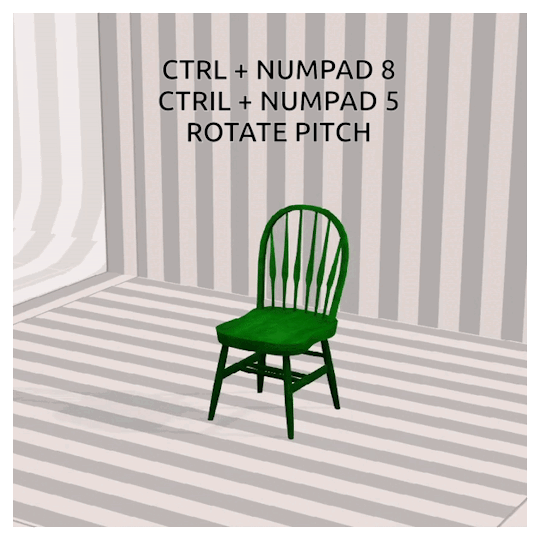
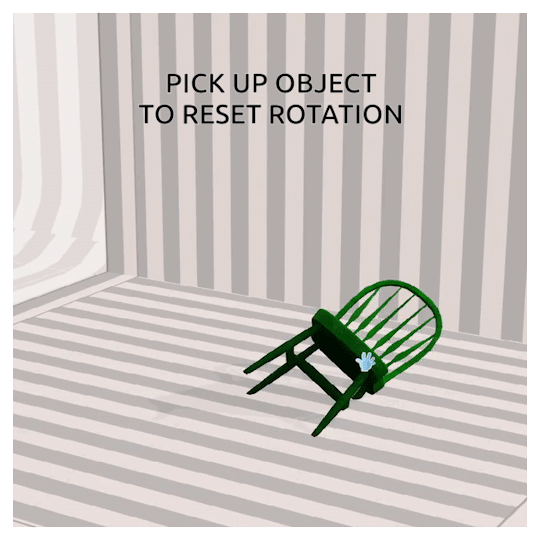
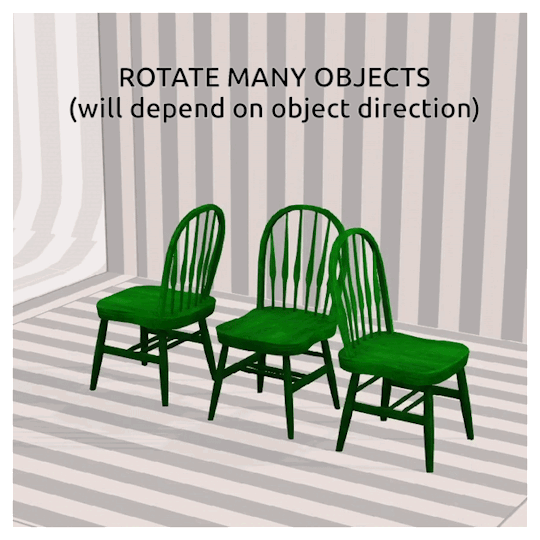
For christmas I wanted to share something special - so here is the public release of the first version of my Decorating Tools mod (or S3DT)
Quick Description - This mod adds hotkeys to the game to allow you to move objects up/down, left/right and rotate in all directions, similar to T.O.O.L for TS4 PDF Guide included below!
To my wonderful patrons - thank you for your support <3 I feel bad that real life has gotten in the way of me delivering more content to you all, so I'll likely be closing it soon! If it's possible, I'll also refund the last couple of months due to my inactivity. Anyone who wants to can still donate to my Ko-Fi
MOD INSTRUCTIONS AND DOWNLOAD BELOW THE CUT


This version is compatible with icarusallsorts' Transmogrifier Mod, and until I can figure out how to script it better, my mod actually REQUIRES it in order for them to be compatible together.
*** EDIT - For some, you might need to use CTRL + SHIFT + Click to bring up object menus! ***
If you would like a version that does not require the Transmogrifier (but is therefore incompatible) send me a message!
FUTURE PLANS: - Adapting movement depending on camera direction - Adding a UI interface for interactions and manual rotations etc. - Scaling interactions with hotkeys
Don't be afraid to reply to this post, send me an ask or a private message if you have any questions or problems. I'm also in the Creator's Cave discord, so feel free to @ me there too :) And please tag me or use the tag #S3DT if you come up with any cool ways to use this mod!
DOWNLOAD S3DecoratorTools.V1
VIEW PDF GUIDE
Thank you to @greenplumbboblover for her help with pesky matrix44's, granthes and Misukisu for laying the groundwork for this mod, and @puddingface1902 for his super helpful videos!
@pis3update
3K notes
·
View notes