
Last Seen Blogs

story-slayer-speaks
Untitled

namitha
Lush Luminary

aaronospina-blog
DΛNCANF

mintybloomz
Peppermint

staaradonya
🎵STAAR LaSalle ADONY’A🎤✨💫✨🌟
Text
SpringMVC Digging Road 4 - Annotation2 - Other uses of RequestMapping
##Request method qualification
###Request narrowing
Used directly on the Controller
>@RequestMapping(value="/request")
####Methodologically,
>@RequestMapping(value="/request",method=RequestMethod.GET)
####Combination mode
>@RequestMapping(value="/request",{method=RequestMethod.GET,RequestMethod.POST})
##Request parameter mapping
####The specified parameter name exists in the request data
>@RequestMapping(params="submitFlag",method=RequestMethod.GET)
Said the request has a parameter name of "submitFlag" and the request method is "GET", which can be matched.
####Parameter name is not specified in the request data
>@RequestMapping(params="!submitFlag",method=RequestMethod.GET)
####Parameter name = value specified in request data
>@RequestMapping(params="submitFlag=create")
####Parameter name != value specified in request data
>@RequestMapping(params="submitFlag!=create",method=RequestMethod.GET)
####Combined use is the relationship of "and"
>@RequestMapping(params={"test1","test2=value"})
##Request Headers mapping
####The request header data has the specified parameter name
>@RequestMapping(value="/header/test",headers="value")
####Parameter name is not specified in the request header data
>@RequestMapping(value="/header/test",headers="value")
####Parameter name = value specified in request header data
>@RequestMapping(value="/header/test",headers="value=data")
####Parameter name != value specified in request header data
>@RequestMapping(value="/header/test",headers="value!=data")
####Combined use is the relationship of "and"
>@RequestMapping(value="/header/test",headers={"Hello=abc","Accept!=text/vnc.wap.wml"})
####Parameter name = value specified in request header data
>@RequestMapping(value="/header/test1",headers="value=data")
**Note: Generally, headers contain the contents of Agent and Cookie.**
##Request type qualification
####The following code only accepts the request type of application/json, that is, the value of Content-Type
>@RequestMapping(value = "/consumes/test", consumes="application/json")
##Set the return type
####Set the return type
####The following code sets the return type to application/json
>@RequestMapping(value = "/produces/test", produces="application/json")
0 notes
Text
SpringMVC Digging Road 3 - Annotation1 - Usage of value in RequestMapping
``
@Controller : Used to identify the processor class
@RequestMapping : Mapping rules of request to processor function method
@RequestParam : Binding of request parameters to method parameters of processor function processing methods
@ModelAttribute : Request the binding of parameters to command objects
@SessionAttributes : Attributes used to declare session level storage are placed on the processor class. Usually, the names corresponding to model attributes (such as @ModelAttribute) are listed, and these attributes will be stored transparently in the session
@InitBinder : Custom data binding registration support is used to convert request parameters to the corresponding types of command object attributes
@CookieValue : Binding of cookie data to method parameters of processor function processing method
@RequestHeader : Binding of request header data to processing method parameters of processor function
@RequestBody : Binding of the requested body (type conversion via HttpMessageConverter)
@RequestStatus : Define the processing method of processor function/the status code and reason returned by the abnormal processor
@ExceptionHandler : Annotated declaration exception handler
@PathVariable : Request the binding of template variable part in URI to the method parameters of processor function processing method, so as to support RESTful architecture style URL
```
Directory structure reference :
https://blog.csdn.net/qq_33811662/article/details/80699470
First of all, the jsp part of the code:
login.jsp:
<%@ page language="java" contentType="text/html; charset=UTF-8"
pageEncoding="UTF-8"%>
<!DOCTYPE html PUBLIC "-//W3C//DTD HTML 4.01 Transitional//EN" "http://www.w3.org/TR/html4/loose.dtd">
<html>
<head>
<meta http-equiv="Content-Type" content="text/html; charset=UTF-8">
<title>Insert title here</title>
</head>
<body>
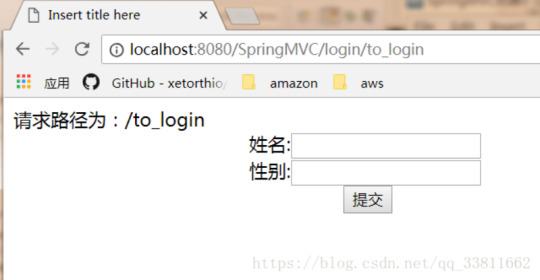
请求路径为:${path}
<center>
<form action="do_login" method="post">
姓名:<input type="text" name="name" /> <br />
性别:<input type="text"name="gender" /> <br />
<input value="提交" type="submit" />
</form>
</center>
</body>
</html>
Only @RequestMapping and @RequestParam will be discussed here
@RequestMapping
View source code:
@Target({ElementType.METHOD, ElementType.TYPE})
@Retention(RetentionPolicy.RUNTIME)
@Documented
@Mapping
public @interface RequestMapping {
String name() default "";
@AliasFor("path")
String[] value() default {};
@AliasFor("value")
String[] path() default {};
RequestMethod[] method() default {};
String[] params() default {};
String[] headers() default {};
String[] consumes() default {};
String[] produces() default {};
}
RequestMapping is an annotation used to handle request address mapping, which can be used on class and interface methods. When used on class or interface, it means that all corresponding request methods in class take this address as the parent path, and the basic fields are name, path(value)(path and value refer to each other), method, params, headers, consumes, produces
More commonly used are:
####value(path)
Specify the actual address of the request, and the specified address can be URI Template mode
####method
Specifies the requested method type. E.g., GET, POST, PUT, DELETE, etc
####consumes
Specify the Content-Type for processing requests, such as application/json, text/html;
####produces
Specifies the content type to be returned, which will only be returned if the specified type is included in the (Accept) type in the request header
####params
Specifies that some parameter values must be included in the request for the method to process the request.
####header
Specifies that some specified header values must be included in the request for the method to process the request.
###Usage of value:
Declare on the method:
@Controller
public class LoginController {
@RequestMapping("/to_login")
public ModelAndView toLogin(){
System.out.println("进入 to_login");
ModelAndView mv = new ModelAndView();
mv.setViewName("login");
return mv;
}
}
At this time, the request address is ip/project_name/to_login
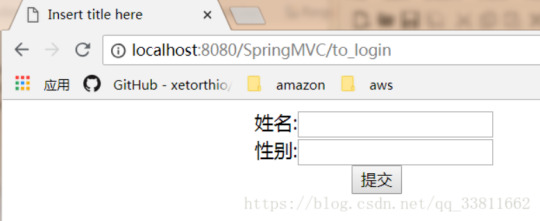
Declare an @RequestMapping annotation on the class:
@Controller
@RequestMapping("/login")
public class LoginController {
@RequestMapping("/to_login")
public ModelAndView toLogin(){
System.out.println("进入 to_login");
ModelAndView mv = new ModelAndView();
mv.setViewName("login");
return mv;
}
}
At this time, the request address is ip/project_name/login/to_login

* Common URL mapping: @ requestmapping ({"/to _ login", "login"}): multiple URL paths can be mapped to the function processing method of the same processor
* Uri template schema mapping
> 1、@RequestMapping("/login/{userId}"):{xx} the URL of placeholder request can be "/login/123" or "/login/abc". The value of xx variable in {xx} in URI template pattern can be extracted through @PathVariable.
> 2、@RequestMapping("/login/{userId}/topic"):The requested URL can be "/login/uid/topic"
> 3、@RequestMapping("/login/{userId}/topic/{topicId}"):The requested URL can be "/login/uid/topic/tid"
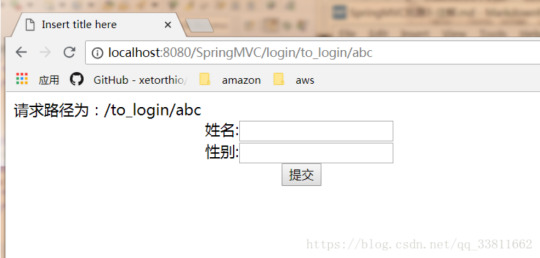
* Ant style URL path mapping
> 1、@RequestMapping("/login/**"):Can match "/login/abc/abc",However, "/login/abc" will be mapped to preferentially by "/login/{userId}" pattern in URI template pattern mapping (longest matching takes precedence)
> 2、@RequestMapping("/login/abc?"):Can match "/login/abcd" and "/login/abc1",can’t match "/login/abc" or "/login/abcde"
> 3、@RequestMapping("/login/abc*"):Can match "/login/abcd" and "/login/abcde",can’t match "/login/abc"
Code example:
@Controller
@RequestMapping("/login")
public class LoginController {
@RequestMapping("/to_login")
public ModelAndView toLogin() {
System.out.println("进入 to_login");
ModelAndView mv = new ModelAndView();
mv.addObject("path", "/to_login");
mv.setViewName("login");
return mv;
}
@RequestMapping({"/to_login2","/login"})
public ModelAndView toLogin2() {
System.out.println("进入 to_login");
ModelAndView mv = new ModelAndView();
mv.addObject("path", "/to_login2,/login");
mv.setViewName("login");
return mv;
}
@RequestMapping({"/to_login/abc?"})
public ModelAndView toLogin3() {
System.out.println("进入 to_login");
ModelAndView mv = new ModelAndView();
mv.addObject("path", "/to_login/abc?");
mv.setViewName("login");
return mv;
}
@RequestMapping({"/to_login/abc*"})
public ModelAndView toLogin4() {
System.out.println("进入 to_login");
ModelAndView mv = new ModelAndView();
mv.addObject("path", "/to_login/abc*");
mv.setViewName("login");
return mv;
}
@RequestMapping("/**")
public ModelAndView toLogin5() {
System.out.println("进入 /**");
ModelAndView mv = new ModelAndView();
mv.addObject("path", "/**");
mv.setViewName("login");
return mv;
}
@RequestMapping("/to_login/**")
public ModelAndView toLogin6() {
System.out.println("进入 /to_login/**");
ModelAndView mv = new ModelAndView();
mv.addObject("path", "/to_login/**");
mv.setViewName("login");
return mv;
}
@RequestMapping("/to_login/abc")
public ModelAndView toLogin7() {
System.out.println("进入 /to_login/abc");
ModelAndView mv = new ModelAndView();
mv.addObject("path", "/to_login/abc");
mv.setViewName("login");
return mv;
}
@RequestMapping("/**/abc")
public ModelAndView toLogin8() {
System.out.println("进入 /**/abc");
ModelAndView mv = new ModelAndView();
mv.addObject("path", "/**/abc");
mv.setViewName("login");
return mv;
}
@RequestMapping("/*/*")
public ModelAndView toLogin9() {
System.out.println("进入 /*/*");
ModelAndView mv = new ModelAndView();
mv.addObject("path", "/*/*");
mv.setViewName("login");
return mv;
}
}
Look at the ways in which different request addresses arrive:


0 notes
Text
Linux system forgot password-modify Ubuntu virtual machine password
###First, turn on the virtual machine. When turning on, click on the virtual machine screen first, and then press Shift for a long time.
###Will enter this page, press the following e key on this page

###Then enter the interface

###Use the up and down cursor keyboard ↑↓ on this page to find ro

###Change ro to rw, and delete everything after the current line, plus init=/bin/bash

###Press F10 to enter the following page

###Enter passwd for your username and press enter

###At this time, the password entered is invisible. Just press Enter directly after entering, and the password updated successfully indicates that the modification is successful.

###Finally, restart the virtual machine. Put the mouse at the arrow position, which is your own virtual machine option. Press Ctrl+R to pop up the page, and click Restart
1 note
·
View note
Text
Java : JVM And Class
Run Java:java class name with main method ----->
Start JVM and load bytecode
When calling java command to run a Java program, the command will start a JVM process, and all threads and variables in the same JVM are in the same process and share the memory area of the JVM.
The JVM exits when the following conditions occur
```
1.When the normal execution of the program ends
2.Use the System.exit(0) method
3.When an exception occurs, no exception is caught
4.The platform forcibly ended the JVM process
```
**Once the JVM process ends, the data in the memory in the process will be lost**

When a program actively uses a class, if the class has not been loaded into memory, the system will initialize the class through three steps: load-> connection-> initialization.
##1.Loading of class
Class loading refers to loading the class file (bytecode file) of the class into memory and creating a java.lang.Class object for it, which is called bytecode object.
The loading process of classes is completed by ClassLoader, which is usually provided by JVM, called system ClassLoader, or it can inherit classloader to provide custom classloader. Different class loaders can load local bytecode files, bytecodes in jar packages, and bytecodes through the network.
##2.Connection of classes
When the Class is loaded into memory, the system generates a corresponding class object for it, and then combines the binary numbers of the class into JRE
```
1.Verification: check whether the loaded class has the correct internal structure
2.Preparation: responsible for allocating memory for static variables of classes and setting default values
3.Parsing: Replace the symbolic reference in the binary data of the class with a direct reference
```
###3.Initialization of class:
At this stage, JVM is responsible for initializing classes, mainly initializing static variables. Class initialization includes the following steps
```
1.If the class has not been loaded and connected, the program loads and connects the class first
2.If the direct parent class of this class has not been initialized, initialize its parent class first
3.If there are initialization statements (static code blocks) in the class, the system executes these initialization statements in turn
```
Attachment: Symbol reference:
Symbol reference is a string, which gives the name of the referenced content and may contain some other information larger than the referenced item-> this information must be enough to uniquely identify a class, field and method. Thus, symbolic references to other classes must give the full name of this class.
0 notes
Text
Java : The introduction of Reflection
###Requirements: Get the construction of a class by reflection
```
1.Gets the bytecode object of this class
2.Find the constructor that needs to be obtained from the bytecode object
```
###Class class gets constructor method:
Constructor class, indicating the type of Constructor in the class, and the instance of constructor is a constructor in a class:
####Gets the constructor decorated by public of the Class represented by the current class:
public Constructor<?>[] getConstructors();
####Get all constructors of the Class represented by the current class (regardless of access rights):
public Constructor<?>[] getDeclaredConstructors()
####Gets the constructor that specifies a public in the Class represented by the current class:
public Constructor<T> getConstructor(Class<?>... parameterTypes);
Parameter: parameterTypes indicates the Class type of the constructor parameter
For example:
public People(String name);
Constructor c = clz.getConstructor(String.class);
**The biggest function of the constructor is to create objects.**
###Question:
Why use reflection to create objects, why not just come to new?
###Answer:
In the framework, we are provided with strings, so we can only use reflection to create objects.
Steps:
```
1.Find the bytecode object of the class where the constructor is located
2.Gets the constructor object
3.Using reflection, create objects
```
A Constructor<T > class indicates the type of Constructor in a class, and an instance of a constructor is a constructor in a class.
**common method**:
####The constructor with parameters can only be called in this way:
public T newInstance(Object... initargs);
Parameter: initargs: indicates the actual parameter of calling the constructor
Return: returns the created instance, and t represents the instance of the Class represented by class
If the constructor in a Class can be directly accessed by the outside world and has no parameters, you can directly use the newInstance method in the class class to create objects!
public Object newInstance();//Equivalent to new class name ();
To access private members, **witch must** set accessible:
Object.setAccessible(true);
###Use reflection to get methods in a class:
```
1:Gets the bytecode object of the class in which the method resides
2:Get method
```
###Common methods in Class:
####Get all public methods including itself and inherited ones:
public Method[] getMethods();
####Get all methods in its own class (excluding inherited ones, regardless of access rights):
public Method[] getDeclaredMethods();
####Call one of the specified public methods (including inherited ones):
public Method getMethod(String methodaName,Class<?>... parameterTypes);
Parameters:
methodName:Indicates the name of the called method
parameterTypes:Represents the Class type of the parameter of the called method.
####Invoke a specified method in this class (excluding inherited ones):
public Method getDeclaredMethod(String methodaName,Class<?>... parameterTypes);
Parameters:
methodName:Indicates the name of the called method
parameterTypes:Represents the Class type of the parameter of the called method
###Use reflection to call the method:
```
1.Gets the bytecode object of the class in which the method resides
2.Gets the method object
3.Invoke the method using reflection
```
####Invoke the Method represented by the current method:
public Object invoke(Object obj,Object...args):
Parameters:
obj : Represents the underlying object of the calling method
Method method = clz.getMethod(Object...args);
args : Represents the actual parameter type passed when calling the method
return : the return result of the underlying method
####Call private method:
Before calling a private method, it should be made accessible.
And because Method is a subclass of AccessibleObject, it is included in Method:
method.setAccessible(true);
####Use reflection to call static methods:
Static methods do not belong to any object, and static methods belong to the class itself,
At this time, set the first parameter of the invoke method to null
static public void doSomething(String str){
System.out.println("Person.doSomething()"+name);
}
Method method = clz.getMethod("doSomething",String.class);
method.invoke(null,"Simple");
####Use reflection to call array parameters (variable parameters):
When calling the method, take the actual parameters as the elements of the Object array
Method Object.invoke (The object of the bottom layer of the method, new Object[]{ all arguments}))
###Reflect other APIs:
0 notes
Text
Java : Resolve : When referencing Spring Security, accessing the server for the first time is extremely slow
When using the technology stack around Spring for authority management, many children's shoes will introduce Spring Security framework, and the adaptability and function of this framework are very powerful. However, there is a pit, and many children's shoes are also found, that is, after starting the project, when accessing the interface, the delay of the first visit sometimes reaches 5-10 minutes, which is intolerable in project deployment.
Generally, Java application services are deployed on Linux system, so take Linux system as an example
```
echo $JAVA_HOME
```
This command outputs the local JAVA_HOME path. If it is empty, it means that it has not been configured yet, so the following steps need not be performed again, and then continue after Baidu JAVA_HOME configuration.
Then modify the configuration file of jre
```
vi $JAVA_HOME/jre/lib/security/java.security
Enter:
Then type on the command line :/securerandom.source=
Press Enter again
```
For example:

Heroes who are familiar with Linux system commands just skip it. In short, to find
```
securerandom.source=file:/dev/random
```
Amended as:```
securerandom.source=file:/dev/./urandom
```
Save and exit
0 notes
Text
Python3.x : Operation database - pymysql
First, you need to download a module:
pip3 install PyMySQL
Next is the code:
#!/usr/bin/python
# -*- coding: UTF-8 -*-
import pymysql
localhost = "xxxxxxxx" # Your database address
username = "xxxxxxxx" # Your username
password = "xxxxxxxx" # Your password
database = "xxxxxxxx" # Your database instance
db = pymysql.connect(localhost, username, password, database, charset="utf8") # Pay attention to coding
cursor = db.cursor()
cursor.execute("select * from account") # Try to query the sql statement
cursor.nextset()
data = cursor.fetchone()
print(data)
cursor.nextset()
data = cursor.fetchone()
print(data)
data_all = cursor.fetchall() # Get all the data
0 notes
Text
Linux : Redis : Use redis to connect to the redis database of the specified port
Steps are as follows
## Download redis
wget http://download.redis.io/releases/redis-4.0.2.tar.gz
## Unzip the downloaded file
tar xzf redis-4.0.2.tar.gz
## Enter the decompressed folder
cd redis-4.0.2
## Compile
make
## Connect the specified ip and the specified port with the specified password
./src/redis-cli -h specify ip -p specify port -a specify password
## See all key values
keys *
0 notes
Text
SpringMVC Digging Road 2 - DispatcherServler + Controller
###Role of DispatcherServlet
DispatcherServlet is the implementation of the front-end controller design pattern, which provides the centralized access point of SpringWebMVC, is responsible for the assignment of responsibilities, and can be seamlessly integrated with SpringIoC container, so as to obtain all the capabilities of Spring.
DispatcherServlet is mainly used for duty scheduling, and it is mainly used for process control. Its main duties are as follows:
```
1:File upload resolution, if the request type is multipart, file upload resolution will be performed through MultipartResolver
2:Map the request to the processor through HandlerMapping (return a HandlerExecutionChain, which includes a processor and multiple HandlerInterceptor interceptors)
3:Many types of processors (processors in HandlerExecutionChain) are supported through HandlerAdapter
4:Resolve the logical view name to the concrete view implementation through ViewResolver
5:Localization analysis
6:Render a specific view
7:If an exception is encountered during execution, it will be handed over to HandlerExceptionResolver for resolution
```
###DispatcherServler Configure
DispatcherServlet can also configure its own initialization parameters, that is, <init-param> can be configured in servlet configuration.

###The relationship of context
The general context configuration of SpringWeb project is as follows:
<listener>
<listener-class>
org.springframework.web.context.ContextLoaderListener
</listener-class>
</listener>
<context-param>
<param-name>contextConfigLocation</param-name>
<param-value>classpath:applicationContext.xml</param-value>
</context-param>
```
contextConfigLocation : Represents the configuration file path used to load Bean;
contextClass : Represents the ApplicationContext implementation class used to load Bean, the default WebApplicationContext```
###Initialization order of DispatcherServlet
```
1:HttpServletBean inherits HttpServlet, so its init method will be called when the Web container starts
2:FrameworkServlet inherits HttpServletBean, initialize the Web context through initServletBean ()
3:DispatcherServlet inherits FrameworkServlet, and implemented onRefresh () method to provide some front-end controller related configurations
```
>In the DispatcherServlet of SpringMVC framework, around line 470:
/**
* This implementation calls {@link #initStrategies}.
*/
@Override
protected void onRefresh(ApplicationContext context) {
initStrategies(context);
}
/**
* Initialize the strategy objects that this servlet uses.
* <p>May be overridden in subclasses in order to initialize further strategy objects.
*/
protected void initStrategies(ApplicationContext context) {
initMultipartResolver(context);
initLocaleResolver(context);
initThemeResolver(context);
initHandlerMappings(context);
initHandlerAdapters(context);
initHandlerExceptionResolvers(context);
initRequestToViewNameTranslator(context);
initViewResolvers(context);
initFlashMapManager(context);
}
**The whole DispatcherServler initialization process mainly does two things:**
> * Initialize the Web context used by SpringMVC, and possibly specify the parent container (ContextLoaderListener loads the root context)
> * Initialize the policy used by DispatcherServlet, such as HandlerMapping、HandlerAdapter
###DispatcherServler Default Configure:
The default configuration of DispatcherServlet is in DispatcherServlet.properties (under the same package as DispatcherServlet class), and it is the default policy used when no configuration is specified in Spring configuration file.
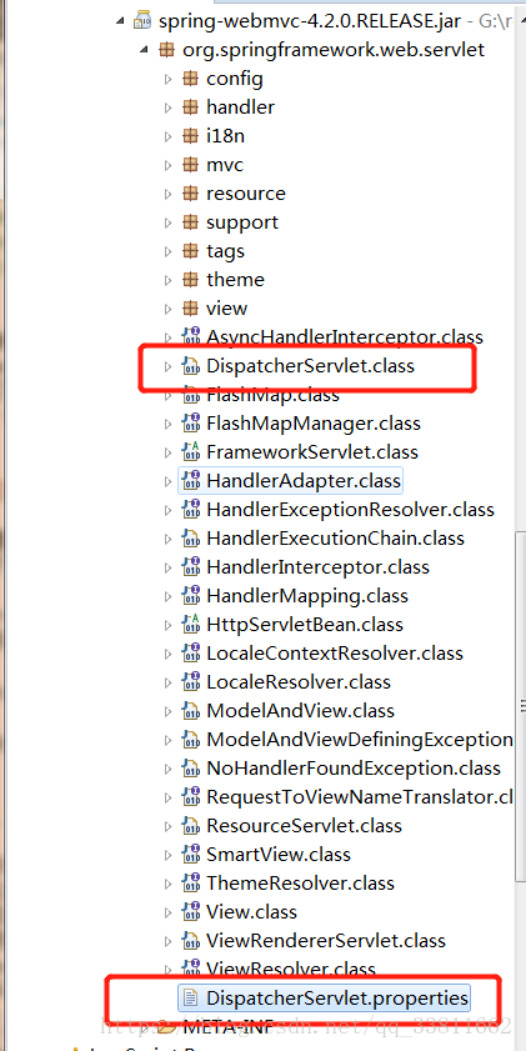
It can be seen from the configuration that the DispatcherServlet will automatically register these special Bean when it starts, so we don't need to register. If we register, the default will not be registered.
###The special Bean which in DispatcherServlet
DispatcherServlet uses WebApplicationContext as the context by default, and there are some Bean in this context as follows:
####Controller
Processor/page controller, doing C in MVC, but the control logic is transferred to the front-end controller for processing requests;
####HandlerMapping
The mapping from processor is requested, and if the mapping is successful, a HandlerExecutionChain object (including a Handler processor (page processor) object and multiple HandlerInterceptor interceptors) is returned; For example, BeanNameUrlHandlerMapping maps URL and Bean name, and the Bean that is successfully mapped is the processor here;
####HandlerAdapter:
HandlerAdapter will package the processor as an adapter, thus supporting many types of processors, that is, the application of adapter design pattern, thus easily supporting many types of processors; For example, SimpleControllerHandlerAdapter will adapt the Bean that implements the Controller interface and call the handleRequest method of the processor for functional processing;
####ViewResolver
The ViewResolver will resolve the logical View name into a concrete view, for example, the InternalResourceViewResoulver will map the logical view name into a jsp view;
####LocalResolver
Localized parsing, because Spring supports internationalization, the LocaleResolver parses the Locale information of the client to facilitate internationalization;
####ThemeResolver
Theme analysis, through which multiple styles of a page can be realized, that is, the common effect similar to software skin;
####MultipartResolver
File upload analysis, used to support file upload;
####HandlerExceptionResolver
Processor exception resolution, which can map exceptions to the corresponding agreed error interface, so as to display a user-friendly interface (instead of showing users specific error information);
####RequestToViewNameTranslator
Automatically mapping the request URL to the logical view name when the processor does not return the relevant information such as the logical view name;
####FlashMapManager
It is used to manage the policy interface of FlashMap, which is used to store the output of one request, and when entering another request, it is used as the input of the request, which is usually used to redirect the scene.
###Controller brief introduction
Controller, which is the part C in MVC, is mainly responsible for the function processing part
```
1、Collect, validate and bind request parameters to command objects
2、Give the command object to the business object, and the business object will process and return the model data
3、Return ModelAndView(Model model part is the model data returned by the business object, and the view part is the logical view name)
```
###DisaptcherServler + Controller
DispatcherServlet is responsible for entrusting the request to the Controller for processing, and then selecting a specific view for rendering according to the logical view name returned by the Controller (and passing in the model data)
**The complete C (including logic control and function processing) in MVC consists of (DispatcherServlet+Controller)
###Controllerannotation
Before Spring2.5, we all defined our processor class by implementing the Controller interface or its implementation class (which is no longer recommended).
Spring2.5 introduces annotated processor support, and defines processor classes through @Controller and @RequestMapping annotations. And provides a powerful set of annotations:
> * @Controller
> * @RequestMapping
> * @RequestParam
> * @ModelAttribute
> * @SessionAttributes
> * @InitBinder
Spring3.0 introduces Restful architecture style support (supported by @PathVariable annotation and some other features), and introduces more annotation support
> * @CookieValue
> * @RequestHeader
> * @RequestBody
> * @ResponseStatus
> * @ExceptionHandler
> * @PathVariable
Spring3.1 use new HandlerMapping and HandlerAdapter to support @Controller and @RequestMapping annotation processors, Use the combination of processor mapping RequestMappingHandlerMapping and processor adapter RequestMappingHandlerAdapter to replace the processor mapping defaultannotationhandlermapping and processor adapter AnnotationMethodHandlerAdapter started in Spring2.5.
###Annotation implementation Controller
The configure of HandlerMapping and HandlerAdapter
> * Previous versions of Spring3.1:
DefaultAnnotationHandlerMapping and AnnotationMethodHandlerAdapter
> * The version starting with Spring3.1:
RequestMappingHandlerMapping and RequestMappingHandlerAdapter
###Example code:
Code structure reference:
https://blog.csdn.net/qq_33811662/article/details/80658813
Modify the content of spring-mvc.xml as follows:
<?xml version="1.0" encoding="UTF-8"?>
<beans xmlns="http://www.springframework.org/schema/beans"
xmlns:xsi="http://www.w3.org/2001/XMLSchema-instance"
xmlns:mvc="http://www.springframework.org/schema/mvc"
xmlns:context="http://www.springframework.org/schema/context"
xsi:schemaLocation="http://www.springframework.org/schema/beans
http://www.springframework.org/schema/beans/spring-beans-4.2.xsd
http://www.springframework.org/schema/mvc
http://www.springframework.org/schema/mvc/spring-mvc-4.2.xsd
http://www.springframework.org/schema/context
http://www.springframework.org/schema/context/spring-context-4.2.xsd">
<context:component-scan base-package="mvc1"></context:component-scan>
<mvc:annotation-driven></mvc:annotation-driven>
</beans>
Modify the contents of HelloController as follows:
package mvc1;
import javax.servlet.http.HttpServletRequest;
import javax.servlet.http.HttpServletResponse;
import org.springframework.stereotype.Controller;
import org.springframework.web.bind.annotation.RequestMapping;
import org.springframework.web.servlet.ModelAndView;
@Controller
public class HelloController {
@RequestMapping("/hello")
public ModelAndView handleRequest(HttpServletRequest request, HttpServletResponse response) throws Exception {
System.out.println("进入后台控制器");
ModelAndView mv = new ModelAndView();
mv.addObject("content", "SpringMVC 初体验");
mv.setViewName("/WEB-INF/jsp/hello.jsp");
return mv;
}
}
Run the Server, enter the URL:
0 notes
Text
Warning
Knowing how the code works is different from knowing whether the algorithm is executed as required. Uncertain whether the algorithm is appropriate is common, but uncertain what the code does is a lazy behavior.
0 notes
Text
SpringMVC Digging Road 1 -> SpringMVC brief introduction
###SpringMVC brief introduction:
SpringMVC is a Java-based lightweight Web framework that realizes the request-driven type of Web MVC design pattern. Even if the MVC architecture pattern is used to decouple the duties of the Web layer, request-driven refers to the use of request-corresponding model. The purpose of the framework is to help us simplify the development, and SpringWebMVC also simplifies our daily web development.
###What can SpringMVC do:
```
Let us design a clean Web layer and a thin Web layer very simply;
Develop a more concise Web layer;
Natural integration with Spring framework (such as IoC container, AOP, etc.);
Provide strong contractual programming support with contract greater than configuration;
Can simply carry out the unit test of Web layer;
Support flexible mapping from URL to page controller;
It is very easy to integrate with other view technologies, such as Velocity, FreeMarker, etc., because the Model data is not placed in a specific API, but in a model (Map data structure is implemented, so it is easy to be used by other frameworks);
Very flexible data validation, formatting and data binding mechanism, which can use any object for data binding without implementing API; of specific framework;
Provide a powerful JSP tag library to simplify JSP development;
Support flexible localization and topic analysis;
Simpler exception handling;
Support for static resources;
Support Restful style.
```
###SpringMVC Components:
```
DispatcherServlet : Front end controller
HandlerMapping : Map requests to processors
HandlerAdapter : Packaging processors as adapters to support multiple types of processors
View Resolver : View parser
Controller Interface : Page controller/action/processor
LocalResolver : Localized parsing, because Spring supports internationalization, LocalResolver parses the Locale information of the client to facilitate internationalization
ThemeResovler : Theme analysis, through which multiple styles of a page can be realized, that is, a common effect similar to software skin
MultipartResolver : File upload analysis, used to support file upload
HandlerExceptionResolver : Parse and handle exceptions
RequestToViewNameTranslator : When the processor does not return the relevant information such as the logical view name, the request URL is automatically mapped to the logical view name
FlashMapManager : A policy interface for managing FlashMap. FlashMap is used to store the output of one request, which is used as the input of another request, and is usually used to redirect the scene
```
###SpringMVC Processing flow:

###SpringMVC Development steps
1、Dispatcher's deployment description in web.xml, thus intercepting requests to SpringMVC
2、Configure HandlerMapping to map requests to processors
3、Configure HandlerAdapter to support multiple types of processors
4、Configure ViewResolver to resolve logical view names to concrete view technologies
5、Configure the processor (page controller) for functional processing
###Advantages of SpringMVC:
```
1、Clear division of roles: DispatcherServler, HandlerMapping, HandlerAdapter, ViewResolver, processor or page Controller, Validator, Command object (the object to which the command request parameter is bound is called the command object), and Form Object (the object that the form object provides for the form display and submits is called the form object).
2、The division of labor is clear, and the extension points are quite flexible, which can be easily extended, although it is hardly needed.
3、Because the command object is a POJO, it is not necessary to integrate the framework-specific API, and the command object can be directly used as a business object
4、Seamless integration with other Spring frameworks is not available in other Web frameworks
5、Adaptable, you can support any class as a processor through HandlerAdapter
6、Customizability, HandlerMapping, ViewResolver, etc. can be customized very simply
7、Powerful data validation, formatting and binding mechanism
8、The Mock object provided by Spring can be used to test the Web layer unit very simply
9、Localization and topic analysis support make it easier to internationalize and switch topics
10、Powerful JSP tag library makes JSP writing easier
```
Code example:
Create a Maven-webapp project first
The directory structure is as follows:

The content of pom.xml is as follows:
<project xmlns="http://maven.apache.org/POM/4.0.0" xmlns:xsi="http://www.w3.org/2001/XMLSchema-instance"
xsi:schemaLocation="http://maven.apache.org/POM/4.0.0 http://maven.apache.org/maven-v4_0_0.xsd">
<modelVersion>4.0.0</modelVersion>
<groupId>net.simple</groupId>
<artifactId>SpringMVC</artifactId>
<packaging>war</packaging>
<version>0.0.1-SNAPSHOT</version>
<name>SpringMVC Maven Webapp</name>
<url>http://maven.apache.org</url>
<properties>
<project.build.sourceEncoding>UTF-8</project.build.sourceEncoding>
<springversion>4.2.0.RELEASE</springversion>
</properties>
<dependencies>
<dependency>
<groupId>org.springframework</groupId>
<artifactId>spring-context</artifactId>
<version>${springversion}</version>
</dependency>
<dependency>
<groupId>org.springframework</groupId>
<artifactId>spring-web</artifactId>
<version>${springversion}</version>
</dependency>
<dependency>
<groupId>org.springframework</groupId>
<artifactId>spring-webmvc</artifactId>
<version>${springversion}</version>
</dependency>
</dependencies>
<build>
<plugins>
<plugin>
<groupId>org.apache.maven.plugins</groupId>
<artifactId>maven-war-plugin</artifactId>
<version>2.6</version>
<configuration>
<failOnMissingWebXml>false</failOnMissingWebXml>
</configuration>
</plugin>
</plugins>
</build>
</project>
HelloController implements the Constroller interface, and the code is as follows:
package mvc1;
import javax.servlet.http.HttpServletRequest;
import javax.servlet.http.HttpServletResponse;
import org.springframework.web.servlet.ModelAndView;
import org.springframework.web.servlet.mvc.Controller;
public class HelloController implements Controller {
public ModelAndView handleRequest(HttpServletRequest request, HttpServletResponse response) throws Exception {
System.out.println("进入后台控制器");
ModelAndView mv = new ModelAndView();
mv.addObject("content", "SpringMVC 初体验");
mv.setViewName("/WEB-INF/jsp/hello.jsp");
return mv;
}
}
The web.xml needs to initialize the contextConfigLocation attribute, otherwise, it will find the [servlet name]-servlet.xml file under WEB-INF by default:
<?xml version="1.0" encoding="UTF-8"?>
<web-app xmlns:xsi="http://www.w3.org/2001/XMLSchema-instance" xmlns="http://java.sun.com/xml/ns/javaee"
xmlns:web="http://java.sun.com/xml/ns/javaee/web-app_2_5.xsd"
xsi:schemaLocation="http://java.sun.com/xml/ns/javaee http://java.sun.com/xml/ns/javaee/web-app_2_5.xsd"
id="WebApp_ID" version="2.5">
<servlet>
<servlet-name>springmvc</servlet-name>
<servlet-class>org.springframework.web.servlet.DispatcherServlet</servlet-class>
<init-param>
<param-name>contextConfigLocation</param-name>
<param-value>classpath:spring-mvc.xml</param-value>
</init-param>
</servlet>
<servlet-mapping>
<servlet-name>springmvc</servlet-name>
<url-pattern>/</url-pattern>
</servlet-mapping>
</web-app>
spring-mvc.xml Content:
<?xml version="1.0" encoding="UTF-8"?>
<beans xmlns="http://www.springframework.org/schema/beans"
xmlns:xsi="http://www.w3.org/2001/XMLSchema-instance"
xmlns:mvc="http://www.springframework.org/schema/mvc"
xsi:schemaLocation="http://www.springframework.org/schema/beans
http://www.springframework.org/schema/beans/spring-beans-4.3.xsd
http://www.springframework.org/schema/mvc
http://www.springframework.org/schema/mvc/spring-mvc.xsd">
<bean
class="org.springframework.web.servlet.handler.BeanNameUrlHandlerMapping" />
<bean
class="org.springframework.web.servlet.mvc.SimpleControllerHandlerAdapter" />
<bean name="/hello" class="mvc1.HelloController"></bean>
<bean
class="org.springframework.web.servlet.view.InternalResourceViewResolver" />
</beans>
hello.jsp Code:
<%@ page language="java" contentType="text/html; charset=UTF-8"
pageEncoding="UTF-8"%>
<!DOCTYPE html PUBLIC "-//W3C//DTD HTML 4.01 Transitional//EN" "http://www.w3.org/TR/html4/loose.dtd">
<html>
<head>
<meta http-equiv="Content-Type" content="text/html; charset=UTF-8">
<title>Insert title here</title>
</head>
<body>${content}
</body>
</html>
Start the tomcat container and type in the browser, as shown in the figure:

0 notes
Text
Java : Encapsulates the Redis tool class
The first is a Key interface class that defines Redis, and records the key value (prefix) and cache time:
public interface KeyPrefix {
public int expireSeconds();
public String getPrefix();
}
Then define the tool class of Redis:
import java.util.ArrayList;
import java.util.List;
import org.springframework.beans.factory.annotation.Autowired;
import org.springframework.stereotype.Service;
import com.alibaba.fastjson.JSON;
import redis.clients.jedis.Jedis;
import redis.clients.jedis.JedisPool;
import redis.clients.jedis.ScanParams;
import redis.clients.jedis.ScanResult;
@Service
public class RedisService {
@Autowired
JedisPool jedisPool;
/**
* Get a single object
* */
public <T> T get(KeyPrefix prefix, String key, Class<T> clazz) {
Jedis jedis = null;
try {
jedis = jedisPool.getResource();
//Generate a real key
String realKey = prefix.getPrefix() + key;
String str = jedis.get(realKey);
T t = stringToBean(str, clazz);
return t;
}finally {
returnToPool(jedis);
}
}
/**
* Setting objects
* */
public <T> boolean set(KeyPrefix prefix, String key, T value) {
Jedis jedis = null;
try {
jedis = jedisPool.getResource();
String str = beanToString(value);
if(str == null || str.length() <= 0) {
return false;
}
//Generate a real key
String realKey = prefix.getPrefix() + key;
int seconds = prefix.expireSeconds();
if(seconds <= 0) {
jedis.set(realKey, str);
}else {
jedis.setex(realKey, seconds, str);
}
return true;
}finally {
returnToPool(jedis);
}
}
/**
* Judging whether key exists or not
* */
public <T> boolean exists(KeyPrefix prefix, String key) {
Jedis jedis = null;
try {
jedis = jedisPool.getResource();
//Generate a real key
String realKey = prefix.getPrefix() + key;
return jedis.exists(realKey);
}finally {
returnToPool(jedis);
}
}
/**
* Delete
* */
public boolean delete(KeyPrefix prefix, String key) {
Jedis jedis = null;
try {
jedis = jedisPool.getResource();
//Generate a real key
String realKey = prefix.getPrefix() + key;
long ret = jedis.del(realKey);
return ret > 0;
}finally {
returnToPool(jedis);
}
}
/**
* add value
* */
public <T> Long incr(KeyPrefix prefix, String key) {
Jedis jedis = null;
try {
jedis = jedisPool.getResource();
//Generate a real key
String realKey = prefix.getPrefix() + key;
return jedis.incr(realKey);
}finally {
returnToPool(jedis);
}
}
/**
* reduce value
* */
public <T> Long decr(KeyPrefix prefix, String key) {
Jedis jedis = null;
try {
jedis = jedisPool.getResource();
//Generate a real key
String realKey = prefix.getPrefix() + key;
return jedis.decr(realKey);
}finally {
returnToPool(jedis);
}
}
/**
* del value
* */
public boolean delete(KeyPrefix prefix) {
if(prefix == null) {
return false;
}
List<String> keys = scanKeys(prefix.getPrefix());
if(keys==null || keys.size() <= 0) {
return true;
}
Jedis jedis = null;
try {
jedis = jedisPool.getResource();
jedis.del(keys.toArray(new String[0]));
return true;
} catch (final Exception e) {
e.printStackTrace();
return false;
} finally {
if(jedis != null) {
jedis.close();
}
}
}
public List<String> scanKeys(String key) {
Jedis jedis = null;
try {
jedis = jedisPool.getResource();
List<String> keys = new ArrayList<String>();
String cursor = "0";
ScanParams sp = new ScanParams();
sp.match("*"+key+"*");
sp.count(100);
do{
ScanResult<String> ret = jedis.scan(cursor,
sp);
List<String> result = ret.getResult();
if(result!=null && result.size() > 0){
keys.addAll(result);
}
//Re-process cursor
cursor = ret.getStringCursor();
}while(!cursor.equals("0"));
return keys;
} finally {
if (jedis != null) {
jedis.close();
}
}
}
public static <T> String beanToString(T value) {
if(value == null) {
return null;
}
Class<?> clazz = value.getClass();
if(clazz == int.class || clazz == Integer.class) {
return ""+value;
}else if(clazz == String.class) {
return (String)value;
}else if(clazz == long.class || clazz == Long.class) {
return ""+value;
}else {
return JSON.toJSONString(value);
}
}
@SuppressWarnings("unchecked")
public static <T> T stringToBean(String str, Class<T> clazz) {
if(str == null || str.length() <= 0 || clazz == null) {
return null;
}
if(clazz == int.class || clazz == Integer.class) {
return (T)Integer.valueOf(str);
}else if(clazz == String.class) {
return (T)str;
}else if(clazz == long.class || clazz == Long.class) {
return (T)Long.valueOf(str);
}else {
return JSON.toJavaObject(JSON.parseObject(str), clazz);
}
}
private void returnToPool(Jedis jedis) {
if(jedis != null) {
jedis.close();
}
}
}
0 notes

Text
Java : Resolve : lombok "can't find the symbol" in the SpringBoot project of idea
In the idea,File -> Settings -> Build.Execution,Deployment -> Annotation Processors -> Enable annotation processing ,Just tick it

0 notes
Text
Database: development difference between Mysql and ORACLE
###First, Comparison of commonly used basic data types

###Second, the commonly used SQL functions and other grammatical differences

0 notes
Text
Python: character string format
String formatting symbol

> * a. Added in Python2.0; And it seems only in Python.
> * b. In Python2.4, %u/%o/%x/%X will return a signed string when it encounters a negative number
Formatting operator auxiliary instruction

##Examples of format strings:
Hexadecimal output:
-> "%x" % 108
'6c'
->
-> "%X" % 108
'6C'
->
-> "%#X" % 108
'0X6C'
->
-> "%#x" % 108
'0x6c'
Floating-point number and scientific counting output:
->
-> '%f' % 1234.567890
Edit By Vheavens
Edit By Vheavens
'1234.567890'
->
-> '%.2f' % 1234.567890
'1234.57'
->
-> '%E' % 1234.567890
'1.234568E+03'
->
-> '%e' % 1234.567890
'1.234568e+03'
->
-> '%g' % 1234.567890
'1234.57'
->
-> '%G' % 1234.567890
'1234.57'
->
-> "%e" % (1111111111111111111111L)
'1.111111e+21'
Integer and string output:
-> "%+d" % 4
'+4'
->
-> "%+d" % -4
'-4'
->
-> "we are at %d%%" % 100
'we are at 100%'
->
-> 'Your host is: %s' % 'earth'
'Your host is: earth'
->
Edit By Vheavens
Edit By Vheavens
-> 'Host: %s\tPort: %d' % ('mars', 80)
'Host: mars Port: 80'
->
-> num = 123
-> 'dec: %d/oct: %#o/hex: %#X' % (num, num, num)
'dec: 123/oct: 0173/hex: 0X7B'
->
-> "MM/DD/YY = %02d/%02d/%d" % (2, 15, 67)
'MM/DD/YY = 02/15/67'
->
-> w, p = 'Web', 'page'
-> 'http://xxx.yyy.zzz/%s/%s.html' % (w, p)
'http://xxx.yyy.zzz/Web/page.html'
The above examples all use parameters of tuple type for conversion. below we will provide parameters of dictionary type to the format Change the operator.
-> 'There are %(howmany)d %(lang)s Quotation Symbols' % \
... {'lang': 'Python', 'howmany': 3}
'There are 3 Python Quotation Symbols'
0 notes
