
skeletonbuddycos
skeleton buddy costumes
cosplay & commission updates
currently working on sheik & impa (hyrule warriors) & blake belladonna (rwby)
4 posts
Don't wanna be here? Send us removal request.
Last Seen Blogs

improves-bone-strength-ljr
Hiring queens duct so right precious metals so stress management

cienie-isengardu
Cienie Isengardu

rajesh266
Life..
purplefox14
im trying to be funny

bm-african-art
BM: African Art
Text
commander meouch writeup 2.8.18
sometimes u gotta plan out a costume at 3 am & just go with it
the inspiration for this costume was actually from this picture i saw on the twrp subreddit a few months ago. i’ve been in both a bodysuit mood & a twrp mood for........several months now, so it just made sense

source: u/_diamondocelot_ on reddit
i started by making a pattern using a high neck long sleeve bodysuit i already had for my raven costume. making patterns off clothing you already own is pretty easy; annika victoria explains it pretty well in her video here

i figured out where to place the blue stripes on the chest & sleeves by pinning where i thought the low point of the chest & the high point on the sleeve seam would be while wearing the original bodysuit, transferring those pinned points to my pattern, & adding 2 inches up/down to get my stripes. i also added my usual 3/8″ seam allowance to the outside of the pattern & to my stripes so i could just fold my main pattern back to cut out sections instead of making another pattern piece
pro tip: when making patterns off clothing you already own, make sure you take the stretch of the original fabric into account when buying new fabric, otherwise you’ll spend 12 hours on a bodysuit, only to have it not fit, then, in a desperate attempt to salvage your work, add several inches of fabric to the gusset which will only make it worse

so! round two of this bodysuit involved 4 way stretch base fabric, leftover yaya han metallic cobalt fabric from danny sexbang, & 3 zippers because i just love to make extra work for myself. i first added the stripes to the front panel & both sleeves, then overlocked the shoulder seams of both halves of the back to the front. i also added a much smaller binding to the neck then on the original because i hate high necks & the neck on the original bodysuit was uncomfortably tight anyway

because i just fucking love to create extra work for myself, instead of just sewing my blue stripes onto my main fabric, i instead of cut out sections of base fabric & sewed my stripes into the bodysuit, then topstitched to make it pretty. this probably added 3-4 hours onto my total time, but the result is so worth it
then i added my back zipper, which i did by lining up the outer edge of the zipper with the raw edge of my fabric, right sides together, & sewing as close to the zipper as possible. after the zipper was installed, i sewed up the rest of the back with a stretch stitch. next i overlocked my sleeves onto the body, lining up the stripes instead of the top edge of the sleeve with the shoulder seam like i normally would

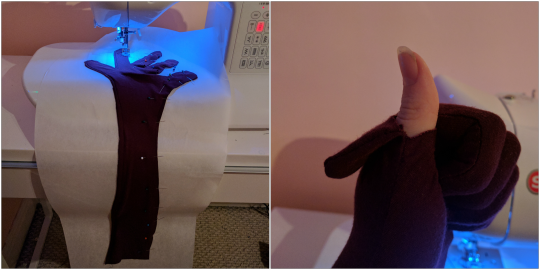
usually at this point, i would sew the sleeves & the side seam up with my overlocker, but, because i was adding built in gloves at the end of my sleeves, i decided to add zippers to the sleeves so i could free my hands whenever i was sick of wearing gloves, an idea i got from a post from kristen carr i saw a while back. i installed these similarly as my back zipper by lining up the zipper outer edge with the fabric raw edge & sewing. this would probably be easier if the sleeve had a top seam i could leave open until i was done, but i managed to pull it off. then i finished sewing up the sleeve with a stretch stitch & overlocked the side seam. to finish off the main bodysuit, i overlocked the crotch & elasticated the legholes

anybody else here just.......fucking hate gloves? they’re a nightmare to make & wearing them all day kinda sucks too. the proper way to make gloves involves a lot of math & a gusset & a separate thumb hole & honestly, it sounds like significantly more work than it’s worth, so fuck that. as usual, i just made cheaters gloves, minus the fingers on all but my right pinky & ring finger. i tried to hem to fingers by folding the fabric down & sewing it into the seam which...kind of worked? the edges still get pulled up when i pull the gloves on & i have to fold them back down so......close enough. to attach them to my sleeves, i turned the sleeve inside out & placed my glove inside, right sides together, lining up the thumb side seam with the sleeve side seam, then running it through my overlocker because after making two gloves, i was tired of slow stretch stitching & i think it was about 2:30 in the morning at this point

the rest of the costume was pretty easy. i made a belt with some embossed faux leather i found in the upholstery section of the fabric store by hemming & adding snaps to attach my buckle. i found the buckle on ebay; i loved the koi fish on the u/_diamondocelot_’s belt & i kinda dig how the eyes on the one i picked up reminds me of how beth kerner illustrates meouch’s eyes

because i guess making the belt wasn’t enough trouble, i decided to make the snaps for the loincloth lined, which was a Process. i cut out two 2″ by 8″ strips from my belt fabric & some leftover woven pyrrha fabric for lining & hand sewed snaps to my lining. i then pinned my fabrics right sides together, sewed around all but one edge, spent about 20 minutes turning both inside out, then topstitched to get everything to lay flat. i finished them off with some rivets i had lying around for style points & the loincloth is held up by the snaps

finishing this #look off with some knee high socks to cover up the fact that i’m too lazy to make leg armor & this boy is officially wearable. i still haven’t bought a mask yet, but i did find this one with some help from the subreddit & twitter that looks pretty similar, minus a paint job, & i might try to make meouch’s left bracer if i have time

as usual, full size images are on imgur & i usually post progress pictures to twitter & instagram first if you’re interested. blake, sheik, & impa updates will be #soon!!! thanks for reading (*´◡`*)
1 note
·
View note
Text
danny sexbang writeup 10.4
i actually wanted to do this costume for dragoncon but didn’t have time, so now i’m living my danny sexbang dreams at an anime convention ¯\_(ツ)_/¯

source: nsp twitter
i decided to do the OG danny sexbang vs the sequin version dan’s rocking in the take on me & 6969 videos like i planned, partly because this was a last second decision & this one was easier to find fabric for, but mostly because i really dig the big furry cape with the handles (i did get a couple comments in the artist alley from people who didn’t know the character, but appreciated the practicality of the handles, so clearly im not alone)

i managed to find everything from joann, except the blue spandex which i found at walmart. hell yes for getting everything in one trip!
i started with the bodysuit because i was really excited to use this metallic cobalt fabric from yaya han’s collection. i made a pattern off a tight fitting tank top & pair of jeggings i already own & though it looks like danny’s suit is one piece, i ended up making mine into two since the one piece pattern looked like it’d be a hot mess at best. i made the pants like corinne leigh shows in her stretchy pants video, minus the waistband. then, before serging the front & back of the top together, i sewed the red star (fabric also from yaya han’s collection) onto a circle of random white lycra, then sewed the circle onto the top, all using a stretch stitch (a narrow zigzag stitch will work if your machine doesn’t have a stretch stitch). tip for sewing these slippery, flimsy fabrics: sandwich them between two pieces of tearaway stabilizer (or any paper you may have on you, though i find designated tearaway stabilizer works best), pin the fuck out of the whole thing, go slow, & you should have 2-3 pieces of fabric that actually lay flat.

i serged the front & back of the top together, then serged the top & bottom together into one sexy bodysuit. this fabric is 4 way stretch, so i didn’t bother to add a zipper or anything to help me get in & out of it (although i probably should’ve lmao)

moving onto the overundies, i used this tutorial from annika victoria to get me started, except i made my front & back patterns separate & added a back pocket. i wanted to add red elastic to the waist/legholes to get some contrast (i really like the contrasting binding on the overundies for the costume danny’s been rocking onstage lately), but i couldn’t find red elastic & when i tried to dye some elastic, it just looked really old & worn. i ended up using some leftover metallic red for the waistband & regular elastic on the legholes like how annika shows in her video.

for the cape, i used the same stretch spandex for the overundies (which i did because i wanted them to match, but the cape doesn’t need to stretch, so don’t worry about using stretch fabric on this if you don’t want to). i folded it in half so the stretch was running vertical, then plotted out my shape. i added a small curve for the neck about 5 inches from the fold, then drew a line straight out 40 inches to get that sweet swoop when the handles are being used. i got 40 inches by holding one end of my tape measure in my hand, then loosening the other end at my shoulder out until i got a shape that i liked, so that length may differ for you. then i drew a line 40 inches down from the center approximately where i wanted the cape to stop, then drew a big curve from the arm length to the bottom length. i cut it out, added some ties & handles with some matte red ribbon, & tried it on to make sure nothing was too long.

i was happy with the base cape, so then it was time to start on the fur/fluff trim. i couldnt find any fur trim at joanns before getting my fabric cut, so i got a yard of fur fabric instead (yes, i did find fur trim after getting my fabric cut but i had to commit at that point). i laid it so the nap was running perpendicular to the lines i was planning on cutting, then drew lines four inches across from one end to the other, with marks going down the middle of each section. i then sewed the edge of the cape onto the halfway marks on the inside as a basting stitch, flipped the fur in half so i had 2 inches on fur on each side of the cape, then sewed along the edge. to get the handles & ties out from under the fur, i cut small slits through the fur after sewing the basting stitch, pulled the handles/ties through the slit, then topstitched to keep them from pulling out completely. i finished the cape by using a comb to pull all of the fur out of my stitches to give a more seamless look.

this was a lot of fun to wear at awa, it was super comfortable, eye catching, & recognizable, & i even ran into a few more danny sexbangs & a ninja brian.

if you liked this writeup and/or found it useful, you can buy me a coffee & you can find full size images here (& a few extra ones that i couldn’t find a place for), since tumblr likes to shit on image quality lmfao. thanks for reading!
5 notes
·
View notes
Text
Building Pyrrha’s sword: Miló
so when i first started planning out this costume at the beginning of the year, i jokingly told my friend she could make me a sword to go with it...........& then she actually did it. yay for friends who encourage each other to take on ambitious builds! you can find thea at her website & on twitter
Creating a replica of Pyrrha’s sword was quite a challenge. As this is the first real prop that I’ve designed and built from scratch, I had to learn a lot of techniques and skills to pull off something convincing. This post attempts to document the build process, tools, and techniques used to create this prop.
Part one: research & references
My first step was to figure out what this sword looks like and how I wanted to bring it to life. I had to get a sense of the size, shape, and colors used and how I would map those into the real world. This requires research and collecting references. It’s important to gather references that show multiple angles so you get a sense for all three dimensions. It’s also useful to get references from multiple sources because it might show the item in a different style which sometimes makes it easier to decide how the item should look in real life.
The easiest and most obvious set of references are just using screenshots from the show, like these:
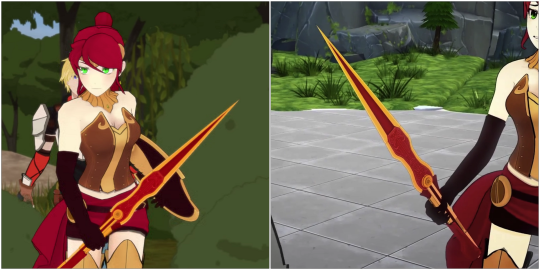
(Source: Rooster Teeth)
RWBY in particular is a great resource for references. The show is 3D animated, so the items generally have plausible construction and proportions.
While researching I also found that the late Monty Oum provided clean references for all the RWBY characters on his Facebook:
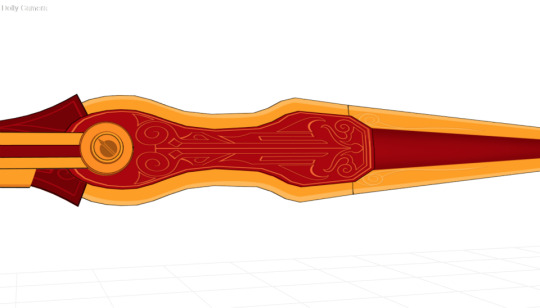
(Source: Monty Oum)
The references so far are probably enough to start building, but I didn’t think that the colors used in the show would translate well into real life. After all, RWBY intentionally uses a simplified art style with bold color and sharp lines. So this is where I started looking for “non-canonical” references - fan art and other cosplays.
In some fan art, Pyrrha is rendered more in gold than yellow and the crimson is lightened up a bit:
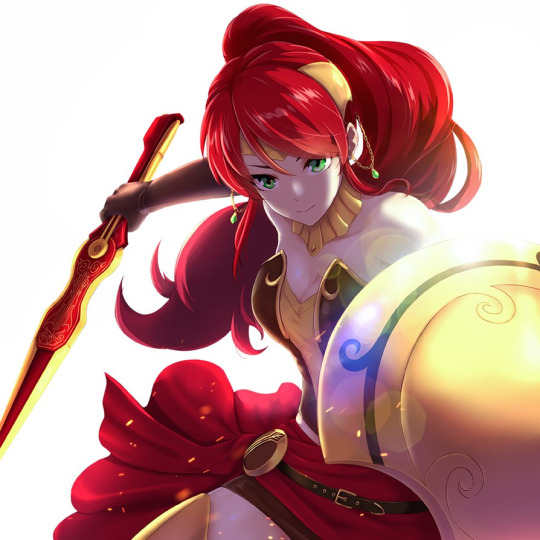
(Source: Infinote on DeviantArt)
Sheena Duquette did an excellent 3D-printed version of Milo that used a significant amount of gold:
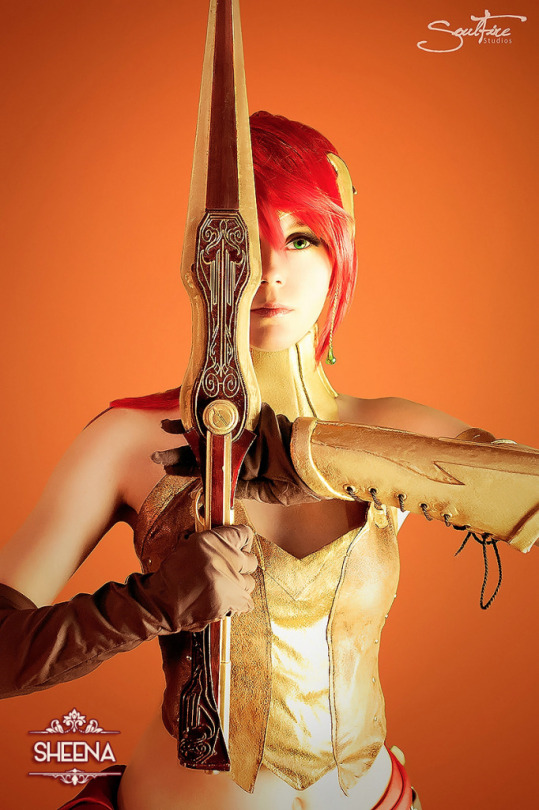
(Source: Soulfire Photography)
With these references in mind I could start designing and prototyping.
Part two: designing & prototyping
Now that I have some idea of what I want it to look like, I needed to design it and figure out how I want to build it. My design is very influenced by the tools available to me. I live in an apartment, I don’t have access to significant woodworking equipment, but I do have access to a small makerspace at work with a laser cutter and 3D printer. How you design and build a prop is so incredibly dependent on what tools and skills you have access to. If I had access to proper woodworking equipment like a CNC router, this would have been a significantly different build.
I designed this prop to build constructed out of layers of laser cut wood with a few 3D-printed embellishments.
Since I’m designing this for laser cutting, I designed everything in vector layers using Affinity Designer (I’ve seen other people use Illustrator or even InkScape). The first thing I did was use the references to create a rough outline of the sword and laser-cut a prototype to test the size:
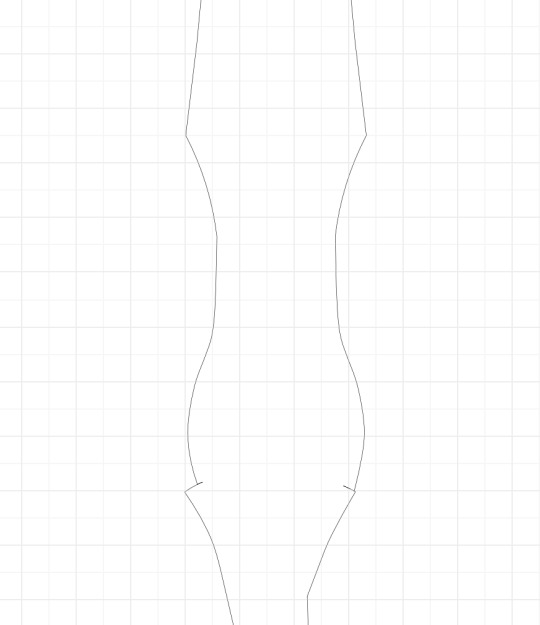
(Rough outline in Affinity)
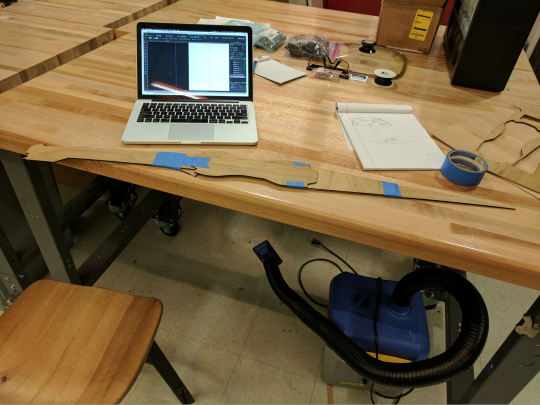
(Laser-cut size test out of cheap plywood)
I could have actually just used paper for the size test, but I was still learning the ins and outs of using the laser cutter and this was a good way for me to get used to the materials and processes involved. I decided after this that the sword was too big so I scaled everything down by 15% and cut a new size test - it seemed perfect to me at that point.
The next step was to start designing all of the layers and embellishments on those layers. I designed most of the layers initially with the material that was readily available to me at the makerspace: cheap 2.8mm plywood. You can see the layer vectors as different colors here:
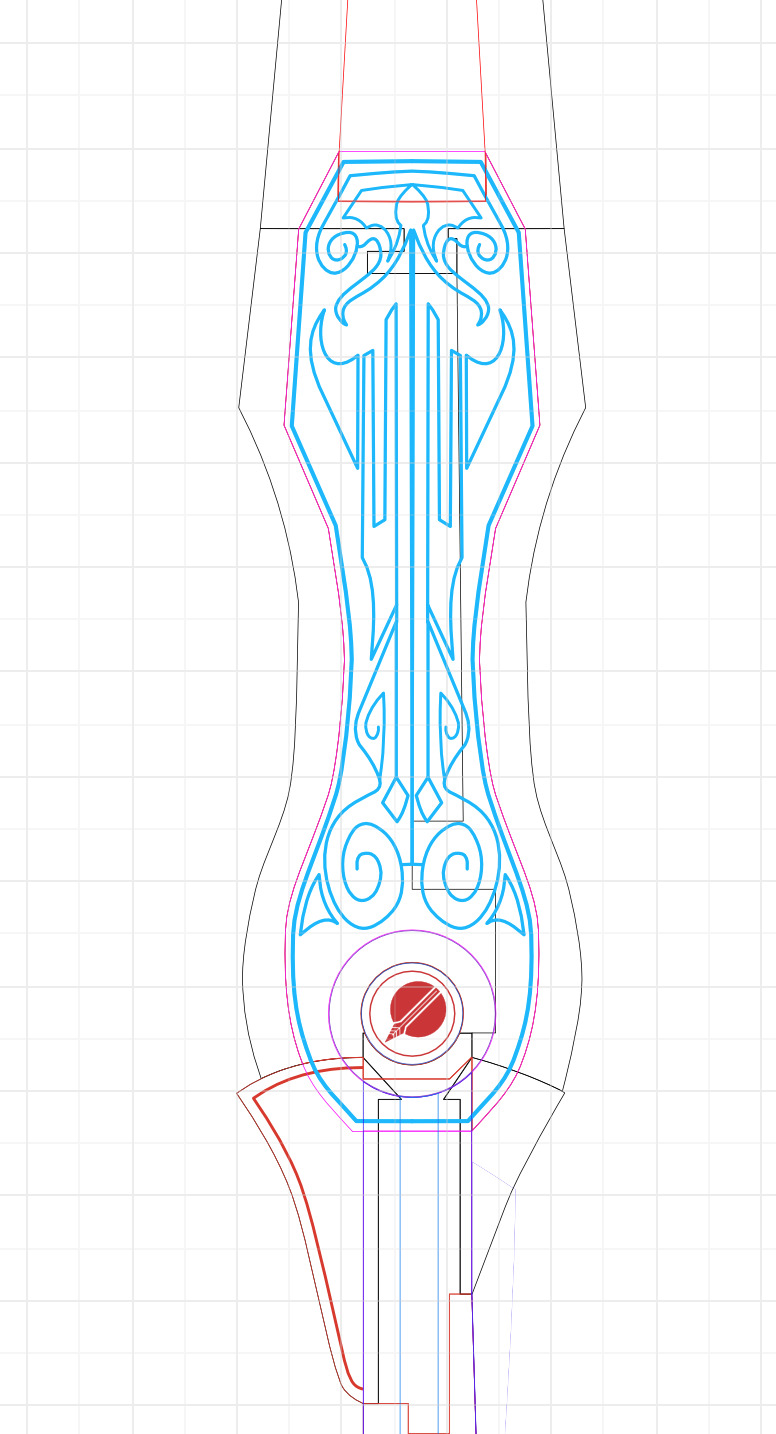
(Layers in Affinity)
Due to the size limitations of the laser cutter and material size, I actually designed some of the layers to be cut in separate pieces. These pieces fit together like puzzle pieces:
(One layer with multiple parts in Affinity)
While designing the layers I printed several prototypes and dry fit them and improved the design. I went through about eight or so iterations before I felt comfortable with the design enough to do the final build.
(Dry fit of a prototype)
During this time I also designed a way for the sword’s blade to be removable to help with transportation. I didn’t get any pictures of this during the prototype, but there’s an explanation of it in the build section.
Once I felt comfortable with the prototype, I glued it all together to get a feel for what the final build would look and feel like.
(The final prototype assembled)
Note that I didn’t design or prototype any of the 3D parts at this stage. Since they’re all part of the “back” of the sword they could be just attached on later. I also wanted to get the final assembled laser cut parts so that I could accurately measure the dimensions of the real object to better design the 3D part.
Step three: building
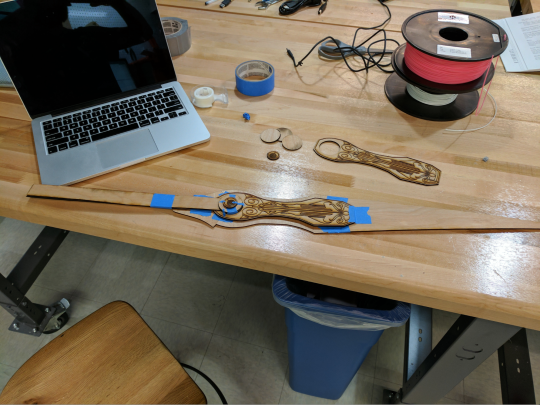
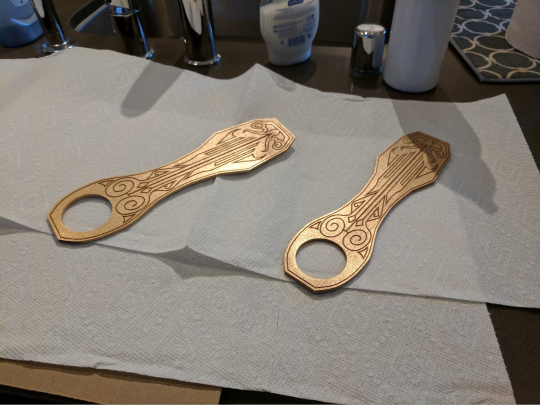
Now it’s time to build this thing. During the prototypes, I decided that the cheap plywood wasn’t going to be acceptable for the final product. I decided to use 1/8" and 1/16” maple stock (from Inventables) for the final build. I used the 30W Epilog Zing 16 laser in the makerspace to cut and engrave all of the pieces out of the stock.
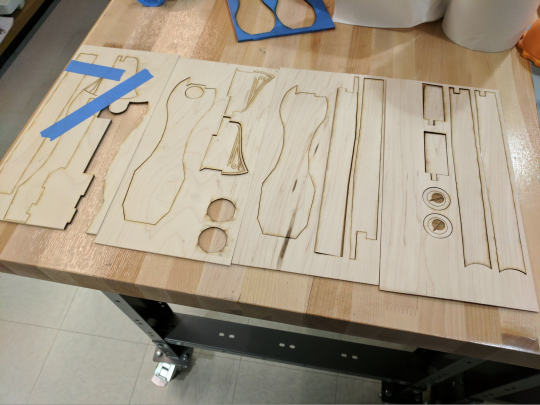
(Laser-cut and engraved parts)
During this time I also had to figure out how to do the gold design in the middle of the sword. I wasn’t content with just stenciling in a flat design, so I decided I wanted to engrave and color fill it. It took me ages to figure out an incredibly simple and low-tech solution to this. First, I painted some stock red and covered it in masking tape:
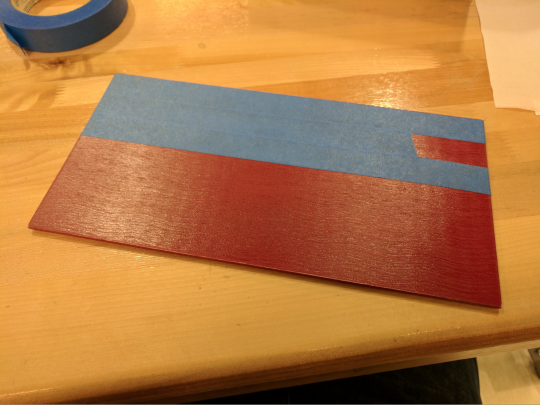
(Red-painted maple stock)
Then, I engraved through the masking tape, paint, and stock. I did this in multiple passes with low power to avoid burning the wood and tape:
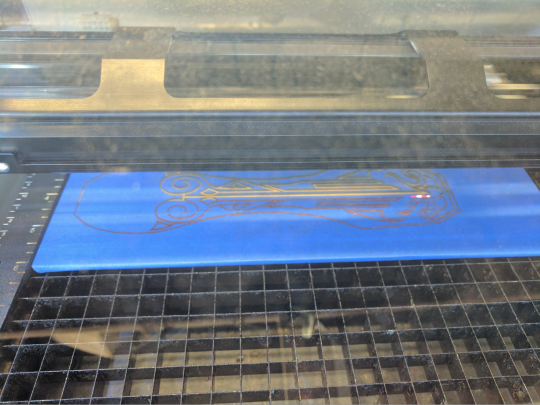
(laser cutter engraving the design on the stock)
(The engraved and masked pieces)
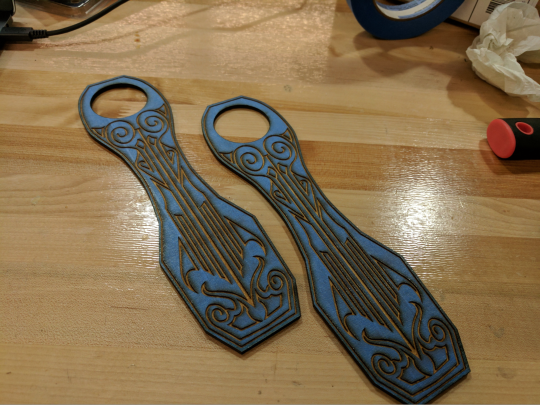
Now that I essentially engraved a paint mask, I used gold spray paint to do the color fill:
(gold-painted parts)
Then, I carefully peeled off the masking tape:
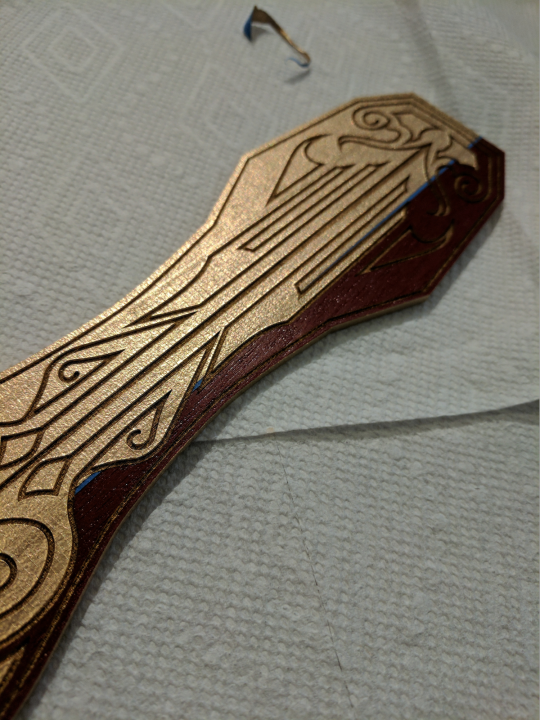
(Masking tape in process of being removed)
And then I had two beautiful color-filled parts:
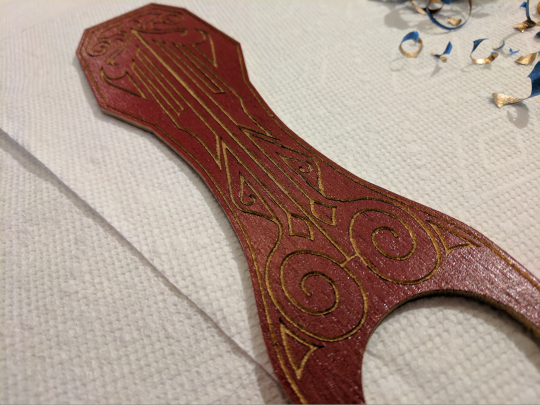
(The finished part, finally!)
With all the laser-cut parts ready, I did a dry-fit of everything to make sure it all worked:
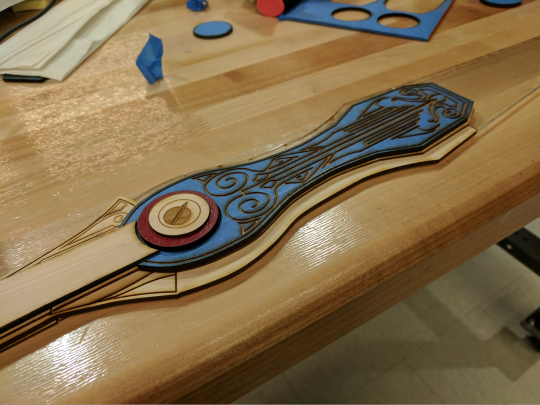
(Dry-fit: looking good!)
Now the fun part: wood-gluing everything together:
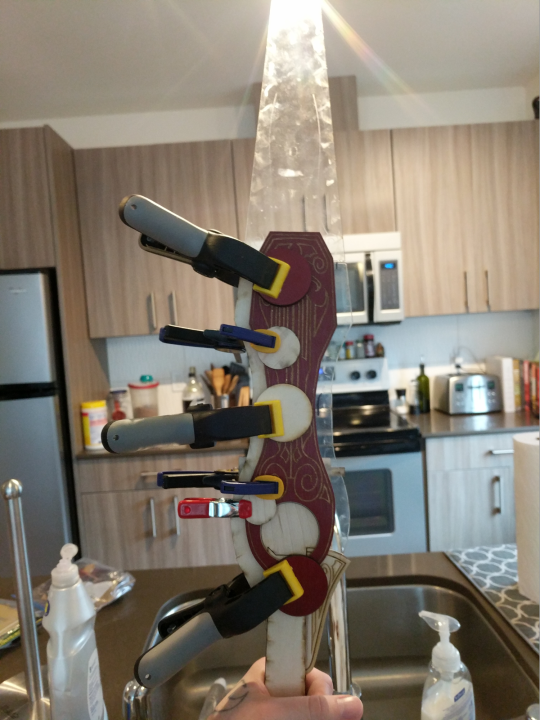
(Making good use of the hundreds of clamps I bought for this)
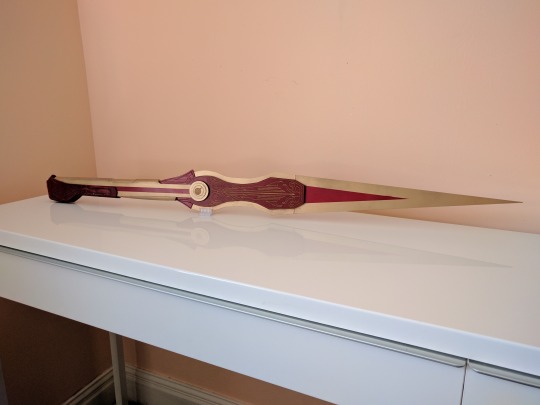
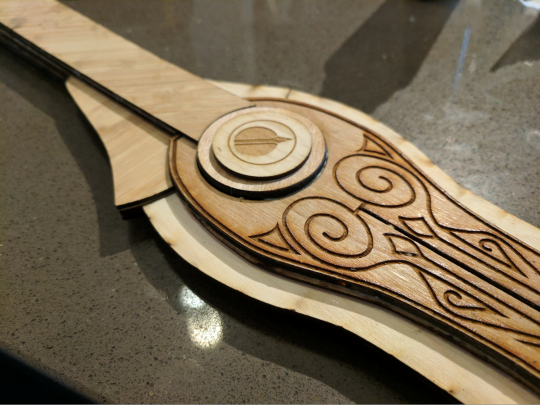
It felt really great to hold this in my hands once it was completely glued:
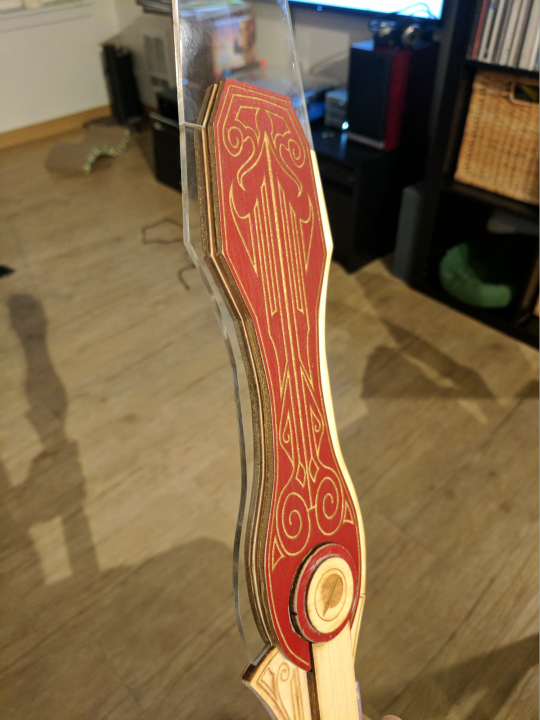
(Assembled!)
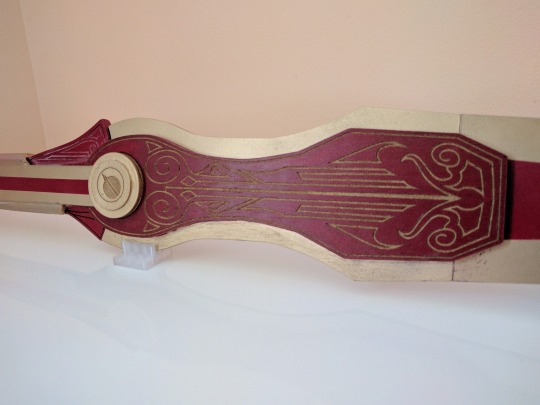
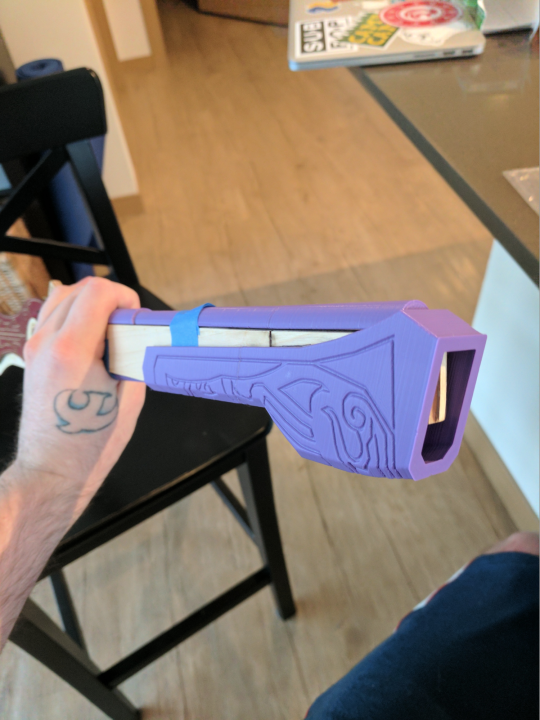
The last part of this step of the build was to finish the blade removal mechanism.

(Blade locking mechanism and cover)
There’s a circle in the center under one of the emblems that works as a lock that's screwed into place. This locks the central blade, and the central blade in turn locks the main blade. The emblem is removable and is held in place using a couple of magnets (which I did number incorrectly, whoops).
Fun story, when I first placed in the magnets I had the acrylic middle blade in place as you see here. I accidentally drilled into the acrylic and partially glued the magnets to the acrylic. That was a huge pain to fix- it involved a putty knife and lots of swearing.
Step four: 3D printing
Now that I had the finalized laser-cut parts all assembled and ready to go, it was time to create the 3d-printed embellishments.
The first thing I printed was the parts that comprised the barrel. I designed these using OpenSCAD and some simple formulas.
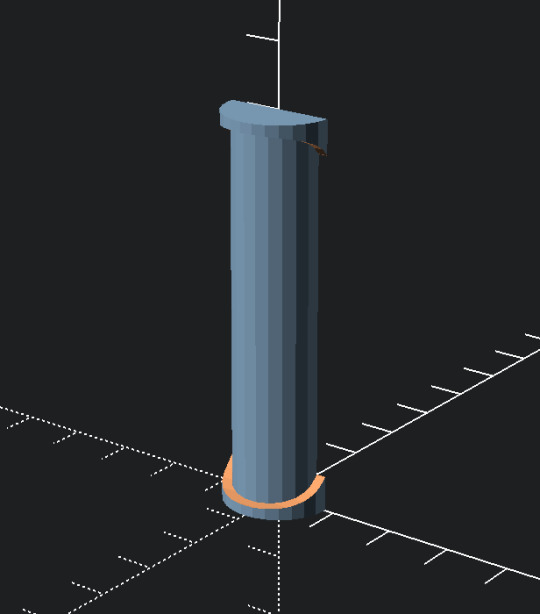
(Middle barrel part in OpenSCAD)
I printed them in PLA on my adorable but powerful Lulzbot Mini. I then glued to the main prop using tacky glue and then blended them in with wood filler and some super-glue.
(Barrel piece glued onto the prop)
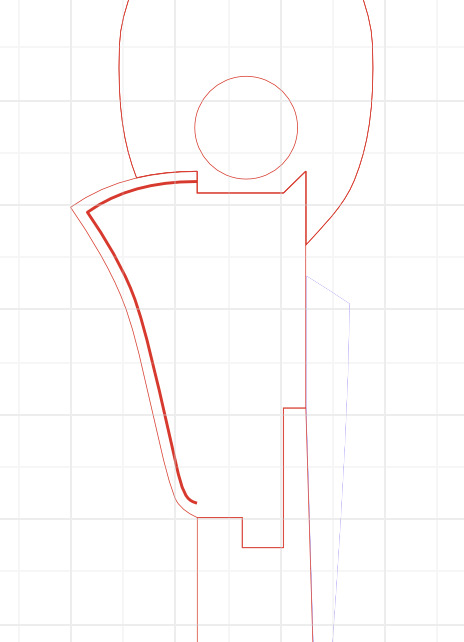
Now for the most difficult part: the barrel cover. I am by no means a 3D artist - I barely know how to use 3D software at all. However, I did use some CAD software in high school, so I’m practically an expert, right? I used Affinity to draw the outline of the barrel cover then used Fusion 360 to model it into the part. I used measurements directly from the real prop to make sure this was designed to fit exactly.
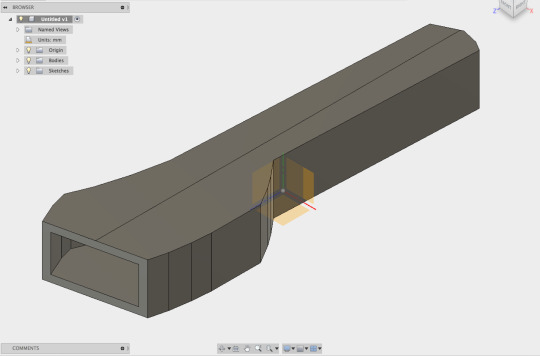
(The basic barrel cover shape in Fusion 360)
I printed this basic shape to make sure it fit and then started to figure out how to do the engravings on this part. This was actually the most frustrating part for me. Fusion 360 kept freezing and crashing which was extremely frustrating. I’m not sure if my Macbook is just too wimpy to handle serious CAD work, but it was baffling to me that such a seemingly simple part was causing Fusion 360 so much trouble. Eventually, I found a hint online about disabling build history which allowed me to actually finish the part and all of the engravings without ripping my hair out and throwing my computer across the room.
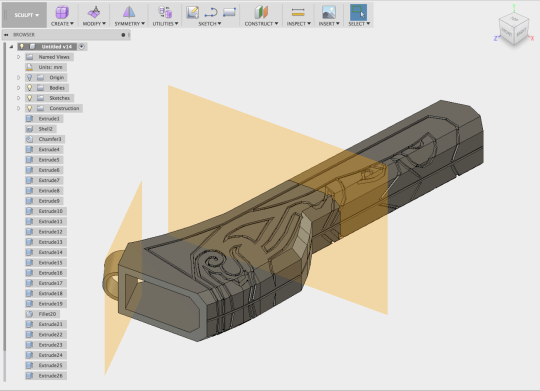
(The final design in Fusion 360, sliced up into three parts so it’ll fit on my Lulzbot Mini)
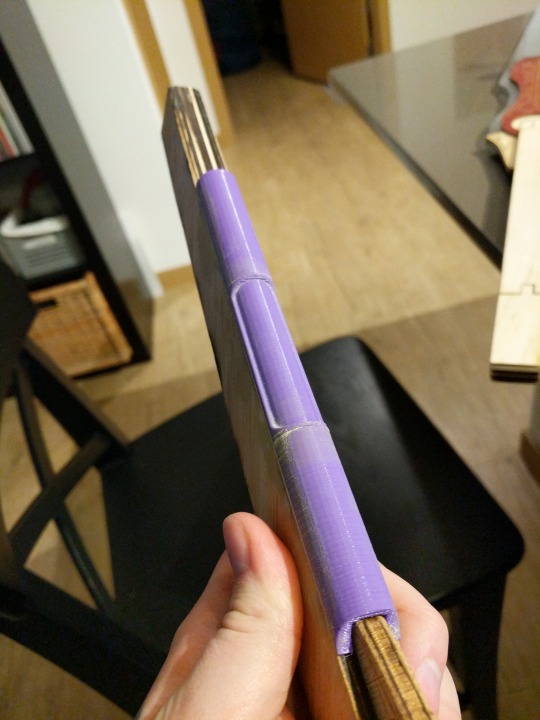
With the design complete, I printed it. My Lulzbot churned out the three parts over two days and it came out fantastic:
(It’s BEAUTIFUL)
With all that done, all I needed was the little barrel poking out at the end. I whipped that up in OpenSCAD.
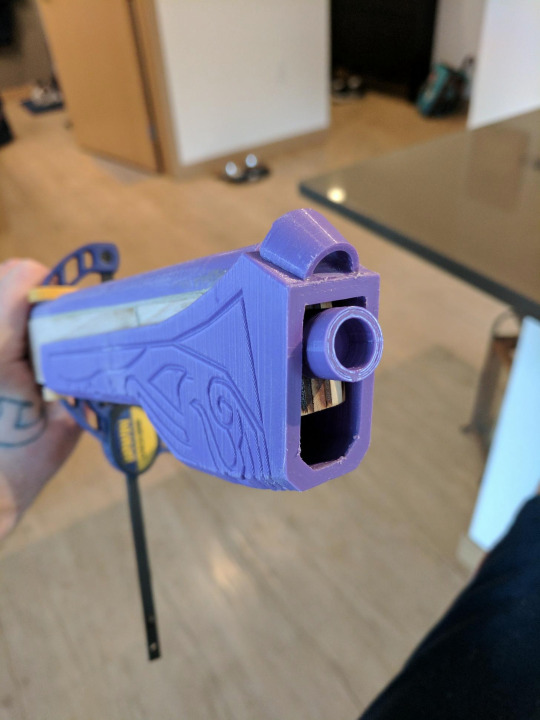
(Barrel and trigger glued in place)
Step five: painting
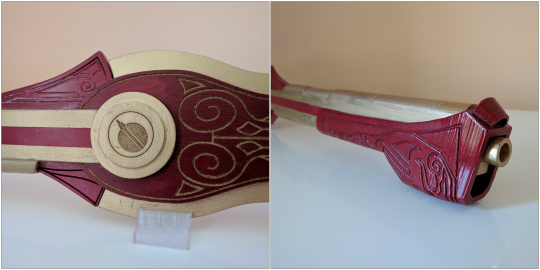
With the prop assembled, I spent a few days sanding and filling various parts to prepare it for painting. Because of limited space, I choose to use spray paint for this and paint at a friend’s house. I used Krylon ColorMaster spray paints. I painted the whole thing with a gray primer, then painted the gold sections, then masked and painted in the red sections. I finished the whole thing with a pass of clear coat.
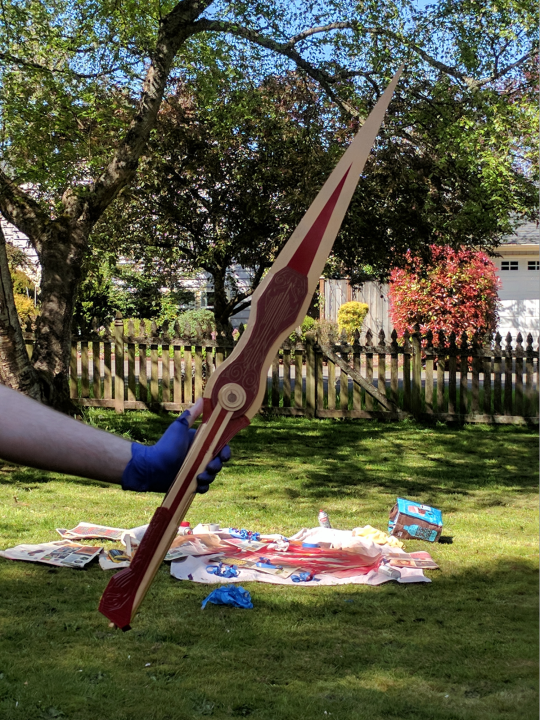
(It’s painted!)
While the 3D design was the most frustrating, the outcome of the painting was the most disappointing to me. While I think the paint job is okay, I think I can do much much better. I felt rushed because I was borrowing another person’s space (despite them being wonderful and accommodating) and it was hot outside (I had a nasty sunburn from doing this). I was also really disappointed in how little control I felt I had over the spray paint. In the future I want to use an airbrush, but I don’t presently have the space for it.
Final thoughts
This was an incredibly ambitious item to try to build as my first prop. I’m honestly really proud of the outcome and I can’t wait to build my next prop. I learned so much about laser cutting and a little bit about 3D printing. I learned that I suck at painting. I learned that it’s critical to understand your tools and skills while designing your prop. I learned that I really wanna get access to proper woodworking and painting equipment. Hopefully someone else finds this build log useful- good luck!
2 notes
·
View notes
Text
pyrrha nikos update 7/8
this costume has been a journey, but i’m super happy with the results so far (ღ˘⌣˘)
i started with the skirt & sash, because i figured those would be an easy start to this soon-to-be shitshow. i used this pattern from jalie (i wanted a skort instead of a skirt because skorts are basically the real world counterpart to monty oum anti-upskirt technology). i altered the pattern to take out the side panels & overall shortened it. for the sash, i used a pattern i came up with a few months back to get that wave/fold that pyrrha’s has. i like the end results, but the sash isn’t quite as long or full as i hoped it would be, so i might remake this.
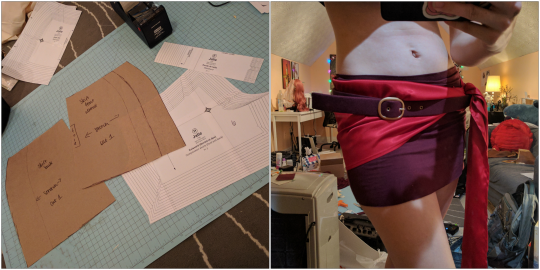
i’m ridiculously proud of the belt, mostly because after a few days of staring at my corset, wondering how i’d fix the binding (more on that later), i finally had something go right. i based this belt off something i saw on labinnak’s instagram story, with a little help from this video from zonbi. i hotglued a bunch of 1 1/4″ strips of craft foam together (two strips to give the belt some sturdiness), sewed a long tube of fabric (using the same fabric as my skirt, shoes, & gloves so everything matches!), then pulled the tube over the foam. i then added a buckle i picked up from the the craft store that i spray painted a while back with the same spray paint as my armor & punched in some grommets. it’s not super sturdy since it’s just craft foam & hot glue, but i don’t plan on this belt actually holding anything up, so i think (hope) it’ll be okay.
the gloves are just cheaters gloves, with an added flap on the thumbs so i can use my phone while wearing these

the boots are......not my proudest accomplishment. i’m quite pleased with the (currently unfinished) boot cuffs, but the boot covers.....yikes. i’ve never made boot covers before, so let’s blame it on that. luckily, these are just shoes from goodwill, so i’m not upset over ruining them (& they’re actually half a size too small, so i might just get another pair & redo these before dragoncon). the red paint on the soles is also a hot mess, because the plastidip i bought to seal it didn’t actually seal it. tbh, i wouldn’t be upset if these shoes met a horrible fate & had to be replaced.
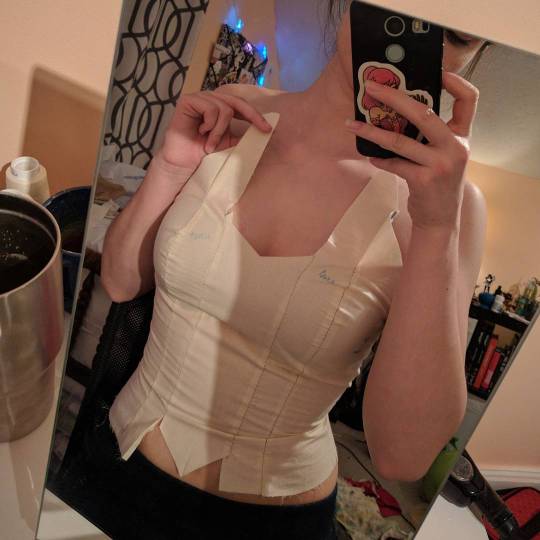
now the corset. holy shit, the corset. pyrrha has such a distinctive top & i’m a perfectionist asshole when it comes to costumes, so i’m going all in on this. one thing i noticed while planning this out is that pyrrha’s corset is probably made out of metal & the 3 panel design of it doesn’t translate well to fabric. i wanted something fitted & supportive, so i started looking for commercial corset patterns (i actually tried to make a custom corset pattern first, but that was its own separate disaster). i finally decided on simplicity pattern 8201, which i think is supposed to be.....a star wars thing? i dunno, but this pattern has a few features i was looking for, including being a generally basic but fitted pattern, having a seam straight up the middle, & being designed for ridiculous fabric. i picked it up at the craft store with some muslin & got to work.

i first made a mockup of the original, unaltered pattern in my size to get an idea of the shape & look, then i started figuring out what should be altered to get to pyrrha’s corset. i don’t have a dress form, so i found it easiest to (badly) draw on myself what i was going for.
then i transferred the pattern onto paper, added my alterations, & made a mockup of that. my alterations included cutting the center front pattern piece on the fabric fold so i get one piece instead of two, extending the top line of the front & side front pieces for the tabs, extending the side back pieces so the corset can lace up (the original pattern calls for a zipper in the center back), & adding a modesty panel. (pyrrha sticker on my phone is from @binch-queen‘s redbubble!)

it took a few tries to get the tabs to lay right, but i finally managed to get something i liked.
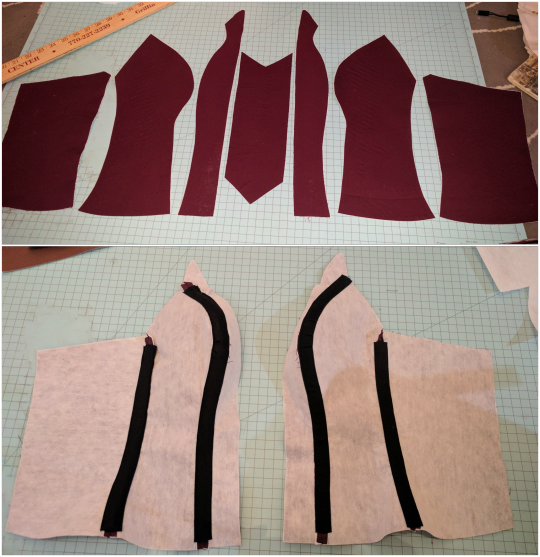
i finally started on the actual corset, but because i’m a baby, i started with my inexpensive lining fabric instead of my pricier outer fabric. i fused the fabric, a woven fabric i found at the craft store that happened to match my knit fabric for the skirt perfectly, to heavy weight fusible interfacing, then sewed the pieces right sides together. i wasn’t sure how exactly i wanted to do the center gold panel, so i didn’t sew that lining piece to the rest. i then sewed my boning channels onto the lining seams.
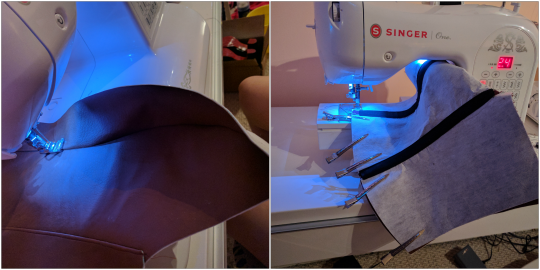
the lining went well, so i finally started on my outer fabric. i looked around online for some faux leather fabric, but couldn’t find anything i really liked. however, when i went to joann to get fabric for another project, i found some upholstery vinyl that had the perfect faux leather look & color & i knew it was meant to be (ღ˘⌣˘) (side note: while looking up that link, i noticed the fabric is flame retardant, so if any cinder cosplayers try to fuck with me, i’ve got that going for me) i did the same to the outer fabric as i did the lining, fusing the heavyweight interfacing & sewing right sides together, then topstitching along the seams to get everything to lay flat. then i placed the outer & lining right sides together, sewed along the bottom & the lower 2/3 of the center, flipped it right side out, then topstitched again to get everything to lay flat.
i added a lining for a few different reason, the first being that the inside of the corset will (probably?) be visible with the tabs, so i didn’t want the ugly wrong side of upholstery vinyl to be on display. i also didn’t want the boning channel stitches visible on the outside, plus the additional layer of interfacing makes the whole thing a lot sturdier. sewing the whole thing together was a nightmare & i’m pretty sure my sewing machine was screaming at me at more than one point, but it looks much neater & more professional.
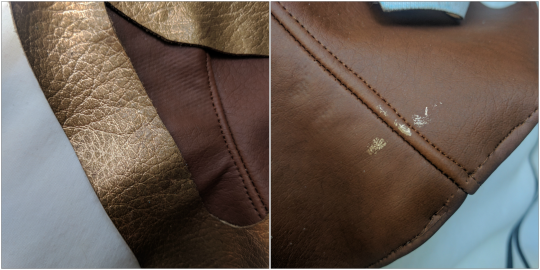
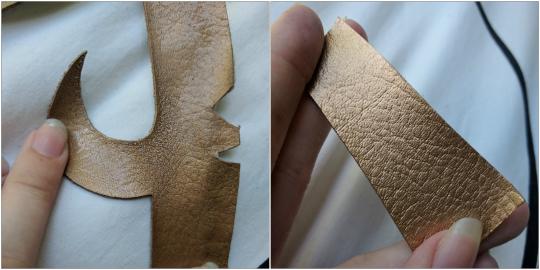
i was on a roll with the corset at this point, but the gold panel & binding quickly derailed me. my original plan was to spray paint the same vinyl fabric gold, fold the binding over the top edge, & sew it down, but i ran into a few different problems. the first was that vinyl doesn’t just fold over like normal fabric, the only way you can get it to lay flat is to topstitch it, which i was planning on doing after folding it onto the fabric. i also couldn’t pin the fabric down without putting in a bunch of permanent holes, so i started to tacky glue the binding onto the corset to hold it in place while i sewed, then discovered when i removed my clamps that the paint pulls up & transfers onto pretty much anything it comes in contact with. my shiny gold accents were now looking quite worn. i tried a clear polyurethane to seal the color, but it also had a sticky surface, so it had the exact same problem as the unsealed paint. i kept gluing & clamping out of denial, but the binding just looked bad. i put my corset aside for a week & started on armor while i tried to figure out how to fix this.
i eventually started looking up sealing spray paint on vinyl (apparently pinterest moms love to upcycle vinyl chairs), but most blogs didn’t give any detail on how they sealed the paint, & the only blog that did mention it used an expensive wax that you can only get from specialty retailers. i tried another clear spray paint, one specifically designed for sealing, & got......whatever those bumps are, plus a really ugly color (although to be fair, that’s the same vinyl binding that was currently being painted for the 4th & 5th time). i shared my dilemmas on reddit, got some tips for helping the color actually stick to the fabric, & discovered that the clear plastidip that betrayed me on the soles of my shoes actually sealed the color without discoloration, weird bumps, or stickiness. i still haven’t stress tested it, but this process is looking much better now than it did yesterday morning.
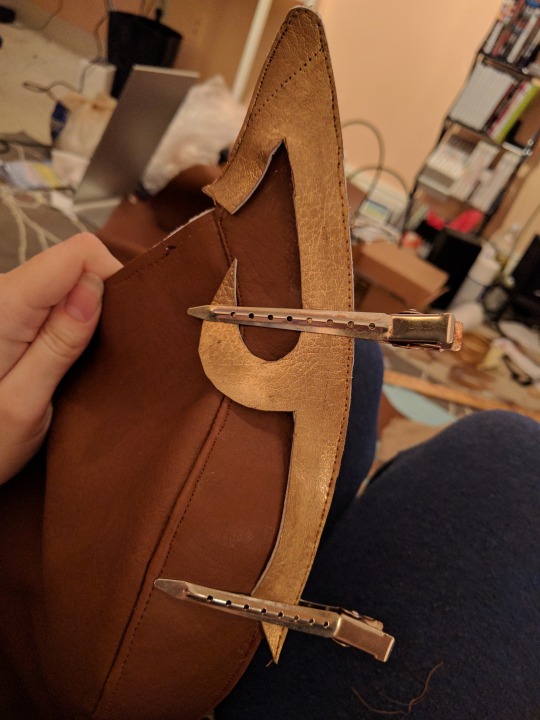
another thing i disliked about my original binding was how it looked on the inside, which would be somewhat visible. the only way i could get the binding to lay flat on the opposite side would be to cut slits in the fabric, which would be visible. i ended up digging up a vinyl binding tutorial from december wynn that i considered when i was first patterning the binding, but decided against because i thought i wouldn’t like it. i tried it out on some scrap gold fabric, & holy shit, it’s infinitely better than my original plan. don’t do my original plan, it’s terrible & will cause you nothing but pain.
i’ve also been working on armor the past few weeks, but this word vomit is long enough so i’ll save that process for another update. i’ll be starting on a commission for amon & a hylian hood this week, so those updates will start soon. thanks for reading! if you found this useful or just enjoyed it, please consider buying me a coffee (ღ˘⌣˘)
3 notes
·
View notes