
Don't wanna be here? Send us removal request.
Statistics
We looked inside some of the posts by skystuccosystems and here's what we found interesting.
Average Info
Notes Per Post
0
Likes Per Post
0
Reblog Per Post
0
Reply Per Post
0
Time Between Posts
23 days
Number of Posts By Type
Text
15
Photo
2
Last Seen Tumblr Blogs


Fun Fact
The Tumblr office adopted Tommy, an 11-year-old Pomeranian.
Text
Exterior Stucco Contractor in Mississauga and Toronto (GTA)

Sky Stucco Systems, Exterior Stucco Contractor in Toronto (GTA) Ontario, Canada
Exterior Stucco the right way, affordable prices, and long-lasting. Read our reviews! OUR PROJECTS GET YOUR ESTIMATE TODAY
Stucco systems that worksFollowing the Exterior Stucco and building standards, to achieve long-lasting and professional work.

For your convenience, colors...We use Exterior Stucco wall Systems from Dryvit, Durock, Duroband, Adex, and STO For your convenience.

5 Years guaranteeBecause we have full confidence in our work and product, we offer a 5 years guarantee in materials and labor.
Sky Stucco Systems,
Installs Exterior Stucco systems in accordance with the manufacturer's specifications. Our experienced crew are highly qualified and work hard to meet deadlines. As a result, therefore, most of our Exterior Stucco projects have come from referrals.

Exterior Stucco and EIFS Installation
Insulated Stucco Moulding Commercial
Stucco Repair
Professional Exterior Stucco Finishing
Exterior Stucco Painting
Exterior Stucco and Foundation Parging
SKY STUCCO SYSTEMS, EXTERIOR STUCCO THE RIGHT WAY.
Feel free to contact us to get your free no-obligation estimate today. GET YOUR FREE ESTIMATE TODAY Please Check latest Projects here Subscribe to our list Don't worry, we don't spam
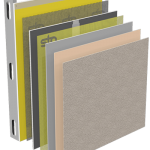
Exterior Insulation and Finish Systems (EIFS)
Offer continuous insulation with unlimited design capabilities. Allowing architects the design flexibility and aesthetics they require, while helping to meet the new energy codes. EIFS are continuous insulation.

Repairing Hairline Cracks In Exterior Stucco – A Helpful Tutorial! Exterior Stucco FAQ
What Are The Best Pressure Washers For Stucco in Toronto Canada 2021? Architectural Moulding Design
List of 20 Homeowner Questions About EIFS Exterior Stucco Exterior stucco
5 Interesting Facts About Stucco Nobody Has Ever Told You Ontario 2020 Exterior Stucco FAQ
How to Deal with the Five Biggest Weather-Related Issues Your Home Will Face Exterior stucco Top rated
Exterior Stucco Home Halton Hill Ontario George town Bay Window project Bay windows Show next Read the full article
0 notes
Text
Benjamin Moore Trending color Palette for 2022 is Now Available!

To say the least, the previous year was exciting. Millions of Americans were forced to return to their homes full-time due to the worldwide coronavirus epidemic. With lockdowns early in 2020 compelling many businesses to adopt work-from-home policies. As a consequence, we're spending more time inside with our spouses, dogs, and children - and the term "home" has taken on a new meaning. This is why we're so happy to offer Janovic consumers the Benjamin Moore Trending color for the 2022 palette, which was just unveiled. With rich neutrals & sun-splashed colors evocative of Portugal's cobblestoned beach towns. This year's collection invites warmth and natural balance back into your most cherished and lived-in areas. Off-yellow colors are also making a resurgence, giving joy to kitchens, bedrooms, living areas, and offices. Replace your chilly, industrial greys and sterile whites with sunbaked colors and welcoming tones this year to give your favorite interior and outdoor elements a new lease of life: Repaint the entrance door as in 2136-40 blue-green Aegean Teal, or make a pleasant reading nook in OC-12 Muslin. You may choose any hue from the color trends palette that appeals to you at Janovic. For same-day pickup, visit one of the NYC locations or make an order online.
Paint Colors That Will Be Popular in 2022
Although subdued, minimalist greys, beiges, and whites may seem to be associated with contemporary design, many of the country's leading designers are now defying that narrative. Shouldn't our home design, which serves as the focal point of our everyday lives and the setting for our families' most memorable moments, is as lively and colorful as our own personality types? A space with just the perfect blend of strong, diverse color and soft, subdued neutrals is just wonderful. It has the ability to bring your most treasured furniture and décor to life in a way that cooler colors can't. With that in mind, here are our five top selections from the Benjamin Moore trending color collection (in no particular order): Benjamin Moore is a painter who specializes in 2089-20 Rosy Peach: This tint is slightly redder than coral, bold and vivid yet gentle enough to not be overpowering. For a stunning initial impression, pair with the greenish charcoal grey or perhaps a dirty purple tint. Foggy Morning 2106-70 by Benjamin Moore: With this exquisite, hint-of-pink, off-white tone, bring the tones of Fashion Week through your home. Violet, stone grey, or a dusty, old brown are all good choices. It's the ideal setting for vibrant, colorful artwork or boho décor. Benjamin Moore is a painter who specializes in Damask Beacon Hill HC-2: This light yellow color is cheerful and very French. It would look great in a kitchen, bedroom, bathroom, or living room. It brightens up any area while being far from tacky. And it also has enough weight for an even more formal environment because of its barely-there grey undertones. HC-86 Kingsport Gray by Benjamin Moore: This warm neutral, which is slightly more brownish than grey, is our (surprise) favorite warm subtle of the year. It may not seem much just on screen, but it works wonders on your walls. Providing a much warmer, cozier alternative to traditional medium grey. While yet maintaining a casual elegance. It looks well with a variety of lighter, brighter colors. Aegean Teal 2136-40 by Benjamin Moore: This teal color is also Benjamin Moore Color for the year 2022, and it's easy to understand why. It exudes tranquility reminiscent of traveling through watercolor vistas along the Mediterranean shore. On a feature wall, let it talk for itself, or match it with a warming beige or a deep charcoal grey.
How to Use Interior Paint Colors That Are Popular Right Now in Your Home
The easiest method to integrate trendy paint colors into your interior design. Whether it's a DIY project or you're hiring a professional, is to prioritize the architectural aspects or décor items you want to emphasize. Then choose a paint color that makes that feature sparkle. Of course, unless you intend to repaint and redesign your whole house, you'll need to choose your "project room" first. If you really want to experiment with a bright paint color, start with a wall before painting the whole room. You'll be able to observe how it blends in with other design components in the room this way. Remember to contrast dark or aggressive tones with natural light, space, & openness. To put it another way, we wouldn't choose AF-655 Benjamin Moore Silhouette for a tiny, windowless bathroom. The ultimate product would be gloomy and depressing, and the color's lovely undertones would be lost due to the cramped area. Allow lots of space for darker colors to breathe: high ceilings and skylights provide just the right amount of contrast. Look for sections of your house that are already coated in neutrals but seem excessively cold, dreary. Uninteresting if you want to integrate a lovely, trendy neutral hue like OC-12 Benjamin Moore Muslin. For example, replace an ice light blue-gray with the gentler off-white Muslin OC-12. This upgrade is low risk, a big return since you aren't dramatically changing your general palette. Another area that suffers from a lack of color and may benefit from a fresh, on-trend shade? Cabinets in your kitchen. There's no reason you can't use a strong eggplant, coral, or teal, (like 2089-20 Benjamin Moore Rosy Peach, listed above) on flat-panel and Shaker cabinets, especially if the kitchen walls & backsplash are pretty neutral. Because repainting cabinets is time-consuming, be sure the color is one you know you'll like in the long run.
Janovic carries Benjamin Moore Color Palette
Are you willing to give your house a makeover? With a bold hue from Benjamin Moore’s palette, breathe fresh life into any interior décor (and outdoor, if you so want!). After all, changing the color of your walls is the simplest and least costly method to update your decor. You can easily discover a shade you like that complements your current furniture and artwork. Stop by our local Janovic shop in New York City and speak with one of our professionals. If you're stuck between two colors or just need help on where to begin your painting job. We'll turn you away with materials, a game plan, & a few examples to try. For more color trend ideas, be likely to follow us through Facebook, Instagram, and Pinterest. With magnificent color from Janovic & Benjamin Moore, make 2022 your home's greatest year ever.
FAQ’s
What color is Benjamin Moore's color of the year for 2021? Benjamin Moore's illustration Aegean Teal is a popular color palette right now. Take a minute to pause and refocus. Benjamin Moore Color for the year 2022 is Aegean Teal 2136-40. Which is intriguing, balanced, and wonderfully calming, creating natural harmony. Which Paint Colors That Are Most Popular White Dove, OC-17. OC-65 Chantilly Lace. OC-130, Cloud White. Swiss Coffee. OC-45. Calm. OC-22OC-20. Pale Oak. Is Benjamin Moore’s coat really that much superior to regular paint? Benjamin Moore's Ben paint brand is a budget-friendly choice that doesn't sacrifice quality. Although the coverage isn't as fantastic since it's not as thick. It's still highly respected by some of the artists we talked with. It's our opinion that it's Regal Select's younger brother. Read the full article
#BenjaminMooreTrendingcolorPalette#BenjaminMooreTrendingcolorPalettefor2022#WhichPaintColorsThatAreMostPopular
0 notes
Text
Kitchen renovation cost

Renovating the kitchen is among the most popular home improvement projects, and for good reason. A new kitchen design not just to improve the selling value of your house, but it can also make your kitchen a much more useful and engaging hub of your house. However, when thinking about a kitchen renovation, one of the very first things homeowners will want to know is how much it will cost and whether or not they can afford it. For those of you who want to mix and match styles to come up with their own unique looks, here are some suggestions to get you started.
The typical cost of a kitchen renovation
If your kitchen is typical in size, upgrading it will cost over $20,000. The total cost will be influenced by the magnitude of your kitchen and the kind of cabinets and appliances you choose. Between $40,000 and $70,000 might be spent on a big kitchen makeover.
Some main points related to cost of kitchen renovation :
1. What Is the Best Way to Plan a Kitchen Renovation Budget? The size of your spending plan is critical. When it comes to your kitchen, the possibilities are only limited by your imagination. A budget of $20,000 or $50,000 is a good place to start for a medium-sized kitchen makeover. The amount you spend on renovating will be determined by a variety of factors, including where you reside, the value of your property, the kind of materials you choose, and the size of the job. Would you like to move walls and reroute utilities in your kitchen? It'll be more expensive than merely switching out the kitchen cabinets and appliances in the current layout. 2. How Much Does it Cost to Renovate a kitchen? The average cost is $22,000, which is close to the national average. However, it's not the whole picture. According to the scale and complexity of your project, you should expect to pay anything between $5,000 up to $50,000 or more for a new kitchen. Average kitchen renovation costs are between $12,500 and $33,000.. 3. It's important where you live? The price of a kitchen makeover might vary greatly, not just from one state to the next but also based on where you live: in the country or the city. A significant kitchen design may cost as little as $20,000 in the South compared to more than $40,000 within North and West. 4. What Is the Highest Price? It's important to consider the scope of your kitchen renovation when figuring up costs. Cabinets are frequently the most expensive part of a kitchen makeover, taking up around 25% of your budget. When it comes to kitchen cabinets, shopping at Ikea or a large box retailer on a budget may save you a tonne of money. Brass hardware, for example, is more durable and may give less costly cabinets a more personalized, premium appearance. Similarly, investing in a high-quality faucet rather than a high-end sink might have a significant impact on your renovation costs. Standard cabinet boxes may be customized by adding unique doors. If you want to keep your cabinets organized for less money, don't buy custom features such as pots or recycling organizers; instead, get customizable organizers from retail shops. 5. Is It Worth It to Redecorate My Kitchen? According to HGTV's Kristen Hampshire, "for possible customers, the kitchen is indeed the space that can make and break the sale." It's been said that an upgraded, eye-catching kitchen can sell a house in one day. The popularity of renovating one's kitchen is on the rise. One reason is that they frequently increase the resale value of a house significantly. In 2019, the average cost of a $66,000 kitchen makeover was recouped in the sale of the property at 62 percent. Remodeling a smaller $22,000 house yielded an average 80 percent return on investment. The return on investment (ROI) from smaller remodels might be higher since they are more focused on fixing functional issues. More adaptable styles are often used while creating them. In more costly projects, personal style & aesthetics sometimes take precedence. While prospective buyers will be concerned with whether or not the plumbing or appliances function, most will not require a lavishly decorated kitchen. Designing a kitchen that you hate is a waste of time unless you want to sell your property soon. In the end, your kitchen is a functional space, not just a financial one. It's a place where you take care of and provide for your loved ones. You host parties and get-togethers in the kitchen. It's your home's central nerve centre, where everyone gathers to think, converse, and relax. If you plan on staying in your house for a long time, go ahead and decorate how you choose. According to the Research of Cooking & Kitchen Intelligence, 40% of homeowners regret their kitchen makeover budget. Most of them regretted not including additional elements to help with organising.
What Are the Possible Costs of a Low-Cost Renovation?
Even on a tight budget, you may make significant improvements to your kitchen. If a simple kitchen remodel costs less than $5,000, we may say it's affordable. Costs that are really high: In a small renovation, where you invest your money determines how you classify large costs. New cabinets will become one of the more expensive parts of a significant makeover. Instead of buying new cabinetry, consider these pricey yet "moderate" modifications for your home's interior: Doors for cabinets may range from $10 to $40 per square foot, depending on the materials used and whether the items are pre-made or customized. As a result, you may preserve the same layout and existing base cabinets while updating the style of the cabinets. Countertops range from $15 to $30 per square foot. Installed. It was time to replace an old linoleum work surface with something more durable. When I completed my own little DIY remodel, it was the most expensive part and cost me $2,000 in total. Flooring costs anything from $3 to $8 per square foot. If your budget is between $3 and $8 per square foot, you'll find plenty of great options. The vinyl tiles I used in my house are groutable peel-and-stick tiles, and they look excellent while costing next to nothing. Appliances: Technology updates may significantly improve the appearance of your place. Installing a new stove, range cover, refrigerator, or a built-in microwave may have a significant influence. Even if your budget does not enable you to change everything, you may start with the systems that are in most need of replacement and work your way up to replacing everything else as time permits. Other significant expenses include: - Dumpster - Window replacements or skylight upgrades - Installing a new sink, - HVAC system - lighting - hardware
FAQs
1. A whole kitchen renovation will set you back how much? The average cost is $22,000, which is close to the national average. However, it's not the whole picture. According to the overall size and complexity of your project, you should expect to pay anything between $5,000 up to $50,000 or more for a new kitchen. Average kitchen renovation costs are between $12,500 and $33,000.. 2. How much does it cost to renovate a tiny kitchen? The typical cost of a modest kitchen makeover is between $9,500 to $14,250, with an industry median of $150 per sq foot both for materials and labor. 3. How much does it cost to renovate a kitchen and is it worth it? If you're prepared to handle the majority of the work yourself, you may do a simple kitchen makeover for around $5,000. New appliances under Consumer Reports' economy design are energy-efficient and affordable. Read the full article
0 notes
Text
Amazing Home decorating ideas on a budget

What can you do to spruce up your home on a budget? Today, I'm going to share with you some of my favorite low-cost decorating ideas. This is a question that has come up often throughout the years... Understandably!
Information for people trying to decorate their home within a limited space allocation
Beautiful objects appeal to all of our senses. Beautiful things, on the other hand, are frequently prohibitively expensive. It's possible to beautify your house on a limited budget, however. It's easy to express oneself and create a pleasant atmosphere with interior design. If you look at Instagram and Pinterest, it's tempting to believe that you need to spend lots of money to create the ideal setting. Of course, carefully arranged homes adorned with high-priced furnishings and home accents beckon us in. However, even if you're on a low budget, there are several methods to enhance your home's appearance. Here are a few tried-and-true suggestions for decorating your house on a budget.
1. Use Your Oown Beauty To Decorate
Whenever it comes to quality decor, this is a no-cost option that is also one of my favorite low-cost options. Using items you already have in your house, search for eye-catching pieces that will work well on a bookcase or even as a table centerpiece. Vignettes are collections of small items displayed together to create a cohesive look. You can redecorate for free by repurposing items you already have around the house.
2. Set Goals While Considering Your House's interior Decor
Cluttered shelves will never have the same visual appeal as well-organized shelves. We've got a tonne of terrific, budget-friendly organizing tips and items for you in this article. Instead of tossing your books into your bookshelf at random, organize them by color. It's possible to make your closet seem more appealing by arranging it according to color. By color-coordinating your things, you not only make your house seem better but also add some visual appeal to something you already own.
3. Go To Home Decor Stores Within Your Price Range
If you're in the market for new home décor pieces, start your search with retailers selling products for less than $100. Shop at T.J.Maxx, Target, Walmart, Etsy, and eBay if you want to save money. These shops are excellent for finding unique items that may serve as just a focal point in a space or as part of a larger interior design scheme. There are plenty of bargains to be had whether you're looking for just a side table, light fittings, or throw cushions. Check out this page for even more tips and ideas on how to decorate your house on a budget.
4. Apply A New Coat Of Paint To The Decoration
If your living space or dining hall set isn't working for you anymore but you don't want to spend the money on new pieces, consider painting them. Old furniture gets a new lease of life with a coat of paint. There's a good chance you already have some paint left over from previous projects. If not, just get some paint and go to work. Don't forget about painting the kitchen whenever it comes to home decorating. Painting your kitchen cupboards is something we've covered in-depth on the site. With a new layer of high gloss paint, we revitalized the Demilune table seen above. This Benjamin Moore Point Hatteras Sand paint color was chosen for the walls of our living room.
5: Replace Your Throw Pillows With New Ones
Replace your throw cushions as a quick and easy way to freshen up your living room design. Buy or manufacture your own, throw pillows are indeed a simple way to accent and liven up a space. Throw pillows should be replaced with new ones that are brighter and fuller, according to Jillian. Alternatively, you may get new pillow coverings that are crisp and clean. However, having more does not make things any better. Keep in mind that there's such a thing as having too many pillows. Changing your pillows according to the season is a simple way to make your home seem more seasonal. If you're redecorating your house for spring, try using cotton pillows instead of velvet ones for a more airy look.
6: Pick Towels You’re Actually Excited To Use
Old, damaged bath towels are an eyesore. Discolored whites and bleaching stains detract from the appearance of a home's value. According to Drew Henry, president of design company Design Dudes, "proudly display immaculate white, fluffy towels as you would find in a posh hotel or spa." "Your visitors will quickly notice the difference, and they'll regard the room with a more upscale attitude." Excellent ratings and reviews from customers back up the quality of these towels, which are available in a variety of colours and patterns. Take advantage of these additional 16 opulent-looking decoration strategies used in hotel rooms.
7. On A Budget, A Great Idea Is To Opt For A Minimalist Look In Your Home’s Decor
A simple, clutter-free look that emphasizes a few primary focus points while minimizing other elements is an excellent way of introducing a new interior design home interior without spending a lot of money. Because the space will be focused on the nicer pieces, you can afford to splurge on just a few more expensive home decor items because you won't need as many other items.
8. Use Unique Accents To Decorate
A Salvatore Dali replica isn't the only option here! "Unique" denotes something that only you have. Without a strategy, people spend a lot of money on interior design items that they end up constantly updating because they don't meet their needs. Look for a few bits that you absolutely adore and use them to direct your interior decorating efforts so that they inspire the entire appearance of your house.
9. Reschedule The Furniture
It's possible that we've grown accustomed to our furniture layout and don't see that there are other options. Using your phone's camera, try snapping a few pictures of your living space. This gives you a fresh perspective on the space. Moving every piece isn't necessary (although it'd be awesome if you did!). Just a few alterations to your furniture arrangement may be all that's required to make you fall in love with the space all over again.
10. Out Those Family Heirlooms And Display Them Throughout Your Home
This is one of my favorite hints. Placing sentimental mementos around your house is a good way to make it feel more like home while also saving money.
11. Decorate With Some Plants Or Fresh Flowers, Always Budget-friendly And Always A Great Idea
Even a quick trip to the local nursery or devices store can result in some stunning outcomes. Simple vase or container arrangement keeps the leaves looking lush for months on end. I use this on our dining table because it's a good way to liven up any space.
12. Don’t Overlook Consignment Shops For Budget-friendly Home Decorating Ideas
Local Goodwill & thrift shops are excellent design resources, whether you're looking to be get rid of things you do own as well as buy new ones. If you can find out what day of the week they receive new items, you'll have a head start on looking through the shipment. These shops have a wide variety of items, ranging from a stunning dining table to a pair of vintage area rugs. It never ends up hurting to inquire as some stores are willing to haggle on the price.
FAQs:
What are some low-cost decorating ideas? Here are a few low-cost and easy ways to decorate your home: On the walls, mash it up. Make a gallery wall out of the tunnel or corridor walls. Be bold and make a point. Consider becoming eco-friendly. Make a show of your collection. Bright colors. Cozy lighting. Dressing it up. Do-it-yourself. What is the cheapest way to decorate a living room? Decorating your living room on a budget? Use these smart, budget-friendly ideas. - Change up the layout of the room. - For cheap living room ideas, look no further than your own home. - Bring new life to your walls by hanging new artwork on them. - Use indoor plants to provide some greenery. - Belief in the transforming power of paint is essential. - Or easily build a mural. Put up removable wallpaper (then remove it). - Make a gallery wall out of photos and other artifacts. What easy ways can I spruce up my house using inexpensive items? Decorating Ideas for Your Home on a Budget: - Do It Yourself - Set the tone from the moment you walk through the door. - Alamy. - Light and Neutral Colors for Walls. - Bruce Buck. Let The Sun Is shining In Your Kitchen. Bruce Buck. - Put A Mirror Somewhere in Every Room (iStock).
CONCLUSION:
You don't have to spend a lot of money on interior design, and there are many free ways to give your house a new look. All of our cool tips are given above. Read the full article
0 notes
Text
Unique Exterior Stucco Home From Scratch: "Leveling/Rasping Insulation EPS"

After you've installed your EPS insulation on your wall, you should level it. Or would you prefer a rough and uneven surface? Of course, it wouldn't meet the eye. Leveling and Rasping the Styrofoam wall is the process nobody likes from the contractor side to Homeowner. As a matter of fact One of The reasons why is because it releases a huge amount of styrofoam flying around. As a matter of fact, if the area is not being covered with tarps or mesh.
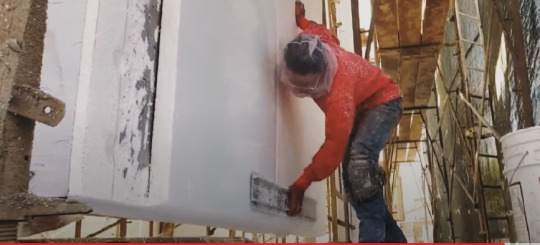
Usually, Neighbors and homeowners will have to agree on this s part of the job as it can really get dusty and look like it's winter. Have you ever been close to a house in the process of doing stucco? you know what I meant. Leveling insulation EPS helps achieve an even and smooth surface. And, this process is not rocket science, it's just as easy if you know what to do. Here, you will find out how to level your insulation EPS. We have broken the process down into actionable steps to help you get the best result. And You will then learn furthermore about the EPS.
What is Expanded Polystyrene (EPS)?
EPS foam is simply any form of expanded polystyrene. EPS is used in the building industry as an insulating material for walls, foundations, and roofing. They make the building resistant to degrading forces. Expanded Polystyrene is produced in different densities (usually 20 - 200 mm) and with graphite for thermal enhancement to provide an insulation material. EPS insulation is a lightweight, rigid, closed-cell insulation. This closed-cell structure provides minimal water absorption and low vapor permanence. EPS production involves 2 major stages: - Raw beads are expanded by applying steam to them to create pre-puff beads. These beads are then cured in large bags and afterward taken to the mold. - Once its in the mold, the steaming process is repeated on the pre-puff beads to form a block that is around 37-1/2″ – 54″ x 49″ x 121-1/2″ – 220″. Then the blocks are placed on the storage floor to age for the appropriate length of time and further cut into various shapes and sizes. Blocks are produced in several densities to meet specific project needs. Density is a measure of mass per volume. EPS is measured in pounds per cubic foot (lbs/pcf). The Insulation Company of America manufactures expanded polystyrene in the following minimum densities: - 0.70 lbs/pcf - 0.90 lbs/pcf - 1.15 lbs/pcf - 1.35 lbs/pcf - 1.80 lbs/pcf - 2.40 lbs/pcf - 2.85 lbs/pcf Benefits Of EPS Insulation #1. Low cost EPS is one of the low-cost rigid insulation options. And, even though it is very cost-effective, it does not compromise thermal performance. In comparison to PIR, a 100 mm thick PIR will give a thermal resistance of 4.54 m2K/W. A PlusTherm EPS of 135 mm thick will achieve the same result while saving up to 50% on cost. #2. Thermal Performance Long story short, EPS provides an excellent thermal performance as a result of its structure. The quality of graphite used for Grey EPS makes it absorb radiant energy effectively, thereby enhancing its thermal conductivity to 0.030 W/mK. #3. Compressive Strength It's remarcable The compression ability of EPS makes it an outstanding construction material for structural fills as well as flooring. EPS comes in various densities which are categorized according to BS EN 13163 standards to fulfill the minimum design strength for each project. #4. Lightweight EPS is made of roughly 98% air and only 2% plastic, and this is light. Lightweight construction materials have an edge over heavier materials in construction. They adapt more to the environment and you can easily move them around. #5. Durability EPS is a durable and permanent material for construction; it is hardly susceptible to insects, bacteria, and fungi. With that said It can last for up to 100 years when you prescribe and install it correctly. Expanded Polystyrene meanwhile is inert - when installed underground, it does not leach into the soil or groundwater. #6. Safe to Use EPS is not dangerous to health, unlike other insulation materials. It is non-toxic, non-irritant, chemically inert, and without odor, making for safe usage across all construction applications. #7. Sustainability Expanded polystyrene is very "Green". EPS Insulation is composed of organic elements – carbon, hydrogen, and oxygen and does not contain chlorofluorocarbons (CFCs) or hydrochlorofluorocarbons (HCFCs). Therefore, EPS has minimal Global Warming Potential and zero Ozone Depletion Potential. It is also 100% recyclable and can be used to create other products. #8. Water-Resistant The closed-cell pattern of EPS makes it resistant to water absorption. Its mechanical and thermal properties are not also influenced by humidity. #9. Easy to Install As a matter of fact EPS is lightweight and thus easy to Install. You do not necessarily need special equipment or skill for EPS insulation, you can always do it yourself.
Installing Insulation EPS
You can install EPS insulation onto your wall using any of these four ways: - Full-surface adhesion - Spot-edge adhesion - Applying adhesive mortar to the EPS insulation board using a machine, or - Applying adhesive mortar to the wall using a machine. Full-Surface Bonding This approach is only feasible for a smooth substrate. - Apply bonding mortar to the full surface. - Use a 15×15 mm toothed trowel for toothing without holding the trowel at too flat an angle. - Trowel off the edges. - Press and align the insulation boards. - Use an emery board to fix the board. You should thoroughly remove bonding mortar between boards' joints immediately to prevent the formation of thermal bridges. Spot-Edge Bonding - Apply an all-around adhesive bid. - Apply 6 adhesive fixing dabs to the board surface. - Press the insulation board onto the wall and fix it using an emery board. Never the less The bonded portion of the board must be at least 40% both on the substrate and the insulation board. - Align the insulation boards. Applying Adhesive Mortar to the EPS Insulation Board Using a Machine - Apply an all-around adhesive bead with an enclosed W. - Press the insulation board onto the wall and fix it using an emery board. The bonded proportion of the board must be at least 40% both on the substrate and the insulation board. - Align the insulation bonds. Applying Adhesive Mortar to the Wall Using a Machine Just like the first method, this method is only used for smooth substrates. - Apply an adhesive board in sinus lines using a maximum spacing of 10 mm to the wall. - Press the insulation board onto the wall and fix it using an emery board. A matter of fact The bonded proportion of the board must be at least 40% both on the substrate and then the insulation board. - Align the insulation boards. You can achieve an adhesive mortar by mixing the dry bonding agent with water to the desired consistency. EPS Insulation Guidelines - The insulation boards must be about. - Always install boards from bottom to top. - The board joints must show a sufficient offset. Where necessary, provide a sufficient offset between the joint of the starter track and the joint of the insulation board of the first board row. - At building corners, the insulation boards should be toothed. - Make sure to align the insulation boards. - Depending on the substrate, win loads, building heights, etc, you should do well with the insulation boards after attaching them.
Leveling Insulation EPS
Leveling your insulation EPS, as a result, makes it smooth and fine, thus revealing the aesthetic properties. Here's how to level your insulation EPS after you've installed it. - Check for the uneven parts in your EPS insulation and shave them off - Apply a base coat of stucco adhesive mixture to the EPS insulation using a trowel. And You may Start applying from down then move upwards to feather get a even finish. - Apply fiberglass mesh - And Apply another layer of adhesive that as a result will healp to cover the mesh Now, you are ready to coat with paint or a stucco finish.
Conclusion
You could follow the above steps for leveling insulation EPS. Read the full article
0 notes
Text
Unique Exterior Stucco Home From Scratch: "Insulating Your External Walls"

If you are considering renovating your home, your exterior walls should be one of the major focuses, they are the first catch of a glance at your home. This, however, involves a series of cautious activities, the first being moisture-proofing; making your wall moisture resistant. Don't Miss out on the process behind it
Unique Exterior Stucco Home From Scratch: Leveling the insulation
This fall Just after this process, it is insulating the wall, which improves the thermal performance of the walls, and generally, improves your building's comfort level. And, one of the recommended materials to work with for insulating your wall is styrofoam.

Aside from being economical and very easy to work with, every inch provides a measure of thickness to strengthen your wall's resistance. This means that you can achieve a high R-value with styrofoam and thus reduce thermal bridging. Here, we will tell you all you should know about insulating your wall.
What is Styrofoam Insulation?

There are different materials such as wool, plywood, that you can use to insulate your exterior walls, but styrofoam is a popular and stronger option. Styrofoam Produce Insulation For the Exterior Wall and such insulation is a traditional form of continuous insulation that provides your exterior wall with thermal efficiency. Styrofoam sheet is made of a rigid foam that is sold in 4×8- or 4×10-footboards. These boards come in different R-values and thicknesses; ranging from 1-inch to 7-1nches, but 1-inch to 3/4 inches are the most common. Basically, styrofoam insulation comes in three forms: expanded polystyrene (EPS), polyisocyanurate (polyiso), and extruded polystyrene (XPS). Polyiso can endure longer in high temperatures because of their cross-linked polymers component. EPS and XPS, in contrast, are non-cross-linked polymers, so they have less resistance with high temperatures. This can vary though, depending on which product you are using. But generally, XPS and polyiso seem to be higher R-value, higher density, and lower permeance than EPS. R-Values Of Styrofoam

The R-value is a measure of an insulation's capability, how much insulation is able to resist heat flow. Typically, insulation with a high R-value has a greater capacity to prevent heat transfer. The R-value of different types of insulation varies, ranging from R-3 to R-15, and depends on various factors. For polyiso, the R-value after installation is around R-9. After about two years, it may reduce to R-8 or R-7. And, this may be as a result of air infiltration. But, styrofoam insulation acts differently, several variables can cause the R-value of styrofoam insulation to change. Normally, 3-inch thick styrofoam insulation will give an R-Value of around R-15. While 3/4 inch thick will achieve an R-Value of around R-3.8. Major Benefits of Insulating Your Walls With Styrofoam Provides Better Insulation One of the major reasons Styrofoam is recommended is that it is more effective for wall insulation. Especially for old walls, styrofoam can provide excellent remodeling and reinforcement. With R-values ranging from 3.6 to 8.0, every inch strengthens your wall better than other materials. Plywood has an R-value of 1.25, and fiberglass, an R-value of 3.14. A higher R-value is an effective control against damages such as rots and molds. This type of insulation is also an active measure against thermal bridging which occurs with more heat-conductive materials, leading to loss of heat. Thermal bridging generally arises when interior insulation cuts across electrical boxes and stud frames. Air Control Insulating with styrofoam can prevent air leaks (act as air barrier) when you seal it with the proper adhesive, using the right technique. It allows air to flow out of the building, while effectively hedging it from penetrating the wall. Moisture Control Styrofoam also further strengthens your moisture-proofing. Since the wood used for moisture-proofing is prone to decay or molds if water touches it, placing layers of styrofoam on the wood will shield the wood from moisture. And, this helps preserve your walls, making them last longer. On the other hand, during the winter, it warms the interior insulation to prevent moisture from storing up from the heated interior air.
How To Insulate Your Exterior Walls
Now, let's guide you step by step into insulating your exterior wall. At this point, you should have done your moisture-proofing and be ready for insulation. You can check Exterior Stucco Home From Scratch: Moisture Proof Stage. To learn more if you are yet to moisture-proof your wall. We will be using a 2-inch XPS insulation for this illustration.
Tips 1
The very first thing you need to do is measure the length and width of your wall and cut out the styrofoam using that measurement. However, if your wall is too long, you may need to cut the styrofoam into bits and place one after another to make it easy to work with.
Tips 2
Then measure the frame of your window and any other immovable objects (power service) on your wall. This is to enable you to make space for them in the foam and achieve a fine fitting. For your windows, measure from the ledger of the bottom to the bottom of the window, mark the measurement on your styrofoam.
Tips 3
Also, measure from the point in the wall where the styrofoam will begin to the edge of the window (do that at both sides). Using the measurements, cut out the foam so that the window frames easily fit into the open space in the foam.
Tips 4 Attach the Foam to the wall
Attach the foam to the wall, ensuring it laps well to the wall, especially at the window and any other place where there is an obstacle. Then fasten a 2-inch nail through the foam into the wall. You can use a longer nail depending on the thickness of your styrofoam. Also, use a nail that has a cap to cover any hole that may result from fastening the nail into the foam.
Make your insulation air and moisture tight
Make your insulation air and moisture tight. You can achieve this using a special "6×8" styrofoam strip to fill up the gap at every edge. This special styrofoam strip has been wrapped with base coat cement and fiberglass mesh to effectively prevent air or moisture penetration.
Use spray foam to fill in the edges
Alternatively, you can use spray foam to fill in those edges. If you are changing your windows, perfect, just pull the windows, add the special styrofoam strip or a wood frame around the opening. The wood or styrofoam strip should be just the same thickness as the foam you are using, then put the window. That way, the window does not project past the styrofoam. Very importantly, also use house wraps or flashing tapes to seal the seams (areas where you joined two styrofoam). To avoid moisture penetration. This is essentially important where the styrofoam insulation is also serving as a drainage plain. The tapes should be strong enough to avoid passage of water at panel joints, risking the life span of the system.
Conclusion
Insulating your wall with styrofoam is one of the easiest insulation methods, hence, you can do it yourself. It does not require specialized equipment, you just need a sharp blade or even your saw, a nail and a hammer to do your installation. However, remember that gaps in styrofoam insulation that results from placing the styrofoam next to the other make it prone to air seepage. Air seepage reduces the effectiveness of the insulation, so you need to follow strict seam-sealing techniques to preserve the R-value of the insulation. Read the full article
0 notes
Text
Unique Exterior Stucco Home From Scratch: "Moisture-Proof and Sealing Stage"

Stucco makes your wall durable and resilient so that it lasts longer. This is as a result of the thorough process involved in installing it.

However, although Stucco is designed to resist the effect of moisture on your wall, little common errors make it prone to water penetration. Moisture in the structure can have serious long-term consequences on Stucco walls. Hence, the moisture-proof stage is vital to strengthen your wall against water penetration. Don't Miss out on the process behind it
Unique Exterior Stucco Home From Scratch: Leveling the insulation
This fall This article will show you the need for moisture-proofing of your structure. Also, you will learn the various approaches to waterproofing Stucco.
Is The Moisture Proof Stage Necessary?

The moisture-proof stage is very vital because the slightest crack or opening in a Stucco wall allows moisture to seep into and get trapped in the material. This can result in rotting, damage, and mold. With this in mind, the moisture-proof stage which you can also refer to as waterproofing Stucco is necessary.
How to Moisture Proof a wall?
Proper waterproofing of Stucco is a three-part process that requires in-depth construction knowledge. There are different ways to waterproof Stucco, they include: #1. Paint the Wall One of the easiest ways to waterproof Stucco is by applying waterproof paint. But, although the easiest, this method is also the riskiest. Any damage to the paint can compromise the Stucco and render it useless. This approach just requires two steps which include: - Clean the wall Clean the Stucco with a soap and water mixture to eliminate dirt and debris. - Paint Wall Apply the waterproof paint directly onto the clean and dry Plywood wall and let it air dry.

#2. Use Stucco Sealant A more durable and reliable method is using a Stucco sealer. Sealants are specially designed to prevent moisture penetration in Stucco. The method of applying a waterproof sealant is the same as painting a Stucco. Simply paint the sealant onto the Stucco and allow it to air dry. However, this method is also not entirely reliable. #3. Use a Waterproof Barrier: Sheathing
The strength of a Stucco lies in its thickness, that's why the layering approach is more preferred than the painting or sealing method. The primary material used for internal construction for most walls is wood, and this makes these walls highly prone to rot and decay. These walls then need to be sufficiently protected against moisture. Another great way to add waterproofing to Stucco is to apply a waterproof barrier before the Stucco, overlapping the walls with layers of the barrier. By doing so you add a layer of waterproof protection. This is how to use a waterproof barrier to moisture-proof Stucco. - Clean the Wall Wipe the wall surface with a towel to get rid of all dirt and debris. - Roll out Barrier You need to roll out the barrier because they come in small rolls with a plastic backing that protects the adhesive surface of the barrier. Work with a roll at a time. Start with the first roll and unroll the barrier with the plastic facing upward. Remove the plastic cover from the back of the barrier so that the adhesive surface of the barrier is visible. - Apply Barrier Take up the barrier and cast the adhesive surface onto the wall and apply. Ensure to press and smooth the barrier against the wall so that it creates a firm adhesion. Repeat this process until the entire wall has been covered with the waterproof barrier. Step 4 -Add Stucco Once you apply the barrier to the wall completely and firmly, you can apply your Stucco directly on top of the barrier. #4. A Drainage Matrix To further strengthen the water-resistant barrier, It’s important to include a system that allows for water drainage. This will prevent moisture from being trapped in the Stucco to avoid spoilage. Also known as an air gap, rainscreen gap, drainage mat, the drainage matrix provides a channel for any water trapped in the structure to drain. It also has an air gap for evaporation. The air allows for moisture to dry up rather than spreading between layers. The drainage matrix together with the weather-resistant barrier serves as an effective design to waterproof Stucco. #5. Flashing Flashing handles water that can enter through the openings in the Stucco wall and store up behind the Stucco. Also, openings around windows. Metal flashing, therefore, is essential for hedging water from penetrating through these openings. You install flashing around all places where doors and windows meet the Stucco to make it watertight. You should use layers of water-resistant barriers on the window sides and beneath the bottom window flanges. To prevent water intrusion into roof and Stucco intersections, kick-out flashing is perfect. You should also use a water-resistant barrier at the top of the Stucco walls. In addition, rain gutters provide a level of protection. Even though flashing is easy to install, if not done properly, it can cause more harm than good. It will cause water to be directed into the cracks instead of away from them. And this improper water channeling can weaken the adhesive that joins the flash to the wall. The disadvantage of flashing is that it may be late before you realize that it was not properly done. You can only detect a flashing that was installed wrongly when the damages from the moisture become visible. But, with a moisture analysis, you can know if your Stucco has an opening that allows water penetration.
How to Check Moisture in Your Stucco Wall

There are different ways to check for moisture in Stucco walls, they include: - Infrared Camera: With the use of an infrared camera you can know if moisture Is trapped in your Stucco wall. However, this method is not reliable because it shows where the Stucco is cooler, and that's no solid proof of moisture In the wall. - Video Scope: Here, you use a small camera to inspect the wall cavity for moisture. Yet, this method has its shortcomings. Most walls are insulated so that you can barely see into them. Also, video scope testing will not detect areas of elevated moisture levels. - Interior Probe Testing: This method is really limited when it comes to moisture content probing. - Exterior Probe Testing: This method is preferred to the others and has been in use over the years. You check for water in the wall by drilling small holes in the Stucco at specific points, then check using a moisture probe. This is not as complicated as other methods, but it gets the job done. Generally, the best way to check moisture is through exterior probing. It offers a more thorough means of investigating moisture content and can access areas that are inaccessible with the interior probing.
Conclusion

Moisture can do great harm to Stucco walls, yet Stucco walls are susceptible to moisture. Hence the need for moisture-proof. However, different types of moisture-proof produce varying results. But using a waterproof barrier, together with a drainage metric and proper metal flashing is sure to produce utmost resilience and durability. Also, it is recommended that you employ the services of a professional, rather than do it yourself. This is because of the complexity of the structure and the essence of waterproofing Stucco. Read the full article
0 notes
Text
Extremely easy Step by step guide to Build a stucco home on a budget

Step by step guide to help you plan or Build a stucco home on a budget. Whether you are in your planning stage or you are in the process I believe this will help you.

Acrylic-Bucket- Sky Stucco Systems Toronto Canada Stucco is among the earliest known materials for building brilliant homes and still receiving attention for positive reasons. Sometimes, when you glance around various communities, you will notice stucco homes have appealingly flawless houses and subtle colors. Stucco houses have interesting advantages, numerous designs, and merits that are sufficient to make your house project more sophisticated. This is just because their wonderful and seamless attraction and subtle hues will grab attention. Therefore, after construction, siding installation, and painting, both the interior and exterior will surely meet your tastes. While enabling your house to breathe, avoid air barriers, and moisture barriers. To become a stucco homeowner while building your home on a budget? Follow the below steps. Steps in Building a Budgeted Stucco Home There are three most important steps you should consider when planning your proposed stucco home with other construction steps. Let's dive in: Step 1 – Set Your Budget. Building just a house is always worth it, in most cases is considered as an investment. One of the things you should do when looking into building a home is to figure out what you can reasonably afford. One good way to do this is to source more funds and set a budget. Step 2 – Set Your Stucco Luxury Generally speaking Getting a stucco design in your budget is most likely feasible, but what luxury means to you will be a priority. Most people do not build a house without changing their minds about their current situation. So ask yourself what you think about your next stucco home. Step 3 – Ask Your Constructor Pick the best brain once you find the builder you want to use. A person who has the experience and probably had done a similar stucco project is better. This can help with some of the decisions. You should be happy when it is all over and let your contractor know your priorities and budget. Contact us now for help Follow the below construction steps to build your dream stucco home. Ground Construction A stucco foundation and erection can be constructed in numerous economical ways, in the form of an aggregate or a mix, and you can use a wide selection of stucco textures, including flat, pebbled, and laced textures. Mostly by signing a series of construction projects that incorporate stucco masonry building materials like coatings, Façade elements, using various building materials to make modern and contemporary residences with: - Brick, - Timber - Concrete block, - Polished concrete - And coating and masonry. Siding Installation For any siding installation, you should make sure there are no obstacles to trip over or barriers to work around, and you should also clean the area well. Getting the Substrate Ready When applying stucco over an existing brick or masonry wall, you must fill any cracks with new mortar and power wash or scrub the wall with disodium phosphate and water solution. Before applying the first coat of stucco, thoroughly wet the wall, then: 1: Place a double layer of construction paper on the wall. 2: Install Trim Accessories 3: Install Galvanized Lath Apply Synthetic Stucco Installation of synthetic stucco is the greatest task to achieve your dream home. Hire professional and certificated stucco contractors and avoid unauthorized contractors who will give present and future problems to you as a homeowner. Whether you're using a two-coat or three-coat system. Undercoats should use the base coat formulation, while topcoats should use a lighter finish coat formulation. The final consistency of the stucco is critical; it should be just moist enough to stay on your trowel without sagging when held sideways, then: 1: Apply the scratch coat 2: Put on the brown coat. 3: Apply the color coat. Apply a Base Coat Paint Use the entire surface of the area you are siding as the base coat. Use as much as a 12-inch-thick coating for complete coverage. Allow the paint to cure for a day, and then apply the final coat using: - Two Coat Stucco layer - Or three coats of stucco layer Settle On the Popouts Popouts are accents that are placed around windows or around corners to give the house a look of depth. Depending on the project and homeowner, there are numerous styles and products to integrate popouts into the owner-builder project. Conduct a Review of Your Contractor Interact with your contractor to learn more about the strategies and tactics they're willing to use. Learn about the benefits and drawbacks of each item before giving it the green light. Add charm The strongest appeal to any home is to add bits of charm that welcome you from the street. Make your home uniquely different from your neighbors by using individualized features. A window box filled with artificial or real flowers, and a unique lighting system would help provide an elegant charm. Completing the Project Give the final touch, like wetting down the walls with a hose is the next step, like cement-based stucco needs to be wet for durability. Only after 3 complete watering on different days, then paint. In this way, other stucco models have a unique final touch. Stucco Home Maintenance Stucco can be simple and inexpensive, but it needs to be taken care of. A proper maintenance culture keeps stucco homes very active. If you don't take care of it, it will wear out quickly, which could result in you having to pay for repairs, and may even reduce the value of your property. To avoid this, ensure you: - eliminate mold - Caulk and seal imperfections - Reduce stucco paint deterioration - Make Repairs As Soon As Possible - Stucco tends to get dirty easily, so keep it clean. - If you apply an elastomeric coating, please do so. - Select the appropriate cleaning product to clean your walls. - Do a visual inspection of the paint for cracking, bubbling, and peeling. - Examine outside walls while they are wet and in other diverse conditions. - Regularly seal it. Before applying stucco to your property, the outer surface should be sealed. Complete your stucco building project with SSS. Sky Stucco Systems is a reputable synthetic stucco installer. For any inquiries? Check-in now. Read the full article
0 notes
Text
Homeowner guide and building permit in Ontario

A Building Permit is your formal permission to begin the construction, demolition, addition, or renovation on your property.

As part of the Building Permit process, Toronto Building staff must review your plans to ensure they comply with the Ontario Building Code, local Zoning By-laws, and other Applicable Law. As the building owner, you are ultimately responsible for complying with all building requirements. Failure to obtain building permits can result in costly construction delays, legal action, and/or the removal of work already completed. The following is a list of common projects that require a building permit. The list is not exhaustive. If you have any questions please contact Toronto Building. - Construct a new building - Construct an addition to an existing building, such as - second or third story additions - attached garages, carports - sunrooms - solariums, porches, decks - Make structural or material alterations, such as - adding or removing walls (i.e., changing room sizes and/or uses) - new windows or doors where there were none before - enlarging or relocating existing windows or doors - enclosing an existing deck, porch or patio of any size - Construct an accessory structure larger than 10 square metres* (108 square feet) in area, such as - Detached Garage - Workshop - Garden shed - Carport - Pool house or cabana - *Note: If you are constructing an accessory structure and it is attached to an existing building and/or has plumbing, regardless of its size, a building permit is required. - Finishing a basement, if the work proposed includes any of the following, - structural or material alterations - installing or modifying the heating and or plumbing systems - excavating and/or constructing foundations - basement underpinning - constructing a basement entrance - adding a second suite - Energy and environmental building improvements, such as - rooftop stormwater retention systems - green roofs - structures used in the support of a wind turbine generator with a rated output of more than 3kW - solar projects such as installation of solar collector systems and solar hot water systems - Construct a deck more than 60 centimeters (24 inches) above ground - Construct a retaining wall more than one metre (3 feet 3 inches) in height provided the retaining wall is on or adjacent to public property (including streets), building entrances, and on private property accessible to the public - Constructing a tent that - covers more than 60 metres squared (646 square feet); and/or - is attached to a building; and/or - is within 3 metres (9 feet 10 inches) from another structure. - Demolish or remove all, or a portion of a building - Install or reconstruct a chimney or fireplace - Install a wood burning stove or fireplace - Install or modify heating and or plumbing systems - Install a backwater valve - Install a backflow prevention device - Change a building’s use (i.e. from residential to office or single dwelling unit house to multi-dwelling unit house). Even if no construction is proposed, if a change of use is proposed a building permit is required. For a detailed list of the process from start to finish can be found at Forever Homes Building a Home resource Specifically, a permit is required when you are: - Building a new structure that is larger than ten metres squared (108 square feet). - Building any addition to an existing structure. - Renovating, including alterations that affect your building’s compliance with building regulations (known as Material Alteration*). - Demolishing all, or part of, a building. - Installing new, or altering existing, mechanical or plumbing systems. *Material Alteration refers to alterations that will affect your project’s compliance with building regulations. For example, if a project involves alterations to the structural design of the building; mechanical, electrical, plumbing services; fire separations; and existing fire protection systems; and/or a change to the use of a building.
Work that requires a building permit:
Generally, all of the following work requires a building permit before beginning construction: • Carport/attached garage • Interior renovations including • basement finishes • accessory apartments or the addition of a second suite • new or altered plumbing or mechanical system • Window/door (if a new opening is created or existing opening is enlarged) • Drain repair • Green roof • Chimney/fireplace (other than direct vent gas fireplace) • Recladding with brick or stone veneer • An addition • Backwater valve installation • Exterior basement stairwell or entrance • Pool fence enclosure • Deck/porch/balcony (if the deck is more than 60 centimeters (24 inches) above the ground) • Accessory structure (if greater than ten square meters, such as a garage) Examples of when a permit is not required can be found online at www.toronto.ca/building-permit-required
The following are examples of work that do not require a building permit and are not subject to the provisions of the building code.
However, please note that this list is not exhaustive and judgment should be used depending on the situation and circumstances associated with the project. Even if a building permit is not required, compliance with the Zoning Bylaw is required. - An uncovered platform (e.g. deck) provided: - its finished deck level is not more than 60 cm (24 inches) above the adjacent finished grade; and/or - it does not form part of an exit required under the building code; and - complies with the Zoning Bylaw. - Installing a skylight in an existing building provided: - the building is a house or small building (3 stories or less) and - the installation does not require the removal of more than one rafter, joist, or another similar structural member (with the exception of a truss); - Re-cladding of a house or small building (3 stories or less) with non-combustible material other than brick or stone veneer; - Adding or replacing insulation; - The replacement of windows or doors provided: - there is no change in the location or size of the window and/or door; - the structural support for the opening (i.e. lintel) is not affected; and - a new exit is not created; - Replacing a furnace or boiler in a house; - The installation of additional cooling systems, gas fireplaces, air cleaners, in-line humidifiers, or hot water tanks in a house; - Repairing and replacing plumbing fixtures; - Replacing existing roofing material provided no structural work is required; - Finishing a basement of a house, if: - the work does not include structural or material alterations; - no additional dwelling unit(s) is (are) created (i.e. a second unit); and - the work does not include the installation of new plumbing; - Undertaking waterproofing repairs to a basement; - Installation of cabinetry and millwork. - Plastic Sheet Covered Accessory Structures (i.e. snow canopies, driveway tents, automotive canopy) do not require a building permit if installed on or after October 15th and are removed on or before April 15th. Compliance with the Zoning Bylaw is required. - Constructing a retaining wall that is on private property, not accessible to the public and/or where the height is less than 1 metre in height at any location. - A building permit is not required to install a sump pump. Note this guide is not the official guide, its reference from Toronto building permit. As a homeowner or builder, we highly recommend to visit the city website to confirm the information above. Resources: PDF guide City website Request a permit https://www.toronto.ca/wp-content/uploads/2017/11/9273-Building-Permit-Guide-WEB.pdf #skystucco, #Exteriorstuccocontractor, #exterior home, #homeimprovement, #homebuilding, #cityoftoronto @skystucco Read the full article
0 notes
Text
Let's talk about the Flexibility And Aesthetic Of the Toronto EIFS Exterior Insulated Finish System In Action In 2021

Generally speaking For most homeowners and builders, the exterior cladding is very important and for a reason. Now a day the options you choose to protect your home from the elements it's a key choice.

Depending on the Cladding and the insulation you used to improve your homes’ energy efficiency and thermal performance are different building aspects. However, there are systems that have been there for ages which in the latest days have been improved to best performance and durability for example combining a unique exterior cladding to work as both an exterior Cladding and home insulation. Toronto Exterior insulation finish systems (EIFS) in action in 2021 it comes to innovative exterior finish systems. However, the increased focus on boosting home insulation as part of a broader strategy to lower household energy use has brought this product back into the spotlight. Below, we look at the advantages that come with using EIFS for your home. However, the Flexibility and aesthetic of “Toronto” Exterior Insulation Finish Systems (EIFS) offer continuous insulation by design. These values allow architects the design flexibility and aesthetics they require, while helping to meet the new energy codes. EIFS are continuous insulation. See the design flexibility and aesthetics of EIFS in real life.


By focusing on customers, we have established the reputation by exceeding the customer’s expectations. Our experts and dedicated work have allowed us to earn the customer’s long-standing trust and respect. The flexibility and aesthetic of Toronto EIFS provide the most advanced stucco and EIFS (Exterior Insulated Finish Systems), professional exterior wall cladding service to any restoration and construction projects. Our expertise with our professional experienced staff is available to assist you to select the most effective wall cladding solutions and offers a wide range of services to suit any design specifications.

What are “Toronto” Exterior Insulation Finish Systems (EIFS)? PUCC, exterior insulation finish systems are both insulation and siding. This definition might bring to mind a home exterior coated in bright pink fiberglass insulation made to look like a cotton candy house you might find at the local fair. However, homes with EIFS can benefit from an unlimited spectrum of colors, textures, and designs. The exterior insulation finish systems comprise some rigid insulation boards placed on the wall sheathing’s exterior. Exterior insulation finish systems work with several substrates. Installers covered that rigid polystyrene insulation board with a thin coating of a changed cement base coat, fiberglass reinforcement, and a textured, colored finish coat chosen by the homeowner. Today, architects and builders looking to offer continuous insulation for homes built in areas with strict energy codes or homes looking to attain specific green building certifications. Some of them are LEED preferred the “Toronto” EIFS Exterior Insulated Finish System in action in 2021. Exterior Insulated Finish Systems are non-load-bearing and exterior wall cladding systems made up of an insulation board fastened either or to the substrate. They then applied a reinforced base coat over the insulation board before a textured protective finish coat is applied. We know the vast majority of exterior insulation finish systems used by home builders as “EIFS with Drainage.” As we will discuss below, the traditional EIFS Exterior Insulated Finish System had problems with moisture accumulation and leakage. EIFS with drainage, which is the predominant method used by builders and architects today, incorporates specific safeguards to reduce moisture before it enters the wall cavity. See the plan flexibility and aesthetics of EIFS in real life. EIFS are sustainable, durable, and resilient. Impact-resistant EIFS Exterior Insulation Finish Systems are achievable using industry-standard application practices and products that are very effective and economical. The keys to high impact resistant Exterior Insulation Finish Systems are the same as for any quality construction: good design, firm and definitive specifications, use of the proper products, and proper construction. Flexibility and efficiency

How Do Flexibility and aesthetic of “Toronto” Exterior Insulation Finish Systems (EIFS) Save Energy in action in 2021? EIFS are unique because they are the best exterior cladding system for offering thermal control and improved energy efficiency to the home. EIFS is a fundamental aspect of continuous insulation systems. Insulation offers constant protection across all structural members of the house. This insulation alternative aims to eliminate all thermal bridges in the structure, except for fasteners and service openings. EIFS is the best performing cladding to provide thermal and moisture protection. EIFS with drainage allows homeowners to maximize their energy savings, reducing their household carbon footprint and the home’s environmental impact. Besides offering continuous insulation around the exterior of the house, these exterior cladding systems can also improve the airtightness of the building envelope - one of the most critical elements of energy-efficient home construction. Take a look through the exhaustive best list of EIFS benefits. EIFS offers a pathway to improve your home’s energy efficiency and thermal performance with no negative health consequences when installed. However, improper installation techniques and older variations of EIFS that did not include specific drainage systems have been shown to lead to serious mold growth. As water and moisture accumulate against the sheathing of your home, mold growth is likely, especially for wood sheathing. Besides leaching allergens into your home, this mold growth can also decay your structure leading to expensive repairs. Homes with barrier Exterior insulation finish systems in action in 2021 are “prone to moisture intrusion problems even when constructed according to industry standards. Unlike other cladding types, the design of barrier EIFS does not allow the draining of water that gets behind the system, either through building components (openings in the building envelope for doors, windows, etc.) Or when sealants break down or crack. Depending upon the climate and the wall assembly’s overall make-up, the wall may not dry out. Sustained elevated levels of moisture without adequate drying will cause rot or decay to sheathe and framing. To be presice In addition to the fact that EIFS come in boundless shadings and a wide assortment of surfaces, however, they can likewise be formed into basically any shape or design. If it's not too much trouble, spend some time in this Project Galleries and investigate some fantastic EIFS Projects! Benefits Of “Toronto” Exterior Insulation Finish Systems

For homeowners wanting to tighten up their building envelope and increase the R-value of their home’s insulation, EIFS are great options. Besides increasing the home’s energy efficiency and thermal performance, EIFS is also one of the cheaper exterior cladding options. They come in a wide variety of finishes allowing you to customize the exterior flexibility and aesthetic of your home. EIFS that do not incorporate drainage systems is prone to moisture accumulation and mold growth on the downside. We can say There are also environmental concerns related to proper disposal and recycling of the polystyrene insulation boards, if that type is chosen, at the end of their lifetime. General Speaking The flexibility and aesthetic of the “Toronto” EIFS Exterior Insulated Finish System in action in 2021 is one of the most highly tested and well-researched building cladding systems in the building industry. It provides many advantages as exterior cladding for commercial and residential construction. So the next time you see a new or attractive building, you’ll be able to recognize the EIFS Exterior Insulated Finish System exterior and understand why it looks the way it does. Read the full article
0 notes
Photo

#skystucco Exterior stucco systems in Toronto GTA Http://Skystuccosystems.ca #homeimprovement #homerenovation #renovationtoronto https://www.instagram.com/p/CSaxL3QjZN2/?utm_medium=tumblr
0 notes
Photo

Did you know that Exterior stucco, the beauty and design that can be achieve is limitless. Victorian style Contemporary and all the way Modern style. Stucco may be the right choice for you, learn more... https://skystuccosystems.ca/latest-exterior-stucco-projects-added/ @skystucco #skystucco #exteriorstucco #homedecor #homeimprovement #stuccohouse #stuccohomes #torontoconstruction #skystuccosystems (at Etobicoke) https://www.instagram.com/p/CSPvL9YL677/?utm_medium=tumblr
#skystucco#exteriorstucco#homedecor#homeimprovement#stuccohouse#stuccohomes#torontoconstruction#skystuccosystems
0 notes
Text
Why High-Ends Homes in Toronto Ontario choose EIFS Stucco.

Are you preparing yourself to have some exterior renovations or finishing on your old or new high-end home? Wondering why the people of Ontario go for stucco? Let us find out, shall we? Stucco has traditionally been the popular exterior wall system in Canada for 17 years. Aside from adding character to the home can give it a very sophisticated look, especially when it is merged with bricks. Stucco might not be your first pick for the best finishing on a high-end home since it has been worn with the age-old the perception that it crumbles and topples over a few years. That is without a doubt very untrue and quite the opposite if you ask the people of Ontario today. Since it is so durable and reliable, more house owners and real estate developers opt for stucco instead of other high-end conventional materials such as planks, wood, or stones. ELEVATE YOUR DESIGN

Stucco can transform your exterior into a stunning tower, making it the talk of the town for some time to come. Stucco can use it to enhance the general aesthetics of your home while still preserving its exterior. So many customs and extricate designs can be created with stucco. They can blend with existing unique and sophisticated Architectural designs such as accent mouldings, arches, stone works, and accent mouldings. Enhance the appeal and worth of your home with durable and stylish finishes and a distinctive look. One of the critical things that are so attractive about stucco is its incredible versatility. As an excellent material that stucco can finish in an endless stream of colours, textures, and shapes, many architects can use these qualities to create unique and mouth dropping buildings. Stucco made of natural lime and ground marbles gives your buildings a very polished look. It is the only plaster that can adequately create faux marble finishes to give your building that regal elegance and glow. Its additional long-lasting durability ensures that your high-end home stands tall and proud for many years to come. ADDED BONUSES Many homeowners in Ontario choose stucco finishes for their very distinct look and numerous benefits. Stucco is currently one of the most common exterior finishes, and here is why: 1. Durability Stucco is currently one of the most durable siding choices on the market. If applied and appropriately maintained., stucco can last over fifty years with a bit of care. This is because stucco contracts and expands as the temperature changes, significantly reducing the risk of crumbling and cracking. 2. Aesthetics The layer application creates a heavily textured surface. This makes it ideal for modern homes. The homeowners with different aesthetics tastes can also appreciate the range of textural options such as coarse, raked, smooth, swirled and pebbled. You can choose whichever application best compliment the style of your home. Since contractors apply stucco seamlessly, it accents the home's architecture and other exterior elements, making it the best choice for traditional, modern and edgy homes. 3. Best Value Stucco provides a beautiful concrete shell around your home the moment it is dry. This complex, durable exterior has excellent curb appeal and characteristics such as earthquake resistance, energy-efficient, fire-resistant, low maintenance, rot resistance and even sound dampening. These also reek up the cost of your home should in case you want to sell. 4. Versatility In case you find yourself renovating an existing house, then stucco is an obvious choice. This is since contractors can apply stucco over concrete masonry or the frames of their wood. In addition to the visual options, the versatile application makes stucco the best choice for homes of different styles. Whether you are building a new home or looking to renovate an existing one, a stucco finish is a wise choice. Talk to your builders in Ontario and get started. 5. Fast Set-Up Siding is one of the most significant home renovations you could take on. Fortunately, if you choose stucco siding, the whole process is cut by half. Most of the applications take between one and three days, and that also includes drying time. This goes a long way to minimise the disruption to your home routines during the renovation process. 6. No Decay The moment your contractor makes sure all checks on the waterproofing process is optimum. Stucco becomes impervious to almost all kinds of decay. These comprise mildew, mould, rot. Unlike other finishing, with the appropriate installation, stucco also does not flake or crumble over time. This makes it best for moist and humid climates where other finishes often succumb to rot after only a few years. Try your best to incorporate stucco today, and you will not regret it. 7. ABC of Maintenance Stucco requires little or no maintenance, even in extreme climates. In warmer areas, homeowners may not need to perform any type of maintenance except for the occasional washing to remove spots or stains. However, in wetter climates, the homeowner needs to clear as much snow or rain away from the walls as possible since it dampens them. Stucco allows for repainting giving your home a new look every holiday. 8. Great Home Efficiency Stucco finishing can also save you a lot of money and drastically cut energy bills by half. Stucco has high insulation efficiency; this makes it easier to maintain the temperature you want in the home than a home without stucco finishing. This is possible no matter the weather condition. Stucco reduces your heating bills in the winter by drastically reducing heat transfer through the walls of your home. 9. Best Home Insurance Premiums If you are ever ready to sell your stucco home, rest assured that you are living in a gold mine. Stuccos' outstanding characteristics benefit you when you sell because these homes can better withstand natural disasters like fires and earthquakes. They last longer and cost way less to maintain other than homes that do not have stucco in them. 10. Endless Options Typically, your contractor and manufacturer partnerships determine the range of your colour pigments. Stucco redefines those odds since the contractor can mix those pigments directly in the solution, giving you the chance to pick the perfect custom shade for your home. While stucco does not require repainting over a long period, you can still do that if you want to. Even though some people will argue that synthetic finishers are better than traditional ones, the winner emerges with age. Stucco is that winner. START TODAY Stucco enhances your home or businesses exterior design. Housing a wide range of advantages, it is by far the best pick for your high-end homes’ exterior décor. With great design options to choose from, it is pretty evident that stucco is indeed the pride of Ontario. Read the full article
0 notes
Text
101 Exterior Caulking guide for stucco

101 Exterior Caulking guide for stucco
before jumping to the concept is very important to know that Exterior window silicon and Exterior Caulkin is used pretty much for the same purpose but totally different product which will have a different result.

Exterior caulk is a thick, viscous solution in a long tube and is applied with a caulking gun. It is built to seal seams in windows, doors, siding, brick, gutters, roofing tiles, and concrete to ensure that your home remains waterproof. Exterior caulks are simple to use and an inexpensive, great option to fix various breaks and cracks around the exterior of your home. There are many caulking choices out there these days, and knowing which one to choose for stucco is half the battle. It is an effortless choice, though, when it comes down to which Caulking you can try, and the other concern is which type of Caulking for applying stucco. Each of them has different elements, which makes them suitable for various projects. An Acrylic Base Caulking:

Caulking with an acrylic base is better suited for applications required on the finish coat because it is simpler to work with and blends into the stucco finish handily, using the correct methods and tools. A Polyurethane Based Caulking. Polyurethane-based Caulking is suitable for sealing up areas on the lath portion of the stucco process. Areas like doors, windows, where lath meets wood, etc., are better suited with a polyurethane-based caulk as seen on Sure Seal Services Polyurethane delivers a better seal and is more watertight. The polyurethane also bonds very well to most materials without any adverse effects. Still, it is much thicker and more challenging to work with, so it is not recommended to blend into the finish. It is sometimes used for deeper, larger cracks as a filler and sealer, and then new Caulking is used on top to mix the finish in. Silicon caulking

Silicone is not recommended because it is hard to work with, and cleanup is a much more complex process. It doesn't stick to materials like polyurethane will, and it will not work well to mix into the stucco finish. Now, silicone caulking will work, and I have noticed people use it. Still, it is less helpful than polyurethane and average in comparison. Rubberized Caulking Rubberized Caulking does have its goal and can come in handy now and then. The material used for rubberized Caulking sticks to the stucco paper so well. It is generally used on areas that will see more water than usual. Now that you know all these options, let's talk about how to apply them properly. Application We will talk about the different choices here as each of them have its own rules. - Guide to Using Acrylic Latex Caulks & Sealants.

The most economical and most used caulking compound in residential work, acrylic latex Caulks, is in various formulations and prices. To their credit, latex Caulks are easy to apply, access tools, and cleaned before curing with water. They bond relatively well to a broad mixture of materials and have a long tooling period. When cured, they are paintable, making acrylic latex outstanding for Caulking paintable trim in the interior and exterior. Lower-end acrylic latex caulks is not having the same flexibility, temperature span, and long-term durability as polyurethane or silicone. Newer premium products promise performance on average with some of the high-performance sealants. Added plasticizers make the material flexible, and other additives deliver better UV and water resistance. For exterior work in joints subject to movement, look for an ASTM C920 rating and a rated common sign of +/1 25%. Most latex caulks cannot be assigned under 40°F and should not be enabled to freeze in the tube or place before cured. Also, don't apply to wet surfaces or where rain is likely to fall before the caulk has a chance to heal fully. - Guide to Using Polyurethane Caulks & Sealants on Building Exteriors. Polyurethane is a water-resistant, versatile, high-performance sealant and has become the first option for many exterior work contractors. Polyurethanes deliver excellent adhesion to a wide range of materials from masonry to wood stay flexible across a broad temperature range. Also, they are relatively simple to the tool, and some brands accept wet tooling with soapy water. Tooling time is adequate and shrinkage minimal. Polyurethane's only problem is available in a few colors, but the cured sealant holds paint well. Although polyurethane is not naturally UV-resistant, UV inhibitors give it good durability in exterior applications. Because of their aggressive bonds, polyurethanes are suitable for sealing between different materials. Polyurethanes are widely used on metal roofs, concrete and masonry control joints, flashing, and exterior trim. This is all you need to know about Caulking, and it's an option for now; if you would like us to talk about other applications, you can comment under the comments section below. Read the full article
0 notes
Text
10 Ultimate List Of EIFS Stucco Failures, What to Expect, And How To Solve Them

Synthetic Stucco, also commonly known by the acronym “EIFS,” which stands for exterior insulation and finish systems, was first used to manufacture homes in Europe in the early 1960s. EIFS benefited the Europeans for this reason. EIFS delivered excellent insulation and weather protection, and it was installed correctly on European houses, which favor the masonry walls to which the EIFS is fixed adequately. In our part of the world, North America - Canada, we tend to use wood or gypsum, which must have a sound moisture barrier for proper installation. Practically, poor workmanship, impact damage, building movement, and incompatible or unsound substrate are part of the significant mistakes of EIFS stucco failures. EIFS Industry Members Association Says: Reputable distributors don't sell to the public because EIFS should be installed by a trained professional, not an unskilled homeowner. EIFS is not a do-it-yourself product. Homeowners who have tried to do it on their own have ended up with problems like leaks and holes or worse. This situation has led to a flurry of class-action lawsuits; homeowners who've done their installation end up suing manufacturers, distributors, builders, and any number of people who have participated in the EIFS process. Sometimes building codes disallow the use of EIFS, but residential projects generally have looser standards, making them more vulnerable to EIFS glitches. It may be because of these disadvantages that make it popular these days. Read the full article
0 notes
Text
TOP 6 STUCCO FAILURE WARNING SIGNS

Stucco failure is an all-too-common problem in Ontario, where over the past 15 years over 70% of stucco installations have been defective. An unsightly and dangerous issue, the moisture intrusion that results from failed stucco can lead to extensive damage and rot. If you’re worried about stucco failure in your home, it’s crucial to diagnose and solve any problems as quickly as possible. This can be hard to diagnose without invasive or destructive testing, but there are several stucco failure warning signs that concerned homeowners should keep an eye out for. 6 STUCCO FAILURE QUESTIONS HOMEOWNERS SHOULD ASK These are the questions a stucco inspector will seek to answer in order to tell if you have bad stucco. Homeowners who are worried about stucco home problems should ask themselves these questions, too. Have there been any leaks in the stucco siding? Thinking about all the years you’ve lived in your home, whether it’s been 2 years or 20. Has there ever been a leak? If so, was the issue plumbing-related? If not, chances are good that the leak was caused by a deficiency in your home’s exterior. Consider any leaks that have occurred in your stucco siding and start there. Is the home’s caulking missing or aged? one thing to keep in mind is to Inspect the interior trim of your home’s windows and doors. Look for missing or aged caulking around the trim. There should be sealant around the entire perimeter of the window and door opening. Read the full article
0 notes