
I wanted to be a model once I was little. I loved photography, and that I loved being on camera. But I used to be short and chubby, so I could not. Anyway, being an artist is much more interesting than simply being a model because it's about you and what you would like to be. you are not being treated sort of coat hanger.
Don't wanna be here? Send us removal request.
Statistics
We looked inside some of the posts by smallzilla and here's what we found interesting.
Average Info
Notes Per Post
6
Likes Per Post
6
Reblog Per Post
0
Reply Per Post
0
Time Between Posts
8 hours
Number of Posts By Type
Text
16
Last Seen Tumblr Blogs


Fun Fact
In 2020, 44% of users from Denmark used Tumblr daily.
Text
The World’s most underrated Travel Destinations for Photographers

There are certain places within the world that you simply must see a minimum of once in your life. These frequently trotted destinations hold unique experiences quintessential to learning about humankind’s history and culture. For this reason, places like Rome or Paris usually find yourself at the very top of everyone’s bucket list.
There’s nothing wrong with having these places at the highest of your list, but the planet is massive and there are many ones among a sort of experiences to be had in countries that you simply won't have even considered yet.
Experiences like seeing the spice market in Istanbul for the primary time, skinny dipping into crystal clear waters of Coron, or seeing Cloud Forest in Singapore should definitely be at the highest of your list.
Keep reading to find out about a number of the foremost underrated destinations around the world!
TRAVEL RECOMMENDATIONS: The best thanks to finding cheap flights – Skyscanner compares prices from all of the main airlines and can find the most cost-effective available flight for the dates you’re trying to find.
Ensure your stuff – If you travel with any quite valuable items (Camera gear, laptops, jewelry, collectibles), you would like to urge travel insurance. You never know what can happen and you are doing NOT want to attend before it’s too late. World Nomads is the premier insurance firm to insure short-term and future travelers against theft or natural disasters.
PHILIPPINES I wish I could fit all of the Philippine’s highlights during a simple bullet list but I found it nearly impossible. Which is why the Philipines is favorite on my top 10 bucket list destinations list.
The Philippines may be a remarkable country made from quite 7,000 islands. it's rustic with a fast-growing population and features a whole array of natural elements to deal with. Many travelers head straight to Japan, India, or Indonesia, leaving Philipines’s underrated offerings gloriously pristine.
BOLIVIA From the glittering salt pan of Salar de Uyuni to an unspoiled swathe of the Amazon jungle, Bolivia truly packs a punch when it involves natural wonders.
One of South America’s least-visited countries, Bolivia’s raw aesthetic beauty remains completely untouched by the hands of the tourist industry and is strictly why you ought to add it to your bucket list.
A big learning experience one gets from traveling is an insight into how our ancestors lived. Bolivia’s history dates back thousands of years which makes the country a portal into how ancient South Americans lived before capitalism and industrialization.
SRI LANKA Sri Lanka holds beauty beyond anything I even have ever seen. Perfect for travelers looking to experience something truly unique. From postcard-worthy beaches are refreshingly pristine, lapped by the Indian Ocean to its misty jungles brim with colorful wildlife, there are many adventures to be had on this island off the coast of India.
SOUTH KOREA If I’m being brutally honest, South Korea was never on the list of things I might do while traveling Asia. The more I study the country, however, I find that South Korea may be a treasure trove of incredible experiences that are truly unique and excluding it from your bucket list could be a grave disservice to you.
South Korea may be a country of delicious food, ancient temples, quirky K-Pop, breathtaking landscapes, friendly people, zany festivals, and much, much more.
Check out Blind Alley, a restaurant where you'll spend an hour or two twiddling with well-fed raccoons. Don’t believe me? Watch this video. Trick Eye Museum – holds a set of two-dimensional images that appear to exist in three-dimensions. it's as interesting because it sounds and prices a visit. Glass castle amusement park – beautiful 200 piece collection of glass art surrounding a castle
JORDAN Known as the jewel of the center East, Jordan remains calm despite being surrounded on all sides by chaos and unrest. The Jordanians I even have met during my travels are a number of the nicest people I even have met in life. Home to great food and epic hiking, Jordan is that the perfect destination for travelers new the center east.
Petra, Jordan – ancient city dig orange rock bed. Dead sea – famous for its salt waters where visitors can float. Wadi Rum – perfect excursion for hikers. Sleep during a Bedouin camp – camp within the middle of Wadi Rum in yurts made out of wool. Enjoy fun camel rides, campfire meals cooked within the earth, and sunset camel rides.
CHINA China seems to butt heads with many nations within the news, but the country itself isn't as bad and chaotic because the media portrays it to be.
It’s home to 1.4 billion people making China the most important country per capita within the world. China may be a laboratory for macro-economic theory on how the planet goes to be handling impending overpopulation. Truly a stimulating place!
SINGAPORE Asia for beginners. Known worldwide because of the premier financial trade center for Asia, Singapore has experienced tremendous financial growth in recent years. The tourism industry is booming in Singapore may be a treasure-trove of cool experiences.
Garden by the Bay and Marina Bay Sands is stunning in the dark Cloud Forest Singapore Botanic Gardens – Singapore’s largest green spaces, complete with the world’s most extensive orchid garden. Home to lush vegetation, well-tended lawns, themed gardens and tranquil lakes. Asian Civilizations Museum Take an evening safari Singapore zoo is one of the highest-rated zoos within the world.
TURKEY The most common city many tourists visit while getting to Turkey is Istanbul. quite just like Europe, this city is filled with high energy and it's true that Istanbul never sleeps.
Turkey is my favorite country within the world, and there are many places in Turkey that you simply don’t want to miss out on. thanks to the title of being a ‘middle eastern country,’ many tourists overlook this place while planning their trips abroad. It’s sad.
Visit Moda, Kadikoy, Karikoy & Beyoglu while you’re in Istanbul Cappadocia – known for its “fairy chimneys,” tall, cone-shaped rock formations. Amongst these formations are homes carved into valley walls dating back to the Bronze Age. Definitely take a ride during a hot air balloon while you’re there. Cesme, Izmir – a gorgeous town known for its fantastic food and turquoise waters.
4 notes
·
View notes
Text
How to Shoot Magical Winter Pictures
Snow portraits are difficult to require due to harsh weather and other factors. These are usually belongings you don’t even believe within the warmer months.
To make your winter portrait photography shoot a hit, you ought to remember a couple of technical and artistic tips.
Once you’re prepared, you’ll be ready to take magical photos even when the weather isn’t ideal.
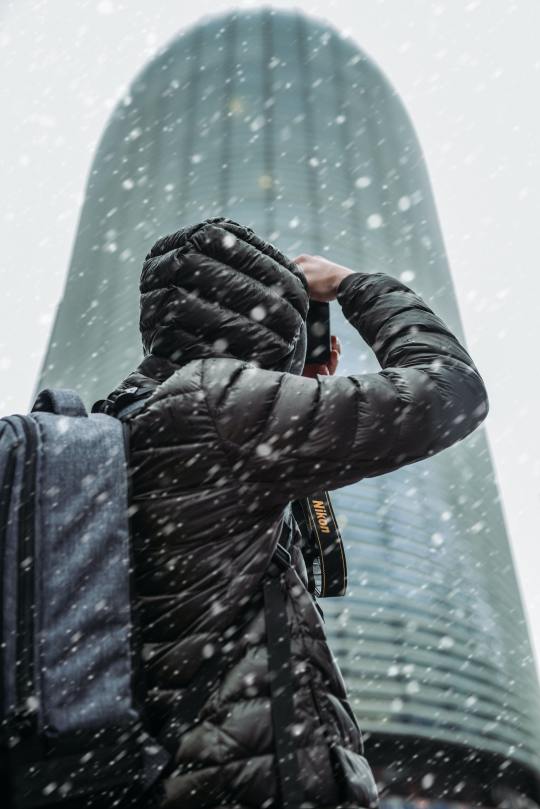
Keep Your Gear Safe in the least Costs! A close from a Nikon camera around the neck of a photographer, shooting snow portraits I don’t recommend taking photos when it’s freezing outside. Extreme weather can damage your equipment and harm your body. Without a functioning camera or warm fingers, you won’t be ready to specialize in the creation of your shoot.
To avoid this, you'll use the subsequent things:
Special winter gloves for photographers A cleaning cloth for your lens A bag or towel for your camera and tripod. Also, confirm you've got an outsized camera bag. you'll keep your batteries, memory cards, and other tools warm inside it.
Most batteries lose power when they’re exposed to cold temperatures. confirm you bring tons of spare ones with you.
Stay Cozy to Avoid Discomfort
A warm cup of coffee or cocoa can make all the difference during a busy winter shoot. This is one of the foremost important belongings you can neutralize the winter. Wear an outfit that provides you adequate room to use your arms. The easier you are feeling, the better it'll be to offer instructions to your model.
Don’t forget to bring snacks and a thermos to your shoot. this may make your model feel reception and provides you an honest reason to require more breaks.
Make Sure There’s Shelter Nearby to Avoid Danger Atmospheric winter portrait of a female model posing on a bench within the falling snow There are many photo opportunities publicly places. Don’t overlook a location simply because it’s popular. Safety is vital during a winter portrait shoot. A location with tons of snow could be crammed with dangerous pits. confirm you're taking photos in risk-free places. These are often parks, gardens, and ice rinks.
If you propose to require photos during a remote location, leave when the weather is favorable. the larger your team, the safer you and your model will feel in unfamiliar places.
Use an outsized Aperture to Blur Your Backgrounds Close up winter portrait photography of a female model posing within the falling snow
A large aperture will separate your model from their surroundings. The softer the background, the more magical your portraits will look.
Examples of large apertures are f/1.2 and f/2.0. The smaller the amount, the narrower your depth of field. and therefore the dreamier your photos will look.
If you discover it difficult to use manual focus due to all the blur, don’t hesitate to modify to autofocus.
Use Burst Mode to form Your Portraits More Exciting Close up winter portrait photography of a female model posing playfully within the falling snow Make sure the background is dark to emphasize the snow. Some of the foremost magical snow portraits feature falling snow. It can get difficult to use your camera when it’s snowing, though.
You can re-create falling snow by having your model blow it out of their hands. (The fluffier the snow, the better it'll be to blow it out.) To capture all the small print, shoot in burst mode.
In this case, having an outsized aperture won't work to your advantage. Use an outsized f-number, like f/3.5, to form sure that both your subject and therefore the snow is focused.
Pay Attention to Your Exposure to Avoid Overexposing Your Photos Close up winter portrait photography of a female model posing within the falling snow If your results find yourself a touch underexposed, you'll fix them in your editing program. Bright snow will make your model’s face stand out and make flattering, atmospheric lighting. If you don’t use the proper exposure, it'll blow out your highlights and appearance unflattering.
To avoid overexposing your photos, take a couple of test photos at the start of your shoot. Don’t use Auto mode.
To preserve the maximum amount of image data as possible, shoot in RAW mode. this may make sure that you’ll be ready to fix photography lighting mistakes without ruining your photo’s quality.
Stay Away from Distracting Backgrounds Close up winter portrait photography of a few posing within the falling snow
Having to specialize in falling snow, staying warm, and giving your model instructions can make it difficult to concentrate on compositions and backgrounds.
For the simplest results, confirm your model isn’t surrounded by distracting objects like branches or signs.
Stay away from stores and busy streets. These will ruin your compositions.
Make Sure You and Your Model Are on an equivalent Page Before Your Shoot A female model asking for a winter portrait
Winter photoshoots are a touch tougher than other portrait shoots. you would like to be extra prepared before you leave. This includes brainstorming together with your model.
Before your shoot, make an inventory of concepts and concepts that you’d wish to re-create. Ask your model for feedback.
If possible, provide them with a mood board so that they have a far better idea of your vision.
If you and your model are on an equivalent page, you’ll be ready to collaborate without feeling awkward or confused.
Have Your Subjects Wear Better Outfits Underneath Their Jackets Fun winter portrait of a male model posing casually under falling snow Make sure your model puts something warm on after you're taking photos of them. Puffy jackets might look unflattering in some portraits. Your model can wear something less appropriate for the weather. this will be a suit. Just confirm they don’t stand call at the cold for too long.
If the weather is mild, this will be an excellent thanks to taking unusual winter portraits without getting sick!
Use a spread of Props Throughout Your Shoot Atmosphere winter portrait of a female model posing with sparklers under falling snow in the dark To avoid taking dull winter portraits, include bright, colorful subjects in your photos. The best snow portraits feature quite just winter outfits and flattering poses.
To make your photos stand out, use vibrant props like sparklers and fairy lights. These will add a lift of color to the winter atmosphere. And they’ll make your model’s face stand out even more.
Some props can only be used when it’s not snowing. If you would like to feature more texture to the photos you're taking on those days, you'll create fake snow in your editing program.
Take Photos When It’s Sunny for phenomenal Portraits Atmosphere winter portrait of a model walking down a road under falling snow When it’s sunny and snowy at an equivalent time, take as many photos as possible! the daylight will illuminate the falling snow and make gorgeous bokeh. Winter is understood for being moody and dull. Photos taken on a dark day won’t always assist you to achieve the magical look you’re going for.
If possible, take photos when it’s sunny outside. Even a touch of sunlight will make your photos glow.
Shoot within the Dark to make Moody Portraits Atmosphere winter portrait of a female model posing under falling snow in the dark
An alternative to warm and glowing portraits is artificial light. one of the simplest ways to emphasize falling snow is to light it employing a bright light. Photograph it ahead of a dark background.
You can take photos just like the one above in any park with street lamps. you'll also use a torch to form the snow stand out.
Take Action Shots to enhance Your Sports Photography Skills Atmospheric sports photography shot of a female snowboarder posing in action - winter portrait photography
Sports photography can assist you to take outstanding photos of your model.
All the action will create impressive textures. And it’ll challenge you to form the foremost of your camera within a brief period of your time.
Or Take Simple Photos of Your Sporty Subject Atmospheric snow portraits of a female snowboarder posing during a winter landscape You can take an opportunity from an action-packed photoshoot to require atmospheric sports photos. Before or after your photo shoot, take casual photos of your model in their sports outfit. you'll use this to specialize in your location or on your model’s equipment.
You can use the photos you're taking during this point in diptychs, triptychs, or other cool photo collages.
Shoot in Picturesque Locations to form Your Portraits Stand Out A photographer shooting during a magical winter landscape Forests, mountains, and lakes all look otherworldly within the winter. Though winter landscapes aren’t vibrant, they will function stunning backgrounds for your portraits.
Visit picturesque locations in your area during a foggy day. You’ll create surreal and dreamy photos.
For more atmospheric photos, use a little aperture (such as f/5.0). this may assist you to capture the maximum amount of your model and their environment as possible.
If you employ a bigger aperture (like f/1.2), you won’t be ready to capture the maximum amount of detail, but your model will stand out.
There’s no right or wrong when it involves aperture. If you’re a beginner, don’t be scared of experimenting with different apertures. See which of them suits your style the foremost.
Use Falling Snow as a Foreground for Dreamy Photos Magical winter portrait photography shot of a female model posing within the falling snow
Falling snow (especially the fluffy kind) is that the epitome of magic.
The closer the snow falls to your lens, the blurrier it'll appear. This blur also referred to as the foreground can frame a photograph. It’ll make simple portraits look more interesting.
Don’t worry if your foreground covers parts of your model’s body or face. This might end in unusual, abstract photos just like the one above.
Take Breaks to stop Coldness and tedium Fun snow portrait of a female model laughing and playing within the snow
Even though winter portrait photography may be a serious business, it shouldn’t stop you from having fun.
Make sure you're taking breaks, stretch your arms to avoid feeling tense. ask your model about your ideas. Being open and relaxed will make everyone in your team feel comfortable. this may cause better photos.
And the better your experience, the likelier it'll be that your model will want to figure with you again.
0 notes
Text
The Best Portrait Photography Poses

If we compare women with men or children, they're the simplest models to figure with. As a portrait photographer, you're likely to require girls' pictures more often. Eventually, you'll haven't any more interesting poses left and such sorts of photoshoots won't bring pleasure either to you or to a model. With the photography poses for ladies mentioned below, you're bound to leave your clients satisfied with the result.
1. Profile Pose portrait photography poses female portrait photography poses female Ask a model to show sideways and slightly lift her head. this is often a simple and a graceful pose. A model also can put one hand on the neck to point out more tenderness. cause you to women portraits warm and classy with these portrait Lightroom presets.
2. Movement Pose portrait photography poses female
Photos that are taken in motion always look more lively and artistic. A model may run, walk or jump within the air. Capturing a movement with a camera may be a complicated process that needs diligence from both a model and a photographer. But the ultimate result is going to be definitely worth some time and energy. But don’t ditch photoshopping portraits especially taken in motion to get rid of distracting blurriness.
3. Crossing Ankles portrait photography poses female portrait photography poses female It is one of the simplest portrait poses for ladies, because it is suitable for any sort of the body. This rather casual but striking pose visually elongates the model's legs and narrows her hips. A model can't only stand but also sit in such a pose and can still look amazing.
4. Seating portrait photography poses female
There exist tons of variations of such a pose. it's quite universal and may transfer various emotions – from strength and power to calmness and sensitivity.
Get professional photo retouching services from $5 per photo. This recognizable pose is widely employed by many celebrities. A model should turn 45 degrees aside and put the arm closest to the camera on a hip. the subsequent step is to maneuver forward a touch one foot, point it within the direction of the camera and shift weight to a different leg. The pose will flatten a model's body and make legs slimmer and longer.
5. Chin in Hand portrait photography poses female portrait photography poses female I recommend using this pose while a model is sitting at the table. Ask her to vary facial expressions to realize a solemn or wistful look.
6. Laying Down Pose portrait photography poses female portrait photography poses female It is one of the only but exquisite variants of outside portrait photography pose. The task of a model is to relocate her hands and head with each new shot. A photographer is meant to require pictures from a ground level and different angles. See more self-portrait ideas that you simply can do for your photo album.
7. Over the Shoulder portrait, photography poses female portrait photography poses female This pose surely enhances the sweetness of a model and makes a photograph more dimensional. In such a pose, a model will “beam” flirtatious vibes. to extend the mysterious atmosphere, ask her to play with a stray of hair. If you would like to urge an ideal film or warm Golden Hour effect, use free Photoshop actions for portraits.
8. Hands Up Pose portrait photography poses female
When a model is posing together with her hands raised over the top, a stress is placed on her body shape. it's one among those poses for portrait photos that depict the female sensuality.
9. Hands-On-Waist Poses portrait photography poses female
This is the foremost suitable pose if you would like to specialize in the upper half of the body. It indicates a strong-willed and powerful character. A model can change the position of the body or turn her head a couple of times and you'll create an array of photos.
10. Feminine Pose portrait photography poses female
If you're trying to find portrait photography ideas poses to spotlight women's gracefulness, this could be the right one. For this pose, a model should place one hand on the shoulder and another one – on the highest of her head. Suggest your model glance into space for a pensive and enigmatic look.
11. Incorporating Hands portrait photography poses female
One of the foremost important portrait photography tips for beginners isn't to forget to involve other parts of the body, like hands while shooting. it's a necessary aspect of turning a photograph into a true and natural one as if it wasn't staged but accidentally taken. as an example, a model can touch her cheek or cross her hand at the neck.
12. Leaning Pose portrait photography poses female portrait photography poses female A pose that will surely catch an eye fixed is that the one where a model gracefully leans against a wall. This poses nicely blends into a proper or casual atmosphere of the shots. A key to a superb photo with such a pose may be a model standing up straight.
13. twiddling with Hair portrait photography poses female
If a model has long and delightful hair, accentuate it in your shots for a more exciting effect. With the assistance of 1 or two hands, she may curl the ends of hair strands or simply put the hands in her hair. View these Photoshop portrait tutorials to get rid of a stray hair or make it volume in Photoshop.
During portrait photoshoots, men are more likely to be reserved and restrained. That's why, as a photographer, you would like to simplify this process and are available up with creative portrait photography poses for men beforehand.
14. Legs Crossed portrait photography poses male portrait photography poses male It is one among the foremost natural, carefree and casual portrait photography poses male. A model leans against a wall or the other surface and features several positions to settle on from, for instance, lean not together with his back, but with one arm or shoulder.
15. Sitting Pose portrait photography poses male
While a model is sitting on some surface, suggest him to put the ankle of 1 leg over the knee of another one. it's certainly an excellent pose for guys.
16. The Strolling Pose portrait photography poses male
Male portraits look more appealing once they are taken in motion. For such a pose, ask a model to straighten his body and keep his head while walking. He should also lengthen his usual stride to intensify the pose.
17. One Leg Up portrait photography poses male portrait photography poses male If you would like to point out the constitution of a model during a creative manner, make him lean on a wall with one leg raised during a standing position. This pose also can be repeated when a model is seated.
18. Showing Indifference portrait photography poses male portrait photography poses male In case a model is dressed trendy, ask him to form an accent on his clothes and don’t pose – stay indifferent to everything. Such a pose will add some dynamics to a photograph and make a model look more sophisticated.
19. Adjusting Collar/Jacket portrait photography poses male
The pose belongs to the list of the simplest portrait poses for men, because it's quite easy yet classy. It contributes to the intensity and confident spirit of an attempt.
20. Hands in Pockets portrait photography poses male
Putting hands within the pockets a person demonstrates calmness and determination. A model is liberal to choose, whether to place an entire or only a half his hand within the pocket and show a thumb.
0 notes
Text
The Best mobile Applications to make your pictures professional

If you're like me taking photos a day together with your phone, I think you want to have come up with some sort of workflow to shoot, edit and manage your photos. there's nothing worst than trying to find that one specific photo and spending a long time trying to find it with no luck. As a content creator, whether it's for private usage or work assignments, having a framework to assist me to manage my photos is needless to say an additional step to stay everything organized but within the future is saving me such a lot of time. So if you're trying to find how to raised manage your photos, here are the apps I exploit on day to day.
MOMENT
Moment may be a great app to find out the way to shoot with the manual mode if you do not own a DSLR or mirrorless camera. you'll control your Shutter speed, ISO, EV, white balance and focus. And shoot your photos in RAW format, which is right to edit your photos.
The interface is often a touch overwhelming initially but once you begin understanding every feature the appliance offers, your photos will look way better.
They also offer some mobile photography accessories and video tutorials to bring your photography game to the subsequent level. confirm to follow their YouTube channel for inspiration. They also offer great recommendations for mobile film-making.
SNAPSEED
This is the primary application I wont to edit my photos. it's free and offers a good range of setting adjustments to urge conversant in the editing process of photography. it's also very user friendly. I don't use it often, but once I do, it's to use some light effects on my photos. Sometimes adding some artificial lights on your photo can give them a second life and make your photos go from a "cool" photo.
This has become me attend editing app since early 2018. I just like it. Lightroom may be a more advanced photography software/app that permits you to make unique looks to your photos but also edit them in batch. you'll also start editing your photos on your mobile and continue editing it on your laptop because of the creative cloud. and therefore the results you get from editing your photos with this app are incredible. Here is an example below of an attempt I took at sunset here in Dublin.
Pro tip: to urge the simplest results editing with this application, you would like to shoot your photos in RAW format. that's why I exploit the instant app.
To be honest, I don't use it that always. But once I do, it might be to get rid of some elements I don't want to ascertain on my photos or within the contrary to feature some elements in my photos (i.e. Sky replacement)
GOOGLE PHOTOS
I use Google photos to make albums and copy my photos. The AI of the app categorizes my photos automatically and stores them by date which makes it very handy to seem for a selected photo. I just need A keyword or search by date to seek out the photo I'm trying to find.
0 notes
Text
What you should focus on while starting Photography

Are you feeling completely overwhelmed with all the items you would like to find out in photography?
Do you end up confused about where to start, or what your next step should be?
Then you're most definitely not alone! I do know exactly what it seems like because I used to be there too.
I remember feeling like I used to be being pulled in 10 different directions directly, seeing of these different paths to I assumed I needed to travel down and learn, with shiny new camera gear pulling my eye faraway from the prize with promises of higher photos.
It is often a confusing and frustrating time needless to say, and if you're not careful, you'll end up wandering around the internet, learning random “tips and tricks”, learning lots, but not moving forward and recuperating photos.
So I wrote this blog post to assist thereupon, by breaking down the areas you ought to be that specialize in FIRST because they're going to assist in giving you that solid foundation on which everything else is made upon.
#1: specialize in the weather of Exposure There are three elements of exposure - Aperture, ISO and Shutter Speed.
These are the building blocks of just about everything in photography, so rather than giving these a fast cursory nod and thinking that you simply have it down, i recommend that you simply stay here a short time, until you truly desire you recognize this inside out.
That’s because these elements do two things: Firstly, they control exposure (In other words, how light or dark your image is) by controlling how long the sensor is “exposed” to light.
But they also control how our images LOOK, by determining what proportion of the scene is focused, what proportion grain you'll get in your image, and whether you show motion through motion blur, or freeze the action.
Everything else you learn will always come to those building blocks, so try to not rush through these! this may also stand you in good stead for focus area #2….
#2: specialize in Learning Manual Mode For me, learning manual mode is an absolute must.
When you learn manual mode (and truly learn it, not simply as how of balancing exposure within the same way that your camera would) then you begin to understand exposure generally, the way to expose for various areas of the scene, and the way to control these elements to offer your image different looks.
It seriously is such a game-changer that I might like to see you specialize in this after you've got learned the fundamentals of exposure.
I can tell you from my very own experience that I spent years on Aperture Priority Mode because I didn’t think that it had been worthwhile to maneuver to Manual Mode - and that I wasted tons of your time within the process. it had been at this point that I felt I knew such a lot about photography, but couldn’t get the pictures that I could see in my head - and it had been only I made the switch to a manual mode that my images FINALLY clicked.
With manual mode, you'll handle anything that's thrown at you - like low light, backlight, creative exposure, and many, many other areas where the camera struggles on its own.
(If you would like to grab a MANUAL MODE CHEAT SHEET for helping you select the proper settings in manual mode, just go here to grab it!)
You don’t need to go straight to manual mode, you'll diversify by controlling only one element of exposure at a time (changing just your aperture or your shutter speed) whilst you gradually take over control.
#3: specialize in Light I’m going kick this one off with a quote:
“Light makes photography. Embrace Light. Admire It. Love it. But in particular, know light. realize it for all you're worth, and you'll know the key to photography” Eastman (Founder of Kodak)
This quote just about sums it up. Light is everything in photography, as, without it, we can’t take a photograph. But even quite that, the proper use of sunshine can make or break your image.
A well thought out image or amazing location is often disappointed by poor use of sunshine, whilst the foremost boring, mundane everyday scene can look wall-worthy and artistic, just by the utilization of sunshine.
So, where does one start?!
I recommend that you simply start INDOORS instead of outdoors. I do know this seems counter-intuitive, as there's more light outdoors than inside, but you'll control the sunshine much easier indoors, and where your subject is within the reference to the sunshine.
If you're new using light proactively (rather than simply placing your subject wherever) the simplest thanks to starting lighting your subject are to possess them face TOWARD the sunshine. So you'll have your subject face the window (making sure the window doesn't currently have direct sunlight coming in) and you the photographer are going to be in between the window and your subject. this provides good lighting on your subject which is usually uber flattering, and easy to photograph in as you do not have big contrasts of sunshine.
Once you've got that down, you'll move onto having your window to the side of your subject, or at a forty-five-degree angle to the sunshine.
Then move outdoors - again, keep it simple initially by using open shade.
So, you're layering on the knowledge of working with differing types of sunshine until you are feeling comfortable shooting indoors, low light, sunny days or cloudy days, and from the front, back or side.
As a side note, for you to urge the simplest results, then you're getting to want to be shooting in manual mode - so learn that first, then move onto learning different sort of light.
#4: specialize in Simple Composition Once you've got those down, then it’s time to maneuver onto a number of the fun stuff - composition!
An interesting, well thought out composition is different you'll make a standard, everyday image and elevate from a snapshot into something far more artistic.
There are a variety of guides you'll use when first starting - you'll go onto break this at a later date, but learn them FIRST, so you recognize when and WHY to interrupt them.
if you're brand fresh, start with the rule of thirds, then move onto another sort of composition like framing, leading lines, or negative space.
#5: specialize in Making Time to Practice We can all be guilty of this: spending longer on our armchairs learning about photography than we do being out there, camera in hand, shooting.
This is something I struggle with constantly - it is often hard to seek out time to truly get out there and practice, especially if you're working, taking care of kids, and doing the 101 other chores that appear to be assigned to you (and only you - why is that?!)
I have found that blocking a part of my day to consider photography is that the only way I seem to urge it done. Once it's in my calendar, I attempt to treat it as I might a meeting - I only break it if I need to.
Here’s something else you'll do today - go and inspect this post that has 12 creative challenges you'll do - it’s an excellent thanks to motivating yourself to urge out and about together with your camera!
0 notes
Text
The Ultimate 10 ways to improve Mobile Photography

How many of you've got a mobile phone?
How many of you're taking pictures together with your mobile phone?
I think the solution to those two questions is one hundred pc ‘YES’.
We all have a minimum of one mobile and that we are taking more pictures with our phone’s camera than ever. Don’t we love taking pictures of everything we like?
Be it an individual or an object, mobile has become the favorite device for taking pictures. Why? Because all folks won't own a DSLR camera and albeit we own, we'd not have it with us every single time.
Taking an image together with your mobile won't appear to be a difficult task as anyone can tap thereon button. But you'll level up your mobile photography with a couple of simple tricks and make your pictures stand out.
In this post, I’ll mention 10 savvy ways to enhance mobile photography. But before moving onto those tricks, allow us to prepare to require the photographs. These are few things to require care of before actually tapping thereon ‘click’ button:
Clean the lens: confirm you clean the lens of the camera of your mobile. Since we feature our mobile mostly in our pockets, take calls, keep holding in our hands, likelihood is that the lens is smudged with dust, sweat, oil, cream, etc. The smudged lens gives us a blurry low-quality image. So, it's better to wash your lens before taking pictures.
Use your both hands to carry your phone, a bit like the camera: once you are taking pictures together with your phone, treat your phone such as you treat your DSLR camera. Hold your phone such as you would hold the important camera, i.e. using your both hands. It provides stability and helps you to require a crisp picture.
Related: the way to Hold A Camera? – the proper Way
Activate the Gridlines: Why does one think your camera has gridlines? They surely do have a purpose. These gridlines assist you in image composition and line up your subject in a stimulating way.
Find interesting subjects: you'll find interesting subjects anywhere anytime. you only got to have an eye fixed for them. A kitchen is often an honest place to seek out interesting subjects to photograph. for instance a mug, your plate, fruits during a basket, a potted plant on your windowsill, etc. It might be anything. you only got to get little creative.
Now, we are all prepared to require brilliant photographs. Here are a couple of tricks which will surely level up your mobile photography:
1. The Rule of Third The Rule of Third is an important photography technique which will be utilized to enhance the composition of the image. it's altogether |one amongst|one in every of"> one among the foremost useful and important techniques to find out because it is often applied in all sorts of photography to supply images that are more appealing and interesting. this is often where activating those gridlines on your camera comes in handy. The gridlines, with two vertical and horizontal lines each, divide the frame into 9 grids. You place your subject along those lines or at their intersections. the most ideal of the Rule of Thirds is to not place your subject at the dead center. An off-center composition is more pleasing to the attention and appears more interesting.
improve mobile photography
2. Frame within a frame A-frame within a frame may be a compositional technique in photography that improves your image in some ways. A photographer uses something within the frame of the scene to border their main subject, creating a second frame within the image. this system will make your main subject stand out within the image adding depth and layers to an otherwise flat and boring image. The ‘frame within a frame’ images looks mysterious and intriguing. You don’t need fancy DSLR to require images using this system . you'll find natural also as man-made frames for your subjects, like trees, bushes, windows, buildings, and so on. improve mobile photography
3. Fill the frame The edges of the viewfinder of your camera are mentioned because of the frame. Filling the frame is another composition technique that will make your shots more interesting. the thought of filling the frame is to urge closer to your subject and make it a big portion of the ultimate photograph. In this manner, you exclude the unnecessary confusion around the subject and make the topic stand out. By filling the frame you're mentioning more details, patterns, and mood of the topic. Next time you're taking an image of an individual or a flower or anything, don’t be afraid to urge closer. improve mobile photography
4. Leading lines In photography, leading lines are one among the foremost effective and under-utilized compositional tools. you'll use the leading lines to draw a viewer’s attention to the most subject. As citizenry, our eyes are naturally drawn along the lines; they will be vertical, horizontal, parallel, diagonal, converging, and so on. you'll create a really powerful, engaging, and interesting photo using such leading lines. Leading lines are often both natural (such as a river, field, etc.) and man-made (such as a road, bridge, etc.). you'll add depth and a way of perspective to your image if you create the great use of those leading lines. improve mobile photography
5. Symmetry Symmetry is where one half the image is almost or completely just like the opposite, which may be top/bottom, left/right or diagonal split. the road that splits a picture into two such halves is named the road of symmetry. Symmetrical images are aesthetically balanced and pleasing to the eyes of the viewers. Symmetry is all around us if we pay more attention. Why not use this powerful photographic tool while taking pictures? you'll photograph using natural symmetry (horizon, reflection on lakes, then on) or the man-made symmetry (such as buildings, staircases, then on) and make an interesting image. improve mobile photography
Related: 9 Basic Photography Tips for Beginners to require PRO Shots
6. The Rule of Odds The Rule of Odds is one of the principles of photographic compositions. It states that the pictures become more appealing to the eyes when there's an odd number of subjects. for instance, if you're trying to compose photographs of quite one subject, then rather than using two, use three or five or seven then on. However, three is taken into account the foremost appealing option while 9 or more is taken into account as not so great as our human brain considers them as a gaggle. Try taking pictures of three flowers or three candles or three pens and see the difference for yourself.improve mobile photography
7. Find a singular angle Most people take pictures at the standard eye-level and make equivalent boring photographs. We see the planet at the attention level or sometimes at the chair level once we are seated and sometimes less than that if we are sitting on the ground. Viewpoint or point of view (POV) plays a serious role during a photographic composition. Just plan of the box while taking pictures. Change the attitude and check out taking pictures from a special viewpoint, from a singular angle, which could be awkward but you'll be amazed by the results you get.
improve mobile photography
8. Set the main target yourself Setting the main target yourself or employing a manual focus mode gives you the freedom of adjusting the main target consistent with your needs. When using our mobile phone’s camera to require pictures, we simply point and click on. The phone automatically sets parameters making it simple and straightforward and that we don’t seem to worry anymore about the manual functions. If you would like to enhance your mobile photography, choosing to line the main target yourself will assist you with an excellent deal. There are many camera apps available that provide DSLR like functions.
improve mobile photography
9. Silhouette photography In photography, a silhouette is defined as a topic that appears dark against a light-weight background. Silhouette photography quickly grabs anyone’s attention with the striking contrast between dark and lightweight, the simplicity, mystery, and wonder. it's one of my favorite techniques to require photographs. you'll take a silhouette photograph with any quite bright source of sunshine but the sun during the sunset and sunrise is that the commonest. confirm to seek out an open space sort of a field, a beach, then on to avoid distracting elements.
improve mobile photography
10. concentrate on detail Last but not least, listening to detail may result during a great photograph. rather than just pointing and shooting sort of a lot of individuals, you'll better your mobile photography with a touch effort of listening to detail. It doesn’t necessarily need to be the macro shots. A detail shot highlights the small print that viewers won't have otherwise noticed and provoke their imagination. Sometimes it's that tiny detail that tells an enormous story, which may be powerful quite anything.
0 notes
Text
HOW TO MAXIMIZE YOUR INCOME AS A PHOTOGRAPHER

Photography is one of the simplest professions. If you’re a photographer, you'll make tons of cash especially if you've got the required equipment and an honest eye. However, it becomes very difficult for many photographers to form a sustainable income and most of them don't last beyond the primary year in photography.
HOW-TO-MAXIMIZE-YOUR-INCOME-AS-A-PHOTOGRAPHER If you want to become a knowledgeable photographer and enjoy this profession, you would like to return up with working strategies. I do "> you are doing what others are doing, you'll be no exemption. during this article, we'll discuss ten tips to assist you to maximize your income from photography business.
1. Offering Small Mini Sessions Most clients prefer hiring photographers only they’re having an outsized event like show and wedding. Most clients don't consider hiring a photographer for little occasions like birthday celebrations as they think that it'll be way too expensive. If you would like to thrive during this business, you would like to think about offering mini session services. this is often one among the simplest ways and chances for you to satisfy new clients.
small mini-seasons Offering small mini sessions This is one of the simplest ways and chances for you to satisfy new clients.
2. Offering Discounts Offering discounts to clients is one of the simplest ways to take care of your clients and attract new clients. If a client gives you an outsized print order or photoshoots, it's always good to offer them a discount. you'll plan to offer your client a particular percent of discount if they buy a particular number of prints.
3. Stock Photography Most photographers know less about stock photography. Stock photography is one of the simplest ways to urge new clients. Consider taking creative photos that feature a story behind. This shows your creativity and earns you tons of respect from people. Consider selling these photos to stock photography websites.
discount code 4. Shoot Charity Event for free of charge Most photographers wouldn't love it when they’re doing something for free of charge. I bet it's the simplest thing you'll do to win the guts of the many. If you're taking photos for free of charge at a charity event, you'll be respected and you'll earn yourself an honest reputation. this may attract tons of individuals to your services. Include your watermark on those photos and let people know you probably did it for free of charge.
5. Selling Large Scale Prints And Offering Unique Materials Of course, you've got standard prints that help your clients to recollect their big day, but it's also important to supply stunning wrapped canvas prints that your clients can proudly display. this is often one of the proven methods which will help your photography business.
unique materials by beart-presets 6. Starting A Referral Program One of the simplest ways to draw in more people to your business is by offering clients a reduction in referring their friends and relatives to you. you'll promise your clients a reduction on their next session. this may encourage them to return and perhaps bring a replacement client. What you would like to try to do is come up with a referral program.
7. Offering Themed Photo Shoots If you offer standard themed photo shoots, you would like to think about offering fun themed packages where your clients can choose their favorite theme. this may attract most clients to your photography business. Always have the best-themed photo shoots for major holidays, weddings and far more.
OFFERING THEMED photoshoots Offering themed photoshoots Always have the best-themed photo shoots for major holidays, weddings and far more.
8. Create an honest Relationship Create an honest relationship with businesses where your target clients spend most of their time and money. Of course, there are specific points where most of your clients choose shopping or seek services like hairdressing. These are several places or businesses where you would like to collaborate or create an honest relationship so that they will make it possible for you to satisfy your clients.
9. Shooting an evening Club Or A Sporting Event These are quite events that attract tons of clients especially the youths. you'll scope out an occasion like a concert, sporting events or a nightclub event. If your photos look great, you’re more likely to urge tons of clients.
Nightclub collection with premium presets and actions 10. Having A Contest for free of charge Photo Shoot Having a contest is one among the simplest and amazing ways to spread the word about your business and therefore the services that you’re offering. this is often actually the simplest way to grow your email list. this is often the simplest thanks to meet new clients.
If you want to grow your photography business and earn a sustainable income, you would like to possess the proper equipment and apply these ten tips.
0 notes
Text
LIGHTING TIPS

TIP #1: SHOOT DURING THE GOLDEN HOURS It’s no surprise that light is that the most vital think about all sorts of photography but it’s especially important for wildlife photography due to the lack to regulate what little light you are doing have.
Wildlife photography is about capturing animals in their most candid moments, and people moments usually exist during the very early and late hours of the day.
Dawn and dusk also are referred to as the golden hours in photography, the time when the sun is at it’s warmest in hue, casting rich colors across the landscape and sometimes providing a dramatic backdrop for your subject.
The key to the present wildlife photography tip isn't simply awakened early enough to shoot during this light, but to use the sunshine creatively and to always remember it. Know the direction the sunshine is going to be coming from and plan for it.
Sometimes things don’t go as planned, especially when photographing wildlife, but that doesn’t mean you can’t reassess the sunshine and work with what you've got within the most creative and intentional way possible.
A photographer who can play with light and use it to spotlight features of their subject will produce much stronger photographs than one who doesn’t.
TIP #2: USE DRAMATIC LIGHTING Thinking creatively about dramatic lighting may be a great wildlife photography tip because you'll find yourself with very unique and thoughtfully composed shots.
Consider the sun setting over the recent Savanah and an outsized elephant walking faraway from where you’re shooting, every creature is popping certain the night. A blood-red sunset like that shouldn’t be wasted, especially when it's the right backdrop for a silhouette shot of the elephant walking toward the setting sun.
Using light during a dramatic way, from backlighting to casting dark shadows and features across your subject can add a singular and intriguing tone to your shots due to the thought and care put into it.
TIP #3: USE EXTERNAL LIGHTING If lighting isn’t good or if your subject has both dark and lightweight contrasting colors on their body, a low-powered external flash can offer you that extra light you would like to fill in those spots or just to supply that perfect gleam in your subject's eyes.
Summit DO YOUR RESEARCH TIP #4: KNOW YOUR LOCATION Knowing the situation on a more intimate level will put a photographer leaps and bounds before the remainder. If you recognize the history of a location and its landmarks or features, you'll incorporate them into your shots making them far more profound for people that are there or realize it.
Knowing the situation well also gives you a way of local comfort, you don’t get to worry about getting rotated or lost because you already feel adjusted to the settings and you won’t hesitate to relocate for a far better angle because you already know exactly where you're.
I’ve spent tons of your time within the wilderness, chasing animals around. there's nothing more unsettling (and distracting) than running in a circle within the woods, not knowing which way you came from.
If you recognize your location, then the likelihood is that you’re getting to have a far better idea of what the weather is going to be like and the way it'll impact your light and your subject's movements or behaviors.
Shooting during the golden hours, dawn and dusk will often cause a change in temperature and a change in temperature means a shift within the wind.
If you would like to urge on the brink of wildlife you usually want to approach from downwind. When the sun sets after an extended hot day the cooler temperatures will push the nice and cozy air up and out of the river bottoms and canyons causing the wind to swirl and sometimes switch directions to rising and out.
Of course, every location has different weather patterns and even some animals don’t mind people snooping around counting on where you're and therefore the time of year. But knowing your location, its weather patterns, and your subject's behavior will offer you the whip hand to form your luck and capture that one during a lifetime shot.
TIP #5: KNOW YOUR SUBJECT As mentioned before, knowing your subject's behavior will assist you to identify their next move. If you awaken early to seek out that a storm is an occupation and therefore the wind is already howling, you'll bet your subject goes to possess a small, if not drastic, change in behavior about the weather.
For example, if your subject is an animal of prey who relies on hearing their predators approach the maximum amount as seeing or smelling them, then a storm goes to vary their movements and behaviors.
This could be an excellent opportunity for unique, emotion-filled shots. Big gusts of wind, especially through wooded areas, can eliminate your subject's ability to smell or hear a predator approaching. So, these animals often resort to large open areas to permit them to a minimum of seeing any threats.
With the right lens, this suggests you'll finish up with a successful, albeit stormy, photoshoot.
BE PATIENT TIP #6: TAKE INTENTIONAL SHOTS Being intentional with what you would like to capture and the way you would like to capture it'll greatly enhance the photos you're taking, but it takes much patience.
Using light creatively and intentionally by putting yourself within the best spot to capture a movement or behavior you'll predict from your subject will increase your chances of a singular shot.
It is hard to predict what your subject will do at any given moment and you obviously can’t give them directions on thanks to |a way to"> the way to stand or which way to look, but a minimum of you'll predict their behavior, position yourself where you'll capture the shot you’ve envisioned, and await a chance to arise.
TIP #7: FIND PATTERNS IN BEHAVIOR Patience is one of the simplest wildlife photography tips, but that doesn’t mean just sit around twirling your thumbs or snapping photos on burst mode constantly. Instead, use the time wisely to watch your subject also on sense their movements and thoughts.
If your subject may be a bird of prey on the wing over an open field expecting prey, you would possibly see that they follow an equivalent flight path back and forth, turning at an equivalent point whenever. Catch them therein address bring a more action-filled shot versus an attempt of the birds flying — anyone can do that!
USE PERSPECTIVE TIP #8: LEAVE YOUR temperature BEHIND You hear this recommendation tons when it involves photography but it’s an excellent thanks to boosting your shots when capturing wildlife. Get on their level or get on a new level, like an airplane soaring over open water and grassy plains.
The more you exit of YOUR box and into a replacement one, the more the photo goes to pop with dimension and character.
Of course, getting yourself into higher or lower positions might require lens that accommodates such an attempt, so confirm you’re prepared by assessing the lenses you have already got and identified any additional lenses you'll enjoy with the journey Junkies lens guide.
TIP #9: found out A “TRAP” A great thanks to getting your subject closer to you so you'll get more up-close shots is to line up a blind or stand that conceals you from view. Bait the animal in nature and capture their curiosity or maybe their hesitation.
Think about the various expressions a dog can make in one situation then attempt to bring similar expressions to call at your subject!
Imagine the shots you'll get if you lured a shy bruin into a clearing and found out a mirror. Would the bear get up during a show of aggression or approach their reflection curiously and playfully?
You’ll never know until you are trying. For other camera traps that you simply can found out for relatively cheap, inspect how professional photographer Jonny Armstrong sets up his traps, you’ll love the results!
USE THE BACKGROUND TIP #10: USE NEGATIVE SPACE A great wildlife photography tip is to embrace negative space. This blank canvas behind an animal can put more emphasis on the topic or it offers a stimulating contrast to the setting of the photo.
An ice bear huddled abreast of a snowbank with nothing but a weary grey backdrop behind it can increase the emotion of the shot by emphasizing the cold loneliness of an extended winter.
TIP #11: FILL THE FRAME If you discover that you simply can’t eliminate a distracting background from your photo by re-positioning yourself, then meet up with and fill the frame. The photo is about your subject in any case.
If you'll ’t meet up with for whatever reason (safety may be a priority) you can also consider changing your camera’s aperture to melt the background with a blur and convey the topic of the shot into an intentional focus.
This wildlife photography tip is particularly helpful when capturing a topic that travels in large groups like birds, meerkats or penguins.
GEAR TIPS TIP #12: USE THE M, AV and television SETTINGS This is perhaps one of the more vital wildlife photography tips for a beginner. Learn these settings, use these settings, practice daily with these settings and know when to use which. this data will greatly increase the number of shots that are composed correctly, in focus, and exposed altogether the proper places.
You can always print off a guide to those three essential settings and keep it in your camera bag, but before you recognize it these will become a habit to you. David Peterson goes into depth on the various shooting modes and what they mean for your specific wildlife situations.
TIP #13: LEARN EXPOSURE COMPENSATION Exposure compensation may be wildlife photographers ally. Learn it, know it, use it. Exposure compensation comes in handy, especially when your subject has lighter and darker colors on their body, or if they're occupation and out of shade and sunlight.
Don’t miss a shocking shot because your exposure isn’t set to what it should be at the instant. Brush abreast of it with the journey Junkies’ guide to exposure.
Summit TIP #14: USE CUSTOM PRESETS Custom presets are another indispensable asset in your bag of wildlife photography tips. These settings are often used for once you got to quickly switch from a stationary subject to suddenly photographing birds on the wing or fast-paced subjects.
A custom preset is often set surely weather or for shots with cluttered backgrounds.
The more you shoot, the more you'll realize what settings should be saved as a custom preset. Richard Peters offers great advice on how and why to enable certain camera settings.
Once you get this down, you’ll stop missing great shots because you're busy twiddling with your camera and begin capturing a number of your best yet.
TIP #15: USE YOUR ISO New photographers seem to think increasing the sensitivity of your camera's sensor may be a big NO-NO. But that’s not the case, especially for wildlife photographers who often add low light conditions and faster shutter speeds.
It’s better to possess an attempt with slight noise than no shot in the least, and better ISO’s on newer cameras aren’t nearly as bad as they wont to be. So, don’t be afraid to crank it up once you got to catch up on fast-paced subjects or dwindling light.
0 notes
Text
11 Useful Food Photography Tips

1. Lighting, Lighting, Lighting Lighting, Lighting
No matter what photos you're taking, light is usually the key element that you simply need to take into consideration. Your ally and your biggest enemy. When it involves food photography, natural right is that the most preferable option. In such how, you'll be ready to get the textures and colors good. Try placing your composition right next to the window then try finding the simplest angle. If you are feeling just like the light is just too harsh, you'll always use a sheer fabric to form it a touch softer. If you'll work outside, then totally do this.
In case you merely can’t use natural light, try photographing the plate or composition inside a photo light box.
Related: Top 6 Best Portable Photo Studio Boxes In 2019 | Photo Light Boxes
2. Garnish and obtain Messy Get Messy
Food pictures look amazing if tons are happening within the frame. In such how , they appear realistic. Don’t be afraid to go away some flour on the table, if you're shooting food . Salads and meat dishes sometimes need even more color and texture. Use garnishes, greens, and spices. Yes, maybe this stuff isn't really within the recipe and you'd want to require them out before beginning to consume the dish, except for the sake of the photo, you'll sometimes add even inedible elements that simply look good.
In case you're shooting a recipe, it’s an excellent idea to put some ingredients round the outcome. You can’t see what exact spices the chef added within the dish, but if you employ thyme and basil, for instance, within the frame, then the viewer will have a clearer idea of the recipe (and the image will simply look such a lot more appealing). Don’t underestimate an easy grater! otherwise, you can always crumble some ingredients on top of the ultimate dish.
3. Learn Manual Learn Manual
Let’s get a touch more technical here. Unfortunately, the probabilities are high that you simply won’t be ready to take stunning food pictures if you can’t use the manual mode that your DSLR has. just in case you've got a special camera, try shooting in ‘macro’ and skip this tip.
Use a high ISO, if you're shooting handheld. you'll boost your ISO up to 1600 or maybe 3200 if you're taking shots indoors. However, take care, as there could be an excessive amount of noise within the picture. If you're employing a tripod, then certainly do lower your ISO to urge crisp and sharp results.
Want to specialize in the dish and keep everything else a touch blurry? Use a shallow depth of field. Shoot using the widest aperture.
Related: What Are the perfect Camera Settings For Studio Photography? 4. Get a Tripod Get a Tripod
It is difficult to overestimate the importance of an honest tripod when it involves food photography. If you would like to shoot a flat lay, for instance, it might be incredibly difficult to urge a pointy picture, if you're holding the camera. But just in case you've got a tripod, you'll easily choose the simplest angle for your picture.
Different bowls, salads and therefore the majority of meat dishes are the simplest shot from above. A burger will look incredible if you shoot it head-on. However, you'll always experiment with the angles to seek out the simplest ones.
A tripod won't only help eliminate the effect of ‘shaking hands’, but they're also won’t be any human shadows within the frame that sometimes will ruin the entire picture. If you're curious about tripods check our list for best tripods for photography.
5. Invest in a tremendous Lens Amazing Lens
But first, you've got to make a decision, if you would like to require to pack up shots of food or to photograph layouts. These are different purposes and you'd certainly need a minimum of two lenses to urge everything right. However, a 50 mm lens is often used for both, pack up shots and for the photographs taken from above.
You would want to take a position during a fixed focal lens. to urge the specified composition, you'd simply got to change your position.
In a nutshell, if you're serious about your food photography, then you ought to not be using the kit lens that you simply initially got together with your camera. to ascertain the simplest lenses for each camera brand check our recommended gear for photographers.
6. Have an idea Have Plan
Of course, the plan and schedule would depend upon the sort of food photography that you simply concentrate on. If you wish to require pictures of step-by-step recipes, then confirm that you simply have all the ingredients.
Before taking the shot, imagine what you would like it to seem like. Get the required accessories (backdrops, napkins, and silverware) and garnish. you'll even try shooting the entire composition without the particular food to form sure that the colors look great which the position is simply perfect.
7. Add Color Add Color
Let’s be honest, some dishes don't look appealing in the least (even though they could be finger-licking good in real life). you would possibly try adding color and texture with some garnish and greens that we've mentioned before. Vegetables and fruit are always an excellent eye-catcher, so you would possibly want to think about adding these to the frame (maybe even next to the plate).
Moreover, don’t ditch the knives, forks, spoons and therefore the actual plates. Those are often incredibly beautiful and help get the viewer’s attention.
8. Get Great Backdrops Great Backdrops
Backdrops are incredibly important for food photography. Especially, if you would like to shoot layouts, recipes or photos for a food blog. Moreover, it's another great and straightforward thanks to adding some color and texture to your composition.
The great news is that these backdrops don’t get to be expensive. Yes, a cool rustic or marble table looks very nice within the pictures. But you'll always get foam boards or maybe scrapbook paper. you'll also get different boards and paint them in bright colors. These are great because they're easy to maneuver around so that you'll find the right light.
9. Don’t ditch Napkins Napkins
These are the tiny things that tons of food photographers neglect. But napkins can easily make your shot look more finished and cute. Those are often colorful paper napkins or beautiful textile options. By the way, you wouldn’t get to splurge on this stuff, but they do make a difference.
10. Have a glance at How Other Photographers roll in the hay How Other Photographers roll in the hay
Now, that doesn't mean that you simply got to copy the photographers that you like. But you'll surely get inspired by some ideas, color combinations, and little tricks. Or if you recognize beforehand that you simply would wish to require an image of mashed potatoes, for instance, and you've got absolutely no idea about the way to make a bowl filled with mashed potatoes look good, then we might recommend taking a peek at how other food photographers do this.
11. Get Creative! Get Creative! Sometimes you don’t need that pie or apple to seem perfect. Take a bite! Mid-meal shots are appealing to the viewer as they're going to see a delicious dish that you simply want to right away devour, rather than a perfect cake that you simply are afraid to the touch. you're adding some authenticity and that’s always great. Bear in mind that sometimes even dirty kitchenware looks amazing. As if you've got just finished cooking and didn’t have time to wash up.
If you've got such a chance, try adding some movement to your shot. for instance, you'll pour the sauce over a dish and take an attempt while it's moving.
0 notes
Text
The Best Ideas for water Photography

Love photographing water, whether within the sort of waterfalls, streams, ponds, or coastal scenes. Leak photos are fun and straightforward if you recognize the way to roll in the hay right. To assist you to get the foremost out of your water photography, here are a number of my top tips and concepts for creating great water photos.
I photographed this rushing spring stream with sunset light on the trees within the background, allowing me to capture colorful reflections within the water. Great Smoky Mountains Park, USA. Canon 5DII, Nikon 14-24 mm f/2.8 lens with Canon adapter, polarizer filter, ISO 50, f/11, 3.2 seconds. Use long exposures for a satisfying blurred water effect Moving water often looks best when captured using long exposures. If you employ a brief exposure, the water will appear frozen, like ice; by adding some motion blur you'll improve the design of your water photos. Typically, shutter speeds of 1/30 second or longer will start to blur moving water. Shutter speeds longer than several seconds will create a “misty” look, with detail and texture within the water beginning to disappear. Often, something between 1/8 and 1 second will yield the foremost pleasing results, blurring the water yet retaining some texture within the water, but results will vary counting on the speed and volume of the moving water. Experiment with different shutter speeds and review images on your camera’s LCD screen until you achieve the specified motion-blur effect.
During an extended exposure, swirling foam beneath a waterfall creates interesting shapes. Cascade River State Park, USA. Canon 5DIII, Canon 16-35mm f/4 lens, polarizer filter, ISO 200, f/11, 13 seconds. Reflections add color to your water photos Photographing water may be a great source for reflections, so find how to use reflections to feature a touch of color and impressionism to your shot. Still, water can act sort of a mirror, producing an ideal reflection, while moving water produces a less distinct reflection, often nothing quite a surreal blur of color.
I made this photo of a hippo floating within the water, surrounded by colorful reflections of foliage on the far bank of the river. Lower Zambezi park, Zambia. Canon 5DIII, Canon 200-400mm f/4 lens with built-in 1.4x extender, ISO 800, f/5.6, 1/200 second. A favorite technique of mine is to photograph sunlit foliage reflected in water, usually with interesting objects (such as boulders, logs, or water plants) protruding of the water. this system usually works best when the reflected subject is within the light, and therefore the water is in shadow.
I waited until the colorful autumn foliage on the far bank of this pond was in direct sunlight. Acadia park, USA. Canon 5DIII, Canon 100-400mm f/4.5-5.6 lens, polarizer filter, ISO 100, f/22, 2 seconds. Get your feet wet! I don’t like limiting my options to only what I can photograph from the shore. getting into the water is the key to finding unique angles and getting the composition you would like. Sandals, wading boots, or fishing waders can are available handy; once I am working in very deep or cold water, I will be able to sometimes put during a wetsuit or drysuit.
A photographer wearing chest waders to securely get within the water for a waterfall shoot. Shenandoah Park, USA. Canon 5DII, 17-40mm f/4 lens, polarizer filter, ISO 400, f/11, 0.4 seconds. Stay safe and faraway from potentially dangerous water. Also, remember that surfaces underwater are often slick, uneven, or muddy, so watch your footing. Be especially careful if working near deep or fast-moving water, or coastal environments where waves are high (and always keep an eye fixed out for exceptionally large incoming “rogue” waves).
I came to the water wearing chest waders to capture this attitude. Brúarfoss, Iceland. Canon 5DIII, Canon 16-35mm f/2.8 lens, polarizer filter, ISO 100, f/11, 0.5 seconds. Waterfalls Waterfalls are a landscape favorite. Overcast light typically works best; the soft, diffused light reduces contrast within the scene, helping to stop distracting “hot spots” from forming within the water and on rocks. it's best to photograph waterfalls right after a soaking rain because it can make streams and waterfalls more attractive by filling them with water, darkening rocks, and intensifying the colors of foliage. When working in dry conditions, I spend a couple of minutes splashing water over rocks within the scene to wet them down and replicate the drenched look found after a soaking rain. A polarizer filter is beneficial when shooting waterfall scenes, to get rid of glare from wet foliage and rocks, enhance contrast, and intensify colors.
A light, soaking rain darkened the rocks around the waterfall. Grand Portage State Park, USA. Canon 5DII, Canon 24-105mm f/4 lens, polarizer filter, ISO 50, f/16, 0.6 seconds. Look for a stimulating curve or zigzag during a watercourse and make this a component of your composition. Get in on the brink of foreground elements, like small rapids beneath a waterfall, to make compositional interest and a way of scale and perspective. Eddies and swirl pools also make very interesting foreground features. Waterfall and stream scenes look best when surrounded by color, like spring or autumn foliage.
I like to incorporate colorful foliage when photographing streams and waterfalls. Los Glaciares park, Argentina. Canon 5DIII, Tamron 24-70mm f/2.8 lens, polarizer filter, ISO 100, f/11, 1.3 seconds. Coastal Photography The key to successful coastal photography is to seek out a satisfying convergence of land, water, and sky. Coastal areas often have unique landforms, like arches, sea stacks, and sea caves; also keep an eye fixed out for interesting features or patterns in rippled sand, tide pools, creeks flowing into the water, and marine life washed abreast of shore (such as shells, seaweed, or starfish). Get low and shut to interesting foreground features, like rocks emerging from the water.
Sunrise and sunset light are especially important for coastal scenes; the colorful light at these times brings coastal scenes to life. Shoot towards the foremost colorful a part of the sky to maximize the reflected light within the water.
A beautiful sunrise is reflected in churning ocean waters, Assateague Island National Seashore, USA. Canon 1DsII, Sigma 12-24mm f/4.5-5.6 lens, ISO 100, f/22, 1/6 second. When working during a tidal area, always check tide times before photographing, as coastal scenes change dramatically with the tides. Some scenes work best with low tides, others high, and even others somewhere in between. Tide information is obtained online, and tide chart apps for smartphones are readily available, supplying you with instant tide information at your fingertips.
Low tide revealed a boulder that I used as a foreground for this ocean sunset. Osa Peninsula, Costa Rica. Canon 5DIII, Tamron 15-30mm f/2.8 lens, ISO 200, f/11, 1 second. Protect your gear Handle your equipment with care around water. If necessary, store cameras and lenses during a dry bag or waterproof container, only taking them out once you can shoot. Pay extra attention to tripod placement when fixing in moving water: you've got to take care that the present or waves aren’t strong enough to comb your tripod away or send vibrations up your tripod legs to your camera, which may cause blurry photos, especially during long exposures.
I swam to the present “sea cave” along the coast of Lake Superior with my camera and tripod safely nestled within a dry bag. Pictured Rocks National Lakeshore, USA. Canon 1DXII, Canon 11-24mm f/4 lens, ISO 100, f/11, 0.5 seconds. Catch the wave! Waves make excellent foreground elements for your water photographs. Long exposures create streaking lines, adding visual interest and energy to your compositions. Use an electronic shutter release to trigger the shot precisely when wave action is at its best. Outgoing waves are often particularly effective for coastal photos, especially when water rushes around objects emerging from the surf.
I triggered the shutter as an outgoing wave flowed around a boulder. Reynisdrangar, Iceland. Canon 5DIII, Canon 16-35mm f/4 lens, ISO 160, f/11, 0.5 seconds. Photograph splashing water One time to use a quick shutter speed is when photographing large waves crashing against the shore, or when an individual or animal is moving quickly through the water. That way, you'll dramatically freeze the water droplets as they fly through the air.
0 notes
Text
How to make money online by Photography

ShutterStock
One of the foremost popular sites to urge paid to require pictures. It’s completely liberal to join, but you'll get to get approved to upload photos. Your images are often sold per download and exclusive license. Rates paid are pretty good for the industry.
They do have a high $100 live amount, but make a payment on time! an ideal site for people looking to form money online with their photos.
123 Royalty Free
A pretty popular site that will pay you to upload your photos. you'll get to apply, and every one photo is approved by 123 Royalty Free.
You will receive 60% of the acquisition price per download which is pretty good for the industry.
Photographers seem to be pretty proud of this site.
Last Month I Made $13,841 Online
I Bet You're uninterested in Making Pennies Online. No More BS. If You're Serious About Making A Full-Time Income Online you would like to ascertain the reality. Stop Wasting some time With subsequent Big Thing When There's Already A Proven Method That Works!
They also pay 30% for purchases made without credits (PayPal, Credit Card). they are doing offer extended licenses for your pictures and can ante up to $29.70 per sale.
Rates are okay, but members seem to be very proud of this site!
Can Stock Photo
Pays as a per image download rate. From what I can see around 60% of the sale price. But they are doing offer an adult pictures section for you people involved therein this could be an honest site for you.
They even have a referral program where you earn $5 for each photographer you refer to that sells 50 photos.
Foap
This is a very cool app that allows you to take photos on your phone then upload them purchasable. All photos are approved before they will be sold.
It looks like they sell the photos for $10 and you'll get paid $5 of that.
Users seem to be very proud of this app.
Paid Pictures
A site that you simply apply for, if accepted, they're going to send you specific photography assignments.
Requires you to upload seven photos for review. From what I can see payment depends on the dimensions of the project, but members seem to be pretty proud of this site.
Shutter Point
One of the upper paying sites. they're very selective on who gets in and what pictures they're going to approve but can pay 85% for full royalty free licenses and 70% for a normal royalty-free license.
A pretty good site that doesn’t have many complaints that I can find.
Deposit Photo
A site that you simply will need to apply for. If accepted you'll tend a photographer level. this is often getting to affect what pay grade you’re at, and level can change supported your photos and sales!
CreStock
A pretty popular site that pays you per download for your images. Pay grade depends on what percentage of photos you’ve uploaded and sales since joining CreStock. The more sales you create, the upper you'll be paid per download.
Always On Vacation
A site that hires you to try to shoot around the world. this is often an ideal site for people that travel tons. If accepted you'll tend projects to finish supported where you're located.
From what I can see shoots usually pay around $50-$100 and perhaps more for bigger projects.
Virtual Tours USA
Another site that hires photographers to require pictures at locations throughout the US. They pay per project, and it does require you to be ready to visit the situation on our own. Seem to always be hiring, but work is restricted.
Obeo
It is a site that hires all levels of photographers. Openings are getting to be hooked into your location because the work you'll be doing is taking photos of homes and commercial property purchasable in your area.
PR Photos
Now, this is often 100% a location-based site. Pr Photos only accepts celebrity photos so if you reside somewhere with tons of celebrities this could be an ideal site for you.
I could not find much information about payment, but I’d say it's to try to to with the star and what quality the photo is.
SnapWire
Another mobile app which will pay you to require photos together with your phone. It seems to be an area where you only post photos purchasable and obtain paid on a per download basis.
Alamy
Another site that's pretty popular. If accepted you'll upload your images purchasable on their site.
You will get paid 50% of the sale price for each photo that's downloaded.
Feature Pics
Easy site to urge accepted to. can pay 70% of the asking price of your photo. It seems to be a growing site, but at this point not as popular as some sites so other sites could also be a far better option.
Fotolia
A site that rewards their most successful photographers the foremost. But you'll upload your pictures purchasable and can be paid on a per download basis.
Pricing all depends on what level photographer you're and past sales and uploads with Fotolia.
Photo Spin
A site where you'll upload your pictures purchasable. Says they ante up to 50% commission on all downloads.
The cool thing is that they have a couple of partner sites that your photos also will be added to purchasable.
Image Vortex
A site that permits you to upload your photos for purchase. can pay up to 70% of the price for a full royalty-free license and lower rates for other licenses. There’s a $100 live amount and payments are made by Direct Deposit.
It does have an affiliate program where you'll refer your friends.
There you've got 19 Work From Home Photography Jobs. Overall of these sites on this list are completely legit and a reasonably good join. I’d say those I prefer over others are ShutterStock and 123 Royalty Free, but you'll prefer other sites.
One thing to stay in mind is that these sites aren’t getting to offer you an enormous income unless you become extremely successful. It’s a competitive field; it’s not as easy as just posting some photos and making a bunch of cash for them. But it is often an honest source of income if you set out high-quality photos that folks are looking for!
If you’re struggling to form money selling your photos, your best bet could be selling your photos on your website. confirm to see out My #1 Recommendation, I remodeled $13,000 last month online and it can assist you to promote your pictures!
Thank you for reading. Hopefully, you'll find a minimum of one site that you simply would like to urge paid to require pictures with.
0 notes
Text
How to make a Backdrop for Photography
You can take those awesome holiday photos without spending many dollars on photo backdrops. Save your money – it should be spent on cameras since those would be much harder to form reception. And have some fun creating your own backdrops!
You can easily make them, albeit you’ve never made a thing in your life. You won’t be needing an entire lot of drugs to try to to it. Just use some items which will be sitting in your garage. Or find them in your local craft store for a dozen bucks – it’s quite a bargain considering that professional, ready-made backdrops cost many dollars!
It’s like having a home-made photo booth that you simply can customize and reuse many times over!
Just a fast tip before we dig in: whichever backdrop option you select, it'll need the brightest spot in your house, with much natural light coming in. inspect these seven simple scenarios you'll make right now!
1. the simplest Scenario – All you would like maybe a Poster Board Are you into food photography? Your case is one among the simplest! All you would like maybe a long poster board, and you won’t even need to glue or nail it to the wall – some adhesive tape will do the trick! Actually, you won’t even need a wall, since your objects are sufficiently small to suit on a table. Choose poster board in white or another color, counting on your subject. Here’s how The Pieper Life does it.
“I love white walls because white reflects the sunshine and maybe a great backdrop for art.” – John Rocha
2. Make a Backdrop Using Paper, Staples and adhesive tape Grab a bunch of colorful paper sheets and celebrate all day! All you would like to try to to is fold the sheets into little fans, staple them together into rosettes, and fasten them to the wall. this is often an excellent option since it allows you to mix different colors for various projects – but we don’t recommend using quite three colors at a time. an excellent idea for kids’ birthday parties! inspect the small print here.
Note that you simply also can make an easier and more elegant version of this backdrop with crepe ribbons and a few painter’s tapes. Just make a frame from the painter’s tape by attaching it to the wall therefore the sticky side is out. Then, attach the colorful crepe ribbons in order that they would hang down while ensuring they overlap. otherwise, you can attach them horizontally – fiddle and see which way works best for you.
“Photography was how on behalf of me to freeze time and to capture the moments that were happy and healthy. I saw a photograph as how to travel back to memory if I ever needed to.” – Rachel Morrison
Improvisation opportunities are endless. Is your loved one a fanatical knitter? Borrow a couple of skeins of yarn, cut it into strings and fasten the strings to the wall in order that they would hang down. Once they're in situ, you'll trim them to different lengths and form various shapes – a bit like performing a haircut. You’ll be surprised at the top result!
3. Get Some Pipes and Fabric You can create a frame from PVC pipes that you simply can later disassemble and put away. you'll need regular pipes also as end caps, elbow and T pieces. But what to place into the frame?
Make a background from differing types of cloth – cotton or maybe polyester. you'll choose single-colored (blue, green or another color) or colorful fabric with a pattern. Just confirm to iron the material so it doesn’t have wrinkles. Muslin is perhaps one among the simplest fabric choices since it’s very easy to dye.
4. Wooden Boards + 2 Sheets of Vinyl Paper = TWO Cute Backdrops This one is almost as simple, and the likelihood is that you've got these things in your garage already. inspect all the parts you need:
A wooden board (dimensions will vary counting on the peak of your model) Two sheets of vinyl paper large enough to hide the board – choose your own styles A baseboard to act just like the floor A beadboard This solution is extremely convenient because you'll have two awesome backdrops in one. Just flip the board over and there’s your second backdrop! Just just in case your kiddo gets bored.
5. Build a Backdrop Wall from Wooden Planks Buy as many wooden planks as possible – these are pretty cheap since they don’t even need to be finished. Actually, the rawer and more unfinished they appear, the higher their impact is going to be. Maybe you don’t even need to buy them. Just investigate a construction site and ask the workers for a few leftovers they don’t need.
wooden planks as a backdrop
Two of these planks (preferably the strongest and thickest) are going to be used as support beams. Nail all of them together, paint if needed, and there’s your vintage backdrop!
Or you can always make the method even simpler if you choose up a couple of wooden boards (the more, the better), and paint them in several colors. Maybe it sounds too simple, but it’s effective – inspect how Recipe Girl did it.
6. Use Those Christmas Lights for Bokeh! Here’s a thought that doesn’t require anything you don’t have already got.
Pick up an outsized open space, take your strings of Christmas lights and fasten them on the wall so all of them hang down. Ideally, space should be as spacious as possible, in order that you and your subject can both escape from the backdrop itself to require a correct angle and capture the Bokeh effect. Another requirement – get the maximum amount of natural light as you'll ahead of your subject while keeping it dark behind.
Christmas lights bokeh effect
7. Grandma’s Doilies Just Got Another Use Those cute and nostalgic doilies from grandma would form an ideal backdrop for wedding photos.
Make a paste by mixing flour with water and soak the doilies in it. Blow a bunch of small balloons (adequate to the doilies’ size). These are getting to be your molds. Wrap the doilies around them, and put each on top of a glass. a few days later, they're going to have hardened enough so you'll blow out the balloons and glue the doilies on your wall. Head up here for full instructions.
If you don’t have enough time to fiddle with these DIY projects, inspect this blog post about Photoshop overlays which will assist you found out a background without moving a finger.
0 notes
Text
The Perfect Guide to Smoke Bomb Photography

Smoke bombs are an important deal if you would like to rework your photos in an explosion of colors.
Smoke bomb photography is a stimulating technique that’s trending in photography. From portraits to wedding photography, photographers use colored smoke grenades to make colorful effects in their photo shoots.
Rachael by James Young on 500px.com If you would like to understand more about the way to produce amazing colored smoke grenade photography you’re within the right place.
In this article, I’m getting to offer you an entire description of this photography style, and a rundown on how you'll use it to feature a blast of color to your images, some awesome tips, where to seek out the proper smoke bombs and what precautions to require when using them.
Let’s start immediately. you'll use the Table of Contents to maneuver through the varied sections of this post.
Table of Contents show What is smoke grenade Photography? Smoke Bomb Photography may be a shooting technique that involves the utilization of colored smoke bombs to feature an ingenious colorful smoke effect to your images.
This photography technique aims to boost your photos by adding an ingenious, striking effect of smoke to your street, portraiture, wedding photography, gender reveals, or landscape images.
If you compose your photos adding a blast of color and texture to the background the wow effect is guaranteed.
The Basics of smoke grenade Photography First of all, smoke bomb photography requires some preparation and a spotlight on the small print to take care of a high level of safety.
The bomb is combustible, meaning that it can cause a fireplace if used inappropriately.

For this reason, all photographers must find out the fundamentals of the way to use smoke bombs safely before then creatively.
Here are a couple of details and terminologies that you simply got to know before getting started with smoke grenade photography.
Smoke Bomb Mechanism Smoke bombs work an equivalent way as fireworks or flares.
You have to “fire them up”. you'll do so by coitus interrupts a special ring designated as WP. The bomb will then produce smoke and sparks of various colors or one color counting on the sort.
WP may be a ring that you simply need to pull so as for the bomb to blow out smoke.
Bursts Bursts ask a kind of smoke bombs that fireplace at both ends. they're ready to fire out smoke from both directions for a more impressive photo session but they're going to the second half the time.
Cool Burning “Cool burning” smoke grenades are a specific sort of smoke bombs that are safer in terms of fireside risk and may be held since the temperature of the can is less than military smoke bombs. you'll read more here.
Check the legality of using smoke bombs publicly places It is important to see with the local authorities whether it's legal to use smoke bombs in your local and federal parks, and other public places.
Using smoke bombs inappropriately may cause a fireplace or raise a false fire alarm. People also will get particularly scared once they see black or white smoke.
Thus, it's essential to urge clearance before using applying smoke bombs in your photo shoots.
Secure smoke bombs could still be dangerous Smoke bombs marked as secure could still pose some danger. once you pull out the WP, the bomb will release some sparks, which can harm your models or maybe cause a fireplace.
You should, therefore, wear protective clothing and ignite the bomb a distance faraway from your models.
Also, refrain from using them near flammable substances.
How to Find the proper Smoke Bombs Finding the perfect smoke grenade for your photo shoots largely depends on your photography needs.
Before jumping to the simplest smoke grenades brand, here are a couple of factors that you simply should concede to find the proper smoke bombs:
Design Smoke bombs are available in different styles, names, and styles. These include smoke cans, smoke grenades, and colored smoke sticks.
Moreover, some sorts of smoke bombs are safe to carry when ignited (cool burning grenades) while others are to assail the bottom.
Burn Duration and Amount of Smoke Some smoke bombs emit smoke from two sides, release much smoke but blow out faster than standard smoke sticks. Others spew a little amount of smoke but last for twice the time as regular bombs (70 – 90 seconds).
Ease of use The smoke grenade that you simply buy shouldn't offer you a tough time coitus interruptus the ring or igniting the bomb. You or your staff shouldn’t require any training and ideally, it should be easy to use to permit you to capture the simplest moments seamlessly.

Cost Prices of smoke bombs start at around $7 per piece, with the marginally costlier bomb going for the maximum amount as $30. Considering this, it's always knowing to go searching to seek out the proper smoke bombs that suit your budget.
Where to shop for Smoke Bombs for Photography After my research, the simplest brand you'll possibly find online is Enolagaye.
Their smoke bombs were initially produced for paintball games but became super popular among photographers since the merchandise is good and safe.
They feature all the characteristics I discussed above: WP ring, cool-burning and that they last for about 90 seconds.
More than enough to snap some cool photos. Here’s their online shop and you'll find their entire set of wire pull smoke grenades here.
Please note: I’m NOT affiliated to Enolagaye and that I DON’T earn a commission if you purchase their products.
I’m an Amazon affiliate partner but at the instant of scripting this article, the sole colored smoke grenades on Amazon I could find have poor reviews, so I wouldn’t recommend getting your smoke grenade from Amazon immediately.
I’ll update this post within the future if I find good smoke bombs on Amazon also or be happy to go away with a suggestion within the comments below.
Best Smoke Bombs Photography Tips Finally, pardon me for the long intro and here are some amazing tips to urge the foremost out of your smoke grenade photoshoots.
Choose the proper Location The location is everything when it involves smoke grenade photography.
Avoid choosing a crowded area and confirm there’s no fire danger around you.
The ideal environment should close up, safe and have proper lighting with little to no wind. you are doing not got to found out an upscale lighting system, as natural light from the sun is capable create a splendid backlight for your shots.
Anyway, if you've got access to strobe lights for portraits you'll use them to feature more interest to your photographs.
Plan Ahead Your Colored Smoke Photoshoots Failing to plan is getting to fail.
Since fixing smoke bombs photography may be a pricey investment (time, model, finding a location, props, etc), it's only logical that you simply plan and practice your shots beforehand.
Have your model practicing the poses and movements she or he will do when igniting the smoke grenade and take some shots to possess a transparent understanding of what you shoot and the way to compose your photos later.
This will allow you to capture the simplest shots without wasting your smoke bombs.
To use smoke as a background, your subjects/models need to hold the bomb and direct some smoke behind them. Alternatively, you'll set the bomb on the bottom behind your models before shooting your images.
Use the proper Props in Your smoke grenade Photos For interesting smoke grenade photos, consider adding some props to the scene.
For instance, you'll place a smoke grenade inside a prop and ask your model to carry the prop. this may add a replacement, exciting element to the scene for impeccable smoke grenade pictures.
Smoke Cloud Effect The model can hold still for a couple of seconds the smoke bomb ahead of her/him then walk forward through the cloud of smoke to make a cool moody effect.
Colored Smoke Movement If you would like to make thicker smoke trails, your model will need to move the bomb slowly within the desired motion.
For lighter smoke trails, consider moving the smoke grenade swiftly within the set direction. a pleasant effect is additionally obtained by moving the smoke bomb in a circle.
Best Light The best light is undeniably natural light. you'll shoot your smoke grenade photos during the golden hour to feature a natural, soft light to your portraiture.
For night photos, think about using brightly colored smoke bombs to deliver creatively stunning images.
If you would like to use artificial lights consider bringing with you some strobe lights for portraits.
Smoke Bomb Photography commonly asked Questions Are smoke bombs for photography illegal? In most countries, smoke bombs are illegal publicly places. You’ll get to inform the local authorities if you would like to use smoke bombs in parks or public places generally.
It’s not against the law to shop for them or use them privately spaces as long as you’re over 18. Also as long as you don’t damage other people’s properties and you don’t disturb others, you'll fire off that smoke grenade.
What is the hearth risk of using smoke grenades? You have to remember the situation where you’re shooting. Woodlands or dry bushes areas require particular attention. I might recommend remaining faraway from such areas to avoid fires.
If you’re shooting within the snow, or at the beach, on the brink of the water, the hearth risk is near zero.
1 note
·
View note
Text
The best places where you can learn Photography Online

I am a self-taught photographer. As far as I can remember I even have always been taking photos since my young age. it had been something common in my family and how to capture memories over the years. it's only since 2015 that I started taking photography more seriously which I bought my first camera: the Sony a5000.
It was a mirrorless camera, very user friendly that helped me to capture beautiful photos and obtain conversant in all the manual settings.
At that point, I used to be against editing my photos as I believed it had been cheating...(don't judge me…!) Nevertheless, it had been an excellent exercise and challenge to not edit my photos because it meant that I needed to nail the right exposure for my photos.
It took me 2 years to start out getting conversant in my camera, the photography techniques and be ready to replicate what I saw in the real world the way I wanted it with my camera.
How did I do it? By learning and practicing, a LOT!
So if you're a beginner or intermediate photographer trying to find how to enhance your photography. Here are 8 of my favorite websites I like to recommend to everyone who wants to intensify their photography game.
1. Youtube
YouTube is a fantastic source of inspiration from content creators. We all have different sorts of photography and it's always interesting to ascertain what are other photographers' creative process. I spent and still spend tons of your time on YouTube learning from my favorite content creators. and therefore the excellent news is that it's FREE.
2. photography School
This is one of the simplest resources for the photography community. they supply many great articles and even have a useful forum with a very engaged community. They also sell books if you're curious about purchasing one. But their articles are an excellent source of inspiration.
3. Photography magazines
Yes my friend, magazines still exist. I read their digital version though that comes with my kindle unlimited subscription. monthly a replacement magazine releases with plenty of great advice and tips from the simplest photographers within the industry.
4. Skillshare
This is my go-to platform for a year now after YouTube to find out photography and also network with a community of creators. This website isn't only a web learning platform for creators but is additionally a web community that encourages them to find out by doing and sharing best practices. I love it. I began to teach on Skillshare also. You can get access to my FREE training about The Art Of Mobile Photography by clicking on my affiliate link here. By using my link you'll even be ready to enjoy 2 FREE months of unlimited classes. If you'd wish to learn more about Skillshare, inspect this post the way to Learn a replacement Skill a day With Skillshare that I wrote.
5. CreativeLive
CreativeLive empowers you to unleash your potential by bringing the world’s greatest experts on to you, live. Featuring workshops in photography, video, design, business, audio, music, crafting, and software training. you'll get to buy most of the classes, but remember that you simply get to be|are"> are going to be learning from the simplest which it'll be cheaper than going to a photography school.
They also offer free live classes every week that covers different sorts of photography.
Have a glance at the Photography starter kit from John Greengo. It covers everything you would like to understand about photography. Here is that the link below:
Photography Starter Kit Classes at CreativeLive 6. Tutsplus
If tutorials are what you're trying to find, you're being served. Tutsplus is one of the most important tutorial sites around. They cover web design, photography, video, then far more. Just dive within the category of your choice and begin learning.
7. Fstoppers
quite 1 million visitors monthly, Fstoppers is one of the most important photography websites within the world. you'll be ready to find an enormous collection of articles associated with photography, gear reviews, industry news then far more. They even have a YouTube channel.
8. Udemy
Udemy is additionally a web learning platform but contrary to Skillshare it's not focused just for creators. By connecting students everywhere the planet to the simplest instructors, Udemy helps individuals reach their goals and pursue their dreams. you'll find paid courses but also FREE ones. They offer discounted courses fairly often also as a part of their promotional programs, so stay the lookout for courses of your interest.
Those are my main 8 resources to find out photography either for free of charge or at a cheap price online. Also, I didn't mention it, but the simplest thanks to recovering at a selected photography style are to hitch workshops of 1 of your favorite photographers.
I am an enormous advocate of learning by doing. Watching tutorials is one thing but having someone to inform you exactly what to try to and what to not neutralize order to urge the simplest results and answer all of your questions is on behalf of my ideal. the most benefits being that you simply learn faster and have the chance to exchange directly together with your mentor and other students.
If you reside in Dublin or visit Dublin soon and need to intensify your photography game, I will be able to be delighted to share with you my photography expertise. You can find more details of the workshops that I offer right here. All levels are welcome. thus far the feedback from my students is great!
I don't believe that we ever can stop learning photography. it's always a learning curve and there'll always be new things to experiment to push our creativity to the subsequent level. Especially nowadays with the new cameras on the market. They keep it up recuperating and better.
What about you? Where did you learn photography and where would you recommend beginners to find out online? If you liked this blog post, don't hesitate to love it, it makes a difference, subscribe my weekly newsletter if you'd wish to receive more photography tips straight in your inbox, and if you recognize anyone that would enjoy this text, be happy to share it with them.
FTC Disclosure of fabric Connection: This post may contain affiliate links where we receive a commission if you buy a product we recommend. Affiliate links add no extra cost to you and permit us to continue running this site. Regardless, we only recommend products or services we use personally and/or believe will add value to our readers.
0 notes
Text
SUNSET PHOTOGRAPHY

One thing that never seems to tire anyone may be a beautiful sunset. Whether you've got traveled far and wide and seen the foremost spectacular things or not.
There’s a universal quality to sunrise and sunset. Regardless of where you're on this earth, regardless of your circumstances as long as you reside, you'll make certain of two things. The sun will rise and at the top of the day, the sun will go down. It’s one of the various things that bind us all at once.
No wonder we would like to capture the sun come up or go down altogether its glorious beauty. It leaves us with a sense of connection to nature and wonder.
SUNSET PHOTOGRAPHY TIPS For years, I’ve tried to photograph it, never quite succeeding. Always a touch disappointed because it didn't reflect the experience I had.
But I even have been perfecting my sunset photography skills over the years. And that I would like to share the items that I’ve discovered. These are my best sunset photography tips and that they make the difference between a somewhat okay shot and a shocking sunset photo.
Are you as pumped as I'm to require your sunset pics to the subsequent level?

#1 PLAN YOUR SUNSET SHOOT In sunset photography (or sunrise photography) it's knowing the plan. You'll find information on the time of sunrise and sunset at your location in any weather app on your phone.
Or you can use a golden hour app that tells you when and where the sun will go down and where the sunshine is coming from.
I use Golden Hour One from the App Store but there are many various golden hour apps for each platform available.
You can also ask a local! They will offer you some insider recommendations on great spots also.
The weather features a big influence on your sunset pictures. Check out the sky during the day and concentrate on the clouds. If it’s completely clouded the sunset won't be very spectacular but if the clouds are thin you've got an excellent sunset photo opp.
Clouds add texture to the sky especially once they are scattered, puffy or wispy.
#2 prepare Once you recognize the right location arrive 1 to 2 hours before the sun is setting so you'll prepare your shot. And if it's a documented, fabulous sunset location being on time will offer you the simplest spot to shoot from.
By the time the sun is at its most spectacular you’re able to capture it. Because once the sun goes down there’s no stopping it. you've got a limited window to urge the shot you would like. Once you arrive on time you'll be ready at the proper moment.
Giving yourself the time to organize also will offer you the main target to make an excellent sunset picture. Because it’s not all about exposure, white balance, and composition rules.
When you’re photographing you would like to be ‘in the zone’. So give yourself the time to urge within the flow of things and be hyper-attentive of your surroundings.
Sunset photography, the way to photograph the sunset | Photo: Sunrise at Murchison Park, Uganda ©Karin van Mierlo, Photography Playground
#3 SUNSET CAMERA SETTINGS If you let the camera have its way it'll calculate a mean of the lighter and therefore the darker areas in your photo. this will work if the contrast isn’t overlarge. But within the case of a sunset, the contrasts between the dark and bright areas are huge.
If you allow the camera on Auto Mode your picture won’t be properly exposed. So you would like to require control and set the exposure yourself.
To get an honest exposure of the brilliant area around the sun where the gorgeous colors are you would like to underexpose. If you underexpose the darker areas will become even darker. But that's okay because you're shooting the sunset. that's the world that must be properly exposed!
APERTURE PRIORITY MODE In sunset photography, you always need a large depth of field. this suggests that everything in your frame is focused from front to back.
Shutter speed may be a lesser priority although if you’re shooting handheld you don’t want to travel slower than 1/250.
The next step is to regulate your iso to match the aperture and shutter speed. Leave some room to regulate the exposure for when the sunshine gets less while the sun goes down.
Ideally, you would like rock bottom iso possible because it keeps the grain out of the door. But if you would like to settle on between iso and aperture a little aperture is preferable. So don’t hesitate to crank up your iso if that's necessary. you furthermore may believe what proportion you'll do to repair grain within the editing phase.
In Aperture Priority Mode set the aperture between f11 and f16. Let the camera choose shutter speed but don’t go slower than 1/250 sec. Because you would like to urge a pointy pic. If you go slower the camera might shake and provides you a but a tack-sharp image. Adjust your ISO to those settings. Use exposure compensation to underexpose. And you ought to try different exposure settings. Of course, if you recognize how you'll also shoot in Manual Mode. But Aperture Priority Mode is sweet while the sun goes down. The lighting conditions will change rapidly and in Aperture Priority Mode the camera will adjust accordingly without you having to believe it.
PROGRAM MODE If you've got no idea what shooting in Raw means and Aperture- or Manual Mode stresses you out you'll still take hold.
Set your camera in Program Mode. It’s an exposure mode not tons of individuals use but it is often quite helpful when you’re beginning to take hold of your camera.
It’s the large P on your dial right next to Auto Mode!
One hugely important thing you'll neutralize Program Mode is to deactivate your automatic flash. When you’re in Auto Mode and therefore the camera thinks there’s not enough light your flash will crop up. There’s nothing you'll do that as long as your camera is about in Auto Mode.
And another thing you'll do is to pick exposure compensation.
I have to be honest with you, it’s not ideal but it’s better than Auto Mode.
Taking longer to organize yourself is crucial if you’re experimenting with Program Mode and check out different settings. Practice so every sunset you’re gonna photograph is going to be better than the previous one.
And who knows it'd offer you the push you would like to urge over your fear of moving far away from Auto.
Go to Manual Mode for more in-depth info on shooting in Program Mode. make certain to download the Program Mode PDF Guide.
sunset photography, the way to photograph the sunset | Photo: Sunset in Sardinia, Italy, ©Karin van Mierlo, Photography Playground

#4 SETTING WHITE BALANCE Light comes in many various colors. It ranges from blue, cold tones to yellow, warm tones.
To get the colors to seem natural to use the camera features a tool called White Balance. It adjusts the color of the light: the color temperature.
If the sunshine is just too yellow it'll add a touch blue. If the sunshine is just too blue it'll add a touch yellow. during a lot of cases, the Auto setting of the White Balance will do an honest job.
But once you photograph a sunset the camera gets confused.
It will needless to say think: “Yoo…..that is way too orange. I’ll contribute tons of blues to form up for that.” and that we lose all the gorgeous yellow and orange tones within the sky.
There is again quite one approach to repair this issue.
RAW When you shoot in RAW there’s no got to believe White Balance just (one of the various perks of shooting in RAW). Leave it in Auto White Balance and affect the White Balance within the editing phase.
JPEG When you shoot in Jpeg you ought to affect the White Balance during the shoot. Set the White Balance to ‘Cloudy’ or ‘Shade’.
By setting the White Balance to ‘Cloudy’ or ‘Shade’ you let the camera think it must add a touch yellow.
And that is how we get those wonderful sunset photos!
sunset photography
0 notes
Text
6 Simple Tips for Sharper Photos

Get Sharper Photos FAST With These Easy to Implement Tips for Sharper Photos! If there's ONE thing a photograph must be, it’s sharp. Unless you’re purposefully aiming for an out of focus, creative look, getting sharper photos are some things I feel all folks are working towards. And guessing by the number of times we see this question come up, I’d say it’s one among the foremost common issues out there. How am I able to get sharper photos? Why aren’t my photos as sharp as I want? Today we've 6 quick and straightforward to implement tips for sharper photos!
Choose Your Focus Point The very initiative to getting the sharp photos you’re after is to form sure that you simply (not your camera) are selecting the purpose of focus in your photos. Most cameras have an autofocus setting which will allow the camera to pick the main target point for you. We recommend that you simply choose the main target point on your own, and don’t let the camera choose the focus for you. When your camera selects the main target point for you, it often picks either the world of highest contrast within the frame or the thing within the frame closest to the camera. Selecting your focus point gives you ultimate control over where the camera focuses.
tips for sharper photos Each camera is different, so check your camera’s user manual for a way to pick your focus points together with your model. Usually, the main target points are often selected by pressing an AF (auto-focus) point selection button and employing a dial on your camera to navigate to the main target point you would like.
tips for sharper photos It’s also worth noting that your camera has two different types of focus points: single focus points and cross-type focus points. Cross-type focus points tend to focus faster and more reliably, so when it’s possible, use your camera’s cross-type focus points. you'll check your camera’s manual to ascertain which of your focus points are single and which are cross-type.

Steady Yourself The better you're braced, the more steady you'll be when taking a photograph. Most of the time, this will be achieved by having a gentle stance when shooting. However, you would possibly also try bracing your elbows against your body, or leaning on a wall or structure once you can, to stay yourself steady while shooting and avoiding camera shake.
Press the Shutter Gently It never occurred to me that I might be getting a camera shake from pressing the shutter until someone pointed it bent me one day! once you press the shutter, pay close attention that you simply aren’t moving your entire camera as you down on the button. confine mind to press gently, and even try to not breathe, as this will cause camera shake.
Check Your Shutter Speed Keeping your shutter speed fast enough is one of the key elements to a pointy photo. an honest general rule of thumb for non-moving subjects is to stay your shutter speed a minimum of 1.5x your focal distance . for instance, if you’re shooting with a 100mm lens, it’s best to stay the shutter speed at a minimum of 1/150. However, you’ll also want to think about your got to freeze motion. If you're taking photos of moving subjects like kids or sports, you’ll want your shutter speed even faster. once I am photographing young, quick-moving children, I nearly always keep my shutter speed at 1/400 or faster. I also like to use Back Button Focus with endless focus mode for my moving subjects.
tips for sharper photos f2.8, ISO 160, 1/500 Understand Your Aperture Understanding aperture and focal planes is a crucial component in taking sharp photos. You’ll want to form sure your aperture isn’t too narrow to urge everything you would like focused on. Still, confused about how aperture and depth of field impact your photos? It also helps to get to understand your lenses and which aperture they're sharpest at. Each lens features a “sweet spot” aperture that's sharpest, usually 2-3 stops above wide open.
Your Lens Matters Your kit lens just won’t get you as sharp of a photograph as a better quality lens. However, don’t fall under the thinking that an excellent expensive lens will solve all of your issues for you. If you don’t understand the way to use your camera or the way to do the items mentioned above, you continue to won’t get sharp photos. Regardless, there's something to be said about the upper quality of the photo that you simply can obtain quality equipment.
Tons go into taking sharp photos! If your images aren’t as sharp as you would like, the following pointers for sharper photos should assist you to narrow down the difficulty. Fortunately, these are all simple tips to implement!
1 note
·
View note