
Don't wanna be here? Send us removal request.
Statistics
We looked inside some of the posts by soulfox937 and here's what we found interesting.
Average Info
Notes Per Post
1
Likes Per Post
1
Reblog Per Post
0
Reply Per Post
0
Time Between Posts
50 seconds
Number of Posts By Type
Text
3
Last Seen Tumblr Blogs


Fun Fact
Tumblr has a 66 index score for customer satisfaction in the US.
Text
Mujhse Dosti Karoge Full Movie Online Youtube
Dailymotion Mujhse Dosti Karoge Full Movie
Mujhse Dosti Karoge Full Film
25:37 - Jeene Ke Hain Chaar Din 55:03 - Mujhse Shaadi Karogi1:06:36 - Kaata Laga Hai Laga1:13:35 - Rab Kare1:33:04 - Aaja Soniye2:09:06 - Laal DupattaSameer.
Mujhse Dosti Karoge!: https://emcos.esclon.com/tfngp5m.
Melody & magical. Watch the song ‘Saanwali Si Ek Ladki’ from the film ‘Mujhse Dosti Karoge’. Subscribe Now: 🔔 Stay updated!#YRFnewrel.
Download Music,. Mujhse Shaadi Karogi (2004) - watch online/download - quality: BRRip HD 720p - free full movie - Sunny rents a room in a City called Goa in India. His room-ma.Download Salman Khan Hindi Movies Mega Pack (1988-2015) - DVD-Hd-BDRips-BrRip RSY torrent.Bit Torrent Scene. Mujhse Shaadi Karogi 2004 Dvdrip 1CD Xvid.
Mujhse Dosti Karoge Film; Mujhse Dosti Karoge 2002; Language Selection Please select the language(s) of the music you listen to. Released by YRF Music Jun 2002 8 Tracks. By Rahul Sharma. Enhance your tracks and mixes with UAD plug-in Bundles from Neve,®.
Mujhse Dosti Karoge!Directed byKunal KohliProduced byYash Chopra Aditya ChopraWritten byAditya Chopra Kunal KohliStarringRani Mukerji Hrithik Roshan Kareena Kapoor Uday ChopraMusic byBabloo Chakravarty Rahul SharmaCinematographyRavi K. Chandran Gopal ShahEdited byV. V. Karnik Ritesh SoniDistributed byYash Raj Films Pvt. Ltd
Release date
Running time
149 minutesLanguageHindiBudget₹120 millionBox office₹336.1 million

Mujhse Dosti Karoge! (transl.Will You Be My Friend!) is a 2002 Indian Hindi-language coming-of-ageromantic drama film directed by Kunal Kohli and produced by Aditya Chopra and Yash Chopra under the banner of Yash Raj Films. The film, which was loosely inspired from the 1996 American comedy The Truth About Cats & Dogs,(1) follows the love triangle of three friends played by Rani Mukerji, Hrithik Roshan and Kareena Kapoor in leading roles, with Uday Chopra appearing in an extended special appearance.
Despite the huge hype due to the star-cast, Mujhse Dosti Karoge! was a moderate commercial success at the domestic box-office, earning ₹430 million (US$6.0 million).,(2) but it performed better at the overseas box-office. Kapoor received a Best Supporting Actress nomination at the 4th IIFA Awards for her performance in the film.
Plot(edit)
Young Pooja Sahani (Rani Mukerji), Raj Khanna (Hrithik Roshan) and Tina Kapoor (Kareena Kapoor) are childhood friends. While Raj has always been attracted to the vivacious and beautiful Tina, he is completely unaware of the quiet Pooja's love for him.
Dailymotion Mujhse Dosti Karoge Full Movie
Raj's father (Kiran Kumar) decides to move to England with his family to take up a new job. Before leaving, Raj makes Tina promise to write to him via e-mail. Tina, a fun-loving and popular girl, soon becomes occupied with other things. Meanwhile Pooja writes to Raj asking about his days in London but instead of her name she signs as Tina, thinking that a letter from Tina will surely bring his reply and also to help Tina keep her promise. While exchanging e-mails, Raj and Pooja realize they have many things in common, and their e-mails bring them close to each other. A decade and a half later, Raj returns to India for a short vacation. By now, he's in love with the girl he has been writing to and believes he can recognize her at first sight. He states that his love for Tina is enough for him to pick her from any crowd so they never exchange any photographs whatsoever.
When the three of them finally meet, Raj, to simple girl-next-door Pooja's disappointment, completely ignores her and is smitten by the typically beautiful Tina, who is initially unsure but slowly becomes attracted to him. However, during the two weeks of his vacation, he cannot help but notice that the real Tina is completely different from the Tina he knew from the e-mails. He also starts a friendship with Pooja and is impressed by their common interests, without realizing she is the one he is really in love with. Tina, despite of being well aware of the fact that she is not the one who Raj has been talking to over the last 15 years, cannot resist herself from reciprocating Raj's continuous flirt and ends up falling in love with him. By the end of Raj's 2 weeks trip to India, their parents see their blooming love and gladly announces the engagement of Raj and Tina. Heartbroken, yet happy for her best friends, Pooja decides to never disclose the secret.
Raj returns to London, where Pooja coincidentally arrives for an interview. Raj takes Pooja to a church that he frequently visits and finds her accidentally humming the tune of a song he wrote to her about years ago. He realises that Pooja is the one who had been writing to him all those years since he shared the information about the church and the song in the e-mails. They discover their love for each other and decide to get married. Back in India, Tina's father (Sachin Khedekar) suddenly dies, leaving Tina alone in the world as an orphan. His last wish was that Tina would marry Raj, and Pooja's parents say that they will perform all the rituals as Tina's parents.
Knowing that Tina also has feelings for Raj and she is now alone, Pooja refuses to marry Raj, as she does not want to break Tina's heart. Raj's parents also agree to the marriage, unaware of the relationship between Raj and Pooja that developed in London. Raj insists on telling his parents the truth but Pooja stops him. He angrily vows to her that he will only marry Tina if Pooja marries someone else on the same day. Everyone comes to London for the wedding ceremony of Tina and Raj.
In London, Rohan Verma (Uday Chopra) is a friend of Raj's who has always been attracted to Pooja. After constant flirting of Rohan and ultimatum from Raj, Pooja bows to the inevitable and agrees to marry Rohan on the same day as Raj and Tina. That way, she hopes to satisfy Raj's condition and ensure Tina's happiness. Rohan realises that Pooja does not love him, but keeps up the charade nevertheless. On the day of the marriage, Tina realises that Raj is really in love with Pooja, as she sees Raj's ancestral bracelet with Pooja, she changes from her wedding attire to simple clothes. At the altar, Raj knocks over the pot of wedding vermilion by mistake, some of which falls into Pooja's hair, which is traditionally a sign of marriage. Just as Pooja is about to wipe it off, Tina stops her, saying that she is not alone and is glad to have such great friends willing to sacrifice their love for her. Pooja approaches Rohan to apologise, but he is not at all angry. He is glad to have made new friends. The movie ends with Pooja and Raj getting married.
Cast(edit)

Rani Mukerji as Pooja Sahani
Hrithik Roshan as Raj Khanna
Kareena Kapoor as Tina Kapoor
Uday Chopra as Rohan Verma
Barkha Singh as young Tina Kapoor
Satish Shah as Mr. Sahani, Pooja's father
Himani Shivpuri as Mrs. Sahani, Pooja's mother
Kiran Kumar as Mr. Khanna, Raj's father
Smita Jaykar as Mrs. Khanna, Raj's mother
Sachin Khedekar as Mr. Kapoor, Tina's father
Parikshat Sahni as Mr. Verma, Rohan's father
Maya Alagh as Mrs. Verma, Rohan's mother
Namuna Nembang as Piya Kapoor
Soundtrack(edit)
Mujhse Dosti KarogeSoundtrack album by Released
5 July 2002
GenreFeature film soundtrackLabelProducerYash Chopra
The music for Mujhse Dosti Karoge! was composed by Babloo Chakravarty, while each of the film's musical numbers were composed by Rahul Sharma with lyrics penned by Anand Bakshi. The film is notable for featuring a medley of 18 songs from earlier films. The characters used the lyrics from those songs to express the way they were feeling in the present.
According to the Indian trade website Box Office India, with around 12,00,000 units sold, the film's soundtrack album was the year's eleventh highest-selling.(3)
SongSinger(s)LengthNotes'Andekhi Anjaani'Lata Mangeshkar and Udit Narayan06:20Picturised on Rani Mukerji, Hrithik Roshan & Kareena Kapoor'Jaane Dil Mein'Lata Mangeshkar and Sonu Nigam05:48Picturised on Rani Mukerji & Hrithik Roshan'Jaane Dil Mein' 2Lata Mangeshkar and Sonu Nigam02:50Picturised on Rani Mukerji & Hrithik Roshan'Mujhse Dosti Karoge'Asha Bhosle, Udit Narayan, Alka Yagnik05:03Picturised on Rani Mukerji, Hrithik Roshan & Kareena Kapoor'Oh My Darling'Alisha Chinai and Sonu Nigam06:09Picturised on Hrithik Roshan & Kareena Kapoor'Saanwali Si Ek Ladki'Udit Narayan03:38Picturised on Rani Mukerji, Hrithik Roshan, Kareena Kapoor & Uday Chopra'The Medley'Lata Mangeshkar, Udit Narayan, Sonu Nigam12:06Picturised on Rani Mukerji, Hrithik Roshan, Kareena Kapoor & Uday Chopra
References(edit)
^'Kareena & Rani to Hrithik: Mujhse Dosti Karoge?' (31 July 2002), The Times of India. Retrieved 30 March 2019.
^'Box Office 2002'. BoxOfficeIndia. Archived from the original on 22 January 2008.
^'Music Hits 2000–2009 (Figures in Units)'. Box Office India. Archived from the original on 15 February 2008.
External links(edit)
Official website: Mujhse Dosti Karoge at the Wayback Machine (archived 2004-08-23)
Mujhse Dosti Karoge! on IMDb
Mujhse Dosti Karoge! at Bollywood Hungama
Mujhse Dosti Karoge Full Film
Retrieved from 'https://en.wikipedia.org/w/index.php?title=Mujhse_Dosti_Karoge!&oldid=1000302320'
0 notes
Text
Digidesign Mbox 2 Driver Mac Os X 10 7

Digidesign CoreAudio Driver
Digidesign Mbox 2 Driver Mac Os X 10 7 Download Free
Digidesign Mbox 2 Driver Mac El Capitan
Version 7.0 for Mac OS X 10.4 'Tiger'
KBClick here to download the demo driver for Mac OS X 1. KBClick here to download the free driver for Mac OS 9. KB (Downloading the free driver does not entitle for buying a crossgrade.)Click here to download the driver for Win XP 6. Pro Tools LE 6.7 is officially supported on Mac OS X 10.3.2, 10.3.4, 10.3.5, 10.3.7, and 10.3.8 (Panther) with the following systems on Power Mac G5, Power Mac G4, iMac G4, PowerBook G4, and iBook models.: Digi 002; Digi 002 Rack; Mbox; Additional Notes: Mac OS X 10.3.3 and 10.3.6 have not been fully tested with Pro Tools and are not recommended.
Now Available — Standalone Digidesign CoreAudio Driver Version 7.0
If you already have Pro Tools TDM 6.9.2 or higher or Pro Tools LE 6.9.2 or higher installed on your system, you should not use the Standalone Digidesign CoreAudio Driver installer. Please install the CoreAudio Driver for your system using the Pro Tools installers listed here:
If You Have Pro Tools 6.9.2/6.9.3 or Pro Tools 7 Installed on Mac OS X 10.4
Pro Tools HD 7 and Pro Tools LE 7 include the option to install the Digidesign CoreAudio Driver for systems supported by Pro Tools 7. See the Digidesign CoreAudio Q & A section below for a listed of third-party applications tested with the Digidesign CoreAudio Driver version 7.0.
Pro Tools TDM 6.9.2, Pro Tools TDM 6.9.3, and Pro Tools LE 6.9.2 include the option to install the Digidesign CoreAudio Driver version 6.9.2 for Pro Tools|HD Accel, Pro Tools|HD, Digi 002, Digi 002 Rack, and Mbox systems on Mac OS X 10.4. If you are using Pro Tools TDM 6.9.2 or 6.9.3, or Pro Tools LE 6.9.2, you should download the latest CS update for those versions, which include fixes for Coreaudio:
Mbox 2 systems with Pro Tools LE 6.8.1 include a version of the Digidesign CoreAudio Driver specifically for the Mbox 2. Other Pro Tools LE 6.x versions will not work with Mbox 2.
Digidesign Mbox 2 Driver Mac Os X 10 7 Download Free
What is the Digidesign CoreAudio Driver?
The Digidesign CoreAudio Driver is a multi-client, multichannel sound driver that allows CoreAudio-compatible applications to record and play back through the following Digidesign audio interfaces:
Pro Tools|HD Accel
Pro Tools|HD
Digi 002
Digi 002 Rack
Mbox 2
Mbox
Full-duplex recording and playback of 24-bit audio is supported at sample rates up to 96 kHz, depending on your Digidesign hardware and CoreAudio client application.
The Digidesign CoreAudio Driver will provide up to 18 channels of I/O depending on your Pro Tools System:
Up to 8 channels of I/O with Pro Tools|HD or HD Accel systems
Up to 18 channels of I/O with Digi 002 and Digi 002 Rack systems (or 18 in and 16 out with S/PDIF Mirroring enabled)
Up to 2 channels of I/O with Mbox systems
For Pro Tools TDM systems with more than one card and multiple I/Os, only the primary I/O connected to the first (core) card can be used with CoreAudio
Not Tested with Digidesign CoreAudio Driver for Mac OS X 10.4
Pro Tools|24 MIX systems
Pro Tools|24 (d24 card) systems
Digi 001
Audiomedia III systems
See the Digidesign CoreAudio Q & A section below for more details.
Standalone Digidesign CoreAudio Driver 7.0 for Mac OS X 10.4
For Owners of Supported Digidesign Hardware on Mac OS X 10.4 'Tiger' That Do Not Have Pro Tools Installed
December 20, 2005

This download is for owners of supported Digidesign hardware on Mac OS X 10.4.x 'Tiger' that wish to install the Digidesign CoreAudio Driver without installing Pro Tools.
If you already have Pro Tools TDM 6.9.2 or higher or Pro Tools LE 6.9.2 or higher installed on your system, you should not use the Standalone Digidesign CoreAudio Driver installer. Please install the CoreAudio Driver for your system using your Pro Tools installer listed at the top of this page. The Digidesign CoreAudio Driver version 7.0 wil NOT work with Pro Tools 6.x, and installs files that may make Pro Tools 6.x unusable.
If you have either Pro Tools TDM 6.9 or lower or Pro Tools LE 6.9 or lower (which will not run on Tiger) installed on your system, you should uninstall Pro Tools from your Tiger startup system before using the Standalone Digidesign CoreAudio Driver installer. To uninstall Pro Tools, insert your Pro Tools CD, run the 'Install Pro Tools' application, and choose Uninstall from the menu instead of Custom Install or Easy Install. Pro Tools application web updaters (except for CS versions) also have the Install/Uninstall menu.
System Requirements — Standalone Digidesign CoreAudio Driver 7.0
The Standalone Digidesign CoreAudio Driver 7.0 can be installed on systems that do not have Pro Tools installed on Mac OS X 10.4.x 'Tiger'. (instructions below)
The Digidesign CoreAudio Driver is a multi-client, multichannel sound driver that allows CoreAudio-compatible applications to record and play back through the following Digidesign audio interfaces:
Pro Tools|HD Accel
Pro Tools|HD
Digi 002
Digi 002 Rack
Mbox
Not Tested with Digidesign CoreAudio Driver Version 7.0
Pro Tools|24 MIX systems
Pro Tools|24 (d24 card) systems
Digi 001
Audiomedia III systems
See the Digidesign CoreAudio Q & A section below for more details.
Documentation:
For more information on installation, usage, compatibility and limitations, please review the CoreAudio Usage Guide and CoreAudio Read Me files provided with the Digidesign CoreAudio 7.0 installer. The CoreAudio Usage Guide and CoreAudio Read Me are installed here:
Applications/Digidesign/Documentation/Drivers/
Also available for separate download here:
CoreAudio Usage Guide (472 k)
CoreAudio Read Me (42 k)
Digidesign CoreAudio Driver Q & A
Q: Does the Digidesign CoreAudio driver support simultaneous use of multiple client applications? A: Yes. Beginning with version 6.5 and higher, the Digidesign CoreAudio Driver supports multiple CoreAudio clients. You no longer have to quit a CoreAudio application before working with another.
Q: Can I use Pro Tools in tandem with other CoreAudio applications? A: No. Pro Tools requires exclusive access to Digidesign hardware and thus it cannot be used simultaneously with other CoreAudio applications. You will have to quit Pro Tools before using other CoreAudio programs, or vice versa.
Q: Why can't I hear my Mac system sounds through my Digidesign hardware using the Digidesign CoreAudio Driver? A: The Digidesign CoreAudio Driver for Mac OS X does not support playback of system sounds. Your Mac system sounds will continue to be available through your Mac speaker and regular Mac line out.
Q: Why doesn't the Digidesign CoreAudio Driver for OS X allow the volume output or input to be adjusted in the OS X Sound Preference Panel? The volume sliders are greyed out. A:This is correct behavior. The Digidesign CoreAudio Driver does not support this function. Playback volume adjustments can be made within the Digi CoreAudio Manager application.
Q: Will Pro Tools|24 MIX, Pro Tools|24, Digi 001, or Audiomedia III hardware work? I can't find them listed under supported systems. A: Pro Tools|24 MIX, Pro Tools|24 (d24 card), Digi 001, and Audiomedia III hardware have not been tested with Mac OS X 10.4, and there is no version of Pro Tools for Mac OS X 10.4 that supports this hardware. While you can try the Digidesign CoreAudo Driver with these discontinued systems, they may not work.
Q: What about compatibility with Mac OS X 10.3 'Panther' and 10.2.x 'Jaguar', with or without Pro Tools installed? A: The Digidesign CoreAudio Driver for Mac OS X 10.4 'Tiger' has not been tested with Mac OS X 10.3 or 10.2. We recommend that you use the correct version of the driver for your version of Mac OS X.
The Digidesign CoreAudio driver version 6.9 for Mac OS X 10.3.x can be downloaded here:
The Digidesign CoreAudio driver version 6.1.2 for Mac OS X 10.2.x can be downloaded here:
Q: What OS X applications work with the Digidesign CoreAudio Driver v7.0? A: With a few possible exceptions, any CoreAudio-compatible application will work with the Digidesign CoreAudio driver. The following third-party CoreAudio-compatible client applications have been tested with the Digidesign CoreAudio Driver v7.0:
Ignition Pack
Ableton Live 4.1x
Reason 3.04
Cubase SX3
Apple GarageBand 2.0.2
Apple iLife v5
Apple Quicktime 7.x
RealOne 10.x
Roxio Toast with Jam 6.x
See the CoreAudio Read Me (42 included with download) for additional information and known issues.

Q: How can you avoid distortion and audio sync errors when using Logic Audio with the Digidesign CoreAudio Driver? A: In our testing, we found that Logic will not play audio properly through the CoreAudio driver until you go into the driver preferences, and manually reset the buffer size to another setting (it defaults to 512, and it can be switched back to 512, but it needs to be set to another value first). if you don't do this, Logic plays the file back with distortion and you will eventually get an audio sync error. Once you've manually changed the buffer size, this problem goes away.
Q: How do you configure Roxio Toast or Jam to use the Digidesign CoreAudio Driver? A: In Roxio Toast 5.2 or Jam 5.01, set the Sound Out to Mac OS X Audio HAL. Jam v6 allows either Mac OS X Audio HAL or Digidesign HW. Toast v6 will automatically default to whichever hardware is selected in the Sound control panel.
Q: Is there still an 'opt-in' list? A: No. Because of its ability to work with multiple clients, the Digidesign CoreAudio driver no longer requires an 'opt-in' list. To exclude applications from access to the Digidesign CoreAudio driver, press and hold down the Shift key when lanching an application. Please see the Digidesign CoreAudio usage guide for more information.
Q: What are the limitations of the Digidesign CoreAudio Driver? A: As listed in the Digidesign CoreAudio Read Me:
The multi-client CoreAudio Driver cannot be used to preview sound files in Macintosh Finder. When you view a sound file Mac OS X Finder window with files displayed by columns, a preview bar is displayed next to it. This preview bar lets you audition the sound file. The sound will always play back though the Macintosh’s built-in audio controller (through the Macintosh’s speaker or headphone jack). However, if you double-click a sound file, the QuickTime application will launch, and can use the multi-client Digidesign CoreAudio Driver for playback.
The multi-client Digidesign CoreAudio Driver cannot be used for playback of System Sounds.
Installing the Standalone Digidesign CoreAudio Driver v7.0
The download includes a complete installer application. Double-click on the downloaded Mac OS X Disk Image to mount it on your desktop, then double-click the installer.
The Digidesign CoreAudio Driver can be installed as a stand-alone driver on systems that do not have Pro Tools installed.
To install the Digidesign CoreAudio Driver 7.0 Without Pro Tools:
From the link below, download and expand the Digidesign CoreAudio 7.0 installer
Double-click on the Install CoreAudio file.
From the pop-up menu, choose the default Easy Install
Follow the on-screen instructions to install the Digidesign CoreAudio Driver.
When the installation is complete, quit the installer and restart your computer.
The installer places the file named Digidesign CoreAudio.plugin in this location:
/Library/Audio/Plug-Ins/HAL
The Digi CoreAudio Manager application is installed on your hard drive here:
/Applications/Digidesign
Previous versions of the Digidesign CoreAudio.plugin and the Digidesign CoreAudio Setup application are removed by the installer. The CoreAudio Usage Guide and CoreAudio Read Me are installed here:
Applications/Digidesign/Documentation/Drivers/
Removing the Digidesign CoreAudio Driver v7.0
To uninstall the Digidesign CoreAudio Driver:
From the link below, download and expand the Digidesign CoreAudio 7.0 installer
Double-click on the Install CoreAudio file.
From the pop-up menu, change Easy Install to Uninstall
Click the uninstall button to remove Digidesign CoreAudio files from your computer
To manually uninstall, remove the 'Digidesign CoreAudio.plugin' file from the following location on your hard drive: Library/Audio/Plug-Ins/HAL
Download Standalone Digidesign CoreAudio Driver 7.0 Installer
for Digidesign Hardware on Mac OS X 10.4 (Tiger)
11.7 MB Mac OS X Disk Image (.dmg)
Previous Version
Only for Digidesign hardware on Mac OS X 10.4 (Tiger) without Pro Tools installed
10.6 MB MacBinary (.bin) encoded format, decodes to Mac OS X Disk Image (.dmg)
Digidesign Mbox 2 Driver Mac El Capitan
DIGIDESIGN, AVID and PRO TOOLS are trademarks or registered trademarks of Digidesign and/or Avid Technology, Inc. CoreAudio is a trademark of Apple Computer, Inc. All other trademarks are the property of their respective owners.
More Information:
Digidesign Downloads | Digidesign Customer Service | Digidesign Technical Support
0 notes
Text
Code Blocks For Macos Catalina

Games For Mac Os Catalina
Install Mac Os Catalina
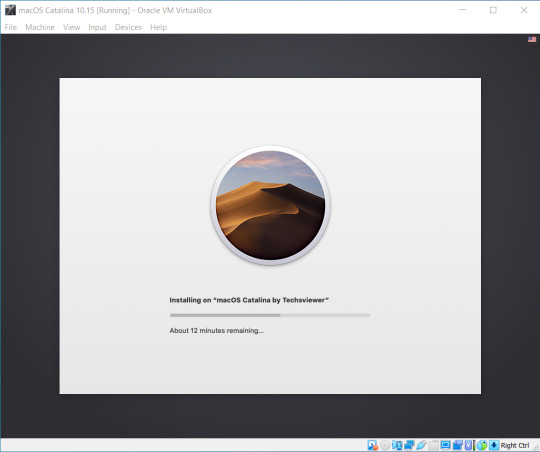
With the release date of macOS Catalina, 10.15 Xcode 11 beta also released. At the current time to test macOS Catalina on VirtualBox or VMware Workstation. Besides that, if you are a developer to develop any kind of App for macOS or Windows. But the bad news there are different tools for Windows Microsoft to develop any App, but Xcode is not available for Windows. Because of the software which we install on macOS, we can’t install on Windows. Also, most of the developers who develop Apps are interested to use the world number developer tool XCode. Unfortunately, they are a Windows user and the XCode app isn’t exist for Windows. Now worries certainly we taken out the solution to install XCode on Windows. Don’t be frustrated at this point that you can’t install XCode on Windows.
Launch Parallels Desktop. From the File menu, choose New to open the Installation Assistant. Yes, the macOS version was officially released at the end of November. Only the the US English version was released. So on the download pages for both the home (retail) version and the Education version, if you select the macOS download and English, you will get the new Scratch-based software. – David Lechner Dec 3 '19 at 0:12. Please note that you can still run mBlock 3 desktop versions on Windows 7+ and macOS under Catalina 10.15. After over one year of hard work, mBlock 5 now not only supplies all the needs that are met in mBlock 3, but also updates with many new features. So we would like to recommend you mBlock 5 for teaching or learning coding.
There are multiple ways that you can install XCode on Windows with a platform. To get started you need some effort to access XCode on Windows. As I mentioned for you with the release date of macOS Catalina Apple release XCode 11. Indeed XCode 11 includes interesting features. Like SwiftUI, MiniMap, Rich Documentation, Swift Package Manager, Inline Diff, Transform iPad Apps to Mac, Debugging and Simulators. However, XCode with its significant features is available now in the Mac App Store. If you don’t have a Mac computer to install XCode on that. Then you can install on the guest operating system of macOS on VirtualBox or VMware. Before that, you have to install macOS Catalina on VMware or install macOS Catalina on VirtualBox. Follow the full instruction on how to install XCode on macOS Catalina 10.15 on Windows PC.
XCode 11 latest version includes the following new features
SwiftUI: This year one of the latest announcements for Xcode 11 is SwiftUI, the best option for creating layout easily with swift codes. However, SwiftUI shows us the real interface of an App. Adding animations and stuff has gone easy with SwiftUI.
MiniMap: The beautiful look of XCode 11 is on Minimap that appears on the left-handed of the window. It allows the developer to quickly go to the specific part of the coding. This feature is available in some other editor software but newly added to XCode 11.
Rich Documentation: This part of the feature in XCode 11 looks awesome. Also, the mark hyphen looks better with bolder text. That allows more text to be visible on the screen, it can give a positive effect.
Swift Package Manager: Waiting is enough, to add the third-party libraries independencies. With the release of XCode 11 introduced a separate built-in manager for XCode. To have this feature go to Swift Packages, Add Swift packages.
Inline Diff: XCode 11 improved to UI to show changes on each line of code based on version control.
Transform iPad Apps to Mac: XCode one of the latest and awesome feature is to turn easily iPad Apps fro Mac natively. You can do this by project navigator.
Debugging and Simulators: Now iOS Simulator is working faster then the previous version of XCode. Metal frameworks can be tested on iOS 13 and tvOS 13. iOS 13 dark theme is a game-changer, during debugging iOS it will automatically turn light mode to dark mode.
What is XCode?
XCode is an integrated environment development tool for macOS operating system. XCode is a development tool developed by Apple Inc. However, XCode is using for developing Apps, software for macOS, iOS, iPadOS, WatchOS, and tvOS. For the first time, XCode was released in 2003 for macOS users. And now the latest version of XCode version 11.3.1 and available in the Apple Mac Store. You can XCode freely from the Mac App Store for macOS Catalina. XCode is the world No1 development tool that could support, Programming language, C++, Objective-C++, Objective-C, JavaScript, AppleScript, Python, Ruby, and Swift. Certainly, XCode is one of the advanced and professional development tools for macOS Catalina and developers.

Install macOS Catalina on VMware & VirtualBox
When everything is possible like installing XCode on Windows PC. Also, you installed macOS Catalina on any Virtualization platform then install XCode on it. It is a great chance to install XCode on it. Through this line below you will get the idea on how to install macOS Catalina on VMware Workstation & VirtualBox. However, there are two separate places where you can install macOS Catalina. Whether you want to install macOS Catalina 10.15 on VMware Workstation. Or whether you want to install macOS Catalina on VirtualBox on Windows PC.
There are different virtual machine like VMware Workstation, VirtualBox, Hyper-V. But as I experienced the virtualization installation VMware & VirtualBox is perfect. Both of them are working professionally on Windows PC to run another OS as a guest operating system. The method of installation macOS Catalina on VMware & VirtualBox is the same there aren’t any differences using the VMDK File. But there are separate ways if you use the ISO File of macOS Catalina.
We have done the installation of macOS Catalina perfectly except XCode. On the other hand, you can run multiple Apps of macOS Catalina on a Virtual machine on Windows PC. However, we covered all the files plus installation to make your work easy.
Install XCode on macOS Catalina 10.15 on Windows PC
When you installed macOS Catalina 10.15 on Virtual machine. Then Power on the virtual machine. When you entered the macOS Catalina window click on the Apple Mac App Store. Once the App Store opened on the left-handed search bar type XCode and hit enter.
Type XCode
Once the XCode opened click on Get option
Click Get
When you clicked on Get, the install button will appear so click on it
Games For Mac Os Catalina
Now you will be required to login with your Apple ID to install XCode. Enter your Apple ID and password then click Sign in.
Sign in with Apple ID
Wait until macOS Catalina should download XCode, for the downloading you need a nice internet connection. And the size of XCode is 7.81 GB.
Download XCode
Once the downloading finished it will automatically start installing
When the installation completed click Open
Install Mac Os Catalina
Click Open
Once the XCode launched, you will need to agree with the terms and conditions of it. Click on the Agree button then enter the password and click OK.
Enter the password
Installing the important components of XCode wait until it should complete
Once the components installed successfully, the main window of XCode will open. Now go ahead and start XCode on Windows PC.
XCode on macOS Catalina 10.15
Read:
Conclusion

That’s it enjoy using XCode on Windows PC by installing macOS Catalina 10.15 on Virtual machines. If you are in trouble of installing macOS Catalina or XCode installation process on Windows PC. Feel free to share your problem below in the comment section. We are happy about listening to your problem in the comment section.
1 note
·
View note