
sowoncosplay
SoWon Cosplay
Hello! We are Aster & Shiki - a couple cosplay team living in Northern California. Here you can find our cosplays, progress, and more! We also update here about our cosplay plans both before conventions and while we are at the con~
187 posts
Don't wanna be here? Send us removal request.
Last Seen Blogs

incasinandomi-blog
e invece niente

ben-tek-siz-hepiniz8
Einstein'ın BEYNİ

nyahoya
Untitled

prootato
Absolute

flyfishinggirl
Fly Fishing Girl
Text
Tutorial - Gadget Hackwrench - suit, ears, goggles and wrench


Imageheavy! (as pictures says more than words :))
Gadget (Rescue Rangers) was a fairly simple and fast project, just for nostalic fun. :)
Here’s a quick progress summary and tutorial for the cosplay. Hopefully this might be helpful for some of you Internet peeps out there :)
Ears
Ears were cut out of craft foam, covered in pink jersey fabric and painted with acrylics before sewn onto a head band with the goggles.

I made a simple “baloon” shape as the template-shape of the ears.


Fabric turned right side-out.


Craft foam stuck into fabric ears.

Painted with regular acrylic paint. Then hand-sewn onto head band.
Goggles
The goggles are simply play dough containers cleaned, sewn and glued onto a piece of foam, then painted and attached to a head band. (I thought I was pretty clever here ;) Sometimes easy solutions are the best!)


First layer of “regular” acrylic paint. Needed several layers for proper coverage. Centre of lids were painted black.

Tadaaa!! So lovely! :D
Suit
For this body suit I used a regular cat suit pattern, but made an inner facing through the whole suit as the fabric was slightly see through ^^; I also placed the zipper in the front in stead of the back, and made a simple collar with flicelin (is that the right english word? the stuff you iron on in between fabric to make it stiff? Ah well, you know what I mean!). I also made a simple tail out of the same fabric as the ears and sewed it onto the waist band, which is attachable with Velcro (sadly no pics of that).


First of all!! ALWAYS wash your fabric before sewing! As fabric will shrink when you wash it the first time, usually several percentages, and this might make your cosplay wonky. (And, we do want washable cosplays, right? No stinky cosplayers, please! <3)

I changed the pattern slightly so that it would have fitted legs, but be looser around the torso and butt, as is Gadget’s suit.

As I mentioned previously I also added a collar, with facing, although I sadly have no more sewing picture than these (as I made this suit in two sittings, and were on a tight schedule). Although if you have a pattern it is pretty straight forward. More or less, cut out the pieces and assemble ^^
Wrench
The wrench is made of insulation foam, which can be bought cheaply at home improvement stores. I cut the shape out with an exacto knife, sanded and covered in papier mache fallowed by wood glue before painting :)


Cut cut cut cut cut~


Pretty good sized :)
(no pics of papier mache and wood glue + sanding, sorry! T^T)

Spay painted.

Distress!! I tend to end up using my fingers, more or less just smearing paint on. Which added to the grease:y look of the wrench :)
There!
That’s all folks! :) Hope you’ve enjoyed this short tutorial, just let me know if you have any further questions! Cheers!
122 notes
·
View notes


Photo


References of my hooded cowl, as promised! ヾ(@°▽°@)ノ
I’ve already ripped away the original pattern drafting paper, but I think it’s fairly easy to understand. I excluded pictures of the lining because this pattern is huge and my table is only so big.
My hooded cowl total was 44" at its longest, so plan your fabric accordingly. Skimping on fabric makes for mediocre work.
The note in the last photo (sewing the lip of the hood to the front facing) is very important, because if you choose to wear the hood up, it’ll keep a nice drape instead of looking like you stuck your head in a stupid tube.
The cape in the picture was made with 100% polyester peachskin.
4K notes
·
View notes
Text
How to take a level in wigworking: six starting tips
Wigworking is weird! It’s intimidating to a lot of people, and one of the last skills that some cosplayers learn, even after tough things like patterning and armormaking. I have friends who will turn away from cosplays because the wig looks too challenging, or they have no clue how to tackle it. It’s really interesting thing to see now that I’ve been tapped as the new “wig person” in our cosplay group, which happened after coming in second place in Iron Wig 2015:

Here’s a secret though: a year ago I was really not that great with wigs.
The truth is, learning how to work with wigs is really no different than learning how to work with fabric or props or armor. It’s intimidating at first but something everyone can learn if you’re willing to put in the time and make a few mistakes! Here are six of my suggestions for where to start:
1) Do your research. In my opinion this is FAR AND AWAY the most important step in any attempt to improve your cosplay. And no, doing your research does not mean asking a friend how they made something before calling it a day. Read a tutorial! Watch a video! Read multiple tutorials because lots of folks have different ideas for how to make the same thing, and one may just click better with you. For instance, there are lots of ways to cover foam with hair. You should consider the pros/cons of each method, and then make your own game plan. If plan A doesn’t work for you, try plan B.
In 2014 I had no idea how to splice a wig, ventilate, make spikes, make a glued hairline, use foam cleanly, or dye with anything other than a sharpie. I did all of this stuff in Iron Wig, but only because I watched a ludicrous amount of tutorials beforehand to learn how. There are tutorials out there for just about everything, so don’t be afraid to look for them! Here’s a few big lists that I’ve come across:
Arda-wigs.com’s huge list of tutorials
Cosplaytutorial.com’s compilation
Epiccosplay’s tutorials
2) Take the time to experiment. You’ve watched your tutorials and are feeling pretty confident - but before you chop up your perfect character wig, make sure you test your theory out on a scrap wig if possible, especially if you are cutting or using glue. Nothing is more frustrating than realizing that you miscalculated and have fudged your wig, so try to keep old damaged wigs around for occasions like this.
3) Go slow. This is absurdly important and something I have a hard time with. If you are using foam or gluing, you really need to take your time, especially if you are learning. Gluing and laying fiber is unforgiving unless you are working exclusively with got2b or hairspray - once that hair is glued down it is stuck forever. It might take you three hours to glue hair over that one strip of foam, but it will look beautiful in the end. Save the breakneck speed for after you have the technique down.
4) Make sure you have enough hair. This is something I did not realize at first, and I am very careful about it now. An easy to make your work cleaner and cut down on flyaways is to make sure that ALL of your fiber reaches to the end of your spike or structure. Imagine that you are laying a spike over a cone of foam. Now imagine that most of the hair reaches to the cone tip, but some of that hair is layered and not quite long enough - some of the fiber only reaches 3/4th of the way up the cone . Because you can’t secure that shorter hair to the cone tip, it could pop loose as flyaways. It’s possible to glue every flyaway down, but this becomes harder the more complicated your shape is. Similarly, if are spending a lot of time trying to conserve hair because you may not have enough, your project is going to be tougher and potentially messier than it needs to be. Always make sure you are buying a long enough wig, or that your wefting fiber’s shortest layer is long enough for your project.
5) Invest in supplies. You need a blowdryer! You need little scissors! You need a wighead! Go get them! Just like you wouldn’t try to sew without straightpins, you shouldn’t expect to have a great time making a wig without the proper tools. Technically I’m sure you could manage, but a lot of this guide is about making your life easy so that you finish up with a good product that didn’t make you want to pull your real hair out. I would recommend purchasing all of the above, plus got2b, tacky glue, a hot glue gun, clips (duckbills are awesome), and a straight iron if you can manage it.
6) Don’t be afraid to try new projects! I really think that hesitation is what stops a lot of cosplayers from advancing their wig skills. Wigs aren’t cheap - a $40 mistake is an awful lot to stomach. Plus, with so many pre-made styles now, most characters aren’t going to require a really over the top wig so there’s not a ton of opportunities to go big and flex your wigmaking muscles. But if that character with the huge hair does pique your interest, don’t be afraid to take it on. If you give yourself enough time and do your research, you may surprise yourself with just what you can learn to make. Remember, your skills won’t advance until you’re willing to actually try to make something!
5K notes
·
View notes
Photo
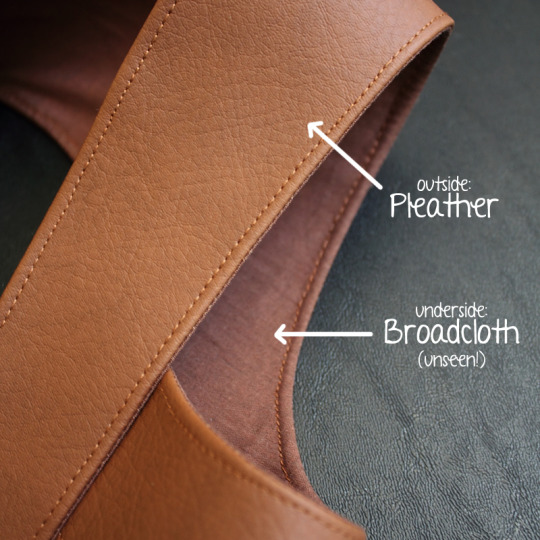
A little cosplay tip!
When making “leather” pieces for costumes, do any of you ever use pleather for both sides of the piece? For things like belts, I often used to sew two pleather pieces together, turn it inside out, and then topstitch it flat. Doing it this way made for a really bulky piece that was difficult to pass through the sewing machine for topstitching, even with the aid of tissue paper underneath. Same goes for any pleather pieces that I thought I could get away with just hemming the edges of a single layer. Pleather is sticky, and it made for some nasty stitch work! There are tricks out there to help pass the fabric under the needle more smoothly, but one thing I started doing instead is that I started treating the underside like lining, and started using cheap fabrics in matching colors instead.
For version 2.0 of my Zidane vest’s leather harness, I decided to “cheat” and use broadcloth in a matching color for the side that will not be seen (the harness will be permanently attached to my vest, so only the outer layer will be visible). Doing this not only cuts down on fabric bulk, but with the broadcloth being the side that’s down, it makes topstitching significantly easier (and cleaner!). Yeah, you can technically see a little of the broadcloth when you look at the piece straight on from the side, but so long as the color matches the pleather, you can get away with it. ;)
This might not work for everything, but it’s an option for things that people will only ever see one side of. I’ve done this with anything I can get away with. I even did this with the gun holster on my Yukio Okumura costume.
Many of you probably already do things like this, and I’m sure there are many more (and probably better) options out there, but this has worked well for me, so I thought I would throw it out there for other people to consider if they’ve never thought of doing it this way before. :)
-Pluto Knights
4K notes
·
View notes
Photo

MINI-TUTORIAL: Belt buckle for Cosplay
1. Make a stencil out of normal paper and copy it onto the styrodur*. Cut out the basic shape with a knife or jigsaw.
2. Grab rough sanding paper and start sanding to get closer to the final shape you would like to create. As you get closer to the final shape use a final sanding paper to smoothen the surface.
Be careful with your fingernailsand other sharp items. Styrodur can be damaged quite easily. The good thing about this trait, however, is that you can add details such as the stripes above with nothing but a pencil or tooth pick.
3. Take some left over Worbla’s Finest Art (or other thermoplastic) and cover the styrodur in it. Add small wholes on the inside of the buckle and push a spit in there. Fasten the spit with glue.
Shape the pin of the buckle out of a tiny piece of thermoplastic as well and wrap it around the spit. Take care to not wrap around the end of the pin around the spit too closely or you might not be able to move the pin back and forth.
Note: The step in which you cover the styrodur with thermoplastic is optional. You can also leave the styrofoam as it is and cover it with various layers of wood glue to keep it from getting damaged easily.
4. Cover the buckle in wood glue and let it dry. Sand the wood glue down to smoothen it. Repeat this step until the surface of the buckle is as smooth as you’d like it to be.
5. Paint the buckle including the pin and spit in one layer of black (acrylic) paint. This will make the golden colour which you’re going to add in the next steps more brilliant.
After the black paint is completely dry you can start applying further layers of gold colour. Depending on the opacity of your golden colour it might take up to 10 layers of paint to finish the buckle.
6. To keep the paint from rubbing off onto your costume add another layer of wood glue or coating to the belt buckle. Make sure to leave the buckle to try for another few hours until you attach it to your actual belt.
*) Styrodur is a more finely pored version of styrofoam. It can be purchased in hardware stores and is used for insulating houses.)
395 notes
·
View notes
Photo


⧠ Free! ~ Pajama Party! ⧠(︶á´ï¸¶ )zzz â§
10K notes
·
View notes
Text
Another arm sock tutorial
I finished this the other day. Thought it might be useful to folks!
Keep reading
1K notes
·
View notes
Text
DIY Pigtail Wig (Harley Quinn)
When I decided to embark on making the new Suicide Squad Movie’s version of Harley Quinn, I quickly ran into a problem. All the pigtail wigs I could find (such as Arda’s Chibi) had bangs. And SS’ Harley? Completely bang free.
So I decided to create my own pig tail wig, with a mock skin part.
To make your own you’ll need:
2 wigs in your desired color
A wig head
Fabric that matches your skin tone
Glue, I used e6000
Scissors
Clips, bobby pins, hair ties ect
A curling iron

First things first is your going to start removing wefts from where you want your hair part to be, my wig had a small skin top so I decided to continue my part down from there. I pinned my wig to my wig head (you’ll want to pin it stretched out a bit since it will loose elasticity) and removed each row of wefts in 3" widths

Now your going to have a big ol’ bald spot. Right down the center of your bald spot your going to glue down a 2" wide strip of fabric the length of your desired part


Now starting in the center, your going to glue down three or four rows of wefts, going VERTICALLY down the skin tone fabric. You are going to glue the wefts down so that the hair is laying in the opposite direction that you want it to go. Because, like in the second picture above, you’re going to fold the wefts over

So, once your rows of wefts have been glued down, and you have waited a few hours to ensure they’re dry, you’re going to fold the wefts over one row at a time, and use a curling iron to press the part down flat and in place. Then repeat the whole process of laying down wefts and folding over on the other half of your wig.

One half done

Both halves done.
Now once you have your center part created, you’ll want to glue some wefts on the underside of your wig to fold over the edges. This stops the ugly flesh tone band of the wig from showing and ruining the look.
Once that’s all done its onto the fun of styling some bouncy pig tails! If you use this tutorial for any of your cosplays, please tag me in photos! I’d love to see!
Here’s a few pics of my pigtail wig a la Harley Quinn:


1K notes
·
View notes
Note
I don't think this is in your faq, if it is I am so sorry but I was wondering how you made/where you got your terezi and dirk glasses and shades, they look really hella!
kkgo357 nope it’s cool, and thankss i put so much goddamn time into the terezi glasses hahah, dirk’s were a bit quicker thank god
my tz glasses are actually made from lenses i popped out of these dollar store clown glasses, and sanded the fuck down BY HAND until they were a shape i liked better. it took days. 10/10 would not recommend. i then got my dad to drill holes in the plastic and attached them to frames i got off of dollar store reading glasses which didn’t have frames around the plastic lenses.

of course, feel free to use whatever clearish red plastic you can get your hands on, or even like fucking cellophane or something if you have a pair of glasses with frames that are a good shape and you just want something for the inside bit.
the dirk glasses i made by taking some thin clear plastic and sticking car window film on both sides (of which you can get a huge roll that you will never finish like ever on ebay for like 10 bucks. ayy). the clear plastic i got off of a piece of packaging over christmas, and honestly i was having trouble finding clear plastic before then, so like rly just like scrounge around and see what you can find.

then you just wanna cut it into the triangles shape, do each triangle separately if you’re like me and can’t find a big enough piece of plastic to do it in one, then do the same thing as with the tz glasses and attach the frames of some reading glasses without frames around the lenses. and because the lenses are just one big lens, i stuck the nosepiece to the back.

*jazz hands*
80 notes
·
View notes
Text
so you wanna make a tattoo sleeve???
YO so i’ve been getting a few questions about how i did my chloe tattoo sleeve so i’ve decided to make this tutorial for all you beautiful people

Keep reading
3K notes
·
View notes
Text

Corsets in cosplay are awesome, so we wanted to make a crash course tutorial! There’s several reasons you may want to incorporate a corset or waist cincher (otherwise known as an underbust corset) into your next costume:
They help keep fitted bodices from buckling or wrinkling
They’re prevalent throughout much of history, and so often necessary when cosplaying certain characters
Costumes from different eras require different silhouettes, which historically accurate corsets can help achieve.
Many modern-era characters wear them (Mami, Elizabeth, etc)
They’re flattering! Corsets are designed to reduce the waist and support the bust, and for anyone not gifted with a natural hourglass figure, they’re a great cheat.
(Note: Corsetry construction is very personal and many people have different methods of construction. This is how I make all our corsets; however there’s many other “right” ways of doing it. If you’re interested in more info check out foundationsrevealed.com)
To get started, you’ll need the following:

Keep reading
6K notes
·
View notes
Photo


COSPLAYERS!
CLEAN YOUR HOT GLUE GUN!
Plug it in, get it warm, then ball up some aluminum foil and wiped off all the glue. Careful not to do it for to long or the foil will heat and make your fingers hot.
CLEAN YOUR IRON!!
Lay down a towel on your ironing board, then a dryer sheet. Iron the dryer sheet! TA DA!!!!
Hey guys! I saw these on pinterest and thought I’d share!! SAVED MY DAYYYY, you know my hot glue looks TERRIBLE, and my iron had sticky paint and glue on it, ahahah!
8K notes
·
View notes
Photo


If you would like to see more, please check out my facebook at https://www.facebook.com/LadyCels
You can view the full sized tutorial HERE .
11K notes
·
View notes