
Hello! This is Regina G. Welcome to a digital portfolio of my project work for MATH 128 - Mathematical Design
Don't wanna be here? Send us removal request.
Statistics
We looked inside some of the posts by spring24mathdesign and here's what we found interesting.
Average Info
Notes Per Post
0
Likes Per Post
0
Reblog Per Post
0
Reply Per Post
0
Time Between Posts
24 seconds
Number of Posts By Type
Text
4
Last Seen Tumblr Blogs


Fun Fact
The Tumblr app for Google Glass was released on May 16, 2013.
Text
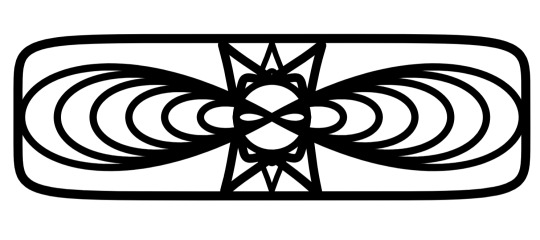
Project One: "Jawbreaker"
For our first project, we were tasked with creating a drawing "based on a family of related functions." With a little help from my partner Rayna, I came up with "Jawbreaker":
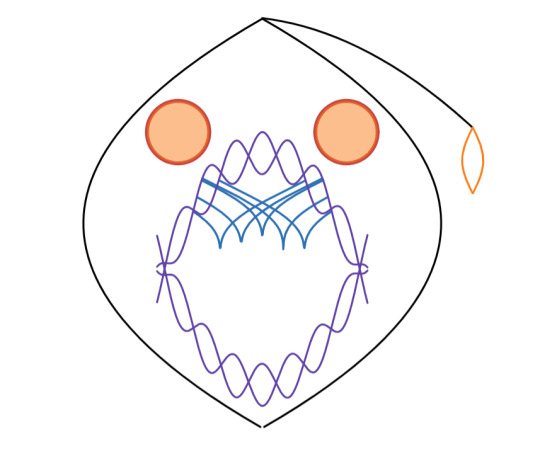

This was my first attempt at seriously using the AxiDraw for a project bigger than two simple graphs. It was a little tricky trying to get every line in the place where I wanted them, but for what it is + my personal limitation of "use only the methods and functions we learned at the time," I think it came out well! I would say that most viewers of the image will know what it is and where the inspiration lies.
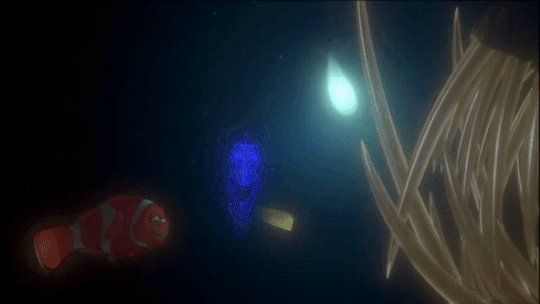
The Inspiration: Anglerfish
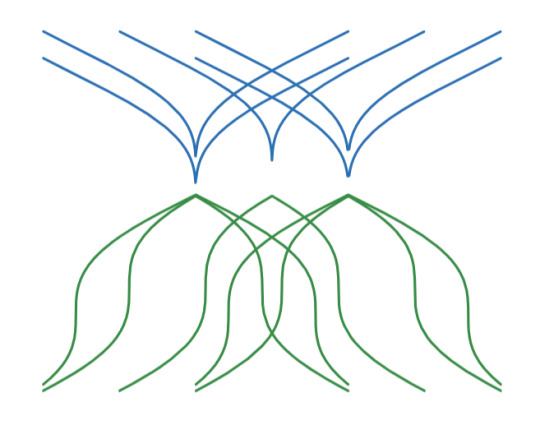
Following the Double Diamond method of creation, I came up with three different ideas, all of which built upon the same cluster of blue curves:
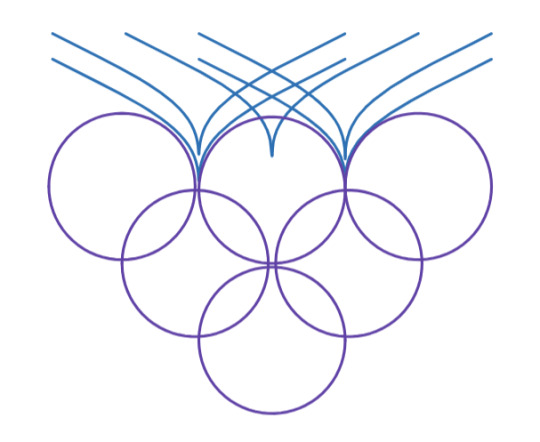
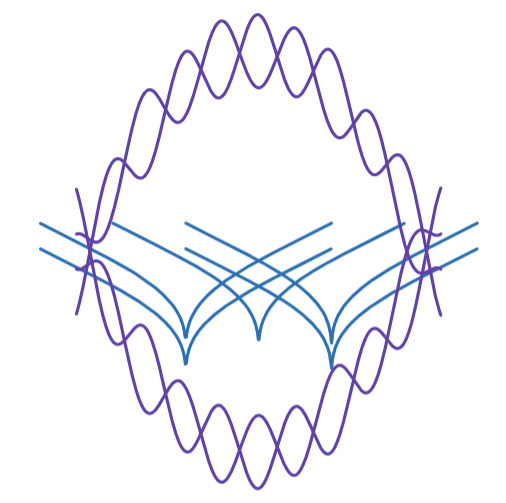
My partner Rayna had taken one glance at "Braces" and imagined an anglerfish's large jaw opening up to take a bite of unsuspecting fish. I frankly had no idea where I would proceed once I had these three ideas, but once Rayna showed me the comparison, my mind was set. I immediately thought of the anglerfish scene in Finding Nemo and set out to emulate that empty-eyed horror from the movie.
The majority of the math used in this first project was very translation heavy. Translations were all I knew at the time when it came to configuring the graphs around my scene. As we moved forward with techniques in the semester, translations would end up falling out of use in most of my works.

Using the AxiDraw
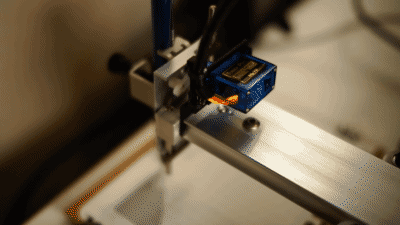
By this point, I had gotten comfortable using the AxiDraw but with how many colors I intended to use in the finished product, I was worried about how I would switch out markers.
I had originally tried pausing the machine like I saw in class when we were first learning about the AxiDraw, but I couldn't figure out how to set it back to the home corner. I thought that restarting the process meant beginning a new plot without the pen being at home corner. The machine proceeded to emit a loud noise that I quickly panicked at.
(You can actually hear me talking about my Pausing Incident in the video, hehe.)
Rayna, on the day of our joint AxiDraw work, suggested that I hide the layers (graphs) that I didn't need plotting, use one marker for the whole process, switch out the marker once the machine was done, and make the next needed layer visible. This trick saved me time and all the panicked trouble.
All in all, for a first project, I was pretty happy with the results! I felt like I wasn't "allowed" to use any functions that weren't aligned with the content we were learning in class, but when I found that this wasn't the case, I allowed myself to branch out from just my limited knowledge and take inspiration from elsewhere.
0 notes
Text
Project Two: "Solar Eclipse"
Project Two introduced Polar Functions! The designs created by polar functions were what I envisioned I would be making in this class (think Spirograph toys!)
Similarly to the first project, I didn't have much of an idea going into it, but once the pieces started coming together I found the inspiration to call my design "Solar Eclipse":

Most of the design was created by a stroke of luck and plenty of trial-and-error exploration. For most of the Polar Unit, my practice designs had the same outward burst effect. There was just something about focusing in on one aspect of the design and then branching out that appealed to me.
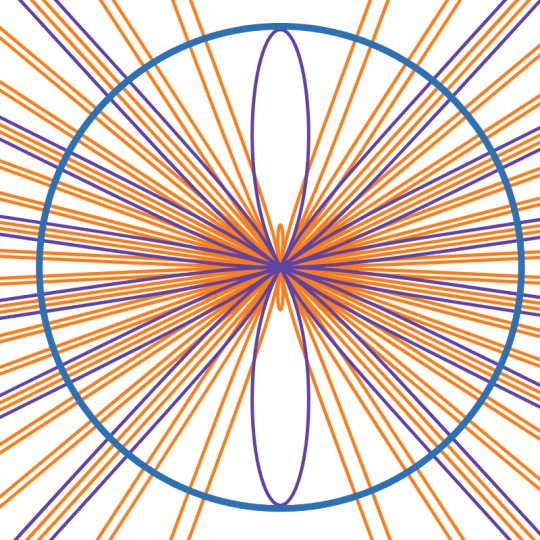
The Inspiration: The Solar Eclipse on April 8th, 2024

In truth, I did not use the eclipse as inspiration until later in the process. I originally wanted to create a sunrise/sunset scene because I had luckily found a curve that looked like clouds while trying out different function combinations. It was only after things started coming together in the design that I decided to base it off of the upcoming (at the time) solar eclipse.
Some Issues...
I had three main problems while working on Project Two.
The first of these was with setting a domain for the polar functions. Even though I had learned about the radians, I often found myself guessing-and-checking by putting random numbers next to pi and seeing if the graph was restricted the way that I wanted it to be.

Secondly, the markers that I used. Posca pens are known for their vibrancy, so I was a little disappointed that the color of the white marker came out watery. It took me more than a few times plotting the same inner ring for the marker to reach a satisfiable opaqueness which could have also put the paper at risk of tearing.

The third problem isn't one that I could have taken into my own hands. I don't know how the MakerSpace works outside of their machines and all my AxiDraw reservation times were taken up by someone else before I got to the space. I am regardless grateful that I was still able to copy the drawing twice despite the trouble.
Overall, I am happy with my outcome for Project Two! I can clearly see my growth between the first project and this one. I was still trying to get comfortable about borrowing cool-looking functions from other people at the time, but I think, even without taking ideas from my peers, this design still came out wonderful!
0 notes
Text
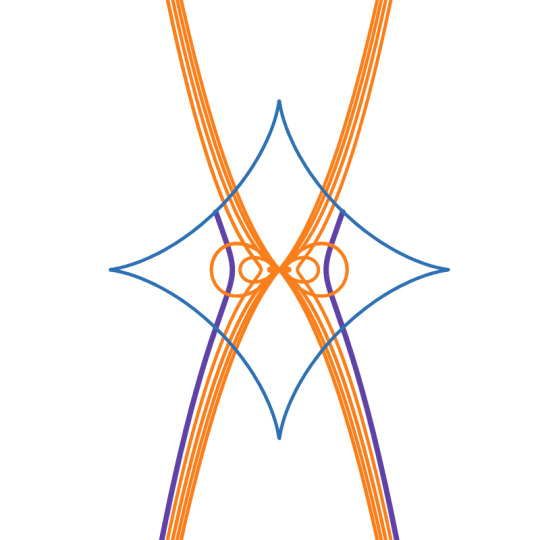
Project Three: "Sturdy"
When I had read the description of the project and came across "design and create a physical object based on parametric curves," I thought it couldn't (wouldn't!) be done. My mind flipped back to one thing: the 3D printers.
The Final Product

I did not think there would be a time where I learned how to use a 3D printer and with minimal difficulty! I was very surprised to know that the steps to using the 3D printer were not all that complicated. It was just a bunch of back-and-forth between different websites and programs that may have been the busy part.
The First Attempt
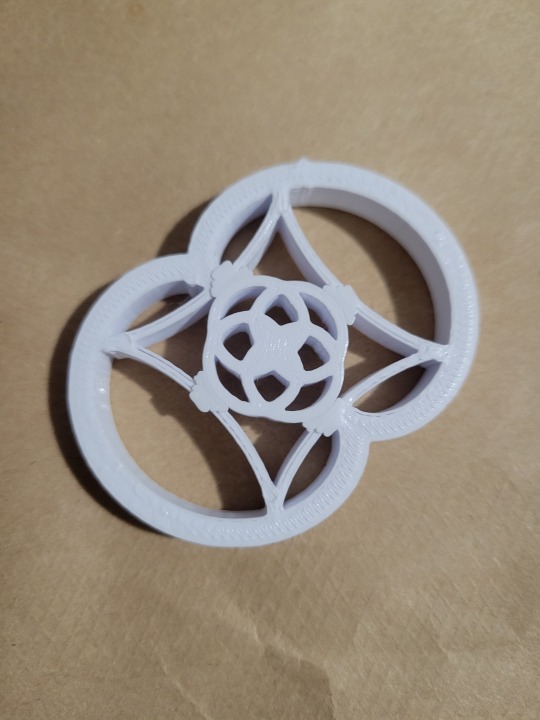
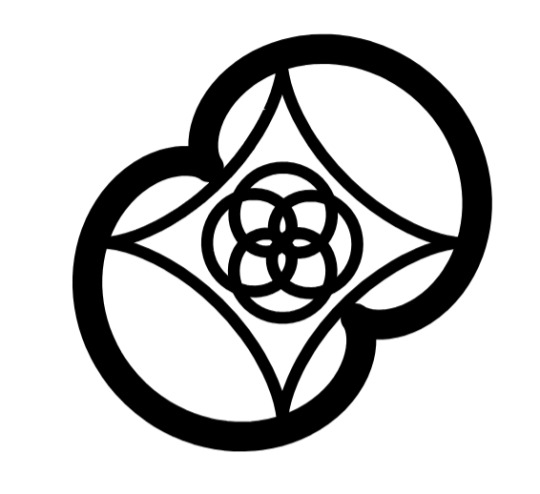
As with all projects, there has to be a first try. This was mine! I liked the way that it looked (not that I don't still like it), but I had forgotten a key component which was making sure all the lines connected. You can see that the middle part of the design was not connected to anything that would tether it to the whole product once it printed.
I was happy to find that the design would still work (meaning it could still be together in one "piece") with the supports attached to the curve in the middle. However, the supports weren't on the original graph. So, instead of building off of this design, I decided to start from scratch.
Using the 3D Printer
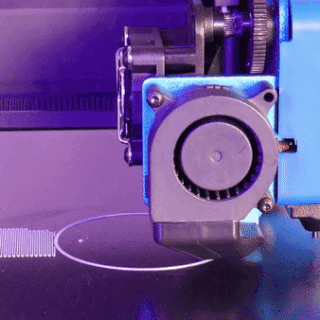
(The specific printer used may not be the one showcased above)
I was intrigued by the printers ever since we had orientation for the MakerSpace, but I never thought we would get to use them! Having never touched a 3D printer before, I always assumed that there was a lot that went into the process and that it would take a
Very.
Long.
Time.
But thankfully, that wasn't the case for me! There was no coding aside from the work done on Desmos, and while I didn't use Tinkercad to further my design (which I would like to for any future personal projects!), moving from .SVG to .STL to .UFP was not a problem!
The Desmos coding itself was more so a list of ideas that I wanted to try out while attempting to keep everything connected in the design. I figured that I would be able to set my domain for the product when I got to the screenshotting phase, but I ended up using the Lamé Curve as the outer border for the piece.

I had my worries at first about finding the time to print. Unlike the AxiDraw, you couldn't reserve a printer for yourself. Without reservations (which, even with them, the AxiDraw felt like a "first come, first served" deal anyways), I thought that the usage demand would be high and that I would never get the design printed. I was pleasantly surprised to find that there was always at least one printer free whenever I walked into the MakerSpace.
Not only that, but my prints were all small, hand-sized projects. Both designs took less than twenty minutes to print! That meant that I could walk into the library with my friends, travel downstairs, set my things down, prep everything in the MakerSpace, set the project to print, leave to eat, and come back to retrieve the finished product before I had to head to my next class! All the struggle with time management surrounding the second project was completely absent with the third project.
In the end, I really enjoyed Project Three! The process was quick and easy, but my only regret is not making something bigger. There were some really cool results that we got to see in class (the gears and duck coaster were some of my personal favorites!), so I wish I had thought to go bigger! Trust that I will be using this knowledge of 3D-printing to create my own personal pieces (I'm looking at you, Epcot Ball).
0 notes
Text
Welcome! (Master Post)
To the strangers who have stumbled across this account, hello! To the ones who have a general idea of what they are about to see, I hope you enjoy it here!
My name is Regina, and this is my digital portfolio for the Spring 2024 course MATH 128 - Mathematical Design! This is not your ordinary math class, nonono! This is a course where math and art come together to create a new and unique experience that only a choice few on the Internet can claim to know the tips and tricks for.
I had come into this class joking that I would finally get to learn how to draw something like Hatsune Miku on Desmos, but what I learned here was even more than that. I have learned a few ins-and-outs about Desmos coding to create works of art that I am proud to call the fruits of my labor!
(Although I may still try to draw her once all is said and done coughcough)
Below will be links to all three of my projects in order (I doubt you will need to access them from here, but this is just to keep things organized!):
Project One: "Jawbreaker"
Project Two: "Solar Eclipse"
Project Three: "Sturdy"
(Be sure to read any ALT text for more insights!)
0 notes