
Don't wanna be here? Send us removal request.
Statistics
We looked inside some of the posts by suiteblog653 and here's what we found interesting.
Average Info
Notes Per Post
1
Likes Per Post
1
Reblog Per Post
0
Reply Per Post
0
Time Between Posts
17 days
Number of Posts By Type
Text
11
Last Seen Tumblr Blogs


Fun Fact
Tumblr has a low social media market share in South America.
Text
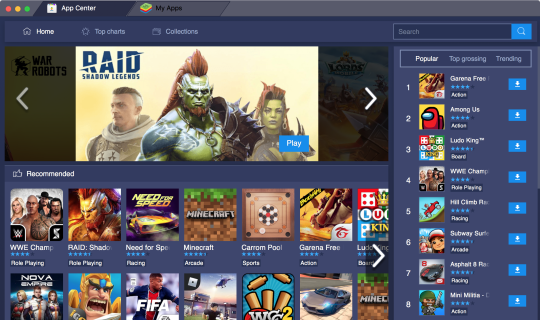
Cod Mobile Not Working On Bluestacks Mac

Bluestacks Call Of Duty
Bluestacks Call Of Duty Mobile
Call Of Duty Mobile Keyboard
Cod Mobile Not Working On Bluestacks Mac Download
Cod Mobile Not Working On Bluestacks Mac Version
BlueStacks is one of the best Android emulators available today . Although it has a high requirement for installing computer configuration, this tool is one of the stable software, and is considered to be the most perfect of the emulators available on the market today.
Why do you want to run PUBG Mobilke on laptop in the first place when there is a desktop version? Its not working with Bluestacks because certain apps like Netflix, Pokemon Go, Mario Run, Banking apps and may be PUBG need a device certified by Goo. In future if you are not happy with running BlueStacks on your machine than you can read here on how to uninstall BlueStacks completely. Bluestacks Android Emulator For Pc And Mac. BlueStacks probably occupy a decent amount of RAM on your system. So depending on the RAM you have in your computer, the BlueStacks may run slower or faster. Sure, you can download Call of Duty Mobile on other Android emulators like Bluestacks, but only Gameloop has the official backing of Tencent. Judging by how well optimized PUBG Mobile is for the. Download Bluestacks. MEmu App Player. MEmu is one of the lightest emulators on the market. Less resource-intensive than Bluestacks, it did not require any configuration on our part to run Call Of.
Download Bluestacks for free here
Free download BlueStacks for Mac
However, recently many emulator users on computers (especially Windows 10 ) have complained that they have some errors related to the BlueStacks emulator on this new operating system. Specifically, BlueStacks cannot work.
Fix BlueStacks error on Windows 10
BlueStacks error does not work on the computer, there are many causes, but the fix can be raised a few ways as follows:
1. Ensure correct system requirements
Before embarking on finding and fixing errors, make sure that your computer has met the configuration requirements of a computer that can install and run BlueStacks well, such as:
Bluestacks Call Of Duty
Minimum RAM of 2 GB.
Partition the hard drive at least from 4 Giga bytes.
The graphics card has been updated to the latest version.
BlueStacks is run under Admin.
2. Regularly update the screen driver
The graphics card is one of the main causes of most errors when running Android emulation software on the computer ( Droid4X , Windroy , Nox App Player ..). That's why when installing these emulators, the requirements are relevant and the video card must be updated.
For computers using NVIDIA, just right-click on the NVIDIA icon located in the system tray, then select the Check for updates item on the Menu so that it runs automatically.
If you are not using NVIDIA, you can update yourself through the built-in Windows feature. But best, if you have no experience, use third-party software such as DriverEasy , Easy Driver Pro , Driver Detective or IObit Driver Booster .. to find and download the missing driver for your computer.
3. Run BlueStacks in Compatibility mode

If the above two methods do not work, you can try the third method below, which is to try to launch the software on Windows 10 in Compatibility mode.
Step 1: From the main interface of the screen, right-click on the icon of BlueStacks and select Properties .
Step 2: A new window appears, left-click and select the Compatibility tab , then click on Run compatibility troubleshooter .
Step 3: The Program Compatibility Troubleshooter interface appears, select Try recommended settings .
Step 4: Left click on the Test the program .. section and restart BlueStacks to see if it works again?
4. Set permissions to run BlueStacks on the computer
Although this is a rare occurrence, without this permission, some security settings will prevent BlueStacks from working on the computer. The test is very simple as follows:
Step 1: Right-click on the icon of the BlueStacks emulation software, select Properties as above.
Step 2: The BlueStacks Properties window appears, left-click on the Security / Edit tab ..
Step 3: In the Group or user names box , select your username, then tick Full control in the Allow column (picture below). Finally, click Apply and then OK .
5. Uninstall and reinstall BlueStacks
If all else fails, the last way for you is to remove this software on your computer and install it again.
Step 1: From the desktop, press Widows + X to open the Power User Menu and then click on Programs and Features.
Step 2: An interface as below appears, right-click on BlueStacks App Player and Uninstall it.
A small message appears asking you:
' Are you sure you want to uninstall BlueStacks App Player? - Are you sure you want to delete BlueStacks or not?', Select Yes to agree.
' Do you want to keep all the apps and data của? - Yes retain all data are on the current account BlueStacks not' select No .
However, unlike the previous operating systems, to be able to wipe this software on your computer, we need to do the following additional tasks:
Go to C: Program Program Data and delete BlueStack Setup .
Next, follow the path C: Program Files (x86) BlueStacks , C: Program Files BlueStacks , C: ProgramData BlueStacks and delete BlueStacks Setup items (if any).
Type the 'BST' keyword into the Search box in File Explorer and press Enter.
Open the Run dialog and enter ' % temp%' and delete all the files in this file.
In addition, you can use some computer cleaning software like CCleaner or professional computer software removal tools like Revo Uninstall , Your Uninstaller , or Advanced Uninstaller Pro , IObit Uninstaller .. to perform.
NOTICE :
For each of the above methods, after doing this, you need to restart your computer before checking the results.
How to fix Windows 10 Anniversary update error with BlueStacks?
If you’re receiving an error with Windows 10 anniversary edition update while using BlueStacks, try disabling the Hyper-V Hypervisor under “Windows Features” to resolve this issue. Here’s how:
Go to Control Panel → Programs → Turn Windows features on or off, un-check Hyper-V settings, and click OK.
Windows Feature will apply the changes and prompt for PC restart. Please restart the system to apply changes.
Launch BlueStacks app player and it should work smoothly now.
Download the latest version. Still having problems? Open a support ticket here.
If you found this article helpful, link to us and share them with others. Have questions or concerns? Chime into the comments below!
I wish you successful implementation!
Call of Duty has become one of the legendary and most entertaining shooter games of the moment. It started as a PC game, but later versions came out that also work for Play Station (Call of Duty Warzone) and for mobile devices, Call of Duty: Mobile.
The latter was one of the most downloaded games ever at its launch, and has been a sensation ever since. Gamers prefer this version over others, and play it on their computers , bringing some errors that we will explain how to solve.

What is Bluestacks in Call of Duty: Mobile?
The millions of users or players around the world of Call of Duty, or CoD, enjoy the game in their way, their time and however they want. We are talking about one of the most incredible games in the history of video shooters.
When the version for mobile phones came out, and it was already possible to obtain it in the stores of their operating systems, Call of Duty: Mobile (so called) became the hobby of millions of users. The reason for this was not having to sit in front of a computer to play, but they could do it lying in bed, on a sofa or wherever they wanted.
As the months went by, as with many first-person video games, Call of Duty: Mobile began to seem uncomfortable for some players; It wasn’t that easy to operate the game with your thumbs, or at least it wasn’t like you could do it on a PC.
Bluestacks Call Of Duty Mobile
Therefore, a well-known Android emulator was used for computers. Many Call of Duty: Mobile lovers started playing from their computers to have a better experience; and this was possible thanks to Bluestacks, the mentioned emulator .
Call of Duty Mobile does not work and closes on Bluestacks
This transition between devices obviously, like everything else in the IT area, would have its short or long term implications .
When a change is made to a game, one that is drastic and sudden, regardless of whether the change was caused by the game developer, there will always be errors, which are sometimes minimal, but other times they simply make it impossible to continue playing. .
Call Of Duty Mobile Keyboard
To download the game on the PC, having installed and managed the Bluestacks emulator, all you have to do is download Call of Duty: Mobile through the Play Store , as is done from the mobile device. If you can’t download it, don’t worry, solving this problem is very easy.
After having it ready, there may be other errors , which can also happen on the phone, such as the black screen error in Call of Duty: Mobile.
And so, many more errors can be generated, and even more when the game is run from an operating system emulator. Therefore, the problem in question, ‘CoD: Mobile does not work and closes on Bluestacks’, has to do with the used versions of the game and / or the emulator.
How to fix the problem of Call of Duty: Mobile not working, closing on Bluestacks? Solution
Like everything in the world of video games, this problem, where Call of Duty: Mobile does not work and closes in the Emulator, has a solution, which can be tedious but at the same time quite easy to solve .
Knowing the causes, and with a little patience, we are going to teach you how to solve this problem, so that you have the game working optimally and you continue to have the most fun. https://suiteblog653.tumblr.com/post/661737231982133249/bluestacks-old-version-mac.
When this error occurs, we just have to remember that we use an emulator, and like operating systems, it has its versions in updates.
Maybe the problem you have is this, that is, you have an old (not compatible) version of Bluestacks and therefore the game will not be able to run. The solution is then to download the latest version of Bluestacks and thus, surely you can continue playing.
Cod Mobile Not Working On Bluestacks Mac Download
If you tried this, or you already have the latest version of Bluestacks, and CoD: Mobile doesn’t work, you have to uninstall and reinstall the game with its latest version. Solved.
Cod Mobile Not Working On Bluestacks Mac Version
Related Posts:
0 notes
Text
Os X El Capitan Iso
These advanced steps are primarily for system administrators and others who are familiar with the command line. You don't need a bootable installer to upgrade macOS or reinstall macOS, but it can be useful when you want to install on multiple computers without downloading the installer each time.

Nvidia Drivers For Mac Os X 10.9. Apt-get For Mac Os X Terminal. Os X El Capitan Download. Download Mac Os X El Capitan Iso For Virtualbox Windows 10. How to download the MAC OS X EL Capitan ISO– As we all know that Mac OS of Apple is the premium Operating System having the most optimum technology.I always prefer Mac over windows just because. Mac OS C EL Capitan 10 11 ISO Download,mac os x el capitan iso download,mac os 10.11 el capitan.rar download,el capitan 10.11.6 download dmg,el capitan 10.11. Finally, after about 25 more minutes, OS X El Capitan should be successfully installed on the target drive. Boot into El Capitan via the USB Device. After the second reboot, boot from the USB device once again, but this time, select Boot OS X from El Capitan, and select verbose mode. Press Enter and cross your fingers again. If all goes well.
Install OS X El Capitan 10.11.6.iso. Install OS X El Capitan 10.11.6.iso (7.14 GB) Choose free or premium download. Mac os x el capitan 10.11.6 dmg the best version of El Capitan series that comes with a lot of improvements and features. Mac os x el capitan 10.11.6 intel usb install is released on 2016, and it’s a multilingual version that works on Intel CPU’S only. This gorgeous version does not require any special hardware it only needs 2 GB of RAM and 8 GB of disk space, and also a good GPU.
What you need to create a bootable installer
Os X El Capitan 10.11.6
A USB flash drive or other secondary volume formatted as Mac OS Extended, with at least 14GB of available storage
A downloaded installer for macOS Big Sur, Catalina, Mojave, High Sierra, or El Capitan
Download macOS
Download: macOS Big Sur, macOS Catalina, macOS Mojave, or macOS High Sierra These download to your Applications folder as an app named Install macOS (version name). If the installer opens after downloading, quit it without continuing installation. To get the correct installer, download from a Mac that is using macOS Sierra 10.12.5 or later, or El Capitan 10.11.6. Enterprise administrators, please download from Apple, not a locally hosted software-update server.
Download: OS X El Capitan This downloads as a disk image named InstallMacOSX.dmg. On a Mac that is compatible with El Capitan, open the disk image and run the installer within, named InstallMacOSX.pkg. It installs an app named Install OS X El Capitan into your Applications folder. You will create the bootable installer from this app, not from the disk image or .pkg installer.
Use the 'createinstallmedia' command in Terminal
Connect the USB flash drive or other volume that you're using for the bootable installer.
Open Terminal, which is in the Utilities folder of your Applications folder.
Type or paste one of the following commands in Terminal. These assume that the installer is in your Applications folder, and MyVolume is the name of the USB flash drive or other volume you're using. If it has a different name, replace MyVolume in these commands with the name of your volume.
Big Sur:*
Catalina:*
Mojave:*
Bluestacks mac requirements. High Sierra:*
El Capitan:
Bluestacks old version mac. * If your Mac is using macOS Sierra or earlier, include the --applicationpath argument and installer path, similar to the way this is done in the command for El Capitan.
After typing the command:
Press Return to enter the command.
When prompted, type your administrator password and press Return again. Terminal doesn't show any characters as you type your password.
When prompted, type Y to confirm that you want to erase the volume, then press Return. Terminal shows the progress as the volume is erased.
After the volume is erased, you may see an alert that Terminal would like to access files on a removable volume. Click OK to allow the copy to proceed.
When Terminal says that it's done, the volume will have the same name as the installer you downloaded, such as Install macOS Big Sur. You can now quit Terminal and eject the volume.
Use the bootable installer
Determine whether you're using a Mac with Apple silicon, then follow the appropriate steps:
Apple silicon
Plug the bootable installer into a Mac that is connected to the internet and compatible with the version of macOS you're installing.
Turn on your Mac and continue to hold the power button until you see the startup options window, which shows your bootable volumes.
Select the volume containing the bootable installer, then click Continue.
When the macOS installer opens, follow the onscreen instructions.

Intel processor
Plug the bootable installer into a Mac that is connected to the internet and compatible with the version of macOS you're installing.
Press and hold the Option (Alt) ⌥ key immediately after turning on or restarting your Mac.
Release the Option key when you see a dark screen showing your bootable volumes.
Select the volume containing the bootable installer. Then click the up arrow or press Return. If you can't start up from the bootable installer, make sure that the External Boot setting in Startup Security Utility is set to allow booting from external media.
Choose your language, if prompted.
Select Install macOS (or Install OS X) from the Utilities window, then click Continue and follow the onscreen instructions.
Download Os X El Capitan Iso
Learn more
Os X El Capitan Iso Torrent
A bootable installer doesn't download macOS from the internet, but it does require an internet connection to get firmware and other information specific to the Mac model.
For information about the createinstallmedia command and the arguments you can use with it, make sure that the macOS installer is in your Applications folder, then enter the appropriate path in Terminal:
0 notes
Text
Free Dvd Burning Mac Software
#1 Review of Best 3 Free DVD Copy Software
It is not a dedicated DVD copy software for Windows 10 and Mac, but it is free and open source. It works nicely to copy homemade DVDs, as no decryption is required. For DVDs that you bought from stores, such as music videos or movies, Handbrake cannot skip the copy protection to rip the media. Top 5 Free/Paid DVD Burner Software for Mac and Windows PC. Whether you are looking for an all-featured DVD burner with powerful functions, or want to free burn video to DVD, you can find your preferred DVD burning software in this part. Aiseesoft Burnova. Aiseesoft Burnova is the professional DVD burner. How to Burn DVD with Alternative to Free DVD Burning Software for Mac: Step 1 Download, install and run Cisdem DVD Burner for Mac. Step 2 Put video files to the app. Head over to the menu bar, click 'File' 'Add Files'. From the pop-up dialog box, choose the target videos you desire to burn. This software is free of cost. It allows you to burn DVD, HD-DVD and Blu-ray authoring Mac discs. It supports all kind of optical storage media and other varieties of burning hardware. It burns the data, audio, and video either on DVD or CD.
1. MacX DVD Ripper Free

MacX DVD Ripper Mac Free Edition wins the top tier place in the top free copy software review, owing to the excellent ability on conversion speed, output quality, and ability to bypass DVD copy protection:
• Rip DVD Movie to mainstream formats like MP4, MOV, M4V, MP3, AAC, and AC3 etc.
• Copy or backup DVD with original quality at maximum DVD ripping speed on Mac
• Bypass all kinds of DVD encryptions including Region Code, CSS, RCE, UOPs, etc.
In addition, with High Quality Engine and De-interlacing tech, the DVD copy freeware provides you with 1:1 lossless quality after you copy DVD to hard drive, MacBook, Windows etc., or rip DVD to MP4, MOV, M4V, iTunes, iMovie, etc. Meanwhile, it has an easy-to-use and uuser-friendly interface. No matter what kind of skill level you are in, you can copy DVD on Mac in 3 steps:
Step 1. Download DVD copy freeware and launch it on your Mac. Click 'DVD Disc' to load the DVD movie.
Step 2

. Choose the output format from the popping-up Output Profile window
Step 3. Hit 'RUN' button to start copy protected DVD on Mac. You're encouraged to check 'Safe Mode' box, which ensures you a smooth DVD copy process, though it might cost a little more longer than general model. Blue stack 2 apk game player.
2. DVD Shrink
Dvd Burning Software Free For Mac
Review: Every free DVD ripper user has a memory of using DVD Shrink just the same as every smart phone user has an experience of using Nokia. Both of them are classic. Back to DVD Shrink, this long lived free DVD copy software has been a memory for one generation as it brings an impressive DVD copy experience: free copy and shrink DVD to a better sized MP4, WMV, MOV, AVI, MKV, etc. no matter for homemade or commercial DVD.
Unfortunately, this DVD decrypter and copy program has lost its shine since May 2005. So you may find the final version of DVD Shrink you have installed is incompatible with your latest Windows 10/8 and vulnerable to a crash during the latest commercial DVD decryption and backup. The backward DVD decryption tech cannot support you to cope with the more and more complicated DVD DRM encryption tech. So it's sensible for you to consider a solid DVD Shrink alternative for DVD compression and conversion.
Free Dvd Copy Software Mac
3. IQmango Free DVD Copy Software
Free Mac Os X Dvd Burning Software
Review: It's never been the only one, but it always had a reputation for making the free DVD copy process painless, being fast and efficient, and packing powerful feature to make users free rip and copy DVDs to computer or hard drive. Aside from these, it also marvels you with its DVD movie editing feature, letting you remove unwanted subtitles, audio tracks or video episode clips at your willing.
Free Dvd Burning Mac Software Windows 10
This tool really does a great job in DVD backup. But when it comes to rip DVD to digital formats, it's seemingly falling into the shade as it only supports you to free rip DVD to MP4 and DIVX AVI formats on Windows 8/7. In case you wanna rip and duplicate DVD to MKV, AVI, MOV, AVCHD, VOB, ISO image and more video/audio formats, the world-renowned MacX DVD Ripper Pro is your desired remedy.
Free Nero Dvd Burning Software
MacX DVD Ripper Free DVD Shrink IQmango Free DVD Copy SoftwareRating★★★★☆★★★☆☆★★★☆☆PlatformmacOS (10.5-10.14) WindowsWindowsProsBypass DVD protection and copy DVD to computer, digital formats fast with HQ.Disable the DVD encryption tech from commercial DVDs.Fast speed to free copy DVDs on Windows with high quality. Editing feature as a bonus.ConsNo DVD backup mode offered like DVD to ISO image/MPEG-2 fileDiscontinued since 2005. New movies on DVD can not be copiedMP4 and DIVX AVI supported only.
0 notes
Text
Bluestacks Old Version Mac

Bluestacks Old Version Uptodown
Bluestacks Old Version Mac
Bluestacks Old Version Mac El Capitan
Bluestacks For Mac 10.11.6
Bluestacks Tweaker
Bluestacks For Mac Os
BlueStacks Old Version download free. full Version For PC/MAC/Android/Windows Xp / 7 / 8 / 8.1 / 10 / Vista . it is offline Installer and standalone setup of BlueStacks Offline Installer For 32-bit and 64-bit System . we can also download BlueStacks Torrent, Filehippo and Kickass .
Uses 40% less RAM than other platforms for a faster and smoother gaming. Download BlueStacks on your PC/Mac with the help of the available download link. After this, you have to install by clicking its.exe file. Now, open the BlueStacks. In the next step, you have to sign-in to the Google account with the aim to access apps available in the Google Play Store. Installing BlueStacks for Mac is as simple as running the DMG data. The program calls for 2GB of RAM as well as 9GB of disk room.
Can I download the old version of BlueStacks to my computer? How to download and install a previous version of the emulator on a PC? Advantages and disadvantages of old versions.
Bluestacks Old Version Uptodown
BlueStacks Old Version Download
BlueStacks Old Version Download is awesome software app player . we ca run Android APK application apps on desktop and Windows same like Smart Phone Android phone . with the help of BlueStacks Old Version App Player we can install APK android file on our Windows and Play Games , Using Whatsapp , Viber, Facebook, Twitter , Google Plus , Wechat , Imo , Telegram etc we can install all Android APK file through play store . BlueStacks Old Version is complete Android Phone in our Windows . BlueStacks Old Version is mostly used in our Windows Million of people who do have have smart phone for using Whatsapp For PC , Viber For PC , Facebook For Android, Imo For PC can easy use these Features if they install BlueStacks Old Version Download . BlueStacks Number 1 App Player is mostly used . BlueStacks 2 Version is also launched .Just install BlueStacks Offline Installer app Player put Gmail email and install all application apk games,chat with friends and family . BlueStacks Offline Installer
” How to Use Whatsapp on PC / Windows “


” How To Use Imo Pn PC“
” How to Use Instagram On PC “
so all problem solution is just install BlueStacks Offline Installer in you PC and enjoy all Android base feature sin Your system . we can using this BlueStacks Offline Installer we can audio and video call same feature as android phone , we can play android base games on PC . BlueStacks Offline Installer can also install in MAC OS X . using gamil account we cans ave all own data google automatically synchronous data and applications . we should install must Net frameWork Software it help to install BlueStacks Offline Installer . we can use BlueStacks Whatsapp For Windows 7 , Windows 8, Windows 8.1 , Windows 10 . we can
Download BlueStacks For Windows 8
Download BlueStacks For Windows 10
BlueStacks Old version have less features ad speed but you can also use it BlueStacks Old version setup file is small . BlueStacks Torrent File can also download but Torrent is not working now a days . But you can download it from BlueStacks Filehippo also . Latest version BlueStacks 2 have adavced features its is highly Compressed File . BlueStacks 2 is latest version .we can easy Root own apps. Many People do not know ” How To Use BlueStacks ” its is so easy app player . BlueStacks Offline Installer Rooted will help to run apk. there are many alternative of BlueStacks but 90 % people use BlueStacks Offline Installer . sometime when you ssytem is hanging BlueStacks is not opening so first increase the Ram and Hard Drive .
Features of BlueStacks Old Version App Player:
Add APK Files: it gives this function to download and add APK files manually by selecting add APK file. This will browse to APK files and after selecting files, they will automatically added in BlueStacks and sync with Google account (if installed).Device Usability: BlueStacks has mobile friendly engine that gives ultimate access to speaker, microphone, web camera and other device functions (e.g. Torch, Sensor). These are pro features of BlueStacks to use social apps with full features while video calling etc.
Accessory Support: BlueStacks has the ability to identify mouse cursor and keyboard binary key interception. Both mouse and keyboard devices can be used to play games, chat with friends through Skype, Facebook, Twitter and other social apps as well.
Processor Support: The developer of this application has done an awesome job with adding support for x86 and ARM mobile devices. Both of these have difference application versions as well as APK file compatibility support. BlueStacks will give 100% apps access to both machine types.
Bluestacks Old Version Mac
Run Multiple Apps: BlueStacks will transform small screen apps into bigger screen. The app player will show running apps and games into multiple tabs. So user can easily navigate or switch with them. Running multiple applications is another great profit from BlueStacks.
Bluestacks Old Version Mac El Capitan
Bluestacks For Mac 10.11.6
System Requirements For BlueStacks Old Version
Operating System: Windows XP/Vista/7/8/10
Memory (RAM): 2 GB of RAM is required
Hard Disk Space: 4 GB of free space is required
Processor: Intel Dual Core or later
Bluestacks Tweaker
BlueStacks Old Version Technical Details
Bluestacks For Mac Os
Author: BlueStacks License Type: Freeware Languages: Multilingual Product Size: 304.87 MB Latest Version: 2.4.44.6257 Filename: BlueStacks2_native.exe Product Title: BlueStacks App Player Webpage:http://www.bluestacks.com/
OS Compatibility (x86): Windows 7 32-bit / Windows 8 32-bit / Windows 8.1 32-bit / Windows 10 32-bit / Windows Vista 32-bit / Windows XP 32-bit OS Compatibility (x64): Windows 7 64-bit / Windows 8 64-bit / Windows 8.1 64-bit / Windows 10 64-bit / Windows Vista 64-bit / Windows XP 64-bit
Mirror-2: Use this for old version: Download BlueStacks Older Version (V. 2.2.24.5969, S.259.75 MB)
0 notes
Text
Bluestacks Mac Requirements

Bluestacks Mac 10.6.8
Bluestacks
Bluestacks Mac Download Among Us
Jul 28, 2021 Here are the recommended system requirements for BlueStacks. We certainly suggest (if possible) to have a machine that’s of this level so that you can have a pain-free life running your favorite Android environment. Obviously, anything that exceeds the below will only enhance the running of BlueStacks. OS: Microsoft Windows 10. In this era of mobile technology, there is hardly any person who has never used any mobile device. Among Android, iOS and other mobile devices, which makes the remarkable position. BlueStacks vs Nox Player: An In-Depth Comparison. There can be various reasons to want to use Android apps on your PC. Some simple examples can be testing apps, playing games, being habitual to the Windows interface, etc. Regardless of the reason, an Android emulator is the first thing you’ll find to run Android apps and games on your PC.
Latest Version:
Requirements:
Mac OS X 10.6 or later
Author / Product:
BlueStacks Team / BlueStacks App Player for Mac
Old Versions:
Filename:
BlueStacks-Installer.dmg

BlueStacks for Mac is the first production software that allows you to use your favorite mobile apps on a Mac. You can download apps like Angry Birds Space, Candy Crush Saga, Telegram, Temple Run 2, Evernote or Documents to Go directly into BlueStacks for macOS

, or sync the apps from your phone using the BlueStacks

Cloud Connect Android app. Basiclly this application is an
Bluestacks Mac 10.6.8
Android emulator for Mac.
Bluestacks
Features and Highlights
Bluestacks Mac Download Among Us

Android apps fast and full-screen on your Mac or tablet
Push apps from your phone to your Blue Stacks using Cloud Connect mobile app
May not work fast yet on older tablets and netbooks
Download apps from Google Play
Comes with pre-installed games and apps

Also Available: Download BlueStacks for Windows
0 notes
Text
Memory Clean 2 Mac

Memory Cleaner 2
Memory Clean 2 For Mac
Memory Clean 2 Mac
Fiplab Memory Clean
Memory Clean 2 Mac Download
测试系统:Big sur 11.2.3. Memory Clean 3下载安装教程. 安装包下载完成后,点击.pkg,按提示即可完成安装。 Memory Clean 3破解版功能介绍. Memory Clean是优化Mac内存的终极应用程序,最适合在使用内存(RAM)密集型应用程序或游戏后使用。. Memory Clean works by purging the Mac's inactive memory and is best used when you close an intensive program that you do not plan to use again quickly within a few hours.
Random-access memory (RAM) is a crucial part of any operating system, and the lack of it or its poor management can take a serious toll on your Mac’s overall performance. As a result, making sure that the memory is not needlessly blocked can improve the system’s responsiveness.
However, the use of memory cleaners is put under question especially when Mac OS X is concerned, considering that the operating system already comes with an above-average memory management system that will automatically allocate the necessary resources to the apps in need.
Memory cleaner that shifts the control over to the user
Even though this is generally the case, and average users will usually not feel the need to use such a tool, the built-in memory optimization features in OS X might not be so efficient when dealing with large memory hogs that are not Apple-vetted.
This is where Memory Clean 2 comes in and offers you the option to both see statistical info about the memory usage without having to launch the Activity Monitor application and manually flush the RAM whenever you see fit.
The benefits are quite obvious if you are using resources-hungry apps on machines that have a rather limited amount of RAM at their disposal, but they can also make a difference if you need to work with utilities that simply handle the memory usage poorly.
Monitor the status of your RAM without going back and forth to the Activity Monitor
Within the OS X Activity Monitor app, you get to see details about the amount of available physical memory and how much of it is used. You can also view the quantity represented by the app, wired, or compressed memory, and the volume of RAM utilized by the cached files.
The Memory Clean 2 menu bar where you get to see statistical data about the memory usage
Memory Clean 2 provides the same information in its status bar menu, or in the app panel, which can be activated with a mouse click.
In addition, it lets you know how much memory is currently available, generates a simple graph to help you visualize the current memory usage situation, and also identifies the major memory hogs.
Manually flush the blocked memory or rely on the automatic cleaning system
Analyzing this information can help you assess if your Mac is slowing down because there is too little RAM available. If this is the case, Memory Clean 2 enables you to trigger the memory cleaning process that frees up the blocks not actively used.
Memory Clean 2 handles everything on its own, and once the process is completed, you get to see how much memory has been made available. The entire procedure is quite straightforward, and we did not notice any sluggishness while Memory Clean 2 was performing the cleaning task.
Memory Clean 2 will let you know the amount of memory that has been freed up
On a 2GHz Intel Core 2 Duo iMac with 6GB RAM running on El Capitan, while cleaning, the Memory Clean 2 resources usage spiked to around 96% of the processing power and almost 2GB of RAM. After the procedure was over, Memory Clean 2 returned to the standby values almost instantly: around 2% of the CPU and 40Mb of RAM.
For your convenience, Memory Clean 2 can also free up memory automatically once a certain threshold is reached: you get to adjust the value in the Preferences, going from 25MB to almost 2GB. The bad news is that you need to work with a slider bar that is not very precise.
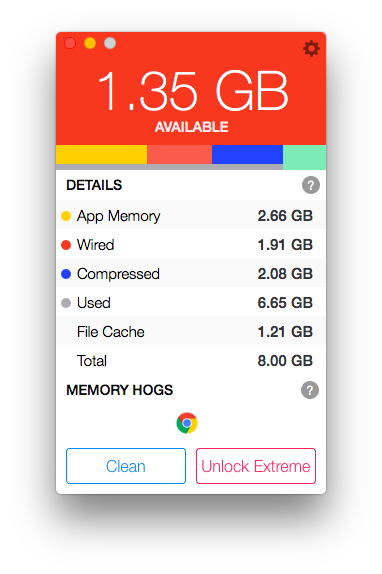

To avoid any issues, Memory Clean 2 keeps the refresh interval between 1 and 30 seconds and comes with an auto clean cool-down function that limits the memory cleanup to once every 3 minutes.
Memory Cleaner 2
The Good
Memory Clean 2 proposes an alternative solution for monitoring your Mac's memory usage without having to go back and forth to the Activity Monitor: the amount of available RAM is displayed in the status bar icon, and all the other statistical data is one click away.
Moreover, the Memory Clean 2 utility can also be used to free up memory that is blocked unnecessarily by various applications running on your Mac. The task can be triggered manually, or you can rely on the built-in auto clean function.
The Bad
There are small details that could improve your overall experience with Memory Clean 2: the possibility of setting a system wide hotkey for activating the app’s panel and one for starting the cleaning process, or a more accurate solution to adjust the threshold value for the auto clean function.
The Memory Clean 2 app does come with some customization options, but you cannot resize its panel or change the interface theme: considering that you can keep the app’s window active in the background, this could be quite useful.
The Truth
Even though using a memory cleaner tool might not be necessary for the average OS X user, Memory Clean 2 can prove quite useful when working with utilities that keep memory blocked even if they don’t actively use it.
Apps that gobble up your Mac’s RAM can go unnoticed if you don't work with multiple memory hogs at a time, and they could also severely affect your computer’s performance, especially on machines running with a moderate amount of RAM available.
Updated: February 28, 2021 Home » Freeware and Software Reviews » System Optimization and Registry Cleaner
Increasingly both Microsoft Windows and Apple macOS are intelligent enough to manage the amount of RAM available in the system, especially newer operating system such as Windows 10 and macOSX. Memory optimization software is not necessary unless you are still using a very old OS such as XP or you have very little RAM to spare. Works great on Microsoft’s Windows 10 and Apple’s macOS.
Related 2021 Article ➤ 7 RAMDisk vs SSD – Ten Times Faster Read and Write Speed via RAM Virtual Disk
↓ 01 – Memory Cleaner X | macOS

Memory Cleaner X monitors your memory usage and cleans up your Mac’s memory, increasing performance. Cached memory can take up the memory needed for new apps, and Memory Cleaner X increases performance by cleaning cached memory. Memory Cleaner X also monitors RAM usage on your computer, and you can free up unused memory in just one click. The application monitors RAM usage on your computer and frees up unused memory with one click. With Memory Cleaner X, you can easily manage your memory usage. An animated status icon in the menu bar shows you the percentage of memory being used, as well as memory cleaning being run. Features:
Memory usage information displayed in the menu bar
Memory usage per application
Manual memory free up when needed
Automatic memory free up
↓ 02 – CleanMem Free | Windows
CleanMem is still a set it and forget program and is totally free. When you install CleanMem it will auto run every 15 min by the Windows Task Scheduler. Once installed it is set it and forget it. Just as it always has been. You can configure CleanMem to do more advanced things such as ignore lists, only lists, and log files. These can be set by the CleanMem Settings program in the start menu.
↓ 03 – Memory Clean 2 | macOS

Memory Clean is the ultimate app for optimizing your Mac’s memory and is best used after you have finished using a memory (RAM) intensive app or game. It replicates the feeling of a fresh system restart. Memory Clean works by purging the Mac’s inactive memory and is best used when you close an intensive program that you do not plan to use again quickly within a few hours.
↓ 04 – RAMRush | Windows
RAMRush is a free memory management and optimization tool. It can efficiently optimize memory usages of your Windows system, free up physical RAM and make your system work better. RAMRush uses an intelligent way to manage the physical memory and lets the RAM work in a better performance. It will help you to prevent system crashes, memory leaks and keep your computer running more efficiently.
Increase system performance
Increase the amount of memory available
Defragment system physical memory
Recover memory from Windows applications
Remove memory leaks
Prevent system crashes caused by memory problems
↓ 05 – Wise Memory Optimizer | Windows
Most PC users have known and unknown applications running in the background that take up your computer’s physical memory and thereby affect its performance. Wise Memory Optimizer helps you free up and tune up the physical memory taken up by some useless applications to boost PC performance. The application requires a pretty low quantity of CPU and system memory, has a good response time and rapidly finishes an optimization job. Better yet, it also has a portable version. You can drop the program files anywhere on the hard drive or a flash drive and run it on any computer without prior install operations.
↓ 06 – Mz RAM Booster | Windows
Mz RAM Booster is a program created to improve the performance of your computer by auto-recovering RAM and fine tuning some Windows system settings! It uses minimal resources and almost no CPU time. Speed up your computer, stop memory leaks and increase free RAM.
Memory Clean 2 For Mac
↓ 07 – Memory Cleaner | macOS
Memory Cleaner can increase your free memory with a simple click and monitor memory usage in the menubar. Memory Cleaner is the perfect tool to keep your computer going full speed and helps you to optimize your memory (RAM) usage with a simple click. Memory Cleaner keeps your systems memory (RAM) clean by monitoring and optimizing the memory usage. Helps you to quickly access detailed memory information and diagnosis from your menu bar and CLEAN your memory with a simple click. Main Features:
One-click and automatic system memory optimization
List of apps with significant memory usage
Memory pressure meter and notifications
Dynamic and customizable menu bar
Detailed memory information
↓ 08 – Mem Reduct | Windows
Lightweight real-time memory management application to monitor and clean system memory on your computer. The program used undocumented internal system features (Native API) to clear system cache (system working set, working set, standby page lists, modified page lists) with variable result ~10-50%. Application it is compatible with Windows XP SP3 and higher operating systems, but some general features available only since Windows Vista.
↓ 09 – MemPlus | Windows
MemPlus can be used to monitor the RAM usage on your device. You can clear the memory of any non-essential processes by clicking the “Clear memory” button which is visible in the main window. This will clear both the working sets of processes and the FileSystem cache, if enabled. You also have the ability to clear the working set or FileSystem cache separately.
RAM Optimizer – MemPlus can be used to reduce the amount of RAM that is being used by applications on your system. In essence, freeing up memory so that more memory is available to you!
RAM Analyzer – MemPlus can help recover the specification of the RAM that is installed on your system. This information can be exported in TEXT, HTML, CSV and Excel formats.
Memory Clean 2 Mac
↓ 10 – Memory Optimizer [ Not Free Anymore ] | Windows
Fiplab Memory Clean
Lacking memory? Optimize with Memory Optimizer. You’d be surprised how much you can recover! Understand your computer’s memory usage and keep it under control – Memory Optimizer will graph your computer’s memory showing you what’s using it and giving you an easy way to optimize it’s usage. Just click “Optimize” and speed your computer up immediately!
Memory Clean 2 Mac Download
Recommended for you:
0 notes
Text
Ae Vfx

Ae Vfx Free Download
Adobe Ae Vfx
After Effects Vfx
Ae Download Vfx
Adobe Ae Vfx
Ae Vfx Tutorial
Cover image via
Get 15 free explosion elements and 25 explosive sound effects for your next video.
These After Effects templates are ideal for use within Instagram Stories, product mockups, music or app promotion. Another way of discovering the perfect After Effects template is to search by the project the animation template is needed for. We have high-quality templates for wedding invitation, sports, food or corporate. ActionVFX provides the best stock footage elements for professional Visual Effects. From Explosions, Fire and Smoke, Muzzle Flashes and Bullet shells and Gun FX, to Debris and Particles, we have your assets covered. Available in 4K. 100% Royalty-Free. With motion tracking, you can use the Warp Stabilizer VFX to animate your scene and compensate for unintentional movement. Add 3D geometry and depth. Turn animations into high-resolution videos. Work with the Cinema 4D renderer to bend layers in 3D space and convert text and shape layers to 3D objects. Ignite Pro gives you 190 professional plugins to fire up After Effects, Premiere Pro, Final Cut Pro, or any other major host. Experiment with over 565 visual effects, presets, and the industry’s best suite of 360° filters. No strings attached. HitFilm Pro already contains Ignite plugins. Ignite Pro is intended as a 3rd party plugin for other. 【ae/mad教程】 如何用of光做出vfx常见背景.
Whether you are shooting an action scene or promoting a company’s big fire sale, these free fiery explosions and SFX are perfect for video editors and motion designers.
These free explosion sound effects and video elements work in nearly every NLE, including Premiere Pro, FCPX, After Effects, DaVinci Resolve, and more!
Download Detonate: 40 Free Explosion SFX and VFX
To download these 40 free SFX and explosion elements, click the button below. These SFX and VFX are free to use in any personal or commercial projects. By downloading, you agree not to resell or redistribute these free assets.

DOWNLOAD DETONATE: 40 FREE EXPLOSION SFX AND VFX
What Do You Get?
Ae Vfx Free Download
With this free pack of 40 explosion elements, you’ll get all of the following.
15 Free Explosion VFX:
Adobe Ae Vfx
Canon Blasts
Fireballs
Groundblast
Oil Rig Fire
Large Plumes
Shockwave
Smoke
25 Free Explosion SFX:
Blasts
Bombs
Mine Explosions
Grenades
Want real explosions?
RocketStock has also released their own Detonate pack with over 50 real explosions captured in 6K. The elements were shot on set using cutting-edge RED cameras and Zeiss Master Prime lenses. The results are truly epic, with the largest explosion reaching 200 feet.
Bonus: 3 More Free SFX Packs from PremiumBeat.com

Looking for more sound effects for you next project? On top of these other free SFX packs, be sure to check out our curated collection of SFX.

20 Free Movie Trailer SFX
After Effects Vfx
Download the FREETrailer Construction Kit (Lite Version) from PremiumBeat. Inject your trailers with high-quality Hollywood-style SFX. Our music and video team handpicked 20 “action trailer” sound effects for thisfree pack: sweeps, risers, slams, and intense atmospheres.
Ae Download Vfx
You can get the 20 Free Movie Trailer SFX here.
SCI-FI UI: 29 FREE Futuristic Computer and HUD Sound Effects
Working with futuristic computers or HUDs in your next project? Download this pack of 29 FREE Sci-Fi UI SFX. Perfect to accentuate your techno-future operating systems or interfaces. If you need HUD elements and digital display elements too, be sure to check our RocketStock’s Interface pack with over 400 overlays and video elements.
You can get the 29 free Sci-Fi UI SFX here.
Adobe Ae Vfx
15 Free Ambient Noise SFX
Need help setting a scene? This ambient noise tracks are the perfect background SFX for creating a rich atmosphere. From busy street traffic to forests and deserts, these 15 free SFX are perfect for you next project.
Ae Vfx Tutorial
You can get the 15 Free Ambient Noise SFX here.
0 notes
Text
Edge Macos

On May 20, 2019, the first preview builds of Edge for macOS were released to the public, marking the first time in 13 years that a Microsoft browser was available on the Mac platform. The last time a Microsoft browser was available on the Mac platform was Microsoft Internet Explorer for Mac, which was withdrawn in January 2006. Jan 15, 2020 When you are ready to deploy the new Microsoft Edge, y ou can lea rn more about rolling out and managing Microsoft Edge across your organization from our enterprise documentation, and you can download our offline deployment packages and administrative policy templates for configuring Microsoft Edge on Windows and macOS at our enterprise page.
With the Intune release from October 2020, the macOS Microsoft Enterprise SSO plug-in became available (in preview). The plug-in is designed to provide a better sign-in experience by limiting the authentication prompts a user gets on his macOS device when accessing Azure AD connected applications.
The SSO plug-in allows any application to participate in single sign-on even if it was not developed using a Microsoft SDK like the Microsoft Authentication Library (MSAL).
In this post, I show the settings I used for testing, which provides an SSO experience for the Safari browser and the Pulse Secure VPN client (which also uses AAD authentication).

The minimum supported macOS version on which the extension supports is 10.15.
Microsoft Edge Mac Os X
Create an Device features Profile
As written in the documentation we should use the sso app extension type Azure AD. To configure the Microsoft Enterprise SSO plug-in for apps that don’t use MSAL we can provide the App bundle ID in the profile. In the documentation also two additional settings are found to further reduce the number of authentication prompt.
The settings to configure the plug-in are found in the Device features profile.
Sign-in to the Endpoint Manager admin center
Browse to Devices – macOS
On the Configuration Profiles tab click +Create profile
Choose Device features as Profile type
Click Create
Give the configuration profile a Name
Enter a Description (optional)
Click Next

Scroll down and open Single sign-on app extension
Select Microsoft Azure AD as sso app extension type
Provide the App bundle IDs of the apps that don`t support MSAL
You can look up the bundle IDs by running this in Terminal:
For example
Enter these two keys, for both choose Integer as Type and enter value 1: browser_sso_interaction_enabled disable_explicit_app_prompt

Finish the setup wizard by assigning the profile to a security group of choice.
Microsoft Edge Mac Os
End-user experience
Time to have a look at the end-user experience.
I tested several Office 365 apps with and without the profile applied, and with and without the app IDs added to the profile. For the first Office app you need to sign-in with full credentials. As soon as you`re signed in to the first app of the Office suite, you don`t need to provide any credentials or only the username in the other apps. The policy seems to not change anything in that behavior. I expected to auto sign-in to the very first app and so on.
For the Pulse VPN client which I used for testing as a third-party app, there is a big difference in the sign-in experience. Without the policy applied, the username and password need to be applied for authentication. With the policy applied, I get a real SSO experience.
Also for Safari, I see a real SSO experience when the policy is applied, which we don`t see without the policy. The SSO experience with the Safari browser is shown below. I signed out from Office 365, choose to forget the account and closed Safari. After starting Safari, I still get an SSO experience.
I also tested the new Microsoft Edge browser (version 87), with different settings without much luck to get an SSO experience. Until I installed and used the Beta (v88) and Dev (v89) versions of the browser. When signed in to the browser, you finally get an SSO experience when visiting Office 365. But still, I needed to sign-in to the browser itself.
The feature is still in preview and as more apps might support MSAL in the future, user experience might get better for more and more apps.
Mac Os Versions
For now, happy testing and let me know your experience with the SSO extension.
Update January 2021:
At this moment only the Company Portal and Microsoft Teams app support MSAL. The other apps from the Office suite should get MSAL support later in 2021.

Related posts:
0 notes
Text
Mac App Store Ios Apps

Ios App Store Download Free
Apple Mac App Store App
Download Ios Apps On Mac
Mac App Store Ios Apps List
Developers of Linux and Unix shells have received warnings from Apple that their iOS apps violate App Store Review Guidelines, with the threat of termination from the App Store said to be reversed. Apps can transform the way you do anything you’re passionate about, whether that’s creating, learning, playing games or just getting more done. And the App Store is the best place to discover new apps that let you pursue your passions in ways you never thought possible. Browse and download apps to your iPad, iPhone, or iPod touch from the App Store. The App Store has more than one million apps and games for your iOS device. The iOS apps will be available on Mac App Store starting this Thursday, November 12, when Apple will release macOS Big Sur to the public. These apps, of course, will be exclusive for Apple Silicon. Mac App Store apps aren't just signed by the developers who make them, but they go through Apple's app review process. VPN Deals: Lifetime license for $16, monthly plans at $1 & more What's more, the Mac App Store makes it easy to update and even re-download apps at any time, on all the Macs logged into your account.
Apple recently released a whole new line-up of Macs that are completely powered by Apple’s own custom-designed chips called ‘Apple Silicon’ instead of the Intel processors that the company has used over the last 15 years. These new chips allow Apple to have more control over the experience of using the Mac, and enable a lot of new features for the consumers.

The first Mac models that ship with these new chips are the MacBook Air, MacBook Pro, and the Mac mini — all of which run the first-generation Apple Silicon named ‘M1’. If you recently purchased any of these three models running Apple M1 chips, your Mac has the ability to run iOS apps. That’s right, you can install and run some of your favorite iPhone and iPad apps on your Mac and this handy guide explains how.
But first, how do you know whether you have an M1 Mac or not? Well, it’s easy to find out.
How to Check if your Mac can run iOS apps?
To run iPhone or iPad apps on your Mac, you need a Mac running Apple Silicon chips. Right now, the only Apple Silicon capable of running iOS apps is Apple M1, but the company is poised to release a newer generation in the coming months. To find out whether your Mac runs on Apple Silicon:
Click on the Apple Logo at the top left corner of your screen.
Click on About this Mac.
In the window that appears, if it says ‘Chip Apple M1’ then your Mac is capable of running iOS apps.
Now that we know that your Mac can run iOS apps, let’s learn how to download and install iPhone and Apps on macOS Big Sur.
How to Download & Install iOS apps on Mac?
To run iPhone and iPad apps on your Mac, you have to download and install them from the App Store app on your Mac. You probably already have this in your Dock, which looks like this:
Click on the app icon to launch it. You can also launch the app by clicking on the little magnifying glass icon at the top right corner of your screen and searching for “App Store”.
Next, in the App Store app, click on the Search field at the top left of the app.
Type in the name of the iOS app that you want to download and install on your Mac. Let’s take the example of Readdle’s Documents, which is now available on the M1 Macs.
In the search results shown on the right, click on iPhone & iPad Apps.
Click on the Get button to start downloading the app.
Once installed, the Get button switches to Open, using which you can launch the iOS app.
That’s it, that’s how easy it is to run iOS apps on your Mac.

Note: The App Store app on your Mac will only list those iOS apps that have been made available by their respective developers for sale on the Mac.
Now that we’ve learned how to download iPhone and iPad apps on your Mac, you can go ahead and explore all the amazing iOS apps that are available through the Mac App Store.

You should get started with Documents by Readdle — the super app for file actions. An immensely popular app for iPhone and iPad, Documents is now available on macOS Big Sur and brings along all the incredible features from the iOS version.
As Apple has already confirmed and we have detailed here, the new Macs with the M1 chip will run iOS apps natively. And to push this feature forward, Apple will add nearly all iOS apps to the Mac App Store. However, there are some apps that will not be available to Mac users — either by developer choice or compatibility issues.
Apple is once again sending emails to iOS developers in order to remind them about this important change that will bring their iPhone and iPad apps to the Mac. By default, every iOS app will be published automatically on the Mac App Store, so the developer must manually choose not to offer their iOS apps on macOS.
We found out that major developers like Google and Facebook won’t include their apps on the Mac App Store, but the popular game Among Us and the HBO Max app will be there.
Ios App Store Download Free

Apple Mac App Store App
Apple asks developers to make sure their iOS apps are fully compatible with macOS and do not require any features that are available exclusively on the iPhone and iPad, such as a cellular connection and the TrueDepth camera. If the app is not compatible, then the developer must opt out of the Mac App Store.
To make sure that Mac users have a great experience, confirm that your apps work well on this platform and don’t rely on iPhone or iPad features not available on Mac. If needed, update their availability on Mac in App Store Connect.
However, Apple is also automatically pulling out some incompatible apps from the Mac App Store. Developers who have iOS apps using the Core Location API, which basically provides access to the user’s location, will not be included in the Mac App Store as the company says they may not work properly on macOS.
For these apps, the company says they “may have issues running on Apple Silicon Mac,” suggesting that the developer should test the apps on a Mac with the M1 chip before offering them on the Mac App Store. At the same time, the Mac App Store will alert users that the app was “Designed for iPad” and “Not checked for macOS” when it’s an iOS app.
Some apps available on Mac may not function as they normally would on iPhone or iPad. For example, features that rely on hardware unique to iPhone or iPad—such as a gyroscope or a screen that supports complex Multi-Touch gestures—may not work on Mac. In some cases, such a feature may be central to the app’s functionality, while in others the app may be usable without it.
Once the developer verifies that the app works fully on the macOS, the “not verified” message can be removed from the App Store. Apple says developers can make small adjustments to make their iOS apps work better on macOS.
Update (Dec. 2nd 2020): Apple is now making it easy for developers to confirm that their iOS apps work perfectly on Apple Silicon Macs. There’s a new “Check Compatibility” button on the App Store Connect that lets developers tell Apple that the app works as expected on macOS, which makes the “not verified for Mac” warning disappear.
Download Ios Apps On Mac
The iOS apps will be available on Mac App Store starting this Thursday, November 12, when Apple will release macOS Big Sur to the public. These apps, of course, will be exclusive for Apple Silicon Macs. Intel-based Macs can only run Catalyst apps that have been manually ported from iOS to macOS by developers.
Mac App Store Ios Apps List
FTC: We use income earning auto affiliate links.More.
0 notes
Text
Windows Remote Desktop App

The Azure portal is your management hub for Windows Virtual Desktop. Configure network, deploy desktop, and enable security with a few clicks. Setup automated scaling with Logic Apps and manage your images efficiently with Azure image gallery. You focus on your desktop apps and policies and Azure will focus on managing the rest. Remote Desktop Connection vs. Remote Desktop App July 13, 2020, 6 Comments Of course, the target PC (the one remoted into) must run Windows 10 Pro, Education or Enterprise (Home can’t support the remote end of such a connection).
Windows Remote Desktop App Ios


Windows Remote Desktop App
Use Remote Desktop on your Windows, Android, or iOS device to connect to a Windows 10 PC from afar.
Set up the PC you want to connect to so it allows remote connections:
Make sure you have Windows 10 Pro. To check, go to Start > Settings > System > About and look for Edition. For info on how to get it, go to Upgrade Windows 10 Home to Windows 10 Pro.
When you're ready, select Start > Settings > System > Remote Desktop, and turn on Enable Remote Desktop.
Make note of the name of this PC under How to connect to this PC. You'll need this later.
Use Remote Desktop to connect to the PC you set up:
On your local Windows 10 PC: In the search box on the taskbar, type Remote Desktop Connection, and then select Remote Desktop Connection. In Remote Desktop Connection, type the name of the PC you want to connect to (from Step 1), and then select Connect.
On your Windows, Android, or iOS device: Open the Remote Desktop app (available for free from Microsoft Store, Google Play, and the Mac App Store), and add the name of the PC that you want to connect to (from Step 1). Select the remote PC name that you added, and then wait for the connection to complete.
0 notes
Text
Smu Office 365


Smu One Drive
Smu Microsoft Office 365
Students, faculty and staff who have valid SMU email addresses can sign up and use Office 365 services, including Office 365 ProPlus and OneDrive for Business. Microsoft will enable the capability for students, faculty and staff to sign up for Office 365 simply by using their SMU email addresses. Obtaining the software Open a web browser on the device that you wish to install Office Visit and Click Login Enter your SMU email address using the @smu.edu format ( [email protected]) You will automatically be redirected to the SMU Office365 login page Enter your SMU. Click to this link - 2. At the SUM login page, enter your SMU email address and password, then click Sign in. Click Install Office at the right-hand side of the screen and select Office 365 apps.
Smu One Drive
If you are currently working towards a Microsoft Office Specialist (MOS) certification and studying on your personal computer, make sure that Microsoft Office does not update automatically just yet!
Office 365, the Office subscription service provided to you by SMU, normally updates automatically on your computer. Since Office 2019 is now being introduced, some students have reported that after updates were applied their MOS practice exams in GMetrix no longer work! This is because the exam focuses on Office 2016 and is not compatible with newer versions.
Smu Microsoft Office 365
Here’s how you can stop automatic updates so you can continue practicing for your Office 2016 exam: Continue reading Studying for MOS Certification? Don’t Update Office!
1 note
·
View note