
Don't wanna be here? Send us removal request.
Statistics
We looked inside some of the posts by sylvain-sims and here's what we found interesting.
Average Info
Notes Per Post
37K
Likes Per Post
17K
Reblog Per Post
19K
Reply Per Post
143
Time Between Posts
13 days
Number of Posts By Type
Text
2
Photo
15
Last Seen Tumblr Blogs


Fun Fact
The KCSC sent more than 20K requests to delete posts related to prostitution and porn to Tumblr from January to June 2017.
Text
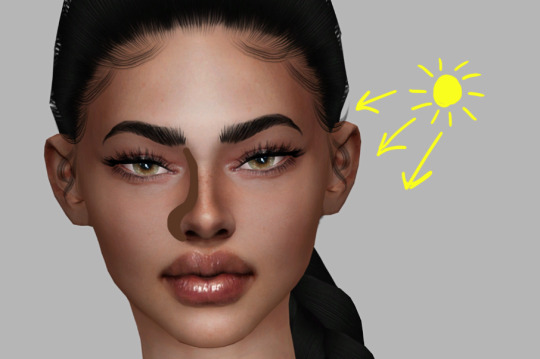
Face Contouring Tutorial Part 1
Hello everyone! today imma be showing you how I face contour and add some shadow! Contour elevates your WHOLE photo and I love adding it to mine. I use a drawing tablet but you can use anything! I try to make my tutorials accessible for everybody!

So to start off I advise using the reference below! it helps a lot and basically tells you were shadows should go. Now there is a male and a female guide. I will be using the female version today.

So to start off you get your image and liquify it im not gonna go into detail about a how to liquify but tutorial for that will come soon!

When you contour be sure to us a HARD round brush not soft! you start by selecting the darkest part of her skin holding alt and select. So when contouring I like to start with the nose and then the eyes and etc. So I do nose contour by drawing from the tip of the eye brow to above the nostril like the below picture provided!

After that what your going to do is set the layer type from normal to multiply like the below picture the lines should turn a very dark brown!…

Next You are going to go to the Gaussian blur option located in Filter/ Blur/ Gaussian blur next you adjust to your liking! when choosing it make sure to choose something that is subtle! nothing to harsh but you want to see the difference.

Okay so now your sims nose is snatched, to get rid of some dark spots I sometimes use the eraser tool with SOFT round brush not hard round. I only use SOFT round brushes to erase SHADOW and HARD round brush to draw shadow!

okay so next I like to do the under and sometimes side nose shadow! so what make a new layer and draw in the nostrils going outwards like the bottom picture with the darkest part of her skin again!

So when you have something like this change from normal to multiply and Gaussian blur like we did for the nose bone area! Now with picking the Gaussian blur type I like to go kinda sharp and blured out at the ends a little on certain images.

Now we got the under nose shadow but were not done. it looks a little to dark so we have to adjust the opacity some. I like to go kinda light but to the point you can still see it! Look below for an example!

So next what I do { Only depending on the lighting situation so this only applies according to were light is coming from } is the side nose shadow! now this for me makes the image look very nice! so first start drawing from whichever Opposite from lighting on the nose!
So then you do the same thing you did for under nose shadow and nose bone area change the mode from normal to multiply, but after I like to erase some parts! like below

Next you do Gaussian blur until you like it! it should be a little subtle but still show!
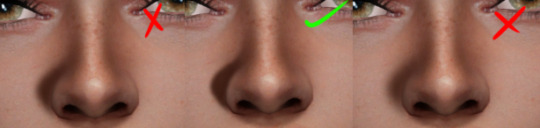
Next what yo do is adjust opacity and boom! you have your nose shadow! :D

Next I like to do the hairline! so what your going to do is basically draw were the edge of the hair is! Your still using the darkest part of their skin! DONT USE BLACK!

next you adjust it like your other shadows! multiply and and Gaussian blur! I also forgot to mention, always try to avoid harsh lines when doing shadows on the face because sometimes it looks unnatural and ew lol!

So when you finish the next step you should have a nice hairline shadow!

Okay so next is shadow after this is the end of this tutorial and I will be posting a part 2 tomorrow! Now with this we are going to change the brush to black! What your going to do is draw inside the eye in the upper lid like below.

So next what you do is Gaussian blur it! Now I’m not gonna include a dos and don’t for this on because this one is up to personal preference!

I like mine like this because it makes her eyes look snatched LOL no next you change the opacity!

So that is the end of part 1 I will be posting part 2 tomorrow! I hope you guys enjoy and let me know if your having and troubles or stuck!!
624 notes
·
View notes


Photo


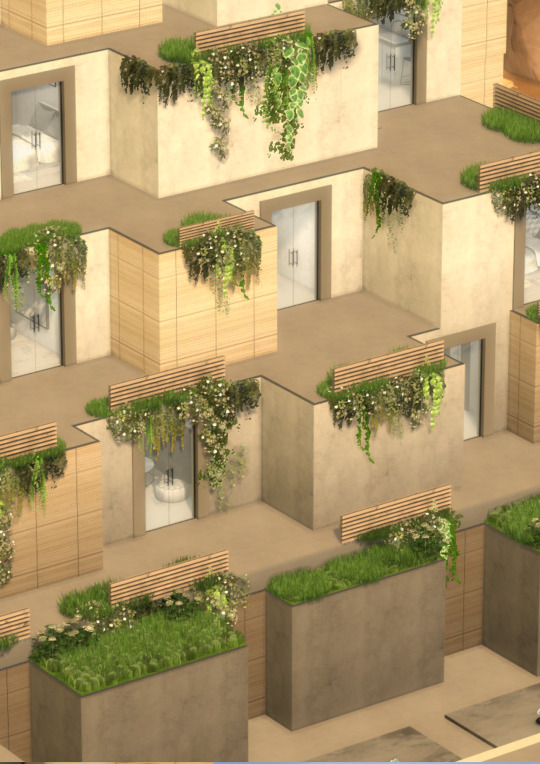


Ok, here we go. Something is looking shady as fuck when I see this download in my files, so… maybe it’s not working. Let me know if you have any problems. For a fuller house, please download wondymoon’s Chlorine fence, Lennox kitchen by Peacemaker and Eik kitchen by Sanoysims. This is a build! Not an interior project. There is some CC inside, but the point of the download is the exterior. Happy simming Download
349 notes
·
View notes
Photo


Design apartment in Stockholm
THENORDROOM.COM - INSTAGRAM - PINTEREST - FACEBOOK
493 notes
·
View notes
Photo


Scandinavian apartment
THENORDROOM.COM - INSTAGRAM - PINTEREST - FACEBOOK
1K notes
·
View notes
Photo


West Elm holiday home | photos by Landon Vonderschmidt
THENORDROOM.COM - INSTAGRAM - PINTEREST - FACEBOOK
3K notes
·
View notes
Photo


terracotta al fresco / lazy afternoon with family friends / the kerrigans + sables
@something-wicked-sims
160 notes
·
View notes


Photo


I thought I would start sharing what are my inspirational images, this is from a recent project, related to my home town, a sort of colonial spanish city, with a cute cafe :) Of course my lot is gonna be filled with color, mosaics and decayed walls! XD
If you are interested I could share more inspo on other styles aswell :)
Im also working on new vintage signs, Menu images, and other coffee shop stuff.
47 notes
·
View notes
Photo


Zara Home Christmas Collection | more here
THENORDROOM.COM - INSTAGRAM - PINTEREST - FACEBOOK
1K notes
·
View notes


Photo


H&M Home A Lush Fall Tale | Get The Look
THENORDROOM.COM - INSTAGRAM - PINTEREST - FACEBOOK
779 notes
·
View notes
Photo

How to get rid of lines that appear on sims/objects/walls
This bug came back when I updated my laptop and I’ve been seeing a lot of people recently that have this bug, so I decided to make a little tutorial on how to get rid of it. Everyone that I know that has the bug had a Nvidia graphics card, so if you don’t have a Nvidia graphics card, sorry, this tutorial probably won’t work for you.
Follow these steps at own risk, nothing should normally go wrong if you follow this tutorial step by step, but if stuff does go wrong then please don’t blame me.
Click on “Keep Reading” for the full tutorial.
继续阅读
3K notes
·
View notes
Photo


CAT Club, Budapest, Hungary,
Art director, Identity and Graphic Design:
Kissmiklos Interior design, marcell benson (craft benson architecture/design), ádám farkas (craft benson architecture/design), eszter mangel hobor
Photography: Eszter Sarah
164 notes
·
View notes
Photo


[MellowLin] Tokyoscape SFood Lightbox * 224 poly Custom thumbnails 14 recs [you can recolor wo.m.p.] Shadows/Shad. fixed
dl
[Toska_MellowLin] Tokyoscape ATM ** 4100 poly Custom thumbnails 3 recs [ask Toska if you want to recolor] Shadows/Shad. fixed
dl
_____________________________________________________________
*You can absolutely include those meshes in your lots, but I’d be really pleased if you link me so I could see your awesome creations.
* Thank you, @toskasims, love, for the amazing mesh.
769 notes
·
View notes
Text
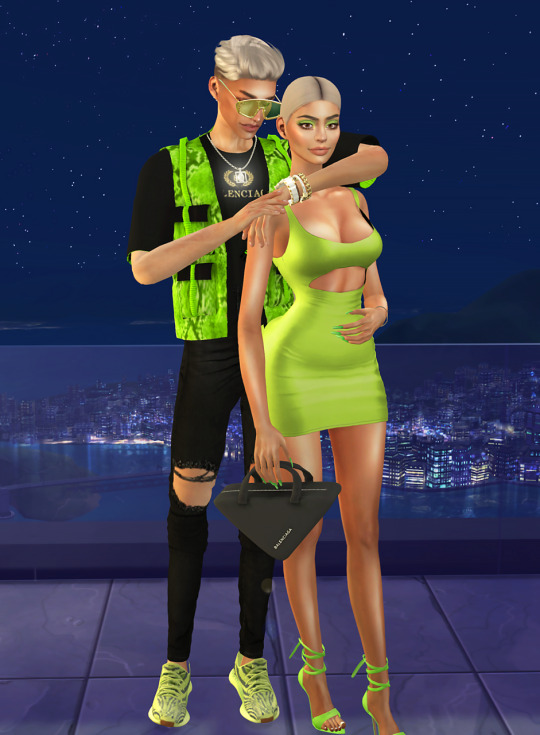
neon couple
thank all cc creators
@simpliciaty-cc @vittleruniverse @slayclassy-showroom @gorillax3 @dscombobulate @antosims
2 notes
·
View notes