#태권독학
Text
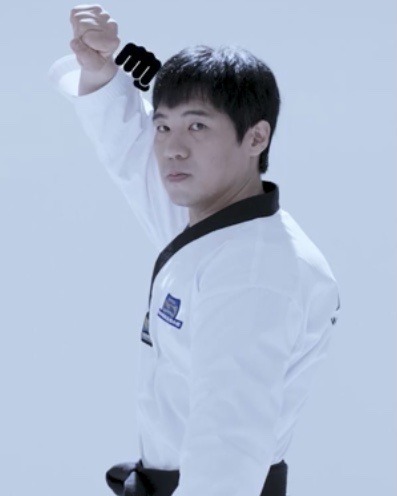
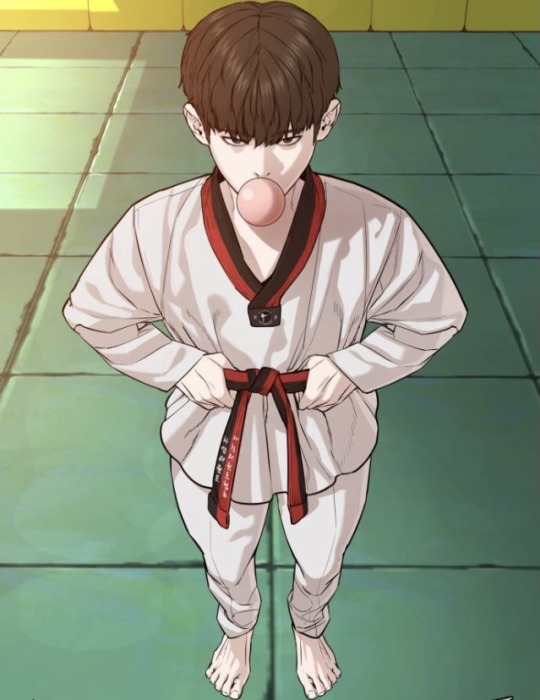
DIAMOND BLOCK (금강 막기)
Hey! It’s me again. Seong Taehoon. Welcome to my blog collab. My guest today is a Karate dweeb.

This guy! The one in the middle. @ji-yeon-woo.
(Wow, look at his dumb face. After our collab we’re gonna beat the shit out of each other. :D)
At his suggestion, I’m going to teach everyone an advanced block, and he’s going to teach you an advanced Kyokushin kick. Disciples with colored belts, you can ignore this lesson for now. Look at it again when I start teaching you double hand block.
The block has two versions: WT-style and ITF-style. I've been teaching you the WT-styled Taekwondo for a while now, so I'm gonna keep it that way. Once I'm done with all the techniques on my list, I will consider asking dad for more ITF Taekwondo lessons.
Ok, enough yapping. Diamond block (geumgang makgi) is one of the highlights of Geumgang poomsae. The poomsae is taught for black belt second dan. It consists of the downward block (naeryeo makgi) and the upward block (eolgul makgi). The block is usually performed with the back stance (dwit kubi) or crane stance (hakdari seogi).
The block is used to deflect attacks to major points: the head and the groin. It is for fights against multiple opponents.
Just to make it clear. There are many more variations of the diamond block, including diamond body block (mostly in ITF, with upward block and outward inner wrist middle block), hand blade diamond block (same movements, only replace the fists with hand blades). Yes, not that complicated.
What I show you below is the standard crane stance-diamond block.


Step 1: Stand in back stance or crane stance.
Step 2: Remember the first hand position of the downward block? If not, check here. How about the upward block? Check again. Place the hand performing the downward block near your shoulder, and the hand performing the upward block around your waist.
Step 3: Start to move two hands at the same time, make sure to keep the hand doing the downward block inside and close to your body. The hand doing the upward block is placed outside, but also close to the other hand.
Step 4: Raise your hand to block the head and sweep your hand to block the lower body at the same time.
Step 5: Repeat with the other leg.


Notice:
When blocking, the lower blocking hand is located at the front foot, or in case of the crane stance, the lifting leg.
In performance, always look forward, in the direction of your front/lifting leg. In a fighting, look at the direction of your opponents.
The hand of the lower block is placed about two fists above your thigh, and the hand of the upper block is placed about one fist above the head.

45 notes
·
View notes
Text
성태훈 태권도 강습
Taekwondo Lessons from Seong Taehoon.
안녕하세요. 태훈태권TV의성태훈 입니다. 반갑습니다. 태권도를 가르쳐 드리러 왔습니다.
Hello. This is Seong Taehoon from TaehoonTaekwonTV. Nice to meet you. I'm here to teach you Taekwondo.
New Rules on This Blog
My Taekwondo Curriculum on NewTube
Please like, subscribe and hit the notification button!
Taekwondo’s principles and etiquette
Student’s oath and five tenets
Dojang etiquette
Counting in Korean
Stances
Attention stance and greetings (차렷 서기/인사)
Close stance (모아 서기)
Basic ready stance (기본 준비 서기)
Parallel stance (나란히 서기)
Horse-riding stance (주춤 서기)
Walking stance (앞 서기)
Front stance (앞굽이 서기)
Fighting stance (겨루기 준비 서기)
Diagonal stance (모 서기)
Front diagonal stance (앞모 서기)
Front diagonal long stance (모 앞굽이 서기)
Back stance (뒷굽이 서기)
Front horse-riding stance (앞 주춤 서기)
Front close stance (앞축 모아 서기)
Back close stance (되축 모아 서기)
T-shaped stance (‘ㅗ’자 서기)
Left side stance (왼 옆 서기)
Right side stance (오른 옆 서기)
Tiger stance (범 서기)
Crane stance (학다리 서기)
Front cross stance (앞 꼬아 서기)
Back cross stance (뒤 꼬아 서기)
Inner knee stance (오금 서기)
Assisting stance (곁다리 서기)
Series of basic kicks
Front kick (앞 차기)
Roundhouse kick (돌려 차기)
Push kick (밀어 차기)
Crescent kick (��달 차기)
Axe kick (내려 차기)
Side kick (옆 차기)
Back kick (뒷 차기)
Hook-grab kick (낚아 차기)
Series of advanced kicks
Spinning back kick (뒷 차기)
Spinning side kick (뒤돌아 옆차기)
Spinning crescent kick (뒤반달 차기)
Spinning hook kick (뒤후려 차기)
Scissors kick (가위 차기)
Jackknife kick (공중제비 차기)
Repeating kick (거듭 차기)
Jumping front kick (뛰어 앞차기)
Jumping roundhouse kick (뛰어 돌려차기)
Jumping side kick (뛰어 옆차기)
Double front kick (양발 앞차기)
Jumping back kick (뛰어 뒤차기)
Jumping hook kick (뛰어후려 차기)
Tornado kick - 360 degrees (360도 턴차기)
Tornado kick - 540 degrees (540도 턴차기)
Tornado kick - 720 degrees (720도 턴차기)
Tornado kick - 900 degrees (900도 턴차기)
Tornado kick - 1080 degrees (1080도 턴차기)
Multidirectional kick (다방향 차기)
Multiple kick (모둠 차기)
Punches
Low punch (아래 지르기)
Middle punch (몸통 지르기)
High punch (얼굴 지르기)
Obverse/reverse punch (반대/바로 지르기)
Triple punch (새지르기)
Side punch (옆 지르기)
Backward punch (저초 지르기)
Turning punch (돌려 지르기)
Turn-over punch (젖혀 지르기)
Downward punch (내려 지르기)
Vertical punch (세워 지르기)
C shape punch (‘ㄷ’자 지르기)
Fork punch (쳇다리 지르기)
Extended knuckle punch (밤주먹 지르기)
Half-clenched fist punch (편주먹 지르기)
Diamond punch (금강 지르기)
Diamond side punch (금강 옆지르기)
Target punch (표적 지르기)
Blocks
Downward block (내려 막기)
Inward middle block (몸통 안 막기)
Outward middle block (몸통 바깥 막기)
Upward block (얼굴 막기)
Knife hand inward block (한손날 안 막기)
Knife hand outward block (한손날 바깥 막기)
Side knife hand block (한손날 옆막기)
Assisting block (거들어 막기)
Pressing block (눌러 막기)
Inward palm heel block (바탕손 안 막기)
Palm heel assisting block (바탕손 거들어막기)
Scissors block (가위 막기)
Opening double block (헤쳐 막기)
Cross block (엇걸어 막기)
Diamond block (금강 막기)
Mountain block (산틀 막기)
Strikes
Knee strike (무릎 치기)
Hammer fist strike (메주먹 치기)
Back fist outward strike (등주먹 바깥치기)
Inward strike (안 치기)
Outward strike (바깥 치기)
Downward strike (내려 치기)
Upward strike (올려 치기)
Palm heel strike (바탕손 치기)
Ridge hand strike (손날등 치기)
Elbow strike (팔굽 치기)
Knife hand strike (손날 치기)
Pulling and strike (당겨 치기)
Support strike (거들어 치기)
Turning strike (돌려 치기)
Twisting strike (비틀어 치기)
Swallow strike (제비품 치기)
Vertical strike (세워 찌르기)
Additional techniques
Dodging (피하기)
Grabbing (잡기)
Sweeping (걸어넘기기)
Throwing (들어넘기기)
Breaking (격파)
Splitting (다리 찢기)
Stretching (스트레칭)
Forms
Taegeuk il jang (태극 일장) - part 1 & part 2
Taegeuk i jang (태극 이장) - part 1 & part 2
Taegeuk sam jang (태극 삼장) - part 1 & part 2
Taegeuk sa jang (태극 사장) - part 1 & part 2
Taegeuk o jang (태극 오장)
Taegeuk yuk jang (태극 육장)
Taegeuk chil jang (태극 칠장)
Taegeuk pal jang (태극 팔장)
Koryeo (고려)
Geumgang (금강)
Taebaek (태백)
Pyongwon (병원)
Sparring techniques
Introduction to sparring
Steps (part 1)
Steps (part 2)
Steps (part 3)
Attacks (part 1)
Attacks (part 2)
Attacks (part 3)
Defenses (part 1)
Defenses (part 2)
Rules in sparring
Belt promotion test
White belt → Yellow belt
Yellow belt → Green belt
Green belt → Blue belt
Blue belt → Red belt
Taekwondo home workout challenges:
7-day challenge (for beginners)
10-day challenge (for beginners)
14-day challenge (for intermediate level)
21-day challenge (for intermediate level)
21-day poomsae + sparring challenge (for advanced level)
1-month challenge (for advanced level)
Taekwondo FAQs:
Fatal moves banned in sparring
Black belt test
Identify a real dojang
Identify a black belt and their rank
Taekwondo for asthma
Joints hurting when doing roundhouse/side kick
How to start a front kick
Heel or tip toe for roundhouse kick
Ha Yan Taekwondo Promotion
Collection of My Quotes
Who I am? And don’t ask me more questions! (#out of character, side blog @jyjtkd)
80 notes
·
View notes
Text
7-DAY TAEKWONDO WORKOUT CHALLENGE
I realized something important. I gave out Taekwondo challenges without instructions. So, here is a beginner’s guide to home workout with Taekwondo. (Recommended for white and yellow belt).

DAY 1
Warm up:
Light jog at your spot for 3 minutes, or 5-10 laps around your house
Stretch your body for 10 minutes
10 push-ups
Split for 3 minutes
Hand strikes + stances:
Horse stance + 10 straight middle punches
Horse stance + 10 straight double middle punches
Horse stance + 10 straight triple punches (high-middle-low)
Walking stance + 10 upward blocks
Walking stance + 10 inward middle blocks
Walking stance + 10 downward blocks
Front stance + 10 downward block and middle punch combos
Kicks + sparring footwork:
Switch leg + 40 front kicks rear leg
Move forward + 40 front push kicks front leg
40 axe kicks
40 roundhouse kicks
20 front kick front leg + roundhouse kick rear leg combos
20 crescent kicks
Cool down:
Stretch for 5 minutes
Meditate for 5 minutes
DAY 2
Warm up:
Light jog at your spot for 3 minutes, or 5-10 laps around your house
Stretch your body for 10 minutes
10 push-ups
Split for 3 minutes
Hand strikes + stances:
Horse stance + 10 straight middle punches
Horse stance + 10 straight double middle punches
Horse stance + 10 straight triple punches (high-middle-low)
Horse stance + 10 triple blocks (upward-middle-downward)
Front stance + 10 upward blocks
Front stance + 10 inward middle blocks
Front stance + 10 downward blocks
Kicks:
40 front kicks
40 roundhouse kicks rear leg
40 roundhouse kicks front leg
40 axe kicks
40 crescent kicks
Cool down:
Stretch for 5 minutes
Meditate for 5 minutes
DAY 3 (Active Rest Day)
DAY 4
Warm up:
Light jog at your spot for 3 minutes, or 5-10 laps around your house
Stretch your body for 10 minutes
10 push-ups
Split for 3 minutes
Hand strikes + stances:
Horse stance + 10 straight middle punches
Horse stance + 10 straight double middle punches
Horse stance + 10 straight triple punches (high-middle-low)
Horse stance + 10 triple blocks (upward-middle-downward)
Front stance + 10 upward blocks
Front stance + 10 inward middle blocks
Front stance + 10 downward blocks
Front stance + 10 downward block and middle punch combos
Poomsae:
Taegeuk 1 Jang: 10 times
Taegeuk 2 Jang: 10 times
Cool down:
Stretch for 5 minutes
Meditate for 5 minutes
DAY 5
Warm up:
Light jog at your spot for 3 minutes, or 5-10 laps around your house
Stretch your body for 10 minutes
10 push-ups
Split for 3 minutes
Hand strikes + stances:
Horse stance + 10 straight middle punches
Horse stance + 10 straight double middle punches
Horse stance + 10 straight triple punches (high-middle-low)
Horse stance + 10 triple blocks (upward-middle-downward)
Kicks + sparring footwork:
Switch leg + 40 front kicks rear leg
Move forward + 40 front push kicks front leg
Move forward + 40 axe kicks front leg
Switch leg + 40 roundhouse kicks rear leg
20 front kick front leg + roundhouse kick rear leg combos
20 axe kick front leg + crescent kick rear leg combos
20 back kicks
Poomsae:
Taegeuk 1 Jang: 5 times
Taegeuk 2 Jang: 5 times
DAY 6 (Active Rest Day)
DAY 7
Warm up:
Light jog at your spot for 3 minutes, or 5-10 laps around your house
Stretch your body for 10 minutes
10 push-ups
Split for 3 minutes
Hand strikes + stances:
Horse stance + 10 straight middle punches
Horse stance + 10 straight double middle punches
Horse stance + 10 straight triple punches (high-middle-low)
Horse stance + 10 triple blocks (upward-middle-downward)
Front stance + 10 upward blocks
Front stance + 10 inward middle blocks
Front stance + 10 downward blocks
Kicks + sparring footwork:
Switch leg + 40 front kicks rear leg
Move forward + 40 front push kicks front leg
Move forward + 40 roundhouse kicks front leg
Switch leg + 40 roundhouse kicks rear leg
20 front kick front leg + roundhouse kick rear leg combos
20 axe kick front leg + crescent kick rear leg combos
20 side kicks
20 back kicks
Poomsae:
Taegeuk 1 Jang: 5 times
Taegeuk 2 Jang: 5 times
Cool down:
Stretch for 5 minutes
Meditate for 5 minutes
53 notes
·
View notes
Text
BELT PROMOTION TEST (승급 시험)
If you're with me from the start (August, 2021) and continue to practice all the techniques I taught you til this day, congrats. I will allow you to take the first belt test. If not, this is only for self-assessment. It's to see how far you've come.
Lemme talk a bit about the belt system:
In my dojang, kids take a longer time to get a black belt. Your learning trajectory varies. There are 10 geup if you’re a kid, 8 geup if you’re an adult.
In South Korea, below the age of 15, you can’t wear a black belt. In other schools outside of Korea, you can’t get it until you’re 18.
Me at 13 wearing a junior black belt:
Me at 15 wearing a black belt:

Anyway, I will tell you the requirements and procedures of belt tests. There are 3 to 4 tests every year. But, you have to ask your sabeomnim for permission to participate. If I deem your progress adequate, you’re allowed to take it. A high-level belt doesn’t mean shit when you can’t prove yourself a hardworking student.
The belt promotion test has 3 parts:
Warm-up:
Greetings and bowing to the flags. (Singing the national anthem is optional).
Introduction of the chief masters, the judges, the instructors and the teaching assistants.
Warm-up and stretching.
The class is divided into different belt levels and gathered at the testing area of that belt.
Belt test:
Hereby I will introduce the requirements of yellow belt.
Attention stance and greetings
Basic ready stance
Horse stance straight knuckle punch x 10 times
Horse stance double straight punch x 10 times
Horse stance triple straight punch x 10 times
Fighting stance
Front kick x 10 times
Front push kick x 10 times
Roundhouse kick x 10 times
Taegeuk 1 Jang
Self-defense application
Push-ups x 10 times for kids, x15 times for adults
Splitting (front split and middle split)
Breaking with axe kick. 1 board for kids, 2 boards for adults
Result:
Cool down and stretching.
The judge will announce the general evaluation, the results and give out the belts to students.
Bowing to the flags and saying the student's oaths.
End of the belt test.
You will pass the test if:
✔️ You did correctly all the techniques I taught, with little to no error.
✔️ Complete Taegeuk 1 Jang (I don't accept even the smallest mistakes) and self-defense application with a partner.
✔️ Complete the push-ups. I don't expect you to pull a full split at this stage.
✔️ Break the boards.
Good luck with the test!
48 notes
·
View notes
Text
KNEE STRIKE (무릎 치기)
I will teach you one of the simplest, yet deadliest strike, the one being banned in official sparring - the knee strike (mureup chigi). Are you ready?
Oh, the one you've seen during my fight with Ji Yeonwoo is not a good example of the knee strike. I didn't use my hand to grab his head because I didn't want to kill him.

Just as the name says, you strike the soft parts of your opponent with the hard part of your leg: the knee. Many people think knee strike only appears in Muay Thai. Wrong! Taekwondoin don't use it often because we're not allowed to use it in matches. For example, if the distance is close, we'd throw a crescent kick to the head.
In real fights, however, I encourage you to use the knee strike and the elbow strike/elbow hook to one-shot the opponent. A good knee strike can totally knock them out (ask Hobin, the dude likes to use it). Knee strike is usually combined with grabbing.
There are many variations of knee strike. Front knee strike, side knee strike, flying knee strike, double flying knee strike.
Aim: groin, torso, solar plexus, nose...
Step 1: Stand in the fighting stance, with arms protect the body or relaxed at the sides.
Step 2: Hold your arms out and grab the opponent’s neck (or hair, arm, shoulders, clothes), at the same time, raise your leg up.


Step 3: Close the distance and pull them down to your knee, turn the ball of your feet around 30 to 45 degrees and quickly strike your knee to your opponent's body.
Step 4: Put your leg down and return to the fighting stance, ready to throw another strike if necessary.


Side view of the shadow front knee strike, a move in Taegeuk 7 Jang:

Knee strike with a partner + front/side knee strike:

Notice:
You have to make the knee strong and sharp, by folding your leg close - calf and thigh touching, toes pointing down.
The knee striking angles depend on the aim and how you grab the opponent. Normally, I thrust forward, not upward.
Make sure the timing is right: grab first, then strike. You have to do the sequence quickly because there’s a chance the opponent also counter with the knee strike or elbow hook. By grabbing, you lock yourself with your opponent.
Girls, in self-defense, strike those bastards in the groin if they harass you. You should measure the distance between you and them. If they’re too far, try to run away. If the distance is about 1 meter, use the push kick. Lesser than that, you use the knee strike.
25 notes
·
View notes
Text
AXE KICK (내려 차기)
Since y’all keep asking me for this kick, I have no choice but to give in.
Axe kick, or literally downward kick, is one of my favorite kicks to use against douchebags and misbehaved students. My head-whacking habit is a milder, more affectionate version of this kick.
The name says for itself. You hit your opponent with the downward force striking from the top. It's similar to crescent kick, but it's more powerful because the power is focused on the heel.

There are two versions: kicking with your knee bent, or your leg straight.
Aim: Head, nose, shoulders, chest, (or in my fight with Hobin, feet),...
Step 1: Stand in fighting stance.
Step 2:
In the first version, lift your kicking leg up and close to your chest, your knee still bent and your pivotal leg turned slightly at 30 to 45 degrees.
In the second version, bring your leg straight up as high as possible at an angle of 30 degrees from the center line, inward or outward, it's your choice. Your pivotal leg is the same with the first version.
Step 3:
In the first version, extend your leg outwards and move it to the center line. Aim your heel above the target and strike a path downward.
In the second version, you just need to move your leg to the center and strike.
Step 4: Once hitting the desired target, lower your leg and return to the fighting stance.

Some tips for beginners:
This kick is extremely powerful only if you're tall, flexible, and/or have muscle mass. Think about it, the kick depends on (1) gravitational force and (2) the distance between your sole/heel and the target. The higher you raise your leg, the more force you can generate when dragging it down.
There is limited trajectory to the kick. This is why I don't use it often in sparring or MMA matches, where clinching and groundwork are more dominant. It will put you at risk of being tackled.
If you want to pull this kick successfully, I suggest you do a lot of splits. Standing split is also recommended.
When you raise your leg, slightly lean backward. The knee of your pivotal leg should be bent. Once you hit the target, lean forward.
Because I'm tall, I don't often stand on tip toe while kicking. I don't recommend it actually, since you have less balance and become more vulnerable for counterstrike. But, if you have mastered the technique, it's ok to stand like that. Even more, you can do the jumping axe kick to increase the force.
Bonus: Here’s dad letting the kids practice the axe kick.

29 notes
·
View notes
Text
SPINNING HOOK KICK (뒤후려 차기)
Hello. This is Seong Taehoon of TaehoonTaekwonTV. We have a special guest for today’s lesson. Come inside and change to your dobok.

A warm welcome to the CEO of our company, resident loser and my favorite disciple @yoo-hobin 👏

Dude, relax. I’m not gonna kill you just because you forgot your dobok (I’ll kill you after this). Take mine.
Hmmm, how should I start…

Alright. I'm gonna teach you one of my favorite knockout moves in Taekwondo - the spinning hook kick. One hook kick to the head is enough to end a street fight.
Perhaps you and my fans have seen it before. I know there are videos of my fights at the arcade. Take a closer look at this, Yoo Hobin.


The hook kick itself is already dangerous. Adding the spin increases its power. Got that? Here I call it dwi-huryeo chagi. In another lesson, I called it nakka chagi. They're the same.
But first, before doing any kicks, you should stretch and do the splits. I don't want you to pull a lame spinning kick in today's collab. My standard? Head level. Less than that and you're a loser. Not that I plan to steal your subs or anything.
Warning: This kick is an intermediate-level kick. You have to master all the basic kicks, including the hook kick, spinning back kick and spinning side kick, to learn it. It is a difficult kick. I only teach you when you reach blue belt or red belt, as in 5th or 4th geup. Don't take my standard at the moment, as it only applies to Hobin.
Similar to the hook kick, you hit the target with your heel, the sole of your foot or behind your knee.
Aim: chest, arms, neck (only close distance), and most often, head (jaw or temple are the best).
Step 1: Stand in the fighting stance.
Step 2: Lift the ball of your front foot and turn 180 degrees, so that the heel is facing forward. Your body also turns around so that your back is facing the opponent.
Step 3: Bring the knee of your back leg (now it's your front leg) up, at the same time, look over your shoulder to spot the opponent.
Step 4: Once your knee is lifted up to a low chamber (like the spinning back kick), open your hip and bring your knee to the side (like the spinning side kick). Still have to look at the target.
Step 5: Extend your leg and then fold your knee to make a hooking motion, hitting the target with your heel, sole, or locking the neck with your calf and thigh.
Step 6: Once hitting the target, retract the leg and return to the initial position.

Some tips for beginners (and Hobin):
As I said earlier, master those three kicks first (very important) before you go to this kick. If you do, this kick will be a lot easier to execute.
Remember to always, always keep your eyes on the target in front of you. I see many students blindly do the kick, beautiful kicks, yet they always miss their targets. Turn your neck and shoulders first, then your hips. This is the perfect time to practice with the kicking paddle or sandbag.
Start slowly. Look at your form and balance in the mirror. Use the chair or wall to practice if you think it's necessary. This kick should be light and powerful, which means your body must be light and know how to coordinate in a fluid motion.
When I say you should be flexible for this kick, there's a reason. Don't lean down too much when you try to kick high, or you'll lose your balance. Keep your body upright unless you think doing so in a situation would lead you to be attacked.
Like any spinning kick, more range of motions means more momentum and more force generated from the kick. In sparring, we want speed. Therefore, don't make big movements by opening your hip too wide. Keep it short and simple. In street fights, however, you want to knock out the opponent. Go big and go all out, swinging your leg and hitting the jaw or the temple.
33 notes
·
View notes
Text
SPLITTING (다리 찢기)
Starting Taekwondo at a young age, I had no problem with splitting. As far as I remember, there wasn't any screaming or crying from me. I keep my flexibility to this day.
However, things ain't smooth-sailing for my peers and disciples. Unfortunately, y'all have to go through this to reach higher levels in Taekwondo. It's mandatory. It's a necessity. So deal with it. You can cry and you can scream, you can tell your mama sabeomnim is evil for splitting your legs apart, as long as you don't give up.

Flexibility depends on many factors: age, gender, genetics, resilience. I can't control the first 3, except I recommend starting Taekwondo early (but not too early). So the only thing left is the splitting technique, and of course, your mindset.
Before jumping into the splits (or as my students say, ‘torture session’ hahaha…), remember the reasons you want to start this painful journey. Advantages of getting a full split are:
You can kick higher in Taekwondo.
You can increase the range of motion in your kicks.
You can increase blood circulation, muscle strength and decrease the risks of injuries in everyday activities.
You look cool as heck while splitting. This is the fact. In addition, you can scare and prank people with your flexibility.
Before doing the split, make sure to stretch your leg and hip muscles properly. In another post, I suggested some exercises that are beneficial for the split, such as the low lunge, squat, hamstring stretch (finger to toe), frog pose, butterfly stretch, etc.
In this post, I'll teach you the two most basic splits in Taekwondo.
How to do a front split?
I personally find the front split to be easier. To each of one's own, I guess, because students scream as equally loud in any type.
Step 1: If you're not flexible, as in your hands can't reach the ground, start with the standing position with two support materials on the sides. If you think you're flexible enough, start with low lunge position with your hands touching the floor on the sides.
Step 2: Slowly sliding down with one leg at the front and one at the back. You hands hold onto the support. If you're in a low lunge position, straighten your front leg with the knee of your back leg touched the ground. Then raise that knee up and straighten the back leg.
Step 3: Stay in that position for 30 to 1 minutes. Switch the the other side.

How to do a middle split?
Step 1: If you're not flexible, start in the standing position with two support materials in front of you. If you're flexible, start with a low squat with your hands on the ground. Push your hips forward to allow more range of motions for your hip bones.
Step 2: Sliding down until you find your limit, where it's mildly uncomfortable. For people doing the squat, jump out with legs on each side and slide down.
Step 3: Stay in that position for 30 to 1 minutes. Switch to the other side.

Once you reach the floor, try to lean forward or to the sides and stretch further.
My advice:
Practice every day. On average, about 5 to 7 times a week. For each session, spend around 1 to 2 minutes on each split to get the best result. It's absolutely possible to get a full split at any age.
This shit takes time and consistency. Do not rush and compare yourself to other people. You have to understand the limits of your body and go at your own pace.
There's a difference between ‘uncomfortable’ and ‘painful.’ High-intensity stretching does not mean you're going to improve faster. In fact, your body will do the opposite and contract your muscles. It can also tear the muscle fibers if you suddenly stretch too much.
When you feel like you've reached your limits but there's still space between your groin and the ground, try out this PNF method. Basically, you stretch the muscles, then gently push them down, and then relax your muscles again, while inhaling and exhaling to the movement.
Find a stretching buddy if you want.
27 notes
·
View notes
Text
PUSH KICK (밀어 차기)
When you want to keep a safe distance from your opponent (e.g, fighting against grapplers), this kick is the best way to both go on defense and offense.
In my dojang, we teach you this kick early (white belt) in preparation for your first sparring match. In other schools, push kick is taught later, around yellow or green belt.

The mechanic of this kick is pretty simple: you use the sole of your foot to push the opponent away from you. In sparring, it can be done with your front leg or rear leg, whichever you find more convenient.
Aim: thighs, hips, torso, chest, arms, shoulders, head,...
At this point, you must be familiar with the front thrust kick and side kick. Well, good news, the push kick is just another variation of those two kicks.
Front push kick:
Step 1: Stand in the fighting stance.
Step 2: Bring the knee of your kicking leg up. The sole should be aiming at your opponent's direction, toes pointing up. Your standing leg turned at a comfortable angle, around 45 to 90 degrees.
Step 3: Extend your knee and push your opponent away with the sole.
Step 4: Quickly drop the foot to the front and ready in a fighting position.

Side push kick:
Step 1: Stand in the fighting stance, with your chest facing the side.
Step 2: Bring the knee of your kicking leg up. The sole should be aiming at your opponent's direction, toes pointing side. Your standing leg turned at a comfortable angle, around 145 to 180 degrees.
Step 3: Extend your knee and push your opponent away with the sole.
Step 4: Drop to the front to the fighting stance.
Some tips for beginners:
When you push them away, it's natural to lean back so your leg can propel forward. Extend your hips and try to get comfortable with the pushing motion.
If there's a big weight-class difference, consider twice before doing this kick. It's a powerful kick if done right, don't get me wrong. You can increase the power by pulling the knee closer to your chest.
To practice this kick, the best way is to ask someone to practice with you. Pushing the sandbag is ok too, but not if you want to master it quickly for sparring. A moving target is always better.
Try to change legs often and combine it with footwork (jumping, stepping). Remember to measure the correct distance before kicking. Too close, you don't have enough space to snap. Too far, you can only graze their armor.
Side push kick in sparring:


25 notes
·
View notes
Text
TAEGEUK 2 JANG (태극 2장) - Part 1
This is the second poomsae in Taekwondo. I want you to learn it at the beginning of yellow belt so we can focus on sparring techniques later on.
It doesn’t mean this poomsae is unimportant.

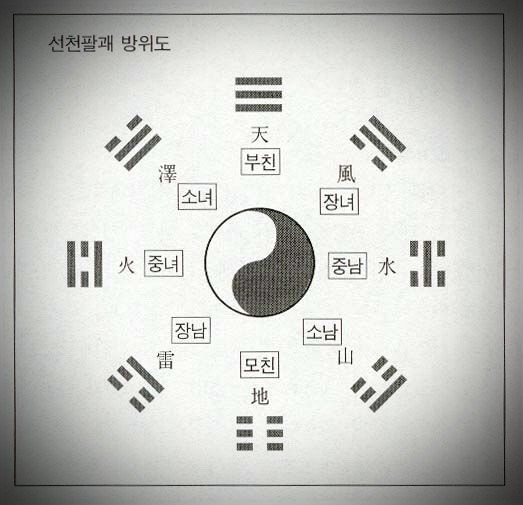
The poomsae represents the symbol ☱ - Tae (兌/태), which means Lake (澤) in the circle of Balkwae (팔괘). In the poomsae, you will find the balance between inner firmness and outer softness.
One of the reasons I decided to teach this poomsae early for 7th geup student is the poomsae's simplicity.

It's nothing that you haven't learned: walking stance, front stance, middle punch, high punch, downward block, inward middle block, upward block, and front kick.
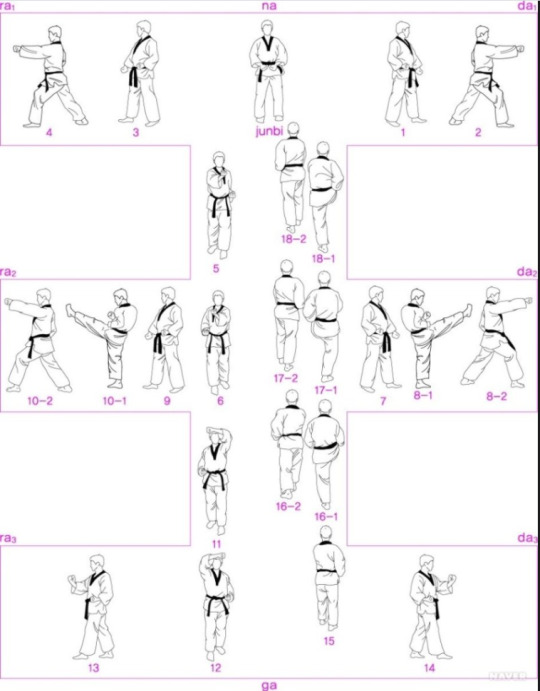
Taegeuk I Jang has 18 movements.
Preparation:
Attention stance: You face the judge and bow. (charyeot - kyungnae)
Basic ready stance: Step to the left and do the basic hand movement to prepare for the poomsae. (joonbi)
Listen to the instructor's command: When everyone's ready, they will gesture with their hand and say the poomsae's name and the word “begin.” (Taegeuk i jang - sijak!)
(L: left strike/left block/left foot in front; R: right strike/right block/right foot in front)
Because you're familiar with turning and moving between stances, I will only state the stance and hand positions. It won't be as detailed as the ones in Taegeuk Il Jang.
Look at the illustration and match my steps.
Line 1
[Step 1]: Turn 90 degrees to the left
Walking stance (L)
Downward block (L)
[Step 2]: Step forward
Front stance (R)
Middle punch (R)
[Step 3]: Turn around 180 degrees to the right
Walking stance (R)
Downward block (R)
[Step 4]: Step forward
Front stance (L)
Middle punch (L)
Moving up
[Step 5]: Turn 90 degrees to the left
Walking stance (L)
Inward middle block (R)
[Step 6]: Step forward
Walking stance (R)
Inward middle block (L)
Line 2
[Step 7]: Turn 90 degrees to the left
Walking stance (L)
Downward block (L)
[Step 8]: Kick and step forward
Front kick (R)
Front stance (R)
High punch (R)
[Step 9]: Turn around 180 degrees to the right
Walking stance (R)
Downward block (L)
[Step 10]: Kick and step forward
Front kick (L)
Front stance (L)
High punch (L)
Moving up
[Step 11]: Turn 90 degrees to the left
Walking stance (L)
Upward block (L)
[Step 12]: Step forward
Walking stance (R)
Upward block (R)
Line 3
[Step 13]: Turn 270 degrees to the left (pay attention to turning your body in this step, as now you are facing the opposite direction to line 1 and 2)
Walking stance (L)
Inward middle block (R)
[Step 14]: Turn around 180 degrees to the right
Walking stance (R)
Inward middle block (L)
Return
[Step 15]: Turn 90 degrees to the left
Walking stance (L)
Downward block (L)
[Step 16]: Kick and step forward
Front kick (R)
Walking stance (R)
Middle punch (R)
[Step 17]: Kick and step forward
Front kick (L)
Walking stance (L)
Middle punch (L)
[Step 18]: Kick and step forward
Front kick (R)
Walking stance (R)
Middle punch (R)
Shouting: Shout KIHAP (or KYAH!) at the final punch.
Closing:
Ready stance: Remain at step 18 until the instructor says “return" (baro), then move your left leg behind and you return to the basic ready stance.
Attention stance: Step your left foot to the left to attention stance and bow. (soet)
12 notes
·
View notes
Text
TAEGEUK 1 JANG (태극 1장) - Part 1
This is the first poomsae in Taekwondo, as it represents the beginning - the origin of all things.

It refers to the symbol ☰ - Keon (乾/건), which means the Sky (天) in the circle of Balkwae (팔괘).
It comprises of the basic movements and techniques in Taekwondo, like middle punch, downward block, inward middle block, upward block, walking stance, front stance, and front kick. If you master all of the techniques I just mentioned, you can easily learn this poomsae.
One thing to remember, in the Taegeuk series, the walking patterns follow the word King (王).
Taegeuk Il Jang has 18 movements.
Preparation:
Attention stance: You face the judge and bow. (charyeot - kyungnae)
Basic ready stance: Step to the left and do the basic hand movement to prepare for the poomsae. (joonbi)
Listen to the instructor's command: When everyone's ready, they will gesture with their hand and say the poomsae's name and the word “begin.” (Taegeuk il jang - sijak!)

(L: left strike/left foot in front; R: right strike/right foot in front)
Line 1:
[1]
Walking stance (L): From the ready position, turn the balls of your feet to walking stance, with your left foot in front of your right foot.
Downward block (L): Raise your left fist to the right shoulder in preparation before turning and making a downward block.
[2]
Walking stance (R): Step your right foot forward to a walking stance, your left heel turns inward into a 30-degree angle.
Middle punch (R): After the downward block, raise your left hand in preparation and do the middle punch from the right hand.
[3]
Walking stance (R): Put your right foot behind, turn your left foot around 180 degrees to a walking stance, with your right foot in front of your left foot.
Downward block (R): After punching, raise your right hand to your left shoulder in preparation for the downward block. At the moment you finish turning to the right, you should sweep your right hand to a downward block.
[4]
Walking stance (L): Similar to step 2, but this time step your left foot forward.
Middle punch (L): Raise your right hand and punch with your left hand.
Moving up:
[5]
Front stance (L): You turn to face the left. Step your left foot forward to a front stance, your right heel lifts and turns 90 degrees.
Downward block (L): Perform a downward block with your left hand.
[6]
Front stance (L): Keep the same stance.
Middle punch (R): Do the reverse punch with your right hand. The hands' transitional movements are similar to step 2 and 4.
Line 2:
[7]
Walking stance (R): Turn to your right. Move your right foot forward and turn the heel of your left foot 90 degrees.
Inward middle block (L): After punching, keep your hand in that position and make an inward middle block with your left hand.
[8]
Walking stance (L): Step your left foot forward.
Middle punch (R): After blocking, put your left hand straight out and do a reverse middle punch with your right hand.
[9]
Walking stance (L): Turn 180 degrees to the left. Step your left foot forward.
Inward middle block (R): Raise your left hand and do the inward middle block with your right hand.
[10]
Walking stance (R): Step your right foot forward.
Middle punch (L): Do a reverse middle punch with your left hand.
Moving up:
[11]
Front stance (R): Turn to your right. Step your right foot forward to a front stance, your left heel lifts and turns 90 degrees.
Downward block (R): Perform a downward block with your right hand.
[12]
Front stance (R): Keep the same stance.
Middle punch (L): Do the reverse punch with your left hand.
Line 3:
[13]
Walking stance (L): Turn to your left. Move your left foot forward and turn the heel of your right foot 90 degrees.
Upward block (L): After punching, move your right fist to your left shoulder and your left fist around your waist. Make an upward block.
[14]
Front kick (R): Close your fists to your body and do a front kick with your right leg.
Walking stance (R): Drop the right leg forward to a walking stance.
Middle punch (R): At the same time, make an obverse middle punch with your right hand.
[15]
Walking stance (R): Turn 180 degrees to the right. Your right foot forward.
Upward block (R): Put your left fist on your right shoulder, right fist around the waist and make an upward block.
[16]
Front kick (L): Close your fists to your body and do a front kick with your left leg.
Walking stance (L): Drop the left leg forward to a walking stance.
Middle punch (L): And make an obverse middle punch.
Return:
[17]
Front stance (L): You turn to face the right. Step your left foot forward to a front stance, your right heel lifts and turns 90 degrees.
Downward block (L): Do a downward block with your left hand.
[18]
Front stance (R): Step your right foot forward to another front stance. Remember to remain at the same height. Don't lift your body up while changing legs between stances.
Middle punch (R): Do an obverse punch with your right hand.
Shouting: Shout KIHAP (or KYAH!) at the final punch.
Closing:
Ready stance: Remain at step 18 until the instructor says “return" (baro), then move your left leg behind and you return to the basic ready stance.
Attention stance: Step your left foot to the left to attention stance and bow. (soet)
undefined
youtube
25 notes
·
View notes
Text
STRETCHING (스트레칭)
Stretching is extremely crucial in Taekwondo, let's be honest. I won't let you practice Taekwondo without proper stretching. It's a part of warm-up routine at the start and relaxed session near the end. It prevents muscles spasm, soreness, helps with your flexibility and increases the power of your kicks. It takes around 15 to 30 minutes for a thorough full-body stretching.

Each dojang and each instructor has different stretching methods. Even me and my dad. I'll go through the basic stretching exercises of MY routine in MY dojang, alright?
In the beginning:
There are two types of stretches: Static and Dynamic. Don't confuse them with other warm-up exercises (for instances, push-ups or running laps around dojang). However, I like to combine all of them into my routine. You can do it by yourself, or let someone help you, especially with splitting exercises.
For static stretch, you keep from 30 seconds to a minute. For dynamic stretch, you do from 12 to 15 reps and switch sides.
Upper Body
Neck stretch: Bend your neck forward, bring your chin to your chest. Bend your neck backward, eyes up the ceiling. Turn your head to the left, then to the right (still facing forward, ears close to shoulders). Turn your face to the left, then to the right. For each exercise, hold for 5-10 seconds. Repeat 4 times.
Neck rotation: Turn your neck in circular motions, from left to right, and from right to left.
Shoulder stretch: Link your fingers together. Raise both arms forward and over your head. Unlike your fingers and raise your arms to the sides. After that, raise one arm forward, grab your tricep and pull across your chest. Repeat for the other arm.
Shoulder/arm rotation: Move your arms in circular motions, like drawing circles on the sides. Start with small circles and end with large circles.
Bicep stretch: Put your arm forward, palm up. Place your other palm on it and bend it down. Your arm must be straight.
Tricep stretch: Raise your arm up and put it behind your back, elbow bent. The other arm grab your elbow and pull.
Side/oblique stretch:
1. Side pull: One hand on your hip. Raise the other hand up. Bend your body to the right while facing forward. Repeat on the left.
2. Side turn: Link your fingers and put them in front of your chest. Turn your body to the right so you're facing the back. Repeat on the left.
Back stretch:
1. Put your arms behind your back and link your fingers together. Stretch your upper back by pulling the arms away from the body.
2. Keep that position, bend down 90 degrees and pull your arms up as much as possible. Keep your neck and back straight. Release your arms and let your finger touch your toes.
3. For dynamic stretch, do the windmill exercise. Your left hand touches your right toes and vice versa.
Hip rotation: Place your hands on your hip and rotate from left to right and vice versa.
Lower Body
Hamstring stretch: It's the same exercise with the back stretch. If it's not possible, put your hands on one knee with the other knee slight bends, sole lifts up the ground. Knee rotation:
Thigh stretch: Fold your leg to the back so your toes touch your behind, one hand holding your foot. Fold your leg in front and hug it with both arms.
Knee rotation: Put your hands on your knees and rotate from left to right and right to left.
Lunge:
1. High lunge: Hands on your hip, do the high lunge. Make sure that your front thigh is parallel to the ground, knee bent 90 degrees and your back leg is straight. When you look down, you can still see your toes.
2. High side lunge: Hands on your hip, head facing forward. Do the side lunge by bending your knee to the side, your other leg is straight. Make sure the thigh is pointed to the same direction as your toe, knee bent 90 degrees.
3. Low lunge (crescent lunge): Same with the high lunge, but this time you touch the whole part below the knee of your back leg to the ground.
4. Low lunge twist: See my demonstration in the picture above. Note: low lunge is extremely helpful for front split.
5. Low side lunge: Stand in wide stance, toes pointed outwards. Bend your knee to lower yourself to the ground, your other leg straighten out. If possible, use your elbow to open your hip wider. Note: low side lunge is very helpful for side split.
Sitting
Hamstring stretch (again):
1. Front hamstring stretch: Put your legs in front and try to touch your toes with your fingers. For flexible students, put your hand on your soles and hug your legs, head touches your knees.
2. Side hamstring stretch: Open your legs to the sides. Bend your body to the right and touch your right toes with your fingers. Do the same with your left side.
Ankle rotation: Place your ankle on your thigh and rotate slowly with your hand.
Outer thigh stretch + hip stretch + hamstring stretch: Sit in the same position as the ankle rotation exercise. Grab your lower leg and pull it close to your chest. Keep it for a few seconds. Then grab the sole with your opposite hand and pull your leg straight forward.
Kneeling
Back stretch + thigh stretch (again): Kneel with legs slightly further apart. Slowly bend backward so that your head touches the ground. Optional: do the bridge pose.
Inner thigh stretch: Kneel with your legs wide apart. Slowly bend forward and support your body with your elbows. (See frog pose)
Splits
Front split: Turn side way, put one leg forward, slowly sliding down until you touch the floor.
Middle split: Turn your head forward, slowly sliding down until you touch the floor. Endure the pain for me. If you can't touch (yet), try to reach your hand down to touch the ground. Once you have additional support from your hands, push yourself down slightly, then up, then down.
Oversplit (optional/highly recommended for red and black belts): Same steps with front split and side split, only with additional tools (like chairs) to support your legs.
Standing split (optional): Stand in side kick position and raise your leg as high as possible
Kicks
You can kick with your legs straight and without moving your knees. This is only for stretching. For instance, with front kick, simply raise your leg up as high as you can (similar to the first step of axe kick).
Front kick
Crescent kick
Side kick
Back kick
In the end:
I do a few yoga poses because they benefits my muscles. Same with warm up, you can do cool-down exercises by yourself or with the help of a fellow student.
Some of my favorite yoga poses for cooling down (you can search them yourselves): Pigeon pose, cat pose, cow pose, cobra pose, frog pose, forward bend pose, knee-to-chest press, wheel pose, child pose and corpse pose.
Additionally, I meditate in lotus pose or corpse pose for 5 to 15 minutes. This is optional.
You can skip a few exercises, just make sure all the muscles are properly stretched. I’ve been doing this routine for years. If you get cramped or sore muscles, it's your fault.
38 notes
·
View notes
Text
DOJANG ETIQUETTE (도장 예절)
Dad read my blog and asked me why there wasn't a post about dojang etiquette. “It's the first thing to learn, son,” he said.

In Taekwondo, “respect” places the highest value. Without respect, you're not a Taekwondoin.
Below is a list of dojang etiquette you should adhere:
Before entering the dojang:
Wear your dobok and belt. Fix your clothes and hair. Remove shoes and accessories to avoid injuries during practice.
Walk quietly into the dojang. Do not run inside. Stand in attention stance and bow to the instructor and the flag.
Inside the dojang:
Outside my dojang, you can call me whatever the fuck you want. Inside my dojang, you should regard me (and my dad) as your Taekwondo masters. Call us “sabeomnim" and use honorifics.
Respect your fellow students, especially black-belt students because they're your seniors. They are your “sunbae.” Always bow to the person with higher dan first. You should bow lower and longer than them.
If you're late for around 30 minutes or less (you'd better have a good reason, later than that and I'll kick you out), do your warm-up routine by yourself at the end or in the corner of class. Quietly join the rest of the students once you're done.
Keep your voice down (preferably shut your mouth) when I'm teaching. Sit cross-legged or stand in attention stance. I don't like kneeling (too formal for me), but dad may ask you to do it during meditation.
Bow to your master/instructor and classmate whenever you receive personal instruction. Bow before and after a spar.
When you adjust your dobok and belt, or when you change to your armor, face away from your instructor and the flag.
My dojang is a sacred place. As a student, refrain from shouting, laughing or swearing. Or I'll whack your head.
Clean the dojang together if it's your turn.
Before leaving, you have to bow again to your master and the flag. Screw that, you have to do it every time you leave, not only at the end of class.
After leaving the dojang:
Change to your normal clothes after class. If you have nothing else to wear, put on a jacket.
Always keep your dobok and belt clean. But, do not wash your belt. I never wash mine. It's disrespectful to do so.
29 notes
·
View notes
Text
OBVERSE/REVERSE PUNCH (반대/바로 지르기)
The two terms “bandae - 반대” (obverse) and “baro - 바로" (reverse) are often used in Taekwondo. They can be applied to punch, kick, block, and strike.
In Taekwondo, there are many stances which have the front foot and the back foot, such as front stance, back stance, and tiger stance.
An “obverse" punch refers to punch in which the punching hand is on the same side as the front foot. A “reverse" punch is when the punching hand is on the opposite side as the front foot.
Of course the obverse punch packs more power than the reverse punch, more suitable for offense. The reverse punch is used mostly for defense, after a block.
Front stance obverse middle punch:

Back stance reverse middle punch/front stance reverse middle punch:


18 notes
·
View notes
Text
BACK KICK (뒷 차기)
Per @jihyeok-snapper’s suggestion and your votes, I decided to teach you an iconic move in Taekwondo - the back kick.

There are two versions: kicking with the blade of your foot, or your heel.
Aim: torso, ribs, chest, shoulders, head...
Step 1: Stand in ready stance or fighting stance, feet paralleled.
Step 2: Raise your knee up like the front kick, make sure the leg is close to, or touches the pivotal leg, at the same time, turn your head and look over your shoulder.
Step 3: Bring your leg down, go under to the back and kick in a straight line with your heel, or turn your ankle to kick with the blade of your foot.
Step 4: Pull your leg up to step 2.
Step 5: Drop your leg in front and face your opponent, or drop to the initial position.

Some tips for beginners:
Same with other kicks, don't worry about kicking high in your first few sessions. In fact, don't kick too high. Worry about your posture first, your aim, then finally your target.
To practice the back kick, relax your body, especially at the waist and lower back. Many students complain to me about their back pain because they try to keep their backs straight while kicking. This is not like other kicks. You actually have to lean your upper body forward to maintain balance. Don't lean too much though, or you'll fall over.
Don't be too concerned about your opponent's distance or the accuracy of your aim by turning your body too much. By doing so, it becomes the spinning side kick. The kick itself is already powerful. If grazed, it can still hurt the opponent.
First, you should try to practice with a chair or a wall. Hold onto it with two hands, arms straight, keep your leg straight and slowly lift it backwards, to a comfortable height, then put it down. Repeat the movement several times so your lower body is familiar to the kicking motion and your upper body is familiar with the leaning motion.
Second, kneel on all four, with your hands and legs. Raise your leg slowly to the back and do the donkey kicks, except you extend your legs all the way.
Third, run on high knees, start at one spot and run backwards like Hobin did in here. When you run, turn your neck and glance over your shoulder, try to imagine you're running towards your target.

Fourth, you can start practice the kick.
Fifth, you can combine running with kicking.
21 notes
·
View notes
Text
PARALLEL STANCE (나란히 서기)
Another stance that I almost skipped, because I believe my disciples are smart enough to not learn something twice. But in the end, dad won. He's the chief master. My lessons need his approval.
By this time, you probably know which stance is similar to parallel stance (naranhi seogi).
Yup, the basic ready stance (kibon joonbi seogi). You stand with knees straight, two feet are about one foot length from each other, toes facing forward. The weight distribution is 50-50.

Similar to the close stance, you keep the fists at your hips, or moving down slowly to a double downward block (gechio naeryeo makgi) like in Taegeuk 6 Jang.
12 notes
·
View notes
Last Seen Blogs