#'insert the code to create your account!' (insert code and press continue) (NOTHING HAPPENS)
Explore tagged Tumblr posts
Visit Tumblr Blog
Explore Tumblr blogs with no restrictions, modern design and the best experience.
Last Seen Tumblr Blogs


Fun Fact
There are dozens of funny blogs to kill time on Tumblr.
Text
i want to find and kill whoever designed Ubisoft's website like this
#'please complete the captcha challenge.' (NO CAPTCHA CHALLENGE LOADED PRIOR)#'invalid username!' (SAID VALID 0.5 NANOSECONDS AGO)#'invalid password!' (SAID IT WAS A GOOD AND STRONG PASSWORD PRIOR)#'insert the code to create your account!' (insert code and press continue) (NOTHING HAPPENS)#'log in!' (repeatedly attempt to log in) (LOCKS ME OUT OF ACCOUNT FOR AN HOUR)#IM GONNA FUCK
1 note
·
View note
Text
Configuring Push Notifications For Xamarin Forms
Push Notifications are one-way forms of communication offered to mobile users that some operation (like an update, deletion, or addition) has happened.
To send a push notification to an Apple device, use the Apple Push Services. For an Android device, use Google’s Firebase Cloud Messaging Services. Fortunately, if you’re sending a push notification to an app on both platforms, Microsoft offers an easier way through Microsoft Azure Notification Hub.
Go to the Azure portal.
Click “Create a resource”, “Web + Mobile” and select “Notification Hub.”
In the new window, enter the notification hub name and create a new namespace.
Select a location. We recommend a location closest to the user or closest to you (the developer).
Choose an existing resource group or create a new resource group.
Select your Microsoft subscription (for billing purposes).
Choose a pricing tier based on your usage needs and click “Select” to close the pricing tab.
Click “Create” to create the new notification hub. It may take few minutes to create and configure.
Choose the “Google (GCM)” from the side menu. This section is used to configure and send Android-based push notifications using Birebase cloud messaging.
Create the Firebase Push Notifcation
Open a new browser window and navigate to https://console.firebase.google.com/.
Login or create a new account. After you have logged in, click “+ Add Project”.

Enter the Project Name and Country/region. You can change the Project ID if required.
Click “CREATE PROJECT.” It may take a few minutes to create the project.
After the message “Your new project is ready”, click “CONTINUE” to navigate to the project page.

In the new page, select “Add Firebase to your Android app” to create an Android-based Firebase app.

In the next screen, enter the “Android package name” and enter an optional app nickname. Select “REGISTER APP.”

In the next screen, click “Download google-services.json” and download the file.

Open the downloaded file and copy the project number (a 12-digit code like 272477558565) into the project’s AppSettings.cs file for FirebaseSenderID.
Create push services for iOS:
Select “Apple (APNS)” from the Azure portal side menu.

Upload a certificate to send push notifications on iOS. Log in to https://developer.apple.com.
Navigate to “Certificates, Identifiers and Profiles.”

Select the Apple ID associated with the application.
Ensure that the ID is configured to use Push Notifications. It should have the status as Configurable. Click “Edit” to configure push services.

In the next screen, choose to create either a development or production SSL certificate and click “Create Certificate.”

The next screen requires you to create a “certSigningRequest”. Create the file and upload it.
On the Mac, open the “Keychain Access” application: press WinKey + Spacebar to open Spotlight. Type “keychain access” and press enter.
Select Keychain Access -> Certificate Assistant -> Request a Certificate From a Certificate Authority.

Enter the user email address, command name, and Certificate Authority (CA) Email address.
Select “Saved to disk” and click “Continue”.

In the popup dialog, save the certSigningRequest.
Choose a location. If you’re choosing a default location, make sure to note the location for future purposes.
Now navigate back to the apple developer website and upload the previously created certSigningRequest and select “Continue.”

In the next screen, click “Download” button to download the .cer file. After downloading the file, select “Done” and close the browser.
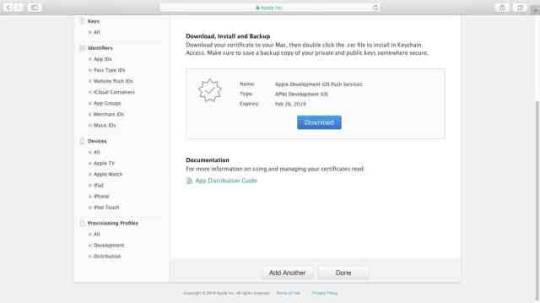
Double click to open the .cer file. It will by default open the Keychain Access application.
Enter the administrator password to install the .cer file.

Right-click on the certificate and choose “Export [Certificate Name].”

Enter a name for the “.p12” file. Select the location of the file and click “Save.” Make sure the file format is “Personal Information Exchange (.p12)” before saving the file.

Enter a password for the p12 file. Re-enter the password.

Enter the administrator password for Keychain Access application to export the key and select “Allow.”

Now navigate back to the Azure portal.
Select Folder Icon.

Find the p12 file and click “Open.” Enter the same password used to create the file. Save.

Open the Backend Mobile app service from the Azure portal and navigate to “Push” from the sidebar menu.
Connect to the notification hub we created earlier.

Choose the previously created notification hub.

On the next screen, add the tag “UserGroup1” for push notifications to be delivered to the mobile devices. Save.

Xamarin.Forms application functionality
The sample Xamarin.Forms application displays a list of push notification messages. This is achieved with the AddMessage method, which adds the specified push notification message to the UI. This method also prevents duplicate messages from being added to the UI, and runs on the main thread so it can be called from any thread. The following code shows the AddMessage method:
public void AddMessage(string message) { Device.BeginInvokeOnMainThread(() => { if (messageDisplay.Children.OfType<Label>().Where(c => c.Text == message).Any()) { // Do nothing, an identical message already exists } else { Label label = new Label() { Text = message, HorizontalOptions = LayoutOptions.CenterAndExpand, VerticalOptions = LayoutOptions.Start }; messageDisplay.Children.Add(label); } }); }
The sample application contains an AppConstants.cs file, which defines properties used by the platform projects. This file needs to be customized with values from your Azure Notification Hub. The following code shows the AppConstants.cs file:C#Copy
public static class AppConstants { public static string NotificationChannelName { get; set; } = "XamarinNotifyChannel"; public static string NotificationHubName { get; set; } = "< Insert your Azure Notification Hub name >"; public static string ListenConnectionString { get; set; } = "< Insert your DefaultListenSharedAccessSignature >"; public static string DebugTag { get; set; } = "XamarinNotify"; public static string[] SubscriptionTags { get; set; } = { "default" }; public static string FCMTemplateBody { get; set; } = "{\"data\":{\"message\":\"$(messageParam)\"}}"; public static string APNTemplateBody { get; set; } = "{\"aps\":{\"alert\":\"$(messageParam)\"}}"; }
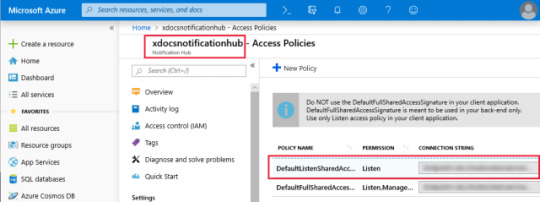
Customize the following values in AppConstants to connect the sample application to your Azure Notification Hub:
NotificationHubName: Use the name of the Azure Notification Hub you created in your Azure portal.
ListenConnectionString: This value is found in the Azure Notification Hub under Access Policies.
The following screenshot shows where these values are located in the Azure portal:
Configure the Android application for notifications
Complete the following steps to configure the Android application to receive and process notifications:
Configure the Android Package name to match the package name in the Firebase console.
Install the following NuGet packages to interact with Google Play, Firebase and Azure Notification Hubs:
Xamarin.GooglePlayServices.Base.
Xamarin.Firebase.Messaging.
Xamarin.Azure.NotificationHubs.Android.
Copy the google-services.json file that you downloaded during FCM setup to the project and set the Build Action to GoogleServicesJson.
Configure AndroidManifest.xml to communicate with Firebase.
Override FirebaseMessagingService to handle messages.
Add incoming notifications to Xamarin.Forms UI.
Note
The GoogleServicesJson build action is part of the Xamarin.GooglePlayServices.Base NuGet package. Visual Studio 2019 sets the available Build Actions during startup. If you do not see GoogleServicesJson as a Build Action, restart Visual Studio 2019 after installing the NuGet packages.
Configure Android manifest
The receiver elements within the application element allow the app to communicate with Firebase. The uses-permission elements allow the app to handle messages and register with Azure Notification Hub. The complete AndroidManifest.xml should look similar to the example below:XMLCopy
<manifest xmlns:android="http://schemas.android.com/apk/res/android" android:versionCode="1" android:versionName="1.0" package="YOUR_PACKAGE_NAME" android:installLocation="auto"> <uses-sdk android:minSdkVersion="21" /> <uses-permission android:name="android.permission.INTERNET" /> <uses-permission android:name="com.google.android.c2dm.permission.RECEIVE" /> <uses-permission android:name="android.permission.WAKE_LOCK" /> <uses-permission android:name="android.permission.GET_ACCOUNTS"/> <application android:label="Notification Hub Sample"> <receiver android:name="com.google.firebase.iid.FirebaseInstanceIdInternalReceiver" android:exported="false" /> <receiver android:name="com.google.firebase.iid.FirebaseInstanceIdReceiver" android:exported="true" android:permission="com.google.android.c2dm.permission.SEND"> <intent-filter> <action android:name="com.google.android.c2dm.intent.RECEIVE" /> <action android:name="com.google.android.c2dm.intent.REGISTRATION" /> <category android:name="${applicationId}" /> </intent-filter> </receiver> </application> </manifest>
Override FirebaseMessagingService to handle messages
To register with Firebase and handle messages, subclass the FirebaseMessagingService class. The sample application defines a FirebaseService class that subclasses the FirebaseMessagingService. This class is tagged with an IntentFilter attribute, which includes the com.google.firebase.MESSAGING_EVENT filter. This filter allows Android to pass incoming messages to this class for handling:C#Copy
[Service] [IntentFilter(new[] { "com.google.firebase.MESSAGING_EVENT" })] public class FirebaseService : FirebaseMessagingService { // ... }
When the application is started, the Firebase SDK will automatically request a unique token identifier from the Firebase server. Upon successful request, the OnNewToken method will be called on the FirebaseService class. The sample project overrides this method and registers the token with Azure Notification Hubs:C#Copy
public override void OnNewToken(string token) { // NOTE: save token instance locally, or log if desired SendRegistrationToServer(token); } void SendRegistrationToServer(string token) { try { NotificationHub hub = new NotificationHub(AppConstants.NotificationHubName, AppConstants.ListenConnectionString, this); // register device with Azure Notification Hub using the token from FCM Registration registration = hub.Register(token, AppConstants.SubscriptionTags); // subscribe to the SubscriptionTags list with a simple template. string pnsHandle = registration.PNSHandle; TemplateRegistration templateReg = hub.RegisterTemplate(pnsHandle, "defaultTemplate", AppConstants.FCMTemplateBody, AppConstants.SubscriptionTags); } catch (Exception e) { Log.Error(AppConstants.DebugTag, $"Error registering device: {e.Message}"); } }
The SendRegistrationToServer method registers the device with the Azure Notification Hub and subscribes to tags with a template. The sample application defines a single tag called default and a template with a single parameter called messageParam in the AppConstants.cs file. For more information about registration, tags, and templates, see Register templates and tags with the Azure Notification Hub.
When a message is received, the OnMessageReceived method will be called on the FirebaseService class:C#Copy
public override void OnMessageReceived(RemoteMessage message) { base.OnMessageReceived(message); string messageBody = string.Empty; if (message.GetNotification() != null) { messageBody = message.GetNotification().Body; } // NOTE: test messages sent via the Azure portal will be received here else { messageBody = message.Data.Values.First(); } // convert the incoming message to a local notification SendLocalNotification(messageBody); // send the incoming message directly to the MainPage SendMessageToMainPage(messageBody); } void SendLocalNotification(string body) { var intent = new Intent(this, typeof(MainActivity)); intent.AddFlags(ActivityFlags.ClearTop); intent.PutExtra("message", body); //Unique request code to avoid PendingIntent collision. var requestCode = new Random().Next(); var pendingIntent = PendingIntent.GetActivity(this, requestCode, intent, PendingIntentFlags.OneShot); var notificationBuilder = new NotificationCompat.Builder(this) .SetContentTitle("XamarinNotify Message") .SetSmallIcon(Resource.Drawable.ic_launcher) .SetContentText(body) .SetAutoCancel(true) .SetShowWhen(false) .SetContentIntent(pendingIntent); if (Build.VERSION.SdkInt >= BuildVersionCodes.O) { notificationBuilder.SetChannelId(AppConstants.NotificationChannelName); } var notificationManager = NotificationManager.FromContext(this); notificationManager.Notify(0, notificationBuilder.Build()); } void SendMessageToMainPage(string body) { (App.Current.MainPage as MainPage)?.AddMessage(body); }
Incoming messages are converted to a local notification with the SendLocalNotification method. This method creates a new Intent and places the message content into the Intent as a string Extra. When the user taps the local notification, whether the app is in the foreground or the background, the MainActivity is launched and has access to the message contents through the Intent object.
The local notification and Intent example requires the user to take the action of tapping on the notification. This is desirable when the user should take action before the application state changes. However, you may want to access the message data without requiring a user action in some cases. The previous example also sends the message directly to the current MainPage instance with the SendMessageToMainPage method. In production, if you implement both methods for a single message type, the MainPage object will get duplicate messages if the user taps the notification.
Note
The Android application will only receive push notifications if it is running in either the background or foreground. To receive push notifications when the main Activity is not running, you must implement a service, which is beyond the scope of this sample. For more information, see Creating Android Services
Add incoming notifications to the Xamarin.Forms UI
The MainActivity class needs to obtain permission to handle notifications and manage incoming message data. The following code shows the complete MainActivity implementation:C#Copy
[Activity(Label = "NotificationHubSample", Icon = "@mipmap/icon", Theme = "@style/MainTheme", MainLauncher = true, ConfigurationChanges = ConfigChanges.ScreenSize | ConfigChanges.Orientation, LaunchMode = LaunchMode.SingleTop)] public class MainActivity : global::Xamarin.Forms.Platform.Android.FormsAppCompatActivity { protected override void OnCreate(Bundle savedInstanceState) { TabLayoutResource = Resource.Layout.Tabbar; ToolbarResource = Resource.Layout.Toolbar; base.OnCreate(savedInstanceState); global::Xamarin.Forms.Forms.Init(this, savedInstanceState); LoadApplication(new App()); if (!IsPlayServiceAvailable()) { throw new Exception("This device does not have Google Play Services and cannot receive push notifications."); } CreateNotificationChannel(); } protected override void OnNewIntent(Intent intent) { if (intent.Extras != null) { var message = intent.GetStringExtra("message"); (App.Current.MainPage as MainPage)?.AddMessage(message); } base.OnNewIntent(intent); } bool IsPlayServiceAvailable() { int resultCode = GoogleApiAvailability.Instance.IsGooglePlayServicesAvailable(this); if (resultCode != ConnectionResult.Success) { if (GoogleApiAvailability.Instance.IsUserResolvableError(resultCode)) Log.Debug(AppConstants.DebugTag, GoogleApiAvailability.Instance.GetErrorString(resultCode)); else { Log.Debug(AppConstants.DebugTag, "This device is not supported"); } return false; } return true; } void CreateNotificationChannel() { // Notification channels are new as of "Oreo". // There is no need to create a notification channel on older versions of Android. if (Build.VERSION.SdkInt >= BuildVersionCodes.O) { var channelName = AppConstants.NotificationChannelName; var channelDescription = String.Empty; var channel = new NotificationChannel(channelName, channelName, NotificationImportance.Default) { Description = channelDescription }; var notificationManager = (NotificationManager)GetSystemService(NotificationService); notificationManager.CreateNotificationChannel(channel); } } }
The Activity attribute sets the application LaunchMode to SingleTop. This launch mode tells the Android OS to only allow a single instance of this activity. With this launch mode, incoming Intent data is routed to the OnNewIntent method, which extracts message data and sends it to the MainPage instance through the AddMessage method. If your application uses a different launch mode, it must handle Intent data differently.
The OnCreate method uses a helper method called IsPlayServiceAvailable to ensure the device supports Google Play Service. Emulators or devices that do not support Google Play Service cannot receive push notifications from Firebase.
Configure iOS for notifications
The process for configuring the iOS application to receive notifications is:
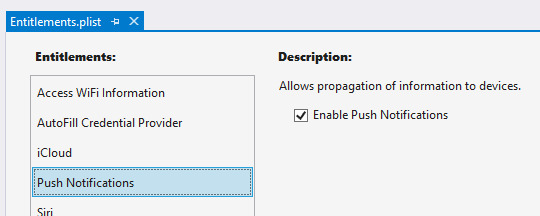
Configure the Bundle Identifier in the Info.plist file to match the value used in the provisioning profile.
Add the Enable Push Notifications option to the Entitlements.plist file.
Add the Xamarin.Azure.NotificationHubs.iOS NuGet package to your project.
Register for notifications with APNS.
Register the application with Azure Notification Hub and subscribe to tags.
Add APNS notifications to Xamarin.Forms UI.
The following screenshot shows the Enable Push Notifications option selected in the Entitlements.plist file within Visual Studio:
Register for notifications with APNS
The FinishedLaunching method in the AppDelegate.cs file must be overridden to register for remote notifications. Registration differs depending on the iOS version being used on the device. The iOS project in the sample application overrides the FinishedLaunching method to call RegisterForRemoteNotifications as shown in the following example:C#Copy
public override bool FinishedLaunching(UIApplication app, NSDictionary options) { global::Xamarin.Forms.Forms.Init(); LoadApplication(new App()); base.FinishedLaunching(app, options); RegisterForRemoteNotifications(); return true; } void RegisterForRemoteNotifications() { // register for remote notifications based on system version if (UIDevice.CurrentDevice.CheckSystemVersion(10, 0)) { UNUserNotificationCenter.Current.RequestAuthorization(UNAuthorizationOptions.Alert | UNAuthorizationOptions.Sound | UNAuthorizationOptions.Sound, (granted, error) => { if (granted) InvokeOnMainThread(UIApplication.SharedApplication.RegisterForRemoteNotifications); }); } else if (UIDevice.CurrentDevice.CheckSystemVersion(8, 0)) { var pushSettings = UIUserNotificationSettings.GetSettingsForTypes( UIUserNotificationType.Alert | UIUserNotificationType.Badge | UIUserNotificationType.Sound, new NSSet()); UIApplication.SharedApplication.RegisterUserNotificationSettings(pushSettings); UIApplication.SharedApplication.RegisterForRemoteNotifications(); } else { UIRemoteNotificationType notificationTypes = UIRemoteNotificationType.Alert | UIRemoteNotificationType.Badge | UIRemoteNotificationType.Sound; UIApplication.SharedApplication.RegisterForRemoteNotificationTypes(notificationTypes); } }
Register with Azure Notification Hub and subscribe to tags
When the device has successfully registered for remote notifications during the FinishedLaunching method, iOS will call the RegisteredForRemoteNotifications method. This method should be overridden to perform the following actions:
Instantiate the SBNotificationHub.
Unregister any existing registrations.
Register the device with your notification hub.
Subscribe to specific tags with a template.
For more information about registration of the device, templates, and tags, see Register templates and tags with the Azure Notification Hub. The following code demonstrates registration of the device and templates:C#Copy
public override void RegisteredForRemoteNotifications(UIApplication application, NSData deviceToken) { Hub = new SBNotificationHub(AppConstants.ListenConnectionString, AppConstants.NotificationHubName); // update registration with Azure Notification Hub Hub.UnregisterAll(deviceToken, (error) => { if (error != null) { Debug.WriteLine($"Unable to call unregister {error}"); return; } var tags = new NSSet(AppConstants.SubscriptionTags.ToArray()); Hub.RegisterNative(deviceToken, tags, (errorCallback) => { if (errorCallback != null) { Debug.WriteLine($"RegisterNativeAsync error: {errorCallback}"); } }); var templateExpiration = DateTime.Now.AddDays(120).ToString(System.Globalization.CultureInfo.CreateSpecificCulture("en-US")); Hub.RegisterTemplate(deviceToken, "defaultTemplate", AppConstants.APNTemplateBody, templateExpiration, tags, (errorCallback) => { if (errorCallback != null) { if (errorCallback != null) { Debug.WriteLine($"RegisterTemplateAsync error: {errorCallback}"); } } }); }); }
Note
Registering for remote notifications can fail in situations such as no network connection. You can choose to override the FailedToRegisterForRemoveNotifications method to handle registration failure.
Add APNS notifications to Xamarin.Forms UI
When a device receives a remote notification, iOS calls the ReceivedRemoteNotification method. Incoming message JSON is converted into an NSDictionary object, and the ProcessNotification method extracts values from the dictionary and sends them to the Xamarin.Forms MainPage instance. The ReceivedRemoteNotifications method is overridden to call ProcessNotification as shown in the following code:C#Copy
public override void ReceivedRemoteNotification(UIApplication application, NSDictionary userInfo) { ProcessNotification(userInfo, false); } void ProcessNotification(NSDictionary options, bool fromFinishedLaunching) { // make sure we have a payload if (options != null && options.ContainsKey(new NSString("aps"))) { // get the APS dictionary and extract message payload. Message JSON will be converted // into a NSDictionary so more complex payloads may require more processing NSDictionary aps = options.ObjectForKey(new NSString("aps")) as NSDictionary; string payload = string.Empty; NSString payloadKey = new NSString("alert"); if (aps.ContainsKey(payloadKey)) { payload = aps[payloadKey].ToString(); } if (!string.IsNullOrWhiteSpace(payload)) { (App.Current.MainPage as MainPage)?.AddMessage(payload); } } else { Debug.WriteLine($"Received request to process notification but there was no payload."); } }
Test notifications in the Azure portal
Azure Notification Hubs enable you to check that your application can receive test messages. The Test Send section in the notification hub allows you to choose the target platform and send a message. Setting the Send to Tag expression to default will send messages to applications that have registered a template for the default tag. Clicking the Send button generates a report that includes the number of devices reached with the message. The following screenshot shows an Android notification test in the Azure portal:

Testing tips
When testing that an application can receive push notifications, you must use a physical device. Android and iOS virtual devices may not be configured correctly to receive push notifications.
The sample Android application registers its token and templates once when the Firebase token is issued. During testing you may need to request a new token and re-register with the Azure Notification Hub. The best way to force this is to clean your project, delete the bin and obj folders and uninstall the application from the device before rebuilding and deploying.
Many parts of the push notification flow are executed asynchronously. This may result in breakpoints not being hit or being hit in an unexpected order. Use device or debug logging to trace execution without interrupting application flow. Filter the Android device log using the DebugTag specified in Constants.
When debugging is stopped in Visual Studio, the app is force closed. Any message receivers or other services launched as part of the debugging process will be closed and will not respond to message events.
Create a notification dispatcher
Azure Notification Hubs enable your backend application to dispatch notifications to devices across platforms. The sample demonstrates notification dispatch with the NotificationDispatcher console application. The application includes the DispatcherConstants.cs file, which defines the following properties:C#Copy
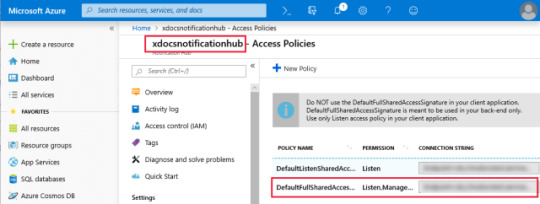
public static class DispatcherConstants { public static string[] SubscriptionTags { get; set; } = { "default" }; public static string NotificationHubName { get; set; } = "< Insert your Azure Notification Hub name >"; public static string FullAccessConnectionString { get; set; } = "< Insert your DefaultFullSharedAccessSignature >"; }
You must configure the DispatcherConstants.cs to match your Azure Notification Hub configuration. The value of the SubscriptionTags property should match the values used in the client apps. The NotificationHubName property is the name of your Azure Notification Hub instance. The FullAccessConnectionString property is the access key found in your notification hub Access Policies. The following screenshot shows the location of the NotificationHubName and FullAccessConnectionString properties in the Azure portal:
The console application loops through each SubscriptionTags value and sends notifications to subscribers using an instance of the NotificationHubClient class. The following code shows the console application Program class:C#Copy
class Program { static int messageCount = 0; static void Main(string[] args) { Console.WriteLine($"Press the spacebar to send a message to each tag in {string.Join(", ", DispatcherConstants.SubscriptionTags)}"); WriteSeparator(); while (Console.ReadKey().Key == ConsoleKey.Spacebar) { SendTemplateNotificationsAsync().GetAwaiter().GetResult(); } } private static async Task SendTemplateNotificationsAsync() { NotificationHubClient hub = NotificationHubClient.CreateClientFromConnectionString(DispatcherConstants.FullAccessConnectionString, DispatcherConstants.NotificationHubName); Dictionary<string, string> templateParameters = new Dictionary<string, string>(); messageCount++; // Send a template notification to each tag. This will go to any devices that // have subscribed to this tag with a template that includes "messageParam" // as a parameter foreach (var tag in DispatcherConstants.SubscriptionTags) { templateParameters["messageParam"] = $"Notification #{messageCount} to {tag} category subscribers!"; try { await hub.SendTemplateNotificationAsync(templateParameters, tag); Console.WriteLine($"Sent message to {tag} subscribers."); } catch (Exception ex) { Console.WriteLine($"Failed to send template notification: {ex.Message}"); } } Console.WriteLine($"Sent messages to {DispatcherConstants.SubscriptionTags.Length} tags."); WriteSeparator(); } private static void WriteSeparator() { Console.WriteLine("=========================================================================="); } }
When the sample console application is run, the spacebar can be pressed to send messages. Devices running the client applications should receive numbered notifications, provided they are properly configured.
The post Configuring Push Notifications For Xamarin Forms appeared first on PureSourceCode.
from WordPress https://www.puresourcecode.com/dotnet/xamarin/configuring-push-notifications-for-xamarin-forms/
0 notes
Text
The Amazon Dash Button as I am sure you know is a small connected device with a single button on it. Amazon intends for a customer to purchase a device for a specific brand of household daily use goods and set it up to order a specific product when the button is pressed. This is an interesting idea, but I can find any other ways of ordering things off of Amazon and do not need a physical button for that. The Amazon Dash Button connects to your homes Wi-Fi and essentially lives in sleep mode until you push the button, then it wakes up connects and sends the command. Now we are certainly not going to be using our Dash Buttons to place orders from Amazon so let’s look at what else we can do with them.
Amazon claims that Dash Buttons are good for 2000 button presses which is a good thing because the battery is not really meant to be user replaceable. I say it is not really meant to be user replaceable because while it can be done, chances are you are going to break your Dash Button while trying to do so. This is a move by Amazon that I cannot really say I am happy with, although if we were using them the way Amazon intended I guess this would not be an issue as they cost you $5 but you get a $5 credit the first time you use the button essentially making it free.
Now Amazon threw us a little bit of a curve-ball. Amazon quickly caught on to the fact that people were hacking Dash Buttons, so they came out with the IoT Dash Button which instead of connecting to a product connected to AWS. From AWS you could get it into IFTTT or have it perform various other tasks. I love that Amazon embraced the hardware hacking community with the release of the IoT Dash Button, however, I do not like the price when you compare it to the regular Dash Button, but if you do not have a Raspberry Pi or do not want to have one running all the time then the IoT Dash Button might just be for you.
At some point, you may need to make a choice between getting regular Amazon Dash Buttons and more expensive IoT Dash Button. This should be an easy one to figure out by simply answering the question of whether you have a Raspberry Pi you want to use. I am running both regular Dash Buttons and IoT Dash Buttons and see no noticeable difference in the length of time from button press to action so we cannot use that as a deciding factor. In fact, the only advantage that the IoT Dash Button has is that it is so easy to set up. So really the decision is completely up to you they can both accomplish the same goal and if you are already using a Raspberry Pi for something like Pi-hole then it is simple.
Let’s start off with the easy one, shall we? How do we get the IoT Dash Button into our automation? For the purposes of this article we will be discussing how to get your Dash Button into IFTTT and from there you will be on your way. To make use of your IoT Dash Button follow the below steps:
IoT Dash Button Setup
Create an AWS Account (during account set up you will need to provide a credit card but fear, not everything you are going to be doing will be in the free tier)
Download the AWS IoT Button app for Android or iOS
From the AWS IoT App Scan the barcode on your IoT Dash Button Box (or manually enter the serial number)
Press and hold the button on your IoT Dash Button for six seconds until the blue light flashes
Choose Trigger IFTTT Maker (nodejs) from the Set Button Actions Page
Insert your IFTTT Maker API Key (you get this from IFTTT under the Webhook Settings, it is the string of random charters at the end of the URL)
Press OK
Press Set Action
IFTTT Setup
From a computer log into your IFTTT Account
Create a New Applet
Select Webhook
Select Receive a Web Request
Enter a simple Event Name and write this down you are going to need it later!
Choose the action you want to happen such as send an SMS or Toggle a Light in SmartThings
Turn on Receive Notification When this Applet Runs (you will shut this off after we test it but I find it helpful in the beginning)
Save your Applet
AWS Setup
From a computer log into the AWS Console
Select Lambda from the Menu
Select Edit next to the Lambda function created by the AWS IoT Button app
Look at like 29 and 30 of the code and enter the Event Name you created in IFTTT
Save the Code and Press your IoT Dash Button it should now do what you told it to do in IFTTT
Now for the regular Dash Button, we have to use a Raspberry Pi so it is a bit more of an advanced setup process but nothing that we can not accomplish. Assuming you have a Raspberry Pi running and know how to use it a little bit simply follow the steps below and you will be up and running in no time.
Installing Amazon_Dash
From Terminal run pip install -U amazon_dash
From terminal again run sudo python -m amazon_dash.install
Setting Up Your Dash Button
From the Amazon Shopping App on your phone select Your Dash Buttons from the Menu
Select Settings
Select Set Up A New Device
Select Dash Button
Select Agree & Get Started
Press and hold the button on your Dash Button for six seconds until the blue LED is flashing
Select Connect
Select Continue to connect the Dash Button to your Wi-Fi
Exit Setup (do not select a product)
Finding the Mac Address of your Dash Button
From Terminal on your Raspberry Pi run sudo amazon-dash discovery
Press the button on your Dash Button and wait for the Mac Address to be displayed with Amazon Device Displayed next to it
Take note of the Mac Address
Setting Up Your Config File
From Terminal on your Raspberry Pi run sudo nano /etc/amazon-dash.yml
Uncomment (by removing the # for each line) the IFTTT section
Enter the Mac Address of your Dash Button on the First Line
Enter a Name for your Dash Button next to name:
Enter your IFTTT Maker Api Key next to ifttt:
Enter an event name next to event: (this will need to be used when setting up the IFTTT Applet
Enter the name of your button again after “value1: in the data section
Press CTRL – X to save and exit
Running Amazon_Dash
From Terminal on your Raspberry Pi run sudo systemctl start amazon-dash
Test your button
If everything works set Amazon_Dash to run at boot by entering sudo systemctl enable amazon-dash in Terminal on your Raspberry Pi
Dash Buttons in any form are easy enough to work into your smart home using IFTTT. This should give you everything you need to do whatever you can think of with a single action button. In my home, however, I take this one step further and integrate into SmartThings using a Virtual Switch. The Dash Button triggers IFTTT which then changes the state of a Virtual Switch in SmartThings and then triggers automation built in Webcore. How you do this is largely going to depend on your use and your ecosystem. But once you are in IFTTT the world is your oyster.
I like the Amazon Dash Buttons as an inexpensive way to add single button control of a device. I predominantly use them in my two-year-old son’s room where I want to be able to turn off lights while we are getting him to bed but I do not want him to have the ability to turn them on. He can sit and press those buttons all night and they will not do anything other than depleting the battery.
Anyone using Amazon Dash Buttons in your home automation? Let me know how in the comments below.
Integrating Amazon Dash Buttons into Your Smart Home The Amazon Dash Button as I am sure you know is a small connected device with a single button on it.
0 notes