#Adelene Bookbinding
Text
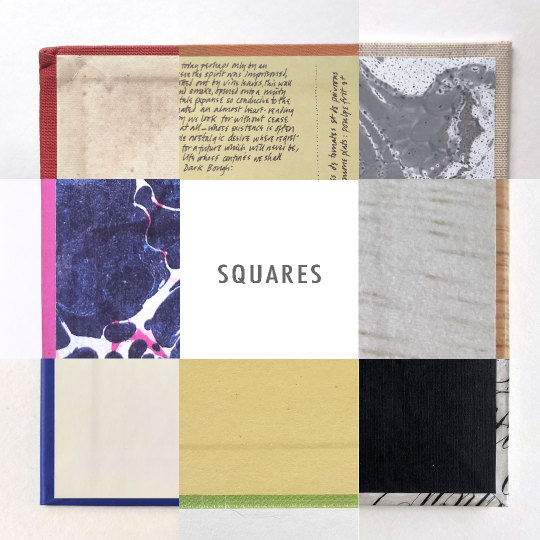
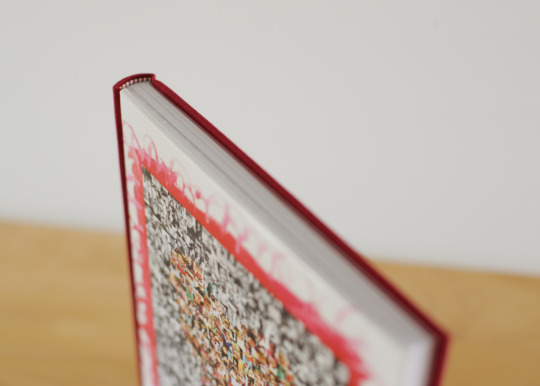
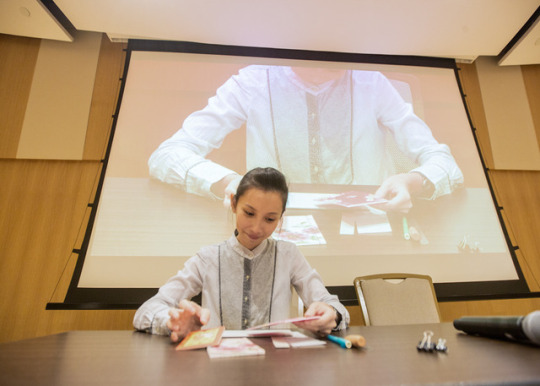
SQUARES: A THESIS
What are squares? And where are they in a book? Why are they called squares and how did they even come into existence? I am about to embark on a journey to learn and discover about the mystery of squares. Book squares is the research topic for my Masters programme thesis which will take me down the road through the history of bookbinding, the evolution of squares and what problems do they cause? Yes, I am so square, I can't help it.
#bookbinding#dddots fine books#dddots#conservationthesis#adelenekoh#adelenekohthebookbinder#adelenekohbookconservator#thesisonsquares#booksquares#bookhistory#dddots adelene koh#bookarts#lookingatsquares
3 notes
·
View notes
Photo

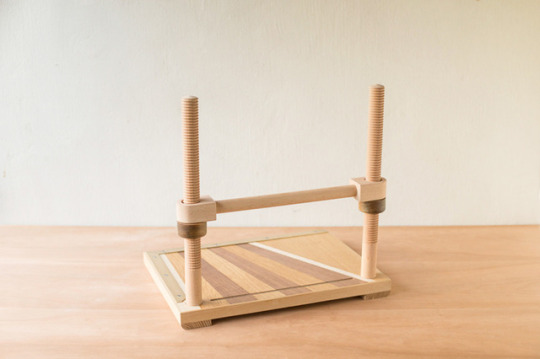
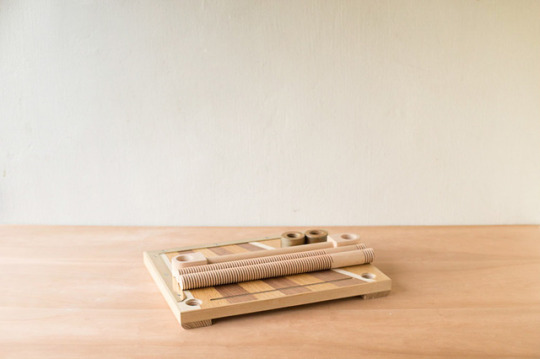
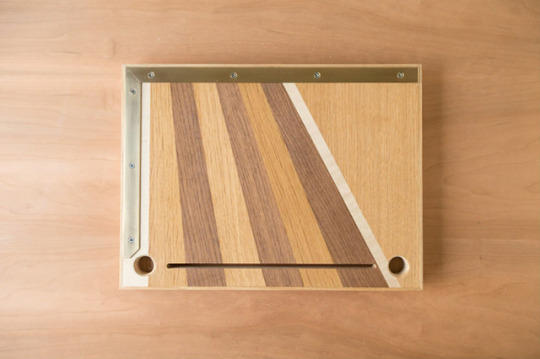

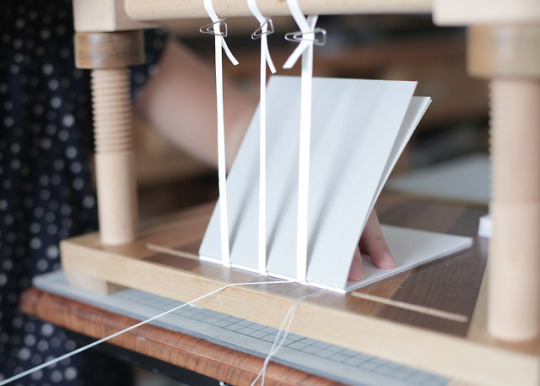
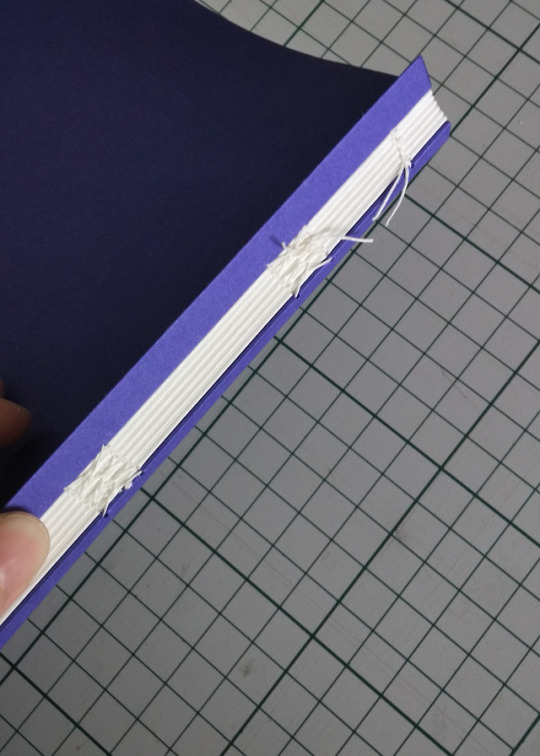
The next book binding equipment in my collection is the sewing frame. A bookbinder's sewing frame holds the cords or tapes in place at the various sewing positions, while the bookbinder sews the sections of the text block together.
This special edition for bookbinder Adelene (dddots.com), incorporates a Greek gauge, made by using alternate oak and walnut veneers to mark out the sewing positions for text blocks.
A square brass rule is also added so that boards can be measured up squarely.
The round stopper nuts made of lignum vitae provide for a smooth longitudinal traversing for positioning the cross piece.
All parts are able to be detached and flat packed for easy transportation and packing away.
#kjungwoodwork#kjungwoodworking#woodworking#woodwork#finewoodworking#sewingframe#bookbinding#bookbinders#equipment#traditional media#book aesthetic#bookarts#greekgauge#brass#brassruler#sgwoodworking#sgwoodwork#louiswoodworkingadventure#handtools#tools#bookbinding tools#studio#custom#bespoke#design#function#oak#wanut#veneering#flatpack
99 notes
·
View notes
Photo
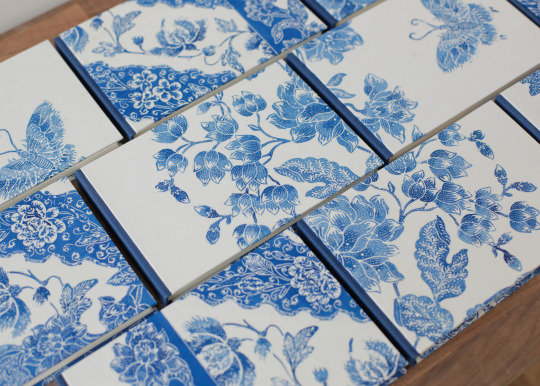

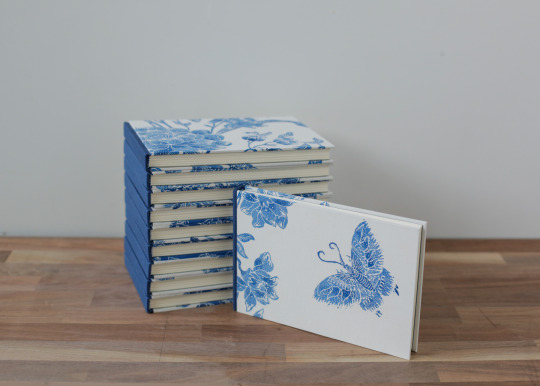


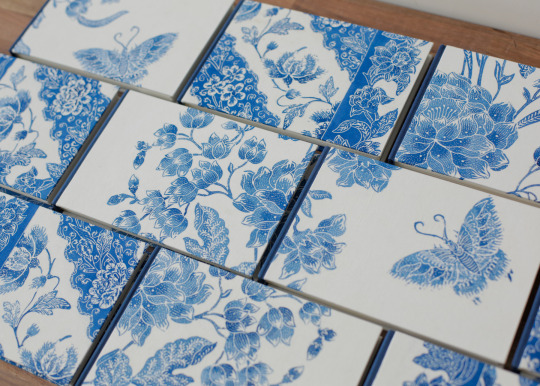
10 Watercolour Travel Journals
Once in a while, I do edition bindings. This is the second book produced by my customer for his travels in Indonesia in 2018. Back in 2017, he made 6 copies of his first book, and also following the look set back then, we decided to keep the batik element in the books.
We chose a single colour batik this time, bound using the same disappearing spine Bradel binding, using a matching solid blue book cloth to break the patterns. The books are all unique, having a different part of the batik on the cover, as well as different colour endpapers. My favourite ones was the one with the huge peony on the front. Unfortunately, I forgot to photograph the endbands, which I made using part of the batik pattern.
I admire my customer’s adventures and envy his beautiful watercolour paintings. They were all painted during his travels deep into the Indonesian jungle, living like a local. It always brings me a lot of joy looking at his paintings while binding his books. Perhaps one day, I might learn to paint like him.
#Edition Bindings#Edition Binding#Edition Books#dddots#dddots Fine Books#dddots Bookbinding#dddots Bookbinder#Adelene The Bookbinder#Adelene Koh#Adelene Bookbinding#Singapore Bookbinder#Singapore Bookbinding#Bespoke Edition Binding#Bespoke Books#Bespoke#Bespoke Bookbinding
10 notes
·
View notes
Photo
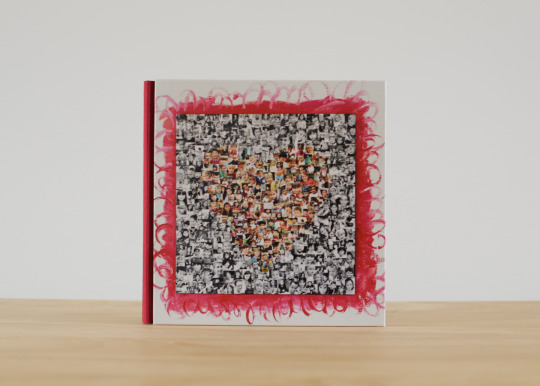

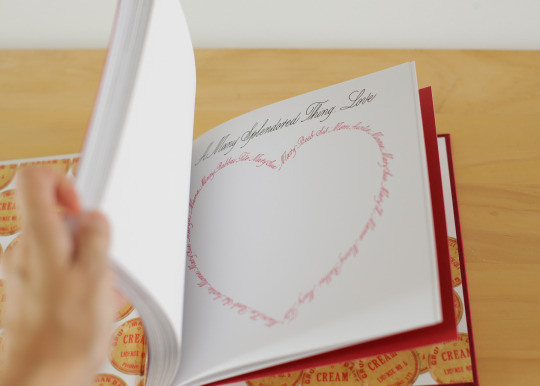
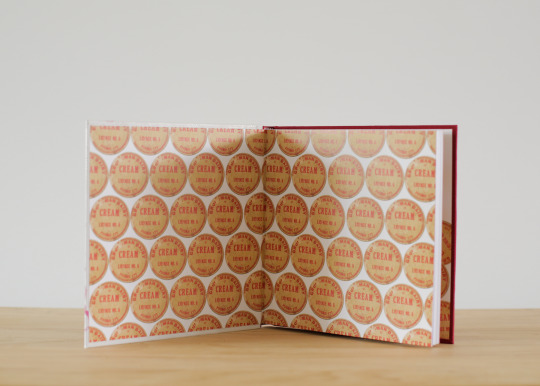


For A Dear Friend’s 70th Birthday
The kind of friendship one has, is one of the most valuable relationships to treasure. My customer came to me, with a grand idea of making a book for her friend on her 70th birthday. It was to be filled with dedications from people who were touched by her friend. The tricky bit was that, all these dedications were sent from all over the world.
The book starts off with a poem, beautifully handwritten by Clarence, a calligrapher from Craft Varies. It was quite a feat designing the layout of the dedications as they came in all sizes, but it all turned out very beautiful. It then ends with a hand drawn/written heart, also by Craft Varies.
For the cover, I printed on canvas, of a piece of artwork provided by my customer of photographs of people who were touched by her friend. The endpapers was made up of a scan of her friend’s grandmother’s dairy farm name card from the 70s.
Presents like these, let us know, how as humans, our gift from our hearts can show a person how much they mean to us. Books are worth investing in, as they carry not just words, but the immense love that is laid out of paper, for all to see, remember and treasure.
#dddots Bookbinder#Bespoke Book#Bespoke Bookbinding#Bespoke Presents#Bespoke Birthday Presents#Bespoke Birthday Books#Bookbinding#Bookbinder#Bespoke#Singapore Bookbinding#SIngapore Bookbinder#Adelene The Bookbinder#Adelene Koh#Adelene Bookbinding#Adelene Bookbinder#Birthday Presents#Birthday Books#Birthday Dedication Books
3 notes
·
View notes
Photo
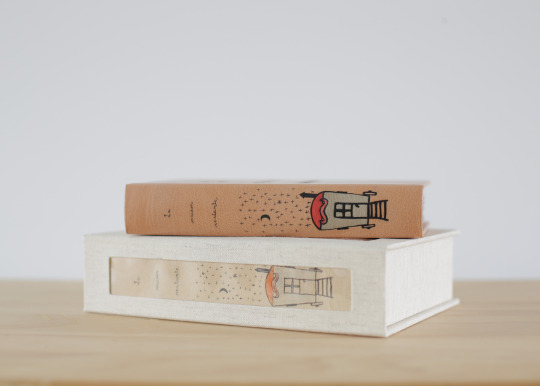


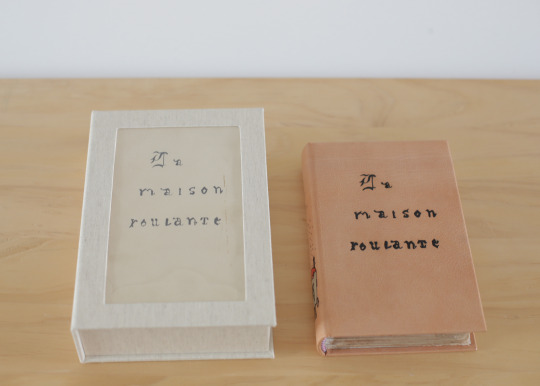

La Maison Roulante (After Restoration) - The Box
To know that a book is an heirloom and the amount of work that is put into it for its longevity to be passed down more generations to come, is phenomenal, that it deserves 3 posts dedicated to it.
In the previous 2 posts, I talked about the condition of the book when I received it before I worked on restoring it, and how the book turned out after the work and time I put into it.
Now, this post is about its box. For a book this precious, a bespoke box has to be made to match up to its splendour. I wanted to feature the original covers, but have it part of the box. I made a two tray drop back box, covered it with a german brand linen book cloth and made windows on the front and spine to house the original covers. I used an archival grade Mylar to protect the original covers. The book sits inside the inner tray perfectly and will now be protected against elements and rough handling.
I hope this book will outlive me, and that the future generations of my customer’s family will enjoy his efforts in wanting to create a family heirloom that holds the memory of all before them.
#Singapore Bookbinder#Singapore Bookbinding#Bespoke Box#Bespoke Bookbinding#Bespoke Books#La Maison Roulante#dddots#dddots Bookbinder#dddots Bookbinding#dddots Fine Books#Adelene The Bookbinder#Adelene Koh#Adelene Bookbinding#Adelene Bookbinder#Heirloom#Heirloom Book#Book Restoration#Box#Handmade Box#Archival Box
1 note
·
View note
Photo
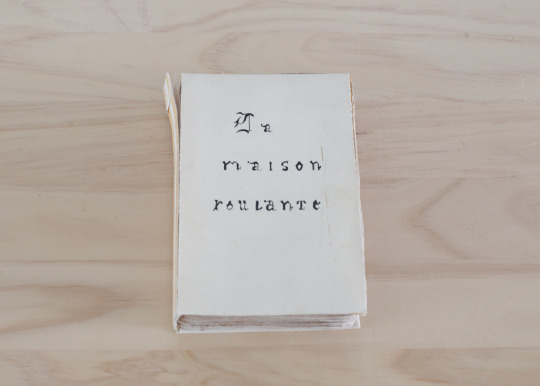

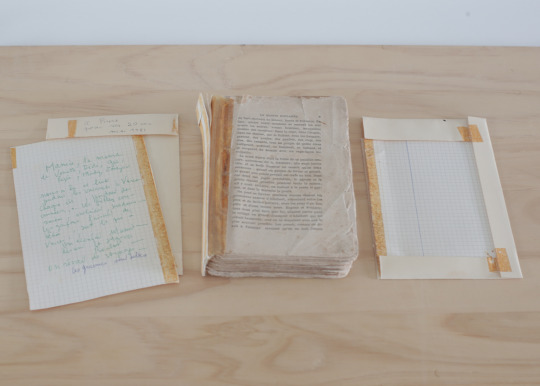
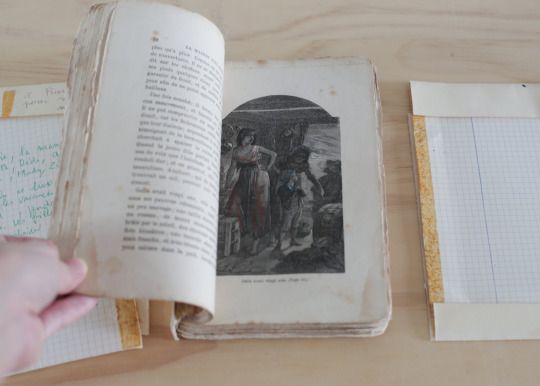
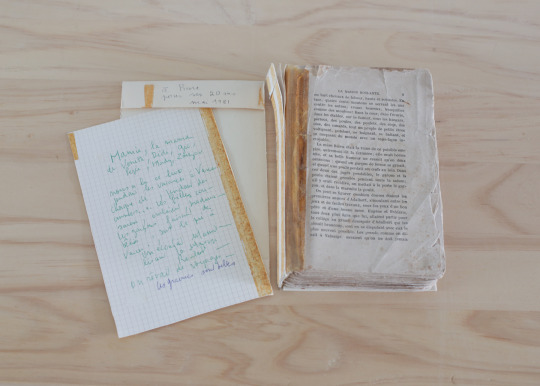
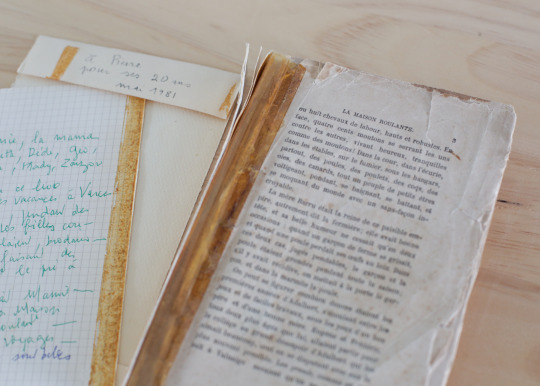
La Maison Roulante (Before Restoration)
La Maison Roulante, also known as The House on Wheels, by Madame de Stolz, is a French children’s book that adults would read to children to teach them about life lessons through stories. Upon receiving this book for restoration, I searched for an English edition of this book, just so that I could read it before I started work on it.
This book belonged to my customer’s grandmother, and in the 70s, his mother gave it to him because it needed repair. He then tried his best, with the little skills and materials he had, did a repair and even made a very nice hand drawn cover for it.
The scotch tape has turned brown and is no longer sticky, and the cover started to fall apart. The book has lost some of its pages in front, as well as one of the pages in the middle. The adhesive on the spine is very old and brittle, but could not be soften for removal whether by water, solvent or heat. It had a sweet smell that was like bitter almond, and now after some research, could have been some form of super glue that probably had cyanide in it. That would have explained why it could not be removed. I had to slowly knock on the adhesive, chip it off gently with a blunt scalpel.
Next was to consolidate the brittle pages using Klucel-G and after letting it settle, guard the pages so that they could be sewn. There were a few sections that had pages that were very stuck together, so they were cast on in a small stack.
Overall, the restoration was quite mind-boggling, labour and time intensive. But the textblock was ready for its new covers. That will be covered in the next post.
#dddots Bookbinding#dddots Bookbinder#dddots Fine Books#dddots#Adelene The Bookbinder#Adelene Bookbinding#Adelene Bookbinder#Singapore Bookbinder#Singapore Bookbinding#Singapore Book Restoration#Book Restoration#Restoration#La Maison Roulante
1 note
·
View note
Photo


Artist-In-Residency at library@orchard Explorations - Drum Leaf Binding
It has been a month since I moved into Imagine That, the space where I currently have my studio as the Artist-In-residence at the library@orchard.
I wanted to explore a binding technique that my teacher, Mark Cockram, has been teaching quite frequently for workshops in UK. Just as I am posting this, Mark will be teaching this binding, in collaboration with Ralph Kiggell, a printmaker. The workshop will be held at Studio 5 in London from 5 to 8 October.
The Drum Leaf Binding is a very versatile binding technique that is relatively easy to accomplish with minimal tools. The main key to this binding is that the grain direction of the paper has to be correct. This will then eliminate problems like the paper cockling (or become wavy).
The Drum Leaf Binding is great for Artist Books, zines, chapbooks, small production run of picture books, pop-up books and to be honest, the possibilities are endless. It is great for most beginners, artists, graphic designers, self-publishing authors, just to name a few.
I will be introducing this to my list of workshops that I will teach upon requests in groups of 10-15 people.
#Bookbinding#Bookbinder#Singapore Bookbinding#Singapore Bookbinder#Adelene The Bookbinder#AdeleneKoh#Adelene Koh#Adelene Bookbinder#Adelene Bookbinding#Bookbinding Workshops#Singapore Bookbinding Workshops#Drum Leaf Binding
1 note
·
View note
Photo


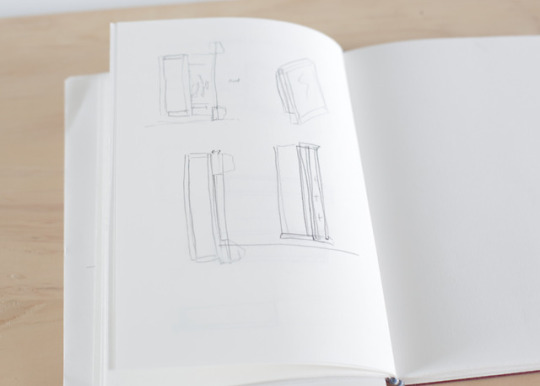

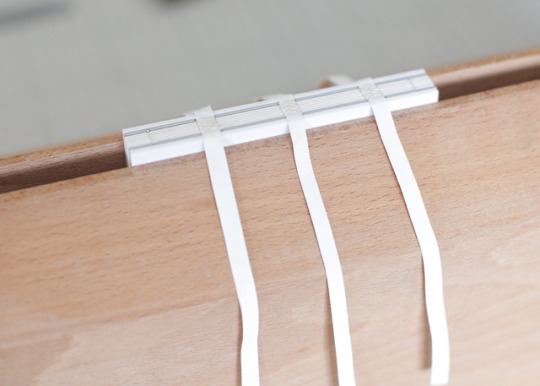
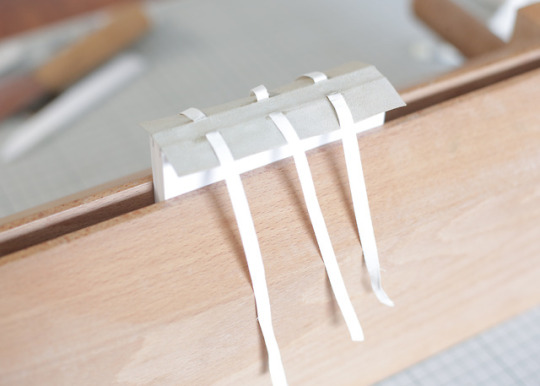
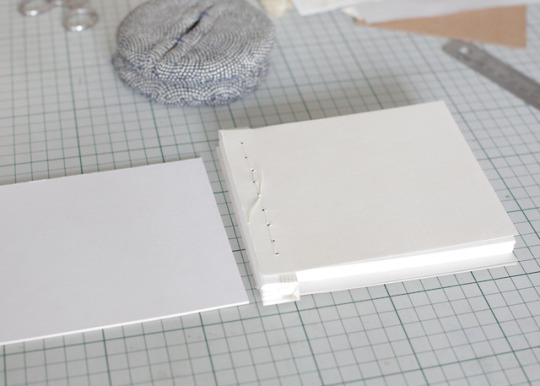
Design Binding Commission - Week 2: Sewing Up The Maquette
In all of my design bindings, I will always make a maquette. A maquette is described in Wikipedia as “a small scale model or rough draft of an unfinished sculpture. An equivalent term is bozzetto, from the Italian word that means "sketch". It is used to visualize and test shapes and ideas without incurring the cost and effort of producing a full-scale product.”
Creating a design binding involves a lot of experimentations, testing of various binding structures, covering applications, design ideas and such. To just do it directly on the actual textblock might lead to a rather costly mistake. So all tests should be done on the maquette. And of course, to keep costs down, a smaller scale model is made.
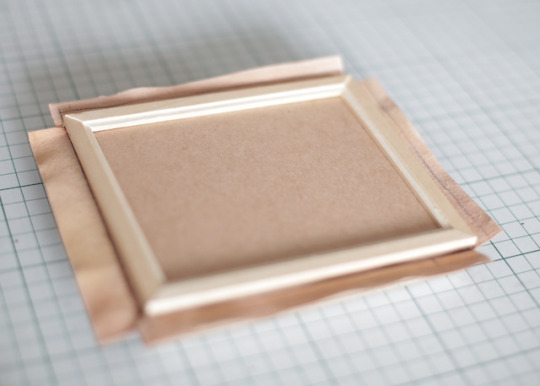
My maquette for “Singapore through 19th Century Photographs” is exactly 1:2 of the actual textblock. For the design of the binding, I have decided that I want to create a photo frame with a 3-dimensional photograph inside. And this will mean that there will be a lot of weight on the front cover. The binding structure has to be able to take such a stress and that it will not cause the book to warp, or the cover to fall off. Therefore, the decision is made to sew on tapes, and a hybrid binding using a leather spine lining, just like a Western Asian (commonly known as Islamic) binding.
I do not often sew on tapes, but this is one rare occasion that my sewing frame comes out of storage. This sewing frame was beautifully made by my husband, Louis, of Kjung Woodwork, and he has been rather disappointed that I have not used the sewing frame much. To mark out the sewing positions, I used a Greek Gauge, which was also incorporated into the sewing frame. But since this maquette is much smaller, I had to draw the Gauge and extend its end so to match the height of my small scale model.
For the maquette, the tapes are jaconette, whereas the actual book will have vellum tapes. After the textblock is sewn up, I lined the spine first with jaconette, followed by a piece of goat leather. I then slit the leather to allow the tapes to come through to the back, which will then be used to lace into the boards.
As this is a maquette absolutely to test the binding structure, I decided not to add the design elements in until I am sure that this binding method works. If it does not, I have to think of a better structure that suits my design ideas. As for now, it seems to be going quite alright.
Till next week!
#Design Bindings#Design Books#Designer Bookbinder#Design Bookbinding#Singapore Bookbinder#Singapore Bookbinding#Singapore Designer Bookbinder#Adelene Koh#Adelene The Bookbinder#Adelene Bookbinding#dddots#dddots Fine Books#Singapore Bookarts#Book Arts#Bookarts#Books#Handmade#Craft#Crafts
8 notes
·
View notes
Photo


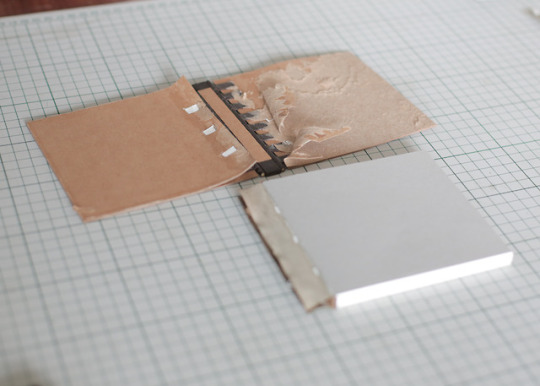


Design Binding Commission - Week 4 & 5: The Failure of The Hinged Structure and the Eureka! Moment
In the wake of the disappointment of the failure of the first structure, I missed posting about the building of the Design Binding Commission last week. The hinged structure that I thought would work for this binding had its limitations and many problems arose even before I could completely attach the textblock to the boards.
This is the thing that many people do not see, that behind all the beautiful works of an artist, many hours of failed attempts, misdirected ideas and even wasted materials go into the creation of an amazing piece. People often equate art as an object, which also translates to the price they are willing to pay, but what they do not see, is the artist’s efforts and experiments before it becomes successful, very much like a scientist.
On Sunday night, insomnia kicked in, and I was unable to sleep. My mind was racing and at 2am, I had a Eureka! Moment. This happens a lot for me, and I usually get brilliant ideas when I am kept awake all night by my busy mind. With that, I woke up Monday morning and took apart the entire maquette.
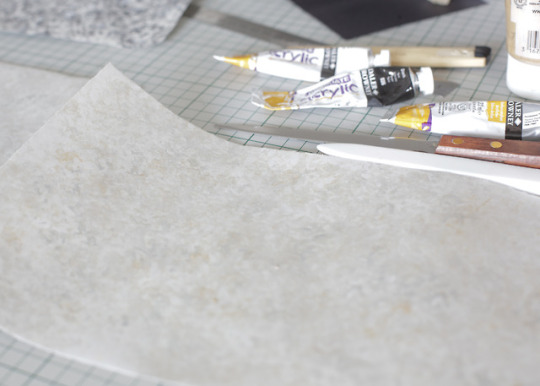
I decided to try out the endpapers by using a natural sponge with pearl and silver acrylic paints. The inspiration for the endpapers come from the technique of how the photographs in this book were made: albumen printing process, also known as the albumen silver print.
As I needed the front board to be almost completely independent but yet very securely hinged to the textblock, I decided to sew the book on stubs. This binding is similar to a pillar binding, but instead of using metal screw pillars, the textblock stubs and the hinge for the boards will be sewn on.
The whole binding process has to be done in reverse, now that it includes a lot of structure building outside, which does not allow for the book to be pressed.
I am happy for that Eureka! Moment. For now, my hands need to be busy, since my brain has already done most of the thinking work.
#Singapore Bookbinder#Singapore Bookbinding#Singapore Design Binding#Singapore Designer Bookbinder#Adelene Koh#Design Binding#Adelene Koh The Bookbinder#Adelene The Bookbinder#Adelene Bookbinding#dddots#dddots Fine Books#dddots Bookbinding#dddots Books#Singapore through 19th Century Photographs
5 notes
·
View notes
Photo
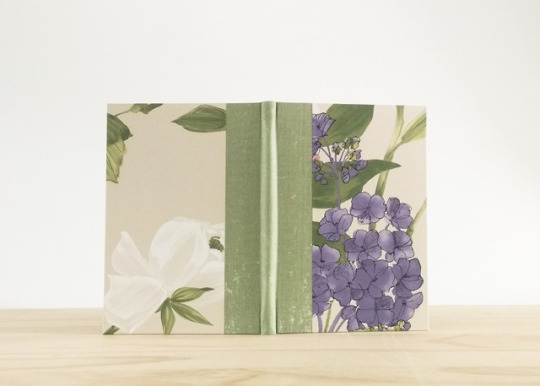
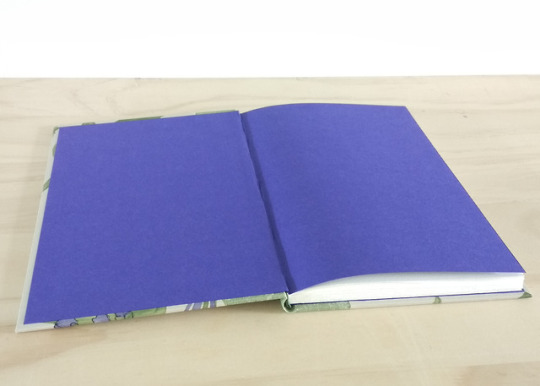
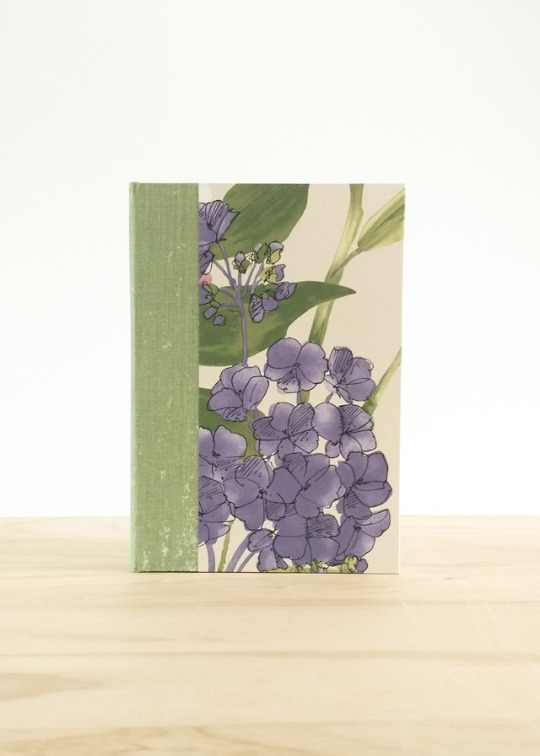
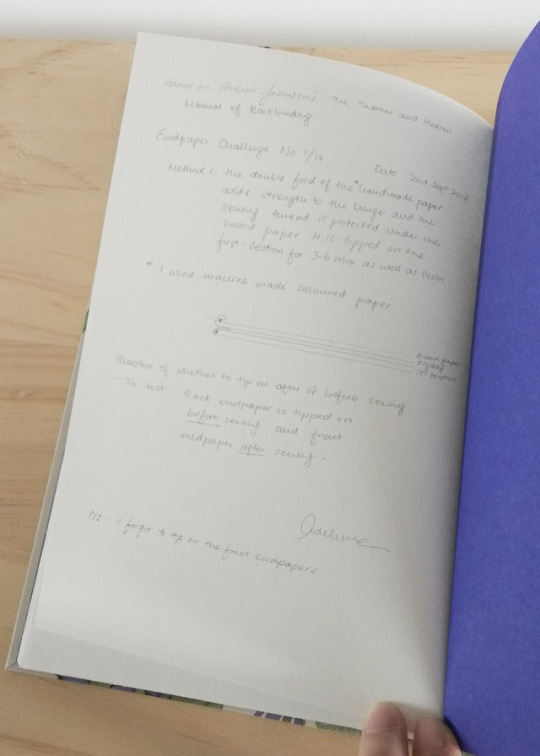


Endpaper Challenge #1
Endpaper Method 1 was a rather straightforward one. In Arthur Johnson, it was described as:
“...Method 1, the double fold of the handmade paper adds strength to the hinge and the sewing thread is protected under the board paper. It is tipped on the first section for 3-6mm as well as sewn.”
I tipped on the back endpaper before sewing and left the front endpaper to be tipped on after sewing. Unfortunately, I forgot to tip on the front before I rounded and backed. But it seemed to hold on well. I did not have any handmade paper with me, and chose to use a machine made coloured paper instead.
The verdict of this endpaper is that even though it does have a great deal of strength in the hinge, the fold causes a thickness under the board paper and it can be seen very obviously after pressing. It will not really work for fine bindings, but for heavy use cased-in bindings, it could be a good option.
As seen in one of the pictures, I have written the style of endpaper and some notes at the back page of this blank journal. And it is signed and numbered.
This is covered in a distressed quarter book cloth and a floral wallpaper cover featuring one of my favourite flowers, Hydrangea. It is for sale at USD65 (excluding shipping).
#Endpaper Challenge#EndpaperChallenge#Endpaper Challenge 2018#Bookbinding#Bookbinding Challenge#Bookbinder#Adelene The Bookbinder#Adelene Bookbinding#Singapore Bookbinder#Singapore Bookarts#Bookarts#Craft#Handmade#Handmade Journal#Handmade books#Singapore Bookbinding#SG Bookbinder#SG Adelene Koh#Adelene Koh#dddots Fine Books#dddots
15 notes
·
View notes
Photo
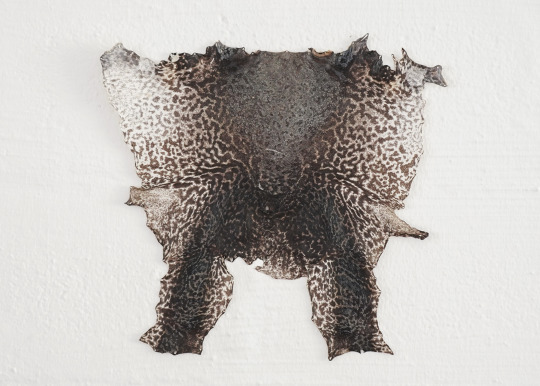
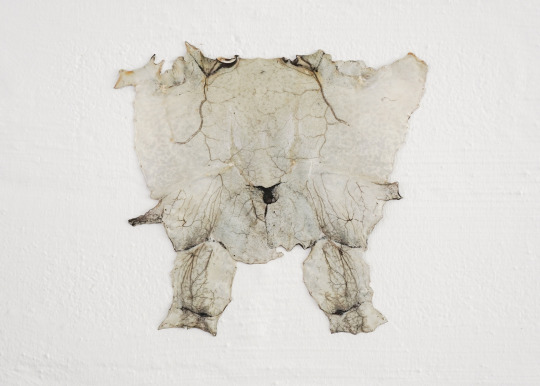
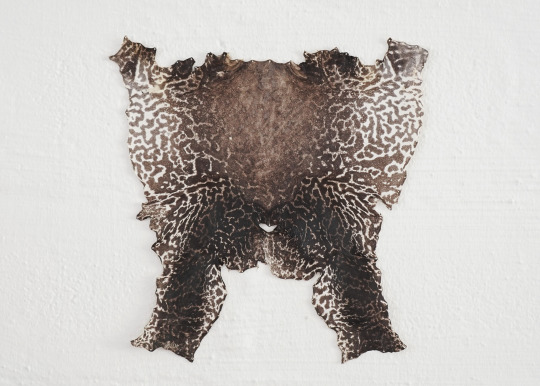

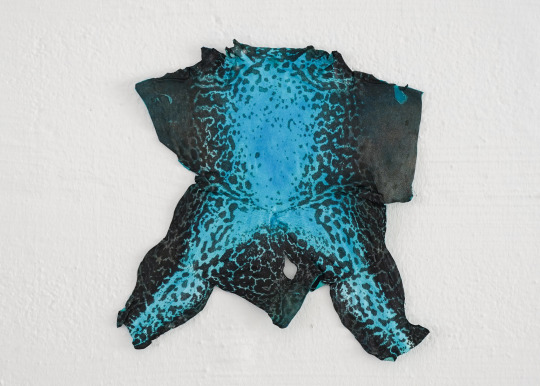
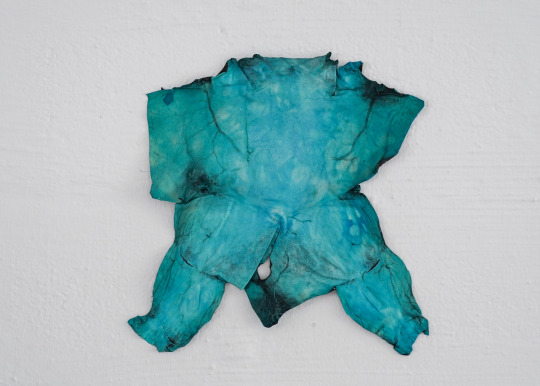
Frog Skin Batch 2: Skins No. 1 to 5
With the experience from the first batch of frog skins, it was much easier for me to understand how to stretch the skins. But the preparation of the tanning is still very much of an experiment.
For Batch 2, Skin No. 1 and 2 are made as parchments. The skins were soaked in soapy water for a few days, and then washed out and stretched on a piece of grey board, lined with a sheet of baking paper. They were cut along the belly and the entire back is complete.
Skin No. 3 was soaked in Pu-er tea (red Chinese tea) and red food colouring for 5 days. The skin was cut along the back and the white part, which strangely, does not really take the colour much in the middle. However, the flesh side is a brilliant red and looks like beet.
Skin No. 4 was soaked in Thai Green Tea blend, also for 5 days. I am very amused by the randomness of the green colouration even though I turned the skin every day.
Skin No. 5 was treated with glycerin and alcohol, with a blue leather dye. This skin was not stretched. It was handled, stretched and pulled by hand while it was drying. This skin dried and became really soft. There is an issue with skins that are treated this way. They tend to grow mould really easily as compared to the rest of the skins. Both glycerin/alcohol treated skins from Batch 1 and 2 behaved the same way. This is something I need to research more about.
#Frog Skins#Frog Skin Leather#Frog Skin Parchment#Frog Skin Batch 2#Bookbinding#Bookbinder#Singapore Bookbiner#Singapore Bookbinding#Bookarts#Adelene Koh#Adelene The Bookbinder#Adelene Bookbinding#dddots#dddots Fine Books#Frog Skin Books#Frog Skin Bindings
0 notes
Photo

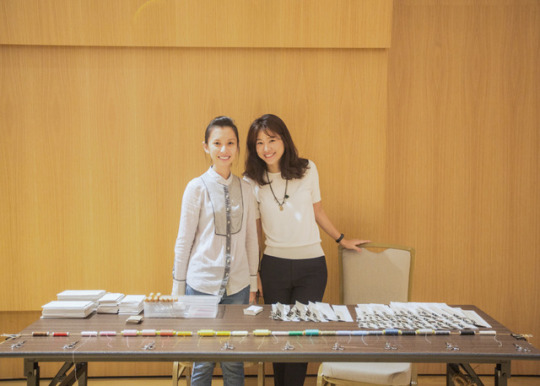


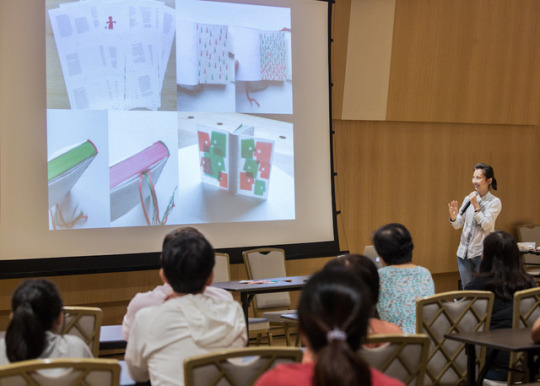
Full House!
On 20th January 2018, I held my first mass bookbinding workshop, organised jointly by the Singapore Chinese Cultural Centre and Singapore Press Holdings’ Chinese newspaper Lianhe Zaobao (联合早报). I was extremely surprised that on the morning of the newspaper article on the 7th of January, the workshop registration was already full.
At 4pm, we started with the video that was done by Another Beautiful Story, followed by a small slides presentation of what I do: Design Binding (精装书) and Book Restoration (修复). My greatest pride was when I introduced my teachers, Mark Cockram and Yamazaki Yo, and showed a picture of me meeting them both together in Hong Kong in 2015. One was the first bookbinding teacher I had, and the other, basically changed my life, in my skill set, artistic approach and my crazy, whimsical and quirky character.
After a short Question and Answer session, we proceed to the workshop proper, teaching participants how to use Chinese new year red packets as the covers for a simplified traditional Chinese Thread binding (红包线装书). The main quote to aid one in attempting this binding is 先上后下,缝横必转, which translated literally means; When you sew, go up first, then down. When you sew the horizontal, you need to turn.
Other than a small mishap of a participant pricking himself, the workshop ended very nicely, on time and everyone brought home their own hand sewn book.
Most importantly, I have to thank 2 very important people who helped me with this big workshop. My (spanking new) husband, Louis, and my wonderful student, Hyunhee. They assisted in making sure that everyone got their materials and that there was no fighting, and also taught some of the slower participants by explaining the technique privatedly. I am very thankful for this experience, and glad that it was such a turn out. Looking forward to more of these in time to come.
#Singapore Chinese Cultural Centre#Singapore Press Holdings#Lianhezaobao#联合早报#Singapore Bookbinder#Singapore Bookbinding#dddots Fine Books#dddots#Adelene Koh#Adelene The Bookbinder#Adelene Bookbinding#Bookbinding SG#Bookbinding#Book Restoration#Bookbinding Workshop#Craft Workshop#Craft#Handmade
4 notes
·
View notes
Photo
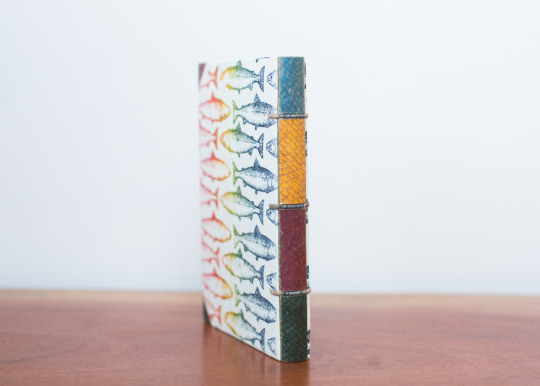

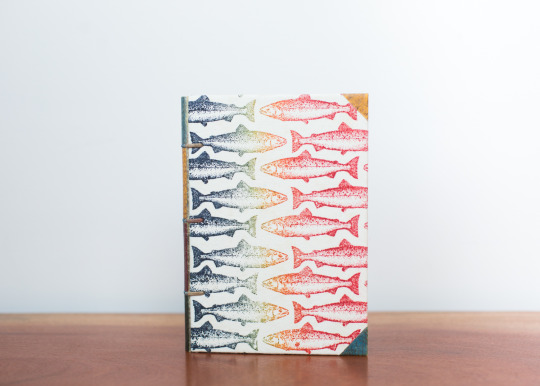
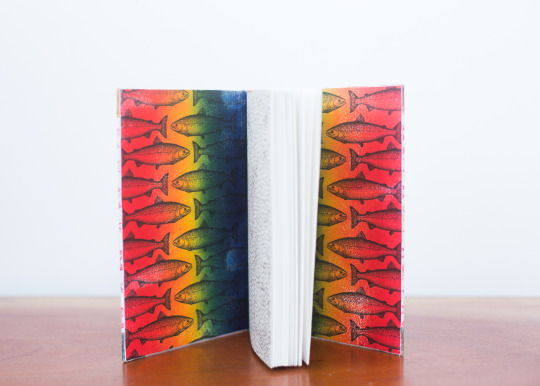
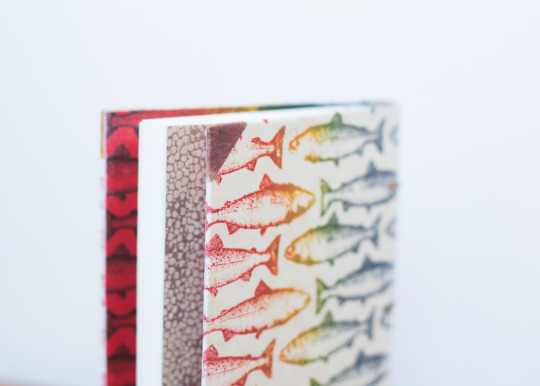
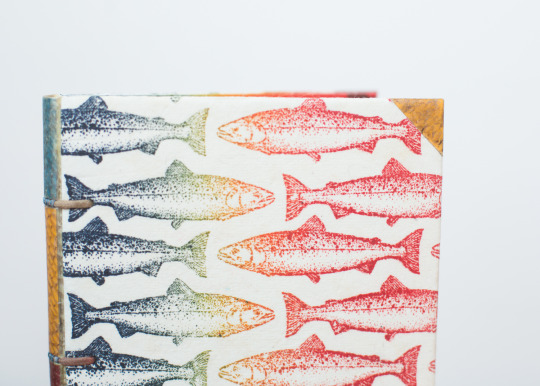
HAPPY 2022!
It is once again, a brand new year. Amidst the insane happenings around the world, I must say, 2021 has been a rather challenging, fulfilling, enlightening and a year filled with immense personal growth. In this new day of the new year, I reflect upon the things that has happened in the past year that has made the future a far brighter and exciting one.
Firstly, my lack of posts on my website is because of a rather personal reason. I am currently in my first year in Graduate school, studying a Masters in Arts for the Conservation of Cultural Relics in the Tainan National University of the Arts. I am now currently based in Taiwan and therefore, will only accept commissions if they can be sent to me via post.
Secondly, the journal I have chosen for 2022, is a homework that was given to me by my dearest teacher and mentor, Mark Cockram. He tasked me (a long time ago) to explore the binding techniques of Jean de Gonet. I decided to use the fish skin parchment I made, paired with a soft plate printed rainbow prints of the fish I used for this parchment: the trout. This was bound sewn on cords, featuring the fish skin parchment on the spine as well as the corners. As fish skin is very translucent, I added coloured paper under the skin to brighten it and to give it variety.
In a Chinese new year greeting “年年有餘”, which translates to “Abundance Every Year”, I look forward to this new year with abundance of love, joy, happiness, opportunities, great health and new knowledge.
Here’s wishing the world, a better future, while I study hard, to become a bookbinder/conservator!
#dddots#dddots Fine Books#Bookbinding#Bookbinder#Singapore Bookbinder#Singapore Bookbinding#Singaporean in Taiwan#Bookbinding Taiwan#Bookbinding Tainan#Jean de Gonet#Jean de Gonet Style#Jean de Gonet Binding#Jean de Gonet Bookbinding#Adelene Koh#Adelene The Bookbinder#Adelene The Book Conservator#Adelene The Explorer#Fish Skin Parchment#Trout Skin Parchment#Parchment
15 notes
·
View notes
Photo
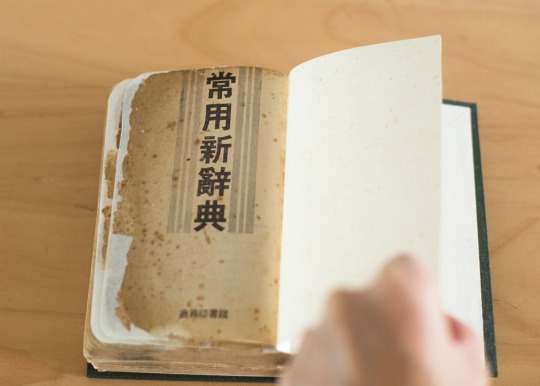

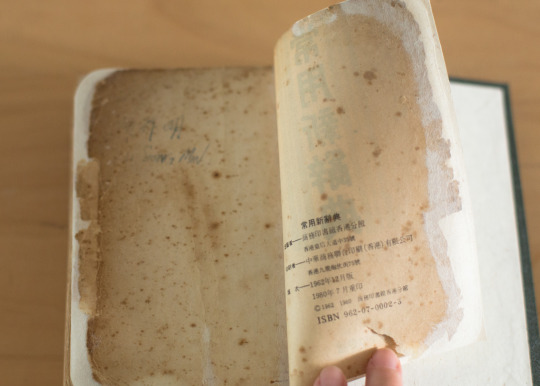
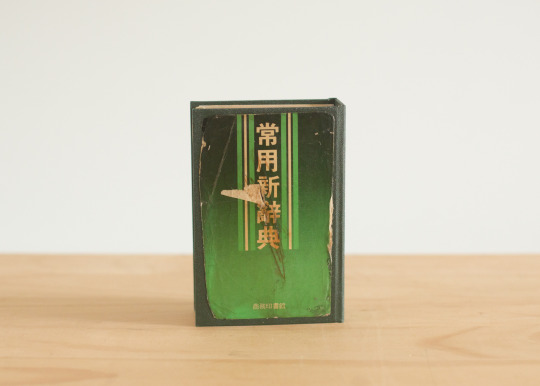
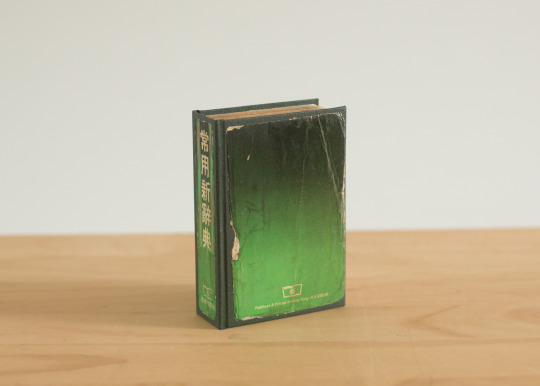


Repairing 常用新辭典
Sometimes when something is old and broken, it does not mean it has to be discarded. Some things cannot be replaced with the new.
This dictionary belongs to my customer’s eighty-four year old mother. She has been using this dictionary for almost 4 decades and have grown accustomed to the dictionary. This is the first time I have ever seen a Mandarin dictionary that is categorised this way. In fact, I find this the best Mandarin dictionary because it makes a lot of sense, and it will definitely be very useful for me now.
The dictionary came with a lot of tape, both on the outside and the inside. And as with most books that were made during that time, the paper quality is very inferior. The pages were all spotted with foxing, and the edges were very brittle. I had to treat the front pages with a deacidifying solution and then Klucel-G. Then I support the edges with Japanese repair tissue.
Initially, I wanted to keep the dictionary as a soft cover as how it was originally, but after discussing with my customer and considering the brittle edges of the dictionary, we decided to give it hard boards with good amount of squares to protect the edges from being in contact with too much surfaces.
Now the dictionary has a new lease of life, and I am on a new mission to find myself a similar type of dictionary. For I am now, on a journey to master traditional Mandarin.
#Bookbinding#Bookbinder#Adelene The Bookbinder#Adelene Koh#dddots#dddots Fine Books#Book Restoration#Old Books#Old Dictionary
19 notes
·
View notes
Photo


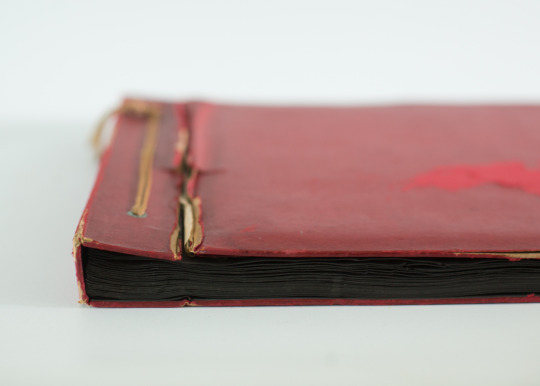
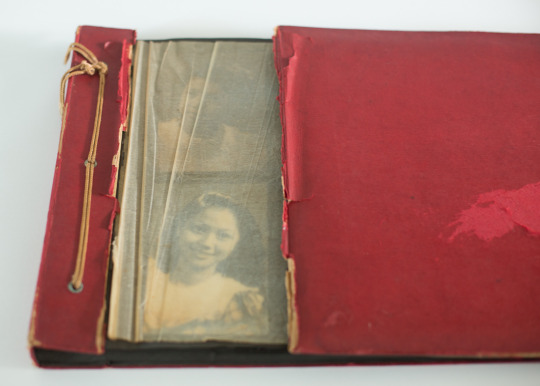
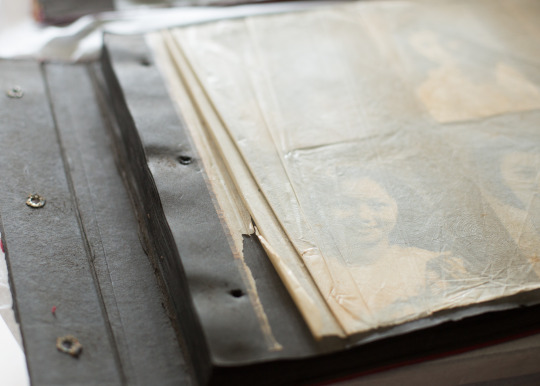
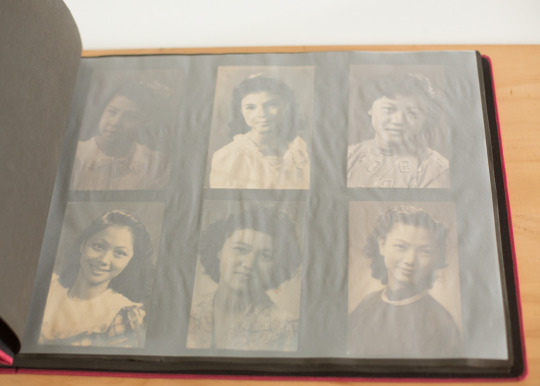
Grandma’s Treasured Photo Album Restored
When my lovely customer came to me, she was extremely happy to know that I was able to restore her grandmother’s photo album. This album was found stuck at the back of an old cupboard, long forgotten. And upon finding it, the condition was not exactly its best.
The album had a textured paper covering, and was tied with a rope that held the covers and pages together. As the paper covering has worn out over time, it was not able to bear the weight of the padded thick board front cover. The rope had also worn out over time and frayed, however the thickness of the rope held and the pages remained in position.
When I did the first assessment, I was very amazed at the condition of the photographs. They were taken in the early 1930s to 40s. Many of them are in great condition.The textured onion skin paper however, was crispy and was crumbling very badly.
I managed to find a book cloth that was as close to the colour of the original paper covering, and replaced the endpapers with a black book cloth instead of a sheet of black paper. Instead of a rope, I used brass pillar screws to hold the pages in place. The onion paper was also replaced with a buffered glassine paper.
#Bookbinding#Bookbinder#Adelene Koh#Adelene The Bookbinder#dddots Fine Books#dddots#Album Restoration#Book Restoration#Old Album#Old Photo Album
11 notes
·
View notes
Photo
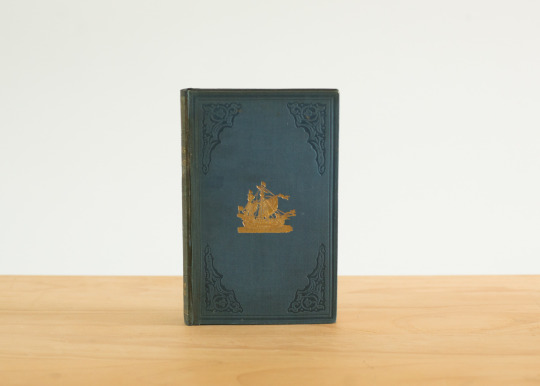
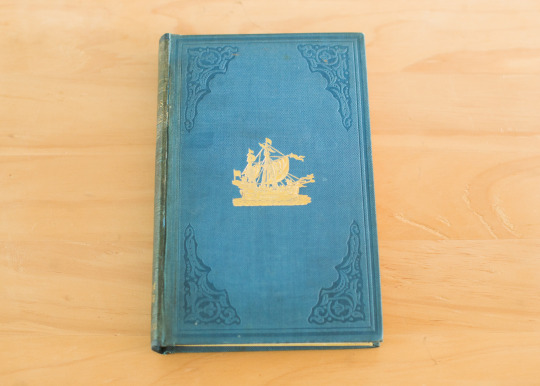
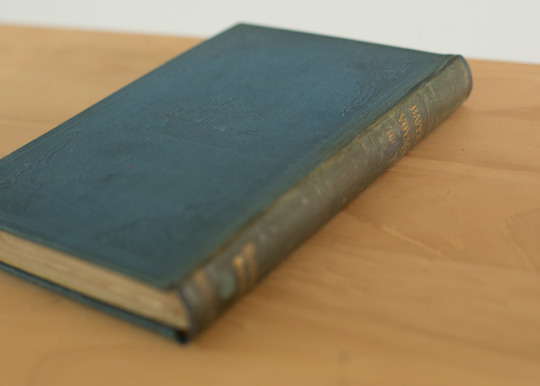

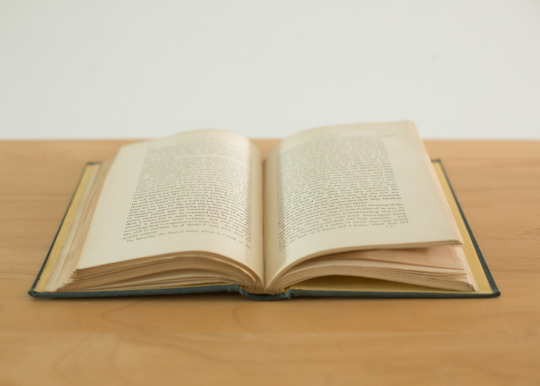
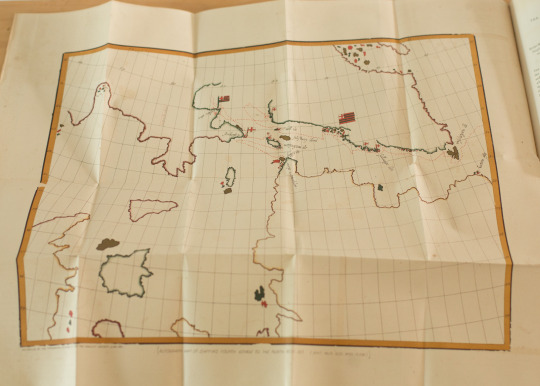

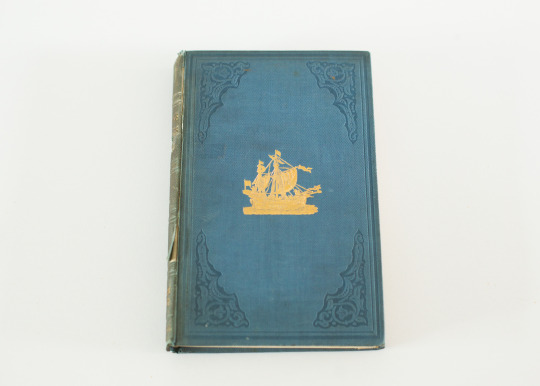


The Repair of Voyages of William Baffin
More often that not, when books are packed tightly on shelves, their spines get exposed to light and pollutants. This will cause the spine to discolour and have a stark difference from the boards. The exposure to light and pollutants also cause the covering material, for this book it is cloth, to age and become brittle. The hinge of the front board has ripped in a very clean straight line. My observation is that, the cloth has cleaning ripped along the grain direction of the cloth, or someone has accidentally used a knife to cut the hinge (which is odd) or during the making of the book, the bookbinder used excessive strength to push in the hinge.
I rehinged the boards using a similar colour and type of book cloth, laminated between the original cloth and boards. The binding is still in relatively good condition, so this was merely to repair the hinges and recase the book.
#Bookbinding#Bookbinder#Book Restoration#Book Repair#Old Books#Adelene Koh#Adelene The Bookbinder#dddots#dddots Fine Books
8 notes
·
View notes
Last Seen Blogs

screechingwitchfury
Untitled

outpost51
Blinding Neon
chanxyzeol
lmao ❤️
mylifeissavage-blog
MLIS

mingjuexichen
now @ wormsound